Keith Glasscock is one of America’s greatest F-Class shooters, as well as a highly respected wind coach. A High Master, Keith finished second overall at the 2021 NRA F-Class Long Range Championship in F-Open division. He also finished second at the 2020 F-Open Nationals, and second at the 2019 F-Open Nationals. His consistency is unrivaled, which means he definitely knows the secrets of competition shooting and loading ultra-accurate ammo. Recently Keith has started PRS/NRL competition, bringing his shooting skills to those popular tactical disciplines.
Keith has a great YouTube Channel with new content every week. On Keith’s Winning in the Wind channel, Keith offers 235+ informative videos on a wide range of topics including wind reading, reloading, component selection, load development, and training.
For today’s Saturday Video Showcase, we offer eight of our favorite Keith Glasscock videos. These cover many key topics — ballistics, barrel care, gunsmithing, bullet sorting, reloading, maintenance and more. Each video has important points that can benefit any competitive rifle shooter, whether you shoot in local 100-yard fun matches or compete at the National Level in F-Class, LR Benchrest, Palma, High Power, or PRS/NRL.
For most disciplines, if you want to achieve maximum accuracy and consistency, you should have your action bedded. This provides an optimal “seating” for the action which quells shot-to-shot motion and helps reduce vibration. Gunsmiths say a good bedding job can produce immediate benefits. In this video Keith Glasscock explains how to check your stock bedding and discusses the realistic benefits you can expect in group size and consistency over long strings.
Keith Glasscock is one of the very few PRS/NRL competitors who has shot F-Class at the very highest level, finishing second three times in F-Class National Championships. PRS/NRL and F-Class are very different disciplines with different challenges. F-Class is shot prone with time between shots and target distances from 600 to 1000 yards. In PRS/NRL competition, you are shooting from multiple positions, at many distances from 100 yards on out, with fast follow-up shoots. For F-Open, you want an extremely accurate load that can deliver sub-quarter MOA groups at 200 yards. For PRS/NRL you don’t necessarily need that level of accuracy (though it helps). But you also need a load that is very consistent, has relatively low recoil, but can also provide sufficient impact energy to clearly show a hit on distant steel. In this video, Keith Glasscock explains his reloading objectives for the two disciplines.
Hard carbon is the bane of rifle shooters. Hard carbon build-up in the barrel can adversely affect accuracy, and in extreme cases, can lead to increased pressure. If possible, you should clean your barrel(s) soon after a match (or shooting session) before the carbon fully hardens. We’ve used Wipe-Out Foam right after a match (with an hour soak time) and that dramatically reduced the amount of brushing required. In this video Keith Glasscock explains the negatives of hard carbon in your barrel, and he discusses how to diagnose the problem and how to remove the carbon build-up efficiently.
Benchrest and F-Class shooters don’t worry about magazines, because their rifles typically employ single-shot actions. However, with PRS/NRL rifles you’ll be shooting from a magazine. Likewise many hunting rifles use magazines to enable quick follow-up shots. In selecting the best magazine(s) for your rifle and discipline you need to consider a variety of factors including fit, capacity, reliability, and, yes, cost. In this video Keith Glasscock examines a variety of magazines for bolt-action rifles used in PRS/NRL competition as well magazines for hunting rifles.
Barrel break-in is a controversial subject. With premium finish-lapped barrels from top manufacturers, some ace F-Class shooters get away with hardly no break-in — just shoot for score right from the get-go. On high-quality custom barrels, we’ve had success with minimalistic break-in with a few wet patches ever 3 rounds for the first 20 rounds. However, with relatively rough factory barrels, you may get better long-term results with a systematic break-in process, even using specialized products on your patches. In this video Keith Glasscock explains break-in procedures he’s found to work for various barrel types and applications.
In general, we have gotten the best match results with loads showing an Extreme Spread (ES) under 13 FPS and an extremely low Standard Deviation (SD). We know that F-Class and ELR shooters competing at 1000 yards and beyond definitely want an extremely low ES to minimize vertical dispersion at long range. That said, some short-range Benchrest competitors look at group size more than ES/SD. In this video, Keith Glasscock talks about the reloading process and methods for lowering ES and SD. Proper brass prep is important, as is precise powder measuring. And long range shooters may want to test 3 or 4 different powder types to find the one that offers the best combination of accuracy and low ES/SD.
Should you sort your bullets? If so, should you sort by weight, OAL, base-to-ogive, or max diameter? Which factor? Well the answer is “it depends”. You need to carefully examine a couple dozen bullets from each batch to see how consistent they are. We had some Lapua bullets that were ultra-consistent with 97 out of 100 within .0015″ base to ogive length. We used those bullets unsorted to set a local range record at 600 yards. On the other hand if you find significant differences in weights, diameters, or bearing surface lengths, you probably should sort. One tip — many shooters do not consider the width difference in bullets. We have seen 6mm bullet diameters vary from 0.2428″ to 0.2436″. We have one 3-groove 6BR barrel that likes the skinny bullets and another 6-groove barrel that definitely prefers the fatter bullets.
The Kestrel 5700 Elite Wind Meter boasts sophisticated ballistics capabilities and LiNK Bluetooth connectivity. With the Kestrel 5700 Elite, once you enter data about bullet type (and BC), velocity, zero, and rifle, the Kestrel can calculate come-ups and wind corrections. The Kestrel 5700 can “talk” to a mobile device that runs the Applied Ballistics APP that contains bullet databases and allows you to easily enter key information such as muzzle velocity, bullet BC, zero distance, velocity, wind, and environmental factors. In this video Keith Glasscock explains the Kestrel 5700’s features including the ability to program sectors for a PRS/NRL match.
This is a grim tale. A man almost lost the use of his right hand, and did suffer terrible injuries to his fingers. All because he picked the wrong bottle of powder off the shelf. We have run this story before, and we will continue to run it every year, as a caution to our readers. This mistake is easy to make, but the consequences can be dire. Always, always double-check your powder labels before you start the hand-loading process. If you don’t, you may not have a hand to load with next time…
Similar Labels, Disasterous Consequences
The shooter, Denny K., was assembling some rounds for his brand new 7mm-08 Savage hunting rifle. He thought he was loading with Hodgdon Varget. Instead he had filled his powder measure with Hodgdon TiteGroup, a fast-burning pistol powder. The labels are similar, so the mistake is understandable. But the results were devastating. Here’s what 41 grains of TiteGroup can do in a 7mm-08:
Posting on the Firing Line, in a thread entitled “Lucky to Be Alive”, Denny writes:
“This is the hardest post to post. I know if I had read it a week ago my comment would have been: ‘You have no business reloading’. I had everything perfect, except pouring the wrong powder in the powder measure. I type this slowly with my left hand, embarrassed but … possibly saving someone else a tragedy or, like me, a long drive to the Emergency Room and surgery to save my finger.”
The Still-Sealed Bottle of Varget
Denny did not initially comprehend exactly why the kaboom happened. He thought maybe his new Savage rifle was at fault. Then, on his return home, he discovered something…
Denny wrote: “The seven-hour period it took to go to ER, transport to Trauma Center and surgery made me think it was a Savage rifle issue. Brand new rifle, new brass, triple-checked loading data. The next day I was humbled when I realized the Varget powder was still sealed.
I knew what powder to use. I thought [Varget] was what I used. Not until the following day did I realize the Varget was still sealed.”
At that point, Denny realized what caused the accident — “operator error”. He knew he had to warn others about using the wrong powder: “I knew I needed to share my mistake, even though it is embarrassing, just to remind people. I’ve been reloading for 30 years…”
Editor’s Comment: Denny was not a novice reloader. His experience demonstrates that this kind of mistake can be made by any hand-loader, even one with decades of experience. Be safe guys, take your time when you load your ammo. Remove powders from measures after your loading sessions (pistol powders can look very similar to rifle powders). And by all means CHECK the LABEL on the jug. As the TiteGroup label says: “A little goes a long way.”
It’s not a bad idea to separate your pistol powders from your rifle powders, or perhaps even load for pistol in a separate part of your workshop.
The LEE Hand Press Kit comes complete with: Breech Lock Hand Press, Ram Primer fittings, Powder Funnel, Case Lube, and one Breech Lock Quick Change Bushing.
The LEE Breech Lock Hand Press is a useful addition to any reloader’s tool collection. This Hand Press allows you to resize brass or seat bullets while at the range or away from your loading room. No it won’t replace your Co-Ax or Rockchucker, but this is a handy piece of gear. And it’s very affordable. Midsouth sells the LEE Breech Lock Hand Press Kit, with everything shown above, for $68.99. Or you can buy just the Hand Press by itself for $52.99 at Titan Reloading. That’s a great deal.
LEE Hand Press Quick-Change Die Functionality
This LEE Press includes the Breech Lock Quick-Change Die Feature, so you can instantly change dies with just a twist of the wrist. One Breech Lock Quick Change Bushing is included. The Breech Lock Hand Press is light and compact. It tips the scale at a mere 1 3/4 pounds and overall product length is 11.5″. Note: the maximum overall length cartridge the LEE Hand Press can accept is 3.650 inches.
While we don’t recommend the Hand Press for major full-length sizing chores, it does a good job seating bullets. This makes it a handy “field expedient” tool when doing load development at the range. For example you can experiment with seating depth by loading a batch of cartridges at home with the bullets deliberately seated long. Then, at the range, you can re-seat the bullets progressively shorter (in a series of rounds), until you find the optimal Cartridge OAL.
LEE’s Hand Press is also great for decapping operations. One verified buyer reports: “I mostly use it for decapping while watching TV, with a universal decapper die. Of course it is also useful for other operations. I wouldn’t love sizing large rifle cases with it, but if you’ve prepped your cases on a bigger press you could comfortably take it to the range for load development, one round at a time, working right there at the line instead of making a bunch of loads at home that you’ll have to disassemble later. It’s smaller and more lightweight than it looks[.]”
Using LEE Hand Press to Load at the Range
To learn more about using the LEE Hand Press in the field with a compact scale, read Reloading Without a Bench on GunsAmerica.com. Author Christopher Mace explains: “Whether you want a better way to do load development, the capability to reload out of your ‘bugout bag’, or you’re short of space but wanting to get into reloading, the LEE Loaders and the LEE Hand Press offer you some options.”
For many years, the U.S. Army Marksmanship Unit (USAMU) regularly published reloading “how-to” articles on the USAMU Facebook page. In this article, the USAMU’s reloading gurus address a question frequently asked by prospective handloaders: “Should I buy a single-stage press, or a progressive?” The USAMU says the best answer is Solomon-esque in both its wisdom and simplicity: “Get BOTH!” However, there is definitely more to the issue, as the USAMU explains below.
Progressive Press Safety Considerations
by USAMU Staff
Many are the beginning handloaders who have asked a friend about their “setting up” a progressive press for them. The idea is that the newbie could then just feed in components and crank out buckets of practice ammo without needing to really learn much about handloading. Tempting though this might be, that’s simply not how it works. Such an approach might be ok if there were never a malfunction with either press or operator, but that’s unrealistic. Our hypothetical newbie would then lack the knowledge to problem-solve most situations.
Worse yet, several different handloading operations would be occurring at different stations on the progressive press at the same time. It takes an experienced operator to keep track of, and truly understand the significance of, all those potential mini-problems. Loading without this experience is a recipe for potential disaster – such as a double powder charge (especially with pistol cartridges) dropped while the loader was attending to some other function, etc. Progressives are an animal unto themselves, and while they offer many benefits, they do take some getting used to – even by experienced handloaders!
ILLUSTRATIVE HORROR STORY
Here, enter a 40-year veteran handloader who decided to jump onto the progressive bandwagon late in his career, having used only single-stage presses all his life. A High Master NRA High Power Rifle competitor, he had no background in competitive pistol shooting, where historically most progressive presses are found.
Experienced Action Pistol shooters have typically encountered multiple episodes in which shooters “skipped” a powder charge for some reason, leading to a squib round and a bullet possibly lodged in the bore. Thus, at matches, it’s reflexive for them to yell “STOP!” in unison if they see a shooter get a “click” vs. a “bang”, and rack the slide to keep firing. This writer has personally seen several pistols saved in just such scenarios over the years.
Click No Bang — What NOT to Do
Our High Master set up a popular progressive press and began turning out .223 Rem 100-yard practice ammo with abandon. He was using a moly-coated 52gr match bullet and an economical, fast-burning surplus powder that gave great accuracy. Once on the range, he began practicing strings of rapid-fire. All was well, until he heard “Click!” rather than “Boom”.
Lacking the above experience or onlookers to halt him, he reflexively operated the charging handle on his expensive, custom NM AR15 Service Rifle, and the next trigger squeeze reportedly registered on seismographs over at least a three-state radius. He sat, uninjured but bewildered, until the hail of expensive bits and pieces quit raining down around him.
When the smoke cleared, he immediately cursed the horrid, evil, demonically-possessed progressive press for this, his first-ever reloading mishap. His $1400 NM upper was ruined, but thankfully, his $800 pre-ban lower… and he had escaped injury.
This tale is told not to discourage the use of progressive presses, but to emphasize the need to EASILY and IMMEDIATELY KNOW what is happening with the press at each station, every time the handle is cranked. Not to do so is, as they say, “bad ju-ju.”
It illustrates why we at the USAMU Handloading Shop agree in recommending that new handloaders should begin with a single-stage press. Once one thoroughly learns the steps in each phase of handloading by repeated experience, then one will be qualified to move on to a progressive press.
The single-stage press will REMAIN virtually indispensable for one’s entire handloading career, even after having purchased a progressive press (or two). There are endless small projects that are best handled on a single-stage press, and a poll of USAMU’s Handloading staff reveals that not one would willingly be without his single-stage press, despite owning at least one progressive.
Sinclair Internationalhas released an interesting article about Case Concentricity* and bullet “run-out”. This instructional article by Bob Kohl explains the reasons brass can exhibit poor concentricity, and why high bullet run-out can be detrimental to accuracy.
Concentricity, Bullet Alignment, and Accuracyby Bob Kohl
The purpose of loading your own ammo is to minimize all the variables that can affect accuracy and can be controlled with proper and conscientious handloading. Concentricity and bullet run-out are important when you’re loading for accuracy. Ideally, it’s important to strive to make each round the same as the one before it and the one after it. It’s a simple issue of uniformity.
The reason shooters work with tools and gauges to measure and control concentricity is simple: to make sure the bullet starts down the bore consistently in line with the bore. If the case isn’t properly concentric and the bullet isn’t properly aligned down the center of the bore, the bullet will enter the rifling inconsistently. While the bore might force the bullet to align itself with the bore (but normally it doesn’t), the bullet may be damaged or overstressed in the process – if it even it corrects itself in transit. These are issues we strive to remedy by handloading, to maintain the best standard possible for accurate ammunition.
The term “concentricity” is derived from “concentric circle”. In simple terms it’s the issue of having the outside of the cartridge in a concentric circle around the center. That goes from case head and center of the flash hole, to the tip of the bullet.
Factors Affecting Concentricity
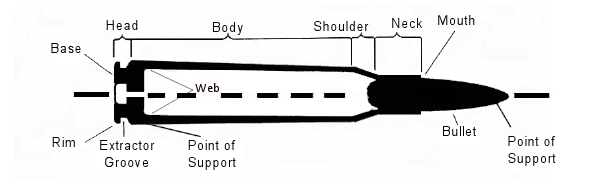
The point of using this term is to identify a series of issues that affect accurate ammunition. Ideally this would work best with a straight-walled case; but since most rifle cartridge cases are tapered, it equates to the smallest cross section that can be measured point by point to verify the concentric circle around the center. For the examples below, I’m working with .308 Winchester ammo.
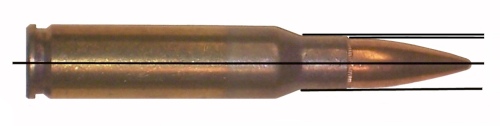
Figure 1: The cartridge.
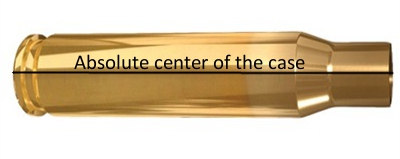
Figure 2: Centerline axis of the case, extending from flash hole to case mouth.
The case walls have to be in perfect alignment with the center, or axis, of that case, even if it’s measured at a thousandth of an inch per segment (in a tapered case).
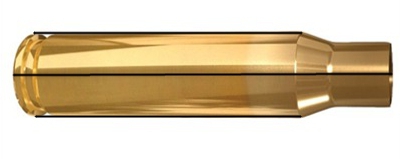
Figure 3: Case body in alignment with its axis, or centerline, even in a tapered case.
The case neck must also be in alignment with its axis. By not doing so you can have erratic bullet entry into the bore. The case neck wall itself should be as uniform as possible in alignment and in thickness (see the M80 7.62x51mm NATO cartridge in Figure 5) and brass can change its alignment and shape. It’s why we expand the case neck or while some folks ream the inside of the neck and then turn the outside for consistent thickness, which affects the tension on the bullet when seated.
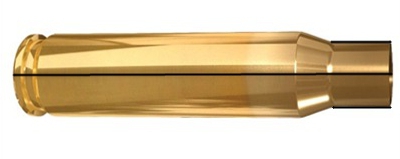
Figure 4: Neck in alignment with center of the case axis.
Figure 5: Variations in case neck wall thickness, especially on some military brass, can cause an offset of the bullet in its alignment. This is an M80 ball round. Note the distinct difference of the neck walls.
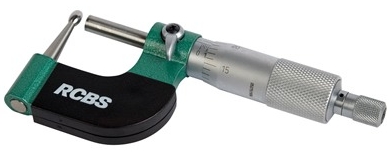
Having a ball micrometer on hand helps, especially with military brass like 7.62x51mm in a semi-auto rifle, where there are limits as to how thin you want the neck walls to be. In the case of 7.62 ball brass you want to keep the wall to .0145″.
Figure 6: A ball micrometer like this RCBS tool (#100-010-268) can measure case neck thickness.
Turning the outside of the neck wall is important with .308 military cases regardless of whether you expand or ream the neck walls. There are several outside neck turning tools from Forster, Hornady, Sinclair, and others. I’ve been using classic Forster case trimming (#100-203-301) and neck turning (#749-012-890) tools for 40 years.
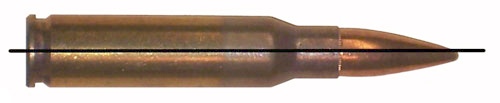
Bullet Run-Out
The cartridge, after being loaded, still needs to be in alignment with the center of the case axis. Figure 7 shows a bad example of this, a round of M80 ball. A tilted bullet is measured for what’s known as bullet “run-out”.
Figure 7: An M80 round with the bullet tilted and not aligned with the axis. This will be a flyer!
Run-out can be affected by several things: (1) improperly indexing your case while sizing, which includes not using the proper shell holder, especially while using a normal expander ball on the sizing die (it also can stretch the brass). (2) The head of a turret press can flex; and (3) improper or sloppy bullet seating. This is also relevant when it comes to using a progressive press when trying to load accuracy ammo.
Mid Tompkins came up with a simple solution for better bullet seating years ago. Seat your bullet half way into the case, back off the seater die and rotate the case 180 degrees before you finish seating the bullet. It cuts down on run-out problems, especially with military brass. You also want to gently ream the inside of the neck mouth to keep from having any brass mar the surface of the bullet jacket and make proper seating easier. A tilted bullet often means a flyer.
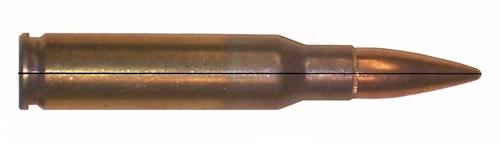
Figure 8: Proper alignment from the center of the case head to the tip of the bullet.
(NOTE: This links to a Web Archive version of the original Sinclair Int’l article.)
*Actually some folks would say that if we are talking about things being off-center or out-of-round, we are actually talking about “eccentricity”. But the tools we use are called “Concentricity Gauges” and Concentricity is the term most commonly used when discussing this subject.
In years past, the U.S. Army Marksmanship Unit published weekly reloading “how-to” article on the USAMU Facebook page. Here is a very informative USAMU article the subject of case lubrication. Tasked with producing thousands of rounds of ammo for team members, the USAMU’s reloading staff has developed very efficient procedures for lubricating large quantities of cases. This article reveals the USAMU’s clever “big-batch” lube methods. For other helpful hand-loading tips, visit the USAMU Facebook page on upcoming Wednesdays.
Rapid, High-Volume Case Lubrication
Today’s topic covers methods for quickly applying spray lube to cartridge cases prior to sizing. A typical order for this shop may be 25,000 rounds, so [speeding up] the lubrication process can be a real time-saver. While your ammunition lots probably aren’t this large, the efficient methods discussed here may help save a considerable amount of time over your handloading career. Our case lubrication rates range from 1500-1600 cases per hour, to 2400-2500 cases per hour, depending on caliber.
This shop uses virgin brass, whereas most home handloaders use fired brass, which necessitates some small changes at times. These will be discussed as they arise. Begin with fired brass that has been tumbled clean.
Ensure as much tumbling media as possible is removed from the brass, as when it gets into a size die, it can dent cases significantly. This is a good time to round out dents in the case mouths using a tapered tool to prevent damage from the decapping stem.
First, dump the clean cases into a large box or reloading bin. Shake the bin back and forth so that many cases are oriented with the mouths up. Next, pick up as many cases as is convenient with the mouths “up”, from natural clusters of correctly-oriented cases. With 7.62mm-size cases, this is usually 3-4, and with 5.56mm cases, this can be up to 8-10. Place the cases into the rack slots, mouth-up. Doing this in groups rather than singly saves considerable time. Once these clusters have been depleted, it will be time to re-shake the bin to orient more cases “up.”.
This photo shows a case lubrication rack made by a USAMU staffer.
Naturally, adjust the spacing to best fit the calibers you reload. We have found this size … convenient for handling through the various phases of case lubrication/transfer to progressive case feeders for processing. Note that the 1/2-inch angle does not cover much of the critical case area at the base, just forward of the extractor groove, where most re-sizing force will be exerted. As the USAMU uses virgin brass, less lubrication is required for our brass than would be needed for Full Length (FL) sizing of previously-fired brass.
NOTE: The amount applied using our rack is easily enough for our purpose. If using fired brass, be sure to adequately lube this base area to avoid having cases stick in the full-length sizing die.
Using a spray lube, coat the cases adequately, but not excessively, from all sides. Be sure to get some lube into the case mouths/necks, in order to reduce expander ball drag and case stretching/headspace changes. The spray lube this shop uses does not harm primers or powder, and does not require tumbling to remove after lubing.*
Take a close look at the photo above. The USAMU shop uses a common kitchen turntable, which allows the rack to be rotated easily. We place this in a custom-made box which prevents over-spray on to floors and walls.
Angled Box Method for Smaller Cases to be Neck-Sized
A refinement of the above method which especially speeds processing of 5.56x45mm cases is as follows. A small cardboard box which holds about 100 cases is fitted with an angled “floor” secured by tape. With the smaller 5.56mm cases, usually about 8-10 cases per handful can be picked up, already correctly-oriented, and placed into the box together. This prevents having to place them into the rack slots, saving time.
HOWEVER, note that this does not allow nearly as much lube access to the case bodies as does the rack. For our purposes — neck-sizing and setting neck tension on new brass, this works well. If using this procedure with fired brass, take steps to ensure adequate lube to prevent stuck cases.
As always, we hope this will help our fellow handloaders. Good luck, and good shooting!
*A two-part test performed here involved spraying primed cases heavily, while getting more lube into the case mouth/body than even a careless handloader would likely apply. The second part of the test involved literally spraying considerable quantities of the lube directly into the cases, drenching the primers. After a several-day wait to allow the lube to penetrate the primers, they were then fired in a test barrel. All fired normally; no unusual reports were noted. This bolstered confidence that normal amounts of the lube would not adversely affect our ammunition, and we have been pleased with the results over several years.
Here is a simple technique that can potentially help you load straighter ammo, with less run-out (as measured on the bullet). This procedure costs nothing and adds only a few seconds to the time needed to load a cartridge. Next time you’re loading ammo with a threaded (screw-in) seating die, try seating the bullet in two stages. Run the cartridge up in the seating die just enough to seat the bullet half way. Then lower the cartridge and rotate it 180° in the shell-holder. Now raise the cartridge up into the die again and finish seating the bullet.
Steve, aka “Short Range”, one of our Forum members, recently inquired about run-out apparently caused by his bullet-seating process. Steve’s 30BR cases were coming out of his neck-sizer with good concentricity, but the run-out nearly doubled after he seated the bullets. At the suggestion of other Forum members, Steve tried the process of rotating his cartridge while seating his bullet. Steve then measured run-out on his loaded rounds. To his surprise there was a noticeable reduction in run-out on the cases which had been rotated during seating. Steve explains: “For the rounds that I loaded yesterday, I seated the bullet half-way, and turned the round 180 degrees, and finished seating the bullet. That reduced the bullet runout by almost half on most rounds compared to the measurements from the first test.”
Steve recorded run-out measurements on his 30 BR brass using both the conventional (one-pass) seating procedure, as well as the two-stage (with 180° rotation) method. Steve’s measurements are collected in the two charts above. As you can see, the run-out was less for the rounds which were rotated during seating. Note, the change is pretty small (less than .001″ on average), but every little bit helps in the accuracy game. If you use a threaded (screw-in) seating die, you might try this two-stage bullet-seating method. Rotating your case in the middle of the seating process won’t cost you a penny, and it just might produce straighter ammo (nothing is guaranteed). If you do NOT see any improvement on the target, you can always go back to seating your bullets in one pass. READ Forum Thread.
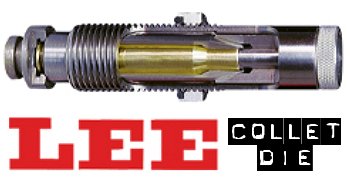
For those who prefer to neck-size their brass (rather than full-length-size), the LEE Collet Die is a popular, inexpensive option. It works by having collet tangs or “fingers” press the neck against a central mandrel. The benefit is that you get a very straight neck, which is sized consistently from top to bottom. Canadian shooter Jerry Teo explains: “LEE Collet Dies produce sized cases with very low runout (measured runout is under .001″ using a Sinclair concentricity gauge). You also don’t get the build-up of brass at the base of the neck, as can happen with bushing neck dies. The neck-shoulder junction stays nice and crisp.”
NOTE: For most handloading, we recommend FULL-LENGTH sizing of cases. You should always have a good Full-length sizing die for your brass. But there are some situations where neck-sizing may be useful. This article explains how to neck-size effectively with a LEE Collet Die.
Here’s a good video that explains how to use a Lee Collet Die to Neck-Size .243 Win brass:
TIP ONE — Adjusting Tension
LEE Collet dies don’t have a specific mechanical adjustment for neck tension. But you CAN easily modify the die to provide more or less tension. If you want to adjust the neck tension using a Lee Collet die, you can simply chuck the mandrel in a drill and reduce the diameter with some sand-paper (to increase neck tension) or you can order a mandrel the next caliber larger and turn it to whatever diameter you want (the larger the mandrel diameter, the less the neck tension). You can also order custom mandrels from Lee sized to any diameter you want.
Regarding neck tension, Boyd Allen makes an important point: “The only way to properly get more neck tension with collet dies is to either reduce the diameter of the mandrel, or order a smaller-diameter mandrel from Lee. I remind folks that adjusting the die position to have more toggle at the top of the ram stroke (not the factory recommended method), or leaning on the press handle with more force than recommended will NOT increase neck tension.”
TIP TWO — Polish and Tune for Easy Case Removal
Some users have complained that their Collet Dies grab the case-neck too firmly, making the case hard to remove. There are solutions to this problem. First inspect the collet fingers and smooth the inner surface up a bit with polishing compound or an extra-fine sanding pad. Second, you can open up the fingers a little bit. LEE recommends that if your Collet Die is sticking, take a steel punch and tap the fingers apart a little bit so that the natural “unloaded” position is wider. Lastly, you should lightly lubricate the outside of the collet fingers (see arrows) before you re-assemble the die. This will ensure they slide smoothly. Also, to prevent the collet fingers from closing too tight, never load up the die with your press without putting a case in place first. Without a case neck between the collet fingers and the mandrel, the collet can clamp itself too tight as you raise the ram.
TIP THREE — Always Have a Case Inside When Operating Collet Die
Our friend Boyd Allen tells us that you need to follow directions and NEVER operate the die without a case inside. Boyd explains: “This is because doing so will spring the quadrants of the collet inward so that they interfere with the insertion of a case, and the user will have to figure out how to undo the damage if the die is to operate properly. This advice would not be needed if everyone read the instructions before using the die…. but many times, they don’t. Another thing that I tell new users is to take the die apart so that they will have a better chance of understanding how it works.”
TIP FOUR — Size Twice and Spin Your Case 1/8th Turn
After reaching fully “down” on your press handle, withdraw the case about an inch and manually rotate it about 1/8th (NOT 1/4 or 1/2) turn while still in the shell-holder, then size again. This will place the die’s collet petals on the four “high spots” of the case neck and will result in a rounder, more evenly-sized neck with slightly more bullet tension. This takes only about one second more per case and is well worth the slight extra effort. (We thank reader Stonecreek for this smart tip).
Get CUSTOM Lee Collet Dies for Your Brass
Yes LEE does make custom collet neck-sizing dies! LEE Precision currently offers Custom Collet Neck-Sizing Dies, made from two of your fired cases. LEE offers custom standard-thread (7/8×14) collet dies for $100.00 (plus S/H) and custom large-thread (1¼x12) collet dies for $160.00 (plus S/H). This is a good option if you run wildcats or have unusual chamber dimensions. CLICK HERE to ORDER.
A while back, we featured a portable reloading bench built on a Black & Decker Workmate. That proved a VERY popular do-it-yourself project so we’re showing it again, in case you missed it the first time.
Texan Robert Lewis made himself a great portable reloading bench from plywood mounted to a Black & Decker Workmate. The bench, roughly 22″ x 19″ on top, folds up to fit easily in your car’s trunk or behind the seats in a pick-up truck cab. Four recessed bolts hold the wood top section to the collapsible B&D Workmate. The sides and back of the unit are attached to the base with small nails. There is a small shelf (also nailed in place) which can be used to clamp a powder measure or hold a scale. Shown in the photo is a Harrell’s Benchrest measure and Harrell’s single-stage “C” press.
Originally, the whole unit could be built for about $65.00 with pine, or $80.00 with oak (as shown). Robert explained: “The Workmate was $40. If someone bought a 2’x4′ sheet of 3/4″ oak plywood, I think it is around $30. Using pine plywood would be about half that. Fasteners were $3. Spar Urethane would be $5.” [Editor: We have seen major inflation — the Workmate is now $90+ and you’ll be spending more for the wood, so figure the whole project might be $150.00.]
Robert told us: “I used a couple ideas I found on the web. The Larry Willis website gave me the idea to use the Black and Decker Workmate as a base. I found the Workmate on sale for $40 and the top is made from oak plywood I had in my shop. I sealed the wood with three coats of Spar Urethane. The whole thing folds into a nice package for transportation to and from the range.”
NOTE: Since we first ran this story, the price of a Black & Decker Workmate WM225 has increased substantially. But good news — Amazon is currently selling WM225-A Workmates for $77.78, a decent price, particularly for Prime members who get FREE shipping. And for the same $77.78 price at Home Depot, you can get the Workmate WM225 with Local Store Pickup or home delivery (in most states).
Do you use bushings to size your case-necks? Are you assuming that your bushings are actually round on the inside, with a hole that’s centered-up properly? Well you may be in for an unpleasant surprise, based on what our friend Jim de Kort recently discovered. Jim was concerned about the run-out on his brass. His cases went into his bushing-equipped FL die pretty straight, but came out of the die with up to .004″ run-out. “What gives?”, Jim wondered. “Could the problem be the bushings themselves?”
To answer that question, Jim decided to examine his bushings. Using an Accuracy One Wheel-drive concentricity gauge, Jim checked out some of his neck bushings. What he discovered may surprise you…
Neck Bushing Flaws Revealed
Trust no one… — Jim de Kort
Jim writes: “I measured the concentricity of my 6BR rounds today. I noticed they went into the neck-bushing equipped full-length sizing die with less than .001″ deviation but came out with .003-.004″. The culprit, it appears, was the bushing itself. Without it the cases stayed within .0005″ to .001″ deviation, so something was happening with the bushing.
One bushing had .00025″ deviation on the outside, yet almost .003″ on the inside, so it is crooked. But even when using a bushing that is within .001″ I still get .003″ runout after sizing. I repeated the same procedure for my 6×47 and got the same results. When using the bushing, concentricity suffers a lot.”
Before we bash the bushing-makers, we must acknowledge that many different things can contribute to excessive run-out and/or mis-alignment of case-necks. We don’t have all the answers here, and Jim would be the first to say that some mysteries remain. Still, these are interesting results that give all precision hand-loaders something to think about.
Jim Borden of Borden Accuracy also offers this tip: “Check the trueness of the face of the die cap. That has more to do with trueness than the bushing. Also check perpendicularity of hole in bushing to top surface. When I was making dies, the cap was made by threading and facing the threaded tenon in same setup.”
Editor’s Comment: Many people have great results with neck-bushing dies, but Jim isn’t the only fellow who has seen some very odd results. I personally employ honed, non-bushing dies for many of my chamberings. These non-bushing dies (with the necks honed for .002-.003″ neck tension) produce extremely straight ammo, with run-out consistently under .0015″.


 Keith has a great YouTube Channel with new content every week. On Keith’s Winning in the Wind channel, Keith offers 235+ informative videos on a wide range of topics including wind reading, reloading, component selection, load development, and training.


 LEE Hand Press Quick-Change Die Functionality


 TIP ONE — Adjusting Tension
 TIP TWO — Polish and Tune for Easy Case Removal
 A while back, we featured a portable reloading bench built on a Black & Decker Workmate. That proved a VERY popular do-it-yourself project so we’re showing it again, in case you missed it the first time.


