Eurooptic vortex burris nightforce sale


teslong borescope digital camera barrel monitor


As an Amazon Associate, this site earns a commission from Amazon sales.


November 12th, 2009

Remote Windage Adjustment System for F-Class Rests

We saw an interesting gizmo on Peter White’s front rest at the recent California Long-Range Championship. Peter, who won the F-Class division, has fitted a remote drive system that allows him to adjust his Sinclair windage top without moving from his shooting position.

Remote Windage Adjustment drive

The windage control cable (actually a McMaster-Carr flexible drive shaft) attaches to the right side of the windage top in place of the regular adjustment knob. It then circles back to the shooter, and is clamped at the end of the pedestal leg (near the vertical adjustment speed screw). A large, knurled knob is attached to the end of the flexible drive.

Remote Windage Adjustment drive

Remote Windage Adjustment driveWith this set-up, Peter can adjust windage easily with his left hand, while keeping his right (trigger) hand in place on the rifle. In addition, he can fine-tune his vertical using the rotary knob (speed screw) on the threaded shaft for the rear-most rest “foot”. The flex-drive adjustment system places his windage control right next to his elevation fine-tune control, so both windage and elevation controls can be manipulated with the “free hand” from the shooting position.

Peter fabricated this system himself from less than $60 worth of parts. All you need is a McMaster Carr flexible drive shaft ($50-$60), an adjustment knob at the shooter’s end, and a small bracket to hold the adjustment knob securely.

Many F-Class shooters have fabricated a similar remote windage control system. If you have basic mechanical skills, you can build your own system in a couple hours (with the correct parts). Or, Leroy Johnson of Johnson’s Precision Gunsmithing, jpgrifles [at] yahoo.com, can build you a working system, if you send in your windage top. Leroy explains that “the various windage tops all have slightly different configurations, so the price depends on how much special work is required.”

Peter’s Parts List and Tips
Peter White offers some advice on building a remote windage control: “The parts were obtained from McMaster-Carr, www.mcmaster.com. The flexible drive shafts come in various lengths and diameters. When using the smallest diameters in this application the bend radius is critical as the cable wants to kink in one direction of operation. The tape you see on my rig covers a couple of stiffener rods. I have seen others using a longer cable with a larger bend radius with no need of a stiffener. Others have employed jacketed cables that have a much higher torque rating (but also much higher cost).”

Products Needed (Total = $49.31)

Part Number Description Price
3127K22 Panel-Mount Flexible Drive Shaft, 18″ Overall Length, 0.130″ Shaft OD $42.31
2577K18 Stainless Steel Knurled-Rim Knob W/Set Screw, 1/4″ Unthreaded Through Hole, 1″ Diameter $7.00
Permalink News No Comments »
July 5th, 2009

Custom-Calibrated Windage & Elevation Knobs from Kenton

Kenton Calibrated Windage Knob
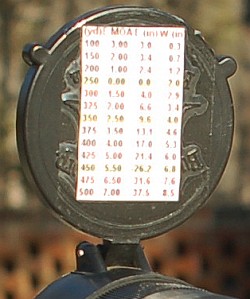
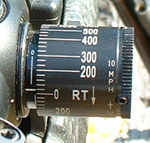
Here’s something that can save you lots of time and aggravation on a varminting trip. This little $90 gizmo is great for varmint hunters and any one who needs to make a quick shot in shifty wind conditions. Instead of the traditional 1/4-MOA hash marks, the Kenton windage turret features markers corresponding to the wind drift your rifle will encounter at various distances.

Custom-Calibrated Windage Knobs
Kenton Industries’ Tuned Windage Compensator (TWC) has built-in windage marks for 10 mph cross-winds at 100-1000 yards. How do they do that? Well the knobs are calibrated either for specific calibers/loads, or they can make custom knobs using your observed field data. The knobs can compensate for various wind speeds (2-20 mph) and angles (15°- 90°), by applying some simple conversion ratios. As a general rule, with a “full-value”, i.e. 90°, crosswind, the wind drift will go up or down in direct proportion to the change in windspeed. That means, for example, a 10 mph crosswind will push the bullet twice as much sideways as a 5 mph crosswind.

Two versions of Kenton’s TWC knobs are offered. The $89.95 TWC #1 features calculated ballistics for standardized factory ammo for the caliber and barrel length you specify. The $89.95 TWC #2 feature customized windage settings based on bullet BC, environmental conditions, elevation, and ballistic information you provide.

Custom Elevation Knobs
Kenton also makes an $79.95 elevation-compensating TTC knob, that can be customized to your rifle. With this elevation turret, yardages are marked in 50-yard increments, and you can literally just “dial in your distance”. However, to work effectively the TTC knob must be tailored to a particular load (velocity and bullet). Moreover, actual bullet drop will differ with changes in altitude, temperature, and shooting angle — so it’s not as simple as it sounds, and you may need multiple knobs if you shoot a variety of loads. Kenton offers it TTC #1 model calibrated for standardized factory ammo. The TTC #2 is calibrated out to the maximum effective range of your cartridge based on bullet type, muzzle velocity, altitude, and temperature. Select the type of yardage format to be used. The #2 is recommended for wildcatters or for those who want to adjust to specific conditions. Lastly, a TTC #3 elevation knob is offered that relies on the purchaser’s actual recorded drop data from the field. The TTC #3 elevation knob will be calibrated based on the click-value or MOA you provide for each 50-yard increment.

Permalink Optics 2 Comments »
May 28th, 2009

Print and Laminate a Ballistics Data Card

Three-gun match competitor Zak Smith employs a simple, handy means to store his elevation and wind dift data — a laminated data card. To make one, first generate a come-up table, using one of the free online ballistics programs such as JBM Ballistics. You can also put the information in an Excel spreadsheet or MS Word table and print it out. You want to keep it pretty small.

Below is a sample of a data card. For each distance, the card includes drop in inches, drop in MOA, drop in mils. It also shows drift for a 10-mph cross wind, expressed three ways–inches, MOA, and mils. Zak explained that “to save space… I printed data every 50 yards. For an actual data-card, I recommend printing data every 20 or 25 yards.” But Zak also advised that you’ll want to customize the card format to keep things simple: “The sample card has multiple sets of data to be more universal. But if you make your own data card, you can reduce the chance of a mistake by keeping it simple. Because I use scopes with MILS, my own card (bottom photo) just has three items: range, wind, drop in MILS only.”

Once you have the card you can fold it in half and then have it laminated at a local office store or Kinko’s. You can keep this in your pocket, tape it to your stock, or tie the laminated card to your rifle. If you regularly shoot at both low and high elevations, you may want to create multiple cards (since your ballistics change with altitude). To learn more about ballistic tables and data cards, check out the excellent “Practical Long-Range Rifle Shooting–Part 1″ article on Zak’s website. This article offers many other insights as well–including valuable tips on caliber and rifle selection.

Another option is to place your ballistics card on the back of the front flip-up scope cover. This set-up is used by Forum member Greg C. (aka “Rem40X”). With your ‘come-up’ table on the flip-up cover you can check your windage and elevation easily without having to move up off the rifle and roll the gun over to look at the side of the stock. Greg tells us: “Placing my trajectory table on the front scope cover has worked well for me for a couple of years and thought I’d share. It’s in plain view and not under my armpit. And the table is far enough away that my aging eyes can read it easily. To apply, just use clear tape on the front objective cover.”

ballistics data scope cover

Permalink Tech Tip 2 Comments »