We know that many of our readers have reached an age when it can be difficult to read small type. Thankfully, there are some easy keyboard tricks that can make our pages easier to view. Here are some tips that can help older eyes, enhancing your reading/viewing experience, when browsing the Daily Bulletin, reading our feature articles, or visiting our Shooters’ Forum.
1. Use the F11 Key on Windows PCs to Enable Full Screen View.
On a Windows PC Keyboard, you’ll find the F11 key above and slightly left of the large “Backspace” key. When you click F11, it will zoom the layout to fill your entire screen, removing the tabs and buttons that can rob space on the top and sides. That provides a less-cluttered layout for reading. To go back to “normal” view, simply click F11 a second time.
2. Use the Scroll Wheel on your Mouse to Increase Text Size.
If you have a mouse with a scroll wheel, you can use this with most browsers to increase the size of text in our articles. Just hold down the CTRL key and roll the wheel forward to increase text size. With most browsers, this enlarges the entire web page, so navigation buttons get bigger too.
With Internet Explorer, Firefox, Chrome, and Opera Browsers, hold down the CTRL key and spin the wheel forward to make the text larger. Hold the CTRL key down and roll the wheel back to shrink text.
3. Use the Keypad Plus/Minus Keys to Increase Text Size.
If you don’t have a scroll wheel on your mouse, you can increase the text size by holding down the CTRL key and clicking the + (plus) key on your keypad, located on the right side of your keyboard. Click the – (minus) key to reduce font size, while holding CTRL key.
4. Use + and – Buttons to Change Text Size on Feature Stories.
When browsing the feature stories in our main site, AccurateShooter.com, you can increase or decrease text size by clicking the plus and minus buttons at the top of right column.
The advantage with this method is it just changes the font size for the main story, while leaving the top section and side navigation unchanged. NOTE this doesn’t yet work on all our stories. Some of the older articles have a fixed layout so that the data tables display correctly.
Use Browser Tabs to Keep Bulletin, Forum, and Home Page Open
By using browser tabs, you can have “instant access” to our Forum while reading the Daily Bulletin. This is easy to do if you use a tab-equipped browser, such as Chrome or Internet Explorer 8+. Here’s how to open multiple tabs. When in the Daily Bulletin, Right Click on the “Forum” link at the top of the page. Select “Open in New Tab”. This will let you browse the Forum without closing the Daily Bulletin. Likewise, put your mouse over the “Home”, right click, and select “Open in New Tab”. This way you can have instant access to the Bulletin, the Home Page, and the Forum.
Product Preview by Jim Bennington
Rifle accuracy and precision have come a long way in the past 15 years. The most recent tool to significantly improve precision is the barrel tuning system. The Rifle Accuracy System (RAS) developed by Precision Rifle Systems, LLC of Myakka City, Florida, brings a fresh approach to tuning. The RAS incorporates a precision muzzle brake with the tuner.
This system provides significant precision improvements and was the subject of a June 2012 Precision Shooting (PS) magazine article, titled “Improved Rifle Accuracy” and will also be featured in an article in the November 2012 issue of PS titled “Tuning with Confidence”.
READ MORE about RAS Tuner Tests on .260 AI, .223 Rem, and 22LR rimfire rifles.
Copies of both articles and detailed instructions on RAS installation and tuning can be downloaded from www.bostromgunsmithing.com. Eric Bostrom is the distributor for the RAS.
Accuracy is the ability of a firearm to hit what it is aimed at within the limits of the precision of that firearm. Precision is the ability of a firearm to place successive shots in or near the first shot. A firearm that delivers one minute of angle (1 MOA) precision should, at 100 yards, place the bullet within roughly one inch of where it is aimed (actually 1.047″), or a sight adjustment should correct the problem. All the improvements in optics, manufacturing and components have allowed precision expectations to go from 1 MOA to 1/2 MOA or even sub-quarter-MOA.
What is the next frontier for the precision rifle? While all the other advancements were being made, advancements in the understanding and methods of managing the barrel vibrations were also being made. Once the rifle has been built and the loads developed, it is the management of the barrel vibrations that has the final influence on the bullet as it is leaving the barrel and the final influence on precision. The RAS has demonstrated with many different rifles and calibers that significant improvements can be made with a properly tuned barrel tuner system. What does this mean? Typically, there is a noteworthy improvement. In fact group size improvements between 30% and 60% have been observed with a properly-tuned barrel tuner system. This has been demonstrated on both custom rifles and loads and factory rifles.
From the late ’70s through 1983, a huge, concrete-walled warehouse in Houston was used for benchrest testing. Virgil King and Bob Fisher set up a bullet-catching backstop at the end of a 30-yard-wide, 325-yard-long fire lane that remained unobstructed even when the warehouse was in use. This allowed accuracy tests in virtually perfect “no wind” conditions. Over a six-year period, about 30 shooters were invited to test their rifles. The results were amazing, with numerous “zero groups” being shot in the facility. Many of the lessons learned in the legendary Houston Warehouse still help benchresters achieve better accuracy today.
Dave Scott explains why the Warehouse was so unique:
“Over a period of six years, the levels of accuracy achieved in the Houston Warehouse went beyond what many precision shooters thought possible for lightweight rifles shot from sandbags and aimed shot-to-shot by human eye. For the first time, a handful of gifted, serious experimenters — armed with the very best performing rifles (with notable exceptions) — could boldly venture into the final frontiers of rifle accuracy, a journey made possible by eliminating the baffling uncertainties of conditions arising from wind and mirage. Under these steel skies, a shooter could, without question, confirm the absolute limits of accuracy of his rifle, or isolate the source of a problem. In the flawlessly stable containment of the Houston Warehouse … a very few exceptional rifles would display the real stuff, drilling repeated groups measuring well below the unbelievably tiny .100″ barrier. The bulk of rifles, however, embarrassed their owners.”
Scott’s article also reveals some interesting technical points: “One thing that IS important is that the bullet be precisely seated against the lands. T.J. Jackson reported this fact in the May 1987 issue of Precision Shooting. In a letter to the Editor, T.J. wrote, ‘…in all our testing in that Houston warehouse… and the dozens and dozens of groups that Virgil King shot in there ‘in the zeroes’… he NEVER fired a single official screamer group when he was ‘jumping’ bullets. All his best groups were always seated into the lands, or at the very least… touching the lands. Virgil said his practice was to seat the bullets so the engraving was half as long as the width of the lands. He noticed an interesting phenomenon with rifles that could really shoot: if the bullets were seated a little short and the powder charge was a bit on the light side, the groups formed vertically. As he seated the bullets farther out and increased the powder charge, the groups finally became horizontal. If he went still farther, the groups formed big globs. He said the trick is to find the midway point between vertical and horizontal. That point should be a small hole.”
You should definitely read the complete article, as it provides many more fascinating insights, including shooting technique, barrel cleaning, neck-turning, and case prep.
This 2010 story is reprinted at readers’ request.
In the past few years, tubeguns have really taken over in high power circles. At many matches you’ll see more tubeguns than conventional prone rifles, and a high percentage of those tubeguns will have been built using an Eliseo (Competition Machine) CSS chassis kit.
Step-By-Step Guide to Stock Set-Up
If you are a new tubegun shooter, or if you are planning a tubegun build this winter, German Salazar has prepared a comprehensive set-up guide for Eliseo tubeguns. Eliseo’s CSS chassis system affords a myriad of adjustments. Initially, one can be overwhelmed by all the variables: Length of Pull, Length to Sights, Length to Handstop, Cheekpad Height, Buttstock Offset, Buttstock Cant Angle, Handstop Angle, and Forearm Rotation.
In his Guide to Configuring the Eliseo Tubegun, Salazar shows how to adjust the Tubegun so that a shooter’s prone position is stable, repeatable, and comfortable. Salazar covers each adjustment, step by step. If you follow his instructions, starting with setting Length of Pull, you should find that your hold becomes more stable, the gun moves less from shot to shot, and your eye position relative to the sights is improved.
German explains the set-up process: “Adjusting the stock is a process that you must work at and it builds on itself. As you get one adjustment right, the others begin to fall into place. Our hope is that you take from this article a system for adjusting the stock, not an exact set of dimensions; and that you understand that it will take continuous work over a period of time to really refine the adjustments. Your goal is not to obtain a ‘perfect set of dimensions’ but rather a perfect feel that accomplishes the three objectives of stability, durability and comfort and the knowledge of how to change the adjustments to achieve those objectives under varying conditions such as sloped firing lines or other terrain features.”
Read More at RiflemansJournal.com German Salazar runs the excellentRifleman’s Journal website, where you will find dozens of informative articles like this story.
A while back, we featured a portable reloading bench built on a Black & Decker Workmate. That proved a VERY popular do-it-yourself project so we’re showing it again, in case you missed it the first time.
Texan Robert Lewis made himself a great portable reloading bench from plywood mounted to a Black & Decker Workmate. The bench, roughly 22″ x 19″ on top, folds up to fit easily in your car’s trunk or behind the seats in a pick-up truck cab. Four recessed bolts hold the wood top section to the collapsible B&D Workmate.The sides and back of the unit are attached to the base with small nails. There is a small shelf (also nailed in place) which can be used to clamp a powder measure or hold a scale. Shown in the photo is a Harrell’s Benchrest measure and Harrell’s single-stage “C” press.
The whole unit can be built for about $65.00 with pine, or $80.00 with oak (as shown). Robert explained: “The Workmate was $40. If someone bought a 2’x4′ sheet of 3/4″ oak plywood, I think it is around $30. Using pine plywood would be about half that. Fasteners were $3. Spar Urethane would be $5.”
Robert told us: “I used a couple ideas I found on the web. The Larry Willis website gave me the idea to use the Black and Decker Workmate as a base. I found the Workmate on sale for $40 and the top is made from oak plywood I had in my shop. I sealed the wood with three coats of Spar Urethane. The whole thing folds into a nice package for transportation to and from the range.”
Editor’s NOTE: In the time that’s transpired since we first ran this story, the price of a Black & Decker workmate has gone up. However you can still pick a WM225 Workmate for under $60.00. Target is currently selling WM225 Workmates for $59.99.
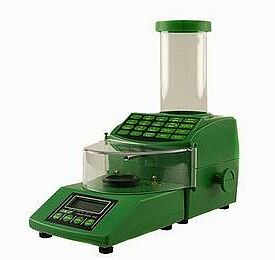
The RCBS ChargeMaster 1500 electronic powder scale and dispenser is the most popular product of its kind on the market. In our original Electronic Powder Dispenser Comparison Test, the ChargeMaster normally dispensed most kinds of powder faster than competitive units from Lyman and PACT. However, after the initial release of the ChargeMaster 1500, RCBS “tweaked” the software a bit to achieve more consistent charge-throws. This slowed down the process somewhat. Some owners have wanted to speed up their ChargeMaster. This IS possible with a relatively simple reprogramming. Most of the internal parameters of the Chargemaster can be modified, under guidance from the tech staff at RCBS.
Gunsmith and Forum member NAT Lambeth reports: “I thought My RCBS ChargeMaster 1500 Combo was fast enough. But I still called RCBS and asked for the programing changes to see if I could speed it up. It was a lot easier than I thought. My 1500 Combo was taking from 15-30 seconds to dispense the powder to the tenth of a grain. I reprogrammed the numbers and now it takes between 7 and 15 seconds to dispense to a tenth. This effectively doubled my loading speed. I only changed the HSB_A1, HSB_B1, and BSP_C1 settings.”
Key ChargeMaster Parameters with Default Settings
HSB_A1 (15.68) Grains under target weight to go from full to high speed
HSB_B1 (3.42) Grains under target weight to go from high to slow speed
BSP_C1 (1.08) Grains under target weight to go from slow to final trickle speed
Nat cautions that you should talk to a RCBS tech before attempting to re-program your ChargeMaster: “You will benefit from talking to the RCBS tech. I have now gone back and played with the numbers a couple of times. (The numbers given to me by the tech at RCBS were still a little conservative.) I think each machine may have its own likes and dislikes. If you get too aggresive with lowering your numbers it will over-throw your intended load.”
Source for ALL the Parameters
There is an extensive discussion of RCBS ChargeMaster programming on the South Africa Hunting Rifle Shooting Assn. (SAJSV) Forum. In this SAJSV Forum ARTICLE, Jaco Brink lists virtually all the programming codes. Importantly, Jaco also provides the default values for various parameters. This is very important, because the ChargeMaster does not have a “return to default” option. Once you change any value, if you want to return to the original value you must enter it manually.
Jaco cautions: “I have to advise you to only make changes to your scale if you are confident to do so, and remember that there is not a ‘return to default’ setting in the scale. If all else fails return your scale to the default settings [I have listed].”
Use a McDonald’s Straw to Reduce “Over-Throws”
Jaco Brink provided another useful tip to avoid “over-throws” (excess charge weight): “The RCBS employee advised me to take a McDonnell’s straw (because it is thicker than a normal straw), cut off about a half inch piece and put it into the tube where the powder exits. This caused the last part of an extruded powder to clutter less, and reduced the amount of overthrows dramatically.”
One of our Shooters’ Forum readers, Trent from Louisiana, asked for help deciding between a 260 Remington and a 6.5×55 for his latest gun project. In the Forum thread, respected UK gun writer Laurie Holland provided a good summary of the differences between the two chamberings. Laurie writes:
“The 6.5×55 case has 6 or 7% more capacity than the .260s, even more in practice when both are loaded to standard COALs with heavy bullets, which sees them having to seated very deep in the .260 Rem using up quite a lot of powder capacity. So loaded up for reasonable pressures in modern actions, the 6.5×55 will give a bit more performance.
The issue for many is what action length is available or wanted, the 6.5 requiring a long action. So sniper rifle / tactical rifle competitors will go for the .260 Rem with the option of the many good short-bolt-throw designs around with detachable box magazines. If a bit more performance is needed, the .260AI gives another 100-150 fps depending on bullet weight.
Brass-wise, you’ve got really good Lapua 6.5×55 off the shelf that needs minimum preparation, and it’s strong and long-lived. There is an Ackley version too that was popular in F-Class in Europe for a while that isn’t too far short of 6.5-284 performance. If you go for .260 Rem, the American brass isn’t as good but you can neck-up Lapua or Norma .243 Win and trim them (or neck-down .308 Win or 7mm-08). This has the downside that doing so usually creates a noticeable ‘doughnut’ at the case-shoulder junction, that may cause problems depending on how deep bullets are seated.
For purely target shooting, I think I’d go with 6.5×55 if I was making the choice again today for performance and brass-preparation reasons. In fact, I’ve considered going back to the gunsmith to have the barrel rechambered.
You want a multi-purpose rifle though and that makes things trickier depending on the bullet weight(s) you want to use. The [typical] 6.5×55 and 6.5-08 throats are really designed for 140s, so 90-120s make a long jump into the rifling. If you’re always going to use 130s and up, it’s less of an issue. If you want to use the lighter stuff, I’d say go for .260 Rem and discuss the reamer with the gunsmith to come up with as good a compromise as you can depending on the mix of shooting. 1:8.5″ twist is the norm and handles all the usual sporting and match bullets; you can go for a little slower twist if you won’t use the heavies.
Over here in the UK, in Scotland to be precise, we have a top sporting rifle builder (Callum Ferguson of Precision Rifle Services) who almost specializes in .260 Rem usually built on Borden actions. He throats the barrel ‘short’ so it’s suited to varmint bullets, but will still handle the 100gr Nosler Partition which he says is more than adequate for any British deer species including Scottish red stags.
Accuracy-wise, I don’t think there’s anything between them if everything else is equal. The 6.5 has a reputation for superlative accuracy, but that was high-quality Swedish military rifles and ammunition matched against often not-so-high-quality military stuff from elsewhere. Put the pair in custom rifles and use equally good brass and bullets and you’ll be hard pressed to tell them apart.” – Laurie Holland
After Laurie’s helpful comments, some other Forum members added their insights on the 260 Rem vs. 6.5×55 question:
“To me, the .260 Remington has no advantage over the 6.5×55 if one is going to use a long action. Likewise, the only advantage the .260 has in a modern rifle is it can be used in a short-action. There is more powder capacity in the 6.5×55 so you have the potential to get more velocity plus there is a lot of reloading data available to you for loading at lower velocity/pressure if you choose. The Lapua brass is great and Winchester brass is pretty good at low pressures. Having loaded a good bit for both, the 6.5×55 would always get the nod from me. To me, if someone wants to use a short-action, the 6.5×47 Lapua is even a better option than the .260 for a target rifle.” — Olympian
“There is just one small item that has been missing from this conversation — the 6.5×55 has a non standard rim diameter of .479″ vs. the standard .473″ of a .308 and all of its varients. Depending on your bolt this may be an issue, or it may not.” — Neil L.
We often get requests from rimfire shooters who’ve acquired an older Anschütz that needs some repair work, or perhaps is missing a few small parts. Other readers have asked “who can help with tuning or upgrading an Anschütz trigger?” Listed below are two important resources. For repairs and factory replacement parts, contact Ten Ring Service. To purchase Anschütz smallbore and air rifles, (along with a selection of Anschütz accessories), you may want to try Champion Shooters Supply.
Anschütz Gunsmithing, Repairs, and Tuning
Looking for an knowledgeable shop that can help with Anschütz smallbore rifle repairs, trigger work, and tuning? Ten Ring Service in Jacksonville, Florida is highly recommended by many leading smallbore shooters. An authorized Anschütz factory repair center, Ten Ring can supply trigger upgrades, bolt replacements, and provide factory parts and accessories.
In 2010 we had an Anschütz 64R Biathlon rifle for testing and evaluation. We had some questions about tuning the 5103 two-stage trigger, and Ten Ring was very helpful. For other Anschütz rifles, Ten Ring can provide replacement springs, trigger parts, firing pins, and both factory and third-party accessories. For more info, contact Ten Ring Service at (904) 724-7419, and ask for Todd or Steven. Note: Ten Ring Service plans to launch a website (at long last) later this month (October, 2012).
Ten Ring Service, Inc.
2227 Lou Dr. West
Jacksonville, FL 32216-4456
Phone: (904) 724-7419 WEBSITE to be launched this month
Anschütz Rifles and Accessories Champion Shooters Supply in New Albany, Ohio carries a large selection of Anschütz target rifles and air rifles. If Champion Shooters doesn’t have a particular model in stock, they can often order the rifle from Germany on request.
Champion Shooters carries a full line of Anschütz shooting accessories, including front and rear sights, stocks, bolt knobs, shooting clothing, and miscellaneous small parts.
Download FREE Rifle Manuals
Looking for a manual or parts diagram for your Anschütz rifle or pistol? Champion Shooters offers FREE Rifle Manuals for 30+ different Anschütz firearms. These manuals are offered as Adobe .PDF files. Most of the manuals offer text in English, German and Spanish. In addition to the user manuals for dozens of Anschütz models, Champion Shooters offers a manual for the Anschütz 5065 trigger assembly.
Jerry Schmidt, an avid shooter and hunter from Montana, has created a tool designed to help install single-dovetail or double-dovetail rings on hunting rifles. Jerry’s invention, the Scope-Tru Alignment Bar (patent pending), is unique. Unlike most other alignment systems, this is a single, long precision machined rod with a pointed forward end. You work on one ring at a time, first setting the front ring in the dovetail and then setting the rear ring. The process is shown by Jerry in the video below.
Jerry explains: “The Scope-Tru Alignment Bar is a tool designed to install both standard ring/mount systems, and dual dovetail ring/mount systems. The tool provides significant leverage to turn the dovetail rings into their bases. By observing the pointer on the end of the bar, it is easy to align the ring with the center of the barrel, thereby assuring that the ring is installed at 90 degrees to the axis of the bore. Because the bar is a one-piece tool, it is possible to get the rings into nearly perfect alignment with each other, and near perfect alignment with the bore axis.”
The photos above show how the tool is used to install and align a set of standard hunting rings (with rear windage adjustment). You start with the front ring, rotating it 90 degrees in the dovetail, and then align with the center of the barrel. Next, slide the tool rearwards and loosely set the rear ring in place. With both rings adjusted correctly, the alignment tool will be perfectly centered and both rings with be subsequently squared at 90° to the bore axis. Schmidt says he can install conventional rings with this tool, tighten them to spec on a rifle scope, and there will be virtually no marks on the scope tube. (Of course this would require that the rings are extremely well made with no burrs or highspots on the trailing and leading edges.)
The Scope-Tru Alignment Bar is CNC-machined from TGP bar stock, and will be offered in both 1 inch, and 30mm diameters. The durable bar is designed for regular, long-term use by the professional gunsmith, the home gunsmith or “gun crank”, and retail or wholesale sporting goods store staff. The 1″-diameter, all-steel Scope-Tru is can be purchased for $135.00 plus shipping and handling. The version for 30mm rings AND a new combo 1″/30mm Scope-Tru tool are both in final development, and could be available in the near future. To place an order for a 1″-diameter Scope-Tru, CLICK this LINK.
For more info, visit Parabola-LLC.com, phone (406) 586-1687, or email info [at] parabola-llc.com. CLICK HERE for a shorter video that shows the entire mounting process in a compressed time format.
Are you a died-in-the-wool .50 BMG fan? Got a hankerin’ for heavy artillery? Then visit the FCSA Photo Gallery page. There you’ll find hundreds of photos from Fifty Caliber Shooting Association (FCSA) matches and fun shoots in California, Nevada, New Mexico, and Washington. To access the photos from the Gallery Page, click on the colored tabs which indicate match location and date (such as NV2011-08).
Photo sets go all the way back to 2002, so you can see the evolution of the hardware over the years. Sample multiple archives to see the differences in terrain from one range to another — from Raton’s alpine setting to the hot, dry Nevada desert. This Gallery is really a treasure-trove of .50-Cal history. It’s worth a visit. Here are a few sample images.
Story Tip from EdLongrange. We welcome reader submissions.


 The advantage with this method is it just changes the font size for the main story, while leaving the top section and side navigation unchanged. NOTE this doesn’t yet work on all our stories. Some of the older articles have a fixed layout so that the data tables display correctly.
 Product Preview by Jim Bennington

 Dave Scott explains why the Warehouse was so unique:
 In his
  A while back, we featured a portable reloading bench built on a Black & Decker Workmate. That proved a VERY popular do-it-yourself project so we’re showing it again, in case you missed it the first time.
 The RCBS ChargeMaster 1500 electronic powder scale and dispenser is the most popular product of its kind on the market. In our original
 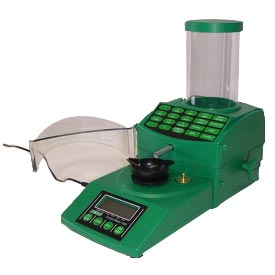 Source for ALL the Parameters
 “The 6.5×55 case has 6 or 7% more capacity than the .260s, even more in practice when both are loaded to standard COALs with heavy bullets, which sees them having to seated very deep in the .260 Rem using up quite a lot of powder capacity. So loaded up for reasonable pressures in modern actions, the 6.5×55 will give a bit more performance.
 After Laurie’s helpful comments, some other Forum members added their insights on the 260 Rem vs. 6.5×55 question:
 Ten Ring Service, Inc.
 Anschütz Rifles and Accessories


