|
|
October 5th, 2014
We recommend that all hand-loaders have a couple reliable reloading manuals as reference guides. Berger, Hornady, and Sierra all offer well-respected load manuals. These can provide starting load information for a wide variety of cartridge types and bullet selections. We do like to cross-check any printed load recipes with current online data, to ensure you have the latest info.
Along with a good load manual, those getting started in metallic cartridge reloading can benefit from a good basic reloading treatise. There’s a new intro guide from the publishers of Gun Digest.

|
The New Gun Digest Shooter’s Guide To Reloading, by Phillip Massaro, was created for shooters new to reloading. This is a good starting point for those who want to learn to hand-load safely and efficiently. Hundreds of photos illustrate the text — and we all know a picture can be worth a thousand words.
After discussing the benefits of hand-loading, Massaro’s book covers the basics of metallic cartridge reloading, step by step. Along the way Massaro recommends appropriate presses and tools for reloading both pistol and rifle cartridges. Massaro also explains the variations in bullet and powder types, and how they affect ballistics. In addition, Massaro includes a “Specialty Situations” chapter that reveals common reloading mistakes and issues and offers practical solutions. This section on avoiding common mistakes is one of book’s best features. We wish all reloading guides had a similar section. |
|
Editor’s NOTE: This book will be released next week. Accordingly, we have not seen the final, printed version yet. At $14.79, the Gun Digest Shooter’s Guide to Reloading is relatively inexpensive. The sample chapters we reviewed provided good basic information in a well-organized fashion. Certainly, we would not tell advanced reloaders and/or competition shooters to rush out and buy this book. However, for folks getting started in hand-loading, this resource should be helpful.
October 4th, 2014
 Have a good look at the photos below — this may be one of the most noteworthy target strings we’ve ever published. What you can see is the effect of barrel tuner position on point of impact (POI). You can clearly see that the tuner position alters the up/down POI location in a predictable fashion. Have a good look at the photos below — this may be one of the most noteworthy target strings we’ve ever published. What you can see is the effect of barrel tuner position on point of impact (POI). You can clearly see that the tuner position alters the up/down POI location in a predictable fashion.
This remarkable 15-shot sequence was shot by French benchrester Pascal Fischbach using his 6 PPC fitted with a CG (Carlito Gonzales) action and a Bukys barrel tuner.
Pascal reports: “After [bullet] seating and load validation, I put the Bukys tuner on, screwing it out 10 turns. According to Carlito, the CG’s super stiff action-to-barrel fit gives a faster vibration modulus that is detrimental below 10 turns [position of the tuner].” Pascal’s procedure was to screw out the tuner 1/4 turn progressively from one shot to the next. He shot one bullet at each tuner position, with a total of 15 shots.
15-Shot Sequence with Tuner Changes

CLICK HERE to SEE Large Version of Complete Test Strip (All 15 shots in a row).
Left Half of Target Strip (shots with 1/4 rotation change of tuner in sequence)

Right Half of Target Strip (shots with 1/4 rotation change of tuner in sequence)

Pascal observed: “Note the point of impact displacement [from shot to shot] tracks clearly along a sinusoide (sine wave curve).” This is indeed notable and significant! This shows how the tuner’s ability to change barrel harmonics can alter the position of the muzzle as each bullet exits, resulting in a higher or lower POI. Pascal sent his results to Carlito Gonzales in Argentina for analysis.
Pascal poses this question to readers: “Guess which three positions Carlito recommends to try?”
Editor’s Note: While this target sequence clearly shows how tuner position can alter bullet point of impact, this, by itself, does not tell us which tuner position(s) are best for accuracy. That will require further multi-shot group testing, involving careful experimentation with tuner position (and powder charge weights). But for those folks who doubt that a tuner can make a difference on a short, fat barrel, just take another look at the photos. The up/down changes are undeniable, and noteworthy in the wave pattern they follow.

October 4th, 2014
These days, when gun owners get together, the hot topic is: “Where did all the rimfire ammo go?” For the past couple of years, .22 LR rimfire ammo has been very hard to find, and what you can purchase is priced much higher than before. Is there some conspiracy? Have ammo-makers cut back production? Mark Keefe, Editor of American Rifleman, recently addressed these questions, and the related issue of production capacity.
Keefe observes that, if “normal” demand for rimfire ammo has increased substantially (and permanently), we may not see a big improvement in the availability of rimfire ammo until such time as ammo-makers increase production capacity. But that would require the construction of very expensive new ammo manufacturing facilities. According to Keefe, that’s not likely to happen any time soon because manufacturers will not spend hundreds of millions chasing a short-term demand “bubble”. In Keefe’s view, until the panic buying subsides, and ammo-makers can reliably determine the true, “normal” long-term demand for rimfire ammo, it is unlikely that they will invest in new factories.
Click Graphic to Read Full Article:

Here are some highlights of the Keefe Article on Rimfire Ammunition:
U.S. Rimfire Ammo Factories Really Are Running at Full Capacity
Keefe: “I have been in two of the major rimfire plants in the United States since this ‘crisis’ hit. They are, indeed, running three shifts, full out. But there are not that many rimfire plants in the [USA].”
Increased Rimfire Gun Sales May Justify Increased Production Capacity
Keefe: “There are, literally, millions more .22 Long Rifle firearms owned and shot that have entered civilian hands in recent years…. Variables such as a substantial increase in the number of .22s sold and a change in the type of .22s being shot … may make a new rimfire plant worth it. Time will tell.”
Construction of New Factories is Very Expensive
Keefe: “Would it be worth it to go to the expense of, say, building a $250 million rimfire plant to make your company’s money back at a penny a round over the next 10 to 20 years? The answer, so far, has been a resounding ‘No’.”
Manufacturers Can’t Assess True Demand Levels Until the Panic Buying Ceases
Keefe: “At some point, ammunition demand will reach its real level[.] At that point, the major ammo makers will look and see if there is sufficient demand for [bringing] a new rimfire plant on-line.”
October 3rd, 2014
Grafs.com is now featuring some hard-to-find products that are very popular with our Forum members. These are items that sell out quickly, or may be back-ordered for months. Grab ‘em while you can.

Berger 7mm 180gr Hybrids
Graf’s has the ultra-accurate, high-BC 7mm 180gr Berger Hybrid bullet. This 7mm Hybrid is probably the most popular projectile in use by top F-Class Open shooters. Yes, 7mm Hybrids are in stock now and ready to ship for $45.99 per 100.
Forster Co-Ax Reloading Press
Graf’s has the superb Forster Co-Ax Press in stock and ready to ship. This unique product is the “Cadillac of reloading presses”. Sizing and seating dies slide into universal jaws for quick die changes. The dies can also self-align in the press for reduced run-out on your loaded rounds. If you’ve been wanting a Co-Ax, grab one now as they can be hard to find between production runs.
Magnetospeed V3 Chronograph
Graf’s now sells the remarkable Third Generation Magnetospeed Chronograph. The original Magnetospeed was a “game-changer” in the shooting industry. This compact chrono attaches directly to your barrel so you don’t need to set up a tripod, and fiddle around aligning sky-screens or diffusers. You also don’t have to worry about putting a bullet hole (or two) in the middle of your chronograph. The latest “V3″ model Magnetospeed features an improved attachment system, an upgraded display/control module, plus software enhancements. And Magnetospeed now provides a rugged polymer case that holds the “bayonet” sensing unit, display module, and all other components. Price is $379.99
NOTE: All these prices include shipping with one $7.95 flat fee per order.
October 3rd, 2014
 Classic American battle rifles have regained popularity via M1 Garand matches, service rifle matches, the M1A Match at Camp Perry, and Vintage Sniper competitions. If you own a classic M1 Garand, or an M1A, the modern semi-auto descendant of the M14, you should enjoy the two videos presented here. With help from our friend Grant G., we managed to located two original U.S. Army training films, one for the M1 Garand, and one for the M14. Both films use clever animated drawings to show the gas guns’ internal operations and cycling processes. Classic American battle rifles have regained popularity via M1 Garand matches, service rifle matches, the M1A Match at Camp Perry, and Vintage Sniper competitions. If you own a classic M1 Garand, or an M1A, the modern semi-auto descendant of the M14, you should enjoy the two videos presented here. With help from our friend Grant G., we managed to located two original U.S. Army training films, one for the M1 Garand, and one for the M14. Both films use clever animated drawings to show the gas guns’ internal operations and cycling processes.
M1 Garand Training Film
Here is a U.S. Army training film for the M1 Garand (officially the United States Rifle, Caliber .30, M1). The M1 Garand was the first semi-automatic battle rifle to be generally issued to the infantry of a major nation, though other countries issued semi-auto rifles to special units. Gen. George S. Patton called the Garand “The greatest battle implement ever devised.”
Animated Diagrams Show M1 Garand Operational Cycle starting at 2:00-Minute Mark:
M14 Training Film
The successor to the M1 Garand was the M14. The 27-minute official U.S. Army video below demonstrates the operation of the M14. Field-stripping is shown from the 5:13 time-mark through 8:30. Cut-away drawings show the M14’s gas operation at 8:40.

The complete 8-step functioning cycle is demonstrated from the 9:25 time-mark through 22:41. These eight operations are: 1) Feeding; 2) Chambering; 3) Locking; 4) Firing; 5) Unlocking; 6) Extracting; 7) Ejecting; and 8) Cocking. This movie is fairly long, but fans of battle rifles will find it well worth their time. Every M1A owner should definitely watch this video start to finish.
Watch M14 Functioning Cycle Starting at 9:25 Mark:
October 3rd, 2014
 Swarovski has a new STR 80 spotting scope with an illuminated reticle. That’s right, this new STR 80 spotter has a ranging reticle like a riflescope, with adjustable brightness levels. This 80mm spotting scope can be used for estimating range to targets, using MIL-based or MOA-based stadia lines on the cross-hairs. This allows you to range targets optically, as you could with a ranging reticle in a riflescope. Swarovski has a new STR 80 spotting scope with an illuminated reticle. That’s right, this new STR 80 spotter has a ranging reticle like a riflescope, with adjustable brightness levels. This 80mm spotting scope can be used for estimating range to targets, using MIL-based or MOA-based stadia lines on the cross-hairs. This allows you to range targets optically, as you could with a ranging reticle in a riflescope.
Revolutionary Reticle “ON”, Reticle “OFF” Technology
The STR 80’s illuminated ranging reticle makes the new STR 80 a fairly unique product among high-end, imported spotting scopes. Thanks to a new technology, Swarovski is the first manufacturer to successfully project a reticle directly in a spotting scope. The reticle (MOA or MRAD) can be activated or deactivated as required. Notably, because the reticle appears via electro-illumination, it can be “turned off” for un-obstructed viewing. So you can have a totally clear field of view when desired, OR a ranging reticle when that functionality is desired. Having the ability to turn OFF the reticle is great — that’s a very intelligent feature.

When viewing targets, the STR 80’s sharp HD (high-definition) lenses will resolve bullet holes at long range. Current Swaro 20-60X and 25-50X (wide) eyepieces can be used with the new STR 80 spotter. Optional accessories include Picatinny mounting rail, digiscoping attachment, and a winged eye cup.
How to Range with STR 80 Reticles
The new STR 80 scope offers a choice of either MOA or MRAD reticles with 15 brightness levels, 10 day levels, and 5 night levels. For convenient ranging, set the magnification level so that the MOA reticle displays ¼ MOA divisions, while the MRAD Reticle displays 0.1 MIL divisions. (NOTE: the reticle will change in size relative to the target at different magnifcation levels. Therefore ranging is normally done at one standard magnification level).

Dustin Woods, Sales Director for Swarovski Optik NA said: “Long range shooters asked for a premium spotting scope with integrated reticle and we have listened. With our new STR spotting scope we now have MOA and Mil-Radian reticle models. Because the reticle is illuminated, the user can have the reticle turned on when they are judging hits and misses but also turn it completely off for an unobstructed view during observation. This product is a real game changer in the precision shooting segment.”
October 3rd, 2014
 We’re just a week away from the Western CMP Games and Creedmoor Cup. This big event will be held at the Ben Avery Shooting Facility in Phoenix, Arizona, on 10-19 October 2014. The Western CMP Games Matches run 10-14 October 2014. The Creedmoor Cup Matches take place on 15-19 October 2014. All interested shooters are invited to participate in these prestigious competitions. We’re just a week away from the Western CMP Games and Creedmoor Cup. This big event will be held at the Ben Avery Shooting Facility in Phoenix, Arizona, on 10-19 October 2014. The Western CMP Games Matches run 10-14 October 2014. The Creedmoor Cup Matches take place on 15-19 October 2014. All interested shooters are invited to participate in these prestigious competitions.
If you are wondering what the fuss is all about, here’s a great Slide Show featuring images from the 2013 CMP Games and Creedmoor Cup. This slide show features photos by some of our Forum members. How many of your buddies do you recognize in the photos?
Western CMP Games Entry Form | Western CMP Games Online Registration
Western CMP Games & Creedmoor Cup Program | Directions to Ben Avery Range
Click Arrow at lower left to start slide show (with music):

October 2nd, 2014
When does a scope cost as much as a new Harley-Davidson? When it is a top-of-the-line 72mm Hensoldt (by Zeiss). The remarkable Hensoldt ZF 6-24x72mm SAM scope integrates ultra-bright apochromatic fluorite glass with a calculator module that provides ballistic info and weather data to the shooter. This 6-24x72mm SAM Hensoldt may be the most advanced riflescope on the planet. With a street price of $11,982.00, it is certainly one of the most expensive. Take a 360° tour with this cool video from Hensoldt Zeiss.
Please enable Javascript and Flash to view this VideoPress video.
Hensoldt ZF 6-24x72mm SAM
SAM stands for “Sniper Auxiliary Module”. An integrated ballistics calculator can be programmed for up to four different types of ammo. Sensors in the integrated ring mount measure weather parameters. These values, as well as scope data, are then directly projected into the visual field of the eyepiece. This provides selectable displays of elevation clicks, windage clicks, angle of fire, cant angle, temperature, and air pressure.


October 2nd, 2014
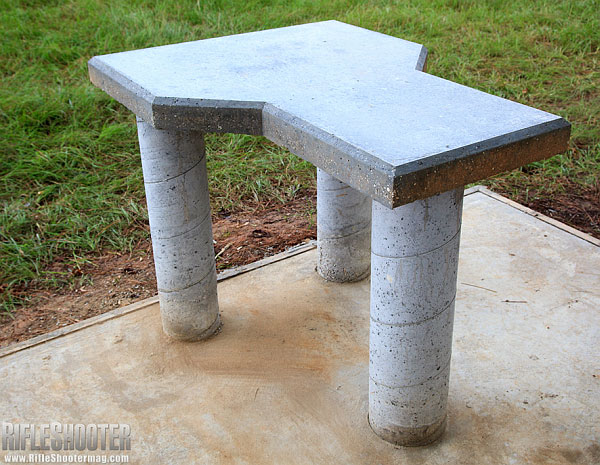
Who hasn’t dreamed of having a professional-quality permanent shooting bench on their own property? Well here’s an article that can help you make that dream come true. The latest online edition of RifleShooter Magazine shows how to build a quality concrete shooting bench step-by-step.

All aspects of the construction process are illustrated and explained. The author, Keith Wood explains: “Construction happened in three phases — first creating the slab foundation, then the support pillars (legs), and finally the table.”
Click image below to load article with slide show.

Each step in the process is illustrated with a large photo and descriptive paragraph. Starting with framing the foundation (Step 1), the article illustrates and explains the 15 Steps that produce the finished, all-concrete bench, shown below.
October 1st, 2014
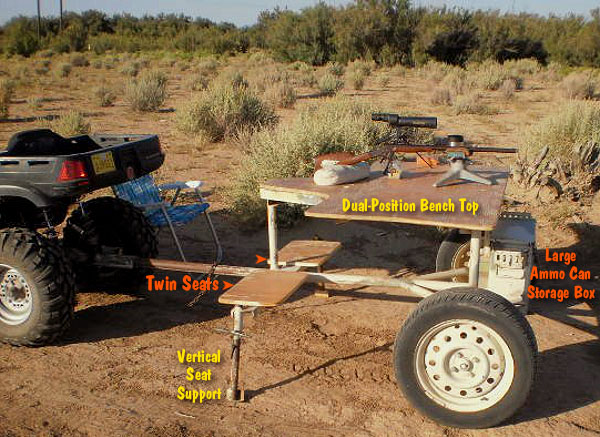
In our Shooters’ Forum thread about Portable Shooting Benches, Forum member John H. of New Mexico (aka “Skratch”) showed off a nicely-crafted mobile shooting bench that he can haul with his ATV. This trailer-mounted, movable bench is built on a central tubular spine that also serves as the tongue for the trailer, which attaches to a standard hitch. The bench offers two (2) shooting positions so it works for both left-handed and right-handed shooters.

Up front, for storage, a surplus .50-Cal ammo can is secured to the trailer frame. The V-shaped middle section of the wood benchtop looks to be reinforced with a metal stiffener frame on the underside. The front section of the bench is supported by twin tubular uprights attached to the box-section axle housing. The two wooden bench-style seats (on left and right) ride on a cross-tube. At the ends of that cross-tube are adjustable legs for additional support.
Great Rig for New Mexico Varmint Hunting
There are plenty of great varmint hunting areas in Skratch’s home state of New Mexico — you’ll find some huge prairie dog fields there. But to get the best results on a varmint-hunting field session, you need a solid shooting station that can be easily hauled to new locations as needed. It looks like John (aka “Scratch”) has come up with an outstanding “War Wagon” for his New Mexico varmint safaris.
Click on image frames to see full-size photos
Some readers wanted to know how John’s War Wagon is positioned in the field and if it is ever detached from John’s ATV. John answers: “We do unhook the 4-wheeler for target-checking unless we have an extra along which is usually the case. That way we can level the table front to rear. We have an umbrella from a patio table to provide shade on extra warm days.”
|


