Do you think your borescope is a state-of-the-art bore inspection device? Well think again. There is now something way more advanced than any optical borescope. A new laser-equipped scanning device can map the entire interior surface of a barrel bore. With this new technology you can now examine every land and every groove, millimeter by millimeter, from the chamber to the tip of the muzzle. The most minute flaw in a barrel can now be revealed.
The new device is called the BEMIS-SC™ (for Barrel Inspection Machine Small Caliber). Operated by Chesapeake Testing and Laser Techniques Company (LTC), BEMIS-SC performs non-destructive laser-based mapping of gun bores. The BEMIS-SC currently works with .22 caliber to .50 caliber (5.56 – 12.7 mm) barrels. The BEMIS captures thousands of highly accurate data points over the full length of a barrel. The inspection can be completed in mere minutes, with scan results displayed in graphical, tabular, and 3D visual formats. Here is a barrel cross-section, as scanned by the BEMIS-SC:
Click for Full-Screen Version
Until the 1980s, gun tube inspection had to be conducted by hand using a manual “star” gauge, a process that would take hours and provide minimal data. Electronic gauges were eventually developed along with the video bore scope, but these systems were still limited to very few, low-resolution data points. That has all changed with the BEMIS™, a huge leap forward in technology that is capable of rapidly capturing thousands of precise data points.
Chesapeake Testing commenced BEMIS-SC barrel inspection services in September 2014. Testing is performed in Chesapeake’s commercial barrel inspection laboratory, located in Belcamp, MD, minutes from the U.S. Army Aberdeen Proving Ground. While testing is currently limited to .22 to .50 caliber barrels, Chesapeake Testing will accommodate both smaller and larger calibers in the future.
“We have always focused on building our company around very unique technologies. BEMIS™ has changed the industry in regards to the inspection of weapon systems. We are excited to be an exclusive partner with LTC in this industry and look forward to contributing to the future of this technology,” says Jim Foulk, founder and president of Chesapeake Testing.
Frank Galli, aka “Lowlight”, runs the popular SnipersHide.com website. A while back, Frank completed a gunsmithing course with Robert Gradous. Frank recounts the learning process in an informative, nicely-illustrated article on the ‘Hide. Frank explains how he put together a new 6.5 Creedmoor tactical rifle using a Bartlein barrel, Bighorn Action (Rem clone with floating bolt-head), and a “lightly used” Accuracy International 1.5 chassis. The HD video below shows the process start-to-finish. READ Full Article.
During Frank’s “hands-on” training sessions with Gradous, Frank learned to thread and chamber a barrel, fit a recoil lug, and install the barreled action in the AI chassis. Chambering was done with great care: “We spent the better part of the day working the barrel. I feel this is a critical component and seeing the attention to detail in Robert’s approach confirmed it for me. When it came time to chamber Robert had a custom tight chamber reamer there for a 6.5CM but I’m shooting a tactical rifle, tight chambers aren’t for me, and this was clear, as out came the standard SAAMI reamer.”
Frank also learned how to modify an aluminum chassis: “the AI chassis had the recoil lug opened up, but it was opened in the wrong direction. This was going to require milling increasing the gap to at least a 1/2″ in size. Robert was really leery of this, but my attitude was, ‘it’s just a chassis and nothing a little Marine Tex can’t handle’.” Thankfully the chassis mod came out OK.
Once the barreled action was complete and the AI chassis was successfully milled, Frank applied a tan Cerakote finish to the barreled action. This would give a proper tactical look to the rifle, while providing superior corrosion resistance for the metal parts. To learn more about Cerakote finishing, check out the Cerakote Application Video, published last week in the Daily Bulletin.
When the rifle was complete, Frank took it out for testing with a variety of ammo, both factory fodder and handloads. There were some initial worries about accuracy as it took a while for the barrel to break in. A few sessions of bore cleaning were required before the barrel stopped fouling and then — like magic — the rifle started printing really small groups.
By the end of his load testing session, Frank was getting good groups with Hornady 120gr GMX factory 6.5 Creedmoor ammo, and really superb groups with handloads. The 120gr GMX ammo “was going 3100 fps with no ill effects”. The best handloads were approaching 1/4 MOA for three shots, and Frank’s load with Berger 130 VLDs shot even smaller than that: “In my opinion the load development we did was worth its weight in gold. Where else can you build in a rifle in two days, then go out and develop a baseline load using everything from 120gr ammo to 140gr ammo with a few in between? My favorite load and clearly the rifle’s too, was the [Berger] 130gr VLD. This gave us great velocity, awesome groups [with some one-holers] and really nice results at distance.”
Lowlight’s Gunsmithing Story is a ‘Must-Read’
We recommend you read Frank’s story. It shows that, with the right tools, and the supervision of a master smith, even a novice can produce an ultra-accurate rifle. For those of you who have considered taking a gunsmithing class, Frank’s successful experience with gunsmith Robert Gradous should give you plenty of motivation.
Would you like to see an image you photographed on the cover of Shooting Sports USA? If you’ve snapped a great shooting-related photo, you could be honored with the cover shot for the SSUSA December issue. 2014 marks Shooting Sports USA’s second year for the December cover shot contest. Both professionals and amateur photographers may participate as long as reproduction rights are given to NRA. Shown below are the ‘Top Shots’ from 2013, i.e. last year’s finalist photos.
Contest Entry Rules and Guidelines
Contest entrants should submit one or two high resolution (300 dpi or greater) photos of youth shooting sports, famous shooting athletes, or shooters in action. Provide a caption for each image. Note: if your image shows shooters on the firing line, the shooters should be wearing ear and protection. Images should be vertically oriented to fit the cover format and color photos are preferred. The magazine’s editors will consider all submissions and pick one for the December cover of Shooting Sports USA magazine. E-mail submissions to: shootingsportsusa [at] nrahq.org.
Forum member Erick C. (aka cncmill) has produced a very nice laminated stock featuring wood inlays. A tool and die maker from Pennsylvania, Erick is justifiably proud of his handiwork. Erick tells us: “Here is my latest build — just finished. The rifle features a Kelbly’s Atlas action, with Hawk Hill custom barrel chambered for the .284 Winchester. The stock is made from three types of wood: Birdseye Maple, African Padauk wood, and Wenge wood (for the dark stripes).” Erick explained that the Wenge inlays served a useful (as well as aesthetic) purpose: “I put the Wenge stripes in to fix two cracks in the Birdseye Maple. I was not sure about it at the time but it turned out well.”
Home-built Laminated Stock features three different woods.
Stock before final finishing.
Detail of Fore-End.
If you like this example of rifle-building, check out the ‘Pride and Joy’ thread in the AccurateShooter Forum to see other “home-built” project guns.
Here’s a new, versatile target stand system from CTK Precision. The P3 Ultimate Target Stand, which combines CTK-supplied clamping plates with wood furring strips, can adjust to almost any size or shape of target. Because the clamping plates (brackets) are readily removed, your entire target frame can easily break down into small units for ease of transport. CTK’s kits include all the metal parts. You supply the wood (which can be purchased at home supply stores.)
• The 24″ angled legs provide a solid 4-point stance on any terrain. Legs can be pushed into the ground to further stabilize the stand. The 3.5″ main beam height allows use of extra sandbag ballast.
• Adjustable from 5″ to many feet wide, this system can handle just about any paper or cardboard target. Bottle holders are optional.
• Clamping plates (with large tightening knobs) grip furring strips firmly over a large area.
Video Shows CTK Target Frame Components and Use with Optional Bottle Holders.
CTK’s P3 Ultimate Target Stand can be adjusted to accommodate paper and cardboard targets of virtually any size. It sets up and breaks down in seconds, with no tools required. The system is crafted in the USA from from strong 14 gauge tubing and 3/8″ rod.
Forum member Rick Curtis, a shooter from the Phoenix area, put together an interesting video showing some of the F-Class shooters at a recent club match at the Ben Avery Shooting Facility. Rick notes: “As you can see (hear) at the beginning of the video the first relay was fired in a ‘frisky’ headwind.” (Don’t worry about the awful wind noise — it moderates 35 seconds into the video.) It is interesting to see the different shooting styles, and the wide variety of hardware on the line.
Watch F-Class Shooting Video from Ben Avery Range in Phoenix, AZ
One fellow who watched the video made an interesting comment: “A couple of those shooters sure do a lot of moving around before and after the shot. I shoot sling and jacket and definitely try to minimize my movement. Is minimizing movement as important in F-Class?”
Rick Curtis replied: “I sent some of the individual videos back to the shooters who were in them with some recommendations that included minimizing movement, spotting scope placement, shot routine suggestions and a few other observations.”
Need to find an FFL near you (or near a destination to which you’ll be traveling)? Then check out this handy FFL Finder app from Huntgeek.com. This easy-to-use, inexpensive iPhone App locates FFLs throughout the country. FFL Finder sells for just 99 cents ($0.99) on the iTunes store.
With FFL Finder, you instantly get mapped results of FFL holders near your location (via GPS) or by selecting an area on a map. You can quickly find a variety of nearby FFLs you can contact to compare their transfer rates and policies. If you need to ship a gun out of state, the program quickly finds an FFL who can receive the firearm. And if you are traveling away from home for a match, or a hunting trip, the App can find locations where you can obtain ammo, supplies, and replacement parts. That’s reassuring. Imagine you are traveling and your firearm breaks, or your optics fail, so you need spare parts or a new scope immediately. The FFL Finder App can help you source what you need.
MIL or MOA — which angular measuring system is better for target ranging (and hold-offs)? In a recent article on his PrecisionRifleBlog.com website, Cal Zant tackles that question. Analyzing the pros and cons of each, Zant concludes that both systems work well, provided you have compatible click values on your scope. Zant does note that a 1/4 MOA division is “slightly more precise” than 1/10th mil, but that’s really not a big deal: “Technically, 1/4 MOA clicks provide a little finer adjustments than 1/10 MIL. This difference is very slight… it only equates to 0.1″ difference in adjustments at 100 yards or 1″ at 1,000 yards[.]” Zant adds that, in practical terms, both 1/4-MOA clicks and 1/10th-MIL clicks work well in the field: “Most shooters agree that 1/4 MOA or 1/10 MIL are both right around that sweet spot.”
Zant does note that a whopping 94% of shooters in the Precision Rifle Series (PRS) used a mil-based reticle. However, Zant says: “This does NOT mean MIL is better. It just means MIL-based scopes are more popular.” Zant agrees with Bryan Litz’s take on the subject: “You can’t really go wrong with either (MIL or MOA). They’re both equally effective, it comes down to how well you know the system. If you’re comfortable with MOA, I wouldn’t recommend switching to MIL. I have a few MIL scopes but primarily because they’re on rifles used for military evaluation projects, and that community is now mostly converted to MILS, so when in Rome….”
We recommend you read Zant’s complete article which is very thorough and is illustrated with helpful graphics. Here are the key points Zant makes in his MIL vs. MOA analysis:
MIL vs. MOA — Key Points
There are a handful of minor differences/trade-offs between MIL & MOA, but there are no inherent advantage to either system. Most people blow the small differences WAY out of proportion….Here are the biggest differences and things to keep in mind:
Whatever you decide, go with matching turret/reticle (i.e. MIL/MIL or MOA/MOA)
1/4 MOA adjustments are slightly more precise than 1/10 MIL.
MIL values are slightly easier to communicate.
If you think in yards/inches the math for range estimation is easier with MOA. If you think in meters/cm the math is easier with MIL.
When your shooting partners are using one system, there can be some advantage to having the same system.
Around 90% of the PRS competitors use MIL.
There are more product options (with ranging reticles) in MIL.
Range Card Print-Outs
Zant makes an interesting practical point regarding range card print-outs. He suggests the MIL System may be easier to read: “You can see in the range card examples below, 1/4 MOA adjustments take up more room and are a little harder to read than 1/10 MIL adjustments.”
The digital archives of Shooting Sports USA feature an interview with Olympic smallbore shooter Lones Wigger. This constitutes the third and final part in a series by Jock Elliott on pressure during a match and the methods top shooters use to handle their nerves.Read Part I | Read Part II.
The Fine Art of Not Cracking Under Pressure – Part III
by Lones Wigger, Smallbore Rifle Olympic Medalist
It’s pretty complicated — this subject of dealing with pressure. I’m a precision shooter and have learned to excel in that discipline. You’ve got to learn to shoot the desired scores at home and in training. And once you’re capable of shooting the scores, you may not shoot the same way in the match because of the match pressure. As a result, it takes 3-4 years to learn how to shoot, and another 3-4 years to learn how to win — to deal with the match pressure. It takes several more years to learn how to do it when it counts.
To win, there are several things you have to learn how to do. You have to do it from within. You have to learn how to train just as if you were in a big competition. You work on every shot. You have got to learn to treat it just like a match — to get the maximum value out of every shot. You have got to use the same technique in practice and in training. A lot of shooters have a problem because they change their technique from practice to the match. In competition, you work your ass off for every shot. You have to approach the training the same way.
A second way to combat pressure is to shoot in every competition you can get into so that you become accustomed to it.
Do Everything Possible to Prepare
The third technique is preparation. Before you are going to shoot in a big competition, train hard to do everything you can to raise your scores. So when you’re in the match, you know that you have done everything humanly possible to get ready for the competition. If you have self-doubt, you will not shoot well. You have to have the will to prepare to win.
When Gary Anderson was a kid, he couldn’t afford a gun or ammunition. He had read about the great Soviet shooters. With his single shot rifle, he would get into position, point that gun and dry fi re for hours at a time in the three different positions. He had tremendous desire. He wanted to win and he did whatever he could to get there. When he finally got into competition, he shot fantastic scores from the beginning.
Visualize Winning to Train the Subconscious Mind
A little bit of psychology: You picture in your mind what you want to do. You have to say, OK, I’m going to the Olympics and perform well. Picture yourself shooting a great score and how good it feels. You are training your subconscious mind. Once you get it trained, it takes over. A coach taught me to visualize the outcome, and it worked. Eventually you train your subconscious and it believes you can win. At first I didn’t know about teaching the subconscious to take over, but now I do it all the time. And it certainly worked for me at the 1972 Olympics. What it really takes is training and doing the same thing in training as at a match. If you are “just shooting,” you are wasting your time. READ MORE….
CLICK HERE to READ FULL ARTICLE featuring interviews with Brian Zins, Bruce Piatt, Carl Bernosky and Ernie Vande Zande. (Article take some time to load.)
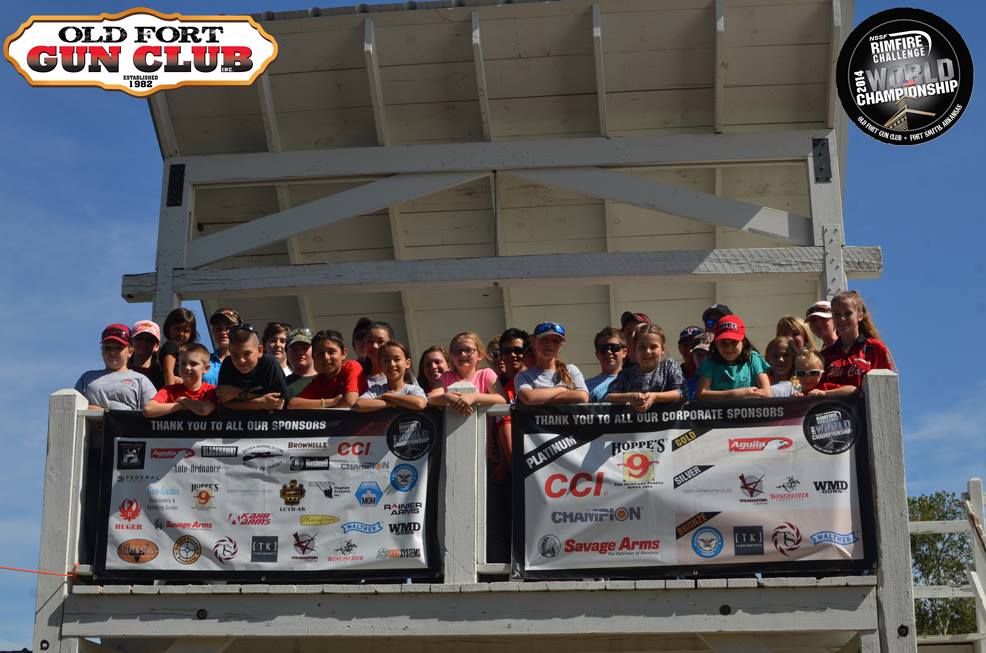
This is the kind of shooting match we like to see — with competitors of all ages having fun without having to shell out gobs of hard-earned money. More than 170 shooters competed at the NSSF Rimfire Challenge World Championship, held this past weekend (October 3-5) at the Old Fort Gun Club in Fort Smith, Arkansas. (Notably, that is ten more competitors than attended the much-ballyhooed Trijicon World Shooting Championships last month.) And, for many competitors, the Rimfire Challenge was very much a family affair — with mom, dad, and the kids all joining in the fun.
Kids Having Fun — Youth Competitors at NSSF Rimfire Challenge World Championship.
Rimfire Challenge attendance was up 60 percent this year compared to 2013. Shooters ranged in age from seven years to 83 years, with a big turn-out of junior (age 13-17) and youth (12 and under) shooters. “We are extremely pleased at the caliber of sportsmanship and camaraderie shown at Old Fort Gun Club this weekend,” said Zach Snow, NSSF Manager of Shooting Promotions. “Entire families traveled from all across the country to be here. It’s exactly this kind of supportive and family-friendly atmosphere that makes the Rimfire Challenge what it is: fun for everyone.”
B.J. Norris walked away with the top prize of World Champion. Shooting in the Open Division, Norris’ total time over the more than a dozen stages was 161.11 seconds. In second place overall was young Caleb Partch of Missouri. Caleb also won the Junior Open Division. Wayne Seale was the top Limited Division Shooter. Top Lady Shooters were Cassie Beahr of Iowa (Open) and Cheyenne Dalton (Limited and Junior). CLICK HERE for complete match results.


 The new device is called the BEMIS-SC™ (for Barrel Inspection Machine Small Caliber). Operated by Chesapeake Testing and Laser Techniques Company (LTC), BEMIS-SC performs non-destructive laser-based mapping of gun bores. The BEMIS-SC currently works with .22 caliber to .50 caliber (5.56 – 12.7 mm) barrels. The BEMIS captures thousands of highly accurate data points over the full length of a barrel. The inspection can be completed in mere minutes, with scan results displayed in graphical, tabular, and 3D visual formats. Here is a barrel cross-section, as scanned by the BEMIS-SC:
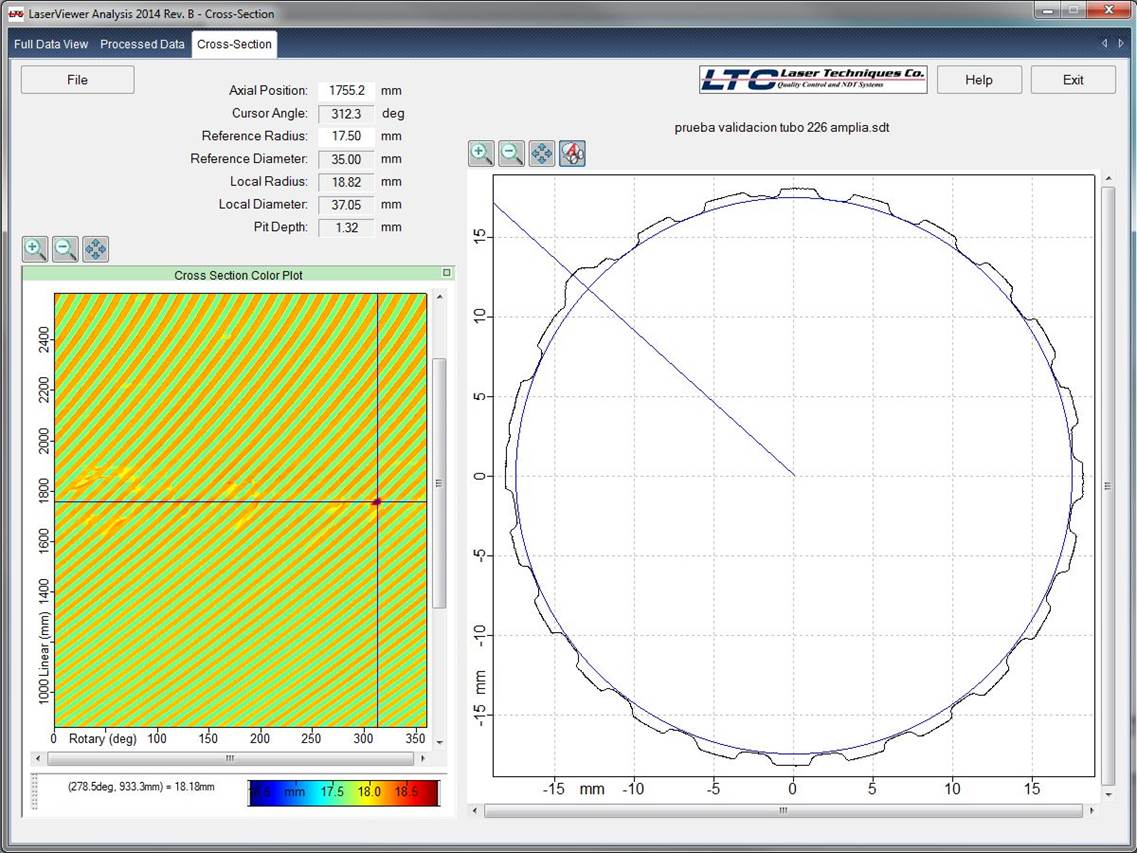


 Once the barreled action was complete and the AI chassis was successfully milled, Frank applied a tan Cerakote finish to the barreled action. This would give a proper tactical look to the rifle, while providing superior corrosion resistance for the metal parts. To learn more about Cerakote finishing, check out the
  By the end of his load testing session, Frank was getting good groups with Hornady 120gr GMX factory 6.5 Creedmoor ammo, and really superb groups with handloads. The 120gr GMX ammo “was going 3100 fps with no ill effects”. The best handloads were approaching 1/4 MOA for three shots, and Frank’s load with Berger 130 VLDs shot even smaller than that: “In my opinion the load development we did was worth its weight in gold. Where else can you build in a rifle in two days, then go out and develop a baseline load using everything from 120gr ammo to 140gr ammo with a few in between? My favorite load and clearly the rifle’s too, was the [Berger] 130gr VLD. This gave us great velocity, awesome groups [with some one-holers] and really nice results at distance.”


 Contest Entry Rules and Guidelines


 Here’s a new, versatile
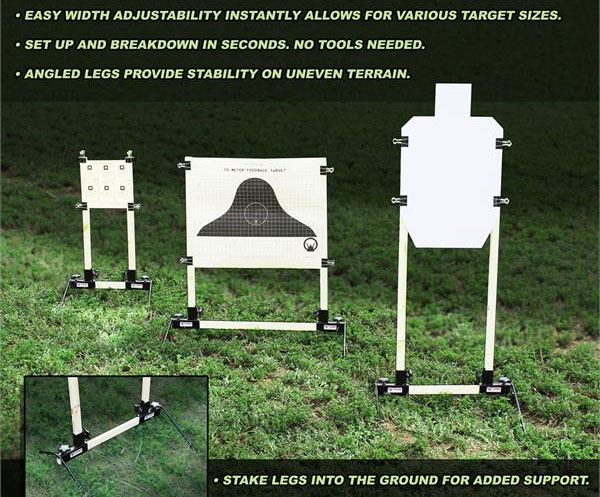


 It’s pretty complicated — this subject of dealing with pressure. I’m a precision shooter and have learned to excel in that discipline. You’ve got to learn to shoot the desired scores at home and in training. And once you’re capable of shooting the scores, you may not shoot the same way in the match because of the match pressure. As a result, it takes 3-4 years to learn how to shoot, and another 3-4 years to learn how to win — to deal with the match pressure. It takes several more years to learn how to do it when it counts.