by Tony Chow
In recent years, the use of electronic trainer systems has revolutionized training in all disciplines of position shooting. By capturing (and illustrating) key performance variables like the steadiness of a shooter’s hold, accuracy of aiming, and the timeliness of trigger release, these devices can offer tremendous insights into the strengths and weakness of a shooter’s position and technique, making high-level marksmanship training less voodoo and more of a science.
Until now, electronic trainers all suffered from one critical limitation: the inability to be used outdoors in live fire training. Now, however, SCATT has introduced the next-generation MX-02 electronic trainer, a product that can finally support outdoor live firing in broad daylight, as well as dry firing indoors. In addition, the MX-02 is the first electronic trainer to support centerfire rifles. It goes without saying that, when we at AccurateShooter.com were offered an MX-02 test unit to review, we jumped at the opportunity.
How the SCATT MX-02 Works
The SCATT sensor mounted on the end of the barrel has a digital camera that “sees” the black bullseye in the target, even in broad daylight outdoors. Using the bullseye as a reference, the SCATT software tracks the movement of the muzzle relative to the center of the target. The unit can plot these movements as a continuous trace, which appears on a monitor as a squiggly, colored line. Data points from the trace are also available in a tabular spreadsheet format. This allows the shooter to “crunch the numbers”, revealing strengths and weaknesses in his gun-handling and aiming technique.
In our testing, we confirmed that, like SCATT’s earlier indoor-only WS-01, the MX-02 offers excellent support for indoor dry-fire training, which will continue to be the primary means through which position shooters sharpen their fundamental skills. Since the new SCATT uses the same familiar Windows software for data capture and analysis as its predecessors, shooters and coaches upgrading to MX-02 will have no learning curve to overcome, and newcomers to the SCATT platform can tap into the wealth of institutional knowledge accumulated over the years by the shooting community on how to interpret shot data.
It’s in the support for outdoor live firing, however, that SCATT MX-02 distinguishes itself from its predecessors and the competition. Shot trace data captured by MX-02 during live firing turned out to be every bit as valuable (and revealing) as we had hoped. The ability to correlate SCATT tracing with real shots on target gave us a better understanding of the shooting process, and helped the reviewer, already a high-level smallbore prone shooter, uncover a significant problem in his shooting. SCATT MX-02’s outdoor capability is therefore an invaluable feature, particularly for experienced shooters aspiring to world-class performance.
In summary, SCATT MX-02 is an outstanding product that delivers on its promises. We heartily recommend it, both for first-time users of electronic training aids, and also for those shooters who may wish to upgrade their current electronic training system. The MSRP for SCATT MX-02 is $1,799, $500 more than its predecessor, the SCATT WS-01, which is still available. In my view, the $500 premium for the MX-02 is justified by the MX-02’s enhanced capabilities, making it a better long-term investment.
Our complete, 3600-word MX-02 review of the SCATT MX-02 can be accessed through the link below. This full review contains many more photos plus detailed field test results. For the time being, the review only covers our experience with the product in smallbore shooting. An upcoming addendum to the review will include test results from centerfire shooting. Those attending SHOT Show in Las Vegas next week can examine SCATT MX-02 in person. SCATT will have the MX-02 on display at Booth 111.
Hey it’s the end of the work week, so we thought you guys might enjoy a little display of honest-to-goodness American .50-Cal firepower. Today’s video features the General Dynamics GAU-19/B Gatling, shown in a vehicle mount (Part 1) and helicopter side-mount (Part 2). The HumVee-mounted version of this bad boy delivers 1300 rounds per minute of .50 BMG ammo. The effect is awesome to behold. We wouldn’t want to be on the receiving end of a GAU. The original GAU-19/A had a selectable rate of fire — either 1,000 or 2,000 rounds per minute. The GAU-19/B, introduced in 2012, provides the same firepower in a much lighter platform, weighing 106 pounds (not counting ammo storage systems).
Never had a chance to hunt prairie dogs in the American west? Then check out this video. Dan Eigen (aka “Walleye Dan”), host of the We Love It Outdoors Television series, head to South Dakota for some varmint hunting. Dan teams up with Varmint Hunter Association President Jeff Rheborg to patrol some South Dakota Dogtowns where things get serious. In the video, you’ll see p-dog hits at distances from 70 yards to roughly 450 yards. The hunters were shooting from portable, wood-topped swivel rests, using AR-platform rifles on X-type sandbag rest. (Rifle zeroing session is shown at the 5:30+ mark.)
Multiple cameras were employed so you can see both the shooter’s POV and close-ups of the prairie dogs downrange. Watch the shooters having fun with a prairie dog cut-out and some Tannerite at the 9:00-minute mark. This guys are having a grand old time sending critters to Prairie Dog Heaven — we think you’ll enjoy the video.
Prairie Dog Hunting Starts at 2:00 Time-Mark in Video:
NOTE: This video actually covers three sequences: 1) Three-gun training; 2) Prairie Dog Hunting; and 3) Coyote Hunting. We’ve embedded the video so it plays back the Prairie Dog segment from 2:00 to 15:15. If you wish, you can slide the controls forward or back to watch the other segments.
Video found by EdLongrange. We welcome reader submissions.
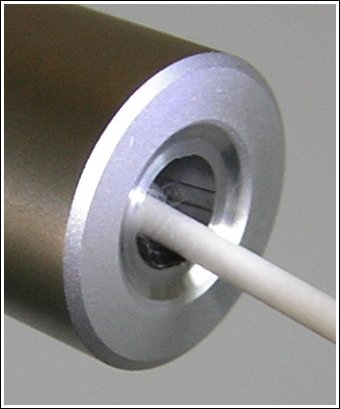
The last half-inch or so of your barrel is absolutely critical. Any damage (or abnormal wear) near the crown will cause a significant drop-off in accuracy. Here are ways you can check the end of your barrel, using a common Q-Tip.
Use Q-Tip for Barrel Inspection To find out if you have a burr or damage to your crown, you can use an ordinary Q-tip cotton swab. Check the edges of the crown by pulling the Q-tip gently out past the edge of the crown. If you have a burr, it will “grab” the cotton and leave strands behind.
Larry Willis has another way to use a Q-Tip: “Here’s a neat trick that will surprise you with how well it works.” Just insert a Q-Tip into your barrel (like the picture below), and it will reflect enough light so that you can get a real good look at the last half inch of rifling and the crown of your barrel. In most cases you’ll find that this works much better than a flashlight. Larry tells us: “I’ve used this method about a jillion times. Q-Tips are handy to keep in your cleaning supplies anyway. This is a good way to judge approximately how well you are cleaning your barrel when you’re at the range. It’s also the best way to examine your barrel when you’re in the field.”
Readers who have just recently discovered the Daily Bulletin may not realize that AccurateShooter.com has hundreds of reference articles in our archives. These authoritative articles are divided into mutiple categories, so you can easily view stories by topic (such as competition, tactical, rimfire, optics, shooting skills etc.). One of the most popular categories is our Technical Articles Collection. On a handy index page (with thumbnails for every story), you’ll find over 100 articles covering technical and gunsmithing topics. These articles can help you with major projects (such as stock painting), and they can also help you build more accurate ammo. Here are five popular selections from our Technical Articles archive.
Complete Precision Case Prep. Jake Gottfredson covers the complete case prep process, including brass weight sorting, case trimming, primer pocket uniforming, neck-sizing, and, case-neck turning.
Stress-Free Pillar Bedding. Richard Franklin explains how to do a top-quality bedding job, start to finish.
OnTarget Software Review. Our Editors test free software that measures shot groups with great precision. We explain how to use the program and configure advanced features.
Savage Action Tuning. Top F-TR shooter Stan Pate explains how to enhance the performance of your Savage rifle by optimizing the torque settings of the action screws.
Stock Painting Instructions. Step-by-step guide for stock painting by expert Mike Ricklefs. Mike shows both simple coverage and fancy effects.
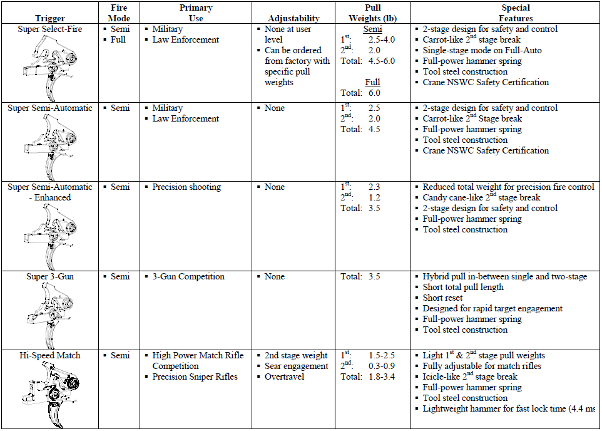
Geissele Automatics manufactures a line of two-stage triggers favored by top Service Rifle, High Power, and 3-Gun shooters. Geissele now offers a variety of trigger models for both large-pin and small-pin lowers, with pull weights from 1.8 lbs to 6.0 lbs. You select the Geissele trigger with the appropriate first and second stage pull for your discipline (refer to chart below for trigger model specs).
Video Shows Geiselle Trigger Installation in AR15
Our friend Gavin Gear of UltimateReloader.com has crafted a video showing how to install a Geissele National Match Trigger in an AR15. This video covers installation of the trigger assembly, the trigger guard, the safety selector lever assembly, and the pistol grip.
AR15 Trigger Installation Video
Follow-Up Video for AR10 Trigger Install
Gavin recently released a follow-up video which covers the installation of a Geissele Super Dynamic Trigger in an AR10. The procedure is mostly the same as for the AR15, but this video also covers removal of the AR10 factory trigger, so it’s worth watching. You may want to turn the volume down on your computer’s speakers before playback. CLICK HERE for Geissele Trigger Instruction Manual
This is a grim tale. A man almost lost the use of his right hand, and did suffer terrible injuries to his fingers. All because he picked the wrong bottle of powder off the shelf.
Similar Labels, Disasterous Consequences
The shooter, Denny K., was assembling some rounds for his brand new 7mm-08 Savage hunting rifle. He thought he was loading with Hodgdon Varget. Instead he had filled his powder measure with Hodgdon TiteGroup, a fast-burning pistol powder. The labels are similar, so the mistake is understandable. But the results were devastating. Here’s what 41 grains of TiteGroup can do in a 7mm-08:
Posting on the Firing Line, in a thread entitled “Lucky to Be Alive”, Denny writes:
“This is the hardest post to post. I know if I had read it a week ago my comment would have been: ‘You have no business reloading’. I had everything perfect, except pouring the wrong powder in the powder measure. I type this slowly with my left hand, embarrassed but … possibly saving someone else a tragedy or, like me, a long drive to the Emergency Room and surgery to save my finger.”
The Still-Sealed Bottle of Varget
Denny did not initially comprehend exactly why the kaboom happened. He thought maybe his new Savage rifle was at fault. Then, on his return home, he discovered something…
Denny wrote: “The seven-hour period it took to go to ER, transport to Trauma Center and surgery made me think it was a Savage rifle issue. Brand new rifle, new brass, triple-checked loading data. The next day I was humbled when I realized the Varget powder was still sealed.
I knew what powder to use. I thought [Varget] was what I used. Not until the following day did I realize the Varget was still sealed.”
At that point, Denny realized what caused the accident — “operator error”. He knew he had to warn others about using the wrong powder: “I knew I needed to share my mistake, even though it is embarrassing, just to remind people. I’ve been reloading for 30 years…”
Editor’s Comment: Denny was not a novice reloader. His experience demonstrates that this kind of mistake can be made by any hand-loader, even one with decades of experience. Be safe guys, take your time when you load your ammo. Remove powders from measures after your loading sessions (pistol powders can look very similar to rifle powders). And by all means CHECK the LABEL on the jug. As the TiteGroup label says: “A little goes a long way.”
It’s not a bad idea to separate your pistol powders from your rifle powders, or perhaps even load for pistol in a separate part of your workshop.
At the request of our readers, we provide select “Deals of the Week”. Every Monday morning we offer our Bargain selections. Here are some of the best deals on firearms, hardware, reloading components, and shooting accessories. Be aware that sale prices are subject to change, and once clearance inventory is sold, it’s gone for good. You snooze you lose.
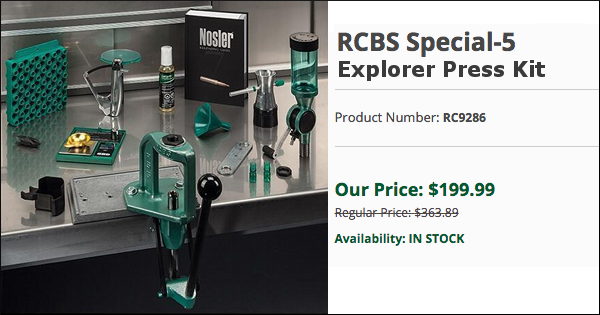
1. Natchez — Special 5 Reloading Press Kit, $199.99
This is an excellent entry-level reloading kit, which is on sale for $199.99 at Natchez Shooters Supply. We like the relatively compact Special 5 press for most reloading duties. Eventually you many want to add an additional large heavy press, but this will get the job done. This kit includes an RCBS Powder Measure, Digital Scale, Powder Trickler, Hand Priming Tool, Load Manual, Loading Tray, and more. It’s hard to beat this combination of tools for under $200.00.
2. CDNN Sports — Remington 597 for $149.99
Looking for a “first rifle” for a family member? Consider this semi-auto Remington 597. It currently retails for just $149.99. That’s right, for under $150 you can get a reliable, self-feeding rimfire rifle that will provide years of fun for a young shooter. The 597 has a stock that’s sized right for both youngsters and adults. Receivers are dovetailed for standard rimfire rings and are also drilled and tapped to allow mounting of Weaver-style bases.
3. Grafs.com — Forster Co-Ax Reloading Press on SALE
If you’ve been patiently waiting to acquire a Forster Co-Ax® reloading press, now’s the time to strike. Grafs.com has Co-Ax presses on sale this week at $289.99. That includes shipping charges (with one flat $7.95 handling charge per order).
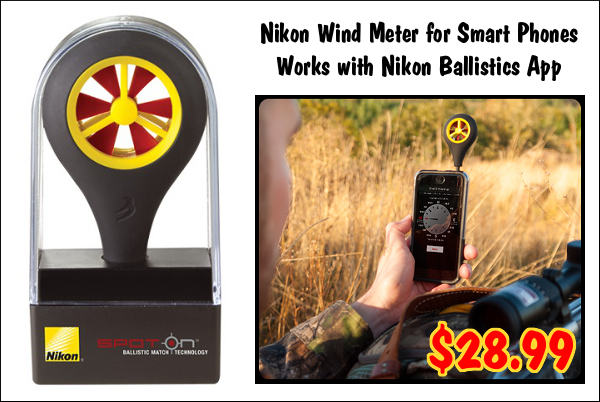
4. Grafs.com — NEW Nikon Wind Meter for SmartPhones, $28.99
Here’s a great new gadget for under $30.00. Nikon’s new Spot On™ Ballistic Wind Meter plugs directly into the headphone port on most popular smart phones. The Spot On Wind Meter reads both wind speed and direction and inputs the data directly into Nikon’s free Spot On Ballistics Mobile App (available for iOS and Android). This allows you to quickly determine and calculate wind drift corrections without needing a separate, dedicated wind meter. When not in use, the Nikon device easily fits in a pocket.
Everyone needs a good .22 LR rimfire handgun, and the Browning Buck Mark is a classic. This stainless, bull barrel version is marked down this week to $379.99. That’s a very good price. Buckmarks, with their excellent triggers and great ergonomics, are fun to shoot and VERY accurate. This is a pistol you can keep for a life-time and pass on to your kids. Browning says: “Every Buck Mark starts out as a solid piece of aircraft-grade 7075 aluminum alloy, and then is CNC machined to exacting tolerances. The crisp single-action trigger, hand reamed chamber, target crowned barrel and finely adjustable target sights mean the Buck Mark comes ready for fun straight from the box.”
Will you be heading to the varmint fields this summer? Proper planning is key to a safe, satisfying, and productive varmint holiday. Of course you’ll be busy reloading, but you should make a check-list of all the gear and supplies you need. Bring a variety of rifles if possible — you’ll need to switch off as one barrel gets hot, and the chambering that works best for your close shots may not be ideal for those longer shots out past 400 yards. Here are some tips from our Forum members that can help you shoot more effectively, and avoid problems on your varmint hunt. Here’s one key tip: at your shooting station, put a strip of surveyor’s tape on a tall stake to show the wind direction. Then shoot in the direction the wind blows. This will minimize the effect of cross-winds.
From PatchHound: “The gear you bring will make or break a trip out to Prairie Dog land. A lot has to do with where you going and how far you are from [civilization]. For starters, bring lots of water. It will be hot in Wyoming in a few more weeks but it don’t hurt to bring warm clothes in case it snows. It’s best to wear leather boots unless you’re real good at dodging cactus while walking around. Good sunsceen will save the day too. [What you need to bring] really depends on whether you’re shooting on some friendly ranch or 100 miles in the middle of [a wilderness area]. Good survival gear is a good thing to have for the latter!”
From Stoner25mkiv: “I’d suggest an adjustable bipod if you are going to do any walking. A laser rangefinder is a huge asset. Have a fanny pack or backpack for extra ammo, water, bore-snake, etc. when you go on your walkabouts. We also take a couple pivoting benches, heavy movers’ pad/blanket, sandbags (Uncle Bud’s Bulls Bag) for shooting from near the vehicle. Boonie hat for blocking the sun, sun glasses, sunscreen. High leather boots.
Anyway, on to the rifles…consider bringing a 17 HMR, .223 Ackley bolt gun, .223 Ackley AR, and a 243 WSSM. Some years the 17 HMR isn’t removed from its case. We had a couple windless days and the 17 was lots of fun. I’d walk into the dogtown and then lay down and wait. After five minutes or so I’d have dogs within easy rimfire range, and out to as far as I’d care to stretch the rimfire. 275 yards was about it.”
From CTShooter: “The .204 [Ruger] is a laser beam and good to 400 yards easy. Forget the rimfire! Do you have a portable bench that pivots? Bring bipod, binocs. Bring a LOT of water. I have a milspec sniper shooter’s mat/drag bag with shoulder straps. It is good to carry everything when you want to wander off and shoot prone with bipod. Here’s a view through my 6BR in ND.”
From RJinTexas: “In most of the locations that we’ll be shooting we’ll usually set up a minimum of 200 yards from the edge of a major dog town. We’ll start by working over the close-in dogs and shooting our way out, some of these towns may run in excess of 500/600 yards deep. I believe that a rimfire will put you at a distinct disadvantage. The only rimfire that will somewhat work is the 17 HMR and you can reload for your 204s for close to the cost of HMR ammo and you’ll be less apt to be under-gunned. Your 204 will work well out to 300/400 yards unless the wind is blowing hard. We classify a 10-mph crosswind as a very calm day and what makes it a little more challenging is that it is usually also gusting. I only took my 17 HMR once, I’ve since even quit taking my 17 Mach IV because when the wind blows hard it range is limited to around 200 yards. Gusting wind will play havoc with 25gr pills.”
From Wes (P1ZombieKiller): “[For my first PD trip] there are so many things I was not ready for. The one thing that I did bring (that no one told me about) was a canopy. I’m glad I did. Even though the weather was [near perfect], I know that sun can humble you real fast. With my pop-up canopy, I could shoot all day without getting killed by the sun. You had to tie the canopy down real well or the wind would blow it across the pasture.
We sat on shooting benches that pivot 360°, and are fast and easy to set up. Most all shots were 175-250 yards. I just felt comfortable at that range. It was more fun for me to be able to film the hits, and the camcorder I was using just did not get good video past 350 yards. The digital zoom distorted the image too much. I knew I would only get this one chance to film my first P-dog outing, and I wanted to get it on film for [posterity].” To learn more about P1’s first Prairie Dog Trip, visit his Website.
In this video, Forum member Erik Cortina shows how to create a custom modified case for use with the Hornady Lock-N-Load Overall Length Gauge (formerly the Stoney Point Tool). While Hornady sells modified cases for many standard cartridges, if you shoot a wildcat such as the 6mm Dasher or .284 Shehane, you’ll need to create a custom modified case*. And even if you shoot a standard cartridge such as the .308 Winchester you can get more consistent measurements if you make a custom modified case from a piece of brass fired in your chamber.
The process is straight-forward. Take a piece of brass fired in your chamber and full-length size it (with about .002″ shoulder bump). Then you need to drill out the primer pocket. Erik uses a mini-lathe for the operation, but this general process can be done with a drill press or other tools. Erik shows how to do this with a 0.290″ HSS (High Speed Steel) drill bit on a mini-lathe. After drilling the hole comes the tricky part — you need to tap the case with the precise 5/16″ x 36 threads per inch (tpi) right-hand thread that matches the male thread on the O.A.L. Gauge. This 5/16″ x 36 tpi tap is pretty uncommon, but you can order it from Amazon.com if you can’t source it locally.
If you use a mini-lathe, Erik suggests loosening the tailstock slightly, so it can float while cutting the threads. Erik also says: “Make sure you get the tap on pretty tight — it’s going to want to spin.” Erik turns the case at about 100 rpm when tapping the threads. Once the case and tap are rigged, the actual tapping process (see video at 6:00) takes only a few seconds. While the mini-lathe makes the tapping process go more quickly, the threading can also be done with other systems.
TIP: Don’t just make one modified case, make three. That gives you one for your range kit, one for your home reloading bench, plus a spare (since you WILL eventually lose or misplace one).
Here’s the Stuff You Need
5/16″-36 TPI Threading Tap
The required thread is somewhat uncommon. You need a 5/16″ – 36 tpi Right Hand Thread Tap. If you can’t find it locally, Amazon.com carries the correct tap. Erik notes: “The 5/16-36 tpi tap is not a common size. I think Hornady did this on purpose to make it more difficult for the average guy to make his own modified cases.”
0.290″ Drill Bit
Erik uses an 0.290″ HSS “L” drill bit. (This “L” Letter Gauge code designates a 0.290″ diameter bit). A close metric equivalent would be 7.3 mm (0.286″). Erik says: “A 9/32″ drill will also work but it will be harder to run the tap in since the hole will be .281″ instead of .290″ with the Letter Gauge L bit.”
Tips for Using O.A.L. Gauge with Modified Case
We’ve noticed that many folks have trouble getting reliable, consistent results when they first start using the Hornady O.A.L. Gauge (formerly the Stoney Point Tool). We’ve found this is usually because they don’t seat the modified case properly and because they don’t use a gentle, consistent method of advancing the bullet until it just kisses the lands.
Here is our suggested procedure for use the O.A.L. Gauge. Following this method we can typically make three of four measurements (with the same bullet), all within .001″ to .0015″. (Yes, we always measure multiple times.)
1. Clean your chamber so there is no build-up of carbon, debris, or lube. Pay particular attention to the shoulder area.
2. Screw the modified case on to the O.A.L. Gauge. Make sure it is seated firmly (and doesn’t spin loose). Note, you may have to re-tighten the modified case after insertion in the chamber.
3. Place your selected bullet so that the ogive (max bullet diameter) is behind the case mouth. This prevents the bullet from “snagging” as you insert the tool in the action.
4. Insert the O.A.L. Gauge into your chamber smoothly. Push a little until you feel resistance. IMPORTANT — You need to ensure that the shoulder of the modified case is seated firmly against the front of your chamber. You may have to wiggle and twist the tool slightly. If you do not have the modified case seated all the way in, you will NOT get a valid measurement.
5. Advance the bullet slowly. (NOTE: This is the most important aspect for consistency!). Push the rod of the O.A.L. tool gently towards the chamber. DON’T shove it hard! Easy does it. Stop when you feel resistance.
6. IMPORTANT. After gently pushing on the rod, give the end of the rod a couple forward taps with your finger. If your bullet was slightly skewed, it may have stopped too far back. Adding a couple extra taps will fix that. If the bullet moves after the taps, then again push gently on the rod. NOT too much! You just want to push the bullet until it just “kisses” the lands and then stops. Do NOT jam the bullet into the rifling. If you do that you will never get consistent results from one measurement to the next.
* For a $15.00 fee, Hornady will make a custom modified case for you if you send two fired pieces of brass. Send fired cases and $15.00 check to: Hornady Manufacturing, Attn: Modified Cases, 108 S. Apollo St., Alda, NE 68810. More Info HERE.


 Hey it’s the end of the work week, so we thought you guys might enjoy a little display of honest-to-goodness American .50-Cal firepower. Today’s video features the General Dynamics


 Never had a chance to hunt prairie dogs in the American west? Then check out this video. Dan Eigen (aka “Walleye Dan”), host of the

 To find out if you have a burr or damage to your crown, you can use an ordinary Q-tip cotton swab. Check the edges of the crown by pulling the Q-tip gently out past the edge of the crown. If you have a burr, it will “grab” the cotton and leave strands behind.


 From Wes (P1ZombieKiller): “[For my first PD trip] there are so many things I was not ready for. The one thing that I did bring (that no one told me about) was a canopy. I’m glad I did. Even though the weather was [near perfect], I know that sun can humble you real fast. With my pop-up canopy, I could shoot all day without getting killed by the sun. You had to tie the canopy down real well or the wind would blow it across the pasture.


