Here’s something all shooters need — a smartphone App that calculates bullet-hole group sizes from your own photos. The Ballistic-X App is simple to use. Take a photo of your target, set some values (such as bullet diameter and distance to target), then use the touchscreen to place circles around each hole. The App will calculate group size (in MOA or Mils), distance to point of aim, and provide all the info in an overlay. Then click “save” to record your group for posterity!
This App works well, is relatively easy to set-up, and costs just $7.99. It is available for both Android devices and iOS (Apple) devices. There are other ways to measure group sizes from target images, such as the excellent On-Target program, which we have used for years. However On-Target requires a software installation on a Windows platform desktop or laptop. Ballistic-X is a simple, easy-to-install App with versions for both Android and iOS (Apple) Mobile devices.
The Ballistic-X App has a relatively easy-to-use interface. Of course you can choose either MOA or Milrad group values, and Inch or Metric dimensions. There are various labeling options that provide useful info for Load Development. There is even an ATZ (Adjustment To Zero) feature for adjusting your turrets.
How to Use Ballistic-X App
1. Select Photo Source — Choose Camera to take new photo or get image from Photo Library.
2. Set Reference Values — Select Bullet Diameter and enter Distance to Target.
3. Establish Scale on Image — Mark two points on target photo to set scale. For example, if the target has a 1″-square grid lines, mark two points on grid for 1″ distance.
4. Mark Point Of Aim — Put the central X on the aim point.
5. Designate Shot Locations — Place the green circles around each shot.
6. Finalize Data Display — Position Overlay, select size/color options, and export file.
Android Options — Range Buddy FREE App
Along with Ballistic-X, there is another Mobile App, Range Buddy, that also measures shot groups. Range Buddy is currently offered for Android devices only. It is FREE, but has adverts. Range Buddy isn’t bad, but users complained about the program crashing, and there are compatibility issues with newer phones. We recommend you pay $7.99 and stick with Ballistic-X.
At the request of our readers, we provide select “Deals of the Week”. Every Monday morning we offer our Best Bargain selections. Here are some of the best deals on firearms, hardware, reloading components, optics, and shooting accessories. Be aware that sale prices are subject to change, and once clearance inventory is sold, it’s gone for good. You snooze you lose.
1. March Optics — Retirement Sale, 30% Off All Scopes in Stock
March Optics delivers some of the most advanced (and unique) optics technology on the planet. But those top-of-the-line March scopes were always a big investment. But now, you can get superb, ultra-premium March scopes for 30% Off. Shiraz Balolia, President of March Optics USA, has decided to stop retailing optics. As a result, March scopes are now being discounted 30% — that’s a huge savings. This sale pricing applies to ALL March scopes, limited to stock in hand. Here are some of the deals:
1. Genesis Extreme Long Range Scope, $4865.00 (marked down from $6950.00) 2. 10-60x56mm High Master Tactical Turrets MTR-1, $2765.00 (marked down from $3950.00) 3. 8-80x56mm Tactical Turrets MTR-4, $2572.50 (marked down from $3675.00) 4. 5-40x56mm FFP Tactical Turrets FMA-2, $2572.50 (marked down from $3675.00) 5. 3-24x52mm FFP Tactical Turrets Illuminated FML-T1, $2572.50 (marked down from $3675.00) 6. 2.5-25x52mm Tactical Turrets Illuminated MTR-3, $2572.50 (marked down from $3675.00)
2. EuroOptic — Mauser M18 Rifles 30% Off (Great Deal)
A huge shipment of Mauser M18 rifles is en-route to EuroOptic from Germany. In preparation for this rifle influx, EuroOptic has slashed prices on all M18s. Expect to save $200 to $250 per rifle. For example, the 6.5 Creedmoor M18 is marked down from $699 to $499 (save $200) while the .243 Win M18 is discounted from $699 to $459 ($240 savings). Eight chamberings will be available including the new 6.5 PRC as well as hunting classics like the .270 Win, .308 Win, .30-06 Springfield, and 7mm Remington Magnum. The Mauser M18 is a fine European-crafted rifle with a 3-lug bolt, smooth 60° bolt lift, and quality hammer-forged barrel. NOTE: Pending arrival, EuroOptic is taking back-orders which are effectively “pre-orders”.
3. Midway USA — Norma 6.5 Creedmoor Brass, 250 for $99.99
The 6.5 Creedmoor is more popular than ever but like any super-trendy cartridge, supplies seem to be either out of stock or too expensive. If you have a 6.5 Creedmoor, check out this killer deal. You can get 250 Norma 6.5 Creedmoor cases for only $99.99. That works out to just forty cents per case — less than half what you’d pay for some other 6.5 Creedmoor brass. We can’t remember the last time we’ve seen such a great deal on quality brass for such a popular cartridge. But you better act soon — we expect this MidwayUSA deal to sell out quickly.
We love our .45 ACP pistols, and we regularly shoot CCI Blazer Brass .45 ACP ammo. It has proved accurate and super reliable. Right now Natchez is offering a great deal — 500 230gr FMJ rounds for just $144.99, a $35.00 savings. Add a box or two of rimfire ammo to put your order over $150.00, then use CODE FH190621 during checkout and and you’ll qualify for FREE HazMat!
5. Midsouth — Rock Chucker Reloading Kit and Free Die, $269.49
Everything you see above can be yours for just $269.49. Amazing Deal. Right now, Midsouth is selling the Rock Chucker Supreme Master Reloading Kit for $269.49, a fine price considering all the hardware you get: Press, Primer Tool, Scale, Powder Measure, Loading Tray, Reloading Manual and more. Heck, the Rock Chucker press alone is worth $165.00+. This is good starter kit for any reloader with sturdy items, such as the Rock Chucker, that will last a lifetime. And now through 7/7/2019 you’ll get a free RCBS FL die set as a bonus. NOTE: This FREE DIE set is offered through RCBS and will ship separately after you submit a form.
6. Amazon — Plano 52″ Double Rifle Case with Wheels, $99.99
This Plano Double Scoped Rifle Case is an Amazon #1 Best Seller for good reason. It offers the functionality and durability of an SKB-type hard case for HALF the money. This is just $99.99 with FREE Shipping, while the equivalent SKB is around $240.00, so you can buy two Planos for the price of one SKB. The 51.5″ interior will fit most scoped competition rifles up to about 29″ barrels (measure your own rifle to make sure). If you separate the barreled action from the stock you can transport even ultra-long ELR rifles. The handles are convenient and beefy and the wheels make this case easy to move. This is a very tough, roomy case for the money — plus there’s Free Shipping! There is also a smaller 42″ version for $64.99.
Exterior Dimensions: 53.5″ x 17″ x 7″
Interior Dimensions: 51.5″ x 14″ x 5.5″
Pluckable Interior Dimensions: 46″ x 10″
Features: Wheels, Secure Latches, O-Ring Seal, Pressure Relief Valve, Customizable Foam
7. Taurus G2c 9mm — $179.99 with Factory Rebate
This is a good little gun at a great price. Taurus has a factory Rebate through 7/7/19. Palmetto State Armory is selling the sub-compact Taurus 9mm with black frame and stainless steel slide for just $209.99 with FREE Shipping. But the Taurus $30 Factory Rebate lowers your price to just $179.99 for this G2c. Or, if you like the milspec look, you can also get an OD-Green G2c G2c for $184.99 after rebate, just $5.00 more. Despite its small size, the G2c has a 12-round magazine. We like the fact it has a left-side manual safety (unlike the Glock).
8. Graf’s — Platinum Case Prep & Trim + EZ Tumbler, $179.99
If you want to step up your brass preparation game, here’s a great deal. Graf’s is offering the Frankford Arsenal Case Prep & Trim PLUS the EZ Tumbler for only $179.99. That’s an amazing deal considering you could pay $199.99 or more for the Prep & Trim unit by itself, and the EZ Tumbler is regularly $50 or more. This Grafs.com combo deal represents a savings of nearly $70.00.
9. Powder Valley — Alliant and CCI Factory Rebates
Powder Valley notified us about some great Rebate offers from Alliant and CCI. If you need powder or primers, now is a great time to buy — this offer ends June 30, 2019! NOTE: These rebates are separate programs. To qualify for these rebates you need to buy at least 4 pounds of Alliant powder OR spend at least $100 on CCI components. You can’t mix and match to qualify — each program has its own minimums.
ALLIANT Powder — More Bang for your Buck$ Rebate
If you buy at least four (4) pounds of powder you get $2.00 back per pound, with a rebate limit of $20 (for ten pounds). Minimum purchase four (4) pounds required.
CCI — Primed for Action Rebate
Spend at least $100 on CCI® reloading primers to get 20% of the purchase price back. Rebate amount calculated on purchase price only, does not include taxes and/or shipping/handling fees. Maximum rebate $100 per person or household. Minimum spend $100 required.
10. Amazon — NcStar Vism Shooting Mat, $24.99
Looking for a good mat at a great price? For $24.99 now you can grab this NcStar Vism shooting mat. This has decent padding, and reinforced areas for elbows and knees. Full dimensions are: 69″ Long x 35″ Wide. This mat has straps for pre-loading your bipod. When you’re done simply fold in the edges, roll it up into a compact 19.50″ W x 8.50″ H package — about the same size as a sleeping bag. You can pay twice as much for a shooting mat and not get much more quality. Purchaser reviews have been very positive. This mat has earned 80% Five-Star buyer ratings on Amazon.
2019 NRA National Pistol Championships
The National Pistol Championships have been conducted at Camp Perry for over 100 years. For 2019, the Camp Perry Joint Training Center in Port Clinton, Ohio will host the NRA National Pistol Championships from July 7-12, 2019.
Important Registration Requirements
for 2019 Pistol Competitors
This year, competitors will be required to create a login on the Competitive Shooting Web Portal before registering for any NRA Championship Match. The NRA claims “This new feature will enhance the competitor experience moving forward, by streamlining event scorekeeping, contact management, and more.” If you don’t do this on or before July 9, 2019, you won’t be able to compete. Got that?
Competitor registration for the NRA National Pistol Championships will close on July 9, 2019. For more information regarding registration for this event, email pistol@nrahq.org or call 703-267-1468.
Learn from Brian “Gunny” Zins, 12-Time Nat’l Champion
Want to be a better pistol shooter? This video provides expert advice from 12-time NRA Pistol Champion Brian Zins who explains how to correct anticipation errors in bullseye pistol shooting.
Like that video? CLICK HERE to access five more pistol marksmanship training videos featuring Brian Zins.
For years we have touted the advantages of Burris Signature rings, with polymer Pos-Align Inserts. PRS/NRL shooters take not — this technology is available in a beefier, heavy-duty ring system for tactical rifles. The impressive Burris XTR Signature Rings offer six (6) clamping bolts per ring plus strong, dual steel base-clamps that self-center on Weaver or Picatinny rails. These aluminum XTR Signature Rings provide strength and holding power, plus the key benefits of Pos-Align inserts. As impressive as XTR rings are — they aren’t that expensive, with 1″-diameter XTRs starting at about $90.00 per pair (30mm and 34mm XTRs cost a bit more).
The polymer inserts in Signature rings perform three key functions. First, the inserts provide full, uniform scope-to-ring contact, with no need for lapping. You get a very secure “grip” on your scope without ring marks. Second, the Pos-Align inserts can provide elevation “pre-load”. With eccentric (offset) inserts, you can raise the back of the scope relative to the front, gaining up to 54 MOA of built-in elevation, without the need for expensive tapered bases. Third, the offset inserts can be rotated clockwise or counter-clockwise to shift point of impact. This lets you zero your rifle easily while keeping the turrets in the center of their travel.
Burris XTR Signature Rings are offered in 1″, 30mm, and 34mm diameters, and three (3) different heights: 1″, 1.25″, and 1.5″. Each ring set includes two sets of concentric inserts and one set each of the following offset inserts: +/-5 MOA, +/-10 MOA, +/-20 MOA. These allow you to “pre-load” elevation and/or center up your cross-hairs.
– Pre-load Elevation. No need for expensive tapered bases for long-range shooting.
– Correct misalignment caused by off-center receiver holes.
– Correct for bases or rings being slightly off-center.
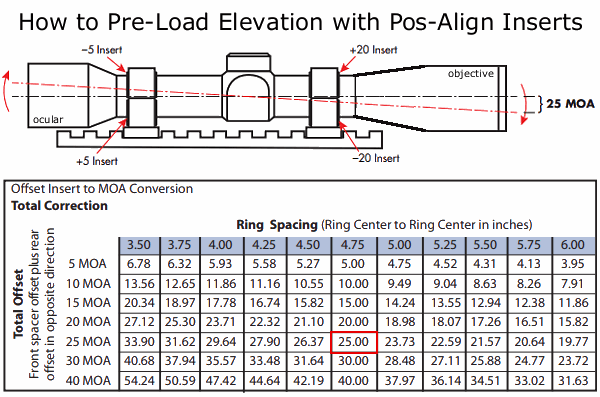
How to Pre-load Elevation
To add elevation, set the Pos-Align Offset Inserts to raise the rear of the scope and lower the front. As long as there remains sufficient clearance between the front objective bell and the barrel, Burris recommends lowering the front of the scope the most and raising the rear of the scope the least. The amount of actual elevation “pre-load” will depend on the ring spacing (see chart). In the illustration, with 4.75 inches between ring centers, a +/- 20 MOA pair in the front combined with a -/+ 5 MOA pair in the rear will yield +25 MOA of total elevation. (If the rings are positioned further apart, you’ll get less elevation pre-load.)
Using Inserts to Adjust Point of Impact in Any Direction
Although it is convenient and most understandable to refer to the ring inserts as a “bottom” or “top” insert, the inserts may be rotated to any angle within the scope rings. This allows the shooter to correct the point-of-impact in any direction. The drawings below show how the inserts can be rotated to induce both elevation and windage changes at the same time.
Product tip from Boyd Allen. We welcome reader submissions.
Want to see the details?CLICK HERE to view full-screen photo.
Five targets, each with FIVE shots in essentially one hole. The events of this story happened two years ago. We are reprising our report because this five-target Aggregate arguably represents the most impressive feat of 100-yard accuracy in the history of marksmanship on this planet.
Check out those five targets. The Aggregate (average) of all five targets is a tiny 0.0840 inches! These were shot by Gary Ocock at 100 yards in a California benchrest match on August 6, 2017. Though Gary’s 0.0840 Agg beats existing records, this was not a “sanctioned” match, so Gary’s killer Agg will NOT be submitted for IBS or NBRSA records. So, sadly, the Agg won’t appear in the record books, but this remains a spectacular, verified feat of rifle accuracy, accomplished in competition.
The argument can be made that this is the Most Accurate Gun Ever Built. As far as we can determine, no one has ever shot a smaller 5-target Agg anywhere, at any time.
The Unlimited Benchrest Record That Will Never Be (Official)
Report by Boyd Allen
Gary Ocock’s stunning unlimited Aggregate is beyond amazing. That’s an average of five, 5-shot groups of .0840. Shot under sanctioned match rules, but at an unsanctioned 100-yard fun match, this Aggregate is well under the current 100-yard official records of the IBS (.1386), and the NBRSA (.1242). The fourth of the five groups measured a minuscule .018, less than half the size of the existing NBRSA Unlimited record of .049 (also shot by Gary). Check it out:
When the top 15 shooters all post teen Aggs, conditions must be pretty favorable. However there were some light switchy winds — Gary said that he shot better in the left to right condition.
GUN SPECIFICATIONS
Ocock’s red Jay Young Unlimited Railgun features one major difference from Young’s typical Railgun designs. The bottom of the barrel block is integral with the top (moving part), of the gun. The barrel is Ocock’s usual 1:13.5″-twist Krieger chambered for the 6 PPC. The BAT Neuvo action* is unusual in that its lugs are horizontal at lock-up instead of the usual vertical. With horizontal lugs, both lugs maintain contact with their abutments when the action is cocked. In the more normal configuration when cocked the top lug is forced off of its seat by a combination of the angle of the trigger cocking piece interface, the pressure of the striker spring, and bolt clearance at the rear of the action.
LOAD SPECIFICATIONS
Gary shot this remarkable Agg with well-used brass, Vihtavuori N133 powder, and self-made 66gr BT bullets** seated at “jam”. This amazing Agg was shot on the second day of a 2-day Unlimited Benchrest match. On Day 1 Gary had experimented with various loads using both surplus IMR 8208 and Vihtavuori N133, but was not satisfied with the results. For his first group on Day 2, Gary tried a light load of N133. After seeing the result, however, he decided to go to the other extreme — a super stout N133 load — with the same powder. As you can see, Gary’s willingness to experiment paid off.
Notably, Gary used light neck tension. Ocock found that for these bullets and this barrel, light neck tension worked best (contrary to “normal” N133 benchrest practice). Ocock used a bushing that only produces .001″ difference between the diameters of sized and loaded case necks.
Comment on Ocock’s Achievement
Congratulations to Gary Ocock for superb shooting (and smart loading). Even though the match was not sanctioned (so the Agg will never be a record), Ocock has raised the bar very high, and given us a new standard of ultimate accuracy.
Though this 0.0840 Aggregate and 0.018 group will never go into the record group, they are still noteworthy. There’s virtually no doubt that they would have survived inspection by any record committee. Except for the lack of fixed backers, an IBS requirement (for detecting cross-fires), all other conditions were met for an officially-sanctioned match.
*The new BAT Neuvo actions are the result of a collaboration between Dwight Scott, and Bruce Thom, featuring Dwight’s ideas and BAT’s proven manufacturing expertise.
** Ocock shot his own, boat-tail match bullets, made with George Ulrich-crafted dies using Hood cores. Although he said that it had been a while since he had weighed any, his best guess was that they weigh something around 66.5 grains.
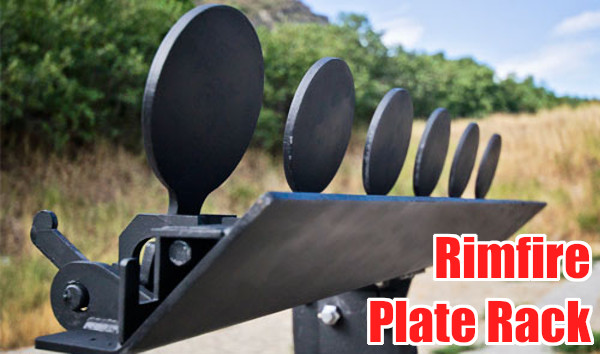
The Action Target Sport Plate Rack is specifically designed for .22 LR Rimfire shooting. This rack features six 4″-diameter plates that reset with a provided cable.
Shooting plates is fun. You get immediate feedback — “instant gratification” when you make a hit. When shooting steel inside 100 yards, we like to use .22 LR rimfire guns. The ammo is inexpensive, noise levels are lower (though you still need ear protection), and at close ranges there are fewer issue with ricochets and bullet splash-back. Additionally, for busy folks who don’t have time to reload, you can pick up a .22 LR rifle or pistol, grab a couple $5 boxes of ammo, and get to the range in a few minutes. The convenience means it is easier to shoot every week if you like.
SFC Joel Turner from the USAMU’s Action Shooting Team offers a few pointers on how to shoot plates quickly and accurately. He’s using a centerfire pistol, but the same principles apply for rimfire handguns. Click speaker icon to activate audio.
New .22 LR CP33 Pistol is Great for Plates
If you like shooting plates, one of the better new handguns for the job is Kel-Tec’s CP33. We tested this interesting handgun at the 2019 SHOT Show Media Day at the Range, and were impressed. The pistol is big, but balances well. The sights are easy to see, and the full-length rail lets you easily mount a variety of optics. The trigger is surprisingly good — better than 90% of rimfire handguns out there. For the plates game, this “quad-stack” gun can handle long stages without mag changes. The standard clear-sided CP33 magazine holds 33 rounds of .22 LR ammo.
If you are interested in an affordable, but very accurate, high-capacity semi-auto rimfire pistol you should consider Kel-Tec’s new CP33. Shooting Sports USA (SSUSA) notes: “The rapid growth of rimfire competition in Steel Challenge has prompted some gun makers to enter the fray. Kel-Tec is one, and their new CP33 .22 LR pistol has a lot of potential.” Watch 22 Plinkster’s video review below. He reports: “This handgun has been 100% reliable IF I load the magazine the right way… and it’s pretty dog-gone accurate.”
SSUSA’s testers tried the pistol with a variety of ammo and it consistently shot about one-half-inch for five shots “from a 25-yard sandbag bench rest using the iron sights.” SSUSA noted that the gun disassembles quickly and easily by removing one central pin. That’s a nice feature.
Overall SSUSA’s tester, Chris Christian, was impressed with the gun, saying it balanced well and the sights aligned naturally: “…the neutral-balance-point grip produced an almost instinctive sight alignment.”
Christian used the CP33 in a 6-stage Steel Challenge Match, and did well: “I decided to shoot Rimfire Pistol Iron (RFPI) and used the CCI Mini-Mag. The high-speed ammo ran perfectly. [T]he bright sights and handling qualities let me finish top among iron-sight shooters and even hold my own with C and B class rimfire pistol shooters using optical sights. It would be interesting to put a reflex sight on the gun, and maybe even shoot some Bullseye with it.”
The competition was founded in 1981 by Mike Dalton and Mike Fichman, in Southern California. The two Mikes wanted an exciting alternative to paper targets and came up with the all-steel format. The Steel Challenge World Speed Shooting Championships have grown to one of the largest professional pistol competitions in America. In 2018, hundredes of competitors from the United States and around the world competed at the Talladega Marksmanship Park for glory and huge cash prizes. The Steel Challenge is governed by the Steel Challenge Shooting Association (SCSA) that consists of eight standardized stages with three types of steel targets: small circle, big circle, and square. Here is a steel challenge layout in Germany.
Steel Challenge is similar to IPSC, but has simpler rules and more consistent stage designs. Up until 2011 the annual Steel Challenge World Championship was held in Piru, California every year. Then, as renamed the World Speed Shooting Championships (WSSC), the Championship was held in Frostproof, Florida (2012, 2013), St. George, Utah (2014), San Luis Obispo, California (2015-2017), and Talladega, Alabama (2018, 2019). There are also over 100 Steel Challenge Regional Matches held around the country.
This Video Shows the Steel Challenge Rimfire Rifle Optics Divison. These guys are FAST!
Yes, folks, it’s officially summer now. This year’s Solstice, considered the official start of summer, transpired Friday, June 21, at 5:54 AM EDT. We hope you have fun this summer with friends and family. To help ensure those summer adventures remain safe and trouble-free, the CTD Shooters’ Log has prepared a helpful Essential Summer Survival Guide. This is worth reading before you venture away from civilization.
Here are some highlights of the article with links for MORE INFO:
First Aid Kits for Campers
You should never venture outside without a first aid kit close at hand. While exploring the outdoors, all types of accidents can occur—from cuts, scrapes, and burns to broken limbs and severe allergic reactions.
Basic Survival Skills
Basic survival skills are a necessity if you plan to spend any amount of time outdoors. These five tips, plus a how-to on what to pack in a lightweight, basic survival kit will help if you are ever stuck, lost, stranded or injured in the field.
How to Treat Burns
Fireworks, barbeques and campfires — in the summer we are frequently around fire, which increases our chance of getting burned. A first-degree burn is most likely home treatable, while a third degree burn requires immediate medical attention. Learn how to spot the differences between minor and severe burns.
Great Case Trimmer for under $130.00
We think Lyman’s new Case Trim Xpress will be a “game changer” for hand-loaders. If you’re like most of us, trimming your brass to length has been a dull, laborious and time-consuming process unless you shell out $500 or more for a top-of-the-line unit. Lyman has broken that mold by releasing an accurate, easy-to-adjust, shoulder-indexing, carbide-bladed, and SPEEDY case trimmer for under $130.00! Given its outstanding performance for the price, the Lyman Case Trim Xpress is a definite winner.
CLICK photo for full-screen view of Case Trim Xpress unit.
Lyman Case Trim Xpress “Hands-On” Review
Review by F-Class John
Case trimming can be one of the most boring and tedious steps in the reloading processes. This is largely because of outdated tools that either require manual turning, clunky pilot systems, or difficult adjustments. In order to overcome these obstacles, you might have to spend $500 for some premium systems. But that has changed with Lyman’s introduction of the new Case Trim Xpress. This bright orange wonder delivers premium trimming performance at a budget price. Available for around under $130, this trimmer offers an easily-adjustable cutting head plus a smart, shoulder-indexing bushing system to improve consistency and speed up the trimming process.
Video Shows How Carbide Cutter Head Adjusts Easily with Index Wheel
The Lyman Case Trim Xpress comes with the main trimming unit, power cord, and 10 bushings in a storage case. These 10 orange bushings let you trim more than 50 popular cartridge types (yes including the 6mmBR, 6.5 Creedmoor, and .308 Win of course). Set-up was simple and straight-forward. Install the bushing you need, turn the unit on and slowly push a piece of brass towards the cutting head. Once the brass is fully depressed, you can start adjusting the dial one click at a time until the case makes contact. Then you start making progressive adjustments and trim until you reach your desired length. The process is so simple that it’ll leave you wondering how you ever used anything else.
Once the machine was adjusted for our brass, we were amazed at how easily and quickly cases could be trimmed. The unit is fairly hefty, so we found it pretty stable just sitting on the bench. If you wish, the unit can also be screwed down for added stability, using the holes in the lower “wings” of the orange housing. There’s a dial adjustment on the side that controls cutter rotation speed (RPM). In our testing, the trimmer worked well across its entire RPM range. These means you can do fast, quick cuts or make slow and precise cuts, as you prefer. And you can adjust the cutter speed to the type of brass you are trimming.
As for trim length control, the adjustment dial has good, positive clicks and the trim length holds very constant. Even after trimming 80+ pieces of brass, we observed trim consistency held within .001″.
One of the things that sets the Case Trim Xpress apart from most trimmers is how it indexes off the shoulder. This ensures that case lengths from mid-shoulder to end of neck are identical for every case (whether they have been sized or not). This is critical for consistent reloading results and will help ensure that every case is optimally positioned in your chamber. A cutting system that indexes off the shoulder is arguably better than a system than merely trims to a given case OAL for both fired and unfired cases.
Another great feature is that this trimmer can be mounted flat on a bench-top, on the underside of a shelf, or even on a vertical wall surface (if oriented horizontally). You can choose different mountings because the clear plastic shroud that catches brass shavings can rotate. This allows the shavings exit port to be orientated to any point on the circle. We liked being able to choose various mounting configurations. Employing little-used wall or shelf space opens up precious bench-top real estate.
Summary — Outstanding Performance for the Price
Overall the Case Trim Xpress is hard to beat for the price. It is one of the few power trimmers we can recommend without hesitation. The machine trims quickly and accurately, the cutter-depth control is precise and easy to use. And the variable speed control is great. Of course we do wish the machine could also de-burr and chamfer brass. But of course that would add quite a bit to the cost, and would probably require a completely different cutting system. For trimming-to-length only, Lyman’s Case Trim Xpress is probably the best trimmer currently available for under $200. This unit should definitely be on the short list of anyone shopping for a variable-speed motorized trimmer.
Want to shoot better scores at your next match? Here’s a smart, inexpensive do-it-yourself project from the good folks at Criterion Barrels. For less than one dollar in materials, in just a few minutes you can create a handy, effective mirage shield, custom-fitted to your favorite rifle.
All precision shooters should be familiar with mirage, a form of optical distortion caused primarily by variations in air temperature. Savvy shooters will use mirage as a valuable tool when gauging wind speed and direction. Natural mirage is unavoidable, but there are many techniques designed to limit its influence in long-range marksmanship.
A form of mirage can be produced by the barrel itself. Heat rising from the barrel may distort sight picture through your optics, leading to erratic results. Mirage caused by barrel heat can be reduced dramatically by a simple, light-weight mirage shield.
How to Make a Mirage Shield
A mirage shield is an extremely cost-effective way to eliminate a commonly-encountered problem. Making your own mirage shield is easy. Using old venetian blind strips and common household materials and tools, you can construct your own mirage shield for under one dollar.
Materials Required:
1. Vertical PVC Venetian blind panel
2. Three 1”x1” pieces adhesive-backed Velcro
3. Ruler or tape measure
4. Scissors or box cutter
5. Pencil or marker
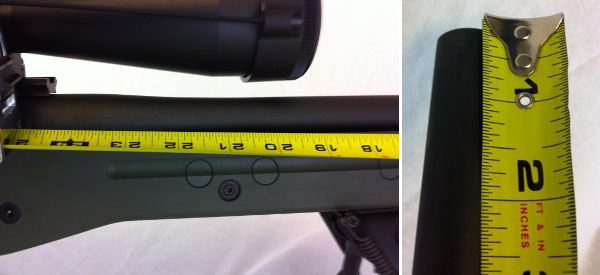
1. Measure the distance from the end of the receiver or rail to the crown of the barrel.
2. Using a pencil and ruler, measure the same distance and mark an even line across the blind.
3. Cut across the line using scissors or a box cutter, shortening the blind to the required length. (Remember, measure twice, cut once!)
4. Expose the adhesive backing on the loop side of the Velcro. Center and apply the Velcro strips on the barrel at regular intervals.
5. Expose the adhesive backing of the fuzzy side of the Velcro.
6. Place the blind on the upper side of the barrel. Apply downward pressure. Once the Velcro has secured itself to the barrel, separate the two sides. Proceed to mold both sides of the Velcro to fit the contour of their respective surfaces.
7. Reaffix the blind. Barrel related mirage is now a thing of the past!
NOTE: You can attach the Velcro on the opposite side of the blind if you want the blind to curve upwards. Some folks thinks that aids barrel cooling — it’s worth a try.
How to Remove and Re-Attach the Mirage Shield
Removal of your mirage shield is accomplished by simply removing the blind. You can un-install the Velcro by pulling off the strips and then gently removing any adhesive residue left behind using an appropriate solvent. (Simple cooking oil may do the job.) Caution: With fine, high-polish blued barrels, test any solvent on a non-visible section of the barrel. Before storing the gun, re-oil the barrel to remove active solvents and residual fingerprints.
Do you have some ammo that got loaded incorrectly, perhaps with the wrong powder? Then you’ll want to disassemble the ammo for safety’s sake. You can use an impact puller to do this task, but if you have more than a dozen rounds or so, you may prefer to use a collet-style bullet puller. These work very quickly and positively, making quick work of big jobs. The efficiency of the collet-style puller is worth the investment if you frequently disassemble ammo. These devices retail for under $25.00 (collets sold separately). Normally, you’ll need a specific collet for each bullet diameter. But collets are not that costly, so this isn’t a big deal, particularly if you only load a few calibers, such as .223, 6mm, and .308.
Hornady and RCBS use different mechanisms to tighten the collet around the bullet. On Hornady’s Cam-Lock Bullet Puller, a lever-arm on the top of the bullet puller serves to tighten the collet around the bullet. Simply rotate the lever from the vertical to the horizontal position to grab the bullet. Lower the ram to remove the case. The bullet will drop out when you return the lever arm to the vertical position. This is demonstrated in the video below:
Hornady Cam-Lock Bullet Puller Demonstrated
Collet bullet-pullers resemble a loading die with a lever or handle on the top. They screw into a standard reloading press. Hornady and RCBS both make collet-style bullet pullers. They use the same basic principle — the device tightens a collet around the bullet, and then the bullet is separated from the case by lowering the press ram. NOTE: Collet pullers may leave small marks on your bullets, unlike impact (kinetic) pullers.*
Like the Hornady tool, the RCBS Bullet Puller employs a collet to grab the bullet. However, the RCBS tool tightens the collet in a different way. The head of the RCBS tool is threaded internally. By rotating the lever arm clockwise in a horizontal circle you squeeze the collet around the bullet. To remove the bullet, after lowering the press ram, simply spin the lever arm back in the opposite direction. The use of the RCBS tool is demonstrated in this video:
RCBS Collet Bullet Puller Demonstrated:
WARNING: When removing bullets from loaded cartridges, always make sure there are no obstructions or debris in your shell-holder or under the loaded round. NEVER engage a primer seating accessory on your press when working with loaded rounds. You can cause a round to discharge by contacting the primer! Also, we recommend you keep your head and torso away from the bullet puller tool at all times.
*By contrast, impact pullers rarely mark bullets, particularly if you put a little bit of foam or paper wadding in the closed end of your impact puller. When dismantling loaded rounds, powder kernels can get trapped in the wadding, so you should remove and replace the wadding before changing to cartridges loaded with a different powder type (assuming you intend to save the powder).


 Like the Hornady tool, the


