This article comes from the Criterion Barrels website. It provides good, conservative advice about barrel cleaning. Understand that cleaning methods may need to be adapted to fit the amount and type of fouling (and the particular barrel). In general, we do try to minimize brushing, and we follow the procedures Criterion recommends respecting the crown/muzzle. We have also had very good success using wet patches followed by Wipe-Out bore foam. Along with the practices outlined by Criterion below, you may want to try Wipe-Out foam. Just be sure to use a fitted cleaning rod bore guide, to keep foam out of the action recesses and trigger assembly.
The above video shows how to apply Wipe-Out or other bore-cleaning foam. We use a slightly different method. First, we use 3-4 wet patches to remove loose carbon fouling. Then we apply the foam as shown, but usually from the muzzle end (with bore guide in chamber). Here’s the important point — after 20-30 minutes, once the bubbles have dissipated, we apply the foam a second time, getting more of the active ingredients into the barrel. We then patch out, as shown, after 3-4 hours.
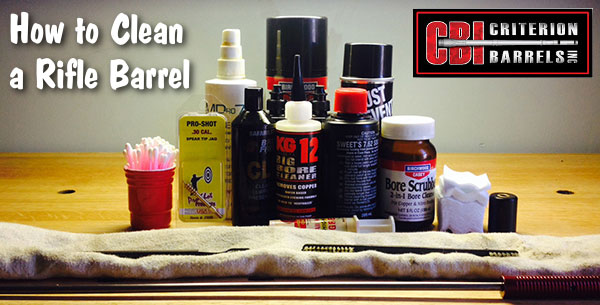
What is the Best Way to Clean a Rifle Barrel?
We are asked this question quite frequently alongside requests for recommended break-in procedures. Improper barrel cleaning methods can damage or destroy a barrel, leading to diminished accuracy or even cause a catastrophic failure. When it comes to barrel maintenance, there are a number of useful techniques that we have not listed. Some techniques may work better with different barrel types. This series of recommendations is designed to incorporate a number of methods that the Criterion Barrels staff has used successfully both in the shop and on their personal rifles. Please feel free to to list your own recommendations in the below comments section.
We recommend the use of the following components during rifle cleaning:
• Cloth patches (sized for the appropriate caliber)
• Brass jag sized properly for your bore [Aluminum and Nylon Jags also work]
• One-piece coated cleaning rod
• General bore cleaner/solvent (Example: Hoppes #9)
• Copper solvent of your choosing (Example: Sweets/KG 12)
• Fitted cleaning rod bore guide
• Plastic AP brush or toothbrush
• Q-Tips
• Plastic dental picks
• CLP or rust preventative type cleaner
There are a number of schools of thought relating to the frequency in which a barrel should be cleaned. At minimum we recommend cleaning a barrel after each shooting session to remove condensation, copper, and carbon build-up. Condensation is the greatest immediate threat, as it can cause the barrel to rust while the rifle sits in storage. Copper and carbon build-up may negatively impact future barrel performance, increasing the possibility of a failure in feed or function. Fouling should be removed whenever possible.
The below tips will help limit the wear of different parts of your barrel during routine maintenance, helping extend the life of the barrel and improving its performance.
The Lands and Grooves
This portion of the barrel may experience reduced efficiency due to copper fouling and cleaning rod damage. If copper fouling takes place during the initial break-in of the rifle, make sure to check our barrel break-in article.
For regular maintenance we suggest using a single piece coated cleaning rod rather than the traditional segmented rod or bore snake. While segmented rods and bore snakes may be convenient for field use, the corners between the segments may bow out and catch on the lands, scraping along the length of the rifling. Residual grit and particles from expended cartridges may also get caught between segments, resulting in an abrasive surface working its way down the length of the barrel. Most bore snakes will remove significant amounts of carbon fouling, but may fall short in the removal residual carbon buildup and copper fouling during deep cleaning. Good rods can be sourced from multiple manufacturers, but we have found good results using both Pro-Shot and Dewey brand products.
General cleaning requires the use of patches rather than nylon or brass bore brushes. Brass brushes may be required when aggressive cleaning is required, but can lead to unnecessary wear on the barrel if used frequently. This is not due to the nature of the soft brushes themselves, but from the abrasive particles of grit that become embedded in the material that is being run repeatedly through the bore. We recommend the use of bore guides when cleaning from both the muzzle and breech. These bore guides will help serve to protect the crown and throat from cleaning rod damage.
If significant resistance develops while running the cleaning rod through the bore, no attempt should be made to force it in further. Back the rod out and inspect the barrel to determine the cause of the resistance. The jag may be pushing between a bore obstruction and the rifling, digging a divot into the barrel before pushing the obstruction back through the muzzle. One way to minimize the risk of a stuck rod is by utilizing a slightly smaller patch during the initial push.
The process of cleaning the length of the rifling is relatively straightforward:
1. Check to make sure the rifle is safely unloaded.
2. Carry out any necessary disassembly procedures prior to cleaning.
3. Remove bolt (if possible) and insert fitted cleaning rod bore guide in action.
4. Soak a patch in bore solvent (similar to Hoppes #9).
5. Center and affix the patch on the brass jag, inserting it into the chamber end of the barrel. A misaligned patch may cause the jag to damage the lands of the rifling, so make sure the patch is centered on the jag. [Note, an aluminum or nylon jag will not show a “false positive”.]
6. Run the patch the full length of the barrel, retracting it upon reaching the end of the muzzle.
7. Let the solvent sit for a minute.
8. Continue to run patches through the bore until carbon residue is minimized.
9. Run a dry patch through the bore to ensure carbon residue has been removed.
10. Soak a patch in copper solvent (Sweet’s or KG-12).
11. Run the patch through the bore, leaving it to sit for 3-5 minutes (do not let solvent sit for more than 15 minutes.*)
12. Repeat this process until no blue residue remains on the patches.
13. Run a patch of Hoppes #9 and a dry patch through the bore to neutralize the copper solvent.
14. Inspect the barrel prior to reassembling the rifle, verifying that no bore obstructions remain.
*Please note that some ammonia-based copper solvents may prove to be corrosive if left sitting in the barrel for an extended period of time. It is essential that these solvents be removed within 15 minutes to avoid ruining the bore.
The Crown
The crown is the portion of the barrel where the bullet loses contact with the lands and grooves and proceeds to exit the firearm. The area most critical to accuracy potential is the angle where the bullet last touches the bore of the barrel.
Avoid damage to this area by using a plastic toothbrush and CLP type cleaner to scrub the crown from the exterior of the barrel. Even the most minimal variation in wear to the crown will negatively impact barrel performance, so be careful to avoid nicking or wearing away this part of the barrel.
Whidden Gunworks makes great sizing and seating dies. The Whidden full-length sizing die with neck bushing is very popular because it allows you to “tune” the neck tension by using different bushings, with larger or smaller inside diameters. In this video, John Whidden explains how to choose a the right bushing size for use with your neck-sizing and full-length sizing bushing dies.
For most applications, John suggest starting with the caliper-measured outside diameter of a loaded cartridge (with your choice of bullet), and then SUBTRACT about three thousandths. For example, if your loaded round mics at .333, then you would want to start with a 0.330 neck bushing. John notes, however, that you may want to experiment with bushings, going down a thousandth and up a thousandth. With thin In addition, as your brass ages and the necks harden, you may want to change your bushing size.
Quick Tip: Try Flipping Your Bushings
You may also want to experiment with “flipping” your neck bushings to alternate the side that first contacts the neck of the case. (One side of the bushing is usually marked with the size, while the other side is unmarked.) So try “number side up” as well as “number side down”.
Some folks believe that one side of the bushing may allow a smoother entry, and that this can enhance concentricity. Other people think they can get very slightly more or less neck tension depending on how the bushing is oriented. This is a subtle effect, but it costs nothing to experiment.
If one bushing orientation proves better you can mark the “up” side with nail polish so that you can always orient the bushing optimally. NOTE: We have confirmed that some bushings are actually made with a slight taper. In addition, bushings may get distorted slightly when the brand name and size is stamped. Therefore there IS a reason to try both orientations.
The 30 BR is an amazing little cartridge. However, 30 BR shooters do have to neck-up 6mmBR or 7mmBR brass and then deal with some issues that can arise from the expansion process. One of our Forum members was concerned about the donut that can form at the new (expanded) neck-shoulder junction. Respected bullet-maker Randy Robinett offers tips on how to deal with the “dreaded donut”.
The Forum member was concerned about thinning the brass if he turned his 30 BR necks after expansion: “Everything I have found on 30 BR case-forming says to simply turn off the bulge at the base of the neck caused by the old 6BR shoulder. I expanded my first case and measured the neck at 0.329″ except on the donut, where it measures 0.335″. Looking inside the case… reveals a groove inside the case under the donut. Now, it is a fact that when I turn that neck and remove the donut, the groove is still going to be there on the inside? That means there is now a thin-spot ring at the base of the neck that is .005 thinner than the rest of the neck. Has anyone experienced a neck cracking on this ring?”
Randy Robinett, who runs BIB Bullet Co., is one of the “founding fathers” of the 30 BR who help prove and popularize the 30 BR for benchrest score shooting. Randy offers this advice on 30 BR case-forming:
While the thinner neck-base was one of our original concerns, unless one cuts too deeply INTO the shoulder, it is not a problem. For my original 30BR chamber, thirty (30) cases were used to fire 6,400 rounds through the barrel. The cases were never annealed, yet there were ZERO case failures, neck separations, or splits. The case-necks were turned for a loaded-round neck diameter of .328″, and, from the beginning, sized with a .324″ neck-bushing.
The best method for avoiding the ‘bulge’ is to fire-form prior to neck-turning (several methods are successfully employed). Cutting too deeply into the shoulder can result in case-neck separations. I have witnessed this, but, with several barrels and thousands to shots fired, have not [personally] experienced it. The last registered BR event fired using that original barrel produced a 500-27x score and a second-place finish. [That’s] not bad for 6K plus shots, at something over 200 firings per case.
Check Out the 30 BR Cartridge Guide on AccurateShooter.com
You’ll find more information on 30 BR Case-forming in our 30 BR Cartridge Guide. Here’s a short excerpt from that page — some tips provided by benchrest for score and HBR shooter Al Nyhus:
30 BR Case-Forming Procedure by Al Nyhus
The 30 BR cartridge is formed by necking-up 6mmBR or 7mmBR brass. You can do this in multiple stages or in one pass. You can use either an expander mandrel (like Joe Entrekin does), or a tapered button in a regular dies. Personally, I use a Redding tapered expander button, part number 16307. This expands the necks from 6mm to .30 cal in one pass. It works well as long as you lube the mandrel and the inside of the necks. I’ve also used the Sinclair expander body with a succession of larger mandrels, but this is a lot more work and the necks stay straighter with the Redding tapered button. This button can be used in any Redding die that has a large enough inside diameter to accept the BR case without any case-to-die contact.
Don’t be concerned about how straight the necks are before firing them the first time. When you whap them with around 50,000 psi, they will straighten out just fine! I recommend not seating the bullets into the lands for the first firing, provided there is an adequate light crush-fit of the case in the chamber. The Lapua cases will shorten from approx. 1.550″ to around 1.520″ after being necked up to 30-caliber I trim to 1.500″ with the (suggested) 1.520 length chambers. I don’t deburr the flash holes or uniform the primer pockets until after the first firing. I use a Ron Hoehn flash hole deburring tool that indexes on the primer pocket, not through the case mouth. — Al Nyhus
Here’s a November video bonus for our Daily Bulletin readers. Today we showcase three of the most amazing 3D “cutaway” gun animations ever created. Watch the operations of a pump shotgun, bolt-action rifle, and semi-automatic pistol. The superb cutaway views show details of the firearms’ internal parts, and show how ammunition cycles start to finish. Each of these videos took hundreds of man-hours to create, and each has been watched many millions of times.
Remington 870 Pump-Action Shotgun
This 3D animation shows how a Remington 870 pump-action shotgun works. The animation is superbly done, showing every aspect of the internal operation. Folks, if you have any interest in shotguns you should definitely watch this video start to finish. This shotgun video has received 3.9 million views in just 10 days!
The video’s talented creator, Matt Rittman states: “Cinema 4D was used to create each individual part, as well as animating everything. Substance Painter was used to create the wood stock and fore-end textures. Corona renderer was used for final output of lighting and textures.” See more of Matt’s 3D videos on his popular YouTube Channel.
This 3D animation showing how a Mauser Karabiner 98K (KAR 98K) bolt-action rifle works. The Karabiner 98K is a controlled-feed bolt-action rifle based on the famous Mauser M98 system. Video creator Matt Rittman notes: “Cinema 4D was used to create each individual part, as well as animating everything. Substance Painter was used to create the wood stock texture. Corona renderer was used to render everything. This animation took me over 500 hours to create.” This video has been watched over 21 million times!
Every bolt-action rifle owner should watch this remarkable video. It shows key processes which are common to many actions — Cocking the Bolt, Feeding from magazine, Engagement of Bolt Lugs, Activation of Trigger and Movement of Firing Pin, and Extraction with Ejection. The modeling of the inside of the bolt and fire-control group is excellent. This really is a superb video that will help rifle owners understand what happening inside their guns as the bolt is cycled. See more of Matt’s 3D videos on his popular YouTube Channel.
This 3D animation demonstrates how a modern semi-automatic, double-action-only Glock 19 handgun works. Cinema 4D was used to create each individual part, as well as animating everything. Substance Painter was used to create the main textures. Corona renderer was used to render everything. This animation took me over 500 hours to create. one of the most-watched gun videos ever created, this Glock 19 animation has been viewed over 78.6 MILLION times!
Video Highlights for Glock 19 Pistol
0:00 Intro
0:11 Basic Function
0:39 Case Extraction
0:47 Cartridge Loading
1:02 Trigger Reset
About Matt Rittman, the 3D Animator/Artist These three amazing videos were all created by the gifted computer graphics artist Matt Rittman. On his Matt Rittman YouTube Channel, Matt states: “I’m a 3D Generalist/Motion Designer from Des Moines, Iowa. I have always enjoyed animation and illustrating how things work. I’m especially interested in cars and anything mechanical.
My aim for this channel is to provide easy to understand how-it-works 3D animations. I will occasionally be releasing tutorials centered around Cinema 4D and the different capabilities of the software.”
Any long range shooter knows that wind is our ultimate nemesis. The best ways of overcoming wind are to measure what we can and use computers to calculate deflection. The Applied Ballistics Kestrel is a great tool for this. As good as our tools may be, we don’t always have them at our fingertips, or they break, batteries go dead, and so on. In these cases, it’s nice to have a simple way of estimating wind based on known variables. There are numerous wind formulas of various complexity.
The Applied Ballistics (AB) Wind Hack is about the simplest way to get a rough wind solution. Here it is: You simply add 2 to the first digit of your G7 BC, and divide your drop by this number to get the 10 mph crosswind deflection. For example, suppose you’re shooting a .308 caliber 175-grain bullet with a G7 BC of 0.260 at 1000 yards, and your drop is 37 MOA. For a G7 BC of 0.260, your “wind number” is 2+2=4. So your 10 mph wind deflection is your drop (37 MOA) divided by your “wind number” (4) = 9.25 MOA. This is really close to the actual 9.37 MOA calculated by the ballistic software.
WIND HACK Formula
10 mph Cross Wind Deflection = Drop (in MOA) divided by (G7 BC 1st Digit + 2)
Give the AB wind hack a try to see how it works with your ballistics!
Some Caveats: Your drop number has to be from a 100-yard zero. This wind hack is most accurate for supersonic flight. Within supersonic range, accuracy is typically better than +/-6″. You can easily scale the 10 mph crosswind deflection by the actual wind speed. Wind direction has to be scaled by the cosine of the angle.
Splatterburst 1″ circles, 62 per sheet, 10-pk $9.99. These can be pasted on other paper backers.
We’ve all seen conventional splatter targets with a single large black bullseye. When a shot hits the target, a halo (usually neon yellow) appears around the bullet hole. This makes it easier to see your shot placements indoors, or at long range outdoors. Today we feature a variety of other targets that also offer the cool halo/splatter effect. We’ve found grids, multiple bull targets, sheets with 62 one-inch circle pasters, handgun training targets, and even white background splatter targets (that produce black halos). Try out some of these targets for fun (kids love plinking with splatter targets).
Ruger has created a helpful set of online resources for new Firearm owners. The New Firearm Owner Resources site features a Fundamentals of Firearms Ownership Video Series, Industry Resources for local “hands-on” training, as well as information on safe storage. In addition, this online Resource Center offers a full library of product instruction manuals along with suggestions for recommended safety equipment.
There are a variety of informative videos, hosted by Mark Gurney, Ruger Director of Product Management. These short (2 min. on average) videos provide key information for new gun owners. If you have friends or family members who are new gun owners, they should watch these videos.
Introduction for New Firearms Owners
Safety Rules — The FOUR Fundamental Safety Rules
Range Safety Equipment — What You Need
This video reviews essential Eye and Ear Protection for shooters.
For many years, the U.S. Army Marksmanship Unit (USAMU) regularly published reloading “how-to” articles on the USAMU Facebook page. In this article, the USAMU’s reloading gurus address a question frequently asked by prospective handloaders: “Should I buy a single-stage press, or a progressive?” The USAMU says the best answer is Solomon-esque in both its wisdom and simplicity: “Get BOTH!” However, there is definitely more to the issue, as the USAMU explains below.
Progressive Press Safety Considerations
by USAMU Staff
Many are the beginning handloaders who have asked a friend about their “setting up” a progressive press for them. The idea is that the newbie could then just feed in components and crank out buckets of practice ammo without needing to really learn much about handloading. Tempting though this might be, that’s simply not how it works. Such an approach might be ok if there were never a malfunction with either press or operator, but that’s unrealistic. Our hypothetical newbie would then lack the knowledge to problem-solve most situations.
Worse yet, several different handloading operations would be occurring at different stations on the progressive press at the same time. It takes an experienced operator to keep track of, and truly understand the significance of, all those potential mini-problems. Loading without this experience is a recipe for potential disaster – such as a double powder charge (especially with pistol cartridges) dropped while the loader was attending to some other function, etc. Progressives are an animal unto themselves, and while they offer many benefits, they do take some getting used to – even by experienced handloaders!
ILLUSTRATIVE HORROR STORY
Here, enter a 40-year veteran handloader who decided to jump onto the progressive bandwagon late in his career, having used only single-stage presses all his life. A High Master NRA High Power Rifle competitor, he had no background in competitive pistol shooting, where historically most progressive presses are found.
Experienced Action Pistol shooters have typically encountered multiple episodes in which shooters “skipped” a powder charge for some reason, leading to a squib round and a bullet possibly lodged in the bore. Thus, at matches, it’s reflexive for them to yell “STOP!” in unison if they see a shooter get a “click” vs. a “bang”, and rack the slide to keep firing. This writer has personally seen several pistols saved in just such scenarios over the years.
Click No Bang — What NOT to Do
Our High Master set up a popular progressive press and began turning out .223 Rem 100-yard practice ammo with abandon. He was using a moly-coated 52gr match bullet and an economical, fast-burning surplus powder that gave great accuracy. Once on the range, he began practicing strings of rapid-fire. All was well, until he heard “Click!” rather than “Boom”.
Lacking the above experience or onlookers to halt him, he reflexively operated the charging handle on his expensive, custom NM AR15 Service Rifle, and the next trigger squeeze reportedly registered on seismographs over at least a three-state radius. He sat, uninjured but bewildered, until the hail of expensive bits and pieces quit raining down around him.
When the smoke cleared, he immediately cursed the horrid, evil, demonically-possessed progressive press for this, his first-ever reloading mishap. His $1400 NM upper was ruined, but thankfully, his $800 pre-ban lower… and he had escaped injury.
This tale is told not to discourage the use of progressive presses, but to emphasize the need to EASILY and IMMEDIATELY KNOW what is happening with the press at each station, every time the handle is cranked. Not to do so is, as they say, “bad ju-ju.”
It illustrates why we at the USAMU Handloading Shop agree in recommending that new handloaders should begin with a single-stage press. Once one thoroughly learns the steps in each phase of handloading by repeated experience, then one will be qualified to move on to a progressive press.
The single-stage press will REMAIN virtually indispensable for one’s entire handloading career, even after having purchased a progressive press (or two). There are endless small projects that are best handled on a single-stage press, and a poll of USAMU’s Handloading staff reveals that not one would willingly be without his single-stage press, despite owning at least one progressive.
As wintertime approaches, many of our readers will be switching to indoor shooting for a few months. Practicing at indoor ranges can be fun with both handguns and rifles (with permitted chamberings). But indoor shooters must be aware of noise issues and general safety concerns.
There are important safety and behavior rules you need to follow at a gun range. Sometimes bad range etiquette is simply annoying. Other times poor gun-handling practices can be downright dangerous. The NRA Blog has published a useful article about range safety and “range etiquette”. While these tips were formulated with indoor ranges in mind, most of the points apply equally well to outdoor ranges. You may want to print out this article to provide to novice shooters at your local range or club.
8 Tips for Gun Range Etiquette
Story by Kyle Jillson for NRABlog
Here are eight tips on range etiquette to keep yourself and others safe while enjoying your day out [at the range]. Special thanks to NRA Headquarters Range General Manager Michael Johns who assisted with this article.
1. Follow the Three Fundamental Rules for Safe Gun Handling
ALWAYS keep the gun pointed in a safe direction.
ALWAYS keep your finger off the trigger until ready to shoot.
ALWAYS keep the gun unloaded until ready to use.
This NSSF Video Covers Basic Gun Range Safety Rules:
2. Bring Safety Gear (Eye and Ear Protection)
Eye and Ear protection are MANDATORY for proper safety and health, no matter if “required” by range rules or not. It is the shooter’s responsibility to ensure proper protection is secured and used prior to entering/using any range. Hearing loss can be instantaneous and permanent in some cases. Eyesight can be ruined in an instant with a catastrophic firearm failure.
3. Carry a Gun Bag or Case
Common courtesy and general good behavior dictates that you bring all firearms to a range unloaded and cased and/or covered. No range staff appreciates a stranger walking into a range with a “naked” firearm whose loaded/unloaded condition is not known. You can buy a long gun sock or pistol case for less than $10.
4. Know Your Range’s Rules
Review and understand any and all “range specific” rules/requirements/expectations set forth by your range. What’s the range’s maximum rate of fire? Are you allowed to collect your brass? Are you required to take a test before you can shoot? Don’t be afraid to ask the staff questions or tell them it’s your first time. They’re there to help.
5. Follow ALL Range Officer instructions
ROs are the first and final authority on any range and their decisions are generally final. Arguing/debating with a Range Officer is both in poor taste and may just get you thrown out depending on circumstances.
6. Don’t Bother Others or Touch Their Guns
Respect other shooters’ privacy unless a safety issue arises. Do NOT engage other shooters to correct a perceived safety violation unless absolutely necessary – inform the RO instead. Shooters have the right and responsibility to call for a cease fire should a SERIOUS safety event occur. Handling/touching another shooter’s firearm without their permission is a major breech of protocol. Offering unsolicited “training” or other instructional suggestions to other shooters is also impolite.
7. Know What To Do During a Cease Fire
IMMEDIATELY set down your firearm, pointed downrange, and STEP AWAY from the shooting booth (or bench). The Range Officer(s) on duty will give instructions from that point and/or secure all firearms prior to going downrange if needed. ROs do not want shooters trying to “secure/unload” their firearms in a cease fire situation, possibly in a stressful event; they want the shooters separated from their guns instantly so that they can then control the situation as they see fit.
8. Clean Up After Yourself
Remember to take down your old targets, police your shooting booth, throw away your trash, and return any equipment/chairs, etc. Other people use the range too; no one wants to walk up to a dirty lane.
Sinclair Internationalhas released an interesting article about Case Concentricity* and bullet “run-out”. This instructional article by Bob Kohl explains the reasons brass can exhibit poor concentricity, and why high bullet run-out can be detrimental to accuracy.
Concentricity, Bullet Alignment, and Accuracyby Bob Kohl
The purpose of loading your own ammo is to minimize all the variables that can affect accuracy and can be controlled with proper and conscientious handloading. Concentricity and bullet run-out are important when you’re loading for accuracy. Ideally, it’s important to strive to make each round the same as the one before it and the one after it. It’s a simple issue of uniformity.
The reason shooters work with tools and gauges to measure and control concentricity is simple: to make sure the bullet starts down the bore consistently in line with the bore. If the case isn’t properly concentric and the bullet isn’t properly aligned down the center of the bore, the bullet will enter the rifling inconsistently. While the bore might force the bullet to align itself with the bore (but normally it doesn’t), the bullet may be damaged or overstressed in the process – if it even it corrects itself in transit. These are issues we strive to remedy by handloading, to maintain the best standard possible for accurate ammunition.
The term “concentricity” is derived from “concentric circle”. In simple terms it’s the issue of having the outside of the cartridge in a concentric circle around the center. That goes from case head and center of the flash hole, to the tip of the bullet.
Factors Affecting Concentricity
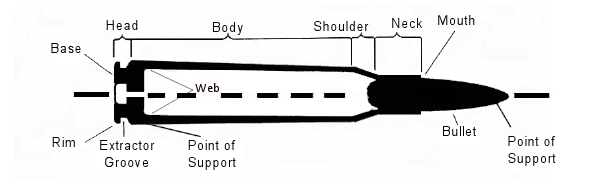
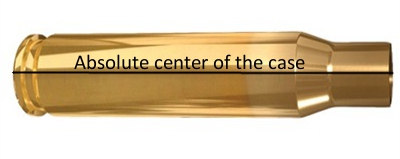
The point of using this term is to identify a series of issues that affect accurate ammunition. Ideally this would work best with a straight-walled case; but since most rifle cartridge cases are tapered, it equates to the smallest cross section that can be measured point by point to verify the concentric circle around the center. For the examples below, I’m working with .308 Winchester ammo.
Figure 1: The cartridge.
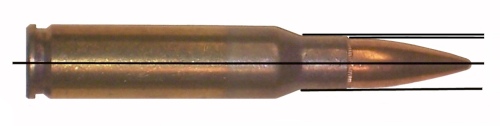
Figure 2: Centerline axis of the case, extending from flash hole to case mouth.
The case walls have to be in perfect alignment with the center, or axis, of that case, even if it’s measured at a thousandth of an inch per segment (in a tapered case).
Figure 3: Case body in alignment with its axis, or centerline, even in a tapered case.
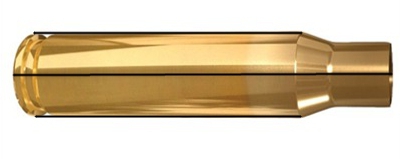
The case neck must also be in alignment with its axis. By not doing so you can have erratic bullet entry into the bore. The case neck wall itself should be as uniform as possible in alignment and in thickness (see the M80 7.62x51mm NATO cartridge in Figure 5) and brass can change its alignment and shape. It’s why we expand the case neck or while some folks ream the inside of the neck and then turn the outside for consistent thickness, which affects the tension on the bullet when seated.
Figure 4: Neck in alignment with center of the case axis.
Figure 5: Variations in case neck wall thickness, especially on some military brass, can cause an offset of the bullet in its alignment. This is an M80 ball round. Note the distinct difference of the neck walls.
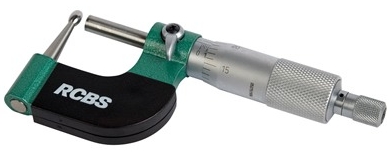
Having a ball micrometer on hand helps, especially with military brass like 7.62x51mm in a semi-auto rifle, where there are limits as to how thin you want the neck walls to be. In the case of 7.62 ball brass you want to keep the wall to .0145″.
Figure 6: A ball micrometer like this RCBS tool (#100-010-268) can measure case neck thickness.
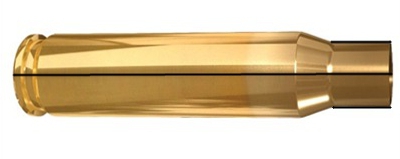
Turning the outside of the neck wall is important with .308 military cases regardless of whether you expand or ream the neck walls. There are several outside neck turning tools from Forster, Hornady, Sinclair, and others. I’ve been using classic Forster case trimming (#100-203-301) and neck turning (#749-012-890) tools for 40 years.
Bullet Run-Out
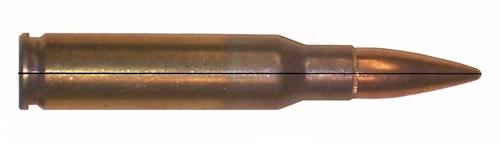
The cartridge, after being loaded, still needs to be in alignment with the center of the case axis. Figure 7 shows a bad example of this, a round of M80 ball. A tilted bullet is measured for what’s known as bullet “run-out”.
Figure 7: An M80 round with the bullet tilted and not aligned with the axis. This will be a flyer!
Run-out can be affected by several things: (1) improperly indexing your case while sizing, which includes not using the proper shell holder, especially while using a normal expander ball on the sizing die (it also can stretch the brass). (2) The head of a turret press can flex; and (3) improper or sloppy bullet seating. This is also relevant when it comes to using a progressive press when trying to load accuracy ammo.
Mid Tompkins came up with a simple solution for better bullet seating years ago. Seat your bullet half way into the case, back off the seater die and rotate the case 180 degrees before you finish seating the bullet. It cuts down on run-out problems, especially with military brass. You also want to gently ream the inside of the neck mouth to keep from having any brass mar the surface of the bullet jacket and make proper seating easier. A tilted bullet often means a flyer.
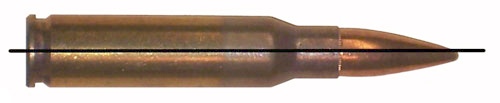
Figure 8: Proper alignment from the center of the case head to the tip of the bullet.
(NOTE: This links to a Web Archive version of the original Sinclair Int’l article.)
*Actually some folks would say that if we are talking about things being off-center or out-of-round, we are actually talking about “eccentricity”. But the tools we use are called “Concentricity Gauges” and Concentricity is the term most commonly used when discussing this subject.


 Quick Tip: Try Flipping Your Bushings
 The 30 BR is an amazing little cartridge. However, 30 BR shooters do have to neck-up 6mmBR or 7mmBR brass and then deal with some issues that can arise from the expansion process. One of our Forum members was concerned about the donut that can form at the new (expanded) neck-shoulder junction. Respected bullet-maker Randy Robinett offers tips on how to deal with the “dreaded donut”.

 These three amazing videos were all created by the gifted computer graphics artist Matt Rittman. On his