Hey it’s the end of the work week, so we thought you guys might enjoy a little display of honest-to-goodness American .50-Cal firepower. Today’s video features the General Dynamics GAU-19/B Gatling, shown in a vehicle mount (Part 1) and helicopter side-mount (Part 2). The HumVee-mounted version of this bad boy delivers 1300 rounds per minute of .50 BMG ammo. The effect is awesome to behold. We wouldn’t want to be on the receiving end of a GAU. The original GAU-19/A had a selectable rate of fire — either 1,000 or 2,000 rounds per minute. The GAU-19/B, introduced in 2012, provides the same firepower in a much lighter platform, weighing 106 pounds (not counting ammo storage systems).
Never had a chance to hunt prairie dogs in the American west? Then check out this video. Dan Eigen (aka “Walleye Dan”), host of the We Love It Outdoors Television series, head to South Dakota for some varmint hunting. Dan teams up with Varmint Hunter Association President Jeff Rheborg to patrol some South Dakota Dogtowns where things get serious. In the video, you’ll see p-dog hits at distances from 70 yards to roughly 450 yards. The hunters were shooting from portable, wood-topped swivel rests, using AR-platform rifles on X-type sandbag rest. (Rifle zeroing session is shown at the 5:30+ mark.)
Multiple cameras were employed so you can see both the shooter’s POV and close-ups of the prairie dogs downrange. Watch the shooters having fun with a prairie dog cut-out and some Tannerite at the 9:00-minute mark. This guys are having a grand old time sending critters to Prairie Dog Heaven — we think you’ll enjoy the video.
Prairie Dog Hunting Starts at 2:00 Time-Mark in Video:
NOTE: This video actually covers three sequences: 1) Three-gun training; 2) Prairie Dog Hunting; and 3) Coyote Hunting. We’ve embedded the video so it plays back the Prairie Dog segment from 2:00 to 15:15. If you wish, you can slide the controls forward or back to watch the other segments.
Video found by EdLongrange. We welcome reader submissions.
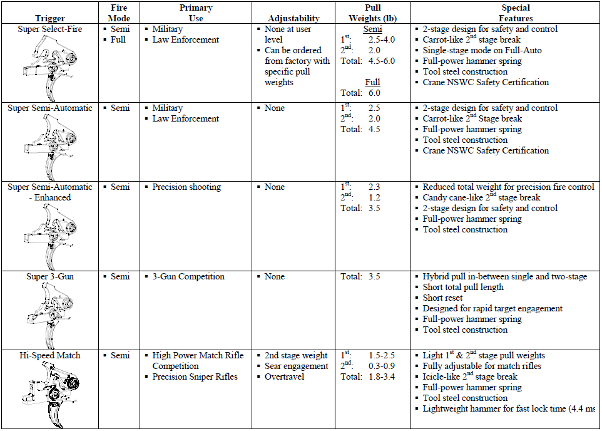
Geissele Automatics manufactures a line of two-stage triggers favored by top Service Rifle, High Power, and 3-Gun shooters. Geissele now offers a variety of trigger models for both large-pin and small-pin lowers, with pull weights from 1.8 lbs to 6.0 lbs. You select the Geissele trigger with the appropriate first and second stage pull for your discipline (refer to chart below for trigger model specs).
Video Shows Geiselle Trigger Installation in AR15
Our friend Gavin Gear of UltimateReloader.com has crafted a video showing how to install a Geissele National Match Trigger in an AR15. This video covers installation of the trigger assembly, the trigger guard, the safety selector lever assembly, and the pistol grip.
AR15 Trigger Installation Video
Follow-Up Video for AR10 Trigger Install
Gavin recently released a follow-up video which covers the installation of a Geissele Super Dynamic Trigger in an AR10. The procedure is mostly the same as for the AR15, but this video also covers removal of the AR10 factory trigger, so it’s worth watching. You may want to turn the volume down on your computer’s speakers before playback. CLICK HERE for Geissele Trigger Instruction Manual
In this video, Forum member Erik Cortina shows how to create a custom modified case for use with the Hornady Lock-N-Load Overall Length Gauge (formerly the Stoney Point Tool). While Hornady sells modified cases for many standard cartridges, if you shoot a wildcat such as the 6mm Dasher or .284 Shehane, you’ll need to create a custom modified case*. And even if you shoot a standard cartridge such as the .308 Winchester you can get more consistent measurements if you make a custom modified case from a piece of brass fired in your chamber.
The process is straight-forward. Take a piece of brass fired in your chamber and full-length size it (with about .002″ shoulder bump). Then you need to drill out the primer pocket. Erik uses a mini-lathe for the operation, but this general process can be done with a drill press or other tools. Erik shows how to do this with a 0.290″ HSS (High Speed Steel) drill bit on a mini-lathe. After drilling the hole comes the tricky part — you need to tap the case with the precise 5/16″ x 36 threads per inch (tpi) right-hand thread that matches the male thread on the O.A.L. Gauge. This 5/16″ x 36 tpi tap is pretty uncommon, but you can order it from Amazon.com if you can’t source it locally.
If you use a mini-lathe, Erik suggests loosening the tailstock slightly, so it can float while cutting the threads. Erik also says: “Make sure you get the tap on pretty tight — it’s going to want to spin.” Erik turns the case at about 100 rpm when tapping the threads. Once the case and tap are rigged, the actual tapping process (see video at 6:00) takes only a few seconds. While the mini-lathe makes the tapping process go more quickly, the threading can also be done with other systems.
TIP: Don’t just make one modified case, make three. That gives you one for your range kit, one for your home reloading bench, plus a spare (since you WILL eventually lose or misplace one).
Here’s the Stuff You Need
5/16″-36 TPI Threading Tap
The required thread is somewhat uncommon. You need a 5/16″ – 36 tpi Right Hand Thread Tap. If you can’t find it locally, Amazon.com carries the correct tap. Erik notes: “The 5/16-36 tpi tap is not a common size. I think Hornady did this on purpose to make it more difficult for the average guy to make his own modified cases.”
0.290″ Drill Bit
Erik uses an 0.290″ HSS “L” drill bit. (This “L” Letter Gauge code designates a 0.290″ diameter bit). A close metric equivalent would be 7.3 mm (0.286″). Erik says: “A 9/32″ drill will also work but it will be harder to run the tap in since the hole will be .281″ instead of .290″ with the Letter Gauge L bit.”
Tips for Using O.A.L. Gauge with Modified Case
We’ve noticed that many folks have trouble getting reliable, consistent results when they first start using the Hornady O.A.L. Gauge (formerly the Stoney Point Tool). We’ve found this is usually because they don’t seat the modified case properly and because they don’t use a gentle, consistent method of advancing the bullet until it just kisses the lands.
Here is our suggested procedure for use the O.A.L. Gauge. Following this method we can typically make three of four measurements (with the same bullet), all within .001″ to .0015″. (Yes, we always measure multiple times.)
1. Clean your chamber so there is no build-up of carbon, debris, or lube. Pay particular attention to the shoulder area.
2. Screw the modified case on to the O.A.L. Gauge. Make sure it is seated firmly (and doesn’t spin loose). Note, you may have to re-tighten the modified case after insertion in the chamber.
3. Place your selected bullet so that the ogive (max bullet diameter) is behind the case mouth. This prevents the bullet from “snagging” as you insert the tool in the action.
4. Insert the O.A.L. Gauge into your chamber smoothly. Push a little until you feel resistance. IMPORTANT — You need to ensure that the shoulder of the modified case is seated firmly against the front of your chamber. You may have to wiggle and twist the tool slightly. If you do not have the modified case seated all the way in, you will NOT get a valid measurement.
5. Advance the bullet slowly. (NOTE: This is the most important aspect for consistency!). Push the rod of the O.A.L. tool gently towards the chamber. DON’T shove it hard! Easy does it. Stop when you feel resistance.
6. IMPORTANT. After gently pushing on the rod, give the end of the rod a couple forward taps with your finger. If your bullet was slightly skewed, it may have stopped too far back. Adding a couple extra taps will fix that. If the bullet moves after the taps, then again push gently on the rod. NOT too much! You just want to push the bullet until it just “kisses” the lands and then stops. Do NOT jam the bullet into the rifling. If you do that you will never get consistent results from one measurement to the next.
* For a $15.00 fee, Hornady will make a custom modified case for you if you send two fired pieces of brass. Send fired cases and $15.00 check to: Hornady Manufacturing, Attn: Modified Cases, 108 S. Apollo St., Alda, NE 68810. More Info HERE.
How would you like to “reach out and touch” someone 203 kilometers away (about 110 nautical miles)? Well America’s Navy may soon be able to do exactly that with an amazing new, high-tech weapon system. BAE Systems has developed (and successfully test-fired) an electro-magnetic rail gun that fires a 23-lb projectile at Mach 7 — (about 5300 mph or 7800 fps). This futuristic weapon can send its projectile 110 nautical miles (126 mi / 203 km), five times the range of the big 16″ guns on WWII-era battleships. This railgun has serious “knock-down” power — at Mach 7, that projectile carries a whopping 32 megajoules of energy. BreakingDefense.com says: “23 pounds ain’t heavy. But it sure hurts when it hits you going at seven times the speed of sound.”
Watch Video to See Navy Rail-Gun in Action:
The latest prototype of the railgun developed by defense contractor BAE, in conjunction with the Office of Naval Research, can accelerate a projectile up to Mach 7 within 10 milliseconds. The gun uses no gunpowder to generate propelling force. Compared to an item on a smaller scale, the railgun projectiles resemble crossbow darts, except they deliver such massive Kinetic Energy they don’t need to carry explosive ordnance. The railgun can strike targets 110 nautical miles away.
To prepare a charge, the ship stores electricity in the pulsed power system. Next, an electric pulse is sent to the railgun, creating an electromagnetic force accelerating the projectile. Because of its extreme speed, the projectile eliminates the hazards of storing high explosives in the ship. Each shot costs about $25,000 — but that’s cheap compared to the price of a missile.
“It’s like a flux capacitor,” chief of Naval research Rear Admiral Mathias Winter said in a video posted by Reuters Friday. “You’re sitting here thinking about these next generation and futuristic ideas, and we’ve got scientists who have designed these, and it’s coming to life.”
The Electromagnetic Railgun Innovative Naval Prototype (INP) was initiated in 2005. The goal during Phase I was to produce a proof-of-concept demonstration at 32 mega-joule muzzle energy, develop launcher technology with adequate service life, develop reliable pulsed power technology, and assess component risk reduction for the projectile.
Phase II, which started in 2012, advanced the technology to demonstrate a repeatable-rate fire capability. Thermal-management techniques required for sustained firing rates will be developed for both the launcher system and the pulsed power system. The railgun will begin testing at sea in 2016.
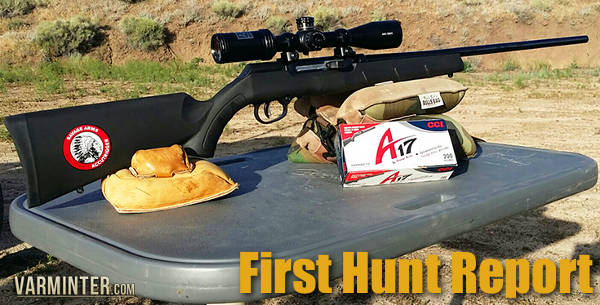
Varminter.com recently released a First Hunt Report on the new Savage A17 rifle. Savage’s new semi-auto .17 HMR has caused quite a stir. Accurate and affordable, the Savage A17 is also the first .17 HMR to feature a delayed blow-back action. We think the A17 may be the most important new rimfire rifle of 2015, so we were pleased to see that Eric Mayer, Editor of Varminter.com, put the new semi-auto Savage through its paces.
Mayer wanted to see how the new Savage would perform, accuracy-wise, and he also wanted to see how the A17 fared in the field. Mayer achieved one-MOA accuracy with the Savage A17 using the latest CCI-brand ammo, and he demonstrated the A17 is wickedly effective on ground squirrels. Below we’ve provided highlights from Varminter.com’s Savage A17 First Hunt Report.
The 2016 Summer Olympic Games will be held in Rio de Janeiro, Brazil. Marksmanship will be an important part of the Rio Olympics. Nearly 400 top shooters from around the world will compete in rifle, pistol, and shotgun events. The shooting competitions will take place in a large, modern sports complex originally created for the 2007 Pan-American Games at a cost of $53.5 million. This complex, located within the Deodoro Olympic Park in Rio, offers roughly 30,000 square meters of improved areas on the 125,000 square meter site. Brazil’s Olympic Shooting Center (also known as the National Shooting Center) is an impressive facility. In size, scale, cost, and capabilities, Rio’s Shooting Center is without rival in the Southern Hemisphere.
Video Showcases Brazil’s Modern Olympic Shooting Center:
ISSF World Cup Underway at Shooting Center Now
If you want to learn more about the Olympic Shooting Center in Rio, there is an good article on the Shooting Sports USA website. This covers the history of Brazil’s Olympic shooting teams, and explains what competitors can expect this summer. Right now the Olympic Shooting Center is being used for the ISSF World Cup.
2016 Olympic Dress Rehearsal
“The 2016 Olympic Games this August will be one of the largest sporting events ever held. There will be another contest this year in the wonderful city of Rio de Janeiro that will function as a ‘dress rehearsal’ for the big show. On April 14-25, the Olympic Shooting Center will host the International Shooting Sport Federation (ISSF) World Cup. During the 11-day competition, 700 athletes from dozens of countries will showcase their skills at the biggest shooting sport event in Brazil before the Olympics.” — Read more at Shooting Sports USA
The NRA Annual Meetings and Exhibits extravaganza is just over one month away. This year, the NRA will hold its annual gathering May 19-22 at the Kentucky Exposition Center in Louisville. This is a huge event with over 750 exhibitors in a 500,000 square-foot facility. The Exhibit Hall opens at 9:00 am on May 20th (Friday Morning).
You can Pre-Register now so your entry badge will be ready when you arrive.
This year’s NRA convention will feature a variety of special events, starting with the NRA Foundation Banquet on Thursday night, May 19th. The ever-popular NRA Country Jam kicks off at 6:00 pm on Friday, May 20th at Louisville’s Belvedere at Waterfront Park. The official NRA Members Meeting will be held Saturday morning at 10:00 in Freedom Hall at the Exposition Center. NRA leaders Wayne LaPierre, Chris W. Cox, and Allan Cors with address the membership. Many other seminars will be hosted over the course of the weekend. Purchase Event Tickets.
Many of our readers have concealed carry permits. When carrying a handgun concealed, holster choice is key. A good holster will carry more comfortably, “print” less, and be 100% secure while still allowing rapid access. Our systems admin Jay C. recently acquired a Walther PPS M2 as a carry gun. Jay has a CCW permit, and he sometimes chooses to carry a concealed handgun, particularly on trips.
After looking at many options, Jay chose a Kydex Clinger ATom Holster. These are very affordable, yet they have many great features. The most important design feature of the $19.99 Clinger Atom is the location of the belt clip. This is placed over the trigger guard area, not the slide. This pulls the grip in closer than if the clip was mounted over the slide as on other holsters. This smart design feature really works, improving concealment and comfort. Jay says: “the Atom works great with my little Walther — it’s very stable and comfortable.”
The $19.99 Clinger Atom also offers adjustable “ride height”. This is accomplished by moving the belt clip up or down. Holster retention (the clamping tightness) is easily adjusted with a simple hex screw.
Along with its popular Atom holster, Clinger offers two other holsters: 1) the $29.99 Stingray model (with choice of 0°, 15°, or 30° cant); and 2) the dual-clip, ultra-thin No-Print Wonder Holster priced at $59.99. The latter is a good choice for carrying a heavier pistol for long periods. All three holsters (Atom, Stingray, No Print Wonder) are shown in the video above.
Clinger offers a Zero-Risk Guarantee. Try any Clinger holster for two weeks. If you don’t like it, you can return it for a full refund. There is also a “Bumper-To-Bumper Lifetime Warranty”. If anything on your Clinger Holster ever needs repair the manufacturer will repair it or replace it for free.
Do you shoot with a SEB joystick-equipped bipod, or are you considering acquiring a “Joy-Pod” for your F-TR rifle? Then you should read this article. Here Sebastian (“Seb”) Lambang, the inventor and builder of the SEB joystick bipod, offers tips on shooting with this impressive piece of engineering. Seb explains some techniques that can help with tracking and getting back on target. You can ask SEB questions about his Joy-Pod in this Shooter’s Forum Thread.
Joy-Pod Shooting Tipsby Seb Lambang
1. Be sure that the rear bag is settled before starting to shoot. Tap your stock into the bag. Then move your rifle back and forth, while checking your reticle. If it tracks straight, vertically perfect, and comes back to the original point of aim, it’s fine. If not, re-adjust.
2. If you use the Pod-Pad, be sure it is fully settled before starting to shoot. Tap the top where the feet rides on using your palm — you wan to create a flat top. To be sure the Pod-Pad does not move or slide, remove any gravel or pebbles under the pad — these can act as roller bearings.
3. Be sure your shooting mat is NOT springy or spongy. This is very important. Use a proper mat, or cut it if possible so your rear bag rests directly on the ground. Use a heavy rear bag. You can use a sand-filled doughnut (not a rigid spacer) to stabilize the bag on uneven ground. These doughnuts are relatively inexpensive and really work.
4. Be sure your whole body position is correct, so your shoulder is square. “Follow” the recoil with your shoulder, don’t push “against” it. Don’t move too much. Don’t make unimportant movements during your shooting string. Always be as consistent as you can in all things — how you hold the rifle, even how you breathe before taking the shot.
This young lady shooter is using a first generation Joy-Pod. The newer versions have flat, ski-like feet.
5. Be sure your rifle and rear bag are aligned. You want the slot between the ears of the bag perfectly aligned with your barrel. (You can use a yardstick or a piece of string to help with the alignment).
6. Use a heavy rear bag. The heavier and the more stable, the better.
7. It does not matter (from my own experience) whether you light-hold the joystick or leave the joystick in the air when you shoot (see Darrell Buell video — he shoots “hands off”). I believe the bullet already exits the muzzle before the joystick moves in your fingers. I lightly hold the joystick myself, just as I would hold a billiard stick.
Watch Darrell Buell shooting his .375 CheyTac equipped with a counter-balanced Joy-Pod. Note how the gun comes straight back, and how Darrell can release the joystick before breaking the shot.
SUMMARY — When It All Comes Together
If everything is set up right, and done correctly, your rifle will track beautifully straight and your reticle will come back or very close to the original point of aim, every time. If you have to change the Joy-Pod, rear bag, or your body position after a shot, there could still be something wrong with your set-up, alignment, or body position. When everything is right, you can also see your own score in the scope after every shot you make (after initial recoil). You also should not have to change the bipod’s setting, the height, the cant etc., at all. You only need to adjust for the current condition with the joystick, the joystick will do it all. That’s why we call our bipod the JOY-Pod.
SEB JOY-POD Joystick Bipod, and POD-PAD
Weighing in at just 18 ounces (510 grams), the Gen 2 Joy-Pod is unlike any other bipod on the market. Designed specifically for weight-restricted shooting classes, the Joy-Pod offers smooth and precise joystick-controlled aiming. The Gen 2 model offers up to 14 degrees of cant and an improved design that functions with up to 50 pounds of rifle weight. Each Joy-Pod comes with a Weaver rail adapter. The optional Pod-Pad accessory is designed expressly for the Joy-Pod. It works filled or unfilled with the Joy-Pod’s sleds to bring you back to your shooting position easily. CLICK HERE for more information, or visit SebRests.com.
.308 Win Tactical Rifle fitted with Joy-Pod on Pod-Pad. CLICK HERE for Video.


 Hey it’s the end of the work week, so we thought you guys might enjoy a little display of honest-to-goodness American .50-Cal firepower. Today’s video features the General Dynamics GAU-19/B Gatling, shown in a vehicle mount (Part 1) and helicopter side-mount (Part 2). The HumVee-mounted version of this bad boy delivers 1300 rounds per minute of .50 BMG ammo. The effect is awesome to behold. We wouldn’t want to be on the receiving end of a GAU. The original GAU-19/A had a selectable rate of fire — either 1,000 or 2,000 rounds per minute. The GAU-19/B, introduced in 2012, provides the same firepower in a much lighter platform, weighing 106 pounds (not counting ammo storage systems).


 Never had a chance to hunt prairie dogs in the American west? Then check out this video. Dan Eigen (aka “Walleye Dan”), host of the