This can be very important — even life-saving. For example, with a hang fire, i.e. a round that does not fire immediately, it is vital to keep the gun pointed DOWN-RANGE. And with a squib load, which may have left a round inside the barrel, it is vital to UNLOAD and NOT take another shot! If you did, the gun could blow up in your hand when the second, full-charge bullet hits the trapped bullet.
The Five Topics Covered Are:
Misfeed (aka Tip-Up)
Double Feed
Stovepipe (Failure to Extract)
Misfire / Hangfire
Squib Load
1. Misfeed or Tip-Up: With any misfeed you should stop firing. With the muzzle pointed safely down-range, remove the magazine, then pull the slide back and remove the round that did not feed. Check the slide for dirt, debris, and check the round that did not feed. After re-inserting the magazine, make sure the mag is seated properly.
2. Double-Feed: This is a fairly common issue with some gun types with worn springs or cheap magazines. Again you want to remove the magazine. CTD states: “Remove the magazine and cycle the action until your double-fed rounds fall out — always keeping the muzzle pointed in a safe direction[.]”
3. Stove-Pipe: This occurs when the case of a fired round does not eject fully. There can be many causes — damaged extractor, low-pressure powder charge, dirty chamber, or greasy cartridge brass. In addition the issue is common with old, worn-out recoil springs. To avoid Stove-Pipes, replace the recoil spring every 4000 rounds, and make sure your chamber is clean and the extractor is not chipped or damaged.
4. Misfires and Hang-Fires: There are multiple causes for misfires (“click no bang”) and hang-fires (slow ignition). There can be a defective primer, the firing pin could be damaged, the powder many have been bad, or the case not filled properly. With a misfire, keep the gun pointed down-range at least one minute. If the case does not fire, eject it but leave it on the ground. With a hang-fire (delayed ignition after firing pin strike), keep the gun pointed down-range, then drop the magazine and eject the (new) unfired cartridge in the chamber and inspect the gun when completely empty.
5. Squib Load: A squib load is when the gun fires, but the actual case ignition is very light with little noise, smoke, or recoil. This can be because the case had a primer but no powder. Or it can be because the powder did not ignite. Squib loads can be very dangerous in rapid-fire situations. If you EVER get a squib load STOP immediately! Do NOT fire another round! This is because the squib may have left a bullet inside the barrel.
Ever wondered what the air around a moving supersonic bullet really looks like? Check out this video from the Bryan Litz Ballistics Facebook page. This is a Schlieren video* of a 6mm 109gr Berger LRHT bullet at about 2800 fps as fired from Francis Colon’s PRS rifle at the Applied Ballistics Lab.
Bryan Litz notes: “You can clearly see the compression (shock) wave at the front of the bullet. A compression wave is formed when the air has to move faster than the speed of sound to get out of the way, which is certainly the case for this bullet which is moving about 2.5 times the speed of sound (Mach 2.5).
That shock wave is the ‘snap’ you hear when bullets fly past you if/when you’re downrange. Also, compressing the air into a shockwave takes energy, and that energy comes directly out of the forward velocity of your bullet and gets converted into heat and noise as the shock wave forms and dissipates.
The turbulent wake at the base of the bullet shows where/how base drag applies. The third and smallest component of drag for a supersonic bullet is skin friction drag, which is a viscous boundary layer effect, and is the least visible in this image. So as you head to the range or the hunting stand, think about the absolute violence your bullets are committing in the atmosphere, before they even reach the target!”
You can spend thousands on a rifle, but that expensive hardware won’t perform at its best if you have poor trigger technique. One key element of precision shooting is trigger control. Our friend Kirsten Joy Weiss has produced a good video that shows how to refine your trigger technique for better accuracy. In this video, Kirsten talks about the actual placement of a shooter’s index finger on the trigger. It is important to have the finger positioned optimally. Otherwise you can pull the shot slightly left or slightly right.
Kirsten tells us: “Finger placement on the trigger might not seem like a big deal, but it actually is. The reason for this is because, depending on where your index finger is placed on the trigger, [this] translates to different muscle interactions with the gun.” Watch this video to see Kirsten demonstrate proper finger placement (and explain problems caused by improper finger positioning).
When you pull the trigger, you only want to engage the last section of your finger, in order to avoid unwanted muscle engagement and to achieve a smooth shot. Remember there is a “sweet spot” between the crease (first joint) and the tip of the finger. If you position the trigger in that “sweet spot”, you should see an increase in your accuracy. Don’t make the mistake of putting the trigger in the crease of your finger, as shown below.
Effects of Incorrect Finger Placements
You want to place the trigger shoe between the end of your finger and the first joint. If you place the trigger on the very tip of you finger you’ll tend to push the rear of the rifle to the left when engaging the trigger, causing shots to go right (for a right-handed shooter). On the other hand, if you put the trigger in the crease (first joint), you’ll tend to bring the rear of the rifle to the right, causing shots to fall left. This is illustrated below for a right-handed shooter.
Shooting indoors is fun, and at many indoor ranges you can shoot in the evening after work. But when shooting indoors you should always be extra careful. Follow all key gun safety practices and adhere to proper range “Etiquette”. We also recommend double hearing protection — plugs under muffs.
The NSSF (NSSF) offers a useful Range Safety and Etiquette video. This 8.5-minute video explains safe practices, especially at indoor ranges. In the video, the moderator list the basic rules of gun safety, before covering key range etiquette topics such as range officer commands, how to uncase your firearm on the range when you first arrive, and what to do if a firearm is accidentally dropped. There are also safety tips specific to handling both semi-automatic handguns and revolvers.
BAD RANGE BEHAVIOR — Five Things NOT to Do at the Range
Here are the five worst behaviors we’ve seen at indoor ranges. These behaviors are both dangerous and inconsiderate. Any one of these behaviors can get you permanently banned from an indoor range.
1. Sweeping other individuals after loading a weapon behind the firing line is very bad. All your weapons should be empty until you reach your shooting station.
2. Turning the handgun sideways while trying to clear a malfunction or insert/remove a magazine. This will point the muzzle at a fellow shooter. Or, after shooting a gun, the shooter fails to clear the weapon and then places the gun somewhere near the shooting station with the muzzle in an unsafe position.
3. Reacting unpredictably when firing a high recoil handgun. We’ve seen people take a second shot by accident with the muzzle way off target.
4. Not obeying range commands — in particular continuing to shoot during called cease-fires.
5. Poorly aimed shooting that hits target frames or carriers, causing ricochets.
Seven Types of People at the Gun Range — HUMOR
This video is satire, but with lots of truth in the characterizations. Laughter guaranteed.
Double-Up on Hearing Protection When Shooting Indoors
When shooting rifles and pistols indoors we recommend quality muffs with earplugs underneath, offering double protection. When inside an enclosed range, with other shooters blasting away right next to you, you really need effective hearing protection. But you also need to hear range commands and be able to communicate with your fellow shooters. That’s why we recommend electronic muffs with plugs underneath.
Hunting season is starting soon in most areas of the country. Here’s a way you can improve your hunting skills/knowledge. The NRA is offering a FREE online Experienced Hunter Education Course for those preparing to take advantage of the 2024 hunting season.
“Our Experienced Hunter Education Course provides those who might have taken a season or two off a convenient way to sharpen their skills before heading back into the field,” said Peter Churchbourne, director of NRA’s Hunters Leadership Forum.
NRA’s free 2-hour course is a firearm and hunting safety-training refresher in a convenient and engaging platform available through desktop, tablet, or smartphone. The course is available to everyone at www.NRAEHE.org. NOTE: The course is NOT a substitute for state-mandated hunter safety requirements and does not offer any certifications.
The NRA’s NRA Experienced Hunter Education Course, is an online training program designed to help hunters brush up their skills. Free to all, this comprehensive hunting refresher course will help hunters become safer and more confident before heading out into the field. CLICK HERE for more information.
“If you’ve taken a break from the shooting sports or haven’t hunted in a season or two, our Experienced Hunter Education Course is the perfect refresher for firearms safety and safe hunting practices,” explained Elizabeth Bush, managing director of NRA Community Engagement. “Best of all, we’re offering this service completely free of charge.”
Course Description
This online training course is specifically designed for individuals who have not hunted in the past year or more and are looking for a safety refresher before they head back out in the field. In this course, hunters will have the opportunity to refresh their skills by taking a look at safe hunting practices and firearms safety. Once completed, you will be a safer hunter in the field.
409,000,000 views! Today’s five feature videos have, collectively, been viewed 372 million times on YouTube. Today’s Saturday special features five remarkable animated firearms videos from Matt Rittman, a very talented computer graphic artist. Matt employs multiple software programs to create these incredibly detailed animations. His software tools of the trade include Cinema 4D, Substance Painter, and Corona renderer. Don’t think this is easy. Some of these videos took over 500 man-hours to create. Enjoy!
AR-15 Full Animation — Components and Function
While there are other AR-15 animations on YouTube, we think this is the most accurate and creative, showing the function of a wide variety of components, including the bolt carrier, extractor, trigger, stock buffer, safety system, forward assist, and mag release. It also shows modes of a military M16, showing 3-round burst fire, and full-auto, employing disconnectors and auto sear. If you are planning to assemble/disassemble an AR, this is definitely worth watching start to finish. This video has recorded over 2 million views in just three weeks!
4:00 Auto Fire
4:58 Burst Fire
6:22 Bolt Catch
6:40 Sights
7:33 Adjustable Stock
7:50 Ejection Port Cover
Mauser Kar-98K Bolt Action Rifle video
This elaborate 3D animation shows how a Mauser-type Karabiner 98 Kurz (aka Kar-98K) bolt-action rifle works. Substance Painter was used to create the wood stock texture. Creator Matt Rittman states that this 3.7 minute video took over 500 man-hours to create. You have to admire the dedication involved in that kind of hard work.
This 3D animation video shows the popular Glock 19 (Gen 4) pistol. This modern, polymer-framed, striker-fired pistol has constant trigger pull for all shots. Some folks call this a DAO (double-action-only) trigger but that’s not really correct. Unlike the Model 1911, on a Glock there is no external safety on the frame or slide. The trigger “shoe” (the part that contacts finger) includes a central blade. This prevents the gun from firing unless the trigger is depresses normally. Glock calls this the “safe action”. The creator, Matt Rittman states: “Cinema 4D was used to create each individual part, as well as animating everything. Substance Painter was used to create the main textures. Corona renderer was used to render everything. This animation [with 84.6 million views] took me over 500 hours to create.”
Elements of Video:
0:11 Basic Function
0:39 Case Extraction
0:47 Cartridge Loading
1:02 Trigger Reset
1:28 Trigger Safety
Pump shotguns are essential firearms for hunting and home defense. The clever design of pump-action shotguns make them reliable even when feeding large diameter, blunt-ended 12 gauge shot-shells.
With 233 million views, this AK-47 video might just be the most-watched firearms tech video on YouTube. The video highlights the design features the account for the AK’s legendary reliability. For viewers with an eye to detail Matt adds this clarification: “The firing pin does NOT puncture the bullet primer. It just strikes it against the anvil, initiating the firing sequence.”
This new ultra-compact spotting scope that should prove useful for hunters and PRS/NRL competitors. The Vortex Viper HD 11-33x50mm spotting scope weighs just 27 ounces — great for back-country hunting where light weight and portability is crucial. This spotter is offered in both straight and angled models for $599.99. It employs a handy dual-focus system, allowing a rapid initial focus plus precision final focus.
The compact Viper HD 11-33×50 has an HD Optical System encased in rugged outer body with rubberized armor. About the size of a large water bottle, this compact, 27 oz. spotter stows easily in a pack. It features a removable eyepiece and has an ARCA mount for tripods.
- Compact and Lightweight maximizes portability for long treks
– Dual-Focus enables rapid and precise image focusing
– ARCA-Swiss Compatible enables quick, versatile, and secure mounting options
– Removable Eyepiece enhances packability, ideal for backcountry hunts
– Twist-up Eyecup provides customized eye relief
– Rubber Armor ensures durability, protection, and a non-slip grip
For a detailed list of technical specifications, frequently asked questions, and high-resolution images, check out the Viper® HD 11-33x50mm Spotter on the Vortex New Product Portal.
In a helpful NSSF video, Ryan Cleckner explains why you normally should avoid canting your rifle — rotating it clockwise or counter-clockwise. Cleckner explains that canting the rifle in one direction or another will change the point of impact: “When you rotate the rifle, not only does the [POI move] in the direction that you’re rotated, [but] it also loses some of its elevation as it rolls down.” This, Cleckner explains, can make you miss on one side or the other:
Cant to the Left — You’re going to miss low and left.
Cant to the Right — You’re going to miss low and right.
In this video, starting at the one-minute mark, Cleckner shows the effect of rifle canting when engaging a 600-yard target. A few degrees of cant (either to the left or to the right), moves the shot POI completely off the steel silhouette target. The POI change occurs mainly because you are lowering (and laterally shifting) the scope sight-line relative to the bore axis, effectively changing your zero.
David Tubb has explained: “Every 1 degree you are off on a cant, is about six inches of difference laterally at 1000 yards”.
Position Shooting with Sling — Rifle Cant Considerations
Cleckner’s discussion assumes that the scope or sights are set to hit center with the rifle level and plumb. That works for most situations when shooting prone off bipod, front mechanical rest, or front sandbag. However, many sling shooters, including David Tubb and John Whidden, do tilt or cant their rifles slightly inward because this allows a more comfortable hold with sling, or allows better eye-to-sight alignment. Holding the rifle at an angle can work — but the angle of cant must be consistent for every shot. Canting the rifle is not a sin by itself. However, after you confirm your zero on your target, the degree of cant must be the same for EVERY shot. You must maintain that exact same degree of rotation on each shot or you will experience the shot POI movement Cleckner illustrates. Consistency is the key.
John Whidden, 5-time Nat’l Long Range Champion, holds a Palma rifle. John now shoots a match rifle with an Anschutz stock which he holds more upright, but still with some counter-clockwise cant. John also installed his iron sights at an angle so that the adjustments are correct (and plumb) even with his canted hold: “While it may not be obvious in the picture, the sights on my rifle are set up so that they’re straight vertical and horizontal while I hold the rifle canted. Making sure your adjustments (scope or sights) are vertical and horizontal is a critical piece of the pie.”
Inexpensive Dual-Diameter Scope-Mounted Bubble Level
The best way to avoid inconsistent rifle canting is to use a bubble level fitted to rail or scope. One very affordable and versatile product is the Jialitte Scope Bubble Level. This features a 30mm milled inside diameter, plus an inner insert ring so it will also fit 1″-diameter main tubes. The Jialitte unit is nicely radiused, and has a low profile in the middle. User reviews have been very positive. You could easily pay $35.00 or more for a 30mm scope level. This costs just $9.99 on Amazon.
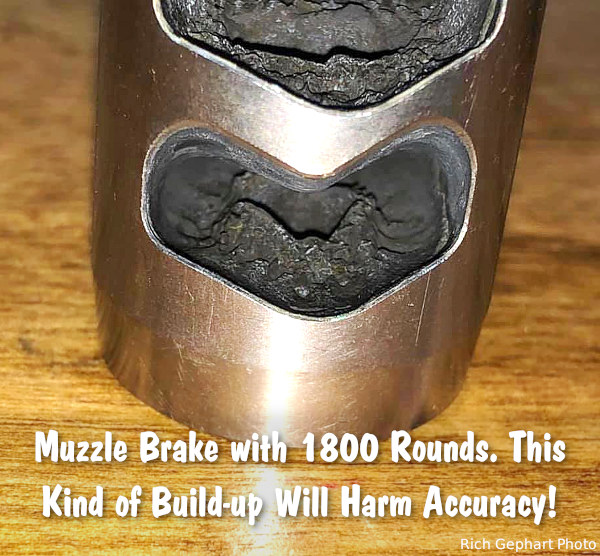
Many hunters and precision rifle competitors use muzzle brakes because these ported devices reduce felt recoil significantly. That makes a real difference getting back on target for quick follow-up shots. While many rifle owners appreciate the benefits of muzzle brakes, they may also neglect their brakes, allowing hard carbon and powder residue to build up. Not good. You should regularly clean your muzzle brake to remove fouling and carbon build-up.
As Mark Edgreen posted: “Carbon build up on the crown and in the brake is a recipe for poor accuracy.” And another gunsmith reported that customers complained about guns that “shot out way too early” but they only needed to have the brakes cleaned.
Gunsmith and PRS/NRL competitor Jim See recently reminded his Facebook Fans about the importance of cleaning muzzle brakes: “How many times do I have to say it? You need to maintain your rifles. Clean your muzzle brakes people!”. Jim, who runs Elite Accuracy LLC, notes that hard carbon build-up in brakes can definitely harm accuracy. Look at this example:
Muzzle Brake Cleaning Methods
There are various methods for cleaning a brake, we list a variety of techniques, but we would start with NON-corrosive ultrasound. You’ll want to remove the muzzle device before doing these tasks.
1. Use Ultrasonic Cleaning Machine with cleaning solution. This may be the most efficient method: “I place my brake in the ultrasonic cleaner. Shiney as new.” (Jim Moseley).
2. Spray with commercial Carb Cleaner and brush. Then apply anti-corrosion coating.
3. Soak in half hydrogen peroxide and half vinegar. Suggestion: “Let sit over night and carbon melts off. Brush remaining carbon off, rinse and put the brake back on.” Apply anti-corrosive before mounting.
4. Soak in 50/50 solution of water and white vinegar and brush. (Be sure to apply anti-corrosion coating, such as Eezox, after soaking).
5. Tumble in liquid solution with stainless pins. Comment: “Comes out slightly faded, but perfectly clean on stainless, non-painted brakes though.” Warning — do NOT do this with threaded brakes — tumbling could affect threads of screw-on brakes. Also, tumbling can harm painted or Cerakote finishes.
Gunsmithing Tip: By fitting the muzzle brake so that the barrel crown is slightly forward, it is easier to wipe carbon fouling off the end of the barrel. See photo:
Our friend Gavin Gear has just released an excellent video showing how to make a threaded Modified Case for use with the Hornady Lock-N-Load Overall Length Gauge. You can watch Gavin make a Modified Case start to finish in the video below:
Video Shows How to Drill and Tap Modified Case
Gavin has some clever tricks. First he uses a sizing die to hold the cartridge case during the threading process. Second he uses two drill bits in sequence — a smaller bit to ream out the primer pocket, and then a larger “M” bit to increase the hole diameter before threading the brass. Finally he leaves the threading tap IN the brass, locks the tailstock, and then “gently pulls on the quill” to remove the brass from the die held in his lathe (See 5:46 timemark).
Get the Correct 5/16″-36 RH Tap
Unfortunately, Hornady has selected an uncommon thread type for OAL Gauges. You probably won’t be able to buy the correct 5/16″ – 36 RH HSS Tap at your local hardware store. However you CAN order this special tap from Amazon for $9.99.
Modified Case Q & A — TECH TIPS
Why do I need a Modified Case?
Every serious reloader should have a Modified Case for each cartridge type they shoot. The reason is that this allows you to get very precise measurements of the length-to-lands in your chamber. When used with the Hornady OAL Gauge, with some practice, you should be able to get repeatable length-to-lands measurements within about 0.0015″. We generally do 4-5 measurements with the OAL Gauge and usually 3 or 4 will be “on the money”. NOTE: We recommend a gentle, easy pressure on the plastic pusher rod. Don’t push too hard or you will jam the bullet hard into the lands, which produces inconsistent results.
Can’t I Just Buy a Modified Case?
Hornady makes a variety of Modified Cases sold on Amazon and through retailers such as Midsouth. While Hornady makes modified cases for many standard cartridges, if you shoot a wildcat such as the 6mm Dasher or .284 Shehane, you’ll need to create a custom modified case. And even if you shoot a standard cartridge such as the .308 Win, you can get more consistent measurements with a custom Modified Case.
If you do decide to make your own modified case, you’ll want to start with a case that’s been fired in your rifle. That way you get the best fit to YOUR chamber. Also, you won’t need to expand the neck to provide bullet clearance. Then you need to drill out the primer pocket and tap the base of the case to match the threads on the Hornady OAL Gauge tool. Make at least two modified cases, as you’ll probably misplace one at some point.
MORE INFORMATION: Want to learn more? We published a much longer story in which Erik Cortina explains in greater detail how to made the Modified Case. That article illustrates the 5/16″ – 36 RH HSS Tap required and shows how to set up the lathe to drill and tap your case. If you are serious about making your own Modified Cases, you should Read the Full Article.