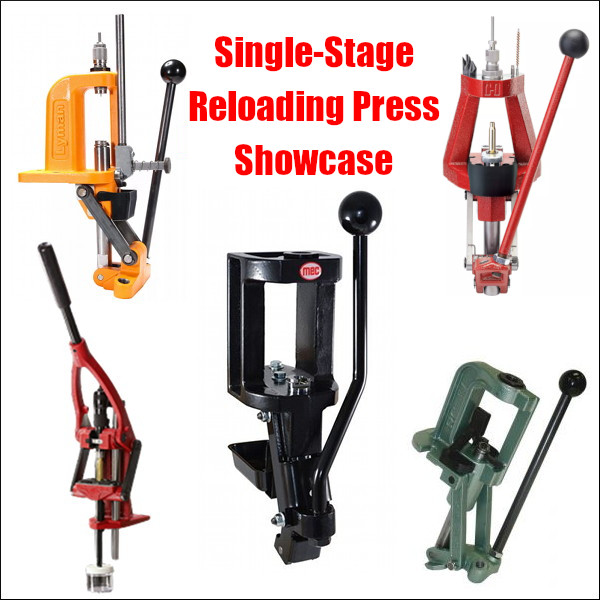
Hand-loaders have never had so many great choices in single-stage presses, with many different configurations and features. There are classic O-Frame presses, Coax-style presses, Open-front presses, Pyramid presses, and compact C-Frame presses. Here is our 2019 Single Stage Press Showcase with products from Forster, Hornady, Lee, Lyman, MEC, and RCBS. We’ve included short videos showing the features of these reloading presses.
If you are shopping for a new press you should look at the various features of each. You may prefer something classic like a Rock Chucker, or the innovative open-front MEC. If you are looking for a compact press to use at the range, the Lyman C-Frame is very impressive for the price. And the Forster Co-Ax remains a great addition to any loading room.
MEC Marksman Single-Stage Press
If you are looking for a new, full-size single-stage reloading press, definitely consider the MEC Marksman. Created by the makers of the popular MEC shotshell reloading systems, the MEC Marksman combines a sturdy cast-iron frame with a modern open-front design. If you are looking for a new, full-size single-stage reloading press, definitely consider the MEC Marksman. Created by the makers of the popular MEC shotshell reloading systems, the MEC Marksman combines a sturdy cast-iron frame with a modern open-front design. With a $239.99 street price, the MEC Marksman press now costs more than an RCBS Rock Chucker Supreme press, but the MEC offers some distinct advantages — such as an open front plus a floating shell-holder system.
Our friend Gavin Gear of UltimateReloader.com got his hands on a MEC Marksman press and put it through its paces. He came away impressed with the product, saying it delivers excellent performance, and has many impressive features. Gavin tells us: “Cast iron tools and machines are a lifetime investment. The made-in-USA MEC Marksman features ductile cast-iron construction, an open-front frame design for easy cartridge access, a new floating shell-holder design with a unique retention system, and ambidextrous handle setup.” MEC also offers a wide selection of accessories for the Marksman press, including a press riser/mount, shell-holder caddy, and die trays.
Forster Co-Ax Press
If you are not yet familiar with the many unique features of the Forster Co-Ax, we recommend you watch the video above, a very thorough video review by Rex Roach. This shows how the press operates and highlights the design elements which set the Co-Ax apart from every other reloading press on the market. This 14-minute video shows the key Co-Ax features, explaining how the floating case-holder jaws work (3:30 time-mark), how the dies are held in place (4:40 time-mark), how spent primers are captured (6:10 time-mark), and how to set the primer seating depth (10:00 time-mark). We’ve used a Co-Ax for years and we still learned a few new things by watching this detailed video. If you are considering purchasing a Co-Ax, definitely watch this video start to finish.
In recent years, Forster Co-Ax® presses have been somewhat hard to find, as demand has out-stripped supply. The Co-Ax has many dedicated fans, given its unique features, such as the floating case-holder jaws, and easy, rapid slide-in/slide-out die placement. We’ve also found that Co-Ax presses load very straight ammo and we like the ability to switch between short handle (good for bullet seating) and long handle (ideal for heavy case-sizing tasks). We also think the Forster Co-Ax has one of the best spent primer capture systems on the market — a straight drop into a removable plastic cup. Simple and it works.
Lyman Brass Smith Victory Single-Stage Press
Lyman’s sturdy Victory Single-stage Press is a full-size unit that competes with the RCBS Rock Chucker Press. With beefy cast iron construction, the Victory’s strength and leverage rivals the Rock Chucker. The press operates smoothly and the handle can be mounted on either side.
If you like to prime cases using a press, this Victory press has a priming system that’s much easier to use than the RCBS Rock Chucker system. The priming tube is right up front, with multiple primers loaded vertically in a tube. Simply push the shuttle at the button of the tube to advance the primer into place.
For convenience, the entire primer-loading system can also be removed so it doesn’t interfere with case and bullet-handling operations. We generally prefer to prime cases separately using a dedicated hand- or bench-mounted tool, but the Victory press does the job nicely.
Overall, the Victory is a great value in a full-size “O-Frame” press with sturdy construction and a solid Lyman warranty. It’s on sale now for $179.99 at Midsouth.
RCBS Rock Chucker Supreme Single-Stage Press
Nearly every serious hand-loader has owned or used the RCBS Rock Chucker press. This Editor still uses a Rock Chucker passed down by his brother 20 years ago. And yes, it is still going strong. The latest Rock Chucker Supreme single-stage press features an improved “upside-down Y-path” dual-bin spent primer catcher. Otherwise the Rock Chucker Supreme remains big, strong, versatile and sturdy. It has very strong linkages, with a compound leverage system providing plenty of power — FL-sizing is a breeze even with large, magnum cases. The 1″-diameter ram has 12.5 sq. inches of ram-bearing surface.
Some people may not know that the Rock Chucker offers a secondary 1 1/4″ x 12 thread for shotshell reloading dies and Piggyback 3 upgrade. The Rock Chucker Supreme retails for under $190.00 ($169.99 now at Midsouth). The RCBS Rock Chucker is definitely a quality product that can last a lifetime. For heavy-duty sizing chores this remains one of the best choices in single-stage presses. We do recommend shopping around. You can sometimes get a pretty big discount on Rock Chuckers and RCBS has regular rebate programs.
Lyman Brass Smith Ideal C-Frame Compact Press
The Lyman Brass Smith Ideal Press is a very affordable, cast iron C-Frame reloading press. We think it is the new “class leader” in compact presses. This works great as a secondary press for your reloading room or a small press you can take to the range. The large front opening allows you to access the shell holder without hitting the support bar on other types of presses. Unlike other compact presses made from aluminum, Lyman’s Ideal press is cast iron so it is rigid and strong. The high-quality steel ram is one inch in diameter. The Brass Smith is a true ambidextrous press that can be accessed from either side and mounted the same. This is a great choice for a second, auxiliary press for depriming and bullet seating.
Hornady Iron Single Stage (Open-front) Press
In this “Reloading with Rosie” video, the attractive female host loads some ammo using the Hornady Iron Press. With a beefy, pyramid-style cast-iron frame with an open front, this press offers some advantages over a traditional “O-Frame” type press. Access is considerably easier, for one thing. And the top of the press includes slots to hold dies and tools — that’s really a very nice feature that saves time. Also an optional “automatic” priming system shuttles primers from a vertical tube in the back to the shell-holder in the front. That’s clever. Over all the Iron Press is a nice piece of engineering — good job Hornady.
Lee Classic Cast (Iron) Breech Lock Press
The Lee Classic Cast Breech Lock Press offers excellent value for the money ($169.99 at Midsouth). Based on the proven design of the Classic Cast press, the updated Breech Lock series adds the quick-change die bushing and an improved primer drop system. This press is strong, with cast iron frame, all-steel linkage, and 12 square inches of ram bearing surface.
Lee says this press has the “largest opening and the longest stroke in the industry” among O-frame type presses. The handle can be mounted on either side. We love the fact that the handle ANGLE can be adjusted, as well as the lever arm length — that allows you to adjust travel and leverage to suit your preference. Smart engineering.
The new spent primer drop features a large-diameter hollow ram with clear hose that drops primers straight to a bin — that’s simple and effective. The press is very rigid and the base is wide enough for good stability. We have one of these Classic Cast Breech Lock Presses in our reloading room and it works well.
You’ve probably heard of cut-rifling, but did you know this process was invented in Germany nearly 500 years ago? Read on to learn more about how a cut-rifled barrel is made…
The cut-rifling process, used by leading barrel-makers such as Bartlein, Blake, Brux, and Krieger can yield a very high-quality barrel with a long useful life. Cut-rifled barrels have been at the top in short- and long-range benchrest competition in recent years, and cut-rifled barrels have long been popular with F-Class and High Power shooters.
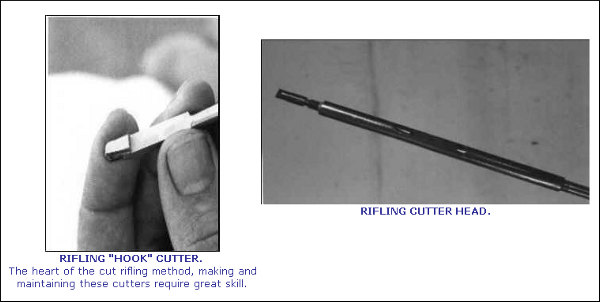
You may be surprised to learn that cut-rifling is probably the oldest method of rifling a barrel. Invented in Nuremberg around 1520, the cut-rifling technique creates spiral grooves in the barrel by removing steel using some form of cutter. In its traditional form, cut rifling may be described as a single-point cutting system using a “hook” cutter. The cutter rests in the cutter box, a hardened steel cylinder made so it will just fit the reamed barrel blank and which also contains the cutter raising mechanism.
Above is a computer animation of an older style, sine-bar cut-rifling machine. Some machine features have been simplified for the purposes of illustration, but the basic operation is correctly shown. No, the cut-rifling machines at Krieger don’t use a hand-crank, but the mechanical process shown in this video is very similar to the way cut-rifling is done with more modern machines.
Read About Cut-Rifling Process at FirearmsID.com
To learn more about the barrel-making process, and cut-rifling in particular, visit FirearmsID.com. There you’ll find a “must-read” article by Dr. Geoffrey Kolbe: The Making of a Rifled Barrel. This article describes in detail how barrels are crafted, using both cut-rifling and button-rifling methods. Kolbe (past owner of Border Barrels) covers all the important processes: steel selection, hole drilling, hole reaming, and rifling (by various means). You’ll find a very extensive discussion of how rifling machines work. Here’s a short sample:
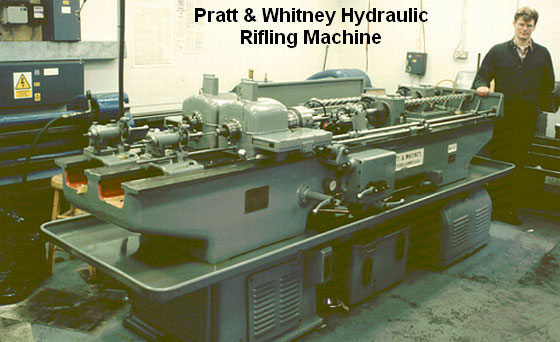
“At the start of World War Two, Pratt & Whitney developed a new, ‘B’ series of hydraulically-powered rifling machines, which were in fact two machines on the same bed. They weighed in at three tons and required the concrete floors now generally seen in workshops by this time. About two thousand were built to satisfy the new demand for rifle barrels, but many were broken up after the war or sold to emerging third world countries building up their own arms industry.
Very few of these hydraulic machines subsequently became available on the surplus market and now it is these machines which are sought after and used by barrel makers like John Krieger and ‘Boots’ Obermeyer. In fact, there are probably less of the ‘B’ series hydraulic riflers around today than of the older ‘Sine Bar’ universal riflers.
The techniques of cut rifling have not stood still since the end of the war though. Largely due to the efforts of Boots Obermeyer the design, manufacture and maintenance of the hook cutter and the cutter box have been refined and developed so that barrels of superb accuracy have come from his shop. Cut rifled barrel makers like John Krieger (Krieger Barrels), Mark Chanlyn (Rocky Mountain Rifle Works) and Cliff Labounty (Labounty Precision Reboring)… learned much of their art from Boots Obermeyer, as did I.” — Geoffrey Kolbe
Video find by Boyd Allen. Archive photos from Border Barrels. In June 2013, Birmingham Gunmakers Ltd. acquired Border Barrels. Dr. Geoffrey Kolbe has set up a new company called BBT Ltd. which produces chamber reamers and other gunsmithing tools and gauges. (Thanks to L. Holland for the Kolbe update).
Here is a stunning highlight reel created by Bullet Theory Films, a Los Angeles-based production company that specializes in capturing action that is too quick for the human eye to see. Using ultra-high-speed cameras, these talented film-makers have captured blindingly fast phenomena — things that happen in micro-seconds. The resulting video imagery can be used for R&D, scientific analysis, product marketing, or (of course) entertainment.
We recommend you watch this video full-screen in High-Definition:
This impressive slo-mo “sizzle reel” features many notable sequences, including:
00:18: .45 ACP leaving m1911 muzzle
00:27: Rifle bullet penetrating barrier with explosive ejecta
00:33: M1A cycling 7.62×51 cartridges
00:38: Pistol bullet disintegrating on steel
00:40: Huge muzzle flame from 12ga shotgun and lead shot on steel
00:45: 5.56 bullet in ballistics gelatin with secondary explosion
01:07: Handgun flame ring from muzzle
01:11: Massive shotgun blast with slug in midair
About the Film-Makers
Bullet Theory Films Co-Founders Matt Novello and Matt Drake first met on the set of History Channel’s highly successful competition reality show TOP SHOT. Throughout five seasons, the show set a benchmark in the art of capturing firearms and live ammunition in action, which has yet to be surpassed.
Utilizing the latest digital high speed technology, Bullet Theory Films offers a full range of production services; from concept development, to the final delivery of your vision. For more information, visit BulletTheoryFilms.com.
Gun-maker Bear Creek Arsenal has a good article on its website about rifling barrels. The article explains four common methods of rifling the interior of barrels: Cut Rifling, Broach Rifling, Button Rifling, and Hammer Forging. In addition, the article describes a new (and somewhat radical) method, Cation Rifling, which employs acid to etch rifling. READ Full Article.
The main focus of the article is on Cold Hammer Forging of barrels. This requires massive, expensive tooling, but the results can be very consistent. Many top gun-makers, such as FN, HK, and Ruger, have used the hammer forging process. And now Bear Creek Arsenal also offers hammer-forged barrels. Bear Creek recently acquired two state-of-the-art cold hammer forging machines. With hammer forging, a chamber can be formed and barrel contour shaped at the same time. This process produces some of the most consistent barrels available today. Here is a summary of how Cold Hammer Forging works:
Cold Hammer Forging — Machinery and Process
A cold hammer-forged barrel starts life… as a short and fat blank with a polished hole running through the center. A hardened mandrel of proper width (caliber) and rifling pattern — again reversed/inverted — is placed into the smooth bore. The pair go into a forging machine that compresses the steel against the mandrel, hammering it into final shape. The barely detectable external spiral patterns that remain on some barrels are imprints from those hammers at work. Some companies polish them out, however.
Cold hammer forging machinery is very expensive, representing a significant investment for companies. However, when the hammer forging process is done and the mandrel removed, the resulting barrel is the proper length and profile with rifling that is consistent and butter smooth. No lapping is required — a time and expense saver — although a stress-relief step often follows.
The process takes place at room temperature, despite the misleading “cold” terminology. There is a hot hammer forging process, but the equipment is even more expensive and the slight improvement in grain consistency hasn’t proven advantageous enough for a return on that investment. Performance is impressive and consistent.
One of the biggest advantages of a cold hammer forged barrel is longevity. They… survive abuse and last longer. The manufacturing process adds those enviable virtues with each strike of those hammers — strengthening the metal in a work-hardening process employed by blacksmiths for centuries.
Comparing Popular Rifling Methods
What rifling process should you choose? If long-distance is your passion and you home brew custom cartridges to print tiny groups in the next zip code, cut rifling is the optimum choice. Button rifling is a solid second choice, but not always the Holy Grail long-distance shooters dream about. Cold hammer forged barrels, however, last longer and [offer great performance for the price.]
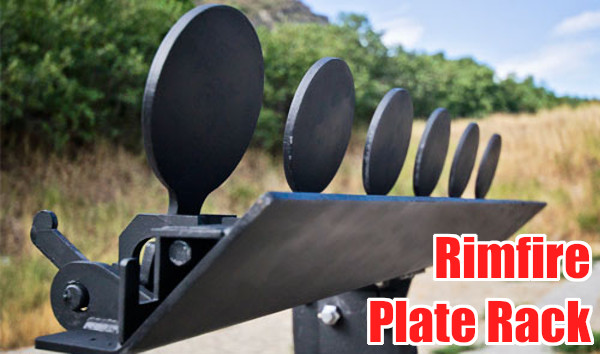
The Action Target Sport Plate Rack is specifically designed for .22 LR Rimfire shooting. This rack features six 4″-diameter plates that reset with a provided cable.
Shooting plates is fun. You get immediate feedback — “instant gratification” when you make a hit. When shooting steel inside 100 yards, we like to use .22 LR rimfire guns. The ammo is inexpensive, noise levels are lower (though you still need ear protection), and at close ranges there are fewer issue with ricochets and bullet splash-back. Additionally, for busy folks who don’t have time to reload, you can pick up a .22 LR rifle or pistol, grab a couple $5 boxes of ammo, and get to the range in a few minutes. The convenience means it is easier to shoot every week if you like.
SFC Joel Turner from the USAMU’s Action Shooting Team offers a few pointers on how to shoot plates quickly and accurately. He’s using a centerfire pistol, but the same principles apply for rimfire handguns. Click speaker icon to activate audio.
New .22 LR CP33 Pistol is Great for Plates
If you like shooting plates, one of the better new handguns for the job is Kel-Tec’s CP33. We tested this interesting handgun at the 2019 SHOT Show Media Day at the Range, and were impressed. The pistol is big, but balances well. The sights are easy to see, and the full-length rail lets you easily mount a variety of optics. The trigger is surprisingly good — better than 90% of rimfire handguns out there. For the plates game, this “quad-stack” gun can handle long stages without mag changes. The standard clear-sided CP33 magazine holds 33 rounds of .22 LR ammo.
If you are interested in an affordable, but very accurate, high-capacity semi-auto rimfire pistol you should consider Kel-Tec’s new CP33. Shooting Sports USA (SSUSA) notes: “The rapid growth of rimfire competition in Steel Challenge has prompted some gun makers to enter the fray. Kel-Tec is one, and their new CP33 .22 LR pistol has a lot of potential.” Popular YouTube host 22 Plinkster tested the gun and reports: “This handgun has been 100% reliable IF I load the magazine the right way… and it’s pretty dog-gone accurate.” The video below shows the best way to load the 33-round magazine:
SSUSA’s testers tried the pistol with a variety of ammo and it consistently shot about one-half-inch for five shots “from a 25-yard sandbag bench rest using the iron sights.” SSUSA noted that the gun disassembles quickly and easily by removing one central pin. That’s a nice feature.
Overall SSUSA’s tester, Chris Christian, was impressed with the gun, saying it balanced well and the sights aligned naturally: “…the neutral-balance-point grip produced an almost instinctive sight alignment.”
Christian used the CP33 in a 6-stage Steel Challenge Match, and did well: “I decided to shoot Rimfire Pistol Iron (RFPI) and used the CCI Mini-Mag. The high-speed ammo ran perfectly. [T]he bright sights and handling qualities let me finish top among iron-sight shooters and even hold my own with C and B class rimfire pistol shooters using optical sights. It would be interesting to put a reflex sight on the gun, and maybe even shoot some Bullseye with it.”
The competition was founded in 1981 by Mike Dalton and Mike Fichman, in Southern California. The two Mikes wanted an exciting alternative to paper targets and came up with the all-steel format. The Steel Challenge World Speed Shooting Championships have grown to one of the largest professional pistol competitions in America. In 2018, hundredes of competitors from the United States and around the world competed at the Talladega Marksmanship Park for glory and huge cash prizes.
The Steel Challenge is governed by the Steel Challenge Shooting Association (SCSA) that consists of eight standardized stages with three types of steel targets: small circle, big circle, and square. Here is a steel challenge layout in Germany.
Steel Challenge is similar to IPSC, but has simpler rules and more consistent stage designs. Up until 2011 the annual Steel Challenge World Championship was held in Piru, California every year. Then, renamed the World Speed Shooting Championships (WSSC), the Championship was held in Frostproof, Florida (2012, 2013), St. George, Utah (2014), San Luis Obispo, California (2015-2017), and Talladega, Alabama (2018-2022). There are also over 100 Steel Challenge Regional Matches held around the country.
Setting optimal bullet seating depth is very important for maximum accuracy. While some cartridges and barrels may deliver good accuracy with a wide range of bullet seating depths, other barrels may be more fussy, and may strongly prefer a specific seating depth, such as .006″ in the lands or .020″ off. To get this kind of precision, you need to know the exact position of the lands in your barrel. In addition, because barrel throats tend to move as the round count goes up, you should check the position of the lands regularly on a competition rifle.
Today’s Saturday Videos demonstrate a number of methods for finding Length to Lands in your rifle barrel. We start with the most common method — using the Hornady O.A.L. Gauge with a threaded modified case. With some practice, and a refined touch, this is actually very accurate. After this, we offer videos that have alternative methods, each with its pros and cons. You should find a method that works for you, that can achieve results within a couple thousandths for multiple measurements.
Finding Cartridge Length to Lands with O.A.L. Gauge
Probably the most common method to find length to lands is using a Hornady O.A.L. Gauge Tool with a comparator on a set of calipers. We regularly use this method with a custom modified case for our 6mmBR rifle. Using the technique described below, we can get results within .0015″ or so three out of four times. We do recommend taking multiple measurements. As explained below, be consistent and do NOT push the gray plastic rod too fast or with too much force.
During this measurement process, the modified case, with a bullet in its neck, is inserted in the chamber. Go slow, take your time. Here are FIVE TIPS that will help you get repeatable and reliable length-to-lands measurements with the Hornady O.A.L. Gauge:
1. Start with a clean chamber and clean barrel throat.
2. Make sure the modified case is fully screwed down and seated on the O.A.L. Gauge. It can sometimes unscrew a bit during repeated measurements.
3. Insert the modified case slowly and gently, but ensure the shoulder of the modified case is fully seated on the end of the chamber.
4. Push the gray plastic rod GENTLY. It is common for the bullet to be tilted a bit. You want to allow the bullet to self-center in the throat BEFORE you apply much pressure. Then tap a couple times and push until you feel resistance. Do NOT push too hard — that will jam the bullet in the lands.
5. Repeat the measurement at least 3 more times. If you follow our instructions, you should, typically, get a repeatable measurement, within 0.0015″ or so, 3 out of 4 times.
NOTE: We’ve seen some folks struggle to get repeatable measurements with this tool. In most cases, they were going too fast and pushing too hard on the gray rod, creating a hard jam.
Brownells — Using Hornady O.A.L. Gauge with Modified Case
This Brownells video shows how to use the modified (threaded) case for the cartridge your rifle shoots. Attach it to the O.A.L. Gauge, then insert a bullet into the case neck and slide the tool into the chamber. It takes a little practice to get consistent results. After getting the measurement in the barrel, you ascertain the length to lands using a Hornady Bullet Comparator attached to your calipers.
Making Your Own Modified Case — Threading the Case End
This helpful video from our friend Gavin Gear of UltimateReloader.com shows how to create a custom modified case to use with a Hornady O.A.L. Gauge. You need to drill out the primer pocket area, then tap and thread the bottom of the case.
Ultimate Reloader Shows 3 Ways to Find the Lands
This video shows three different ways to measure distance to lands. First Gavin Gear shows how to use a Hornady O.A.L. Gauge with Modified Case. The second methods shows how to use a bit of Loctite INSIDE the neck to secure a bullet. Be sure there is NO Loctite on the outside of the neck — you don’t want that in your chamber! You place the case with bullet into the chamber, then close bolt to seat the bullet. After waiting 5-10 minutes for the Loctite to set, you remove the cartridge gently. The third method (time-mark 16:50) is a Jam method using a bolt with the firing pin assembly and ejector removed (so there is no extra pressure on the case). Gavin notes: “The bullet ogive can be colored with a permanent marker if you want to indicate lands contact.”
About this third Jam method, ace F-Class shooter Erik Cortina posted: “My method is actually the last one that Travis showed. The one where you let the lands push bullet in. But it is neck tension dependent. I also put die wax in bullet ogive to prevent it from sticking in the lands. The method of seating bullet deeper and deeper until bolt closes is the Alex Wheeler method. As you said, there are a tons of ways to measure this.”
Finding Length to Lands the Speedy Way
Here is another method to find length to lands that can work with an unmounted barrel. This method is explained by Thomas “Speedy” Gonzales, a top gunsmith and ace benchrest shooter. Speedy drops a case with bullet seated into the chamber and then adjusts the seating depth with an inline seating die until there is no sticking or resistance felt. He can then adjust the true length to lands easily with his micrometer seating die. If you don’t have a modified case and do not want to partially disassemble your bolt to take measurement, you might want to use Speedy’s method.
Finding Length to Lands Using Bolt Movement — Primal Rights
This video shows how to remove the firing pin assembly in your bolt. This way the bolt can be used to advance a case with bullet smoothly into the chamber. Then the bullet seated in the case neck will move back to “first touch” contact position. Then extract the case slowly and measure.
The video host states: “Overall length gauges and modified cases tend to be close, but never as precise as we would like them to be. Here we describe how to measure the length to your lands in your rifle as precisely as possible, using a caliper and bullet comparator.” NOTE: The host says a store-bought Modified Case may not deliver that exact same length from case base to lands as your own fired case. That is true, but as long as the commercial Modified Case gives you repeatable results, you have a functional reference point which you can then use to test seating depths relative to that measurement.
Finding Length to Lands Using Bullet in Case With Split-Cut Neck
Here is a common method that requires no special tools. Simply take a fired (no primer), neck-sized case and split the necks down vertically with a Dremel. Done right, this will hold the bullet in place when you chamber the unloaded round. As the bullet touches the rifling it will move back. As the cartridge chambers, the bullet slides back into the case to give you length to lands. This is not super-accurate but it is probably good enough for finding the length to lands for a hunting rifle. The video maker explains: “No need to purchase gauges for this if you are willing to sacrifice one case. With a little time and patience you can get good results with this method.” Further Explanation.
How to Adjust Tension — Length and Number of Neck Cuts
Forum member Andris Silins, who uses this method, explains: “I made the neck cuts using a Dremel with a cut-off wheel. You can adjust tension two ways. First, you can make the cuts longer or shorter. Longer cuts = less tension. If you used only three cuts instead of four you would get more tension. The trick is to be gentle when you open and close the bolt. If you ram the bolt closed you may wedge the bullet into the lands. When you open the bolt it helps to keep a finger or two near by to guide the case out straight because the ejector wants to push it sideways.” READ MORE.
Finding the Lands with HK Rifleworks
This is another video that demonstrates how to disassemble the bolt so that the firing pin assembly and spring does not apply pressure on the empty case which would affect the bullet as it touches the lands. The video maker shows how to use a Brownells bolt disassembly tool to quickly take the bolt apart (3:20 time-mark). Once you have a repeatable measurement, you know exactly where is “first touch”. Then you can adjust your seating depth to be into the lands, or jumping the bullets. Many benchrest shooters like to load “into the lands”. PRS/NRL shooters and hunters will generally prefer to jump their bullets .0020″ or more.
American shooter Jessie Harrison was part of a victorious USA Team and took second in the Ladies Open Division at the IPSC Handgun World Shoot held in November, 2022 in Pattaya, Thailand.* The IPSC World Shoot is considered by many to be the most prestigious action pistol competition in the world. “The IPSC Handgun World Championships are our equivalent to the Olympics, the pinnacle of matches,” said Harrison.
Jessie won a Silver Medal in individual competition and shared a Gold medal in team competition. “It’s an honor to represent the USA and to be able to bring home a gold and silver medal in the teams and individual divisions!” Harrison added. Jessie took second place overall in the Ladies Open Division shooting a .38 Super Comp cartridge with Hornady 125gr HAP bullets.
The International Practical Shooting Confederation (IPSC) was established to promote, maintain, improve, and advance the sport of practical shooting, safeguard its principles, and regulate its conduct worldwide for the safe, recreational use of firearms by persons of good character.
This MS IPSC video shows the action in Pattaya, Thailand at the very green tropical range.
This was filmed in 2022 though the logo says 2020 (match was postponed two years).
* The logo says “2020” but this is from November 2022 — the original logo was made for the event in 2020 but that was rescheduled to 2022 due to COVID restrictions.
More and more shooters are “wet-tumbling” their brass (in liquid) with reusable polishing media, rather than using dry media in a vibratory tumbler. The “wet-cleaning” method works best with a rotary tumbler fitted with a water-tight, horizontal drum to hold your brass, cleaning solution, and stainless, pin-type media. The rotary tumbler of choice has been the Thumler’s Tumbler Model B Heavy-Duty. That is a great, sturdy machine, but now you have a more affordable option.
Frankford Arsenal offers “Platinum Series” rotary tumblers designed to clean cartridge brass with liquid and stainless media. The watertight, polymer drum rides on four rollers which rotate the drum around its horizontal axis. Two filters are provided so you can quickly separate your brass and media. A built-in timer allows you to set tumbling sessions up to three hours. There is a large, 7-liter unit and a smaller, 3.3-liter tumbler. Frankford Arsenal says the big version will clean up to 1000 cases of .223 Rem brass. That’s impressive capacity.
Rotary Tumbler Sources Online
The Frankford Arsenal Platinum Series rotary tumblers are sold by major retailers including Grafs.com, Midsouth, and Cabela’s. Shop multiple vendors to find the best current pricing.
Amazon often has very competitive pricing on the Frankford Arsenal Tumblers, both the 7-liter unit and the smaller, 3.3-liter tumbler.
How to Wet-Clean Your Brass in a Rotary Tumbler On our main Accurateshooter.com website, you’ll find a comprehensive review of the STM system for cleaning cartridge brass with stainless media. To clean brass with stainless media, start with five pounds of small stainless pins sold by StainlessTumblingMedia.com. Place these along with a gallon of water, a little liquid cleaner, and two pounds of cartridge brass in a rotary tumbler, and run the machine for one to four hours. After cleaning be sure to inspect all your primer holes. CLICK HERE for Brass Cleaning System Review.
Forum Member Tests STM System
Our reviewer, Forum member Jason Koplin, purchased the STM media and a new Thumler’s Tumbler. He then tested the STM cleaning procedure on his own brass, including some extremely dirty and tarnished “range pick-up” brass. Jason was thoroughly impressed with how well the STM process worked — as you can see from the “before and after” photos below. Brass which looked like it was ready for the scrap heap was restored to “like-new” appearance. The process works equally well on both rifle brass and pistol brass. Jason observed that one surprise benefit of the STM cleaning procedure is a big reduction in noise. Jason said the water-filled rotary tumbler was much quieter than his vibratory tumblers. One tip though — you should always inspect every cartridge carefully after wet-tumbling with stainless media. With large-flash-hole brass it is possible to have a pin stuck in a flash hole. This is rare, but it CAN happen.
At the request of our readers, we provide select “Deals of the Week”. Every Sunday afternoon or Monday morning we offer our Best Bargain selections. Here are some of the best deals on firearms, hardware, reloading components, optics, and shooting accessories. Be aware that sale prices are subject to change, and once clearance inventory is sold, it’s gone for good. You snooze you lose.
NOTE: All listed products are for sale to persons 18 years of age or older. No products are intended for use by minors.
1. Midsouth — Christmas Sale, Save 10-30%
⏺ Major December savings on wide selection of products at Midsouth
Midsouth is running a huge Christmas Gift Sale this month, with over 170 products deeply discounted. Save 10-30% on reloading presses, powder dispensers, scales, tools, ammo, cleaning kits, and much more. Shown above are some of the best deals we found, but there are over 160 more bargains. Act soon as inventory is limited for some of the featured products on sale.
2. EuroOptic — Black Friday/December Extended Nightforce Sale
Now through December 31, 2022, EuroOptic is running a major sale on Nightforce Optics. Save 10% on most regularly-priced Nightforce NXS and SHV riflescopes now through December 31st. That 10% discount can save you $150 or more on many models. CLICK HERE to access Nightforce optics on sale.
3. Bruno Shooters — McMillan Stocks 10% Off + FREE Shipping
⏺ McMillan — great stocks for hunting, benchrest, F-Class, and tactical
Need a high quality gunstock? Bruno Shooters Supply is running a great special right now. All McMillan stocks in inventory are discounted 10%. In addition, Bruno’s will ship these McMillan fiberglass stocks for FREE. To see the available stocks, CLICK THIS LINK then click All McMillan Stocks or select a particular model, such as Kestros or MBR.
4. KYGUNCO — 12 Deals of Christmas, S&W and Walther Pistols
⏺ December Daily Deals on handguns, shotguns, and rifles
Starting 12/1/2022, KYGUNCO has released special deals through its 12 Deals of Christmas promotion. There are pistols and rifles deeply discounted, with the listed sale prices good through December 31, 2022. From the landing page, click each Day to see the available deals. NOTE: The provided links below for Days 6-12 have not yet activated, but should work later in the week.
5. Bruno Shooters — Discounts on Bullets, Brass, Powder & More
⏺ Savings this week on bullets, brass, ammo, optics, actions and more
Need reloading supplies? Head over to Bruno Shooters Supply. Prices have been discounted this week on Bullets, Brass, Powder, and Ammo. In addition, Kelbly actions and Hart barrels are discounted. Optics prices have been reduced as well.
6. CDNN Sports — Ruger and Springfield Armory Pistol Deals
⏺ Great deals on two distinctive handguns, 9×19 mm and 5.7×38 mm
CDNN Sports has some of the best deals you’ll find on popular handguns. Two of CDNN’s best pistol bargains available now are the Springfield Armory XDM 9mm Elite, and the Ruger 57™ 5.7×28 Model. Both these mag-fed handguns ship with TW0 20-round factory magazines.
7. Precision Reloading — Hornady Auto Charge Pro, $299.99
⏺ Save $85 on new-generation powder scale/dispenser
The Hornady Auto Charge Pro powder scale/dispenser is a good unit that was the top choice in a recent powder dispenser comparison test. This unit has proven efficient and accurate with typical rifle powders. The Auto Charge Pro offers customizable trickle speeds for various powder types, as well as custom time settings. A large knob on the side simplifies powder emptying. The keypad screen is elevated so the Auto Charge Pro occupies less space on your bench than other powder dispensers. Right now Precision Reloading has the Auto Charge Pro for $299.99, an $85 savings.
8. Palmetto State Armory — Norma TAC-22 Ammo, $3.99/box
⏺ Excellent rimfire ammo at a GREAT price — .22 LR Deal of the Year
We’ve found no other .22 LR ammo that rivals Norma TAC-22 at anywhere near the price — just 8 cents per round ($3.99/box). If you shoot NRL22 or just practice for fun, grab some Norma TAC22 .22 LR ammo at Palmetto State Armory. On sale at just $3.99 per 50-round box, this TAC-22 ammo is a truly great bargain. In our test, it out-shot some ammo that cost $8 per box. During testing with a CZ 457, one of our Editors had multiple 5-shot groups at 50 yards that were typically one ragged hole (all shots touching). He observed “It’s amazingly good ammo for the money”.
⏺ Great price on insulated, polyester fabric blanket
For winter nights, save money by turning the heat down and using this on your bed instead. Spread horizontally, this will cover most of even a king size bed. The Editor bought this for his own home. This versatile sleeping blanket comes in very handy — use it outdoors in summer and indoors in winter. The blanket (we’ll call it a nylon quilt) measures 70″ L x 50″ W. It is machine-washable with a water- and dirt-resistant 190T polyester fabric cover. Inside is excellent TechLoft Silver insulation. This blanket stows neatly into a 13.5″ x 7.5″ roll in the provided carry sack.
10. Amazon — Clock with Wireless Charging plus USB Power Port
⏺ Charge your smartphone wirelessly while you sleep
Here’s a great gift for a family member with a new-generation smart phone. Wireless charging is really convenient, and this Sharp Digital Alarm Clock will charge your phone while you sleep. It also has a fixed USB charge port in the rear to charge a second device — such as an iPad, or an older smartphone without wireless charging capability. The Sharp Digital Clock is just $19.99 on Amazon. That’s less than you’ll pay for many wireless charging units by themselves.
⏺ Quality name-brand shooting eyewear — buy multiples at this price
Every shooter needs eye protection EVERY TIME you go to the shooting range. Right now Midsouth has the good Radians clear Lens Outback Shooting Glasses for just $5.88. These ANSI Z87.1 Radians Shooting Glasses provide 99.9% UVA/UVB protection with the coated lenses. These offer excellent wrap-around protection and are fairly light and comfortable. A handy neck cord is included. With this low $5.88 price, you can buy 3 or 4 sets and keep spares for yourself and your shooting buddies.
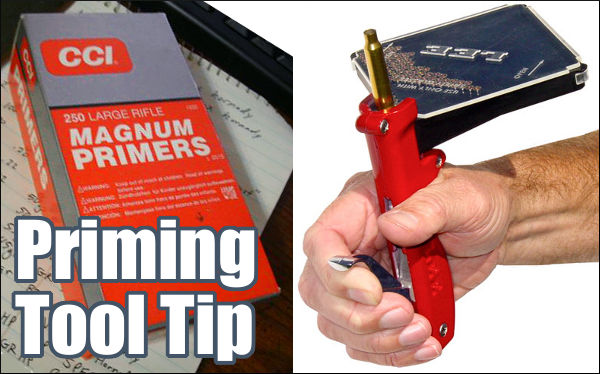
Seating primers is a key part of the reloading process. You need to seat primers consistently to achieve best accuracy. There are many different tools offered for seating primers, both hand-held and bench-mounted. Deluxe premium hand-held seaters may hold just a single primer, while a variety of handheld units employ trays to hold more primers. With bench-mounted primer seaters there are a variety of feeding systems — vertical tubes, angled trays, and even a strip feeder — the APS system pioneered by RCBS.
Today’s Saturday at the Movies feature covers a variety of primer seater options, from low-cost hand tools to the $600.00 Primal Rights unit. We also cover the innovative Lee Automated Case Primer (ACP) system which even feeds your brass, increasing your processing rate.
Forster Co-Ax Bench-Mounted Priming Tool
The Forster Co-Ax® Primer Seater is a trusted bench-mounted priming tool that works very well. Set the jaws for a particular rim size, load the tube, and you’re ready to seat primers. The tool has good “feel” plus plenty of leverage. Forster says that the tool’s “unique design allows the operator to eliminate all slop when working with a specific cartridge, translating into perfect seating, reliable ignition, and reduced misfires.” This Forster tool requires no separate shell holders. The spring-loaded jaws close to securely grip most modern rifle and pistol cases with a rim thickness of .045″ to .072″. And Forster provides a primer flipper tray that makes it easy to load the provided small and large tubes. If you shoot a large variety of cartridge types with various rim sizes, this Forster Co-Ax primer seater is a good choice.
Primal Rights Competition Priming Seater (CPS) Review
If there is a Ferrari of priming tools, it has to be the Primal Rights Competition Primer Seater (CPS). This impressive bench-mounted tool allows very precise control over primer seating depth. A vertical tube holds primers ready for insertion. The action is smooth and precise. Seating depth control is as good as you can get. That precise, repeatable control, and the tool’s smooth operation, are the tool’s major selling points. Video reviewer F-Class John believes that Primal Rights machine is definitely the best priming tool on the market, though it may not be for everyone given its premium $600.00 price.
Frankford Arsenal Perfect Priming Tool
Our friend Jim See of Elite Accuracy LLC has tested the depth-adjustable hand priming tool from Frankford Arsenal. This product, called the Platinum Series Perfect Seat Hand Primer, has some unique features. Primer seating depth can be adjusted with a handy wheel in the tool’s center handgrip. Each “click” of the wheel moves the primer post .001″ (one one-thousandth of an inch). Additionally, the design of the case-holder allows quick and easy removal of a primed case. The unit ships with a full set of shell-holders to match all types of cases. Like many other hand priming units, the primers are loaded into a flip tray that attaches to the head of the tool.
Accuracy Variances and Priming Tool Types
The above video compares the performance of the Frankford Arsensal adjustable priming tool with a Sinclair Int’l hand priming tool — a unit used for many years by top benchrest shooters.
LEE Automatic Case Priming (ACP) System
The LEE Automatic Case Primer (ACP) is the world’s first automatic-feeding priming tool that does not need shell-holders. Cases are guided into position by a sliding “finger guide”. The “dead length” priming device ensures that primers are seated uniformly without “feel” or adjustments required. This is very efficient and relatively easy, once the primers are loaded into the triangular tray. This ACP tool is on sale at Midsouth for $84.99, 16% off the regular price. We’ve tested the product and it works well, but sometimes needs a little fiddling with the primer feed guide.
Gavin Gear of UltimateReloader.com has reviewed Lee Precision’s new lever-operated, bench-mounted priming tool. The Lee Auto Bench Prime features a hopper-style primer feeder set at an angle. Gavin likes the tool, reporting that primers feed well and seat fully with very little effort. And switching from large to small primer size (or vice-versa) is quick and easy. Overall, Gavin says the Lee Auto Bench Prime has earned a place in his reloading room: “The Lee Auto Bench Prime is easier to use than a hand priming tool, and more efficient.”
How the Lee Auto Bench Prime Performs
Gavin had three important “take-aways” from his initial loading sessions with the Lee Auto Bench Prime:
1. I was surprised by the low effort needed to prime cases — it’s pretty amazing.
2. You can quickly and easily install shellholders and change primer sizes.
3. The folding primer tray works very well. It’s a great setup from my testing so far.
Are there any negatives with the tool? Gavin noted that, in the course of loading 100+ rounds, once or twice he had to tap the triangular tray to get the primer to feed: “That’s not a big deal, and may smooth out with time”.
RCBS APS Strip Priming System — Bench Tool and Strip Loader
RCBS pioneered an innovative priming system that held primers in handy horizontal strips. This video shows primers being placed in strips, and then cases being primed using an RCBS bench-mounted APS strip-priming system. Many years ago, this Editor acquired an RCBS Pro 2000 progressive press, which employed the APS strip priming system. Primers were held in strips which could be easily connected for continuous feeding — no tubes to load! I liked the system so much I then acquired an APS hand priming tool (photo right), an APS bench-mounted tool, and an APS strip priming tool that fits on a single stage press. I loaded many thousands of rounds successfully with the APS system with not one inverted primer ever. I still use the APS hand primer tool to prime most of my rifle rounds.
Unfortunately, RCBS has discontinued sales of most APS priming tools, but you can still get primers pre-packaged in APS strips, and you can still buy the Strip Loader tool for placing primers into strips.
BONUS Video — K&M Primer Pocket Correction Tool
K&M offers a handy tool for optimizing primer pocket depth. K&M’s Primer Pocket Correction Tool uses a carbide cutter with a preset depth, allowing consistent depth squaring of the primer pocket bottom. Designed with a drive shank to be used with your cordless screwdriver and/or a K&M handle, these tools are available in four types: Small Rifle/Pistol; Large Pistol; Large Rifle; and .50 BMG.
Priming Tool Tip — Check Your Primer Seater for Wear
From time to time, we all encounter a primer that doesn’t go off. It’s normal to attribute the problem to a bad primer. But sometimes there are other explanations. George S., one of our Forum members, experienced a couple failures to fire, but he learned that the issue was his priming TOOL, not his primers. Here’s what George told us. There’s a lesson to be learned:
“I had issues with CCI 450s when I had my first 6BR barreled. I had probably three or four out of 20 rounds that failed to fire. the primers were dented but didn’t fire. I called CCI since I had bought a case of them. The tech was decent enough but had the audacity to tell me I was not seating the primers all the way in the pocket. I proceeded to let him know I had been reloading longer than he had been alive and I knew how to seat a primer.
Turns out that I did and I didn’t! I was using the RCBS primer tool I had used for years and the primers felt just fine to me. I finally decided to check the tool and since I had a new one I took the seating pins out and measured them. The seating pin on the tool I had been using for years was shorter by a few thousandths! I then used the pin from the new primer tool and darned if the primers that didn’t seat down to the bottom of the cup.



 If you are not yet familiar with the many unique features of the Forster Co-Ax, we recommend you watch the video above, a very thorough video review by Rex Roach. This shows how the press operates and highlights the design elements which set the Co-Ax apart from every other reloading press on the market. This 14-minute video shows the key Co-Ax features, explaining how the floating case-holder jaws work (3:30 time-mark), how the dies are held in place (4:40 time-mark), how spent primers are captured (6:10 time-mark), and how to set the primer seating depth (10:00 time-mark). We’ve used a Co-Ax for years and we still learned a few new things by watching this detailed video. If you are considering purchasing a Co-Ax, definitely watch this video start to finish.
 Lyman’s sturdy Victory Single-stage Press is a full-size unit that competes with the RCBS Rock Chucker Press. With beefy cast iron construction, the Victory’s strength and leverage rivals the Rock Chucker. The press operates smoothly and the handle can be mounted on either side.
 Nearly every serious hand-loader has owned or used the RCBS Rock Chucker press. This Editor still uses a Rock Chucker passed down by his brother 20 years ago. And yes, it is still going strong. The latest Rock Chucker Supreme single-stage press features an improved “upside-down Y-path” dual-bin spent primer catcher. Otherwise the Rock Chucker Supreme remains big, strong, versatile and sturdy. It has very strong linkages, with a compound leverage system providing plenty of power — FL-sizing is a breeze even with large, magnum cases. The 1″-diameter ram has 12.5 sq. inches of ram-bearing surface.

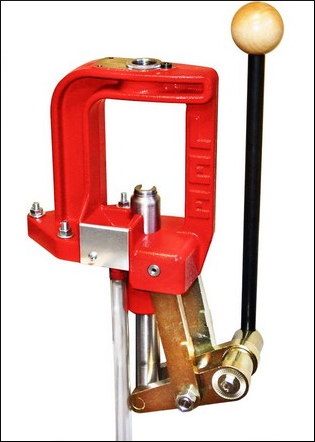 The Lee Classic Cast Breech Lock Press offers excellent value for the money ($169.99 at Midsouth). Based on the proven design of the Classic Cast press, the updated Breech Lock series adds the quick-change die bushing and an improved primer drop system. This press is strong, with cast iron frame, all-steel linkage, and 12 square inches of ram bearing surface.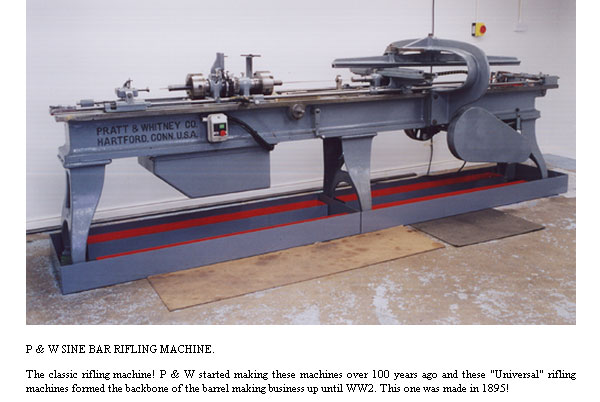






 On our main


 RCBS pioneered an innovative priming system that held primers in handy horizontal strips. This video shows primers being placed in strips, and then cases being primed using an RCBS bench-mounted APS strip-priming system. Many years ago, this Editor acquired an RCBS Pro 2000 progressive press, which employed the APS strip priming system. Primers were held in strips which could be easily connected for continuous feeding — no tubes to load! I liked the system so much I then acquired an APS hand priming tool (photo right), an APS bench-mounted tool, and an APS strip priming tool that fits on a single stage press. I loaded many thousands of rounds successfully with the APS system with not one inverted primer ever. I still use the APS hand primer tool to prime most of my rifle rounds.