Forum member F-Class John is an avid F-Class competitor and expert handloader. John reviews reloading hardware and shooting-related products for his popular F-Class John YouTube Channel, which now boasts 500+ videos. John also does important product testing for AccurateShooter.com. Through his YouTube channel, John has reviewed many of the latest and greatest reloading tools and accessories. For today’s Video Showcase, we selected eight F-Class John product reviews. Products tested include front rests, AMP Annealer, Flavio Fare triggers, AutoDod IDOD power neck-turner, Henderson and Giraud case trimmers, Zero turret press, 21st Century arbor press, and Accuracy One concentricity checker.
If you like these informative videos, consider joining F-Class John’s Patreon Channel for live video meetings, more in-depth videos, and detailed explanations. Join Patreon via Patreon.com/fclassjohn for full length videos, live chats, and more.
SEB NEO-X and Rodzilla Raptor Front Rests
This video covers two outstanding front joystick rests, the SEB Neo-X and the Rodzilla Raptor. Both of these rests work great for both benchrest and F-Class shooters, centerfire and rimfire. Build quality is outstanding for both rests. Tester F-Class John observes: “Both are great units and user preference will really dictate which to get. I own both and find they give me consistent target acquisition.” To learn more about these two excellent front rests, visit TheRodzilla.com and/or SEB Rests USA.
Flavio Fare Triggers Tested
The Flavio Fare triggers are some of the best on the market. These are offered for various action types including Remington clones and custom actions. CLICK HERE for a discussion of these triggers on our Forum. The Flavio Fare Veloce Hunting Trigger (with safety) adjusts from 5 to 25 ounces pull weight and retails for $439.95. The Flavio Fare Whisper 2.1 BenchRest Trigger (no safety) adjusts from 0.7 to 2.8 ounces, and costs $449.95. Reviewer F-Class John says these Flavio Fare triggers are “smooth, crisp, with a wide range of trigger pull weights … I love these things.”
Annealing Made Perfect AMP Mark II DB Annealer
This detailed 9.7 minute review outlines the features of the latest AMP electronic annealing machine, the AMP Mark II DB. This uses a computer control to deliver precise annealing times and temperatures with a profile for your specific lot and brand of brass. One user praised this new AMP machine: “The touch screen is much more intuitive than the old one.” Another stated: “If you want to anneal the best way possible this is it. Does a torch work? Sure it does. The AMP does it far better and far more consistently.” A buyer confirmed this sophisticated new AMP is fast and efficient: “Just got one, a few days ago and it’s so easy to use. Without even trying, I easily anneal eight rounds per minute”.
Bryan Blake, a very clever machinist and gunsmith, has created an ultra-precise and speedy neck-turning machine. Bryan, who runs Blake Machine, Blake Barrel, and F-Class Products has created a system that uses twin precision cutter tips to turn case necks inside and out quickly and efficiently, with superior precision. This advanced IDOD Neck Turning Machine holds cases securely in a precision-machined spindle attached to an electric motor. Twin blades move precisely during the cutting process, milling the necks inside and out. The turned necks come out perfect every time, with the shoulders trimmed exactly (with doughnut removed) as well.
Henderson vs. Giraud Case Powered Case Trimmers
After adding the impressive Henderson Gen 3 Powered Trimmer to his inventory of tools. F-Class John became is a Henderson fan. He likes the speed, precision, and repeatability of the $779.00 Henderson machine, which trims-to-length and chamfers the case mouth all in one pass. Unlike some other trimming tools, the Henderson indexes off the overall case length NOT the shoulder. The Giraud trimmer is a very different design which indexes off the case shoulder, but it is also very precise. When set up correctly, it can trim brass with amazing consistency. As long as you have fire-formed brass with consistent base-to-shoulder dimensions, you should get very consistent trim lengths.
Zero Turret Press with Whidden Sizing Die
The Zero Press from Area 419 is arguably the best turret press ever crafted. It offers unrivaled precision, along with the highest-capacity turret head with NINE die/tool stations. Milled from billet aluminum and stainless steel, this press moves with the help of 14 bearings. In this video, F-Class John shows how to use a Whidden Gunworks full-length sizing die on the Zero Press. And John has two other video reviews of the $1275 Zero Press: 1. Zero Press First Thoughts Video; 2. Loading on a Zero Press.
21st Century Hydro Press and Standard Arbor Press
John notes: “You can’t really talk about precision reloading without taking about inline dies and arbor presses. For my money there’s nothing better than the lineup from 21st Century Shooting. They offer the Hydro Seater which is hands-down the best manual seater out there as well as their standard arbor press which is great for taking on the road to push back bullets as needed.”
Concentricity Checking with Accuracy One Gauge
Every serious hand-loader needs a quality concentricity gauge. The Accuracy One Concentricity Gauge boasts a smart design that delivers precise, repeatable results. We like the unit’s easy adjustability and its ability to work in a variety of configurations. The Accuracy One Gauge measures internal and external neck runout of cartridge cases as well as seated bullet runout. It can also measure the runout of the ogive, bearing surface, and boat-tail of individual bullets. And it can even measure your primer pocket runout. Reviewer F-Class John notes: “I think this is the best concentricity tool on the market. Such a tool is a necessity for new loaders or those who are always setting up new dies.”
This custom war wagon hauls varmint hunters around the Longmeadow Game Resort in Colorado.
Will you be heading to the varmint fields this summer? Proper planning is key to a safe, satisfying, and productive varmint holiday. Of course you’ll be busy reloading, but you should make a check-list of all the gear and supplies you need. Bring a variety of rifles if possible — you’ll need to switch off as one barrel gets hot, and the chambering that works best for your close shots may not be ideal for those longer shots out past 400 yards. Here are some tips from our Forum members that can help you shoot more effectively, and avoid problems on your varmint hunt. Here’s one key tip: at your shooting station, put a strip of surveyor’s tape on a tall stake to show the wind direction. Then shoot in the direction the wind blows. This will minimize the effect of cross-winds.
Varmint Safari Planning, Equipment, and Shooting Advice
From PatchHound: “The gear you bring will make or break a trip out to Prairie Dog land. A lot has to do with where you going and how far you are from [civilization]. For starters, bring lots of water. It will be hot in Wyoming in a few more weeks but it don’t hurt to bring warm clothes in case it snows. It’s best to wear leather boots unless you’re real good at dodging cactus while walking around. Good sunscreen [and a wide-brimmed hat] will save the day too. [What you need to bring] really depends on whether you’re shooting on some friendly ranch or 100 miles in the middle of [a wilderness area]. Good survival gear is a good thing to have for the latter!”
This photo is from a Dan Eigen TV Show video featuring a P-Dog hunt.
From Stoner25mkiv: “I’d suggest an adjustable bipod if you are going to do any walking. A laser rangefinder is a huge asset. Have a fanny pack or backpack for extra ammo, water, bore-snake, etc. when you go on your walkabouts. We also take a couple pivoting benches, heavy movers’ pad/blanket, sandbags (Uncle Bud’s Bulls Bag) for shooting from near the vehicle. Boonie hat for blocking the sun, sun glasses, sunscreen. High leather boots.
Anyway, on to the rifles…consider bringing a 17 HMR, .223 Ackley bolt gun, .223 Ackley AR, and a 243 WSSM. Some years the 17 HMR isn’t removed from its case. We had a couple windless days and the 17 was lots of fun. I’d walk into the dogtown and then lay down and wait. After five minutes or so I’d have dogs within easy rimfire range, and out to as far as I’d care to stretch the rimfire. 275 yards was about it.”
From CTShooter: “The .204 [Ruger] is a laser beam and good to 400 yards easy. Forget the rimfire! Do you have a portable bench that pivots? Bring bipod, binocs. Bring a LOT of water. I have a milspec sniper shooter’s mat/drag bag with shoulder straps. It is good to carry everything when you want to wander off and shoot prone with bipod. Here’s a view through my 6BR in ND.”
From RJinTexas: “In most of the locations that we’ll be shooting we’ll usually set up a minimum of 200 yards from the edge of a major dog town. We’ll start by working over the close-in dogs and shooting our way out, some of these towns may run in excess of 500/600 yards deep. I believe that a rimfire will put you at a distinct disadvantage. The only rimfire that will somewhat work is the 17 HMR and you can reload for your 204s for close to the cost of HMR ammo and you’ll be less apt to be under-gunned. Your 204 will work well out to 300/400 yards unless the wind is blowing hard. We classify a 10-mph crosswind as a very calm day and what makes it a little more challenging is that it is usually also gusting.”
From Wes (P1ZombieKiller): “[For my first PD trip] there are so many things I was not ready for. The one thing that I did bring (that no one told me about) was a canopy. I’m glad I did. Even though the weather was [near perfect], I know that sun can humble you real fast. With my pop-up canopy, I could shoot all day without getting killed by the sun. You had to tie the canopy down real well or the wind would blow it across the pasture.
We sat on shooting benches that pivot 360°, and are fast and easy to set up. Most all shots were 175-250 yards. I just felt comfortable at that range. It was more fun for me to be able to film the hits, and the camcorder I was using just did not get good video past 350 yards. The digital zoom distorted the image too much. I knew I would only get this one chance to film my first P-dog outing, and I wanted to get it on film for [posterity].”
Bring Multiple Rifles on Your Varmint Adventures
On our P-Dog adventures, we like to have multiple rifles — a .17 HMR for close work, then maybe a .20 Practical AR for 150-250 yards, then a larger caliber such as 6BRA, 6 Dasher or 6XC for those long shots. The classic 22-250 is also a wickedly effective varmint cartridge.
.20 Practical (20-223 Rem) AR-Platform Varminter
Here is a .20 Practical built by Robert Whitley. Whitley’s Ultimate Prairie Dog Rifle (PDR) features a 24″ Bartlein 11-twist cut-rifled barrel, DPMS side-charging upper, and a Jewell trigger. It is chambered in 20 Practical, a cartridge popularized by Warren “Fireball” Brookman.
This .20 Practical cartridge is simply the .223 Remington necked down to .204. You can use your existing .223 Rem brass — no special case-forming required! The 20 Practical is accurate, flat-shooting, and has almost no recoil. The advantage over the standard .223 Remington is that, grain for grain, the bullets have a higher BC and travel at a higher velocity for more dramatic effect on a small varmint. The ultra-low recoil allows you to easily see your hits, even without a muzzle brake. The 20 Practical, launching 40-grainers at about 3750 fps, shoots flatter than a .223 Rem with 55gr hollowpoints.
.17 HMR Savage A17 Varmint Rifle
We also like to have a Rimfire for the closer shots, inside 150 yards. The .17 HMR or .17 WSM are good choices. With a rimfire you save on ammo costs and you don’t waste precious centerfire barrel life.
This video shows a successful Prairie Dog hunt with a .17 HMR. Watch and you’ll see hits out to 160 yards (00:50), proving the effective range of the .17 HMR cartridge. The host is shooting a Savage A17 semi-auto .17 HMR rifle in a Boyds laminated stock.
The NRA Blog ran an feature on Silhouette shooting by NRA Silhouette Program Coordinator Jonathan Leighton. Here are selections from Leighton’s story:
NRA Silhouette Shooting
The loud crack from the bullet exiting the muzzle followed by an even louder ‘clang’ as you watch your target fly off the railing is really a true addiction for most Silhouette shooters. There is nothing better than shooting a game where you actually get to see your target react to the bullet. In my opinion, this is truly what makes this game so much fun.
Metallic Silhouette — A Mexican Import
Silhouette shooting came to this country from Mexico in the 1960s. It is speculated that sport had its origins in shooting contests between Pancho Villa’s men around 1914. After the Mexican Revolution the sport spread quickly throughout Mexico. ‘Siluetas Metalicas’ uses steel silhouettes shaped like game animals. Chickens up front followed by rows of pigs, turkeys, and furthest away, rams. Being that ‘Siluetas Metalicas’ was originally a Mexican sport, it is common to hear the targets referred to by their Spanish names Gallina (chicken), Javelina (pig), Guajalote (turkey) and Borrego (ram). Depending on the discipline one is shooting, these animals are set at different distances from the firing line, but always in the same order.
Before Steel There Was… Barbeque
In the very beginnings of the sport, live farm animals were used as targets, and afterwards, the shooters would have a barbeque with all the livestock and/or game that was shot during the match. The first Silhouette match that used steel targets instead of livestock was conducted in 1948 in Mexico City, Mexico by Don Gonzalo Aguilar. [Some matches hosted by wealthy Mexicans included high-ranking politicians and military leaders].
As the sport spread and gained popularity during the 1950s, shooters from the Southwestern USA started crossing the Mexican border to compete. Silhouette shooting came into the US in 1968 at the Tucson Rifle Club in Arizona. The rules have stayed pretty much the same since the sport has been shot in the US. NRA officially recognized Silhouette as a shooting discipline in 1972, and conducted its first NRA Silhouette Nationals in November of 1972.
Great Video of Silhouette Shooting in Canada with Drone Footage
Now There Are Multiple Disciplines
The actual sport of Silhouette is broken into several different disciplines. High Power Rifle, Smallbore Rifle, Cowboy Lever Action Rifle, Black Powder Cartridge Rifle, Air Rifle, Air Pistol, and Hunter’s Pistol are the basic disciplines. Cowboy Lever Action is broken into three sub-categories to include Smallbore Cowboy Rifle, Pistol Cartridge Cowboy Lever Action, and regular Cowboy Lever Action. Black Powder Cartridge Rifle also has a ‘Scope’ class, and Hunter’s Pistol is broken into four sub-categories. Some clubs also offer Military Rifle Silhouette comps.
Where to Shoot Silhouette
NRA-Sanctioned matches are found at gun clubs nation-wide. There are also many State, Regional, and National matches across the country as well. You can find match listings on the Shooting Sports USA website or contact the NRA Silhouette Department at (703) 267-1465. For more info, visit SteelChickens.com, the #1 website dedicated to Silhouette shooting sports.
One of the most fun things you can do with a firearm is to shoot reactive targets at relatively short ranges. For this kind of shooting, a rimfire gun is the way to go. Recoil is way less so you can transition targets quickly, and the cost of .22 LR ammo is a fraction of the cost of centerfire ammo. Rimfire is a bargain — you can get decent bulk .22 LR ammo for just six cents ($0.06) a round. Even cheap 9mm ammo can cost you twenty-four cents ($0.24) a round or more — that’s four times more expensive than .22 LR!
If you’re looking for a nice .22 LR pistol for gun games, we can recommend the SIG Sauer P322-COMP pistol. Designed for speed, accuracy, and flat shooting (low muzzle flip), this rimfire pistol is ready for competition right out of the box. It comes with a red dot optic, barrel-mounted compensator, slide-mounted racker, good trigger, and high-capacity (20- and 25-rd) magazines. READ P322 Manual.
We think this would be a good choice for fun action pistol matches. One YouTube viewer noted: “I applaud SIG… basically [the P322-COMP is] the first RFPO (Rimfire Pistol Open) factory option for Steel Challenge. Every other gun on the market you have to buy the optic, thumb rest, and compensator.”
SIG P322-COMP — Components and Features Video
NOTE: This 44-second video from SIG Sauer has detailed illustrations of all components with 3D rotation of the pistol so you can see it from all angles.
The SIG SAUER P322-COMP is a competition-ready .22 LR rimfire pistol with class-leading 25+1-round and 20+1-round capacity. It has a threaded barrel equipped with a 2-port compensator and comes with a factory-installed ROMEO Zero Elite Red Dot Optic. The polymer grip features an extended magazine catch, adjustable trigger shoe, sport takedown lever, 1913 rail, and integrated magwell. The Single Action Only hammer-fired action on the P322-COMP is completely enclosed in a two-tone competition alloy slide with a high viz fiber-optic front sight, plus front, rear, and top cocking serrations. The ambidextrous, slide-mounted racker ensures easy slide manipulation. The pistol ships with (1) 20-round magazine and (1) 25-round magazine.
P322-COMP Specs:
Caliber: .22 LR
Capacity: 20+1, 25+1
Barrel length: 4 inches
Sight Radius: 6 inches
Weight (w/magazine): 19.8 oz.
22Plinkster Review of P322-COMP Pistol
Note how fast 22Plinkster can hit multiple targets with this new brake-equipped pistol. No question this rimfire pistol would be fun to shoot on steel targets.
There is an excellent article about primers on the Shooting Times website. We strongly recommend you read Mysteries And Misconceptions Of The All-Important Primer, written by Allan Jones. Mr. Jones is a bona fide expert — he served as the manager of technical publications for CCI Ammunition and Speer Bullets and Jones authored three editions of the Speer Reloading Manual.
This authoritative Shooting Times article explains the fine points of primer design and construction. Jones also reveals some little-known facts about primers and he corrects common misconceptions. Here are some highlights from the article:
Size Matters
Useful Trivia — even though Small Rifle and Small Pistol primer pockets share the same depth specification, Large Rifle and Large Pistol primers do not. The standard pocket for a Large Pistol primer is somewhat shallower than its Large Rifle counterpart, specifically, 0.008 to 0.009 inch less.
Magnum Primers
There are two ways to make a Magnum primer — either use more of the standard chemical mix to provide a longer-burning flame or change the mix to one with more aggressive burn characteristics. Prior to 1989, CCI used the first option in Magnum Rifle primers. After that, we switched to a mix optimized for spherical propellants that produced a 24% increase in flame temperature and a 16% boost in gas volume.
Foiled Again
Most component primers have a little disk of paper between the anvil and the priming mix. It is called “foil paper” not because it’s made of foil but because it replaces the true metal foil used to seal early percussion caps. The reason this little disk exists is strictly a manufacturing convenience. Wet primer pellets are smaller than the inside diameter of the cup when inserted and must be compacted to achieve their proper diameter and height. Without the foil paper, the wet mix would stick to the compaction pins and jam up the assembly process.
Primer Functionality and Primer Types Compared
This video looks at a variety of primer types from multiple manufacturers, foreign and domestic. The video explains the basics of how primers function, and then explains the key characteristics of standard primers, magnum primers, and mil-spec primers (designed for semi-auto rifles).
Do you enjoy shooting pistols for sport, or perhaps you carry a handgun for self-defense? If you’re like most of us, you might benefit from a “refresher course” on the fundamentals of handgun shooting. The NRA has created a useful Infographic that covers important basics of handgun marksmanship — key things such as Sight Alignment, Trigger Control, and Handgun Hold.
Here are the first two (2) lessons. Click the link below to see all SIX (6) training topics: Sight Alignment, Sight Focus, Trigger Control, Breath Control, Hold Control, and Follow-Through.
Video Shows Sight Alignment, Grip, Stance, Trigger Control and More
In this USAMU video, SGT Shane Coley talks about the basics of sight alignment and trigger control. But then SGT Coley talks about other important control factors such as grip, arm position, and body stance. For rapid-fire shooting, you need to have a good arm and body positioning to control recoil and get back on target quickly. This video is a valuable complement to the NRA Infographic because it demonstrates all the important pistol fundamentals during live fire, at the range.
The model 1911 pistol, designed by John Moses Browning, is an American classic. Originally manufactured as .45 ACP military pistols, modern 1911s have evolved to be superb competition pistols, and carry pistols. With a Single-Action-Only (SAO) configuration, the 1911 design is different than most modern pistols. You must have the hammer cocked to fire a 1911 — like a single-action revolver. But the positive side of the Single-Action design is than modern 1911 pistols enjoy superb triggers with very positive release and fast reset. There is a reason the 1911 design is the basis for so many modern competition pistols.
In today’s Saturday at the Movies feature, we showcase videos that cover the history, design, and function of 1911-type pistols. We also include videos that explain how to field-strip a 1911 and how to accessorize/upgrade 1911 pistols.
Operation of 1911 Pistol with 3D Animations
Here are two excellent videos that show how a classic 1911-type pistol functions. 3D computer graphics animation offers a X-Ray view inside the pistol, showing how cartridges feed and how the slide cycles during the firing process.
How to Field-Strip and Re-Assemble a 1911 Pistol
There are a few tricks to field-stripping a 1911-type pistols, and it helps to have a couple specialized tools. This helpful TFB-TV (The Firearm Blog) video shows the process of disassembling a 1911 pistol from start to finish, and notes components that require lubrication or special attention.
History of the Classic Model 1911 Pistol
The model of 1911 pistol is an American classic with a long and illustrious history. These two videos cover the interesting origins of the 1911 pistol, and explain how J.M. Browning designed the remarkable 1911 pistol which became the iconic American sidearm of the U.S. Military, the longest-serving pistol in American military history.
A fascinating article by Rock Island Armory covers the complete evolution of the 1911 pistol, including its earlier prototype variants, starting with the model of 1905. SEE: Road to the 1911 Article (with Model 1905, 1907, 1909, and 1910 prototypes).
Over time the 1911 design has evolved into many variants, including the modern “race gun” used in rapid-fire pistol competitions. Here is an STI DVC Open model fitted with a C-More sight, and front compensator.
Pistol Shooting Skills Demonstrated with 1911
How to Grip a 1911 Handgun Properly
World Champion pistol ace (and 18-time Bianchi Cup winner) Doug Koenig demonstrates how to grip a handgun. While the fundamentals are demonstrated on a 1911 pistol they are effective for establishing a proper grip on any handgun.
Trigger Press and Trigger Control
In this video Champion shooter Doug Koenig talks about key techniques that apply to all pistol marksmanship — not just speed shooting “on the clock”. With any handgun, Doug explains, you should focus on consistent trigger control. You want to avoid yanking the trigger or anticipating recoil.
How to Accessorize Your 1911
The Brownells YouTube Channel has a series of videos showing how to accessorize a 1911. The videos show procedures for upgrading the magazine release, slide release, hammer, guide rod, mainspring housing, and grips. There are also good videos on barrel replacement and drop-in trigger group installation. If you want to upgrade your 1911, these videos are worth watching. Below are links to three of these 1911 videos.
Legendary competitive shooter and Team Vihtavuori member Bruce Piatt has claimed his eighth Bianchi Cup title, securing victory at the 2025 Bianchi Cup with the only perfect score of 1920 in the match. The Civilian Marksmanship Program (CMP) now oversees the Bianchi Cup competition, previously run by the National Rifle Association.
The 2025 Civilian Marksmanship Program (CMP) Bianchi Cup, known as the gold standard in action pistol shooting, was hosted once again at the Green Valley Rifle and Pistol Club in Hallsville, Missouri, May 20-23, 2025. Participants from all over the world competed in the Falling Plates, Moving Target, Barricade, and Practical events.
“The 2025 Bianchi Cup is coming home with me for the 8th time!” Piatt said after the match. “Dealing with a nasty cold the entire time and having to switch to my backup gun at the last minute didn’t exactly boost my confidence — but focus and determination paid off.”
Piatt won his impressive 8th Bianchi Cup title running the .38 Super cartridge powered by high-qualty Vihtavuori N320 powder. Beyond his individual triumph, Piatt also accompanied his 4-man team to victory, achieving a team score of 1918-175X. The winning quartet included Piatt, Mark Itzstein, Joey De Leon, and fellow Team Vihtavuori athlete, Doug Koenig.
Editor’s Note: Vihtavuori N320 is our favorite powder for .45 ACP target loads. It is very accurate and burns cleaner, with fewer sparks, than any other brand of powder we have tried for the .45 ACP. We highly recommend N320 and the slightly faster N310.
Our .45 ACP loads showed superb accuracy with coated lead bullets. This combination provided great performance and also had our pistols running very clean, reducing maintenance chores.
Bruce Piatt 3-Gun Skills on Display
Bruce Piatt also competes in 3-Gun Matches. This short video shows Bruce completing a 3-gun stage (shotgun 0.09 time-mark, pistol 0.18, then rifle 0.53) at the Rockcastle 3-Gun Pro-Am event. His speed with the AR-type rifle was very impressive as was his long-range accuracy.
About Vihtavuori
Vihtavuori is renowned its clean burning and temperature stable smokeless powders that have great lot-to-lot consistency. Vihtavuori is imported by Capstone Precision Group, exclusive U.S. distributor for Berger, Lapua, Vihtavuori and SK-Rimfire products. For more information, visit Vihtavuori.com.
FPC Urges U.S. Senate to Pass Suppressor Reforms
The Firearms Policy Coalition (FPC) has urged the U.S. Senate to pass H.R. 1, the “One Big Beautiful Bill Act”, with the legislation’s current suppressor reforms intact.
Last month, the House of Representatives passed the Act with three important provisions relating to suppressors, one removing these hearing protection devices from the extreme regulations of the National Firearms Act (NFA) and two others zeroing out the current significant Federal fees that must be paid when acquiring a suppressor.
Research by the Centers for Disease Control and Prevention (CDC) has shown that “[t]he only potentially effective noise control method to reduce students’ or instructors’ noise exposure from gunfire is through the use of noise suppressors that can be attached to the end of the gun barrel.” The CDC’s conclusion has been affirmed by many other health experts. The American Academy of Otolaryngology-Head and Neck Surgery has endorsed “the use of firearm suppressors as an effective method of reducing the risk of hearing loss, especially when used in conjunction with conventional hearing protective measures”.
See Through Suppressor in Super Slow Motion (110,000 fps) — Click Arrow to Watch:
“Firearm suppressors are incredibly important hearing protection devices that reduce the risk of permanent damage and hearing loss for shooters and others nearby”, explained FPC President Brandon Combs. “These important safety tools are no different than hard hats, safety glasses, and fire extinguishers and should be widely available for personal use, not taxed out of the reach of ordinary Americans.”
Suppressors, On Average, Reduce Noise Levels about 30 Decibels
Suppressors work similar to a car’s muffler, redirecting exhaust gases. In an article for Ammoland, gunwriter Sam Hoober says that you can expect about 30 decibels (dB) of noise reduction from the average suppressor: “Looking at a few different products, SilencerCo attests their suppressors reduce the sound pressure of a 9mm gunshot to anywhere from 125.7 dB to 131.5 dB, depending on the model. Advanced Armament Co, another popular supplier, attests a 23 dB to 33 dB reduction or down to 127 dB. In short, we can [expect] 30 dB of attenuation as an average.” Reducing gun shot noise to the 130dB range means that the sound level with NOT permanently damage hearing.
Emil Praslick III is widely recognized as one of the greatest wind wizards on the planet — a master at identifying wind value and direction, and predicting wind cycles. As coach of the USAMU and top civilian teams, Emil has helped win many high-level championships. In the three videos we feature today, Emil, who works with Capstone Precision Group (Berger, Lapua, SK, Vihtavuori) and Team Applied Ballistics, explains how to determine wind direction and velocity using a variety of indicators. Praslick, now retired from the U.S. Army, was an 18-time National and 2-time World Champion coach with the USAMU.
Video ONE: Wind Theory Basics — Understanding “Wind Values”
In this video from UltimateReloader.com, Emil explains the basics of modern wind theory. To properly understand the effect of the wind you need to know both the velocity of the wind and its angle. The combination of those variables translates to the wind value. Emil also explains that the wind value may not be constant — it can cycle both in speed and velocity. Emil also explains some of the environmental conditions such as mirage that can reveal wind conditions.
Video TWO: Determining the Direction of the Wind
Key Point in Video — Find the Boil
Emil explains how to determine wind direction using optic. The method is to use spotting scope, riflescope, or binoculars to look for the “Boil” — the condition in mirage when the light waves rising straight up. The wind will generate that straight-up, vertical boil in your optics when it is blowing directly at you, or directly from your rear. To identify this, traverse your scope or optics until you see the boil running straight up. When you see that vertical boil, the direction your optic is pointing is aligned with the wind flow (either blowing towards you or from directly behind you).
Video THREE: The No Wind Zero Setting
In this second video, Emil defines the “No-Wind Zero”, and explains why competitive shooters must understand the no-wind zero and have their sights or optics set for a no-wind zero starting point before heading to a match. In order to hit your target, after determining wind speed and direction, says Emil, “you have to have your scope setting dialed to ‘no wind zero’ first.”
Coach of Champions — Emil Praslick III
SFC Emil Praslick III, (U.S. Army, retired) works with Berger Bullets and Applied Ballistics. Emil served as the Head Coach of the U.S. National Long Range Rifle Team and Head Coach of the USAMU for several years. Teams coached by Emil have won 33 Inter-Service Rifle Championships. On top of that, teams he coached set 18 National records and 2 World Records. Overall, in the role of coach, Praslick can be credited with the most team wins of any coach in U.S. Military history.


 From Wes (P1ZombieKiller): “[For my first PD trip] there are so many things I was not ready for. The one thing that I did bring (that no one told me about) was a canopy. I’m glad I did. Even though the weather was [near perfect], I know that sun can humble you real fast. With my pop-up canopy, I could shoot all day without getting killed by the sun. You had to tie the canopy down real well or the wind would blow it across the pasture.
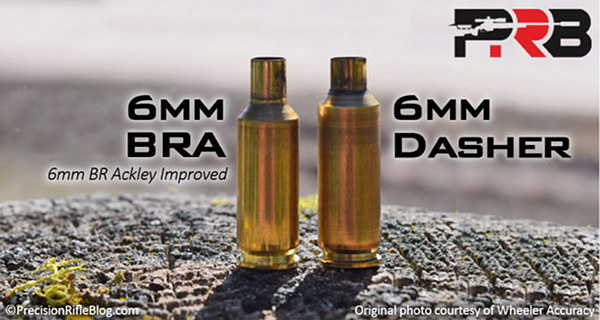


 The
The 
 Metallic Silhouette — A Mexican Import
 Before Steel There Was… Barbeque


 Legendary competitive shooter and Team Vihtavuori member Bruce Piatt has claimed his eighth Bianchi Cup title, securing victory at the 2025 Bianchi Cup with the only perfect score of 1920 in the match. The Civilian Marksmanship Program (CMP) now oversees the Bianchi Cup competition, previously run by the National Rifle Association.

 Editor’s Note: Vihtavuori N320 is our favorite powder for
 FPC Urges U.S. Senate to Pass Suppressor Reforms


