In this article we cover a better barrel cooler you can build yourself for under $15. This uses a high-speed inflator fan sold on Amazon, along with a piece of temp-stable tubing. Forum member (and popular YouTube host) F-Class John devised this system. He found it cools his barrels in less than half the time of some other products. And the system can also serve as an Empty Chamber Indicator (ECI).
Barrel coolers perform an important function — reducing barrel operating temperatures. This can definitely help preserve barrel life and help maintain good accuracy in competition. In addition, keeping barrels cool can reduce the chances of excess chamber pressure, an important safety concern.
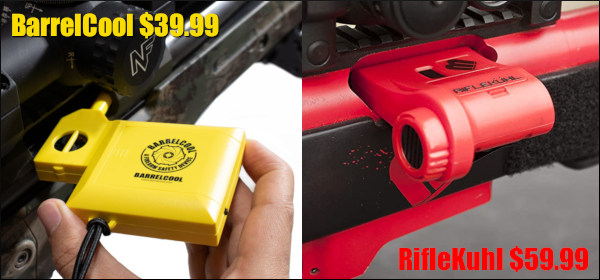
There are a variety of commercially-available barrel cooling systems. There are external fans, as well as internal, slip-in systems than can do double duty as an Empty Chamber Indicator (ECI). You can get the original yellow $39.99 BarrelCool or the red $59.99 RifleKuhl from Magnetospeeed. Both are good products. But F-Class John came up with a system that works even better — one you can build for a fraction of the cost of those yellow or red fans.
Build Your Own Barrel Cooler for Under $15
This system is easy to put together. Order a $11.99 YIVAR pump from Amazon. This is a small, high-output pump designed to inflate air mattresses. Then get some high-temp-rated tubing from a local supply shop. Then trim the case-head off an old piece of brass. Taper the end of the tube a bit and fit it in the case. NOTE: Use of the fitted case is optional. Having the case provides a nice fit in your chamber. But the system works pretty well just with the tubing and Yivar air pump.
In his .284 Win barrel, the Yivar pump system blows air at 10+ mph out the muzzle. F-Class John says that is “about three times the velocity of other systems”. The Yivar pump “holds about 45 minutes of charge” so he can use it for 15 minutes after each of three strings in a match. And then it can be recharged from a USB-compatible battery pack at the range. John notes the fan continues to blow about the same speed for the full 45-minute charge duration.
Key Benefits of this system
1. Faster Cooling
2. Low Cost (under $15)
3. Longer run time on battery
4. Fan battery is USB rechargeable
5. Finally a use for that worn-out brass
John confirmed the effectiveness of his barrel cooler using a stick-on temperature tape placed on the barrel. This showed that his fan system cooled the barreled in less than HALF the time as the plastic commercial fan systems. In addition, his run time was excellent, and the Yivar’s built-in Lithium-Ion battery is fully rechargeable so he never has to buy expensive batteries.
What are the downsides? Not many. The fan IS somewhat noisy — watch video at 4:04-4:28 time mark to hear the fan. F-Class John notes, however, that the Yivar fan is about 4 decibels (dB) quieter than a Magnetospeed RifleKuhl, so the Yivar’s noise is not that bad.
Here are comments from YouTube viewers who like F-Class John’s invention:
Finally something affordable! It’s compact and can be recharged at the range. I have room for this but not all the other gadgets you show. And a poor pensioner like my self can afford it! Thanks for the tip.
Ingenious and awesome idea! I bought one as soon as I saw this. I’ve been thinking about getting a cooler when I’m testing my loads. Thanks!
Brilliant… Brilliant… Brilliant! I have been deferring buying a barrel cooler for years now on account of wanting to spend my toy fund budget on other things. Considering how cheap it is to build, there is no excuse to not make one now.
Fan with Plain Hose Also Works Well (No Brass Case Cutting/Fitting Required)
F-Class John likes the custom fit he achieves with the hose inserted into a piece of modified brass. However he notes that the system also works well with no brass at all — i.e. just hose and fan. If you have a small diameter chamber, this may actually work better. Simply put the hose on the fan, trim/taper the forward hose end to fit and you are good to go.
F-Class John explains: “The heavy duty tubing and the motor works just fine without a brass case. The hose can sit in the chamber by itself. Obviously not every brass case will easily allow for you to put it on the end of the tube. For many people simply using the tube (without brass) may be the simpler option.”
Bang Clang! The 2021 Steel Challenge World Speed Shooting Championship will be featured on Shooting USA TV tomorrow. The Shooting USA Steel Challenge episode runs September 22, 2021 on the Outdoor Channel. Show times are: Wednesdays, 9:00 PM Eastern and Pacific, 8:00 PM Central.
This past April, the fastest speed shooters in the nation showcased their skills at the Steel Challenge Championship at Alabama’s Talladega Marksmanship Complex in Alabama. The Steel Challenge course consists of multiple 5-target close-range stages. This discipline has been called “drag racing with guns”. Draw and shoot 5 steel targets with time as your score. The shooter with the lowest overall time wins.
There are multiple pistol and revolver classes, both rimfire and centerfire, iron sights and optics. Increasing in popularity (and speed) are the rimfire rifle and pistol-caliber centerfire rifle classes. There are 13 gun classes in total, the most for any shooting championship. In the centerfire handgun match, the fastest times are posted by competitors using enhanced open guns with compensators and red-dot optics. This year, KC Eusebio has set out to become the only eight-time World Speed Shooting Champion.
Here is a full length Shooting USA Steel Challenge Episode from 2017:
Shooting USA Video covers Course of Fire, Firearms Classes, and Target Layouts (1:20)
Definitely watch the 4-minute video (above) produced by Shooting USA. It explains the classes, shows the stages, and illustrates ALL the different gun classes, pistol AND rifle. You can also see some of the world’s fastest shooters including Jessie Harrison (1:47, 3:44) and Max Michel (3:48). Be amazed by the speed of semi-auto rimfire rifles — five targets hit in under two seconds!
Here is Jessie Harrison, the fastest lady pistol shooter on the planet. At the 2021 World Speed Shooting Championship, Jessie won the Ladies Overall Open title for the 13th time with a total time of 93.03 seconds. Full Report on SSUSA.org.
The Steel Challenge was founded in 1981 by Mike Dalton and Mike Fichman, in Southern California. The two Mikes wanted an exciting alternative to paper targets and came up with the all-steel format. The Steel Challenge World Speed Shooting Championships have grown to one of the largest professional pistol competitions in America. In 2021, scores of competitors competed at the Talladega Marksmanship Park for glory and cash prizes. The Steel Challenge is governed by the Steel Challenge Shooting Association (SCSA) that consists of eight standardized stages with three types of steel targets: small circle, big circle, and square. Here is a steel challenge layout in Germany.
Ace tactical shooter and gunsmith Jim See of Elite Accuracy LLC recently tested a Frankford Arsenal rotary brass tumbler. Like the older Thumbler’s Tumblers, this can tumble your cases in a liquid solution. The wet-tumbling process worked very well Jim reports. Posting on Facebook, Jim noted: “I was super impressed with the Frankford Arsenal rotary tumbler and cleaning packs they sent me. I ran 350 pieces of brass for one hour. They now look great.” Jim appreciated not having to deal with dry tumbling media, such as crushed walnut shells. Dry media produces dust and can leave residues or clog flash-holes.
Interestingly, Jim recommends you try wet-tumbling WITHOUT using stainless media. At least give it a try. Tumbling without media simplifies the process and you don’t have to worry about pins stuck in flash-holes or case-necks*. Jim reports: “Stainless steel pins come with the Frankford kit, but mine hit the trash right out of the box. There is no need to clean the inside of your cases 100% and that’s all the pins add to the equation. The brass bumping brass with hot water and Frankford’s liquid cleaner works great all by itself.” One wag stated: “That’s great to hear. Stainless steel pins are a PITA.”
Other Facebook posters concurred with Jim’s evaluation of the Frankford Arsenal Rotary Tumbler:
“I’ve had one for a couple years, and it works well. I usually run about 250-300 Dasher cases at once in it. But I use the pins because I’m OCD about clean brass.” — David W.
“I’ve had one for a year and a half and it definitely works with or without pins.” — Luke C.
“I got one about six months ago and have yet to use any SS media. I just use some dawn, distilled water, and Lemi Shine®. Turns nasty 5.56 range brass bright and shiny.” — Brian D.
“I don’t use the pins either and use a combination of Dawn soap and Lemi Shine.” — Jon N.G.
This video shows how to assemble and operate the Frankford rotary tumbler. But note, Jim See does NOT feel that it is necessary to use stainless media.
How to Dry Your Brass — Hair Dryer Vs. Machine
The downside of wet tumbling is that you end up with a pile of wet brass at the end of the cleaning cycle. There are many ways to dry brass, from drying in the sun to using a kitchen oven (be careful not to “overcook” your brass). One Facebook poster asked Jim: “What is your drying method for wet brass, and how long does it take?”
Jim See replied: “To start I just drain off the dirty water, and rinse the brass with clean hot water. Then I roll the brass on a towel for 30 seconds and put the brass in a one-gallon bucket. Next I insert a hair dryer in the bucket (with the brass) and let it run for about 5 minutes. With this procedure, the drying process for me is done in less than 10 minutes.”
Jack Lanhart has another method: “I use a food dehydrator. It takes 30 to 45 minutes.”
For those who don’t want to mess with towels and hair dryers, Frankford Arsenal offers a matching Platinum Series Case Dryer that simplifies the process of drying brass. Lyman also makes an excellent Cyclone Case Dryer. These drying machines each cost about $65.00 and both have multiple levels so you can separate different types of cartridge brass. Lyman states that “The forced heated air circulation of the Cyclone will dry your brass inside and out within an hour or two, with no unsightly water spots.” The Lyman dryer can also be used for ultrasonically-cleaned gun parts.
*The Frankford Rotary tumbler does include media separators if you choose to use the provided pins or other media. CLICK HERE for diagram showing how to use media separators.
.223 Rem for Long Range Palma, by John Whidden (5-Time Nat’l LR Champion)
We’ve seen quite an amount of interest in recent years in .223s for Long Range Palma shooting. Yes, the .223 Remington is a pretty light cartridge for long range use, but the specific rules of Palma shooting make it a choice worth considering.
Back in 2019, the Int’l Confederation of Fullbore Rifle Associations (ICFRA), the international governing body for Palma shooting, made a rule change allowing .223 Rem rifles to use bullets of less than 91 grains. Previously the rule allowed the use of bullets less than 81 grains in the .223 Rem, and we have long had the popular option of .308s shooting bullets less than 156 grains. These heavier bullets such as the 85.5gr Berger LR Hybrid and 90gr Berger VLD make the .223s quite competitive in the wind with the old standby .308 Winchester. The .223 does hold the obvious advantage of much lower recoil than the .308. [Editor: The reduced recoil is quite noticeable in the video below where John is shooting his .223 Rem rifle.]
John Whidden Shoots .223 Rem Palma Rifle with 90gr Berger VLDs
Watch video at 00:25 and you’ll see the recoil of Whidden’s .223 Rem Palma rifle is significantly less than a .308 Win Palma rig. John joked: “With the .223 Rem there is just a pop and a wiggle after the shot.”
.223 Rem Palma Rifle — Barnard Action, Tec-Hro Stock
The Barnard P action imported by Whidden Gunworks is the foundation for many winning Palma rifles. As soon as our USA shooters returned from the New Zealand Palma match in 2019 they were immediately requesting bolts to convert their actions to .223 Remington.
Given all of this interest in the .223 Rem, I decided to build one myself and see if all of these theories about wind performance held water. Starting with my Barnard P action, I worked with Tec-Hro in Germany to use one of their Fanatic stocks for the project. The Fanatic is a modern aluminum stock suitable for prone or Three Position use. The stock uses adapter blocks to work with a wide variety of rimfire actions such as Anschutz, Walther, and Feinwerkbau. As far as I know we were the first to test it out for centerfire use. After shooting the stock with my .308 Win barreled action installed to refine a few details and ensure the stock would stand up to recoil, I then mounted my .223 Rem barreled action and went to the range.
Prior to my range visit a decision was made concerning bullets and twist rate. After discussion with Mark Buettgen at Bartlein Barrels I ordered two barrels — a 1:7″-twist and also a 1:6.25″-twist. Mark was looking for some data using the Sierra 90gr MatchKing bullet and we expected that the faster twist rate might give the best success with that MatchKing bullet. When the barrels arrived they were chambered and installed on the rifle.
John uses a Warner rear adjustable sight with a Centra front sight.
Fast Twist-Rate Barrels for Long .223-Caliber Bullet
First up the 1:6.25″-twist barrel was installed and testing commenced. The barrel shot extremely well right out of the gate. All loads used Lapua brass and Vihtavuori N140 powder. I tested the Berger 85.5gr and 90gr bullets as well as Sierra 90gr and 95gr bullets. Testing with the 6.25-twist barrel went well with both of the Berger bullets looking especially good. Later the 1:7″-twist barrel was mounted and tested.
While both barrels were very accurate we decided that the 1:6.25″-twist barrel outshined the 1:7″-twist tube. Now we all know that some barrels are just a little more accurate than others. With such a small sample of data here (just two barrels) I’m not saying that a 1:6.25″-twist is decidedly better. In fact we have a number of customers shooting 7-twist barrels who are shooting them very well. With this particular rifle however, the 6.25-twist seems to be the more accurate of the two.
.223 Rem Load Development for Palma Competition
The load I settled on is Lapua brass, Vihtavuori N140 powder, and Berger 90 grain VLDs which I moly-coat. I soft-seat the bullets into the lands with only .001″ neck tension or a little less.
Why the Berger 90gr VLD? The secret sauce is that the 90gr VLD is much superior in the wind after we point it up with the Whidden Pointing Die. The 85.5gr Hybrid bullet comes from Berger with this treatment already done while the 90gr VLD does not. When the 90-grainer is pointed up, the wind drift is a few percent better than the 85.5, given the velocities that I feel comfortable achieving with the rifle.
I settled on 2840 fps for the 90gr VLD and 2880 fps for the 85.5gr Hybrid from a 32″ barrel. When pointed up, the 90-grainer shoots flatter to 1000 yards by 1 MOA which indicates a G7 BC of .289 in my combination. Wind Drift in a 10 mph direct crosswind at 1000 yards is 70.8″ with this 90gr combination compared to 76.8″ for the 85.5gr load.
Testing in Competition — at Camp Perry
This past August 2021 at the CMP Long Range National Championships at Camp Perry I finally had the chance to shoot the rifle on a big stage. Winds that day were from almost directly 12:00 to about 1:30 switching headwinds. Velocity was around 8-10 mph meaning not the easiest or the hardest of conditions. I managed a third place finish in the Palma match. That proves the .223 Rem is definitely competitive in elite Palma events.
.223 Rem Performance in the Wind
My sense of the .223 Rem’s wind performance was that it was in line with the performance I’d expect from my .308 Win Palma gun. Of course the lack of recoil made the .223 Rem much easier to shoot well.
How to Order a Rifle Like This Whidden Gunworks can build a rifle like this for Palma competitors who want to move to .223 Rem. John tells us: “We’ve built a number of these combinations of the Barnard P action, Tec-Hro Fanatic stock, and Bartlein barrel. They all shoot incredibly well and the ergonomics are top notch. One of the good points is that the current price of $3875.00 (without sights) makes it a bargain for a top-tier Palma rifle.”
About John Whidden
5-Time National Long Range Champion
John Whidden is founder and owner of Whidden Gunworks and a lifelong competitive shooter. Major shooting accomplishments include being a 5-Time U.S. National Long Range Champion, winner of the Australia National Queen’s Prize, and member of three USA Palma Teams. John is currently active in Long Range Highpower, 300 Meter Prone, and Smallbore prone events. John tells us that one secret of his success is having top equipment: “The mental component of Long Range competitive shooting is always challenging but having tremendous confidence in the accuracy of your equipment is a huge benefit. There’s nothing to start your Palma match off well like knowing that you are shooting the most accurate Palma rifle you’ve ever owned.”
Whidden Gunworks stands ready to help with your shooting and reloading needs. Whidden Gunworks specializes in custom bolt action rifles, reloading dies, other reloading tools, and reloading components. Well known for match-grade custom rifles and high-quality reloading dies, Whidden Gunworks’ growing lineup includes components from Berger, Lapua, Vihtavuori, and SK rimfire ammunition. Learn more by visiting www.WhiddenGunworks.com.
Hunting season is starting soon. We know many readers have acquired a new hunting rifles, or perhaps are using new ammo or a new optic. If you’ve got new gear, you’ll want to sight-in and zero your hunting rig properly. Here’s how…
Here’s a simple procedure that lets you get a solid zero in just four shots. Of course you probably want to fire a few more rounds to confirm your zero before you head off to your hunting grounds, but this will let you get on-target with a minimum amount of time and ammo expended. (This assumes your scope is securely mounted, and the bases are not drastically out of alignment.)
QUICK-TIP: The Key to this procedure is Dialing to Shot One Point of Impact (POI). Re-aim at center of target after SHOT ONE. Then with the rifle motionless, use the turrets to put the middle of the cross-hair (reticle) on the first shot location. Be sure NOT to move your rifle while clicking.
1. First, remove the bolt and boresight the rifle. Adjust the position of the rifle so that, looking through the bore, you can see the center of the target with your eyes. Secure the rifle in the rests to maintain its position as boresighted. Then, without moving the rifle, center the reticle. That should get you on paper. With the rifle solidly secured in front and rear rests or sandbags, aim at the center of a target placed at your zeroing distance (50 or 100 yards). Confirm there are no obstructions in the barrel! Then load and fire SHOT ONE. Then, return the gun to the exact position it was when you pulled the trigger, with the cross-hair centered on the target as before.
2. Locate, in the scope, where your first bullet landed on the target. Now, while you grip the rifle firmly so it doesn’t move, have a friend adjust the turrets on your scope. While you look through the scope, have your friend turn the windage and elevation turrets until the cross-hairs, as viewed through the scope, bisect the first bullet hole on the target. Use the turrets to move the center of the reticle to the actual position of shot number one. IMPORTANT: Dial the crosshairs to the hole — don’t move the rifle.
3. After you’ve adjusted the turrets, now re-aim the rifle so the cross-hairs are, once again, positioned on the target center. Keep the rifle firmly supported by your rest or sandbag. Take the SECOND SHOT. You should find that the bullet now strikes in the center of the target.
4. Take a THIRD SHOT with the cross-hairs aligned in the center of the target to confirm your zero. Make minor modifications to the windage and elevation as necessary.
5. Finally, shoot the rifle from a field rest (shooting sticks, bipod, or rucksack) as you would use when actually hunting. Confirm, with SHOT FOUR, that your zero is unchanged. You may need to make slight adjustments. Some rifles, particularly those with flexy fore-arms, exhibit a different POI (point of impact) when fired from a bipod or ruck vs. a sandbag rest.
Don’t Rush the Process
One more important point comes from reader Bruce: “DO NOT rush the procedure. Hunting rifles need a cold zero. When you go for a walk in the weeds for that freezer-filler with a hat-rack your FIRST (and likely ONLY) shot will be from a COLD barrel. Bambi is not going to hang around while you fire warming shots”.
This Video Shows the Process Described Above:
Fouling Shots and Cold Bore Condition
If you recently cleaned your rifle, you may want to fire two or three fouling shots before you start this procedure. But keep in mind that you want to duplicate the typical cold bore conditions that you’ll experience during the hunt. If you set your zero after three fouling shots, then make sure the bore is in a similar condition when you actually go out hunting.
Pyramyd Air is running a great contest right now — the Backyard Brawl. There will be $7,000 in CASH PRIZES. Four Grand Prize winners will each get $1000.00. But act soon — the entry deadline is September 15, 2019, just a few days away.
This Backyard Brawl contest is a bit unusual. To enter you need to shoot a set of mini silhouettes and then make a video. The silhouette targets are free with code BRAWL21 (you just pay for shipping). Once you receive the targets, knock ‘em down with your airgun, and upload a video to YouTube or Vimeo. You MUST upload a video to be entered in the contest. Make sure the title includes “Pyramyd Air Backyard Brawl” and put this link in the description: https://www.pyramydair.com/bb.
How to Enter Backyard Brawl Contest
Order Air Venturi Airgun Slynger Metal Silhouette Targets, FREE with promo code BRAWL21 (just pay shipping). Then upload a video of you shooting the targets with an air rifle or air pistol. Limit one entry per person. Contest ends September 15, 2021. Winners will be announced on/around the week of October 1st, 2021.
Backyard Brawl Contestant Videos
Here are two videos uploaded by past Backyard Brawl contest entrants. You’ll see some pretty good shooting with interesting airguns. Can you make a more entertaining video?
Here Matt Coulter shoots a .22 Caliber Royale with JSP Express Jumbo pellets at about 580 fps.
In this video, UpNorthAirGunner shoots a Benjamin Marauder .177 Field & Target, a Broom-Handle Mauser clone full-auto BB Pistol, and a Seneca “Dragon Claw” .50 caliber air rifle.
How to Enter Backyard Brawl and How to Get Your Four FREE Mini Silhouette Targets
While AccurateShooter.com focuses on rifles, we know that a large percentage of our readers own handguns, with 1911-style pistols being particular favorites. For you 1911 owners, here are six short videos from Brownells showing how to customize a 1911-style pistol with after-market upgrades.
How to Accessorize Your 1911
This six-part series by Brownells provides step-by-step instruction on how to accessorize your 1911. The videos cover changing out the mainspring housing, magazine release, slide release, hammer, guide rod, and installing a group gripper. If you want to upgrade your 1911, these videos are worth watching.
Model 1911 Components and Cycling — Cut-Away Animation Video
If you’re not familiar with M1911 type single-action pistols, this video animation provides an inside look at the M1911’s components and shows how the M1911 cycles:
The popular BarrelCool is a compact barrel-cooling device that also serves as an empty-chamber safety flag. A small, battery-powered fan drives cooling air through the barrel’s bore. Yes it really works — manufacturer-provided data shows that BarrelCool significantly reduces the time it takes to cool down a hot barrel. Look at the chart above to see what to expect.
In the past, folks have tried various methods to cool barrels: water flushed through the bore, CO2 tanks, even battery-operated fish pumps. BarrelCool is a simpler, less costly, and much handier solution. Priced at $39.99, this small device can definitely save you time at the range. Potentially it can save you money by extending barrel life. To see how Barrelcool works, watch th videos below that show the BarrelCool units in both bolt-action and AR-type rifles.
BarrelCool Range Reports from Forum Members
Forum members have been impress with the BarrelCool device. Member Comrade Terry said: “At the range, I spend a good bit of time waiting for the barrel to cool between shot strings. I fired my usual 50 rounds today, and (though it was 85° today) I was able to leave the range 30-40 minutes earlier than usual thanks to the BarrelCool. I like it!” Another Forum member, J-Rod, reports “Did some load development on my new rifle. This used to take forever due to the barrel heating up outside in full sun (90° ambient). I’d say this little gem cut about two hours off my normal shooting time. I got home early and the wife was happy — what’s that worth?”
How and Why BarrelCool Was Invented
BarrelCool originated from the idea that cease-fire periods would be a great time to cool a barrel. During cease-fires, most ranges and matches require empty chamber flags in the gun so that the range officer and everyone on the firing line can see visually that the gun is in a safe condition. The BarrelCool does double duty — cooling the barrel while serving as an empty-chamber indicator.
BarrelCool inventor Bryan Sumoba explains: “Previous barrel-cooling methods required additional steps such as running patches down the bore, or a fan that gets in the way of a required empty-chamber flag. BarrelCool now allows the shooter to cool the barrel while having the empty-chamber flag in the firearm.”
Sumoba says BarrelCool significantly shortens the time needed to cool down a hot barrel: “In controlled testing, it took about half the time to cool the barrel from 140 degrees F to 100 degrees F. Our customers also report significant reductions in the time it takes to cool down a hot barrel. At an F-Class match in Sacramento, one shooter fired 25 shots out of his 7mm RSAUM and got the barrel to the point where it was too hot to touch. We placed BarrelCool in his firearm and within 30 minutes, the barrel was back to near-ambient temperature.”
Using three (3) CR123A batteries, a BarrelCool unit can operate for 7-10+ hours. BarrelCool fits both AR-style rifles as well as most bolt action rifles. The Hi-Viz yellow color stands out on the firing line and BarrelCool is small enough to fit in most range or gun bags. Manufactured in the USA, Barrelcool can benefit competition, precision, or recreational shooters who need to cool down their barrels more rapidly, while displaying “safe condition” on the firing line. For more information, or to order for $34.99, visit www.barrelcool.com.
BATTERY TIP: We recommend rechargeable CR123A batteries for use in the BarrelCool. These can last many seasaons and can be charged at home or in a vehicle. Keep a spare set in your range bag. A 4-pack of C123A Lithium Batteries with USB recharger unit is $29.99 on Amazon
The Lee Hand Press Kit comes complete with: Breech Lock Hand Press, Ram Primer fittings, Powder Funnel, Case Lube, and one Breech Lock Quick Change Bushing.
The Lee Breech Lock Hand Press is a useful addition to any reloader’s tool collection. This Hand Press allows you to resize brass or seat bullets while at the range or away from your loading room. No it won’t replace your Co-Ax or Rockchucker, but this is a handy piece of gear. And it’s very affordable. Midsouth sells the Lee Breech Lock Hand Press Kit, with everything shown above, for $64.52. Or you can buy just the Hand Press by itself for $49.91 at Amazon. That’s a great deal.
Lee Hand Press Quick-Change Die Functionality
This Lee Press includes the Breech Lock Quick-Change Die Feature, so you can instantly change dies with just a twist of the wrist. One Breech Lock Quick Change Bushing is included. The Breech Lock Hand Press is light and compact. It tips the scale at a mere 1 3/4 pounds and overall product length is 11.5″. Note: the maximum overall length cartridge the Lee Hand Press can accept is 3.650 inches.
While we don’t recommend the Hand Press for major full-length sizing chores, it does a good job seating bullets. This makes it a handy “field expedient” tool when doing load development at the range. For example you can experiment with seating depth by loading a batch of cartridges at home with the bullets deliberately seated long. Then, at the range, you can re-seat the bullets progressively shorter (in a series of rounds), until you find the optimal Cartridge OAL.
Lee’s Hand Press is also great for decapping operations. One verified buyer reports: “I mostly use it for decapping while watching TV, with a universal decapper die. Of course it is also useful for other operations. I wouldn’t love sizing large rifle cases with it, but if you’ve prepped your cases on a bigger press you could comfortably take it to the range for load development, one round at a time, working right there at the line instead of making a bunch of loads at home that you’ll have to disassemble later. It’s smaller and more lightweight than it looks[.]”
Using Hand Press to Load at the Range
To learn more about using the Lee Hand Press in the field with a compact scale, read Reloading Without a Bench on GunsAmerica.com. Author Christopher Mace explains: “whether you want a better way to do load development, the capability to reload out of your ‘bugout bag’, or you’re short of space but wanting to get into reloading, the Lee Loaders and the Lee Hand Press offer you some options.”
If you ever shoot with electronic targets, ShotMarkers, or target cams, chances are you’ll spend lots of time looking at the screen of a tablet computer or iPad. These electronic devices are pretty amazing, but they have one major shortcoming when used outdoors — reflections from the highly-polished glass screen.
Well it turns out there is a simple, inexpensive solution to the problem of annoying tablet screen reflections. Just purchase a quality anti-reflective screen protector for your tablet, iPad, or smartphone and you will eliminate most annoying reflections and make your mobile device MUCH easier to use at the range.
Take a look at the two photos above. The first photo shows how annoying reflections can obscure the ShotMarker display on a tablet. The second shot shows how much easier it is to view the ShotMarker target image with an anti-reflective screen cover in place. BIG improvement!
Our friend Keith Glasscock recently added an anti-reflective screen protector to his iPad tablet and found that it works wonders. Keith recently reviewed the iCarez Matte Screen Protector for his Winning in the Wind YouTube Channel. These screen covers are available in a wide variety of sizes to fit most Apple iPhones and Apple iPads. These thin, matte screen protectors are quite affordable, with prices starting at just $6.95.
In addition, there are other brands of screen protectors for Android devices that work the same way. Again, you’ll find a variety of sizes. For example, Supershieldz now offers a 3-pack of matte screen covers for 10″ Samsung tablets for just $6.99 on Amazon
In the above video, Keith Glasscock explains the problem of screen reflections when using mobile devices for shot monitoring. Keith then describes his positive experience with the iCarez Matte screen cover installed on his personal iPad.
A good screen cover can eliminate this kind of harsh reflection on tablet screens:


 Key Benefits of this system





 Testing in Competition — at Camp Perry
 About John Whidden




 Lee Hand Press Quick-Change Die Functionality


