Keith Glasscock is one of America’s greatest F-Class shooters, as well as a highly respected wind coach. A High Master, Keith finished second overall at the 2021 NRA F-Class Long Range Championship in F-Open division. He also finished second at the 2020 Nationals, tied with F-Open winner Pat Scully on points, but with fewer Xs. And he took second also at the 2019 Nationals. His consistency is unrivaled, which means he definitely knows the secrets of long range wind calling and loading ultra-accurate ammo.
Keith has a popular YouTube Channel with new content every week. On Keith’s Winning in the Wind channel, Keith offers 60+ informative videos on a wide range of topics including wind reading, reloading, component selection, load development, and training. For today’s Video Showcase, we offer four of our favorite Keith Glasscock videos. Each video has important points that can benefit any competitive rifle shooter, whether you shoot in local 100-yard fun matches or compete at the National Level in F-Class, LR Benchrest, Palma, or High Power.
How to Find (and Fine-Tune) Seating Depth
This is Keith’s most popular video. Keith definitely knows how to maximize accuracy by finding the optimal seating depth for each particular barrel. He is achieving groups in the high Ones for three shots. That would be good for a short-range benchrest cartridge, but Keith is achieving that with a .284 Winchester which has much more recoil. If you shoot F-TR or F-Open or even PRS, you should watch this video.
How to Lower your ES/SD and Reduce Vertical at Long Range
This is Keith’s first video in a series on how to improve long range groups, precision, and accuracy by reducing velocity Extreme Spread (ES) and Standard Deviation (SD). To achieve the lowest ES you need to look at multiple processes, including precision powder weighing, careful seating, brass annealing, and primer selection. Another factor is bullet selection. Not all bullets of the same nominal caliber and weight class have exactly the same bullet diameter or shape. Sometimes you can get better accuracy AND lower ES by trying a different brand of bullet. We have found bullet diameters, of the same stated caliber, can vary by up to .0008″ (eight ten-thousandths). Some barrels like the fatter bullets, while other barrels may favor the skinny bullets.
How to Find Bullet-to-Rifling Touch Point
Before you even start to load for a new rifle you need to know the point at which the bullet in a loaded round will first touch the rifling. (This will be a base to ogive measurement on your round). Beyond that point you are “in the lands”. If you load shorter than that base-to-ogive length you are “jumping” your bullets. Some cartridge/bullet combos typically shoot best in the lands, while with other bullets and cartridges, jumping is the way to go. Additionally, with some disciplines it is wise to jump your bullets since you may have to unload a chambered round while on the firing line. In this video Keith shows a number of methods to determine “length to lands” with repeatable precision.
Field Test and Review of SEB Mini-X Coaxial Front Rest
While gear reviews are not the primary focus of Keith’s YouTube Channel, Keith does talk about products he likes and uses. In this video. Keith reviews the SEB Mini-X, the newest coaxial tripod rest from SEB Rests. The Mini-X offers fast, precise windage and elevation adjustment with the joystick control. The unit is much easier to pack and transport than a large, heavy front rest such as a SEB NEO or Farley. The latest Mini-X also has upgraded foot controls that make it easier to level the rest on uneven ground. For more info, see our SEB Mini-X Report.
In the video below, Shiraz Balolia takes you through the essentials of fire-forming brass with his custom-made, water-cooled benchrest railgun. Shiraz is a current Team member (and former Team Captain) of the U.S. F-Class Open Rifle Team. Shiraz has competed on the National and World level for more than two decades, and has won multiple major International championships in 1000-yard shooting. In this video he will walk you through fire-forming cartridges in .284 Shiraz, a wildcat based on the .284 Winchester.
Fire-forming properly is a pre-requisite for accuracy in a match rifle. Done right, fire-forming can improve cartridge consistency shot to shot. Creating a fire-forming fixture like this, or even a more basic design, can save you time and potential frustration on the range, Shiraz explains. The key is getting the initial case expansion to match your competition chamber quickly but without generating excessive heat. Follow along as Shiraz takes you through the methodology of fire-forming both in his work shop and on the range.
Here Shiraz Balolia takes you through the essentials of fire-forming brass with his custom-made, water-cooled benchrest railgun.
Along with running the successful Grizzly Industrial enterprise, Shiraz is a top competitor and member of the U.S. F-Open team. He has competed in three world championships. In recent years he captured three straight Canadian National F-Class Championships (READ 3-Peat STORY). So, this guy knows his stuff.
Shiraz shows fellow shooters how to fire-form cases efficiently without burning precious match barrel life. In the video above he uses a custom-designed railgun that employs water cooling for the barrel. This is done with hoses running from a sink, so that cool water is constantly flowing through the barrel jacket.
Shiraz says the fired cartridge are actually cool to the touch because the water-jacketed barrel keeps everything at a moderate temperature. (See video at 8:00)
If you like accurate rifles and reactive targets, you’ll enjoy this 48-minute video from Shooting USA TV, which features long-range varmint silhouette competition in Texas, the Lone Star State. We have participated in these kind of matches on the West Coast — they are definitely a ton of fun. The sport combines the pure accuracy of benchrest competition with the fun of knocking down critter targets. These are smaller than standard silhouettes, so it’s quite a challenge to hit them at 300 yards and beyond.
In this episode, host John Scoutten competes with his 6.5 Creedmoor PRS rifle. He found that 1-MOA Coyotes offered plenty of challenge at 385 meters! Most shooters use benchrest-grade rifles with premium front rests.
Full 48-Minute Episode of Shooting USA featuring Texas Varmint Silhouette:
5″x4″ Hogs — 500 Meters
Chickens (on Swingers) — 600 Yards
Pigs (on Swingers) — 750 Yards
EDITOR: We strongly recommend you take the time to watch this Shooting USA feature — it shows some top-flight benchrest rifles, and also covers the origins of benchrest varmint silhouette in Pennsylvania. There are even some AccurateShooter Forum members on screen. John Scoutten also does nice job explaining the challenges of shooting this discipline with a PRS rig. We think any benchrest or tactical shooter will really enjoy watching this video.
Travis Frazier, who created steel targets with Field & Cave Outfitters, says shooters love the reactive targets: “The most exciting thing is seeing your hits — these [targets] really go airborne”. Yep, that’s the best thing about Varmint Silhouette matches — hits deliver instant gratification. Travis designs and produces these steel targets.
This Texas match features multiple target shapes, 10 at each distance: Tiny Prairie Dogs at 200m, 3″x3″ Armadillos at 300m; 3″x5″ Coyotes at 385m; 5″x4″ Hogs at 500m; Chickens (on swingers) at 600 yards; and Pigs (on Swingers) at 750 yards. Competitors are allowed 10 rounds and 10 minutes to hit each set of targets.
The 2021 NRA F-Class National Championships are underway right now at Camp Atterbury, Indiana. The Mid-Range Nationals concluded yesterday with the Team Match, and the Long-Range F-Class Nationals commence today, July 27, 2021 and run through Friday, July 30th. For F-Class competitors, making the right wind call is a vital skill. Many shooters and team wind coaches will be using Kestrel Wind Meters, widely regarded as the best on the market.
This article reviews the advanced Kestrel 5700 Elite Wind Meter with sophisticated ballistics capabilities. Our review features three videos by F-Class John that show how the Kestrel 5700 Elite works with Applied Ballistics APP software and LiNK connection.
This Part I Video starts with a basic Kestrel Anemometer (blue case, 00:00-00:40) wind meter. Then reviewer F-Class John looks at the “smart” Kestrel 5700 Elite with Applied Ballistics functionality and LiNK Bluetooth connectivity. John explains the many features of the Kestrel 5700 and how it holds a powerful ballistics calculator in the convenient, easy-to-tote Kestrel package. With the Kestrel 5700 Elite, once you enter data about your bullets, velocity, zero, and rifle, the Kestrel can calculate come-ups and wind corrections. If you don’t yet own a Kestrel, we highly recommend you watch this series of videos that explains advanced Kestrel features in detail.
This Part II Video shows the key features of the advanced software APP used by the Kestrel 5700 Elite unit with Applied Ballistics. The Kestrel 5700 can “talk” to a mobile device that runs the Applied Ballistics software APP that contains bullet databases and allows you to enter key information such as muzzle velocity, bullet BC, zero distance, velocity, wind, and environmental factors (altitude, temperature etc.). There are also gun-specific factors such as scope height over bore and barrel twist rate. The video also explains how “range cards” are created and how to view them with your Elite Ballistics-enabled Kestrel. John notes: “The APP is great because you don’t have to fiddle with the Kestrel’s buttons. It’s much easier to enter data and change settings with the APP.”
This Part III video shows how to determine true wind direction by aligning the SIDE of the unit into the wind. You essentially want to set the unit 90 degrees to the wind direction so the impeller runs as slowly as possible. Then, after you set your target distance (See 3:03), the unit can give you precise come-ups for your intended target (10.28 MOA for 559 yards here). The Kestrel then calculates the cross-wind correction as well (See 3:12).
DISCLAIMER: This video and description contains affiliate links, which means that if you click on one of the product links, the video author may receive a small commission. This helps support F-Class John’s YouTube channel and allows him to continue to make videos like this.
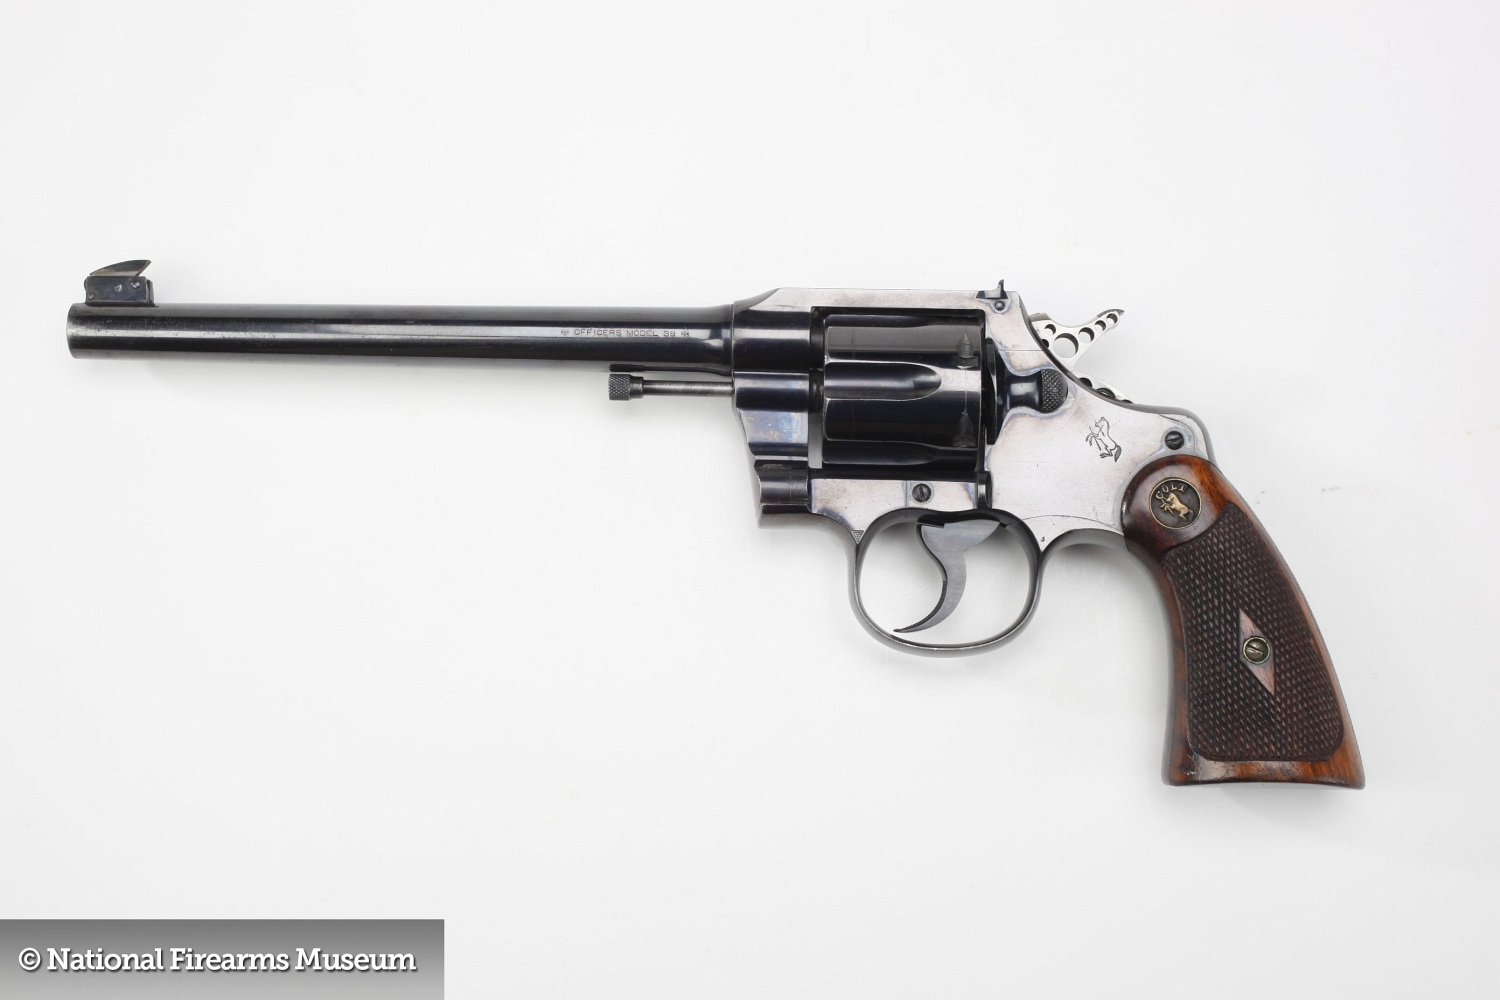
With the 2021 Tokyo Olympic Games kicking off tomorrow, July 23, 2021, we thought our readers might be interested in the “winningest” pistol ever used in the Olympic Games. There is currently no centerfire pistol shooting in the Olympics, but in the early part of the 20th century, centerfire pistol shooting was an Olympic sport. (Now Olympic pistol shooting is limited to Air Pistol and Rimfire Pistol.*) Today’s story showcases a Colt .38-Cal pistol that captured FIVE Gold Medals in the hands of shooter A.P. Lane.
A.P. Land and His .38-Cal Officer’s Model Colt
A.P. Lane was one of the greatest pistol shooters of his generation. He shot scores that were typically 25-50 points higher than those of his competitors. And he exhibited true Corinthian spirit. At the 1912 Olympics, Lane shared his match ammunition with another competitor who used that ammo to capture the Silver Medal (Lane won the Gold).
Click Photo to See Full-Size Image
This revolver, factory-fitted with a skeletonized hammer, was used by American A.P. Lane in winning five Olympic Gold Medals in the 1912 and 1920 Olympic Games. It’s a .38 caliber, Colt Officer’s Model centerfire revolver from the early 20th century. Olympian A.P. Lane’s Gun can be found in Gallery 13, Firearm Traditions for Today, at the NRA National Firearms Museum in Fairfax, Virginia. The Museum exhibit includes a panoply of Lane pieces – his revolver, his five Gold Medals, and the five Olympic certificates that went along with them.
Watch Video History of the A.P. Lane Revolver
* There are air pistol and rimfire (.22 LR) pistol matches in Tokyo this year. Matches include 10M Women’s and 10M Mixed Team air pistol, and 25M Women’s Pistol and 25M Men’s Rapid-Fire Pistol.
Many years ago, when we decided to do a story about SAKO’s TRG series of rifles, we remembered our friend Terje Fjørtoft in Norway. Terje has owned, and hunted with, both the TRG-22 (in .308 Win), and its big brother, the TRG-42 (chambered in .338 Lapua Magnum). Unlike many TRG owners in the USA, Terje has carried his “tactical hunters” into the field, and tested their effectiveness on large game in both coastal and mountain environments, in warm weather and cold. Terje tells us the TRGs have proven to be rugged and reliable. And they are accurate. The .308 Win TRG-22 delivers about 0.45 MOA groups at 420 yards shot from bipod. The .338 LM TRG-42 shoots about 0.55 – 0.7 MOA at that distance.
A Tale of Two TRGsby Terje Fjørtoft
I live in Brattvåg, along the coast of Norway, but I hunt and shoot at the nearby island “Fjørtoft” (same as my last name) and a small island outside Fjørtoft. I grew up on Fjørtoft as a child, and we hunt seals there in the spring and fall. The large, top photo shows me with my black TRG-42 338 Lapua Mag (“LM”) during a seal hunt a couple years ago. Click on the thumbnail at right to watch a video that shows me shooting the .338 LM. Most of the photos in this story are from that hunt. Because the .338 LM was really “overkill” on the seals (and expensive to reload), I replaced that rifle with a TRG-22 in .308 Winchester.
We hunt seals primarily for wildlife control. This is because the seals carry an internal parasite, called “Kveis”, a small worm that breeds inside the seals (after eating contaminated fish). When the seals expel the Kveis into the water, the Kveis larvae are consumed by the fish and then the fish become unfit to eat. The parasite literally eats the fish from the inside out. It’s not very pretty and it has hurt our Norwegian fishing industry. So there is an important purpose for our seal hunting. We hunt mostly from islands, targeting the seals in the water, and retrieving them with a small boat.
Because the seals spend most of their time in the water, a seal-hunter needs a very accurate rifle [to take head shots at distance]. I like the TRG-22 because it is very accurate out of the box, with a very nice bipod that works well in the field. The stock is comfortable with good adjustment range. The TRG features a 10-rd magazine and the barrel is pre-threaded for a muzzle brake or suppressor.
I have also used my TRGs for hunting big game, deer and what Americans call “Elk”. You can see, further down on this page, a picture from a hunting stand taken late in the evening, in the fading light. Yes I successfully bagged a nice buck during that trip with my TRG-42. When hunting, I use a Leica 900 rangefinder, Swarovski 7×42 Habicht binoculars, and a Silva windwatch. For Optics on the TRG-22, I have a Zeiss 6-24×56 scope, in Tikka Optilock rings. To get more scope adjustment I milled 0.9 mm off the front scope base mount. The Zeiss is great for viewing small targets past 400 meters. It was very difficult to find a longer shooting place than 575 meters on this Island (Uksnøy) but I found a place where I can shoot out to 930 meters, and I’ve made an 80-cm steel gong for a target. At this range, the bullet must fly nearly all the distance over the water.
Terje Shooting the TRG-42 without suppressor. Big recoil, big flash.
Both the TRG-22 and TRG-42 are very accurate right out of the box. The only thing I did before I first shot the TRGs was to clean the barrels very thoroughly. This is because the SAKO factory test shoots the gun without cleaning the barrel. I also adjust the cheek piece upward when shooting the rifles with a big scope. However, if you raise the cheek piece too high you can’t get the bolt out without removing the whole cheek piece. The only real modification I’ve made to my TRGs was to put rubber foot pads on the feet of the SAKO factory bipod. This gives the bipod better grip on slick surfaces such as concrete, or the rocks on the offshore islands.
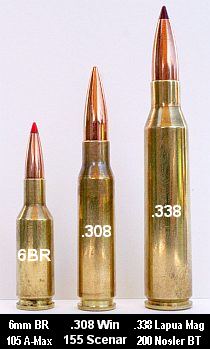
.338 LM vs. .308 Win — Smaller Can Be Better
A few years ago I had a black TRG-42 (338 LM), but after a year, I sold it, and ordered a TRG-22 from the SAKO factory. After a one-year wait, I got the new green TRG-22 in February this year. One main reason I changed to .308 Win was the cost of ammo. I can reload .308 Win ammo for about one-third the price that it costs to reload .338 LM. One other reason is that my usual shooting distance is about 390 meters–at that distance the .308 is more than effective enough. Also, with the .338 LM, the barrel and the suppressor heated up after only a few shots, but with my new .308, I can shoot at my own pace without this problem. After my most recent shooting trip I once again confirmed how accurate, and fun-to-shoot, the TRG-22 is. I think now the TRG-22 has become my favorite plinking gun.
Though it is fun to experience the big boom and flash of the .338 LM, I’ll admit that it is just too much rifle for most applications. The .338 LM is REAL overkill for seal hunting. Here in Norway we have a rule that the smallest caliber we can use is 6.5×55 with a 140gr (or heavier) bullet, but everyone who hunts seals knows that the seals stay mostly in the water, and therefore you must take a headshot at distance up to about 200 meters. Making the headshot with a smaller caliber is advised for two reasons. First, when a big .338 bullet hits the water, there is a danger it will skip and ricochet quite some distance. Second, if you use too powerful a load/gun/caliber and take a headshot on a swimming seal, the seal sinks like a rock.
Reloading for the TRG-22 (.308 Win) With the TRG-22, I found it was easy to get an accurate load. My groups with 155gr Scenars are consistently good with a variety of different powders. I’ve tried both light and heavy bullets, but I favor the 155gr Scenars over the 185gr Scenars because the 155s fly a lot faster and drop less.
Three loads (all with Fed 210m primers) that have worked well are: 155gr Scenar with VV N150, 885m/sec; 155gr Scenar with Norma N-11, 890m/sec, and 185gr Scenar, VV N150, 770m/sec. Norma N-11 is a low-cost powder for target shooting. N-11 is similar to Norma 203B or Norma 202 but it varies quite a bit from lot to lot.
I use a RCBS Rock Chucker press, and currently use a standard RCBS full-length die kit to reload my .308 rounds. However, I recently ordered a Redding Competition 3-die set with a .335 bushing. I look forward to trying the Reddings. I have just started to test different seating depths. The 155s just “kiss” the lands at 74.10 mm. I’ve tried 74.00 mm, 74.10 mm and 73.55 mm, but so far saw no significant differences.
Reloading for the TRG-42 (.338 LM)
For the .338 LM, I started with a 250gr Scenar and 95 grains of Vihtavuori N-170. That load was very accurate at about 850 m/sec, but it produced excessive muzzle flash. And, in the winter, the muzzle velocity was inconsistent, and there was too much unburned powder. Next I tried Norma N-15, which proved very accurate at about 880 m/sec. With that load I shot my best TRG-42 group at 380 meters. I set the 250gr Scenar to touch the rifling with 93.2 mm COAL, and I used Federal 215m primers in Lapua-brand brass. Norma MPR2 and VV N-560 (860 m/sec) also were very accurate with the 250 Scenar.
My seal hunting bullet was the 200gr Nosler BT. This bullet grouped very well with 90-94 grains Norma N-15. Velocity was about 970m/sec if I remember correctly. I also tried the 300gr Sierra MK, and got 1/2″ 3-shot groups at 100 meters with 93.5 grains of VV N-170, but this combination produced terrible groups at longer range.
Loading for the .338 LM was not difficult — about the same as loading for .308 Win, except that you use nearly twice the amount of powder. I didn’t crimp the bullets in the neck, didn’t use any special tricks or neck lube. I used RCBS .338 LM full-length die. That functioned, but it would not be my first choice today. Overall, my better loads in the .338 shot in the 0.5-0.7 MOA range. My best group was four shots in 25mm (1″) at 380 meters (416 yards).
Hunting in Norway
I’m not a competitive sport-shooter. Normally, the only time I go to a “commercial” rifle range is to take the test for my hunting license. Every year, I must re-qualify for a shooting license to hunt big game and seals.
Hunters Tested Annually
In Norway, you must pass an actual shooting test before you can hunt big game. This test requires five shots at a deer silhouette target at 100 meters. No rests are allowed–you must shoot off-hand or with a sling only. You have to place five shots inside a 30 cm circle over the front leg.
Every big game hunter that passes this test is authorized to hunt at “dusk and dawn” and in moonlight. So, we do a lot of our hunting in the twilight hours. However, no night-vision or artificial illumination (spotlights) are allowed. We usually hunt deer at dusk and dawn. In the evening, we go on post two to three hours before it is dark, and sit there waiting for the deer to show up–hopefully before it is too dark. In the morning we go to the post one hour before you see any light of the sun, and wait for the deer to show up until the daylight. But when it is full moon we sometime have enough light to hunt in the middle of the night. In the photo, you can see a deer through the scope of my TRG-42. This was very late in the evening. CLICK HERE for BIG Photo.
Sound Suppressors for Hunting Rifles
Suppressors are legal to use for hunting in Norway. I have suppressors on all my rifles, even my little CZ 452 in 17 HMR. To me, shooting a rifle without a suppressor is like driving a car without an exhaust system. The suppressor reduces both noise AND recoil significantly. With a good suppressor, there is no loss of accuracy. The only “negative” in using a suppressor is extra weight on the end of the barrel.
I crafted my own home-made suppressor. It’s similar to my commercially-made TRG-22 suppressor, but the core is made from titanium to be lighter in weight and more corrosion-resistant. I used a lathe at work to craft the inside of the new suppressor. The core of the unit is built from a 27.5 cm X 40mm round bar of titanium while the outer cylinder is made from a 42mm stainless steel tube. I wanted to use titanium for the exterior cylinder as well, but I couldn’t source the right size titanium tube.
Commercial Suppressor on TRG-42
Comparing .308 Win vs. 6mmBR I also have a 6BR hunting rifle (compensated of course). I have a lot of field time with the 6BR rifle, and feel very confident with that gun. When I got the Krieger 6mmBR barrel on the SAKO Varminter, I fell in love with that rifle from day one, and that rifle is my first choice for small game hunting.
I also like the TRG-22 gun very much and enjoy it more and more with each new field trip. That .308 is my big game rifle and my long-range target rifle.
I recently tested my TRG-22 rifle at 387 meters. This was just “fun shooting” at steel plates, and I didn’t measure groups. But I was happy with the results. Once I corrected for the 5 m/sec crosswind, I was able to put five successive shots on a 10 cm (4″) diameter steel target at 387 meters (423 yards).
My SAKO Varminter in 6mm BR and my TRG-22 are two very different rifles. The TRG-22 is much heavier. I guess the TRG-22 is about 6.5-7 kg while my SAKO 6BR is about 4.5-5 kg, both with suppressor, scope, and bipod. The 6BR with suppressor is much quieter than the TRG-22 with suppressor. The recoil of the 6BR is a lot softer than the TRG-22. So far my 6BR is more accurate. A typical three-shot group with the 6BR is 25-40 mm at 387 meter (423 yards), and that is with just 10X magnification from a Zeiss scope. With my TRG-22, my 3-shot groups run about 50-60 mm, shooting with bipod and beanbag. But I think with a better .308 Win reloading die and more practice, I can improve my groupings with the TRG-22.
SPEC SHEET
The SAKO TRG-22 and TRG-42 are built in Finland by SAKO, a subsidiary of Beretta. In America, the guns are distributed by Beretta USA. Both TRGs (22/42) are available in forest green or a matte black textured finish. A two-stage match trigger is standard.
The stock is somewhat unconventional. It is an external shell, bolted to an internal metal chassis. The action bolts directly to the chassis, without bedding. The injection-molded stock is adjustable for comb height, length of pull (with spacers), vertical butt-pad height and cast-off.
Weight TRG-22 4.7 kg (black) 4.9 kg (green)
Barrel TRG-22 660 mm (26″), hammer-forged, optional stainless or phosphate finish
It’s Pistol Time at Camp Perry this weekend. Today Saturday July 17, 2021, Perry’s Pistol ranges will see hundreds of competitors for the President’s 100 Pistol Match, the National Trophy Individual Match, the National Trophy Team Matches, and the Glock Match. Tomorrow, July 18th, the handgun phase of the CMP National Matches concludes with the Oliver Hazard Perry Pop-Up Pistol Match, Military & Police Pistol Match, 1911 As-Issued Pistol Match, and the final Glock Match. After the last match of each day, the CMP Pistol Games Awards will be distributed to the top shooters. SEE 2021 CMP National Matches Calendar.
This video shows .45 ACP centerfire pistol competitors at Camp Perry
Civilians and military shooters competed together at the 2019 NTT Pistol Match.
The 2021 National Matches encompass multiple pistol competitions, including a Centerfire Pistol 900 Aggregate, a .45 Pistol 900 Aggregate, and a CMP Revolver Match. To learn more about CMP events at the 2021 National Matches at Camp Perry, visit the CMP Nat’l Matches Website.
It took decades of competition to acquire all those patches — that’s dedication to the sport.
See Photos from 2019 NRA Pistol Championships
Shooting Sports USA has a slide-show featuring 40 images from the 2019 NRA Pistol Championships at Camp Perry. SSUSA Editor John Parker noted: “A big thank you to Mr. John Rickards for his hard work on the firing line to grab the majority of these great images.”
HOW TO SEE 40 PHOTOS — IMPORTANT: Click the above photo. Then when you get to the SSUSA.org site, put your finger (or mouse arrow) on the first photo. Then SWIPE LEFT to see the next of 40 total images. As you progress, you can then swipe back and forth.
An American Tradition — National Pistol Matches at Camp Perry
The National Matches at Camp Perry are a great American tradition. Over the past 114 years, hundreds of thousands of competitors have attended the matches at Perry on the shores of Lake Erie. Don Weihl, an avid shooter now in his 80s, has great memories from pistol matches at Camp Perry. In a story for the CMP, Don recounts the halcyon days of pistol competition at Camp Perry, when thousands of shooters competed on the pistol firing lines each summer. Don attended over 40 matches at Camp Perry starting in 1963. Here is part of his account:
Best Camp Perry times were in the Sixties
The 1963 through 1967 years were the best…
There were more than 2,000 competitors each year. There were 600 targets — numbered 1 through 600, from left to right — across the ranges and grouped into six ranges, 100 targets wide. The matches ran like a well-oiled machine. There was a print shop on the base. All competitors could get a printed match report for each match, not too long after scores were in.
Most nights in those years, there were movies for the competitors and their families in the base theater. The mess hall in those years served three meals a day to over 3,000 hungry mouths – every day.
Forum member F-Class John is an avid F-Class competitor and expert handloader. John reviews reloading hardware and shooting-related products for his popular F-Class John YouTube Channel, which now boasts 220+ videos. John also does important product testing for AccurateShooter.com. Through his YouTube channel, John has reviewed many of the latest and greatest reloading tools and accessories. For today’s Video Showcase, we selected eight F-Class John tool and reloading product reviews.
If you like these selected videos, consider joining F-Class John’s Patreon Channel for live video meetings, more in-depth videos, and detailed explanations.
21st Century Hydro Press and Standard Arbor Press
John notes: “You can’t really talk about precision reloading without taking about inline dies and arbor presses. For my money there’s nothing better than the lineup from 21st Century Shooting. They offer the Hydro Seater which is hands-down the best manual seater out there as well as their standard arbor press which is great for taking on the road to push back bullets as needed.”
Primal Rights Competition Priming Seater (CPS) Review
If there is a Ferrari of priming tools, it has to be the Primal Rights Competition Primer Seater (CPS). This impressive bench-mounted tool allows very precise control over primer seating depth. A vertical tube holds primers ready for insertion. The action is smooth and precise. John believes that this is definitely the best priming tool on the market, though it may not be for everyone given its premium $600.00 price.
Lyman Powered Case Trimmer Review
The Lyman Case Trim Xpress is an efficient, precise unit that allows easy adjustment of trim length with a click-adjustable collar. The trimmer comes with a set of cartridge-specific bushings that index off the case shoulder. One nice feature is a variable speed control. For the price, $154.99 on Amazon, this trimmer delivers excellent performance. F-Class John has another video review of the Lyman Case Trim Xpress which shows set-up and operation.
Dillon 750 Tips and Tricks
The Dillon XL 750 is a favorite of high-volume reloaders. With the optional case feeder, the XL 750 offers high output with great reliability. And Dillon offers one of the best warranties in the business. In this video, F-Class John features upgrades including the Armanov tool-head holders from Europe. These are drilled and tapped for all FIVE stations allowing the user to put threaded dies in any station.
Gunsmithing Torque Wrench Comparisons
When you are working on custom rifles that might cost $5000+, and mounting scopes that can run $3000 (or more), you need to use very high-quality tools. Precise torque settings are essential, both to avoid damage to valuable parts, and to have the rifle and optic perform optimally. In this video, F-Class John looks at a variety of torque wrenches suitable for gunsmithing duties.
Concentricity Checking with Accuracy One Gauge
Every serious hand-loader needs a quality concentricity gauge. The Accuracy One Concentricity Gauge boasts a smart design that delivers precise, repeatable results. We like the unit’s easy adjustability and its ability to work in a variety of configurations. The Accuracy One Gauge measures internal and external neck runout of cartridge cases as well as seated bullet runout. It can also measure the runout of the ogive, bearing surface, and boat-tail of individual bullets. And it can even measure your primer pocket runout.
Teslong Rigid (Shaft) Borescope with Monitor
Seeing inside your barrel can provide clues to how well you’re cleaning and the bore’s overall health. One of the best tools on the market is the Teslong Rigid Borescope. This features a solid rod for easy use in barrels. Plus it comes with a self-contained high-definition viewing monitor so no smartphones or WiFi tablets are needed. If you’re looking for something more portable and a bit more versatile, try the Teslong Flexible Borescope, $99.99 including monitor. John was impressed with the new rigid Teslong he tested, and he likes having a dedicated monitor (no WiFi required).
Zero Turret Press with Whidden Sizing Die
The new Zero Press from Area 419 is arguably the best turret press ever crafted. It offers unrivaled precision, along with the highest-capacity turret head with NINE die/tool stations. Milled from billet aluminum and stainless steel, this press moves with the help of 14 bearings. In this video, F-Class John shows how to use a Whidden Gunworks full-length sizing die on the Zero Press. And John has two other video reviews of the $1200 Zero Press: 1. Zero Press First Thoughts Video; 2. Loading on a Zero Press.
Kirsten Weiss knows a thing about accuracy. She won the 2012 NRA Three-Position Women’s Smallbore Championship, while finishing as the National Overall Woman Champion. She used to shoot with the American team in top-level World Cup competition. Kirsten started shooting fairly late — at age 16. Despite her relatively late start, she earned a place on the University of Nebraska shooting team. That literally opened up a new world for Kirsten: “During the course of my career, I’ve had a lot of success. I’ve gone to World Cups… in Zagreb, Croatia, in Munich, Germany. I’ve won National Championships, and got on to the U.S. Olympic short list, so it’s been a good career.”
In these three videos, Kirsten offers key tips on accurate shooting. In the first video she explains how to get and maintain the proper cheek weld on your rifle. In the second, Kirsten talks about canting error — how having inconsistent side-to-side tilt on your rifle. In the third video, Kirsten explains the importance of proper trigger placement.
Proper Cheek Weld
No matter what your discipline — smallbore, silhouette, High Power, F-Class, or even PRS — it’s vital to have a consistent cheek weld for every shot. You want your head to be in the same position on the stock each time. This helps ensure proper eye-to-sights/optic alignment and consistent rifle balance.
In this video, Kirsten explains how to find the best position for your head on the stock, which may require adjusting the cheekpiece and/or length of pull. Then Kirsten demonstrates how to maintain consistent cheek weld shot after shot.
Consistent Rifle Cant (Tilt from Centerline)
Kirsten says most training manuals don’t explain rifle cant: “You won’t find this shooting technique just anywhere. Most shooters don’t even think about it — and they’re missing out. Proper Rifle Cant or Gun Cant (also known as cant error or even scope cant) is a complicated topic, but I’ll explain it simply — and how to simply avoid cant error.”
Want to know how to actually aim a gun right? This accuracy tip covers a crucial aspect of marksmanship. If you cant your rifle inconsistently from shot to shot, the point of impact will change, even with “perfect aim”. This is another episode in Kirsten’s How to Shoot Awesomely video series.
Proper Trigger Finger Technique
Kirsten tells us: “Finger placement on the trigger might not seem like a big deal, but it actually is. The reason for this is because, depending on where your index finger is placed on the trigger, [this] translates to different muscle interactions with the gun.” Watch this video to see Kirsten demonstrate proper finger placement (and explain problems caused by improper finger positioning).
When you pull the trigger, you only want to engage the last section of your finger, in order to avoid unwanted muscle engagement and to achieve a smooth shot. Remember there is a “sweet spot” between the crease (first joint) and the tip of the finger. If you position the trigger in that “sweet spot”, you should see an increase in your accuracy. Don’t make the mistake of putting the trigger in the crease of your finger, as shown below.
Performs as Promised — Prevents Mess at Home or at Range
When cleaning rifles, wet and dirty patches can make a real mess. And solvent spray from the muzzle is another issue. Here’s a solution — the MTM Gun Cleaning Patch Catcher. Simply slip it over your barrel to contain all the patches pushed out the muzzle. No more mess and stains on your bench/table. When cleaning tasks are done, simply remove the Patch Catcher and dump the contents into the trash.
We’ve tried this product and it definitely helps keep your work surfaces and floors clean. No more messes on the bench or spray from solvents. Purchasers really like this product — it has 80% five-star reviews on Amazon (current Price $9.03). Watch the video to see how the MTM Patch Catcher works.
Here are product reviews from actual MTM Patch Catcher purchasers:
“This box straps over the muzzle end of a barrel and keeps the mess completely contained. Excess cleaning solvents collect in the bottom. Patches fall off the jag and are captured as well when the cleaning rod is withdrawn. It also completely contains the splatter burst when a bore brush exits the muzzle of whatever firearm is being cleaned.” — D.J. Bradley
“This little device is more than a patch catcher. It also contains that dirty, smelly spray when a bore bristle exits the barrel. With the top open, it will also catch spray cleaners and lubes when used on small parts. It takes a little work to mount it on a railed over/under, but it gets the job done there too.” — TwoBoxer
“This does exactly what it claims. It keeps the table or floor clean while you are cleaning barrels. It is easy to use and easy to clean. If you are cleaning guns outside on a range, then you probably don’t need this. If you cleaning them in your garage, then buy this. Your garage and workbench will love you.” — DDDnotes
Q: Does this fit securely if you have a standard muzzle break?
Answer: Yes, I regularly use this product on all of my rifles including my Savage 111 Long Range Hunter with a factory brake. It really keeps the smell down with the top closed. Also stops the splatter of a stiff brush exiting the muzzle. Great Product! — Iklwa
Q: Has anyone used this with an AR15?
Answer: It works quite well — goes on and off easily. Slide it on the barrel until you can tighten the strap behind the flash suppressor.” — Cactus




 Because the seals spend most of their time in the water, a seal-hunter needs a very accurate rifle [to take head shots at distance]. I like the TRG-22 because it is very accurate out of the box, with a very nice bipod that works well in the field. The stock is comfortable with good adjustment range. The TRG features a 10-rd magazine and the barrel is pre-threaded for a muzzle brake or suppressor.

 Both the TRG-22 and TRG-42 are very accurate right out of the box. The only thing I did before I first shot the TRGs was to clean the barrels very thoroughly. This is because the SAKO factory test shoots the gun without cleaning the barrel. I also adjust the cheek piece upward when shooting the rifles with a big scope. However, if you raise the cheek piece too high you can’t get the bolt out without removing the whole cheek piece. The only real modification I’ve made to my TRGs was to put rubber foot pads on the feet of the SAKO factory bipod. This gives the bipod better grip on slick surfaces such as concrete, or the rocks on the offshore islands.
 .338 LM vs. .308 Win — Smaller Can Be Better

 Reloading for the TRG-22 (.308 Win)
 Reloading for the TRG-42 (.338 LM)

 Hunting in Norway


 I also have a 6BR hunting rifle (compensated of course). I have a lot of field time with the 6BR rifle, and feel very confident with that gun. When I got the Krieger 6mmBR barrel on the SAKO Varminter, I fell in love with that rifle from day one, and that rifle is my first choice for small game hunting.


