20th Day of the 2020th Year!
For folks in the gun industry, the third Monday in January is the best day of the year. Held in conjunction with SHOT Show, Industry Day at the Range lets us try out dozens of new rifles and pistols, as well as meet top gun designers and friends in the shooting sports. We saw some very great new products this year. Here are some of the most interesting “take-aways” from Industry Day at the Range, held in Bolder City, Nevada on January 20, 2020.
New Guns + Old Friends on 1/20/20
Meeting old friends, and shooting new guns. That’s what Monday was all about at the annual Industry Day at the Range, a “hands-on” preview the day before SHOT Show opens in Las Vegas. At the crack of dawn your Editor met with Gavin Gear of UltimateReloader.com and headed out to the Boulder City (NV) range. There we met up with GunsAmerica Editor True Pearce, F-Class aces Stan Pate and Matt Schwartzkopf, Down Range TV host Michael Bane, Top Shot’s Dustin Ellerman, and many other friends in the industry.
We were not disappointed — there was plenty to see this year. On display were a bunch of new precision rifles, some nice new revolvers, and some very exotic optics. SEE Exhibitor List.
Cool New Rifles and Chassis Systems
There is a definite trend towards metal modular chassis systems. We saw many more metal stocks than fiberglass stocks on the firing line. One of the most interesting chassis rifles was showcased by Advanced Shooting Analytics (ASA). This features a STEEL alloy center section that holds the steel rifle action. The thinking behind this is that aluminum expands as it gets hot at a different rate than steel. That can stress the steel action. Having “steel on steel” eliminates those stresses say the designers — providing an advantage compared to an all-aluminum chassis.
We tested the new Savage 110 Elite Precision, an impressive new rifle boasting an advanced aluminum chassis crafted by MDT. Part of Savage’s new Precision Series, this is clearly aimed at the PRS crowd. Savage also showcased its new rimfire precision rifles. See below:
The innovative, patented FightLite SCR® (Sport Configurable Rifle) blends the utility and accuracy of an AR15 with the classic lines of an American sporter. Importantly, this rifle is 50-state legal! The old-fashioned stock design of the SCR permits shipping to FFLs in all 50 states.
Cadex Defense showcased its CDX-R7 Sheepdog hunting rifle. A departure from the metal-chassis rifles. The Sheepdog features a comfortable outer skin and a very ergonomic design. Here’s a video preview:
Wild-Looking AR Rifles — Vivid Colors and Ports
Bling is the thing in 2020. There were some wild-looking AR-platform rifles with exotic finishes. One AR, used by the Eotech folks to showcase their Vudu optics, had a radically ported upper.
Optics — New Scopes and Electro-Optics
Actual view through Schmidt & Bender scope. Great glass — sharp and bright to the edge
Zeiss displayed some impressive Second Focal Plane scopes.
Here is the impressive Charlie TARAC prism unit from TacomHQ, set up on an ELR rifle with a massive barrel. The prism designer John Baker showed us new prototype units that allow the user to dial the amount of elevation increase.
One tripod sported an array of hardware, with a rangefinder and a big Swarovski Spotting scope fitted what appeared to be a Phone Skope adapter. This allows through-the-eyepiece viewing/recording.
Handguns — Rimfire and Centerfire
This striking image is from GunsAmerica’s Range Day Report on the new Colt Python. This report by Levi Sim features a video and many photos.
We viewed dozens of pistols, but were most impressed with a couple updated rimfires, and two ultra-accurate wheelguns — the Ruger Super 100 9mm and the “reborn” Colt Python, a stainless beauty. Show above are both 4″ and 6″ versions. The workmanship was superb — as was the accuracy.
We also tested a updated version of the classic Browning Buckmark .22 LR semi-auto pistol with a ported barrel shroud. This balanced great and had a very nice trigger pull.
Ammunition — Big News from Sierra and True Velocity
Sierra displayed one of the most noteworthy innovations in loaded ammunition. The new Sierra/True Velocity Composite Ammo features a POLYMER case. This allows a very significant weight savings — at least 35% compared to conventional ammunition. Sierra and True Velocity are partners in this project. Initial offerings of hunting ammunition should be available in late 2020.
New TECH — Shot-Locating Steel Target Plates from Israel
Israel’s A.D.L. Smart Solutions LTD. displayed an innovative shot location plotting system. This measures shot location and hit rates via a sensor module on the BACK (reverse side) of a thick armored steel plate. The designers tell us the armored plates have survived 7000+ rifle shots without a problem. The sensor unit transmits shot locations wirelessly back to a laptop which runs Apple or Windows software. The software can also keep profiles of different rifles/cartridge types with ballistics for each.
About Industry Day at the Range
With two dozen shooting bays, plus an elevated shooting station with targets out to 400 yards, there is plenty of action. Here’s the layout:
Next best thing to being there — this video shows 2020 Industry Day highlights. It’s a great overview featuring a wide variety of rifles, pistols and shotguns. The biggest commercial, hands-on “live fire” gun demonstration in the world, Industry Day at the Range is attended by over 1700 journalists and buyers.
Turn a Rough Factory Rifle into an Accurate Hunting Rig
Kiwi Nathan Foster has produced a good video for hunters with “under-performing” Remington Model 700 rifles. In this video, Nathan helps a client turn a badly-behaving Rem 700 into a reliable tack-driver. A customer had sent Nathan this rifle to rectify stubborn copper fouling. After bedding the rifle, the customer discovered that the rifle produced terrible groups due to the stubborn bore.
Nathan told us: “This was a grand opportunity to study what can go wrong with the M700 rifle with regards to both do-it-yourself work and flaws within rifle production. To help structure the video, we used the chapters of our Accurizing Book as reference steps for the video. This footage also works in conjunction with our free Remington bedding tutorials on YouTube.
Those who have watched the full M700 Troubleshooting video say this is one of the most helpful videos yet released on problem-solving with a factory hunting rifle. This video is especially helpful for those just getting into the accuracy game, as it walks the viewer through the basics of rifle tuning, then proceeds to more advanced methods of improving a badly-behaving rifle.
This video focuses on the Remington M700 and Rem clones, such as the Bergara rifle. However the lessons and techniques in the video can apply to any type of bolt-action rifle suffering heavy copper fouling. The video features detailed footage of barrel break-in and barrel-lapping procedures. These procedures may be beneficial for rough factory barrels. IMPORTANT! AccurateShooter.com recommends different break-in and maintenance regimes for custom, hand-lapped premium barrels — be conservative with fine custom barrels. Our best custom barrels have all shot superbly with minimal break-in and zero use of abrasives during break-in.
Troubleshooting the Remington 700 Rifle with Nathan Foster
NOTE: This is a free 70-second trailer video. The FULL Remington Troubleshooting Video is 1 hour, 16 minutes long and can be streamed through Vimeo-on-Demand for $12.00. Access Full Video HERE.
Nathan Foster of Terminal Ballistics Research in New Zealand, is a expert hunter and highly-respected author of a series of hunting and long range shooting books. Nathan’s first book, The Practical Guide to Long Range Hunting Rifles, is a classic — one of the best treatises ever written on choosing and using a hunting rifle.
The Remington 700 is the most popular bolt-action rifle in America, according to Gunbroker.com sales figures for new and “previously-owned” rifles. So, chances are that you (or a family member) have a Rem 700 of some vintage sitting in the gunsafe. Click the link above for a PDF version of the Remington 700 Owner’s Manual (also covers models Seven, and 673).
There an excellent YouTube channel, THLR.NO, that offers videos for long-range hunters and marksmen. The channel’s creator, Thomas Haugland, is a serious, knowledgeable shooter, who takes his rifles out into the field, in all conditions. The THLR.NO channel offers solid advice on scopes, reticles, wind-reading, field positions, and much more. Haugland’s team puts a wide variety of gear through serious field tests — every thing from suppressors to packs to the latest electro-optical hardware. In addition the THLR.NO channel provides good advice on stalking techniques and hunting skills. Here are some recent videos that can help any rifleman.
How to Shoot Better with a Hunting Rifle
This “must-watch” video has great practical advice for hunters. It illustrates proper hand-hold and head position, and shows how to stay steady when breaking the shot. Even competition shooters can learn a few things. One viewer notes: “This was very informative. The footage through the scope showing how one’s position moves the sight alignment was particularly helpful.”
How to Gauge Wind Speed and Hold Off Using Reticles
This field video shows how to observe natural indicators — trees and vegetation — to estimate wind velocity. Then it shows how to calculate hold-offs using the reticle hash-marks. Thomas shoots a fast-cycling Blaser R93 rifle with Norma 6XC ammunition.
If you like these three videos, there are hundreds more on the THLR.NO YouTube channel. In addition, there is an excellent long-format video, Longrange Shooting 2, available on DVD or Vimeo on Demand. This impressive outdoors video features Thomas Haugland and Ulf Lindroth. Here is a preview:
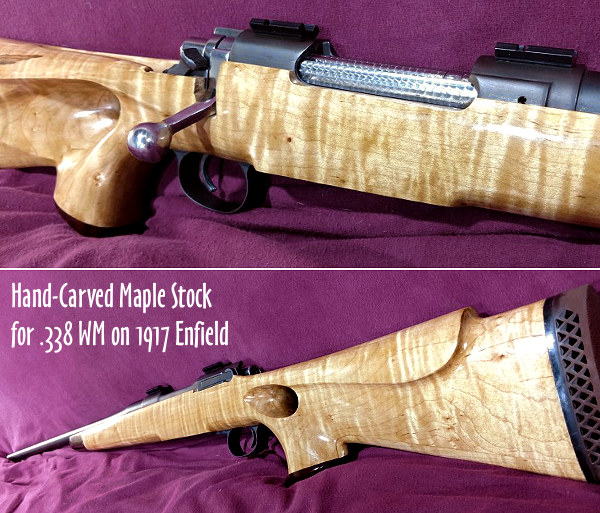
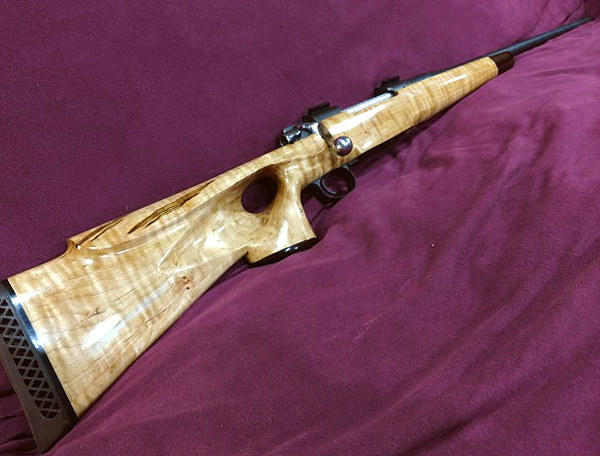
Believe it or not, this is the first stock Brett M. carved by hand. We’d say he did a darn good job!
AccurateShooter Forum member Brett M. from Minnesota (aka Spitfire_er) recently completed a handsome laminated maple gunstock. This beauty wasn’t produced with a stock duplicator. It was made the old-fashioned way — by hand. After laminating three sections, Brett carved the complete stock with hand tools. You can see the entire carving process, start to finish, in Brett’s time lapse video.
MUST-SEE time-lapse carving video. Every second is one minute in real time. This 15:54 video shows 15.9 hours of carving! Brett says the whole job took nearly 20 hours:
Handsome Maple Blank Was Lumber Yard Return!
Brett reports: “Here’s a stock I carved up over the past year or so. I found this wood as a return at a lumber yard about 7-8 years ago. I asked the guy in the yard about it and he said it had been returned because it had too much figure for the job the customer was working on. First thing I thought was “That would make a nice stock!” I finally got around to finishing it a couple months ago.
I fit it around a 1917 Enfield in .338 WM that I purchased a while back. I usually do all the work on the receiver and barrel, but this one was done up in an OK fashion already.
This stock was almost completely made using hand tools over the course of about a year. This is a piece of laminated 1x8x1″ maple that was glued together. After it sat for about eight years, I finally got around to carving it up. This stock design/shape was from my own ideas and was carved as I went along. It turned out pretty good.”
There’s a great new way to apply an eye-catching finish to fiberglass and synthetic stocks. Water Transfer Printing (aka Hydro-Dipping) can apply beautiful, stylized patterns to your stock, and the process costs less than a custom paint job. Hydro-dipping is ideal for applying amazing photo-realistic effects such as stone, wood burl, snakeskin, or faux carbon fiber. Hydro-dipping requires no harsh chemicals or high heat so there are no negative side effects. You just end up with an amazing, patterned finish on your stock.
Hundreds of different patterns are available. We like the carbon-look finish on benchrest guns and the snakeskin patterns on hunting and varmint rifles. Natural snakeskin designs, in this Editor’s opinion, are perhaps the most effective camouflage for the largely arrid backcountry in the American southwest.
Hydro-Dip of Idaho Does Great Work
While there are a half-dozen companies offering water transfer printing for rifle stocks, Forum member Francis B. recommends Hydro-Dip, LLC of Meridian, Idaho. Examples of Hydro-Dip’s work are shown above. Francis writes: “Scott, Adam, and old man Rod Springer own and run Hydro-Dip. This is a company that will ‘paint’ your rifle, tool box, trailer, airplane, whatever and will do an excellent job while doing it. Check out their archives of jobs done. You will be amazed. I’ve not had one of their jobs done for any of mine (yet) but I’m considering it. Those who have had their rifles done tell me the cost is very reasonable. I have seen a few stocks done and they are works of art.”
Hydro-dipping (water transfer printing) can be performed on virtually any metal or plastic surface. You can Hydro-dip car parts, archery gear, rifle stocks — you name it. Watch the process in the video:
To be honest, when we read the description of Trijicon’s new Ventus device, we thought it sounded like science fiction. This quad-collimated laser rangefinder/wind-reading gizmo seems like something Captain Kirk would use on Star Trek. According to Trijicon, the Ventus is “the world’s first advanced wind-mapping and range-detecting handheld device.” That’s right folks, this is a rangefinder that also “measures three-dimensional wind velocities at multiple distances out to 500 yards”. Combined with a claimed 5000-yard ranging ability (on reflective objects), Trijicon says its new Ventus gives “shooters and hunters previously unattainable data about their environment for long-range accuracy.”
The Ventus unit is designed with a Doppler LIDAR engine that can measure headwind, tailwind, crosswind and vertical wind components at six different distances, in any weather condition. The higher-end Ventus X Model also includes an onboard ballistics solver which communicates, via Bluetooth, with the Trijicon Ballistics App. This allows Ventus-X users to store shooter and target geographic locations, calculate ballistic solutions, and display wind maps.
The Ventus utilizes an advanced Doppler LIDAR engine and four collimated lasers sent out in a cone to measure wavelength interaction with dust particles at up to six different distances.
Four Collimated Lasers Read the Wind via Doppler LIDAR
How does the wind-reading work? Trijicon states: “Thanks to a fiber optic collimated laser capable of returns through dust, fog, sleet, and snow, the Ventus offers extreme, all-weather performance. Four collimated lasers [are] sent out in a cone to measure wavelength interaction with dust particles at up to six different distances. This technology allows the Ventus to calculate for head, tail, cross and vertical wind, giving shooters an incredibly accurate wind reading.”
Ventus X Model Includes Advanced Ballistics Solver
The Ventus comes in two models: Ventus and Ventus X. The basic Ventus handles ranging duties. The upgraded Ventus X adds a state-of-the-art, onboard ballistics solver. An onboard sensor suite captures all necessary data — range, wind, atmospheric temperature, stratospheric pressure, and incline angle — to provide a very advanced ballistic solution.
The Ventus X also communicates via Bluetooth to the advanced Trijicon Ballistic application, soon to be available for both iOS and Android. The Ballistic App stores shooter and target geographic locations, provides a ballistic solution, and displays a wind map overlay of readings.
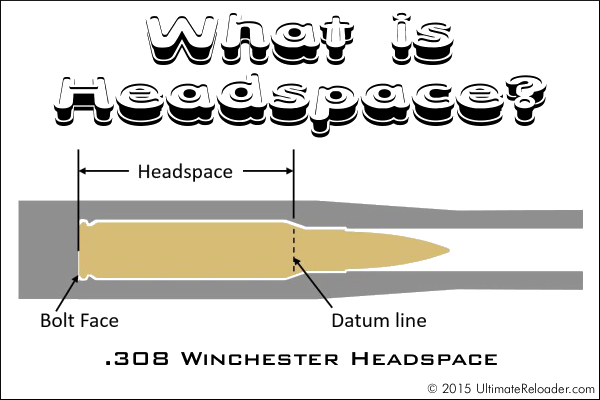
This illustration shows headspace measurement for the popular .308 Winchester cartridge, which headspaces on the shoulder. Image copyright 2015 Ultimate Reloader.
In this Brownells Tech Tip, Brownells gun tech Steve Ostrem explains what headspace is and why it’s one of the most critical measurements for nearly all firearms. Even if you’re an experienced rifle shooter, it’s worth watching this video to refresh your understanding of headspace measurements, and the correct use of “GO” and “NO-GO” gauges.
Headspace Definition
In firearms, headspace is the distance measured from the part of the chamber that stops forward motion of the cartridge (the datum reference) to the face of the bolt. Used as a verb, headspace refers to the interference created between this part of the chamber and the feature of the cartridge that achieves the correct positioning. Different cartridges have their datum lines in different positions in relation to the cartridge. For example, 5.56x45mm NATO ammunition headspaces off the shoulder of the cartridge, whereas .303 British headspaces off the forward rim of the cartridge.
If the headspace is too short, ammunition that is in specification may not chamber correctly. If headspace is too large, the ammunition may not fit as intended or designed and the cartridge case may rupture, possibly damaging the firearm and injuring the shooter. (Source: Wikipedia)
Headspace Gauges
Headspace is measured with a set of two headspace gauges: a “Go” gauge, and a “No-Go” gauge. Headspace gauges resemble the cartridges for the chambers they are designed to headspace, and are typically made of heat-treated tool steel. Both a “Go” and a “No-Go” gauge are required for a gunsmith to headspace a firearm properly. A third gauge, the “Field” gauge, is used (as the name implies) in the field to indicate the absolute maximum safe headspace. This gauge is used because, over time, the bolt and receiver will wear, the bolt and lugs compress, and the receiver may stretch, all causing the headspace to gradually increase from the “factory specs” measured by the “Go” and “No-Go” gauges. A bolt that closes on “No-Go” but not on “Field” is close to being unsafe to fire, and may malfunction on cartridges that are slightly out of spec. (Source: Wikipedia)
To learn more, read Brownell’s longer article Headspace Gauges and How to Use Them. Among other things, this explains the relative lengths of “Go”, “No-Go”, and “Field” gauges. The “Field” is actually the longest: “The GO gauge corresponds to the SAAMI (Sporting Arms & Ammunition Manufacturer’s Institute) minimum chamber length, while the FIELD gauge usually matches the maximum chamber depth, or slightly less. NO-GO gauges are an intermediate length between minimum and maximum, that, technically, is a voluntary dimension. A firearm that closes on a NO-GO gauge and does not close on a FIELD gauge may not give good accuracy and may have very short cartridge case life from the ammunition re-loader’s standpoint.”
Creedmoor Sports has released a series of helpful “how-to” videos in its new InfoZone web page. In the latest InfoZone video Bill Gravatt shows how to seat bullets using L.E. Wilson Hand Dies and an Arbor Press. The basic process is simple, particularly with a micrometer-top seating die. That makes it easy to adjust and set seating depth. Before you start seating bullets, you want to adjust the height of the arbor so the stroke is appropriate to the height of your die.
Bill Gravatt Shows How to Use Hand Seating Dies — Creedmoor INFOZONE
ARBOR PRESS TECHNIQUE: When using an arbor press, smooth is good. You don’t want to slam the handle down quickly. Try to repeat the same motion each time. You can also experiment by seating the bullet part way, then rotate the cartridge (in the die) and do the final seating with a second stroke. If your arbor press has a force gauge, note both the max value of the gauge needle and how it moves as you seat the bullet. If the needle spikes too rapidly, or bounces back and forth irregularly, set that cartridge aside and/or mark it. You could have neck tension issue with that case or some other fault. You might even have a bad bullet. That’s rare, but can happen. The key to success is moving the press arm in a smooth motion every time, maintaining the same down-pressure with each cartridge.
Here Bill Gravatt Offers a Simple Tip for Adjusting Wilson Seating Dies
One of our Forum readers asked “How can I get a custom in-line seater for my new rifle?”. First, we would say that, if you are not shooting an unusual Wildcat, check first to see if L.E. Wilson makes a stainless Micrometer Seater Die for your rifle. These dies are a joy to use, and we’ve found the fit to be exceptionally good with many calibers. Typically priced from $90-$100, Wilson stainless micrometer-top seaters are available for dozens of cartridge types: .204 Ruger, 20 BR, .222 Rem, .223 Rem, 22 PPC, 22 BR, .22-250, .223 WSSM, 6 PPC, 6mmBR, 6XC, 243 Win, .243 WSSM, 25 WSSM, 6.5×47 Lapua, 6.5 Creedmoor, 6.5-284, 26 Nosler, .270 WSM, 7mm-08, .284 Win, 28 Nosler, 7mm RUM, 30 BR, 30 IHMSA, .308 Win, .300 WinMag, .338 Edge (and MORE).
If you do want a custom seater die, the process is relatively simple. Purchase a die blank from Wilson and have your gunsmith run the chambering reamer in. Forum member Gunamonth explains: “I start with a Wilson seating die blank. They’re available from Sinclair and other vendors. Just run the reamer in. For some of my rifles, where I wanted the stainless die with the micrometer adjustment, I bought a smaller die and had the smith ream it with the chamber reamer. That’s how I had my 6 Dasher and 6mm AI seaters made. With the Dasher I stared with a 6mmBR Micrometer die.”
SEATER STEM TIP: If, on your seated bullets, you are seeing a sharp line around the jacket near the ogive, you may want to smooth out the leading edge of the Wilson seater stem (see above left). Do this by putting a little lapping compound on one bullet and manually spin this around in the stem. Without much effort you’ll have a smooth bullet/stem interface.
Micrometer Top Add-on
We really like micrometer tops on a seating die. But what if Wilson doesn’t make a micrometer top seater for your chambering? Don’t despair, Sinclair Int’l sells a $39.99 micrometer top that can be added to Wilson standard seaters or to a custom seater die made from a Wilson die blank.
22Plinkster Tours CCI/Speer Idaho Factory
Trickshot artist and YouTube host 22Plinkster recently got a chance to tour the CCI/Speer production facility in Lewiston, Idaho. This large plant produces both rimfire and centerfire ammunition. While touring the plant, 22Plinkster was allowed to capture video showing the creation of .22 LR rounds from start to finish. This is a fascinating video, well worth watching.
This revealing video shows all phases of .22 LR ammo production including cupping, drawing, annealing, washing, drying, head-stamping, priming, powder charging, bullet seating, crimping, waxing, inspection, and final packaging. If you’ve got ten minutes to spare, we really recommend you watch the video from start to finish. You’ll definitely learn some new things about rimfire ammo.
Field & Stream Tours Federal Ammo Plant in Minnesota
Note to Viewers — After Starting Video, Click Speaker Icon to HEAR audio!
Last year a Field & Stream writer toured the Federal ammunition production facility in Anoka, Minnesota. This large plant produces both rimfire and centerfire ammunition. While touring the plant, the reporter was allowed to capture video showing the creation of .22 LR rounds from start to finish. This is a fascinating video, well worth watching. Click speaker icon for sound.
The Manufacturing Process for .22 LR Rimfire Ammunition Shooting Sports USA explains: “Rimfire cartridge cases are the oldest self-contained cartridge in existence, having been in continuous production since the mid-1850s. Rimfire cases are drawn from a thin piece of brass and formed with a hollow rim. A priming compound is then forced into the case using centrifugal force, where it is charged with powder and a bullet is seated in the mouth of the case. The case is then crimped around the bullet to ensure sufficient push and pull when the round is fired. When the firing pin strikes the thin brass rim of the case, the hollow rim is crushed and the primer is ignited.” Source: SSUSA.org 9/2/2017.
Buried in CCI Rimfire Ammo
22Plinkster was literally up to his neck in ammo while touring the CCI/Speer Idaho ammo plant. He says: “This was truly a dream come true for me. I can’t thank the people at CCI and Speer enough for allowing me to do this. I couldn’t possibly show everything that went on at the factory. However, hopefully I showed you enough for you to grasp the concept of how rimfire [ammo] is made.”
History — Speer Brothers Brought Ammo Production to Lewiston
Here is an interesting historical footnote. Today’s large CCI/Speer operation in Idaho can be traced back to the companies founded by the Speer brothers. After settling in Lewiston in 1944, Vernon Speer started Speer Bullets. A few years later, in 1951, Vernon’s brother Dick (with partner Arvid Nelson) started Cascade Cartridges Inc., a producer of small-arms ammunition and primers. Yes, as you may suspect, Cascade Cartridges Inc. is now CCI, a Vista Outdoor company, and one of the largest manufacturers of primers and loaded ammunition. Today, the CCI/Speer Lewiston plant produces both Speer bullets and CCI-branded ammunition and primers. Vista Outdoor’s predecessor, ATK, acquired the plant in 2001. Vernon Speer died in 1979, and Dick Speer died in 1994.
The U.S. Army Marksmanship Unit (USAMU), in cooperation with Shooting USA TV, has created a series of instructional Pro Tip pages covering a wide range of shooting disciplines. All totaled, there are more than 50 USAMU Pro Tips. Most relate to rifle marksmanship but there are also numerous tips for shotgunners and pistol shooters. Each Pro Tip entry includes multiple photos and 6-15 paragraphs, in an easy-to-follow format. Many Pro Tips also include an instructional video produced by Shooting USA. Here are three Pro Tip videos, and links to seven more Pro Tip web pages.
USAMU TOP TEN PRO TIPS
1. Reading the Wind with SGT Sherri Gallagher.
Apart from gravity, wind has the most pull on the bullet as it travels down range. Being able to accurately read the wind and mirage will greatly enhance your performance on the rifle range. National Champion, SGT Gallagher gives you some of her tips.
2. Angle Shooting with SFC (Ret.) Emil Praslick.
SFC Praslick shows you how to determine the angle to your target, and then how to include that to change your data necessary to hit your target on the first shot.
3. Rifle Grip, Stance and Body Position for 3-Gun with SFC Daniel Horner.
Professional 3-gun marksman SFC Daniel Horner, U.S. Army Marksmanship Unit (USAMU), give tips on how to properly handle a semi-automatic rifle, including grip, stance and body position.







 Handsome Maple Blank Was Lumber Yard Return!



 Headspace Gauges

 One of our Forum readers asked “How can I get a custom in-line seater for my new rifle?”. First, we would say that, if you are not shooting an unusual Wildcat, check first to see if


