Editor’s NOTE: Shelley Davidson passed away in 2008 after a courageous battle with cancer. He was one of the great innovators in benchrest rifle design. This article, written before Shelley died, showcases Shelley’s creative talents at their best. His “Tinker Toy” design will always be a tribute to Shelley’s fabricating skills and imagination.
Shelley Davidson — a brilliant innovator. R.I.P. Shelley — you will not be forgotten.
Shelley Davidson’s peers called his radical rifle the “Tinker Toy” gun. We call it revolutionary. Even now, 14 years after its creation, there’s nothing quite like it. This innovative, skeleton design threw conventional wisdom to the winds. Shelley readily concedes he “broke the rules” of benchrest rifle building. But this was inspired rule-breaking, because Davidson’s rifle shot like a house on fire. The Tinker Toy gun won its first matches, both for Score AND for Group. And this rifle also delivered many “zero groups” in Gene Begg’s Texas Tunnel. Hats off to Shelley for conceiving and building a truly radical rifle that was also wicked accurate and successful in competition.
Tinker Toy 30 BR — Radical As It Gets
Report by Shelley Davidson
Although I’m not big on naming rifles, my shooting buddies have christened the gun “Tinker Toy.” I can live with that as it does kind of look as if it was made with a Tinker Toy set.
Origins of the Project
This project began with some wild ideas I had in the fall of 2006 about using magnets to tune a barrel. My idea was to use one magnet on the barrel and another on the stock so they pushed against each other to counter gravity-induced barrel sag (and possibly) tame barrel vibration in a beneficial manner. The only way to test these ideas was to build the device and mount it on a gun. That meant I had to build a new rifle because there was no place to mount a magnet on the stock of a conventional benchrest rig. I had a Kelbly-stocked heavy varmint stock with a Michael Kavanaugh paint job on it. I didn’t think Kav would ever forgive me if I started drilling holes in one of his works of art. My light varmint was in a carbon fiber Scoville stock that costs about a grand. Drilling into the Scoville for an experiment just smacked of bad judgment. So, the magnet thing was my first motivation for designing a new stock. As long as I was building from scratch I decided to offset the barrel and action 0.75″ to the right to counteract the spin/torque from the bullet.
Although there’s nothing new here, my second motivation was to build a 30BR that could shoot in the 10.5 lb light varmint class in NBRSA. The magnetic tuner will automatically make this gun illegal in the IBS. The IBS has declared all barrel attachments un-safe and have outlawed them. I personally feel that the IBS really outlawed all barrel attachments to prevent experimentation and innovation. But at least we have NBRSA matches.
Designing the New Gun — Thinking “Outside the Box”
Once I’d decided to build a lightweight stock that could support experimental devices out near the muzzle, I started drawing up some rough plans. I also took a trip to Jerry Stiller’s shop in Wylie, Texas for a brainstorming session with Jerry, the maker of Viper and other Benchrest actions. Jerry is a school-trained mechanical engineer and thinks differently than I do. I came away from Stiller’s shop with my design roughed out and sketched on paper. The design violated several covenants of conventional wisdom for building competition BR rifles. For instance, two-piece stocks stress the action. Stress reduction is why most BR rifles are glued into the stock. Another myth is that metal stocks vibrate too much so wood or foam-filled fiberglass or carbon fiber are used.
Tinker Toy Rifle DESIGN FEATURES
Shelly Davidson’s Rifle was so innovative, that almost every feature, except the bare action, is very different than you’ll find on most Benchrest rigs. Accordingly we felt it would be useful to isolate and describe the key design features, from stem to stern. Click thumbnails to view FULL-SIZE PHOTOS.
Front Bracket with Magnetic Tuner
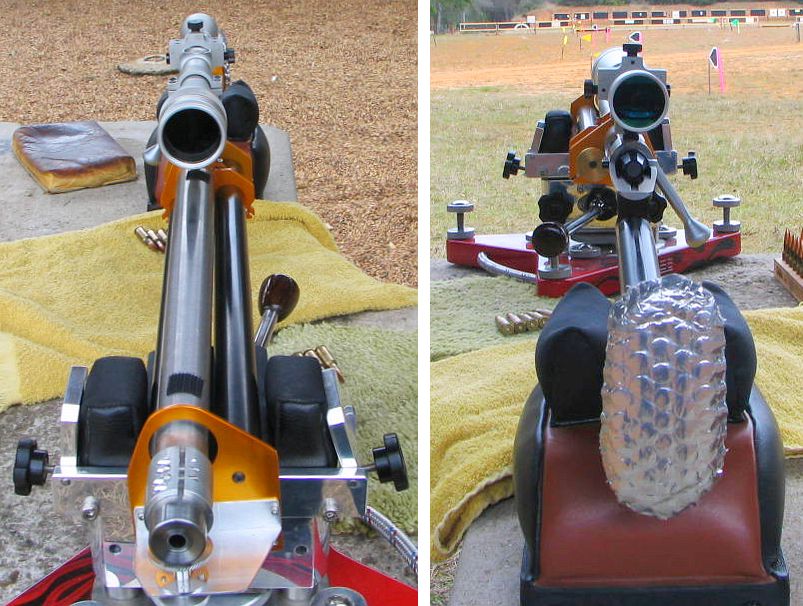
The tuner consists of one rare earth magnet attached to the stock and another attached to a barrel sleeve with the magnets oriented so as to make the magnetic force repel each other. The purpose is to counter “barrel droop” and, hopefully, dampen barrel vibration. The lower magnet is carried on a threaded shaft (with lock ring), allowing the magnet to be raised up and down to adjust the “up push” on the barrel.
Tubular Fore-Arm Supported by Brackets
Three brackets support two tubes, one on either side of the barrel. The rear-most bracket is sandwiched between the barrel and the action. Four inches forward (max distance allowed for barrel blocks) a second bracket grips the barrel. Near the muzzle a third bracket secures the ends of the tubes and holds the magnetic tuner. To allow barrel offset, the left tube is 1″ diameter tube while the right tube is 5/8″ diameter.
Offset Barrel The rifle rests on a 3″ wide plate attached to the underside of the two fore-end tubes. With the plate centered in the front sandbag, the barreled action is actually offset 0.75″ to the right (looking forward from the breech). The purpose of this offset is to keep more weight on the right side to counter the tendency of the rifle to torque counter-clockwise. Two different diameter tubes allow for the built-in offset.
Floating Action without Sub-Support or Bedding
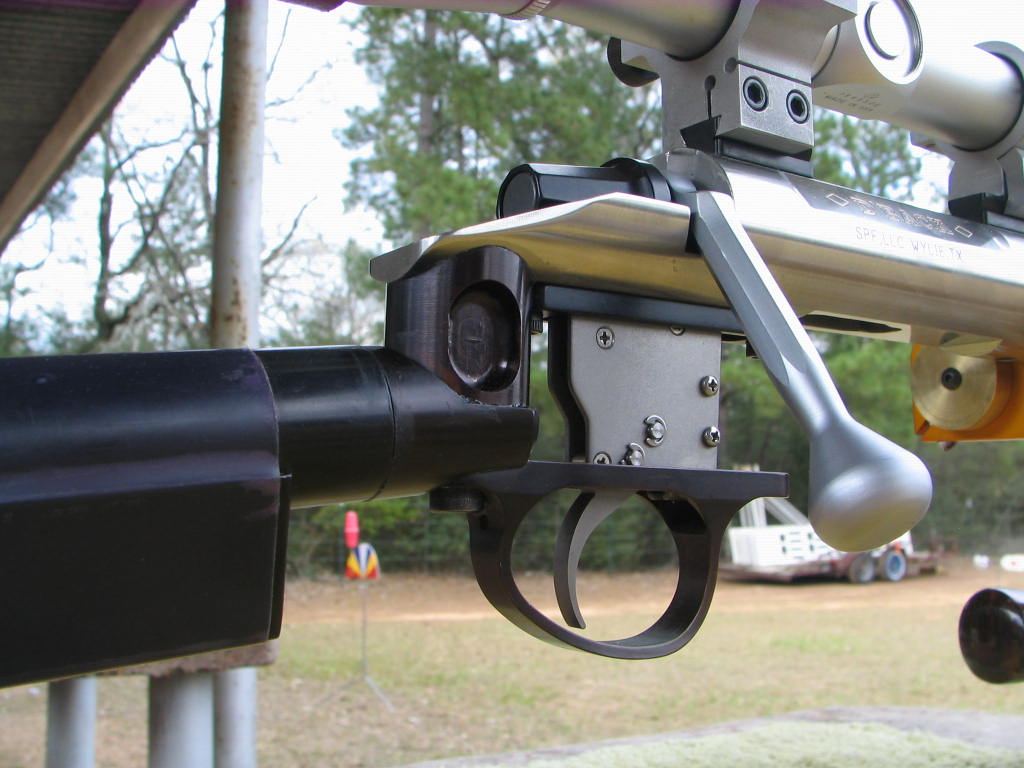
On the Tinker Toy gun, the action serves as a load-bearing assembly, holding the barrel in the front, and the skeleton buttstock (or “keel”) in the rear. Shelley was told that accuracy would suffer if you stressed a benchrest action in this manner but that proved untrue. It is a very simple solution to building a rifle, and it eliminates the need to bed the action. The forearm attaches to the action via a bracket installed like a recoil lug.
Skeleton Rear “Keel” Affixed Directly to Action
Davidson’s Tinker Toy does not have a conventional rear buttstock. Instead there is low-profile, v-shaped metal “keel”, as Davidson calls it, that rides the rear bag. The keel is supported by a tubular backbone that attaches at the rear of the Diamondback action. At the butt end is an aluminum plate covered with bubble wrap that serves as a butt pad. The skeletonized rear section helps the rifle maintain a very low center of gravity.
Locked Scope with External Windage and Elevation Adjustment
Shelley ran an older Leupold 36X Benchrest Scope with front-adjusting objective. To eliminate slop or loose tolerances in the erector mechanism that could cause changes in point of impact, the internals have been locked up by Jackie Schmidt. To move the cross-hairs relative to the bore axis, Shelley has a special Jewell/Foster rear ring that allows a limited amount of lateral and vertical movement of the entire scope body.
TINKER TOY SPECIFICATIONS
Action: Stiller SS Diamondback Drop-Port (1/2″ short), with .308 Bolt Face.
Barrel: Shilen .308 caliber, 17-twist, HV.
Chambering: 30BR, .330″ neck, Pacific Tool & Gauge Robinett Reamer.
Stock: Davidson Custom Tubular Stock with 0.75″ Offset Barreled Action.
Tube Construction: 6061 Aluminum, 1″ diameter (left), 5/8″ diameter (right).
Load: H4198 powder and 118gr Ronnie Cheek bullets. Loaded to 2980 fps.
Trigger: Jewell, 2 ounce BR.
Tuner: Custom, Adjustable with Opposing Magnets.
Optics: Leupold 36X (locked by J. Schmidt).
Rings: Jewell Foster External Adjusting Rings.
Stiller Diamondback Action and Shilen 17-Twist Barrel
I had wanted to use an aluminum Stiller Cobra drop port with a 6mmBR bolt face but Jerry had none in stock and he estimated it would be a year before one was available. Although I’ve waited for up to a year for an action in the past, I wanted to build this rifle during the fall of 2006 while the weather was pleasant enough to work in my unheated and un-air-conditioned garage shop. Jerry did have a 1/2″ short stainless steel Diamondback in stock so I purchased it even though it would add 3 ounces to the gun compared to the aluminum Cobra. Three ounces is a lot of weight when you’re working with a 10.5-lb limit. I had a heavy varmint contour Shilen 17-twist barrel that would work nicely and I had a Jewell trigger on a rifle that I wasn’t using at the time. I also decided to use my Leupold 36X (locked-up by Jackie Schmidt) with the Jewell/Foster adjustable rings.
Building the Tube Fore-Arm and Brackets
I took a wild guess as to tubing thickness and settled on .035″ for the 1″ left fore-arm tube and .058″ for the 5/8″ right fore-arm tube. All of the flat stock and tubes are 6061 Aluminum. I did the lathe work and the mill work and every evening I’d put the parts together and think about the proper way to proceed.
When the parts were mostly made, I started thinking that this was a truly ugly rifle. I thought about painting it but that wasn’t a good option as many of the parts are designed to slide over others and glue together. Anodizing was the best answer so while looking on the Internet for local anodizing shops I Googled “Home Anodizing”. Sure enough there were a few sites that told about how to anodize at home. I picked up some battery acid from NAPA Auto Supply, some Rit Clothes Dye from Wal-Mart, and a bunch of distilled water from the grocery store. Using an old battery charger as my dc power supply I started anodizing and dying the eighteen parts that went into the stock. Although I had to strip and re-anodize some of the parts, the work turned out acceptable.
Putting it All Together–Lug-Mounting the Fore-Arm and Lots of Epoxy
The barrel contour had to be modified to work with the stock which attaches by way of a rear plate which mounts like a recoil lug and a plate that ties the barrel and the stock tubes together 4″ forward of the bolt face. The four-inch maximum distance is a NBRSA rule concerning barrel blocks.
The recoil lug-style stock mount is probably the only truly innovative thing I did other than the opposing-magnet tuner. Basically, the rear bracket is sandwiched between the receiver face and the barrel shoulder–positioned where a conventional recoil lug would go. I also added a brass ring (visible in photo) between the anodized bracket and the barrel. This was done to distribute loads over a wider surface area. (I was concerned that the bracket material was fairly soft and I didn’t want to crush it as I torqued the barrel in place.) After fitting the barrel and plates I glued the entire gun together using epoxy and various LocTite adhesives. The rest of the parts were assembled but I did not Loctite the scope bases since I thought I’d be disassembling the rifle for re-work after the first trials. That came back to bite me during later testing when the gun started shooting erratically and I went down a couple of blind alleys before finding the loose bases.
Range Testing–Results Are Very Positive
The first range session was a real shocker. Even though the wind was up to 10mph and twitchy, the rifle showed promise from the very first shot. I really didn’t expect that kind of performance without, at least, some rework. After sighting in, I shot five, 5-shot groups that, when averaged together, measured .223″. That’s good enough to win some benchrest group matches. But I wasn’t finished with the gun yet–I still wanted to try out my magnetic tuner concept.
The Magnetic Tuner
Next, I built the magnetic tuner. The tuner consists of one rare earth magnet attached to the stock and another attached to a barrel sleeve with the magnets oriented so the magnetic forces repel each other. In order to test the magnets and to determine if the rifle really shot as well as it seemed to, I took it to Gene Beggs’s shooting tunnel in Odessa, Texas. I spent two days at the tunnel testing loads and then installed the magnetic tuner. The gun shoots well with the magnets and shoots well without them. I suppose I can’t make any claims as to how much, if any, improvement the magnets make. Gene said that my gun was the most accurate rifle to be tested at his one-year-old shooting facility: “Shelley Davidson brought one of the most unusual rifles I had ever seen; he called it his ‘Tube Gun.’ And boy, did it ever shoot! It still holds the record in the tunnel as the rifle that shot more zeros than any other to date.” I definitely recommend Gene’s facility for testing and refining shooting techniques and loads.
Competition — Tinker Toy Won Both Score and Group Matches
Finally the big day arrived when I’d shoot the first match with my new gun. The North Texas Shooters Association was holding its first club match of the 2007 season. At the Denton, Texas matches we shoot a Score Match in the morning and a Group Match in the afternoon. The March event was at 100 yards and the April match will be at 200 yards and so on alternating throughout the benchrest season.
Match One–Tinker Toy Wins Score with a 250 – 17X
Since the gun is chambered in 30BR and that chambering is almost immune to tuning woes, I preloaded 130 rounds with H4198 powder and 118gr Cheek bullets. I used my SEB front rest and rear bag which are made by Sebastian Lambang in Indonesia. Everything came together, and Tinker Toy demonstrated that the accuracy it showed in the tunnel was no fluke. The gun shot great and I won the morning match with a 250, 17X. The day was quite windy and the next best shooter scored a 250, 15X. So I’d chalked up my first win.
Match Two–Tinker Toy Wins Group with a .2282″ Agg Tinker Toy won the afternoon group match I entered with a five-group Aggregate of .2282″. (The second place score was .2568″.) My groups were .149″, .197″, .243″, .302″ (oops), and .250″. You know how some folks say a 30BR can’t be competitive with a PPC? Well that .2282″ Agg won’t break any records, but it is good enough to win some regional registered BR matches. So this rifle has demonstrated an ability to win in both Score and Group matches. Obviously I have a very good Shilen barrel, great Cheek bullets and the rest of the components are doing their jobs as well. But, the stock is also working well.
Score Shooting vs. Group Shooting–The Rules
In a score match, the shooter shoots one bullet at each of five record targets, which are clustered on one target sheet. The Aggregate score of five of these targets determines the winner. If the shooter touches the 10 ring on all of his 25 targets he can score a “clean” 250 score. Usually there will be more than one shooter who scores a 250 so the winner is determined by the X-count. The 1/2″ 10-point ring has a 1/16″ dot in its center. Touching the X dot adds to the shooters X count. In short-range group matches, the shooter must try to put five bullets through the same hole. At each distance (100 or 200), five, 5-shot matches are scored, the group sizes are added together (MOA equivalent at 200) and the total is divided by five to arrive at an Aggregate score.
Today is National Hunting and Fishing Day. To help the avid hunters among our readers, here are Twenty Tips that can help ensure a safe and successful hunt. These tips have been compiled from our AccurateShooter Hunting Forum, with help from Hunting Editor Colton Reid (who has already been out hunting this month). Some items are preparatory — such as working with maps, sighting in the rifle, and improving physical fitness. We also talk about equipment — having the right gear, from proper boots to a GPS for multi-day hunts.
Of course there are entire volumes written on hunting, but these 20 Tips can benefit all hunters. Follow these suggestions and you should have a safer hunting experience with greater likelihood of success. If you liked these pointers, you’ll find two dozen more helpful hints on the NSSF Website.
Preparations Before The Hunt
1. Map Your Hunt and Notify Others — Before your hunt, make a plan and notify friends and family members about WHERE you are going and your intended return date and time. Print out a Google Satellite map and locate landmarks and trailheads. Mark where you plan to park your vehicle and give a copy of this map to friend and/or family members. A hunter may injure himself by falling off a rock, or tumbling in a creek-bed. After that kind of injury the hunter may be confused or unable to walk. If you get stranded in the wilderness, you want trusted persons to know where you are. So, before you leave on a trip, provide a map to a friend or family member. Show them where you will leave your vehicle, and where you expect to be every day of your hunting adventure.
2. Licenses and Permits — Make sure you have a valid hunting licenses and all the necessary tags. Begin this process with ample time before your intended hunt(s). The NSSF adds: “If you are crossing state or national borders, find out about any special considerations you must take care of. Border crossings can mean knowing about firearm transport laws or Chronic Wasting Disease-related regulations.”
3. Work on Your Fitness — On a multi-day hunt you may be trekking many miles. You need to be in good shape. If you are out of shape you may be putting yourself in a precarious situation, particularly if you underestimate the terrain difficulty. As the NSSF says: “Not being able to handle the conditions lessens your chances of success, can turn a great experience into an agonizing one and can endanger your health.”
4. Do Your Homework — Study the area you will be hunting. Talk to other hunters. Look at satellite photos. Get a real sense of the walking and terrain challenges. For a multi-day hunt, MAKE a PLAN. The NSSF states: “Eliminate surprises. Learn as much about where you will be staying, the area you will be hunting, what the weather might be like and what you need to bring[.]”
5. Rifle and Ammo — Make sure your rifle is sighted-in and your ammo is tested. Sight-in your rifle with the ammo you plan to use on your hunt. CLICK HERE for 4-Shot Sight-in Method. After sighting-in from the bench, confirm your zero by shooting from typical hunting positions (kneeling and with forearm supported on a rock or post).
6. Shooting Positions — Practice the shooting positions you will use in the field. Practice sitting, kneeling, and prone positions. You should also practice with shooting sticks, using your day pack as a rest, and with a bipod. Try to have a rock-steady rest before taking your shot.
7. Back-Up Irons — If possible, select a rifle with back-up iron sights. While modern scopes are very durable, they can and do fail (glass can crack). If you’ve invested a lot of time and money in your hunt, back-up iron sights can keep you in the game even if your riflescope fails.
8. Communications and GPS — Bring a GPS if you are in a wilderness area far from civilization. It’s a good idea to bring a cell phone, but you may not have coverage if you’re quite a distance from populated areas. A smart-phone also doubles as a digital camera to record your trophies. For navigation and safety, consider getting Garmin inReach Explorer+. This high-tech handheld unit features interactive SOS, connecting you to the GEOS 24/7 search-and-rescue monitoring center. They also allow you to send and receive text messages, no matter where you are, via advanced inReach satellite technology. Yes you can communicate even if you are miles from the nearest cell tower.
9. Select Good Gear — Make sure you have GOOD BOOTS that are comfortable — you’ll spend a lot of time on your feet. You may want a pack with harness for your rifle so you have both hands free. On a multi-day trip, make sure you can carry enough water, and that you will stay warm enough at night. Good practices for backpacking apply to multi-day hunts.
10. Make a Checklist — Create a complete checklist of the gear and supplies you need. That includes arms, ammunition, rangefinder, binoculars, proper clothing (including spare clothes), hunting accessories, sleeping gear (on multi-day hunts), toiletries, medications. Don’t forget a good first aid kit — lots of bad things can happen during any wilderness trip. You can cut a hand, break an ankle or worse.
During The Hunt
11. Have a Plan — know where you plan to go and when. Try to be where you want in the early morning and early evening hours when deer are likely most active.
12. Take Your Time — If you spot a deer and get too excited and don’t take your time you may spook him. Go slow and glass. If possible, wait for the animals to bed down and relax. Then work out the best way to approach your prey. Remember, “You get so few opportunities, don’t screw it up!”
13. Glass More, Walk Less — Let your eyes do the walking — get good binoculars and use them. With their heightened senses of smell and hearing, deer/elk are able to spot you way better than you can spot them. If you are walking around a lot, chances are you are getting spotted by your prey.
14. Riflescopes Are Not Binoculars — Never use a riflescope as a substitute for binoculars. The temptation to do so is real, but when one does this, one is by definition pointing the muzzle of the gun at unknown targets. We like binoculars with built-in rangefinders. When glassing at long range, try supporting your binoculars on your pack.
15. Be Sure of Your Target before Shooting — Every year during whitetail season, farmers everywhere are forced to spray-paint their cattle or risk having them “harvested” by hunters who don’t bother confirming the species in their sights. Hunters with “buck fever” can make mistakes. When in doubt, don’t shoot.
16. Know When to Unload — When finished hunting, unload your firearm before returning to camp. You should also unload your gun before attempting to climb a steep bank or travel across slippery ground.
17. Hearing Protection — While pursuing and stalking your prey you’ll want full sensory use of your ears. But when you’re finally ready to take the shot, slip in hearing protection. A shot from a large-caliber hunting rifle can exceed 170 decibels. Unprotected exposure to noise from a SINGLE 170+ dB shot can cause permanent hearing damage. (Source: ASHA.org). If you make a follow-up shot, you double that noise hazard. Therefore a hunter with a non-suppressed rifle should have hearing protection available.
You can keep a pair of quick-insert plugs on a cord around your neck. Or, get the Howard Leight Quiet Band QB2HYG. This is a plastic ring with earbuds, you can keep around your neck.
“Once a hunter is successful, the REAL work begins.” — Colton Reid
18. Harvesting the Animal — When dressing your animal, be careful with the meat. You’ll want very sharp knives. Some hunters prefer knives with replaceable, razor-sharp blades. Don’t rush the task. Make sure you don’t get moisture or dirt on meat. The three spoilers of meat are heat, moisture, and dirt.
19. Pace Yourself When Packing Out — If you DO succeed, and bring down a big buck, will you be able to dress the animal and carry out the meat? Always be prepared to hike out with extra weight. If you are successful, make sure not to waste the meat you worked so hard for. Choose a pack that can help you carry a heavy load. Remember, this is not an insignificant challenge — you may be carrying 60 to 100 extra pounds in addition to your other gear. Again, take your time. Rest as needed. Don’t hurt yourself.
20. Remember to Enjoy the Experience — Our Hunting Editor, Colton Reid, offers this sage advice to all hunters, but particularly to novices: “Have fun, and appreciate your hunt, whether you bag a buck or not. It is a privilege to experience the wilderness and to get away from the city. Enjoy it while you’re out there. And keep your spirits up. You may get tired, but remember that ‘comes with the territory’. At the end of the day, yes you may be exhausted. And you may want to quit and go home. But stay positive, stay focused. Be patient, the experience is worth it.”
CLICK HERE for Hunter Training/Mentoring Programs State-by-State.
Prepare For Your Hunt — Get Fit and Practice Positions
As part of the NRA’s Tips & Tactics video series, Kristy Titus explains how to prepare for a hunt. Titus, co-host of the Team Elk TV show has hunted around the globe. She grew up in the outdoors, running pack mules in Oregon with her father. In this video, Kristy discusses fitness training and demonstrates field positions that can be employed during a hunt.
Kristy explains: “Hunting can lead you into some steep, rough country. It’s really important that you train both your body and your mind to handle the elements and the rigors of hunting So, if you plan on going on a mountain hunt, get out and train your body. Train with your firearm. Get off the bench and have some fun with this. Do some positional shooting or, if you want to add a stress dynamic… have someone put you under a time parameter.”
Visit WhereToHunt.org
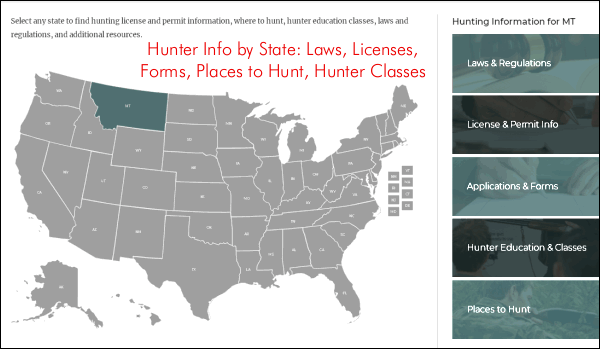
There’s a great online resource for hunters that will help you find game locations in your state and ensure you have all the proper permits and game tags. WheretoHunt.org features an interactive map of the country. For all 50 states, the NSSF has compiled information about hunting license and permits, where to hunt, hunter education classes, laws and regulations and more. For each state you’ll also find a link for required applications and license forms.
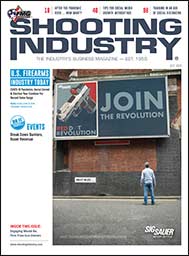
If you want to stay current with trends in the firearms industry, and see important new product releases before they hit dealers’ shelves, you should check out Shooting Industry magazine. While tailored for firearms/outdoor gear retailers and industry professionals, this monthly journal also provides valuable information for all gun owners. We read Shooting Industry to learn about sales trends, new products, and current gun laws issues.
READ for FREE — Shooting Industry is now available in a digital format for FREE. There are free archives going back 13 years to December 2007.
Get FREE Digital Shooting Industry Magazines for the Past 13 Years
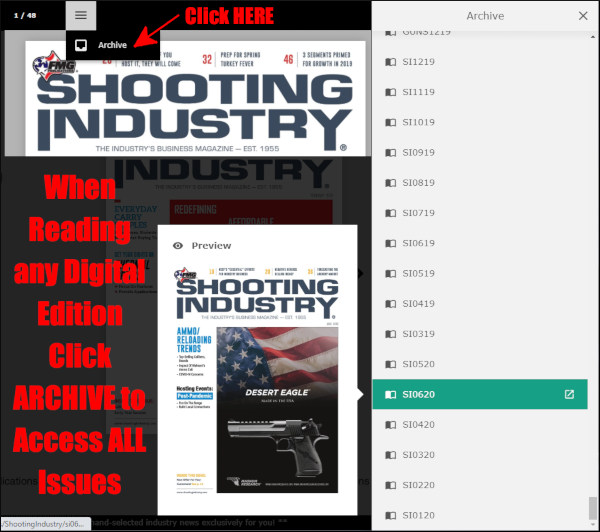
You can access, for free, nearly 13 years of Shooting Industry back issues, plus all the recent 2020 issues. CLICK HERE for the current issue along with all issues for the last three years: 2018, 2019, 2020. IMPORTANT — To access older issues, you much first launch a recent digital edition. That will give you access to the full 13-year archive, as explained below.
Here are links for the last three issues — July, August, and September 2020. Simply click each cover to read full issue for FREE:
SEPTEMBER 2020
Top Stories:
Gun Storage in Pandemic
Tracking Big-Game Hunters
AUGUST 2020
Top Stories:
Self-Defense Long Guns
Pandemic Spurs Hunting
JULY 2020
Top Stories:
First-Time Gun Buyers
U.S. Firearms Industry Today
How to Access Magazine Archives Back to December 2007
Once you have launched the digital version of a recent issue, you can access the past 13 years of Shooting Industry back issues by using the ARCHIVE Button. First click on the MENU icon (three horizontal lines). Then click on the link for ARCHIVE. When you click on “Archive”, a list appears on the right. Scroll down to select any issue from September 2020 back to December 2007.
BONUS! FREE Back Issues of GUNS Magazine and American Handgunner
In the Shooting Industry Archives, you will also find free digital editions of GUNS Magazine and American Handgunner. These will be found in the archive tables on the right. Just look for GUNSxxxx in the list entry for GUNS Magazine back issues, or AHxxxx for American Handgunner back issues.
What a tale this rusty Colt could tell — this M1911 pistol is more than a vintage military side-arm. It is a symbol of courage, determination, and triumph over adversity. This pistol was carried on a 2,060-mile open-boat ocean crossing from the Philippines to Australia. In May of 1942, the skipper and 17 crewmen of the Minesweeper U.S.S. Quail courageously decided to sail from Manilla to Darwin, Australia rather than surrender to the Japanese. Lt. J.H. Morrill and his crew made that long ocean journey in a 36-foot launch, braving enemy air and sea forces and dangerous ocean conditions.
This pistol is part of the NRA Museum Collection in Fairfax, Virginia. This historic Colt M1911 was a featured “Gun of the Day” on the NRA Museum Facebook Page where you’ll find hundreds of other interesting firearms. We believe the remarkable story of this pistol deserved to be told here…
Colt M1911 Pistol — Escape from Corregidor
The minesweeper U.S.S. Quail was the last operational American naval vessel in the Philippines when Japan began its occupation of the country in May 1942. After his vessel was disabled at the strategically-important island of Corregidor near the entrance to Manilla Bay, Lt. Commander J. H. Morrill scuttled the ship and gave his crew a choice: either surrender to the Japanese or attempt to escape, by sea, to Allied territory thousands of miles away. Rather than surrender, 17 crew members elected to join Morrill on a dangerous passage in a 36-foot open launch/lifeboat. Gear was scavenged including this M1911 recovered from a dead serviceman. With few charts or navigational aids, Morrill and his men successfully completed an epic 58-day 2,060-mile journey to Australia and safety.
Old “Number 2″ belonging to Ray Gross. Click Photo for full-screen Image.
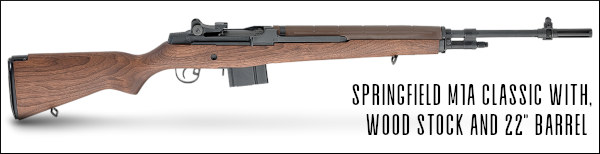
Ray Gross, one of America’s great rifle competitors, has served as captain of the United States F-TR Team. While Ray is best known for his F-Class shooting and leadership, Ray is also an experienced service rifle shooter, who secured his Distinguished Rifleman Badge 25 years ago. Ray has shot many rifles during his competitive shooting career, but the M1A rifle above held a special place in Ray’s heart. This old semi-auto earned Ray his Distinguished Badge, and he’ll never forget that, though he parted with the rifle in 2016.
Posting back in 2016, Ray told us:
“I said goodbye to an old friend… Affectionately known as ‘Number 2′, she is the rifle that I earned my Distinguished Rifleman Badge with in 1995 (#1159).
That rifle was also responsible for a fair amount of Venison in the ’90s, as well. But since then, she has spent a lot of time in the closet. Last time I got her out was to destroy a bunch of hard drives containing evidence collected during my Computer Forensics days. She deserved better than that.
I will miss the beautiful sound of all that American steel slamming into battery when I tripped her bolt.” – Ray Gross
Ray Gross was profiled in Shooting Sports USA last year. He explained how he started his competitive shooting career with an M1A rifle:
How did you begin in competitive shooting?
I began competing in 1991, at age 27. I bought an M1A and joined the Midland County Sportsman’s Club. One day I was at the club shooting the M1A when a member, Rich Koskela, came over and invited me to join them shooting competitions. Up until that point, I had no idea there was such a thing as NRA Competitive Shooting and I had been a member since 1986. Anyway, Rich and some of his friends showed me the basics and at my first match, I finished in the top half and first MU.
What are your major accomplishments in the shooting sports?
In 1995, I earned the Distinguished Rifleman Badge and a few years later switched to Palma rifle. On the way to making my first Palma team in 2003, I won the Army Cup, the Andrus trophy twice and the Sierra Trophy once. As a coach, I won the Herrick match, and seven F-TR National Championship team matches. Internationally, I’ve coached three gold medal America Match teams (The USA has only won four in Palma Rifle), and earned a Silver and Bronze coaching on the Palma Team in 2015 and 2019. In 2017, I led the U.S. F-TR Team to a World Championship. This year (2019), I also won the NRA ELR National Championship (25-lb max Division).”
“Descended from the M1 Garand, the M14 utilized multiple improvements that made it a far superior firearm for combat and a much better rifle for competition.” — Dick Jones, Shooting Sports USA.
In the April 2018 issue of Shooting Sports USA, you’ll find a good article on the civilian version of the M14, now sold commercially as the Springfield M1A. An evolution of the battle-proven M1 Garand, the M14 was designed to shoot the 7.62×51 (.308 Win) round instead of the larger .30-06 Springfield cartridge used in WWI, WWII and Korea. While the vast majority of today’s M1As are chambered for .308 Win/7.62×51, Springfield Armory also produces a 6.5 Creedmoor version.
Dick Jones reports that accurized M14/M1As could post remarkable scores: “The accuracy potential of the M14/M1A is unquestionable. During their reign as service rifles, they produced multiple perfect 200 scores at 600 and 1000 yards in the hands of top shooters. This is a difficult feat with a modern, scoped, magnum-caliber rifle and remarkable with an iron-sighted battle rifle. Good competition rifles can group 10 shots under one MOA, and the meticulously-massaged rifles used by the top shooters during my career would consistently put up 10 shots under an inch at 200 yards off a test cradle.”
For many years, the semi-auto version of the M14 was “top dog” in iron sights Service Rifle competition. Now that discipline is dominated by .223 Rem (5.56×45) AR-type rifles, but the bigger .308-caliber rifle, now sold as the M1A, remains popular. And in non-pandemic years, the CMP hosts a major M1A Match at Camp Perry, sponsored by Springfield Armory. This is a very popular event with 100+ competitors and significant cash prizes.
See how the modern M1A is built in this Springfield Armory Video:
As racing improves automobiles, competition improves firearms, and the current crop of Springfield M1As, from the Basic to the top-of-the-line Super Match and Loaded models, reflects the years of development. The M14 and its variants are … still considered by many to be the best battle rifle in the history of the U.S. Military. — Dick Jones, Shooting Sports USA
Military Version Operation Revealed — M14 Training Film
The original military version of the M1A was the select-fire M14. The 27-minute official U.S. Army video below demonstrates the operation of the M14. Field-stripping is shown from the 5:13 time-mark through 8:30. Cut-away drawings show the M14’s gas operation at 8:40.
Watch M14 Functioning Cycle Starting at 9:25 Mark:
The M14’s complete 8-step functioning cycle is demonstrated from the 9:25 time-mark through 22:41. These eight operations are: 1) Feeding; 2) Chambering; 3) Locking; 4) Firing; 5) Unlocking; 6) Extracting; 7) Ejecting; and 8) Cocking. This movie is fairly long, but fans of battle rifles will find it well worth their time. Every M1A owner should definitely watch this video start to finish.
With the big fires happening on the West Coast, many have wondered about hazards faced by gun owners in fire zones. This important video shows what really happens when loaded ammunition burns. You will probably be surprised. Contrary to Hollywood notions, the ammo doesn’t ignite in a massive explosion. Far from it… basically the rounds “cook off” one by one, and the bullets release at relatively low velocity. We’ve featured this SAAMI research project before, but it is worth reprising for those who have not yet seen the burn tests.
A few years back, SAAMI released an important video concerning ammo and fire. With professional fire-fighters standing by, over 400,000 rounds of ammo were incinerated in a series of eye-opening tests. If you haven’t had the chance to view this video yet, you should take the time to watch it now
The Sporting Arms and Ammunition Manufacturers’ Institute (SAAMI) has produced an amazing 25-minute video that shows what actually happens to sporting ammunition involved in a fire. This video shows the results of serious tests conducted with the assistance of professional fire crews. We strongly recommend you watch this video, all the way through. It dispels many myths, while demonstrating what really happens when ammunition is burned, dropped, or crushed.
Watch SAAMI Ammunition Testing Video
Video Timeline
2:10 Impact Test (ignited outside firearm)
3:40 65-foot Drop Test
5:08 Bullet Impact (.308 Win firing)
7:55 Blasting Cap Attacks
9:55 Bulldozer and Forklift Tests
12:20 Boxed Ammo Bonfire
15:37 Bonfire without Packaging
17:21 Retail Store Simulation Burn
20:55 Truck Trailer Burn
Over 400,000 rounds of ammunition were used in the tests. Some of the footage is quite remarkable. Testers built a bonfire with 28,000 rounds of boxed ammo soaked in diesel fuel. Then the testers loaded five pallets of ammo (250,000 rounds) in the back of a semi-truck, and torched it all using wood and paper fire-starting materials doused with diesel fuel.
The video shows that, when ammo boxes are set on fire, and ammunition does discharge, the bullet normally exits at low speed and low pressure. SAAMI states: “Smokeless powders must be confined to propel a projectile at high velocity. When not in a firearm, projectile velocities are extremely low.” At distances of 10 meters, bullets launched from “cooked-off” ammo would not penetrate the normal “turn-out gear” worn by fire-fighters.
We are not suggesting you disregard the risks of ammo “cooking off” in a fire, but you will learn the realities of the situation by watching the video. There are some amazing demonstrations — including a simulated retail store fire with 115,000 rounds of ammo in boxes. As cartridges cook off, it sounds like a battery of machine-guns, but projectiles did not penetrate the “store” walls, or even two layers of sheet-rock. The fire crew puts out the “store fire” easily in under 20 seconds, just using water.
Additional Testing: Drop Test, Projectile Test, Crush Test, Blasting Cap Test
Drop Test
The video also offers interesting ammo-handling tests. Boxes of ammo were dropped from a height of 65 feet. Only a tiny fraction of the cartridges discharged, and there was no chain-fire. SAAMI concludes: “When dropped from extreme heights (65 feet), sporting ammunition is unlikely to ignite. If a cartridge ignites, it does not propagate.”
Rifle Fire Test
SAAMI’s testers even tried to blow up boxes of ammunition with rifle fire. Boxes of loaded ammo were shot with .308 Win rounds from 65 yards. The video includes fascinating slow-motion footage showing rounds penetrating boxes of rifle cartridges, pistol ammo, and shotgun shells. Individual cartridges that were penetrated were destroyed, but adjacent cartridges suffered little damage, other than some powder leakage. SAAMI observed: “Most of the ammunition did not ignite. When a cartridge did ignite, there was no chain reaction.”
Bulldozer Crush Test
The test team also did an amazing “crush-test” using a Bulldozer. First boxes of loaded ammo, then loose piles of ammo, were crushed under the treads of a Bulldozer. A handful of rounds fired off, but again there was no chain-fire, and no large explosion. SAAMI observed: “Even in the most extreme conditions of compression and friction, sporting ammunition is unlikely to ignite. [If it does ignite when crushed] it does not propagate.”
Blasting Cap Test
Perhaps most amazingly, the testers were not able to get ammunition to chain-fire (detonate all at once), even when using blasting caps affixed directly to live primers. In the SAAMI test, a blasting cap was placed on the primer of a round housed in a large box of ammo. One cartridge ignited but the rest of the boxed ammo was relatively undamaged and there was no propagation.
Looking for a match-worthy PRS/NRL rig for under $1750.00? Check out Savage’s new Elite Precision Model 110. GunsAmerica Digest recently did a very thorough test of the 110 Elite Precision, declaring that this modern Savage is “Competition-Ready Out of the Box.”
The 110 Elite Precision has many notable features:
1. Modular Driven Technologies (MDT) Adjustable Core Competition (ACC) Chassis
2. Trigger adjusts from 1.5-4.0 pounds
3. Barrel comes with timed muzzle brake from factory
4. MDT Stocks easily accepts Weights and Accessories
5. Takes AICS-compatible Magazines
6. Titanium Nitride coated bolt body
This rifle boasts an excellent MDT ACC modular chassis. GunsAmerica stated: “Combined with the excellent trigger, an AR-compatible vertical grip, flared magazine well, and AICS mag system (along with a host of additional features), the 110 Elite Precision comes with everything you need [for PRS/NRL matches].” The stock has ARCA rails on the fore-end and M-LOK mounting points for accessories and/or weights. You can add an additional 9 pounds of steel to customize the balance/mass of the rifle to improve stability and minimize recoil.
The Cheekpiece and Buttpad are adjustable, along with Length of Pull (LOP).
Another reviewer noted that the 110 Elite Precision has important accurizing tweaks from the factory: “Key upgrades include a blueprinted action … Savage squared the receiver face and cleaned up the receiver threads to ensure they’re concentric with the barrel’s bore. This combination goes a long way in eliminating the occasional flyer that can ruin a good group or cause a miss in a match.” Source: GunsandAmmo.com.
Decent Accuracy with Factory Ammo
What kind of accuracy can you expect? Decent for a factory barrel and factory ammo. With Hornady 6.5 Creedmoor ammo, shooting off a sled, the test rifle delivered 1.1-MOA average groups. We would expect considerably better accuracy using a proper front rest with a bag-rider fitted to the fore-end. Likewise, the gun would almost certainly shoot better with handloads with Lapua brass and Berger bullets. Handling was good: “The Elite Precision is about as shootable as it gets. The 12.6-pound rifle produces very little recoil with the 6.5 Creedmoor cartridge, and … the ACC chassis can be weighted to control recoil even further.”
Actual owners have been impressed with the 110 Elite Precision. One buyer posted: “You couldn’t build a complete PRS rifle that is this good of a platform for even close to the price!” GunsAmerica tester Jordan Michaels concurred that this rig is a great choice for PRS/NRL factory-class: “If you’re in the market for a rifle to compete in a long-range competition, the Savage 110 Elite Precision is an excellent choice.”
Will there be a 2021 SHOT Show in Las Vegas? The answer is that nobody knows for sure. While the NSSF, the show’s organizer, is proceeding as planned for a big event, there is no clear “green light” decision from Las Vegas government and public health officials. The NSSF has talked about having an event with a more open layout, fewer booth personnel, and social distancing restrictions, but it is unclear how that would work. Also, given the fact that January 2021 SHOT Show might still be cancelled in its entirety, attendees need to be concerned with their hotel reservations, specifically getting deposits back. We know many show attendees are taking a “wait and see” approach, and holding off on making hotel and transportation arrangements.
As of today (9/16/2020), we know the NSSF and their SHOT working group are moving forward with plans for a 2021 SHOT Show. We also know it will be bigger physically, and considerably different experience from previous versions.
SHOT Show 2021 will feature a more expansive and “distanced” layout, with larger aisles, smaller numbers of booth workers. It’s likely that social distancing, sanitizing, masks, and a whole COVID-19 compliance regimen — as is mandated by the state and local governments at the time — will be in place.
The real question that will have the largest impact is this: What will the COVID-19 compliance regulations look like by January 2021? If there are still restrictions on gatherings, it would be pretty tough to have an event the magnitude of SHOT for groups of 50 or fewer attendees at a time.
That’s NOT social distancing. We can’t imagine this scene in today’s COVID-19 Pandemic environment.
What Will Happen to Hotel Reservations if SHOT Show is Cancelled?
The National Shooting Sports Foundation (NSSF) has issued Information on Hotel Cancellation Policies, regarding the reservations for SHOT Show 2021:
Many people have been reaching out to our team about hotel reservations and policies that are in place during this uncertain time. As you may know, there are two ways in which those coming to SHOT Show can book a room through our official channels — directly through the Venetian|Palazzo link on SHOTshow.org or through onPeak.com for all our other partner hotels.
OnPeak – With respect to hotel rooms booked through onPeak, every reservation is held without deposit until December 16. If the show is not permitted to take place, all reservations will be canceled without a deposit being taken so there will be no cancellation fees due. If you decide not to attend the SHOT Show, you will be able to cancel your reservation up to December 15 without a cancellation fee.
Venetian|Palazzo — The Venetian|Palazzo have always had a one-night nonrefundable deposit policy, and that still holds should someone choose to cancel their reservation. However, if the SHOT Show is not permitted to take place, the Venetian|Palazzo will return the deposit this year.
NSSF hopes this helps clarify the current hotel reservation policies and provides comfort for those planning their stays in January. In the meantime, please continue to visit the SHOT Show Hotel & Travel page as it continues to update with adjusted rates welcoming the SHOT Show community back to Vegas.
SHOT Show Floor image courtesy DKC company a supplier of lead consumables for the firearms industry.
The National Shooting Sports Foundation (NSSF) has released its 2020 Congressional Report Card. This report card grades all 431 U.S. Representatives and 100 U.S. Senators on key legislation of critical importance to the firearm industry, as well as the Second Amendment rights of America’s hunters and target shooters. See Complete Congressional Report Card HERE.
In the Report Card, the NSSF awarded 17 U.S. Senators and 97 U.S. Representatives the highest “A+” rating. This includes U.S. Senators Steve Daines (R-Mont.), Cory Gardner (R-Colo.), Lindsey Graham (R-S.C.), David Perdue (R-Ga.) and Thom Tillis (R-N.C.). Congressman Collin Peterson (D-Minn.) was also among the lawmakers awarded the highest rating.
Shown below is the U.S. Senate Report card. The Report card for the House of Representatives is four pages long, too lengthy to display here. CLICK HERE for House Report.
This nonpartisan scorecard reflects the voting record of each legislator. These grades indicate their public voting record as well as the weight and importance of these lawmakers sponsoring and co-sponsoring key legislation, their work on committees, letters signed to support issues and leadership to stand for our industry. “This scorecard is of vital importance to voters as we head into November elections. This tells voters exactly where their lawmakers stand on issues they care about like recreational shooting and hunting and the right to keep and bear arms” said Lawrence G. Keane, NSSF VP and General Counsel.
The NSSF notes that grades are meant to analyze the level of support of each lawmaker during the 116th Congress and do not constitute an endorsement or opposition to a candidate’s election. The entire report, including the list of key legislation that comprised the scores, is available HERE.
Hunting season is right around the corner. We know many readers have acquired a new hunting rifles, or perhaps are using new ammo or a new optic. If you’ve got new gear, you’ll want to sight-in and zero your hunting rig properly. Here’s how…
Here’s a simple procedure that lets you get a solid zero in just four shots. Of course you probably want to fire a few more rounds to confirm your zero before you head off to your hunting grounds, but this will let you get on-target with a minimum amount of time and ammo expended. (This assumes your scope is securely mounted, and the bases are not drastically out of alignment.)
QUICK-TIP: The Key to this procedure is Dialing to Shot One Point of Impact (POI). Re-aim at center of target after SHOT ONE. Then with the rifle motionless, use the turrets to put the middle of the cross-hair (reticle) on the first shot location. Be sure NOT to move your rifle while clicking.
1. First, remove the bolt and boresight the rifle. Adjust the position of the rifle so that, looking through the bore, you can see the center of the target with your eyes. Secure the rifle in the rests to maintain its position as boresighted. Then, without moving the rifle, center the reticle. That should get you on paper. With the rifle solidly secured in front and rear rests or sandbags, aim at the center of a target placed at your zeroing distance (50 or 100 yards). Confirm there are no obstructions in the barrel! Then load and fire SHOT ONE. Then, return the gun to the exact position it was when you pulled the trigger, with the cross-hair centered on the target as before.
2. Locate, in the scope, where your first bullet landed on the target. Now, while you grip the rifle firmly so it doesn’t move, have a friend adjust the turrets on your scope. While you look through the scope, have your friend turn the windage and elevation turrets until the cross-hairs, as viewed through the scope, bisect the first bullet hole on the target. Use the turrets to move the center of the reticle to the actual position of shot number one. IMPORTANT: Dial the crosshairs to the hole — don’t move the rifle.
3. After you’ve adjusted the turrets, now re-aim the rifle so the cross-hairs are, once again, positioned on the target center. Keep the rifle firmly supported by your rest or sandbag. Take the SECOND SHOT. You should find that the bullet now strikes in the center of the target.
4. Take a THIRD SHOT with the cross-hairs aligned in the center of the target to confirm your zero. Make minor modifications to the windage and elevation as necessary.
5. Finally, shoot the rifle from a field rest (shooting sticks, bipod, or rucksack) as you would use when actually hunting. Confirm, with SHOT FOUR, that your zero is unchanged. You may need to make slight adjustments. Some rifles, particularly those with flexy fore-arms, exhibit a different POI (point of impact) when fired from a bipod or ruck vs. a sandbag rest.
This Video Shows the Process Described Above:
Fouling Shots and Cold Bore Condition
If you recently cleaned your rifle, you may want to fire two or three fouling shots before you start this procedure. But keep in mind that you want to duplicate the typical cold bore conditions that you’ll experience during the hunt. If you set your zero after three fouling shots, then make sure the bore is in a similar condition when you actually go out hunting.



 Front Bracket with Magnetic Tuner
 Tubular Fore-Arm Supported by Brackets
 Offset Barrel
 Floating Action without Sub-Support or Bedding
 Skeleton Rear “Keel” Affixed Directly to Action
 Locked Scope with External Windage and Elevation Adjustment


 The recoil lug-style stock mount is probably the only truly innovative thing I did other than the opposing-magnet tuner. Basically, the rear bracket is sandwiched between the receiver face and the barrel shoulder–positioned where a conventional recoil lug would go. I also added a brass ring (visible in photo) between the anodized bracket and the barrel. This was done to distribute loads over a wider surface area. (I was concerned that the bracket material was fairly soft and I didn’t want to crush it as I torqued the barrel in place.) After fitting the barrel and plates I glued the entire gun together using epoxy and various LocTite adhesives. The rest of the parts were assembled but I did not Loctite the scope bases since I thought I’d be disassembling the rifle for re-work after the first trials. That came back to bite me during later testing when the gun started shooting erratically and I went down a couple of blind alleys before finding the loose bases.

 Match One–Tinker Toy Wins Score with a 250 – 17X






 Ray Gross was profiled in



 The Sporting Arms and Ammunition Manufacturers’ Institute (
 We are not suggesting you disregard the risks of ammo “cooking off” in a fire, but you will learn the realities of the situation by watching the video. There are some amazing demonstrations — including a simulated retail store fire with 115,000 rounds of ammo in boxes. As cartridges cook off, it sounds like a battery of machine-guns, but projectiles did not penetrate the “store” walls, or even two layers of sheet-rock. The fire crew puts out the “store fire” easily in under 20 seconds, just using water.


