There is a good article on gun safes in SHOT Business, a publication for the NSSF SHOT Show audience. Written by Christopher Cogley, this Safe Spaces Article offers some very important things to consider when purchasing a gun safe. Here are key points from that article:
Safe Security — The security of a gun safe comes down to two main factors: the thickness of the steel and the construction of the safe. When it comes to construction, look for a safe that has continuous welded construction instead of bolts or spot-welding, which are easier for trained gun thieves to cut through with torches or high-power saws.
Lock Options — Traditional combination locks are arguably the simplest choice. The downside, though, is they don’t provide quick access to firearms in an emergency. Electronic and biometric keypads provide quicker access — but be sure to replace the batteries every year.
Fireproof Rating — Aside from theft, the biggest threat to your firearms is fire. Unfortunately, the fireproof rating on gun safes can be confusing because there is no single, “standard” fireproof rating. As a general rule, the fireproof rating states how long a safe can be exposed to a fire of a particular temperature and maintain a temperature inside the safe of no more than 350 degrees F. To put this in context, the average house fire creates temperatures between 800 and 1,200 degrees F.
Where to Place a Gun Safe in Your Home
The Safe Spaces article includes advice from Stephen Hall, CEO of Lock It Up Safes. Hall addressed the question: “Where should I put my safe?”
Hall states: “Ease of installation should NOT be the foremost consideration when making this decision. Putting a safe in the garage has both pros and cons. We see some retailers recommend the garage solely because they don’t have the right team on board to install safes in other locations, and wheeling one into the garage is the easy way out.
Putting a safe in the garage is fine if that is the only place you an put it, but most want the safe in the home, where they can get to it quickly. Temperature and humidity are important considerations as well, and both are more easily controlled in a house rather than in the garage.
One advantage to garage installation is the concrete floor provides a solid base for safe installation. Houses built on concrete slabs also offer a solid anchor on the first level. If the safe needs to go to an upper floor, the weight of the safe and its contents need to be factored in.”
Place Safe Against Outside Wall
Hall recommends placing your gun safe against an outside wall: “In case of fire, the safe will typically last longer as there is not a lot that can burn on one side of the safe, thus keeping it cooler.”
Don’t Make the Mistake of Buying an Undersized Safe
The most common mistake people make when buying a gun safe is getting a safe that’s too small. This video explains why you should probably invest in a bigger safe. First, the rated gun capacity is exaggerated — rifles with mounted optics, long barrels, wide forearms and/or pistol grips take up considerably more space than a small rimfire rifle or a lever gun with iron sights. Second, your gun collection will likely grow in years to come. Third, you may want to store other valuables in the safe — such as vital documents, jewelry, watches, and pricey electronics. In this video the host notes: “Get a much larger safe than you think you’ll need at first. This will guarantee that you will have enough room for future purchases and all the guns and equipment you currently have.”
Recommended Safe Features for Long-Gun Storage
Editor’s Recommendation:
Budget $1200-1500 for a safe from a major maker, with external hinges, and an interior at least 58″ high. That gives you room for 30″-barreled rifles with a top shelf for handguns and other valuables. A rotary rack and slide-out drawers are great additions.
Keypad or Dial? We favor rotary dial locks. With minimal maintenance they will function flawlessly for decades. But the digital locks offer quick-access and convenience. If you go digital, get a commercial-grade unit.
Fire-lining is worth getting, but a thin layer of sheet-rock doesn’t make a safe truly “fire-proof”.
Interior at least 58″ High and 30″ wide Overall Weight 750+ Pounds 8 Gauge or Heavier Wall Thickness Double-Wall, Composite Door with Relockers Minimum UL RSC Rated. TL-15 or TL-30 Rating is Desirable External Hinges
Mechanical UL Group II (or better) Lock with Standard Dial Or UL Type 1 Commercial-Grade Electronic Lock
Custom Interior Suitable for Scoped Guns with Long Barrels On-Door Storage System for Non-scoped Long Guns OR Rotary Gun Rack for Scoped Rifles and ARs
Internal (sandwiched) Insulator, Reinforced if Sheet-rock Palusol? Heat-Activated Expanding Door Seals
Slide-out Drawers for Handguns Fire-lined Inner Safe for Paper and Media
Low Gloss, Rust-resistant External Finish Pre-Drilled holes for Lag Bolts and in Rear for Electric Cord Overhead Fluorescent Lamp and/or LED Mini-lights on Strings
Montana-based PROOF Research has released a revealing video showcasing carbon fiber firearms technology and the company’s barrel-making process. Viewers will find the 8-minute film an intriguing introduction to composite barrel-making, which employs aerospace carbon fiber wrapped around a steel barrel core. The video showcases the high-tech machines used at PROOF’s production facilities.
This video shows how PROOF Research employs aerospace-grade, high-temperature composite materials to build match-grade carbon fiber-wrapped barrels.
Dr. David Curliss, General Manager of PROOF Research’s Advanced Composite Division, and former head of the U.S. Air Force High Temperature Composites Laboratory, explains how aerospace expertise helps in the development of PROOF’s firearms-related products: “We are able to provide premier materials for PROOF Research for firearms barrels applications as well as the aerospace market. We’re probably the only firearms technology company that has composite materials in orbit around the earth.”
If you want to use an AR-platform rifle in the varmint fields, consider getting a 20-caliber barrel chambered for the efficient, low-recoil 20 Practical cartridge. The 20 Practical is simply a .223 Remington necked down to 20 caliber. The parent .223 Rem cartridge of course works great in an AR, but the 20 Practical offers some notable advantages for high-volume varmint shooters. The 20 Practical delivers very high velocity with very low recoil while still providing outstanding accuracy. The 20 Practical is great option for folks who favor “fast and light” — smaller, lower-mass bullets traveling at very high velocities. This little cartridge can launch 40-grainers at over 3900 fps, and 32-grainers even faster. This makes the 20 Practical a great choice for an AR-based varmint rifle.
20 Practical Ultimate Varminter
Over a decade ago, as a “proof-of-concept”, AccurateShooter.com created a 20 Practical AR15 Ultimate Varminter with a custom 20-caliber upper from Robert Whitley of AR-X Enterprises, LLC. That project rifle was ultra-accurate — every 5-shot group out of the gun was less than the size of a dime. That gun was auctioned off, but Robert Whitley produced many other 20 Practical AR15 uppers. (The 20 Practical cartridge is simply the .223 Rem necked down to 20 caliber — you can use standard .223 brass and load with standard.223 Rem dies. Just swap in a smaller expander and use smaller neck bushings.)
Robert learned that the accuracy of the first 20 Practical AR15 was no fluke. After building six (6) more 20 Practical uppers, he tested them for accuracy and they all shot great. These uppers featured DPMS low-pro receivers with side-charging handles. They are fitted with PacNor 1:11″ twist, 3-groove stainless barrels. Three of the uppers had 24″ barrels, two had 20″ barrels, and one had an 18″ barrel (See below).
Robert reports: “We [made] more 20 Practical AR15 uppers and I have to say I am astounded by the accuracy of [all those uppers]. For shooting little tiny groups out of an AR15 with bullets going 3500+ fps, it’s hard to beat the 20 Practical cartridge.”
In four of these uppers I shot re-sized Winchester brass using 25.3 grains of WC844 powder with Berger 40gr BTHP bullets loaded at 2.225″ OAL (about .015″ off the lands). WC844 is inexpensive military surplus powder that is nearly identical to H335. I tried three different primers and the choice did not seem to matter (CCI BR4, Rem 7 1/2s and Win Small Rifle — the old silver ones). All these four uppers shot great.”
Below is an animated GIF with targets from uppers #6, 10, and 11. All groups are mag-fed, 5-shot groups shot at 100 yards using a front rest and rear bag.
Targets Shot with Three Different 20 Practical AR Uppers
20 Practical Shooters Explain Why They Love this Little Cartridge
A popular thread in our Shooters’ Forum focuses on favorite variants of the .223 Rem cartridge. The thread asks: “What is your favorite and most versatile round that you have made from a .223 Rem parent case?” Many cartridges were named, but the wildcat cartridge cited most often was the 20 Practical. Here are some comments by Forum members, who explain the appeal of this great little 20-caliber cartridge:
“The 20 Practical is just a hoot to shoot. Outstanding precision, minimal recoil, easy case forming and inexpensive to shoot. What’s not to like?” — JLT
“The 20 Practical for me. Never had as much fun shooting a rifle as I did with the 20 Practical. Also, [it is] the easiest wildcat to form. Just get cases, a couple of bushings to get the right neck tension, and you are shooting.” — NMKid
“My favorite was and is the 20 Practical. No fire-forming, no neck-turning, and with the increased BC of the 20 Cal bullets, it’s hard to wipe the smile off your face in a prairie dog town[.]” — Region Rat
“20 Practical and the [original] .223 Rem are my favorites. Accurate, cheap to shoot. The 20 Prac allows you to see your hits and it’s fast.” — Alguapo
Smart Tips on Forming 20 Practical Cases
Varmint ace Warren B, aka “Fireball” in our Forum, explains how to form 20 Practical Cases. “Forming 20 Practical cases is very easy and no fire-forming is required. Start with any good quality .223 Rem brass. One can simply run the case into your bushing die with the appropriate bushing and call it done. I however like to make it a little more involved by doing the neck reduction in steps. I find that taking steps doesn’t overwork the brass as much as one step does. Also, if you resize the neck in too large of a step, sometimes, depending on the neck thickness, the neck will not be dimensionally what you would expect when finished. This is especially important towards the last step when one is getting close to the final required neck diameter.
For my cases the first thing I did was to run them into an old RCBS .223 Rem full length die with the decapping assembly removed. This will take care of any dented necks on the raw cases and bring the necks down to around 0.243″. Since all standard full-length dies oversize the necks way too much, starting with a .223 FL die actually reduces the neck diameter quite a bit — and obviates the need to buy an extra bushing for the first step. I then use my Redding Type-S die with two bushing sizes to get down to where I need to be. In other words, I start with the FL sizer, then move to a Type-S with a 0.233″ bushing and finish with a 0.228″ bushing. I use progressively smaller increments in size between the reductions.”
Efficient Loading of 20 Practical Cartridge
The beauty of the 20 Practical as a cartridge is its simplicity. You can start with .223 Rem brass, and use .223 Rem dies with minor modifications. No special case-forming dies are necessary. To prepare the brass, all you need is a .223 Rem bushing die with .233″ and .225″ bushings, plus a 20 Cal decapping rod assembly, Redding part #14206. First remove the .223 Rem decapping assembly and replace it with the 20 Cal decapping rod assembly (the same assembly used with Redding .204 Ruger dies). Put the .233″ bushing in a Redding Type ‘S’ bushing die and run your cases through for a first pass. Then swap in the smaller .225″ bushing for the second pass. Now your brass is sized and ready for loading.
You can seat bullets using a regular Redding, Whidden, Lee, or Hornady .223 Rem seating die with no mods. Use the .225″ bushing for neck sizing for all subsequent loadings once the cases have been necked down the first time. It is simple and easy.
In the above video, Robert Whitley shows how to neck down .223 Rem brass using two bushings in sequence. Then seats a bullet with the Redding Comp Seater die. To save time in the video, Robert skipped the steps of adding primer and powder. But those steps require no special equipment for the 20 Practical.
20 Practical vs. 20 Tactical
Varminter Kevin Weaver, who shoots both the 20 Practical and 20 Tactical, states that: “Both the 20 Tactical and the 20 Practical are fine .20 caliber cartridges. However, my favorite would be the 20 Practical. The 20 Practical gives the SAME performance as the 20 Tactical without fire-forming, or having to buy expensive forming dies.
So with the 20 Practical you do less work, you shell out a lot less money, yet you give up nothing in performance. What’s not to like? To create 20 Practical cases, just buy a .223 Rem Redding Type “S” Bushing Die set with a .230 or .228 bushing and have fun with this great little cartridge.
The 20 Practical and the 20 Tactical are almost identical cartridges. There are only slight differences in case outside diameter, shoulder angle, and case body length. Neck length on the 20 Tactical is a bit longer, but there is still plenty of neck on the 20 Practical to grip the popular bullets, such as the 32gr V-Max.”
20 Practical and 20 Tactical Specifications:
Cartridge
Bolt face to shoulder
Shoulder O.D.
Shoulder Angle
Total length
20 Practical
1.5778″
.3553
23°
1.760″
20 Tactical
1.5232″
.360
30°
1.755″
Parting Shot — Yes the 20 Practical works in Bolt Guns too!
“Favorite .223 Rem Wildcat? The 20 Practical hands down for me. I have two of them built on Savage actions right now. One has a 20″ BHW barrel and the other has a 26″ Criterion. It is my go-to caliber for shooting up a Prairie Dog town and the ones I have are insanely accurate. Here are some typical 100- and 200-yard groups with my 20 Practicals.” — IA_Shooter
Plan Your Visit: Top 5 Areas to Explore Near Camp Perry Feature based on article by Ashley Dugan, CMP Writer
This summer, many of our readers will visit Camp Perry, Ohio to participate in the historic CMP annual National Matches. There will be smallbore and centerfire rifle matches, along with pistol matches. And this year there will be a number of new mid-range (600-yard) rifle matches. For those competing at Camp Perry this summer, there are many interesting nearby places to visit along the shores of Lake Erie. This article covers some tourism highlights in the area — the Top 5 areas visitors can explore outside of Camp Perry this summer. Many of these tourism attractions are featured in Ohio’s useful Shores and Islands website.
Marblehead and East Harbor State Park
Marblehead is a small village about 18 miles east of Camp Perry. The downtown area offers a strip of quaint shops and restaurants along with an eclectic array of artist galleries and events. Here, catch the Kelleys Island ferry or drive slowly down the picturesque coastline of the peninsula to reach the Marblehead Lighthouse – a state park with the oldest continuously operating lighthouse on the Great Lakes (since 1822). The spot has a good nautical museum on the grounds. Fish off the rocks, have a picnic or take in views of the world-famous amusement park, Cedar Point, located just across the bay. For more outdoor activities, Marblehead offers East Harbor State Park, with a public beach, a marsh pond, camping and breathtaking views.
Port Clinton, Put-In-Bay, Liberty Aviation Museum
Port Clinton is the city where Camp Perry is located. Nestled along the shore of Lake Erie, Port Clinton offers beaches, restaurants, festivals. and live outdoor music during the summer months. Ride the fast, Jet Express catamaran ferry to Put-In-Bay, visit the old Port Clinton Lighthouse, reserve your spot on one of the many charter fishing boats or grab a basket of fried Lake Erie perch.
Visitors may also visit the Liberty Aviation Museum, which showcases several authentic World War II aircraft and a fully operational Ford Tri-motor “Tin Goose” — one of only a few still flying. Learn more about Port Clinton at PortClinton.com.
Catawba Island
No more than a 10-minute drive from downtown Port Clinton is Catawba Island, which offers several fun options. The Gideon Owen Wine Company serves up local wines, with roots dating back to the 1870s. Just down the road, The Orchard restaurant offers farm-to-table options in an upscale atmosphere. Try fresh seafood or Wagyu beef, and listen to the live entertainment. Visit the farm stand next door for a salad or hot honey & whipped feta dip, or simply sip on some wine in the garden area. Later you can watch the sunset over the lake at Catawba Island State Park, find yet another ferry to Put-In-Bay, play putt-putt or maybe even take a tour of African Safari Wildlife Park, a member of the Zoological Association of America and home to many exotic animals and drive-through encounters.
Sandusky and Cedar Point
Just a short drive across the bay, you’ll find Sandusky, which is home to Cedar Point, a large amusement park opened in 1870 that now has over 70 thrill rides, including 18 roller coasters. The park is built within its own peninsula and holds a mile-long sandy beach and water park. Kalahari Resort & Convention Center, located in Sandusky, is Ohio’s largest indoor water park. Buy a day pass to the many pools and water slides. This is the USA’s #1 indoor water park according to USA Today. Other Sandusky amenities include the Sandusky Mall, a Merry-Go-Round Museum, a speakeasy bar, and the Jackson Street Pier with a variety of restaurants to enjoy. Learn more about Sandusky at CityofSandusky.com.
Lake Erie Islands
The Western Basin of Lake Erie, where Camp Perry is located, is home to several unique islands. Just a short ferry ride away, guests may rent golf carts, bikes, or take their own transportation. Such islands include South Bass, home to Put-In-Bay. The island is also home to Heineman Winery, founded in 1888. While at the winery, explore Crystal Cave, one of the largest geodes in the world, and Perry’s Cave, a limestone cavern discovered in 1813. Families may also visit the Perry’s Victory & International Peace Memorial, at 352 feet, one of the tallest monuments in the USA.
Viewable from South Bass is Kelleys Island, another fun destination in Lake Erie. The island offers historic homes, bed & breakfasts, and a State Park where you can camp, sunbathe, swim, or rent kayaks. Next to the beach is the Glacial Grooves, a natural phenomenon created when a massive glacier moved through the area millions of years ago, forming the Great Lakes.
SSG Greg Markowski of the USAMU at Camp Perry, Ohio.
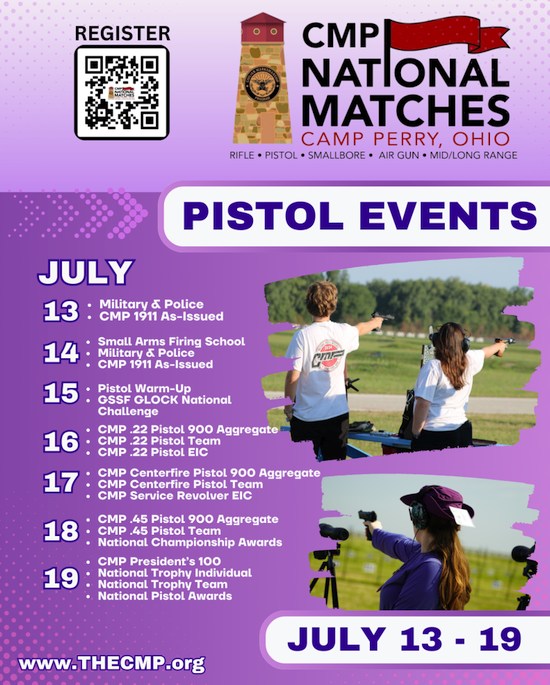
On July 13, 2025, pistol competition commenced at the National Matches at Camp Perry. Many of the best pistol shooters in the country have been on the firing lines, including members of the U.S. Army Marksmanship Unit Service Pistol team. After the last pistol match on Saturday, July 19th, trophies and awards will be presented to the top shooters.
Below is a schedule for the 2025 Pistol Competitions at Camp Perry. For more information about the National Trophy Pistol & Games Matches, visit the CMP’s Pistol Match INFO Page.
This video shows .45 ACP centerfire pistol competitors at Camp Perry
Loading Precision Centerfire Pistol Ammunition
If you want to compete in top competitions like the CMP matches at Camp Perry, you’ll need good ammo. The following USAMU article provides rock-solid reloading advice, explaining how to load accurate, reliable handgun ammo.
The U.S. Army Marksmanship Unit (USAMU) fields pistol teams as well as rifle and shotgun competition squads. Consequently the USAMU’s Reloading Shop loads tens of thousands of pistol rounds every year. In this article, the USAMU’s handgun experts talk about reloading for handguns — with smart tips on how to achieve superior accuracy with 100% reliability. This article, which offers important insights on COAL, primers, crimps and more.
Precision Pistol Reloading — Recommended Methods
Optimize the Taper Crimp
One often-overlooked aspect of handloading highly-accurate pistol ammunition is the amount of crimp and its effect on accuracy. Different amounts of taper crimp are used with various handloads to obtain best accuracy. The amount is based on bullet weight, powder burn rate and charge, plus other factors. It is not unusual for our Shop to vary a load’s crimp in degrees of 0.001″ and re-test for finest accuracy.
Use Consistent Brass
Brass is also important to pistol accuracy. While accurate ammunition can be loaded using brass of mixed parentage, that is not conducive to finest results, particularly at 50 yards. It is important for the serious competitor/handloader to use brass of the same headstamp and ideally one lot number, to maximize uniformity. Given the volumes of ammunition consumed by active pistol competitors, using inexpensive, mixed surplus brass for practice, particularly at the “short line” (25 yards), is understandable. However, for the “long line” (50 yards), purchasing and segregating a lot of high-quality brass to be used strictly for slow-fire is a wise idea.
Importance of Uniform COAL
Uniformity of the Case Overall Length (COAL) as it comes from the factory is also important to achieving utmost accuracy. More uniform case lengths (best measured after sizing) contribute to greater consistency of crimp, neck tension, ignition/burn of powder charge, and so on. Cartridge case-length consistency varies from lot to lot, as well as by maker. Some manufacturers are more consistent in this dimension than others. [Editor’s note: It is easy to trim pistol brass to uniform length. Doing this will make your taper crimps much more consistent.]
Primers and Powders — Comparison Test for Accuracy
Pay attention to primer brands, powder types and charges. Evaluating accuracy with a Ransom or other machine rest at 50 yards can quickly reveal the effect of changes made to handload recipes.
Bullet Selection — FMJ vs. JHP
Bullets are another vital issue. First, there is the question of FMJ vs. JHP. A friend of this writer spent decades making and accuracy-testing rifle and pistol bullets during QC for a major bullet manufacturer. In his experience, making highly-accurate FMJ bullets is much more difficult than making highly-accurate JHPs, in large part due to the way the jackets are formed. Small die changes could affect accuracy of FMJ lots dramatically.
The CMP now allows “safe, jacketed ammunition” in Excellence-in-Competition (EIC) Service Pistol matches, although wadcutter ammunition is prohibited. Thus, the option to use very accurate JHP designs simplifies the life of CMP Service Pistol shooters in pursuit of the prestigious Distinguished Pistol Shot badge.
Hopefully, these tips will be helpful to any pistol shooters interested in accurate handloads, not just “Bullseye” shooters. Small tweaks to one’s normal routine can pay big dividends in improved accuracy and make practice and competition more rewarding. Stay safe, and good shooting!
TOP IMAGE: SSG Greg Markowski, a shooter/instructor with the U.S. Army Marksmanship Unit and native of Poland, fires his pistol during the 2018 Civilian Marksmanship Program’s National Pistol Matches at Camp Perry, Ohio July 13, 2018. At that event, Markowski claimed the General Mellon Trophy, General Patton Trophy and the General Custer Trophy. U.S. Army photo by Maj. Michelle Lunato/released by Defense Visual Information Distribution Service.
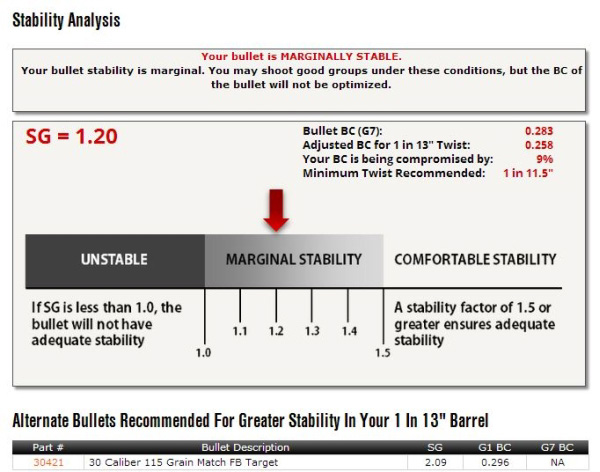
Berger Twist-Rate Stability Calculator On the Berger Bullets website you’ll find a handy Twist-Rate Stability Calculator that predicts your gyroscopic stability factor (SG) based on mulitiple variables: velocity, bullet length, bullet weight, barrel twist rate, ambient temperature, and altitude. This cool tool tells you if your chosen bullet will really stabilize in your barrel.
How to Use Berger’s Twist Rate Calculator
Using the Twist Rate Calculator is simple. Just enter the bullet DIAMETER (e.g. .264), bullet WEIGHT (in grains), and bullet overall LENGTH (in inches). On its website, Berger conveniently provides this info for all its bullet types. For other brands, we suggest you weigh three examples of your chosen bullet, and also measure the length on three samples. Then use the average weight and length of the three. To calculate bullet stability, simply enter your bullet data (along with observed Muzzle Velocity, outside Temperature, and Altitude) and click “Calculate SG”. Try different twist rate numbers (and recalculate) until you get an SG value of 1.4 (or higher).
Gyroscopic Stability (SG) and Twist Rate
Berger’s Twist Rate Calculator provides a predicted stability value called “SG” (for “Gyroscopic Stability”). This indicates the Gyroscopic Stability applied to the bullet by spin. This number is derived from the basic equation: SG = (rigidity of the spinning mass)/(overturning aerodynamic torque).
If you have an SG under 1.0, your bullet is predicted not to stabilize. If you have between 1.0 and 1.1 SG, your bullet may or may not stabilize. If you have an SG greater than 1.1, your bullet should stabilize under optimal conditions, but stabilization might not be adequate when temperature, altitude, or other variables are less-than-optimal. That’s why Berger normally recommends at least 1.5 SG to get out of the “Marginal Stability” zone.
In his book Applied Ballistics For Long-Range Shooting (3rd Ed.), Bryan Litz (Berger Ballistician) recommends at least a 1.4 SG rating when selecting a barrel twist for a particular bullet. This gives you a safety margin for shooting under various conditions, such as higher or lower altitudes or temperatures.
Story idea from EdLongrange. We welcome reader submissions.
Adam Scepaniak, of The Guns and Gear Store, has written an interesting story about Prairie Dog Hunting in North Dakota. If a P-Dog safari is on your “bucket list”, you’ll want to read the full story in the Sierra Bullets Blog. Adam provides many tips that can help you plan a successful prairie dog adventure.
Prairie Dog Hunting in North Dakota with Sierra Bullets
It’s that time of year where lots of men and women point their vehicles westward and try to push the limits of their rifles on prairie dogs. [A few seasons back] I was a part of this group of people… while in northwestern North Dakota. CLICK HERE to Read Full Story.
Little Missouri National Grassland
Once my hunting party arrived at the Little Missouri National Grassland in North Dakota we immediately began scouting for prime prairie dog towns. There is a certain amount of strategy involved in choosing a prairie dog town … for several reasons. For one, you should try to always stay “above” the prairie dogs.
Small objects like rocks, cactuses, and prairie vegetation can easily obstruct your view if you’re shooting prone on a level plane. We encountered this in the first small prairie dog town we stopped and shot at. The prairie dog town was very visible while walking and standing, but once we laid down with our rifles on bipods the two-foot prairie grass became a severe obstruction. We shortly moved on because the small town became quick-studies to our shooting.
The second prairie dog town we hunted was at the base of a small ridge with a dried, cattle creek at the bottom. This area offered better shooting opportunities because we were above most of the prairie dog holes, and if we were not above them, a deep ravine separated us from the prairie dogs removing any obstructions from our rifle scopes which was our previous problem. This area had its own disadvantage though because of some other wildlife present. There were approximately fifty head of cattle in our close vicinity grazing, which was to no surprise because many ranchers utilize the National Grassland for grazing. We had to wait for the cattle to leave our area as to not have an incidental hit due to a rare ricochet. As the sun passed over the horizon we decided to return to this spot the next morning, but would change our shooting position to increase our advantage.
This Location Offered a Nice Overlook.
Zoomed Image Shows Individual Prairie Dog Mounds.
My previous varminting best was a 275-yard shot near Mobridge, South Dakota on a separate prairie dog hunting trip. With more experience and better reloading, Here in North Dakota I was able to make a solid hit on a prairie dog just over 400 yards which made me ecstatic! For a central Minnesota, shotgun-raised guy, I was pretty happy that my bullet selection and hand-loading ability produced a 125-yard improvement.
Once we cleaned and cased our rifles for the journey home we had shot a little over 200 rounds of my Sierra® reloads. This was a lot less than previous prairie dog trips I have been a part of, but our hit percentage was substantially higher as well. Traveling into a new area meant a lot more scouting and experimentation for us as a group. In future trips or hunts of your own, it can be very beneficial to schedule an extra day just for scouting[.]
Little Missouri National Grassland is a National Grassland located in western North Dakota. At 1,033,271 acres, it is the largest grassland in the country. Within its borders is Theodore Roosevelt National Park. The Little Missouri National Grasslands was once a part of the Custer National Forest, but is now a part of the Dakota Prairie Grasslands, a National Forest unit consisting entirely of National Grasslands. A predominant feature of the grassland is colorful and beautiful badlands, a rugged terrain extensively eroded by wind and water. It is a mixed grass prairie, meaning it has both long and short grass.
The boundaries of the grasslands on certain maps can be misleading. Within the boundaries of the national grassland are significant portions of state-owned and privately-owned land, much of it leased by cattle ranchers for grazing.
The grassland is administered by the Forest Service as part of the Dakota Prairie Grasslands from offices in Bismarck, ND. There are ranger district offices in Dickinson and Watford City.
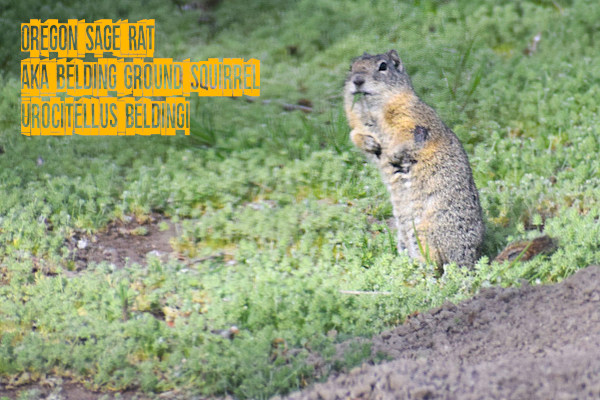
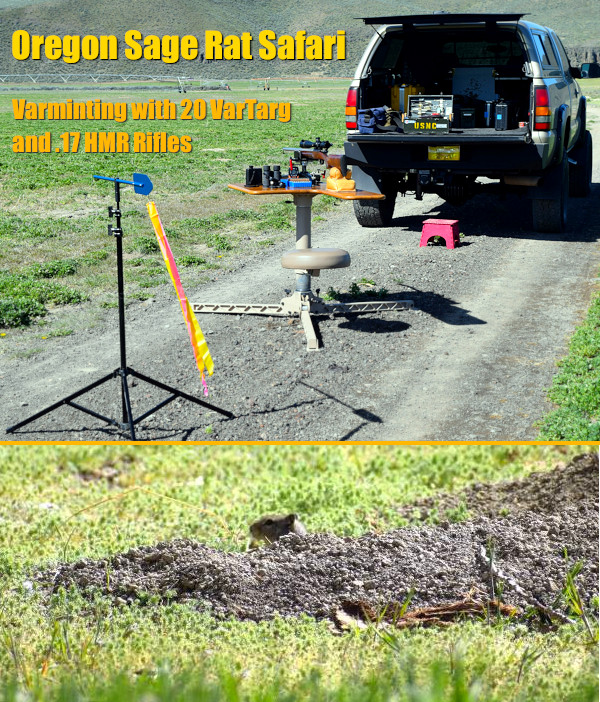
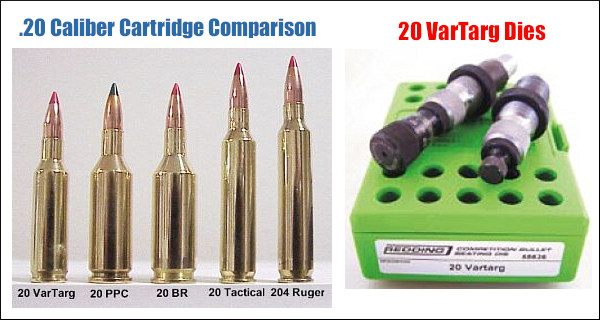
Our AccurateShooter.com Forum has an active section for hunting and varminting. One of the notable varminting threads in recent weeks was an account of a varmint hunt in Eastern Oregon. Forum member “Rick in Oregon” spent a week this past April nailing small varmints — known as “Sage Rats”, aka Belding ground squirrels (Urocitellus beldingi). Rick did most of his shooting with his handsome Cooper M38 rifle chambered for the 20 VarTarg wildcat, which is basically a .221 Fireball case necked down to .20 caliber. Here is Rick’s report on his successful Sage Rat Safari.
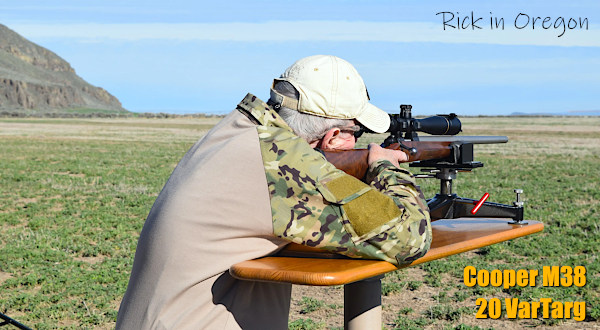
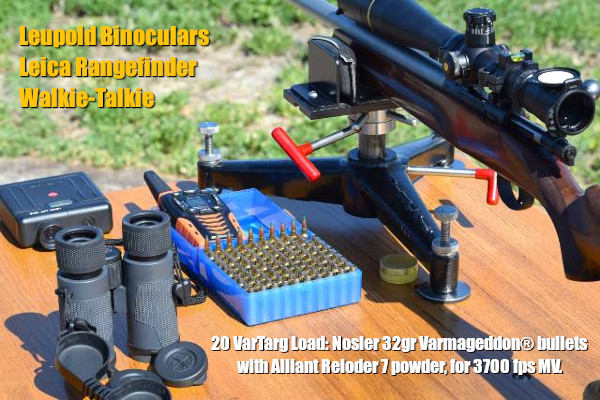
Forum member Rick in Oregon with his 20 VarTarg Cooper M38 rifle.
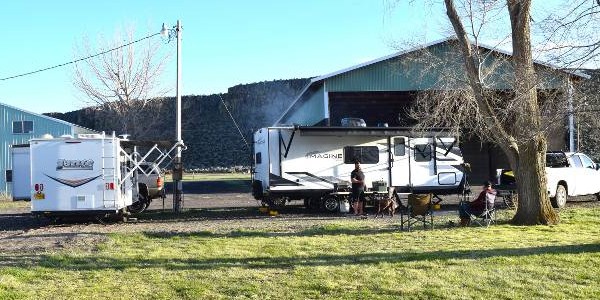
We just returned from a week-long sage rat shoot in the Orygun outback. Decent weather this time, no blowing snow, just plenty of sunshine and our buddy “Skippy the Flying Squirrel” to enhance our shooting enjoyment. Our rancher host refuses to use poison, so he welcomes us with the ability to hook our trailers to power and water, and a nice place to park them while we rid him of his sage rat problem. A true win-win situation for all. Out of respect for the rancher, we did not drive out into the fields. Instead we parked on the perimeter two-tracks, placed our portable benches, set up our windflags, then had at it.
For shooting these small critters, you need accurate rifles that shoot less than 0.5 MOA. The sage rats are small and they may be partially concealed inside their relatively flat mounds. I took my custom M700 .204 Match 1:11-twist rifle, but there were no long range opportunities to justify burning over 25 grains of powder, as no elevated positions were available to take advantage of it. Shooting from the flat terrain gets much mirage, making any hits past 350 yards virtually impossible, so my 20 VarTarg got the most action out to 350 yards. Then inside of 200 yards I used my Anschutz 1715D HB in .17 HMR which did a very fine job of rat launching.
Rick is a definite 20 VarTarg devotee: “For years I thought my .223 AI was the ideal Prairie Dog cartridge. It may well be, but for sage rats, the 20 VarTarg has few equals when efficiency and performance is considered. This makes 15 years of 20 VT sage rat medicine for me, and I do not see any changes on the horizon. It also works quite well on rockchucks!”
As usual when the “Eastern Oregon Raptor Feeding Society” shows up, so do the raptors. In fact bald eagles, golden eagles, hawks, and ravens all feast on the generous sage rat meals we provide. The terminal effects of the .20-Cal 32-grain bullets can’t be overstated. It sure makes it easy for the birds to do their thing. CLICK HERE for dead critter “blood and guts” close-up photo.
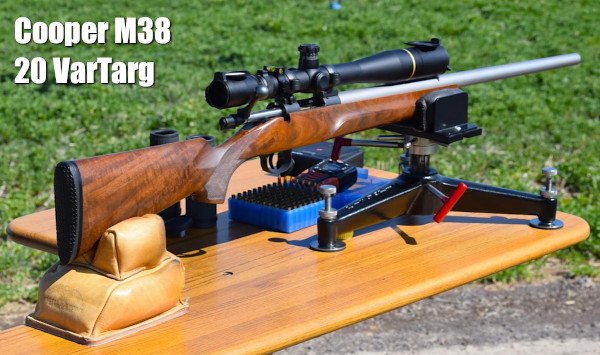
Above is Rick’s Cooper M38 chambered for the 20 VarTarg wildcat on his rotating field bench. Rick tells us: “My Cooper M38 VR 20 VarTarg is basically a stock offering from Cooper Firearms of Montana with a Jard 10 oz. trigger added. The barrel is a 1:12-twist 24″ Wilson chambered by Cooper. The bedding was perfect so I have not touched it in that regard.”
Rick’s load with Nosler 32gr Varmageddon bullets runs 3680 FPS — wicked fast. He loads Alliant Reloder 7 in Lapua or Nosler brass with Rem 7½ primers. Rick says this rig is VERY accurate, delivering groups in the sub-quarter-MOA range.
The scope is a Leupold VX3 6.5-20x40mm LR, with Varmint Hunter Reticle, factory-installed M1 elevation turret, EGW scope level, carried in Leupold rings. Rick notes: “My come-up chart in the scope’s ocular cover was developed using Sierra Infinity ballistics software based on my actual load. The chart has proven to be deadly spot-on at all suitable ranges I encounter the rats and rockchucks.”
EDITOR: The 20 VarTarg cartridge is based on the .221 Fireball case, necked down to .204 and slightly modified for extra capacity. This very efficient cartridge offers low recoil and great accuracy. It’s one of our first choices for ground squirrels and P-dogs out to 300 yards.
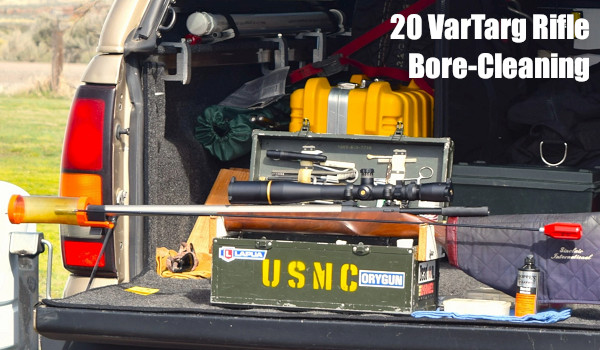
Tailgate Cleaning Set-Up — Brush That Barrel Back at Camp
Rick notes: “When the winds get up, cleaning in the field is problematic, blowing patches about, so cleaning back at camp on the tailgate is the hot setup.”
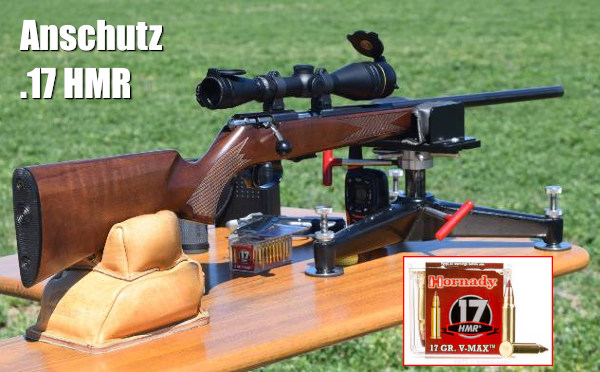
Anschutz 1715D HB in .17 HMR
For shots inside 200 yards, the .17 HMR works well. Rick notes: “The little ones were out, so inside of 200 yards, my Anschutz .17 HMR was the perfect medicine for that work. It really thumps those guys [doing] a very fine job of rat-launching.”
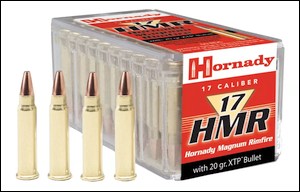
The .17 Hornady Magnum Rimfire (HMR) The .17 Hornady Magnum Rimfire (HMR) was introduced in 2002 by Hornady as a high-velocity, rimfire cartridge derived from the .22 Magnum case necked down to .17-caliber. The .17 HMR gained popularity among varmint hunters and target shooters for its good accuracy and hitting power out to 200 yards or more — all with low recoil and relatively low cost (compared to centerfire ammo).
Most .17 HMR ammo runs 17-grain or 20-grain hollow-point or plastic-tipped bullets at speeds around 2375-2550 FPS (lower for 20-grainers). Though lightweight, these small projectiles do deliver a powerful impact on small game while maintaining low recoil. Compared to the .22 LR, the .17 HMR offers superior ballistic performance, with flatter trajectories and higher energy at extended distances. It’s good for shooting prairie dogs, ground squirrels, sage rats, and other small critters.
During his sage rat safari in Oregon, Rick stayed in his trailer (see above). Rick noted that one critter “was frolicking about my trailer, so he made a good subject for a 300mm telephoto lens, shot out my dinette window. I can never get that close to them when in the field.”
Jerry Miculek is the best action revolver shooter who has ever lived. Miculek is also a true master with rifle and shotgun. This guy shoots hundreds of thousands of rounds every year in all types of firearms. Through that process, he has discovered common mistakes many shooters make. Those mistakes can harm the guns, or threaten the safety of the operator. Here Jerry offers some vital gun handling and safety advice in his “Never Do This” video series.
Jerry Miculek has won multiple revolvers championships, and has set amazing records for revolver speed shooting (with reloads). Yes Jerry, “Mr. Revolver”, knows a thing or two about wheelguns. In this video, Jerry explains how you can damage your revolver by using the wrong methods to open and close the cylinder and extract ammo. Jerry shows what NOT to do, and then he very carefully explains the proper procedure to release the cylinder, and swing it out of the frame. In addition, Jerry shows how best to swing a loaded cyclinder back into place. If you own a revolver, ANY revolver, you should definitely watch this video.
In this second video, Jerry explains common mistakes people make when handling and shooting three classic, semi-auto firearm types — the M1 Garand, the SKS carbine, and the M1911 pistol. Jerry shows handling faults that can cause out-of-battery detonation or early primer strikes, or cause jams in the Garand and SKS. Then Jerry explains why you should never release the slide on a M1911 pistol with a round already in the chamber. This is a must-watch video for Garand owners.
Here Jerry demonstrates of the most common jams that can happen with AR-platform rifles. Miculek reveals the cause of the issue and then shows how to prevent it. Jerry notes: “This is one of those malfunctions that you won’t see coming! I’ve seen it … on the range and it can be devastating to your time in a match. All ammo used in the video were dummy rounds and intentionally loaded for training without powder or primers.”
With the New Year approaching, we thought our readers might enjoy some historical background on the National Rifle Association, an organization which has served American firearms owners and marksmen for over 150 years.
Shooting Sports USA (SSUSA) has a good article on the origins and history of the National Rifle Association. This feature story covers the first 36 years of NRA history from 1871 to 1907. The NRA was founded in 1871, and 1907 marked the first year of Matches at Camp Perry, Ohio.
SSUSA explains the NRA’s original mission: “The NRA’s program during its youthful years centered mainly on improving marksmanship among the military. Rifle tournaments at ranges in Creedmoor (NY), Sea Girt (NJ), and Camp Perry (OH) captured the country’s spirit of nationalism and resulted in key improvements in rifles and target scoring. NRA also set standards for military rifle training and even inspired the federal government to form its own segment within the War Department to focus on promoting rifle practice among soldiers as well as civilians.”
1871 — A group of New York National Guardsmen founded the National Rifle Association to promote marksmanship training. Figures such as Capt. George Wingate had called for better rifle marksmanship to support the nation’s defense.
1872 — The NRA acquires Creed’s Farm in Long Island, New York for $26,250. Renamed “Creedmoor”, this becomes the NRA’s first range. The first match was held in 1873.
1874 — The NRA hosts its first International Match, shot at the Creedmoor Range in New York.
The First-Ever Creedmoor Challenge Match in 1874
The Irish International Shooting team arrived in New York on the 16th of September and proceeded to “take in the sights”, which was understandable, before some practice at the Creedmoor range. On September 26th they presented themselves for the match with confidence and in high spirits. The crowds that day were reported to be between 5,000 and 10,000 strong, which showed the huge support already growing for the fledgling sport in America.
The course of fire was 15 shots to each man at 800, 900, and 1000 yards. Unfortunately, the details of each mans scores at the individual distances have been lost to time but we do know that the Americans were well ahead after the 800-yard shoot. The Irish then caught up after the 900-yard and finished the 1000-yard shoot ahead by 1 point. The Americans still had one man left to shoot and it came down to his very last shot with which he scored a 4 giving the American team the win over the Irish by 3 points.
1892 — The NRA moves its Annual Matches to the Sea Girt Range in New Jersey, which was less than 60 Miles from New York City, NY. The Sea Girt Range was maintained by the New Jersey State Rifle Association, founded in 1878.
1903 — The U.S. War Department sets up a National Board for the Promotion of Rifle Practice (NBPRP). In 1903, an amendment to the War Dept. Appropriations Bill established the NBPRP to promote both Military and Civilian marksmanship. This government advisory board became the predecessor to today’s Corporation for the Promotion of Rifle Practice and Firearms Safety that now governs the CMP.
1907 — The NRA commences National Matches at Camp Perry, Ohio.
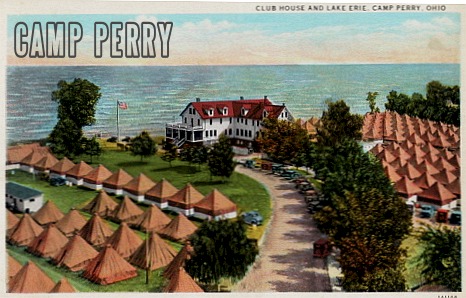
History of Camp Perry
The National Matches have been held at Camp Perry since 1907. The range is located along the shores of Lake Erie in northern Ohio near Port Clinton. The site was first acquired in 1906, in response to the need for a larger facility for military training and the NRA’s shooting programs. In 1906 Gen. Ammon B. Crichfield, Adjutant General of Ohio, ordered construction of a new shooting facility on the shores of Lake Erie, 45 miles east of Toledo, Ohio. The original land for Camp Perry was purchased in 1906, and the reservation was named after Commodore Oliver Hazard Perry, the American naval commander who won the Battle of Put-in-Bay during the War of 1812.
On August 19, 1907, Cpl. L. B. Jarrett fired the first shot at the new Camp Perry Training Site. And that year, 1907, Camp Perry held its first National Pistol and Rifle Championship events. This location has hosted the annual NRA National Matches ever since. Today, over 4,000 competitors attend the National Matches each year, making it the most popular shooting competition in the western hemisphere.
Federal legislation originally launched the National Matches. The 1903 legislation also established the National Matches, commissioned the National Trophy and provided funding to support the Matches.


 20 Practical Ultimate Varminter
 Robert learned that the accuracy of the first 20 Practical AR15 was no fluke. After building six (6) more 20 Practical uppers, he tested them for accuracy and they all shot great. These uppers featured DPMS low-pro receivers with side-charging handles. They are fitted with PacNor 1:11″ twist, 3-groove stainless barrels. Three of the uppers had 24″ barrels, two had 20″ barrels, and one had an 18″ barrel (See below).


 Varmint ace Warren B, aka “Fireball” in our Forum, explains how to form 20 Practical Cases. “Forming 20 Practical cases is very easy and no fire-forming is required. Start with any good quality .223 Rem brass. One can simply run the case into your bushing die with the appropriate bushing and call it done. I however like to make it a little more involved by doing the neck reduction in steps. I find that taking steps doesn’t overwork the brass as much as one step does. Also, if you resize the neck in too large of a step, sometimes, depending on the neck thickness, the neck will not be dimensionally what you would expect when finished. This is especially important towards the last step when one is getting close to the final required neck diameter.
 Varminter Kevin Weaver, who shoots both the 20 Practical and 20 Tactical, states that: “Both the 20 Tactical and the 20 Practical are fine .20 caliber cartridges. However, my favorite would be the 20 Practical. The 20 Practical gives the SAME performance as the 20 Tactical without fire-forming, or having to buy expensive forming dies.


 Use Consistent Brass


 Little Missouri National Grassland


 The .17 Hornady Magnum Rimfire (HMR) was introduced in 2002 by Hornady as a high-velocity, rimfire cartridge derived from the .22 Magnum case necked down to .17-caliber. The .17 HMR gained popularity among varmint hunters and target shooters for its good accuracy and hitting power out to 200 yards or more — all with low recoil and relatively low cost (compared to centerfire ammo).