This week, June 1-7, is Gun Storage Check Week. Be sure you store your firearms safely and securely. This article provides information on the two primary types of gun safe locking systems — keypad and rotary lock. If you are considering buying a safe you will want to think carefully about your lock choice. Some safes actually offer both systems, but you’ll want to test that dual system before ordering it. For speed of opening, electronic systems are definitely faster. But high-quality mechanical locks can last for a century or more, with no battery changes required.
Electronic (Keypad) Lock vs. Manual (Rotary) Lock
Smart gun owners know they need a good, solid gun safe. But when choosing a gun safe, what kind of lock should you select — electronic or mechanical? Both types have their advantages and disadvantages. This article will help you make the right choice for your needs and also get the most reliable performance from either type.
Gunsafes can be fitted with either an electronic keypad-style lock, or a conventional dial lock. In our Gunsafe Buyer’s Guide, we explain the important features of both dial and electronic lock systems. Many safe-makers will tell you that consumers prefer electronic locks for convenience. On the other hand, most of the locksmiths we’ve polled believe that the “old-fashioned” dial locks, such as the Sargent & Greenleaf model 6730, will be more reliable in the long run. CLICK HERE to learn more about the Pros and Cons of Mechanical (dial) Lock vs. Electronic (keypad) safe locking systems.
One safe supplier, The Safe Keeper, notes that mechanical (dial) locks tend to be more reliable over long periods: “When it comes to reliability, a mechanical lock is the way to go. Anything electronic is designed to fail sooner or later. For every 20 broken electronic locks we will get one mechanical. Bottom line is, it’s not that complicated to input a combination on a mechanical lock. Those extra 7 seconds just might save you from being locked out and having your safe drilled opened.”
This Liberty Safe video compares Mechanical (dial or key) vs. Electronic (keypad) safe locking systems.
Here is the opinion of RFB from Michigan. He is a professional locksmith with over two decades of experience servicing locks and safes of all brands and types:
What a Professional Locksmith Says:
For the convenience of quick opening, the electronic locks can’t be beat. However, for endurance and years of trouble-free use, the electronics can’t compare with the dial lock.
I’ve earned my living, the past 22 years, servicing locks of all types. This includes opening safes that can’t otherwise be opened. I do warranty work for several safe manufacturers (including Liberty). What I’ve learned in all those years is that manual dial locks have very few problems. The most common is a loose dial ring which can shift either left or right, which will result in the index point being in the wrong place for proper tumbler alignment. This is simple to fix.
Electronic locks, however, can have all kinds of issues, and none (except bad key-pad) are easy to fix, and when one goes bad, it must be drilled into to open it. IMO, it’s not a matter of ‘if’ an electronic lock will ultimately fail, but a matter of ‘when’ it will fail. Over the past 10 years or so, since electronics have become more and more prevalent, I’ve had to drill open bad electronic locks vs. bad manual dial locks on a ratio of about 20-1.
My professional opinion is to get the manual dial lock, unless you’ve got a good friend who is a locksmith/safecracker.
How Secure is Your Lock?
RFB tells us that both dial and electronic locks offer good security, provided it’s a good quality lock made by LaGard, Sargent & Greenleaf, Amsec, or Kaba/Ilco. However, RFB warns that “Some of the ‘cheaper’ locks (both manual and electronic) however, are very simple to bypass.
An electronic lock that’s glued or ‘stuck’ to the door with double-sided tape, and has its ‘brain’ on the outside of the lock in the same housing as the keypad, and merely sends power to an inner solenoid via a pair of wires through the door, is a thief’s best friend. The good ones have the brain inside the safe, inaccessible from the outside.
No amateur can ‘manipulate’ either a good manual or electronic lock. Both give you a theoretical one million possible combinations. I say ‘theoretical’ because there are many combinations that cannot, or should not, be used. You wouldn’t set your combo on a dial lock to 01-01-01 etc., nor would you set an electronic to 1-1-1-1-1-1, or 1-2-3-4-5-6.”
Tips for Dial Locks
RFB notes that “The speed, and ease of use, of a manual dial lock can be improved upon, simply by having your combo reset using certain guidelines. Avoid high numbers above 50. Having a 1st number in the 40s, 2nd number anywhere from 0-25, and 3rd number between 25 and 35 will cut dialing time in half, without compromising security. (For mechanical reasons I won’t get into here, the 3rd number of a good manual dial lock cannot — or should not — be set to any number between 95 & 20).”
Tips for Electronic Locks
Electronic locks can have the combination changed by the user much more easily than dial locks. That should be a good thing. However, RFB explains: “That can be a double-edged sword. More than a few times I’ve had to drill open a safe with an electronic lock that has had the combo changed incorrectly by the user, resulting in an unknown number that nobody can determine. Also, don’t forget that electronic locks have a ‘wrong-number lock-out’. I would NOT rely on the normal quickness of an electronic 6-number combo in an emergency situation. If for any reason (panic etc.) you punch in the wrong number several times, the lock will shut down for a 5-minute ‘penalty’.
Replace Electronic Lock Batteries Every Year
To get the most life out of any electronic (keypad Lock), you should always change the battery at least once a year, whether it needs it or not. With some systems you should replace every 6 months! Low voltage won’t necessarily shut down the lock, but using it in a low voltage situation is bad for the electronics, and eventually will cause lock failure. So, If you do nothing else to maintain your digital-lock safe, replace the battery every year.
And get a fresh battery (with a release date) from the store — don’t just pull a battery out of a storage bin, even if it’s never been used. Old batteries can lose “juice” and physically degrade, even when in storage.
This article is Copyright 2025 AccurateShooter.com. No reproduction on any other website is authorized without payment of licensing fees or liquidated damages.
Summer is almost here (Summer Solstice is June 20, 2025). That means many of our readers will be on the road traveling to matches or holiday destinations. LawShield, America’s largest provider of Legal Defense for Self Defense® coverage, offers a National Travel Guide for Gun Owners and state-specific Travel Guides for Gun Owners. These guides feature practical information for people traveling through nearly every state in the USA.
State-Specific Travel Guides — Access for FREE
State-specific Travel Guides and a National Travel Guide for Gun Owners can be accessed for FREE on the the U.S. LawShield website. For planning future travel, bookmark Resources.uslawshield.com/travel-guide.
According to Kirk Evans, President of U.S. LawShield, “Because there are so many details for people to understand before they leave home, we developed state-specific guides to help folks stay on the right side of the law. Take the time to learn the laws before hitting the road because they are not the same everywhere. Don’t wait until after the fact to plan for your guns when preparing for your trip.”
Travel Guide for Gun Owners Topics:
Permits/licenses recognized by specific states
State laws you should know, including vehicle carry, duty to notify law enforcement, and open and concealed carry laws
Where you can legally carry your gun
Federal laws you should know
Carrying in National Parks
Transfer of firearms
Traveling from state to state and the Safe Passage provision
Flying with a firearm, including TSA requirement warnings and how to pack ammunition
Driving with a firearm
Two Knowledgeable Attorneys Explain State Law Issues When Traveling
In this video U.S. LawShield Independent Program Attorneys Richard Hayes and Emily Taylor provide essential information for traveling with firearms. Discussion includes essential information needed to stay safe and responsible while traveling with firearms.
Know the Laws of Every State You Travel Through
“There is no standardization of gun laws within the 50 individual states, so even if a state recognizes your handgun license or permit, they may have additional restrictions on certain types of firearms, magazines, or ammunition,” said Evans. “In some states, it’s illegal for a non-resident to possess a firearm in the passenger compartment of their vehicle. And, because you are subject to a state’s laws when you are in that state, if you break their laws, you could be committing a crime — whether you think you intentionally broke the law or not,” he added.
“Remember, not knowing the law is not a valid defense,” stated Evans. “Use our Travel Guide for Gun Owners for whatever state you’re traveling through, and learn which states honor your carry license or permit before you go.”
Here’s a simple task you can do that will give your seater die a more perfect fit to your match bullets. You can lap the inside of the seater stem so that it matches the exact profile of the bullet. This spreads out the seating force over a larger area of the bullet jacket. That allows smoother, more consistent seating, without putting dents, creases, or sharp rings in your bullets.
This process is demonstrated here by our friend Erik Cortina of Team Lapua-Brux-Borden. Erik, one of the nation’s top F-Class shooters and a skilled machinist, explains: “Here I’m lapping my new seater die stem with lapping compound. I chuck up a bullet in the lathe and lap the inside of the seating stem. I put lapping compound on the bullet and also in the stem. You can do the same with a hand drill and bore paste. You can see in the piture below how much contact area the stem has on the bullet after being lapped. This bullet is a Berger 7mm 180-grain Hybrid. ”
It can be helpful but it’s not necessary to make your seating stem an exact match to a bullet, particularly if you’re loading hunting or varmint rounds. But it is helpful to do some mild internal stem polishing. This should eliminate any ring (or dent) that forms on the bullet jacket during seating.
Sharp edges on a seating stem can cause a ring to be pressed into the bullet jacket — especially with compressed loads that resist downward bullet movement.
Q2: Is there any down-side to the process?
Not really. However, if you shoot many different bullet types for a particular cartridge, you may not want to conform the stem aggressively to one particular bullet design. Lightly lap the inside of the stem to remove burrs/sharp edges but leave it at that. A light lap will prevent a ring forming when seating bullets.
Photos and Facebook post by Tactical Rifle Shooters
Yet another .300 Blackout disaster. Unfortunately, that .300 Blackout cartridge can fit in a .223 Rem chamber. Shooting a .308-caliber bullet in .223 bore is a recipe for disaster.
The .300 AAC Blackout aka “300 BLK”, is a compact 30-caliber cartridge designed to work in AR-15 rifles. It has a shorter cartridge case to accommodate the bigger 30-caliber bullet while still fitting in a standard AR-15 magazine. Unfortunately, that’s the danger. A careless shooter can toss a .300 Blackout cartridge in with .223 Rem rounds without noting. And because the case-head size is the same as the .223 Rem (5.56×45) the rifle’s bolt assembly will happily chamber and fire the .300 BLK round. Problem is, that forces a .308 diameter bullet down an undersized .223-caliber bore. Not good!
This images were provided by Tactical Rifle Shooters on Facebook. The message was clear: “Don’t try to run 300 Blackout in your .223/5.56mm. It won’t end well. The problem is identical rifles and identical magazines but different calibers.”
Image from Accurate Shooter Forum. Cutaway shows the jammed .30-Cal bullet:
For those who MUST have a .300 Blackout, here are some things you can do:
1. Use different colored magazines for .300 Blackout vs. .223 Rem.
2. Fit all your uppers with caliber-labeled ejection port covers.
3. Mark .223 Rem upper handguards with the caliber in bright paint.
4. Mark all .300 BLK Rounds with heavy black marker.
Comments by Folks Who Viewed these .300 Blackout Disaster Photos:
“The .300 Blackout is simply a badly-designed round. A properly-designed round would have had a feature in the shape that would have prevented cross loading in the first place.” — D. Santiago
“I almost made that mistake… I had a magazine of 300 BLK inserted in my .223/5.56 all night. Fortunately, I never pulled the trigger. Once I realized the mistake, I almost got ill. [After that incident] I no longer own a 300 BLK.” — B. Welch
“Happened to me hog hunting from a helo. Gun exploded in my face.” — B. Hood
“Fire-forming projectiles [is] so wrong in centerfire!” — M. Stres
“Had some dude come into the store the other day wanting .300 Blackout ammo to shoot in his 5.56 AR. It took 15 minutes of explaining for him to understand you got to have a .300 Blackout Upper!” — R. Williams
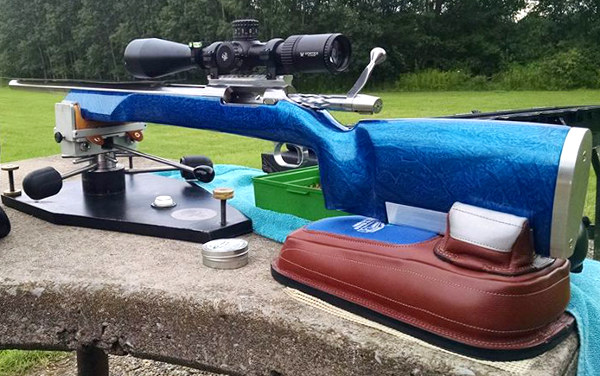
The summer solstice — the official start of summer — is June 20, 2025. Here we feature some notable guns of summer from our popular, long-running “Pride and Joy” thread in our Shooters’ Forum. Since 2009, Forum members have posted photos and descriptions of their most prized firearms. Here are some of our favorite “Pride and Joy” rifles recently showcased in our Forum. Do you have a gun you’d like to see featured there? Register for the Forum and you can add your favorite gun to the list. The photo above shows multiple wood-stocked Palma rifles belonging to Forum member SParker.
We hope these “pride and joy” rifles may provide inspiration for our readers, whetting their appetite for their next competition, varminting, or hunting rifle project.
Team Vihtavuori F-Open Rifle
Here is a state-of-the-art F-Open competition rifle belonging to Team Vihtavuori member Tim Vaught. This features a BAT M action, Alex Wheeler-Avila WFO stock, Bartlein barrels, Bix’N Andy trigger, and March Majesta scope. This ultra-accurate rifle also has a barrel tuner and an adjustable R.A.D. 2A recoil-reducing system. This tames recoil and allows the buttpad to adjust horizontally (fore/aft), adjust vertically, and rotate. Tim lists three chamberings for his F-Open blue beast: 7-6.5 PRC; 7-300 WSM; and 300 WSM.
22 BR Savage Varminter — Accuracy on a Budget
This 22 BR Savage, with upgrades from Sharpshooter Supply, is the “pride and joy” of Forum member Maynard. Note the heavy-contour custom barrel with brake. That 22 BR cartridge is a very effective choice for varmint work, as the ground hog in the photo proves. The 22 BR and 22 Dasher are capable of outstanding accuracy with a large variety of bullets and powders. A 22 Dasher can rival the ballistics of a 6mmBR out to 500+ yards, but with reduced recoil.
Stockmaker’s New 30BR Pride and Joy
This handsome 30BR competition rifle was crafted by its owner, Forum member WillyTP who runs Todd Payseur Stocks in South Carolina. He posted: “Finally found the time to make myself a new stock and get it finished this time. All work from the rooter to the tooter by yours truly.” This score benchrest rifle features top-end components: BAT SV action, BRUX Barrel, Bix’N Andy trigger, and Nightforce 42x44mm scope.
Daughter’s First Rifle — Built by Dad
Above is a nice field rifle built up by a father for his daughter. Forum member FrankZ explains: “This is my favorite rifle and it will become my daughter’s first centerfire. The action is from the first rifle I purchased with my own money 21 years ago (700VSS).” The rifle now sports a 24″ Brux barrel chambered in 6mm Creedmoor, with aftermarket PT&G Bolt and DBM metal.
6BR Ackley Improved from Alex Wheeler
Here is a 6BR Ackley Improved (6BRA) built by Alex Wheeler. This blue marble-painted beauty features a BAT “B” action timed by Alex, fitted with Jewell trigger, and Borden trigger guard. The barrel is a Hawk Hill HV contour finished at 28 inches. The stock is a Deep Creek Tracker with 4″ forearm and rudder system (the toe of the stock adjusts for angle, allowing better tracking). This scope is a Vortex 15-60x52mm Golden Eagle riding in Burris Signature Zee rings.
F-Open Rifle with Borden Action + McMillan Kestros ZR Stock
This state-of-the-art .284 Shehane F-Open rifle belongs to Forum member Willow. This has a McMillan Kestros ZR stock fitted with a RAD (spring-loaded buttpad) system with custom spring. Other components are: Borden BRMXD LBRP DLC-coated action, Bartlein 32″, 4 groove, 1:8.5″-twist 400MOD steel barrel, and TriggerTech Diamond trigger. On top is a March HM 10-60x56mm scope in March Gen 3 rings. Below is a video by Editor F-Class John, showing the features of the Kestros ZR stock.
6BRX in the Country
Forum member Grimstod posted this nice 6BRX in a scenic setting: “Bill Goad at Premier Accuracy crated this fantastic 6BRX. It shoots better then I do.” The rifle features a single-feed Alpin action, with Hart 26″ 1:8″-twist barrel, chambered for the 6BRX (6mmBR wildcat) with .269 neck. Grimstod currently runs 95gr Berger VLDs in Lapua brass. On top is a Leupold 40x45mm scope on a Picatinny rail that Grimstod machined himself. The stock is an HS Precision painted by Premier Accuracy.
6mm Dasher for Benchrest Silhouette Matches
Here’s a gorgeous green 6mm Dasher. Forum Member Gunnermhr states: “This is my new 12-lb Dasher for the 1000 Yard Benchrest silhouette matches. My good friend at CRS Custom Rifle Stocks in Aaronsburg, PA made and painted the stock. It’s similar to a Tooley MBR with a few modifications. It still supported on a 3″ forearm and is full length. Hard to imagine it still makes weight with a wood stock and a 36 power Leopold. Crossed the scale at 11.7lbs. The rifle features a BAT “B” Action. The paint is Candy Apple Green, the forearm has a white base-coat, center section is gray base coat and the buttstock is black base coat, all covered with five coats of clear. It’s the new pride of the fleet as it shoots as good as it looks. This gun hammers with 105gr Berger Hybrids.”
Two Dashers and a Rimfire for Fun
Courtesy Forum member Dan H., here are two red-stocked Dashers plus an Anschutz 54.30 (Benchrest Stock) to make it a trio. Dan says: “The Anschutz provides good practice in trigger-pulling. It’s amazing what you can learn from a rifle that is as sensitive as this one.”
1917 Enfield Upgraded with Hand-Carved Figured Maple Stock
This impressive rifle features an “antique” 1917 Enfield action chambered for the .338 Win Magnum cartridge. The lovely Maple stock was hand-carved by Forum member Spitfire_ER. He tells us: “I found this piece of wood as a return at a lumber yard about 7-8 years ago. I asked the guy in the yard about it and he said it had been returned because it had too much figure for the job the customer was working on. First thing I thought was, ‘That would make a nice stock’.”
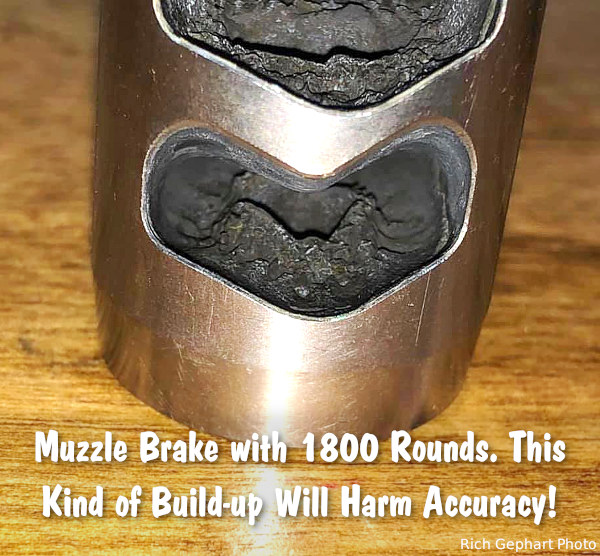
Many hunters and precision rifle competitors use muzzle brakes because these ported devices reduce felt recoil significantly. That make s real difference getting back on target for quick follow-up shots. While many rifle owners appreciate the benefits of muzzle brakes, they may also neglect their brakes, allowing hard carbon and powder residue to build up. Not good. You should regularly clean your muzzle brake to remove fouling and carbon build-up.
As Mark Edgreen posted: “Carbon build up on the crown and in the brake is a recipe for poor accuracy.” And another gunsmith reported that customers complained about guns that “shot out way too early” but they only needed to have the brakes cleaned.
Gunsmith and PRS/NRL competitor Jim See recently reminded his Facebook Fans about the importance of cleaning muzzle brakes: “How many times do I have to say it? You need to maintain your rifles. Clean your muzzle brakes people!”. Jim, who runs Elite Accuracy LLC, notes that hard carbon build-up in brakes can definitely harm accuracy. Look at this example:
Muzzle Brake Cleaning Methods
There are various methods for cleaning a brake, we list a variety of techniques, but we would start with NON-corrosive ultrasound. You’ll want to remove the muzzle device before doing these tasks.
1. Use Ultrasonic Cleaning Machine with cleaning solution. This may be the most efficient method: “I place my brake in the ultrasonic cleaner. Shiney as new.” (Jim Moseley).
2. Spray with commercial Carb Cleaner and brush. Then apply anti-corrosion coating.
3. Soak in half hydrogen peroxide and half vinegar. Suggestion: “Let sit over night and carbon melts off. Brush remaining carbon off, rinse and put the brake back on.” Apply anti-corrosive before mounting.
4. Soak in 50/50 solution of water and white vinegar and brush. (Be sure to apply anti-corrosion coating, such as Eezox, after soaking).
5. Tumble in liquid solution with stainless pins. Comment: “Comes out slightly faded, but perfectly clean on stainless, non-painted brakes though.” Warning — do NOT do this with threaded brakes — tumbling could affect threads of screw-on brakes. Also, tumbling can harm painted or Cerakote finishes.
Gunsmithing Tip: By fitting the muzzle brake so that the barrel crown is slightly forward, it is easier to wipe carbon fouling off the end of the barrel. See photo:
NRA America’s Rifle Challenge
The National Rifle Association, as part of NRA 2.0 in 2025, is launching an AR-based competition called the America’s Rifle Challenge (ARC). This is a competitive shooting program designed to encourage the “every day responsible rifle owner” to do more than just target practice at the range. ARC can provide a fun, exhilarating introduction to action shooting sports for AR owners.
Shooting Sports USA features the new ARC program in the March 2025 issue, available for FREE online: READ Full Article HERE.
ARC Competition Levels
The NRA America’s Rifle Challenge (ARC) is a unique AR-based competition shooting program designed as a way for “everyday responsible rifle owners” to go beyond typical target practice. Millions of gun owners have purchased ARs over the past few years, and this program will help them sharpen their skills. Featuring two levels of competition, NRA America’s Rifle Challenge can accommodate everyone from AR novices to seasoned competitors. And there will be an optional Two-Gun component in the NRA America’s Rifle Challenge program that adds handgun shooting to the courses of fire. Not only that, pistol-caliber carbines chambered in 9mm Luger, .40 S&W, or .45 ACP are permitted in all NRA ARC Level 1 matches and special Level 2 and Two-Gun events.
NOTE: The NRA plans to release the full NRA America’s Rifle Challenge rulebook as well as NRA ARC requirements for clubs/ranges no later than August 1, 2025. You will be able to download the rulebook at: Arc.nra.org/nra-arc-rulebook.
America’s Rifle Challenge Event Levels:
Level 1: The Level 1 course of fire is conducted from 10 out to 100 yards with competitors firing from different positions under time constraints. Level 1 is intended for AR owners new to competitive shooting. This event focuses on building skills to improve accuracy, speed, and mechanics. L1 matches are conducted from 100 yards and inward, with a balance of both time and accuracy being measured in every event. There are currently five total stages of fire in this match, with more in development. NOTE: Level 1 is limited to the first 32 competitors (4 squads). Space in level 1 is limited, so sign up quickly.
Level 2: The Level 2 course of fire covers the full spectrum of what is possible with an AR. L2 matches are conducted from 500 yards inward. Competitors will face a variety of stages designed to test skills — shooting and moving, positional shooting skills, long-range precision, speed, stage planning, and use of barricades, as well as close-quarters exercises. Level 2 offers a higher round count and more dynamics to the stages. NOTE: Level 2 is limited to the first 60 competitors (6 squads).
On the Applied Ballistics Facebook Page, there is a fascinating series of posts showing traces of bullets at various speeds from Mach 0.86 to Mach 3.0. At the slowest speed, Mach 0.86, i.e. 962 FPS, there is turbulence behind the bullet, but no clear shockwave. At the highest velocity, Mach 3.0 (3375 FPS at sea level, 68° F), there is a dramatic double nose and tail wave formation.
To learn more, visit TheScienceofAccuracy.com. On that site you’ll find exclusive video content and you can subscribe to member’s only Podcasts. And you can purchase Applied Ballistics books on the Science of Accuracy webstore.
Mach 3.00 Bullet Flight Image
At Mach 3 (3355 FPS) this bullet now has a strong and well established shock wave forming at the tip, and at the base. Unlike the transition through Mach 1.0, nothing really interesting happens to the aerodynamics or shock waves meaning the aerodynamics and stability are: continuous, easy to predict, and model. As you go faster, the shockwaves make a shallower angle because the bullet is moving forward 3X faster than the shock wave is moving away from it. So the shock wave makes an angle that has a rise/run ratio of 1/3.
If a bullet flew within 10 feet of you traveling this fast, it would be about as loud as a 22 magnum. You’d certainly want hearing protection as the energy contained in a Mach 3 shock wave is high! How high…? Well, in 10 yards, this bullet slows from 3355 FPS to 3334 FPS in a time of 0.0090 seconds. The 55 ft-lb of kinetic energy lost during this 10 yards is due to aerodynamic drag on the bullet, which is comprised of wave, base, and skin friction drag components with the majority of the drag being due to shock wave formation. Expending 55 ft-lb of energy in 0.0090 seconds requires a power output of 6111 ft-lb/sec = 11.1 horsepower, most of which goes into creating the shock wave. Remember it’s a 3-D cone that travels great distance, and it gets its energy by stealing velocity from your bullet!
Mach 1.00 Bullet Flight Image
Many shots were fired to capture an image of the transonic shockwave structure at exactly Mach 1.00. With the bullet now moving at the speed of sound, the local airflow on some parts of the bullet exceeds Mach 1.0. Anytime something is moving thru the air faster than the air can get out of the way, you get a compression wave, aka “shock wave”. That’s what’s visible in this image — the areas where the air density changes rapidly (in the compression wave) are visible as near vertical lines and a detached bow wave out front. As the bullet progresses through transonic speed, this shockwave structure develops which has strong effects on the drag (wind sensitivity) and stability of the bullet.
The exact development of the shockwaves and the resulting effects are unique and sensitive to the bullet geometry, and become very difficult to predict through the transition from subsonic (incompressible flow without shock waves) to supersonic (compressible flow with shock waves). Each bullet geometry does this differently which is why it’s difficult to determine transonic stability criteria for bullets of different shapes.
Mach 0.86 Bullet Flight Image
Here’s a bullet at Mach 0.86 (86% the speed of sound, which is 962 FPS at 61° F). As you can see, this 0.86 Mach is not fast enough to make any discernable waves but you can see turbulence in the bullet wake (right side in photo). The beginning of small shock waves can be seen on the bullet tip, and at the bearing surface/boat tail juncture. For the most part, all of the airflow around this bullet is subsonic. You wouldn’t hear a supersonic ‘crack’ from this bullet flying past the observer.
Each year, on the last Monday in May, Americans honor the sacrifices of military men and women who paid the ultimate price in their service to our nation. More than 1.35 million American men and women have died in military service during wartime, including more than 666,400+ combat deaths. On May 26, 2025, we again pay tribute to these men and women and remember their service to their country.
This is what Memorial Day symbolizes — a time Americans take a clear look at both our past and our future. One day each year, when we acknowledge the debt we owe to those men and women who — because they so cherished peace — chose to live as warriors.
Could anything be more contradictory than the lives of our soldiers? They love America, so they spend long years in foreign lands far from her shores. They revere freedom, so they sacrifice their own that we may be free. They defend our right to live as individuals, yet yield their individuality in that cause. Perhaps most paradoxically of all, they value life, and so bravely ready themselves to die in the service of our country. — Deborah Y. Parker
Moment of Remembrance
Memorial Day Observances will range from parades to memorial ceremonies and organized moments of silence. The Memorial Day National Moment of Remembrance honors America’s fallen warrriors. Established by Congress in 2000, the “Moment” asks Americans, wherever they are at 3:00 p.m. local time on Memorial Day, to pause for one minute, in an act of national unity and respect for the fallen.
What Is Memorial Day?
Memorial Day is a federal holiday in the United States for remembering the men and women who died while serving in the country’s armed forces. The holiday, which is celebrated every year on the last Monday of May, was formerly known as Decoration Day and originated after the American Civil War to commemorate the Union and Confederate soldiers who died in the war. By the 20th century, Memorial Day had been extended to honor all Americans who have died while in the military service.
On Memorial Day, the United States flag is traditionally raised to the top of the staff, then solemnly lowered to half-staff position until noon, when it is raised again to full-staff for the rest of the day. The half-staff position is to remember the more than one million men and women who have given their lives for this country.
Flags placed in Arlington National Cemetery by members of the 3rd Infantry Regiment, the “Old Guard”.
Many people visit cemeteries and memorials, particularly to honor those who have died in military service. Many volunteers place an American flag on each grave in national cemeteries.
Creedmoor Sports is a leading vendor of products for competitive shooters and serious hand-loaders. Along with great gear, Creedmoor Sports provides informative content for its customers. The Creedmoor InfoZone provides Reloading Tips, Gear Reviews, Shooting News, and basic gunsmithing information.
Bill Gravatt, President of Creedmoor Sports, is an expert on reloading processes and gear. He developed many of the popular tools marketed by Sinclair Int’l, and he brings that expertise to Creedmoor Sports. Bill hosts a series of “how-to” videos produced for the Creedmoor InfoZone.
In this video, Bill Gravatt demonstrates several methods to clean your cases. Bill tells us: “Powder residue should be removed before you insert your cases into your reloading dies. There are several ways to clean your cases. Many shooters use a combination of various methods…”
1. Manual Cleaning — You can use 0000 Steel wool for the outside of the case and a Case Neck brush for the inside. A paper towel can remove any remaining residue. This is a handy way to clean if you load at the range.
2. Vibratory Tumbling — This traditional method works well, particularly for pistol brass. Experiment with both Corn Cob and Walnut media. You can get a brighter shine by putting a small amount of liquid brass polish in the media.
3. Wet Tumbling with Stainless Media — This process can get your brass clean inside and out. Do check to ensure no pins are stuck in the flash-holes. Watch for peening of case mouths that can occur over time.
4. Ultrasonic Cleaning — Ultrasonic cleaning works great for small parts as well as brass. The ultrasonic process removes all carbon and traces of lube, which can leave the inside of case necks too dry. To smooth bullet seating, try putting a tablespoon of Ballistol in the cleaning solution.
Cleaning Reloading Dies
Cleaning your reloading dies is something that many hand-loaders neglect. In this 60-second Tech Tip, Bill Gravatt provides some smart advice on cleaning your dies. Bill notes: “After heavy use, case lube and carbon can build up in your reloading dies. It’s important to keep them clean. Also, with new dies, give them a good cleaning before first use, because they ship with a corrosion inhibitor.”
1. Step 1 — Prior to cleaning, disassemble the die and spray it with a good degreaser. Do this with brand new dies too.
2. Step 2 – Take a patch and run it in the die to remove old lube and gunk. Don’t forget the decapping assembly and other internal parts.
3. Step 3 — After cleaning the die, but before reassembly, spray the die with a good corrosion inhibitor, such as Corrosion-X or Starrett M1.


 Gunsafes can be fitted with either an electronic keypad-style lock, or a conventional dial lock. In our Gunsafe Buyer’s Guide, we explain the important features of both dial and electronic lock systems. Many safe-makers will tell you that consumers prefer electronic locks for convenience. On the other hand, most of the locksmiths we’ve polled believe that the “old-fashioned” dial locks, such as the Sargent & Greenleaf model 6730, will be more reliable in the long run. CLICK HERE to learn more about the Pros and Cons of Mechanical (dial) Lock vs. Electronic (keypad) safe locking systems.
 Tips for Dial Locks
Replace Electronic Lock Batteries Every Year


 The
The