This story is about a great shooter, Joe Hendricks Jr., and his Eliseo RTS Tubegun, chambered in 6mm Competition Match. With this versatile rifle, Joe Hendricks Jr. won the 2019 CMP Cup Aggregate Title for Match Rifles. Joe comes from a long line of talented marksmen. His father AND his grandfather are elite competitive shooters. His dad has been a National Champion, and all three generations have shot together, shoulder to shoulder, on the Remington Rifle Team. Like grandfather, like father, like son.
Joe says: “I think it’s pretty cool that there have now been two major Across the Course Championships won by a Hendricks using a Gary Eliseo chassis, one by me this year, and one in 2014 when my father (Joe Hendricks Sr.) won the NRA National Championship.”
Photography by Meghan Hendricks.
Joe Hendricks Jr.’s Rifle — Eliseo RTS Chassis, Rem 40X Action, Krieger Barrel
Joe’s rifle is built on a Competition Machine RTS Target Model chassis. This Tubegun features a Remington 40X action with Pacific Tool & Gauge Bolt and Jewell trigger. The scope is a Leupold 6-18x40mm. The barrel is a Krieger chambered in 6mm Competition Match. Joe explains: “The 6mm Competition Match is a cartridge that my dad came up with. It is basically a .243 Winchester with a 31° shoulder.”
If you look carefully in the photo below, you’ll note the silver-toned, adjustable butt-plate. That’s an upgrade Joe added: “I did a small modification to the stock, where I put on an Anschutz buttplate instead of the standard one Gary Eliseo uses. This Anschutz hardware provides a little bit more adjustability.”
Here Joe Hendricks Jr. fires at 200 yards from the standing position.
The Standing Position — Why It’s Critical to Match Success
Joe told us: “As far as shooting strategies and training methods go, I shoot a lot of standing practice — at least 50 shots per session. I still train the other positions of course, but I believe if you start your day off with a great standing score, it really makes the rest of the day easy because then you don’t feel like you’re playing catch-up the whole time.”
Joe explains: “When I’m shooting standing, I shoot in a manner very similar to the way that Carl Bernosky does. He’s written a few articles about the standing position. He always talks about making sure the shot goes off inside his hold, and I’m the same way. I don’t try to do too much. I just let the gun do its thing and when/if it stops in the Ten Ring, I shoot the shot. If it doesn’t, I don’t.”
About the CMP Cup Two-Day Course of Fire
The CMP Cup is a two-day match comprised of two, 1000-point Aggregates, for a 2000-point Grand Agg. Each day, the competitors fire 100 shots total from the 200, 300, and 600 yard lines. The match starts with 20 shots slow fire standing at 200 yards. Next are two, 10-shot, rapid fire strings in 60 seconds from the sitting position. Next are two, 10-shot strings in 70 seconds prone at 300 yards (rapid fire prone). Each day’s course of fire concludes with two, 20-shot sequences of slow-fire prone at 600 yards.
6mm Competition Match Cartridge — Slower Powder Yields Better Barrel Life
My dad was shooting a 6XC for a while and was getting tired of going through almost two barrels a year. So, he came up with the 6mm Competition Match. Like I said, it is a .243 Winchester with a 31-degree shoulder. This delivers the same (if not better) velocity as the other popular 6mm cartridges, but we get almost double the barrel life because we increased the case capacity, so we can shoot a slower burning powder. The barrel I took to Camp Perry that won the CMP Cup had over 3700 rounds on it when I was finished. [EDITOR: Take note readers! Most 6mm barrels are toast after 2500 rounds.] Granted it definitely needed to come off at that point, but it obviously was still shooting well enough to win!
Accurate Load with Peterson Brass, Berger Bullets, and Vihtavuori N165
The two loads I shot all week were Berger 108gr BT behind Vihtavuori N165 in Peterson Cartridge Company brass for 200 and 300 yards, and then Berger 115 VLD behind N165 in Peterson brass for 600 yards. Both loads are easily going over 3000 FPS. I try to only use the best components for reloading, so that’s why I go with Berger, Vihtavuori, and Peterson. Obviously Berger and Vihtavuori quality are pretty known, but I believe Peterson is right up there with Lapua[.] I’ve visited the Petersen factory many times. I’m always blown away by the time and effort Peterson puts into everything.
Winning Marksmanship — the Mental Game
The other big thing I’ve been focusing on lately is my mental game. In order to be at the top of a sport, regardless of the sport, the athlete has to have a solid mental approach. For me, I’ve learned that my key is confidence. A good shooting buddy, who was with me the first day of the CMP Cup, suggested I was arrogant because I kept telling him I was going to win. Then I told him it was confidence not arrogance. If I was confident in my ability, I did not think there was any way I could lose. [Editor: To help build confidence and visualize success, we recommend With Winning in Mind, by Lanny Bassham, an Olympic gold-medal winning marksman.]
All in the Family — Three Generations of Hendricks Marksmen
Joe’s father, Joseph Hendricks Sr., has been a National Champion rifle shooter. Joe’s grandfather, Gary Hendricks, is also a talented marksman. In fact, all three men — grandfather, father, and son — shot together on the Remington Rifle Team. Joe says that the shooting sports have helped build strong family bonds. He and his father enjoy shooting together, and competing against one another: “I learn so much just by watching my dad… shoot. Even though I have been competing for 10 years now, I’m still incredibly new to the shooting sports compared to my dad. My father is always there to help.”
“I feel very privileged to have grown up in the family that I did, with not only my father as a competitive shooter, but my grandfather as well. I definitely would not be the person I am today, let alone the shooter, without either of them. At one point, all three of us were on the Remington Rifle Team. I’ve had the opportunity to shoot team matches with all three of us on one team, as recently as this past summer.”
“Initially when I began shooting competitively, I was putting a lot of pressure on myself. I wanted to be as good a shooter as my dad and grandfather. I was trying so hard that it was really affecting my scores negatively. Then one year, I told myself I was just going to have fun, and not worry about match scores. That year was the year I really started to win things, and shoot some good scores.”
“When my father won the NRA National Championship in 2014, I was so proud, but along with being proud, all it did was make me more motivated. Ever since I started shooting, I wanted to win a National Championship, but after he won, it just fueled my fire more. There is a bit of father/son rivalry. It’s a lot of fun if we are shooting right next to each other at the same time. We just give each other crap about shooting a bad a shot, or shooting a lower score by a point or an X.”
“My dad started shooting when he was around 10, so he has a vast amount of knowledge compared to most people, especially me. He is always there to help whenever I have a question on anything firearm or shooting related. To this day, whenever I’m done with a match, I always talk to my dad. He always has time to listen to what I have to say.”
Let’s face it, AR-platform rifles run dirty, at least compared to typical bolt-action rifles. The AR-15 works by piping gas from the barrel back into the bolt carrier, causing the bolt to unlock and the carrier to move the bolt backward. The “exhaust gas” from the barrel contains soot and carbon. The carbon will form hard deposits on the bolt. In addition, the carbon can combine with lube on the bolt carrier to make a nasty, paste-like sludge. This can be particularly problematic when the black paste pollutes the ejector and extractor recess.
This Editor has inspected dozens of ARs over the years. Other than mag-related malfunctions, the most common cause of AR cycling problems I found was oily gunk in the extractor and ejector areas. Many AR owners overlook these critical areas. Look at an AR that hasn’t been cleaned properly and you’ll probably find black gunk (and small brass shavings) in the ejector and extractor recesses.
If you want to keep your black rifle running smoothly and reliably, you must clean it regularly and follow the correct maintenance procedures. Here are three videos that explain how to properly disassemble and clean AR-platform rifles. And then they cover the essential lubrication ARs need to run reliably.
Take-Down and Full Cleaning of AR15 by Jerry Miculek
Here ace shooter Jerry Miculek takes down and cleans an AR-platform rifle belonging to his daughter Lena. This is a good video because Lena’s rifle was “run hard and packed up dirty” so you can see where carbon and grease build up. This 35-minute video is very thorough. Jerry is one of the nation’s top action carbine shooters, so listen carefully to his advice on cleaning and lubrication.
General AR-15 Maintenance and Lubrication
There are various schools of thought on AR lubrication. Some guys like to run “wet” with lots of CLP, while others choose to focus lubrication on the key spots that receive the most friction and wear, such as the contact point for the bolt carrier. We do advice check the ejector recess and extractor spring recess frequently as gunk can get in there, causing malfunctions. Here is a good video from Pew Pew Tactical — a 7-minute guide to cleaning and lubricating AR-platform rifles. This shows important details for both the upper and the lower.
How to Clean Your AR-15 Bolt Carrier Assembly
This video offers very specific advice on the bolt carrier group, which receives the dirty gas directly from the barrel. Be sure to check the extractor and ejector recesses. That’s where old lube, brass shavings, and carbon accumulate. Follow the directions in this video for lubrication, and don’t over-lubricate the bolt carrier — that will only capture more carbon.
All shooters, even rimfire enthusiasts, should always wear ear protection when at the range. A typical rifle gunshot is very loud — in the region of 140 to 170 decibels (the pain threshold is 130-140 db). Without ear protection, you can permanently damage your hearing during a single shooting session. We all know older shooters who are partially deaf, or who suffer from Tinnitus, because they didn’t use earplugs or muffs when they were younger.
How Humans Hear Sounds — Amazing Video Reveals All
The human sense of hearing involves multiple delicate internal membranes, bones, organs, and nerves. Shooters understand the importance of protecting their hearing, but they may not understand the bio-mechanics of human hearing. We hear sounds through Auditory Transduction. Sound waves vibrate the ear drum (tympanic membrane), but that is only the beginning. These vibrations are passed along via tiny rocker-arm-like bones to be “processed” in a spiral chamber, the cochlea.
This remarkable VIDEO explains how humans hear sounds. We strongly recommend you take the time to watch and learn. The hearing you save may be your own!
Click Speaker Icon to turn on the video’s soundtrack.
Vibrations moving through the cochlea are separated into frequencies and then sent as neural messages to the brain. It is an astonishingly complex process, one that truly seems miraculous when you examine the bio-engineering involved. In the Video above, the process of human Auditory Transduction is explained and illustrated with 3D animation. You really should watch this amazing video. By the end you will have a new-found appreciation for your ability to hear.
Every shooter should own a pair of Electronic muffs, even if you prefer shooting with earplugs and/or standard muffs. Electronic muffs are great when you are spotting for other shooters or are working near the firing line. They let you hear ordinary conversations while still providing vital hearing protection. You can also wear ear-plugs under muffs for extra sound attenuation.
Plugs PLUS Ear-Muffs — The Benefits of “Doubling-Up” Your Hearing Protection
According to OHS Online: “The combined attenuation of an ear plug and an ear muff is not simply the algebraic sum of the performance of each individual protector. This is due to an acoustic and vibratory interaction between the ear muff and the ear plug that causes them to behave together as a system rather than as independent hearing protectors.
Generally speaking, when you combine two hearing protectors, ear muffs over ear plugs, you can expect an increase [in noise reduction] of between 3 and 10 dB over the higher-performing hearing protector. OSHA [now advises] 5 dB as the [typical] benefit offered by combining hearing protectors.” Source: OHSonline.com
The 2025 NRA Annual Meetings & Exhibits kick off today. The big event runs April 24-27, 2025, at the Georgia World Congress Center in Atlanta, Georgia. The NRA expects tens of thousands of attendees. The event includes speeches, seminars, exhibits, and a large, 14-acre exhibit hall where gun manufacturers and other vendors showcase their products. This Thursday the 24th there are Ring of Freedom member gatherings and the Wall of Guns opens for viewing. The full Exhibit Hall opens Friday morning, April 25th.
Key Highlights
The NRA Leadership Forum features respected political Leaders and Second Amendment advocates.
Seminars and workshops on firearm safety, shooting sports, and the Second Amendment.
Exhibit Hall showcasing over 14 acres of guns, gear, and other products from various companies.
Special events, concerts, and notable celebrity meet-and-greets.
The NRA Foundation Wall of Guns returns for 2025 with great gun prizes. The member favorite Wall of Guns is open April 24-27 with 60+ prize guns.
Outfitter Area — Attendees can book the hunt of a lifetime in the outfitter section with respected hunting guide services from throughout the world.
The Exhibit Hall is open all three days, with over 14 acres of the latest guns and gear from the most popular companies in the industry as well as smaller, newer companies.
Show Registration and App
The NRA Annual Meetings & Exhibits is free to all NRA members and their families (spouses and children under 18 years old), uniformed military and law enforcement personnel.
Registration: You can register online or join the NRA at the door if you are not an NRA member. Nonmembers can grab a 3-day pass for just $10.
FREE Event Phone App: Download SHOW Map App for Android.
Visit NRAAM.org for event schedules and Atlanta hotel information.
There will also be music events including a big show on April 26th with country music stars Big & Rich performing in the Sidney Marcus Auditorium.
Will you be traveling out of state this spring? Or do you have questions about your own state’s firearms laws? Then you’ll want to have quick access to summaries of gun laws in America’s 50 states. Here’s a very valuable online resource you may want to bookmark.
The NRA-ILA (Institute for Legislative Action) has a great feature on the NRA-ILA’s homepage. From the NRA home page, NRA-ILA.org, you can instantly access a host of information for all 50 states. There is a menu box that includes all 50 states plus the District of Columbia, New York City, and Guam. Look for the box that appears below the “NRA-ILA Top Stories Banner”:
Alternatively, look at the UPPER LEFT for three horizontal lines. Click that to open a drop-down menu. Then select the third line Gun Laws > State Gun Laws. That will open a page with all the 50 states listed in order A to Z. Or bookmark the NRA-ILA State Gun Laws Page.
Shown below is part of the NRA-ILA’s coverage for Georgia, site of the 2025 NRA Annual Meetings and Exhibits. There is a summary of the most important Georgia gun laws. Below that is a map showing the states that recognize Georgia carry permits.
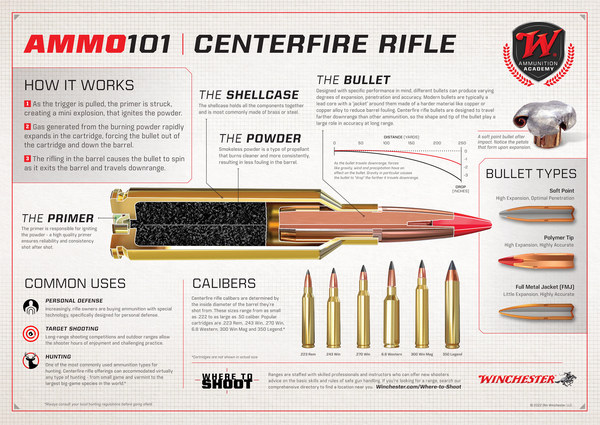
Winchester’s new “Introduction to Ammunition — Ammo 101” is a four-part series including custom illustrations and information for four major ammunition categories: rifle, pistol, rimfire, and shotshell. The Ammo 101 series provides a detailed overview of centerfire rifle, centerfire pistol, rimfire, and shotshell ammunition, showcasing ammunition construction, components, calibers, and common usage. The Ammo 101 resource is free to download from Winchesters.mediaassets.com. Or, simply click one or more diagrams below. Each image will launch a large PDF which you can print or download.
TIP: Click Each Image for Full-Screen Printable PDF
Shown below are the first four ammunition information sheets prepared by Winchester. These show all the key components of cartridges and shotshells, and explain the functions. These diagrams are useful for training, and for persons getting started in reloading.
Ammo 101 Centerfire Rifle Cartridge Diagram (click for PDF)
Ammo 101 Rimfire Cartridge Diagram (click for printable PDF)
Ammo 101 Pistol Cartridge Diagram (click for printable PDF)
Ammo101 Shotshell Diagram (click for printable PDF)
About the Ammo 101 Series
The FREE Ammo 101 resources can help instructors nationwide who introduce new entrants to the shooting sports and hunting. Instructors can incorporate these resources into their training presentations, use them as handouts, or have them printed locally.
“The basics of ammunition… is what we want to deliver with the Ammo 101 series,” said Matt Campbell, Winchester V.P. of Sales & Marketing. “With millions of people across the United States starting their journey in the shooting sports as new firearm owners, providing easy-to-understand information on ammunition types is one way we can help educate our customers.”
The 2025 NRA Annual Meetings & Exhibits will take place at the Georgia World Congress Center (GWCC) on April 24-27, 2025 in Atlanta, Georgia. The Exhibit Hall is open the 25th through the 27th and will showcase over 14 acres of guns and gear. There will also be numerous special events, plus entertainment. If you plan to attend, be sure to register for the event and book your hotel soon!
The 154th NRA Annual Meetings & Exhibits will be held at the Georgia World Congress Center (see map below). The 14-acre exhibit hall will feature the latest guns and gear from firearm industry companies. The schedule of events also includes educational seminars, product demonstrations, and fundraising banquets to supprt Second Amendment rights.
The 2025 NRA Annual Meetings & Exhibits has events on the 24th and the convention hall will officially open at 9:00 AM on April 25. NRA members and immediate family receive free entry. Non-members can join online or at the door for immediate access. Visit NRAam.org for more information.
NRA Annual Meetings & Exhibits Registration
CLICK HERE to REGISTER for the 2025 NRA Annual Meetings and Exhibits. NOTE: NRA Members and their immediate family get FREE ENTRY.
NRA Annual Meetings & Exhibits — Special Events
CLICK HERE for list of Special Events. There will be a powerhouse line-up of political speakers this year. In addition there will be major fundraising events featuring products from many companies (see below). Other special events will include: NRA Foundation Banquet and Auction, Women’s Leadership Forum, NRA Ring of Freedom meetings, National Prayer Breakfast and more.
Entertainment
Big & Rich bring their high-energy Country Rock sound to the Annual Meetings. With chart-topping hits like Save a Horse (Ride a Cowboy), Lost in This Moment, and Comin’ to Your City, Big Kenny and John Rich are popular entertainers.
We think every handgun fan should have a nice .22 LR rimfire pistol in his/her collection. Rimfire pistols have low recoil and the cost per shot is a small fraction of the price of shooting a centerfire pistol (especially a .44 magnum or .45 ACP).
The Taurus TX22 is a nice first rimfire handgun, with very good ergonomics, above-average accuracy, and a very affordable price. Right now the TX-22 with gray frame and 4.1″ barrel is on sale at Palmetto SA for just $236.99 — a real steal. There is also a compact model TX22C with 3.6″ barrel for $249.99.
Here are some verified owner reviews:
“Fantastic ergonomics, great trigger! More than 500 rounds through this pistol without a single jam or failure to feed. Can’t recommend this pistol enough. Buy one!”
“Fantastic 22LR pistol. I have a few different plinkers and this is my favorite one — it’s accurate and reliable as hell straight out the box.”
“This gun is very accurate… a fantastic training gun. Reliability is excellent. I would recommend this handgun to a friend.”
“Total fun shooting. It is reliable and comfortable. The kit comes with a [handy loader] for the magazines.”
“Perfect for teaching the kids, new shooters, and having fun. It cycles all sorts of ammo with no issues.”
“Really great shooting gun. It even ate through the cheap ammo with no problems.”
Taurus TX22 Competition — Optics-Ready
In addition to the basic, budget-priced TX22 pistol, Taurus offers an impressive Comp model set up for optics. The Taurus TX22 Competition model is built on the same full-size polymer receiver as the basic Taurus TX22 but has a newly engineered slide and barrel assembly designed to work with red dot optics.
The Taurus TX 22 Competition features a “skeletonized” slide with a cutout between the ejection port to just behind the front sight. The mounting system allows the use of the following (but not limited to) sight models: Trijicon RMR, C-More STS 2, Vortex Venom, Doctor Noblex, Burris Fast Fire, Sightmark Mini, Holosun HS507C, Leupold Delta Point Pro.
Tips for Pistol Shoppers
When initially shopping for a pistol, it’s wise to try a variety of guns from multiple manufacturers. You’ll want to try polymer vs. metal frame, iron sights vs. optics. And try to test-fire the pistols on the type of targets you’ll be using for competition and/or fun shooting.
Coating bullets with a friction-reducing compound such as Molybdenum Disulfide (Moly) offers potential benefits, including reduced barrel heat, and being able to shoot longer strings of fire between bore cleanings. One of the effects of reduced friction can be the lessening of internal barrel pressures. This, in turn, means that coated bullets MAY run slower than naked bullets (with charges held equal).
To restore velocities, shooters running coated bullets are inclined to “bump up” the load — but you need to be cautious.
Be Careful When Increasing Loads for Coated Bullets
We caution shooters that when your start out with coated bullets in a “fresh barrel” you should NOT immediately raise the charge weight. It may take a couple dozen coated rounds before the anti-friction coating is distributed through the bore, and you really start to see the reduced pressures. Some guys will automatically add a grain or so to recommended “naked” bullet charge weights when they shoot coated bullets. That’s a risky undertaking.
We recommend that you use “naked” bullet loads for the first dozen coated rounds through a new barrel. Use a chronograph and monitor velocities. It may take up to 30 rounds before you see a reduction in velocity of 30-50 fps that indicates that your anti-friction coating is fully effective.
We have a friend who was recently testing moly-coated 6mm bullets in a 6-6.5×47. Moly had not been used in the barrel before. Our friend had added a grain to his “naked” bullet load, thinking that would compensate for the predicted lower pressures. What he found instead was that his loads were WAY too hot initially. It took 30+ moly-coated rounds through the bore before he saw his velocities drop — a sign that the pressure had lowered due to the moly. For the rounds fired before that point his pressures were too high, and he ended up tossing some expensive Lapua brass into the trash because the primer pockets had expanded excessively.
LESSON: Start low, even with coated bullets. Don’t increase your charge weights (over naked bullet loads) until you have clear evidence of lower pressure and reduced velocity.
Procedure After Barrel Cleaning
If you shoot Moly, and clean the barrel aggressively after a match, you may want to shoot a dozen coated “foulers” before starting your record string. Robert Whitley, who has used Moly in some of his rifles, tells us he liked to have 10-15 coated rounds through the bore before commencing record fire. In a “squeaky-clean” bore, you won’t get the full “benefits” of moly immediately.
To learn more about the properties of dry lubricants for bullets, read our Guide to Coating Bullets. This covers the three most popular bullet coatings: Molybdenum Disulfide (Moly), Tungsten Disulfide (WS2 or ‘Danzac’), and Hexagonal Boron Nitride (HBN). The article discusses the pros and cons of the different bullet coatings and offers step-by-step, illustrated instructions on how to coat your bullets using a tumbler.
Pistol shooting is fun — that’s reason enough to head to an indoor range. In addition, all CCW permit holders should definitely practice regularly. For many people, indoor shooting can be done in the evening, after work, relatively close to home. Indoor ranges are most convenient for those who live near urban centers, where the biggest threats to public safety currently exist. This article talks about indoor firearms training and the proper procedures you should follow at indoor ranges.
This Video Covers Basic Gun Range Safety Rules and Etiquette
FIVE IMPORTANT SAFETY PROCEDURES for Indoor Ranges
1. Follow the Three Fundamental Rules for Safe Gun Handling
ALWAYS keep the gun pointed in a safe direction. ALWAYS keep your finger off the trigger until ready to shoot. ALWAYS keep the gun unloaded until ready to use.
2. Follow ALL Range Officer Instructions
ROs are the first and final authority on any range and their decisions are generally final. Arguing with a Range Officer may just get you thrown out.
3. Don’t Bother Others or Touch Their Guns
Respect other shooters’ privacy unless a safety issue arises. Do NOT engage other shooters to correct a perceived safety violation unless absolutely necessary – inform the RO instead. NEVER handle or touch another shooter’s firearm without their permission!
4. Know Your Range’s Rules
Review and understand any and all range rules and requirements/expectations. For example, what is the range’s maximum rate of fire? Are you allowed to collect your brass?
5. Know What To Do During a Cease Fire
IMMEDIATELY set down your firearm, pointed downrange, and STEP AWAY from the shooting booth (or bench). Range Officers do not want shooters trying to “secure/unload” their firearms in a cease fire situation — they want the shooters separated from their guns instantly.
BAD RANGE BEHAVIOR — Five Things NOT to Do at the Range
Here are the five worst behaviors we’ve seen at indoor ranges. These behaviors are both dangerous and inconsiderate. Any one of these behaviors can get you permanently banned from an indoor range.
1. Sweeping other individuals after loading a weapon behind the firing line is very bad. All your weapons should be empty until you reach your shooting station.
2. Turning the handgun sideways while trying to clear a malfunction or insert/remove a magazine. This will point the muzzle at a fellow shooter. Or, after shooting a gun, the shooter fails to clear the weapon and then places the gun somewhere near the shooting station with the muzzle in an unsafe position.
3. Reacting unpredictably when firing a high recoil handgun. We’ve seen people take a second shot by accident with the muzzle way off target.
4. Not obeying range commands — in particular continuing to shoot during called cease-fires.
5. Poorly aimed shooting that hits target frames or carriers, causing ricochets.
Double-Up on Hearing Protection When Shooting Indoors
When shooting indoors we recommend quality muffs with earplugs underneath, offering double protection. When inside an enclosed range, with other shooters blasting away right next to you, you really need effective hearing protection. But you also need to hear range commands and be able to communicate. That’s why we recommend electronic muffs with plugs underneath.
For indoor pistol shooting, we like the Howard Leight Impact Pro Muffs. These offer an impressive 30 dB Noise Reduction Rating (NRR). In addition, the electronic functionality allows you to hear all range commands clearly. These muffs are a good value. These are available for $76.99 at Palmetto SA. Howard Leight also makes good protective safety eyewear with ANSI Z87.1-2010 (High Impact) rating. These milspec, wrap-around Genesis safety glasses can be purchased for $16.63 on Amazon (#ad).


 All shooters, even rimfire enthusiasts, should always wear ear protection when at the range. A typical rifle gunshot is very loud — in the region of 140 to 170 decibels (the pain threshold is 130-140 db). Without ear protection, you can permanently damage your hearing during a single shooting session. We all know older shooters who are partially deaf, or who suffer from