Photo 1: Three Near-Equal-Weight 7mm Bullets with Different Shapes
TECH TIP: Bullets of the same weight (and caliber) can generate very different pressure levels due to variances in Bearing Surface Length (BSL).
This article, from the USAMU Facebook Page, concerns reloading safety. In the relentless quest for more speed and flatter ballistics, some hand-loaders load way too hot, running charges that exceed safe pressure levels. Hint: If you need a mallet to open your bolt, chances are your load is too hot. Stay within safe margins — your equipment will last longer, and you won’t risk an injury caused by over-pressure. In this article, the USAMU explains that you need to account for bullet shape, diameter, and bearing surface when working up a load. Don’t assume that a load which is safe for one bullet will be safe for another even if both bullets are exactly the same weight.
How Bullet Profile and Bearing Surface Affect Pressure Levels
Today, we continue our handloading safety theme, focusing on not inadvertently exceeding the boundaries of known, safe data. Bullet manufacturers’ loading manuals often display three, four, or more similar-weight bullets grouped together with one set of load recipes. The manufacturer has tested these bullets and developed safe data for that group. However, seeing data in this format can tempt loaders — especially new ones — to think that ALL bullets of a given weight and caliber can interchangeably use the same load data. Actually, not so much.
The researchers ensure their data is safe with the bullet yielding the highest pressure. Thus, all others in that group should produce equal or less pressure, and they are safe using this data.
However, bullet designs include many variables such as different bearing surface lengths, hardness, and even slight variations in diameter. In fact, diameters can occasionally range up to 0.001″ by design. Thus, choosing untested bullets of the same weight and caliber, and using them with data not developed for them can yield excess pressures.
This is only one of the countless reasons not to begin at or very near the highest pressure loads during load development. Always begin at the starting load and look for pressure signs as one increases powder charges.
Bullet Bearing Surface and Pressure
Bullet bearing surface length (BSL) is often overlooked when considering maximum safe powder charges and pressures. In Photo 1, note the differences in the bullets’ appearance. All three are 7 mm, and their maximum weight difference is just five grains. Yet, the traditional round nose, flat base design on the left appears to have much more BSL than the sleeker match bullets. All things being equal, based on appearance, the RN/FB bullet seems likely to reach maximum pressure with significantly less powder than the other two designs.
TECH TIP: Bullets of the same weight (and caliber) can generate very different pressure levels due to variances in Bearing Surface Length (BSL).
Bullet 1 (L-R), the RN/FB, has a very slight taper and only reaches its full diameter (0.284 inch) very near the cannelure. This taper is often seen on similar bullets; it helps reduce pressures with good accuracy. The calculated BSL of Bullet 1 was ~0.324″. The BSL of Bullet 2, in the center, was ~0.430″, and Bullet 3’s was ~ 0.463″. Obviously, bullets can be visually deceiving as to BSL!
Some might be tempted to use a bullet ogive comparator (or two) to measure bullets’ true BSL for comparison’s sake. Unfortunately, comparators don’t typically measure maximum bullet diameter and this approach can be deluding.
Note: Due to time constraints, the writer used an approximate, direct measurement approach to assess the bullets’ different BSLs. While fairly repeatable, the results were far from ballistics engineer-grade. Still, they are adequate for this example.
Photo 2: The Perils of Measuring Bearing Surface Length with Comparators
In Photo 2, two 7mm comparators have been installed on a dial caliper in an attempt to measure BSL. Using this approach, the BSLs differed sharply from the original [measurements]. The comparator-measured Bullet 1 BSL was 0.694” vs. 0.324” (original), Bullet 2 was 0.601” (comparator) vs. 0.430” (original), and Bullet 3 (shown in Photo 2) was 0.602” (comparator) vs. 0.463” (original). [Editor’s comment — Note the very large difference for Bullet 1, masking the fact that the true full diameter on this bullet starts very far back. You can use comparators on calipers, but be aware that this method may give you deceptive reading — we’ve seen variances just by reversing the comparators on the calipers, because the comparators, typically, are not perfectly round, nor are they machined to precision tolerances.]
Thanks to the U.S. Army Marksmanship Unit for allowing the reprint of this article.
Tumblers and walnut/corncob media are old school. These days many shooters prefer processing brass rapidly with an ultrasonic cleaning machine. When used with the proper solution, a good ultrasonic cleaning machine can quickly remove remove dust, carbon, oil, and powder residue from your cartridge brass. The ultrasonic process will clean the inside of the cases, and even the primer pockets. Tumbling works well too, but for really dirty brass, ultrasonic cleaning may be a wise choice.
Our friend Gavin Gear has evaluated an RCBS Ultrasonic cleaning machine using RCBS Ultrasonic Case Cleaning Solution (RCBS #87058). To provide a real challenge, Gavin used some very dull and greasy milsurp brass: “I bought a huge lot of military once-fired 7.52x51mm brass (fired in a machine gun) that I’ve been slowly prepping for my DPMS LR-308B AR-10 style rifle. Some of this brass was fully prepped (sized/de-primed, trimmed, case mouths chamfered, primer pockets reamed) but it was gunked up with lube and looking dingy.”
UltimateReloader.com Case Cleaning Video (7.5 minutes):
Gavin describes the cleaning exercise step-by-step on UltimateReloader.com. Read Gavin’s Cartridge Cleaning Article to learn how he mixed the solution, activated the heater, and cycled the machine for 30 minutes. As you can see in the video above, the results were impressive. If you have never cleaned brass with ultrasound before, you should definitely watch Gavin’s 7.5-minute video — it provides many useful tips and shows the cleaning operation in progress from start to finish.
Ultra Dry Necks After Ultrasonic Cleaning — Some Suggestions
The Ultrasonic cleaning process gets cartridge brass so “squeaky clean” that increased force may be required to seat your bullets, or they may “grab” as they go in the necks. To reduce bullet-seating effort, you may benefit from adding a little dry case lube inside the case-neck before loading (use a nylon brush). Another trick is adding a teaspoon of Ballistol lube to the cleaning solution. That provides a trace lubricant inside the necks, but does not interfere with powder ignition in any way.
The latest Gen2 RCBS ultrasonic cleaning machine has a large 6.3-quart capacity. That’s nearly 100% larger than the first generation machine in Gavin’s video. The bigger Gen2 machine, $419.99 at Precision Reloading (with FREE shipping), features a second ceramic heater and transducer to better clean brass cases and firearm parts. The LED is easily programmable, and the timer can be set for up to 30 minutes of cleaning. The original 3.2 quart-capacity RCBS ultrasonic machine, as shown in Gavin’s video, is still available for $197.99 at Midsouth Shooters. There is also another good 6-liter multi-mode ultrasonic cleaning machine, with stainless steel tank, available for $199.99 on Amazon.
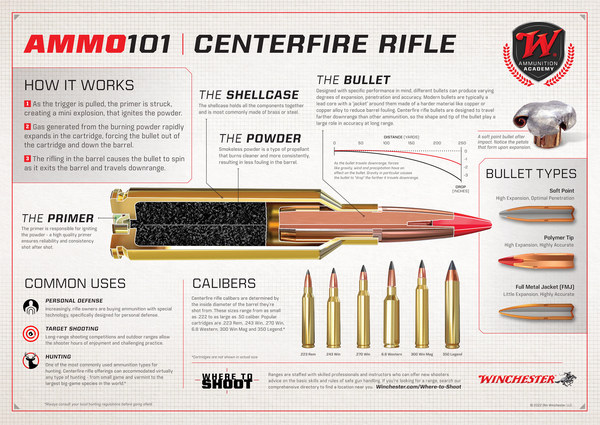
Winchester’s new “Introduction to Ammunition — Ammo 101” is a four-part series including custom illustrations and information for four major ammunition categories: rifle, pistol, rimfire, and shotshell. The Ammo 101 series provides a detailed overview of centerfire rifle, centerfire pistol, rimfire, and shotshell ammunition, showcasing ammunition construction, components, calibers, and common usage. The Ammo 101 resource is free to download from Winchesters.mediaassets.com. Or, simply click one or more diagrams below. Each image will launch a large PDF which you can print or download.
TIP: Click Each Image for Full-Screen Printable PDF
Shown below are the first four ammunition information sheets prepared by Winchester. These show all the key components of cartridges and shotshells, and explain the functions. These diagrams are useful for training, and for persons getting started in reloading.
Ammo 101 Centerfire Rifle Cartridge Diagram (click for PDF)
Ammo 101 Rimfire Cartridge Diagram (click for printable PDF)
Ammo 101 Pistol Cartridge Diagram (click for printable PDF)
Ammo101 Shotshell Diagram (click for printable PDF)
About the Ammo 101 Series
The FREE Ammo 101 resources can help instructors nationwide who introduce new entrants to the shooting sports and hunting. Instructors can incorporate these resources into their training presentations, use them as handouts, or have them printed locally.
“The basics of ammunition… is what we want to deliver with the Ammo 101 series,” said Matt Campbell, Winchester V.P. of Sales & Marketing. “With millions of people across the United States starting their journey in the shooting sports as new firearm owners, providing easy-to-understand information on ammunition types is one way we can help educate our customers.”
At the request of our readers, we provide select “Deals of the Week”. Every Sunday afternoon or Monday morning we offer our Best Bargain selections. Here are some of the best deals on firearms, hardware, reloading components, optics, and shooting accessories. Be aware that sale prices are subject to change, and once clearance inventory is sold, it’s gone for good. You snooze you lose.
NOTE: All listed products are for sale to persons 18 years of age or older. No products are intended for use by minors.
Brownells — Match Ammunition Sale, Major Brands, Many Types
⏺️ » Big savings on match ammo from Berger, Federal, Hornady and more
This week Brownells is running a major sale on top-tier Match Rifle Ammunition. You can save 10-25% on high-quality ammo for .223 Rem, 6mmGT, 6mm Creedmoor, 6.5 Creedmoor, .308 Win, .300 Win Mag, .30-06 Springfield and more. Brands on sale include Berger, Federal, Fiocchi, Hornady, and SIG Sauer. If you need factory ammo for an upcoming match or want to use it to test a new rifle, this is a good opportunity.
MidwayUSA — Major Athlon Optics Sale, Save up to 53%
⏺️ » Major discounts on wide selection of Athlon scopes and more
Athlon makes a variety of high-quality products, including rifle scopes, spotting scopes, thermal scopes, rangefinders, radar chronographs, and binoculars. Right now at MidwayUSA you can get discounts up to 53% on a large selection of quality Athlon products.
As an Amazon affiliate, this site can earn revenues through sales commissions.
With the catastrophic fires last year in California, many have wondered about hazards faced by gun owners in fire zones. This important video shows what really happens when loaded ammunition burns. You will probably be surprised. Contrary to Hollywood notions, the ammo doesn’t ignite in a massive explosion. Far from it… basically the rounds “cook off” one by one, and the bullets release at relatively low velocity. We’ve featured this SAAMI research project before, but it is worth reprising for those who have not yet seen the burn tests.
A few years back, SAAMI released an important video concerning ammo and fire. With professional fire-fighters standing by, over 400,000 rounds of ammo were incinerated in a series of eye-opening tests. If you haven’t had the chance to view this video yet, you should take the time to watch it now
The Sporting Arms and Ammunition Manufacturers’ Institute (SAAMI) has produced an amazing 25-minute video that shows what actually happens to sporting ammunition involved in a fire. This video shows the results of serious tests conducted with the assistance of professional fire crews. We strongly recommend you watch this video, all the way through. It dispels many myths, while demonstrating what really happens when ammunition is burned, dropped, or crushed.
Watch SAAMI Ammunition Testing Video
Video Timeline
2:10 Impact Test (ignited outside firearm)
3:40 65-foot Drop Test
5:08 Bullet Impact (.308 Win firing)
7:55 Blasting Cap Attacks
9:55 Bulldozer and Forklift Tests
12:20 Boxed Ammo Bonfire
15:37 Bonfire without Packaging
17:21 Retail Store Simulation Burn
20:55 Truck Trailer Burn
Over 400,000 rounds of ammunition were used in the tests. Some of the footage is quite remarkable. Testers built a bonfire with 28,000 rounds of boxed ammo soaked in diesel fuel. Then the testers loaded five pallets of ammo (250,000 rounds) in the back of a semi-truck, and torched it all using wood and paper fire-starting materials doused with diesel fuel.
The video shows that, when ammo boxes are set on fire, and ammunition does discharge, the bullet normally exits at low speed and low pressure. SAAMI states: “Smokeless powders must be confined to propel a projectile at high velocity. When not in a firearm, projectile velocities are extremely low.” At distances of 10 meters, bullets launched from “cooked-off” ammo would not penetrate the normal “turn-out gear” worn by fire-fighters.
We are not suggesting you disregard the risks of ammo “cooking off” in a fire, but you will learn the realities of the situation by watching the video. There are some amazing demonstrations — including a simulated retail store fire with 115,000 rounds of ammo in boxes. As cartridges cook off, it sounds like a battery of machine-guns, but projectiles did not penetrate the “store” walls, or even two layers of sheet-rock. The fire crew puts out the “store fire” easily in under 20 seconds, just using water.
Additional Testing: Drop Test, Projectile Test, Crush Test, Blasting Cap Test
Drop Test
The video also offers interesting ammo-handling tests. Boxes of ammo were dropped from a height of 65 feet. Only a tiny fraction of the cartridges discharged, and there was no chain-fire. SAAMI concludes: “When dropped from extreme heights (65 feet), sporting ammunition is unlikely to ignite. If a cartridge ignites, it does not propagate.”
Rifle Fire Test
SAAMI’s testers even tried to blow up boxes of ammunition with rifle fire. Boxes of loaded ammo were shot with .308 Win rounds from 65 yards. The video includes fascinating slow-motion footage showing rounds penetrating boxes of rifle cartridges, pistol ammo, and shotgun shells. Individual cartridges that were penetrated were destroyed, but adjacent cartridges suffered little damage, other than some powder leakage. SAAMI observed: “Most of the ammunition did not ignite. When a cartridge did ignite, there was no chain reaction.”
Bulldozer Crush Test
The test team also did an amazing “crush-test” using a Bulldozer. First boxes of loaded ammo, then loose piles of ammo, were crushed under the treads of a Bulldozer. A handful of rounds fired off, but again there was no chain-fire, and no large explosion. SAAMI observed: “Even in the most extreme conditions of compression and friction, sporting ammunition is unlikely to ignite. [If it does ignite when crushed] it does not propagate.”
Blasting Cap Test
Perhaps most amazingly, the testers were not able to get ammunition to chain-fire (detonate all at once), even when using blasting caps affixed directly to live primers. In the SAAMI test, a blasting cap was placed on the primer of a round housed in a large box of ammo. One cartridge ignited but the rest of the boxed ammo was relatively undamaged and there was no propagation.
We are re-publishing this article at the request of Forum members who found the information very valuable. If you haven’t read this Safety Tip before, take a moment to learn how you can inspect your fired brass to determine if there may be a potential for case separation. A case separation can be dangerous, potentially causing serious injury.
On the highly-respected Riflemans’ Journal blog, created by our late, dear friend German Salazar*, there was an excellent article about Cartridge Case-Head Separation. In this important article, Salazar (aka GS Arizona) examined the causes of this serious problem and explained the ways you can inspect your brass to minimize the risk of a case-head separation. As cases get fired multiple times and then resized during reloading, the cases can stretch. Typically, there is a point in the lower section of the case where the case-walls thin out. This is your “danger zone” and you need to watch for tell-tale signs of weakening.
The photo below shows a case sectioned so that you can see where the case wall becomes thinner near the web. You can see a little arrow into the soot inside the case pointing to the thinned area. This case hadn’t split yet, but it most likely would do so after one or two more firings.
Paper Clip Hack for Detecting Problems
The article provided a great, easy tip for detecting potential problems. You can use a bent paper clip to detect potential case wall problems. Slide the paper clip inside your case to check for thin spots. GS Arizona explains: “This simple little tool (bent paper clip) will let you check the inside of cases before you reload them. The thin spot will be immediately apparent as you run the clip up the inside of the case. If you’re seeing a shiny line on the outside and the clip is really hitting a thin spot inside, it’s time to retire the case. If you do this every time you reload, on at least 15% of your cases, you’ll develop a good feel for what the thin spot feels like and how it gets worse as the case is reloaded more times. And if you’re loading the night before a match and feel pressured for time — don’t skip this step!”
* Sadly, German Salazar passed away unexpectedly on June 21, 2022 at age 62. German was a great inspiration to this site who helped guide the creation of the AccurateShooter Forum. A brilliant man, expert attorney, and top-tier marksman, German will be sorely missed in the shooting sports world.
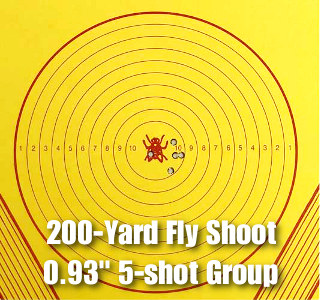
What kind of accuracy do you think is possible from a rimfire benchrest rifle? If we said 0.44 MOA you might not be surprised, thinking this was at 50 yards. But how about 0.44 MOA accuracy at TWO HUNDRED yards. Now that’s impressive. Consider this — at 200 yards, a 10 mph crosswind will push that little 40gr bullet 15.3 inches. Here’s the story, which comes from the Land Down-Under, Australia.
A few seasons back, Australian John Lavaring shot a group at 200 yards that would make most centerfire shooters proud. The five-shot group, with all shots in the center 10-Ring, measured just 0.93 inches. That works out to 0.44 MOA at 200 — mighty impressive for a .22 LR. Recorded at a Rimfire Fly Shoot benchrest event in Canberra, Australia, this 200-yard target set two new Australian SSAA National records! John was using ELEY Tenex ammunition.
Congratulations to John Lavaring for a spectacular demonstration of how well a rimfire rig can shoot — even at 200 yards. We rarely shoot our .22 LR rifles past 50 meters. Maybe it’s time to start a Rimfire ELR series, with targets at 200 or even 300 yards. What do you think of the Rimfire ELR idea? Leave comments below.
Anschutz 54 Benchrest Rig
The rifle was a Anschutz model 54 Match in a custom benchrest stock. John’s record-setting rig features a barrel block, which you can see forward of the action. Scope is a Bausch & Lomb BR model. We don’t have the round count on Lavaring’s barrel, but good rimfire benchrest rifles can often get 10,000 rounds (or more) of accurate life.
Rimfire Ballistics at 200 Yards
Some folks may be wondering about .22 LR ballistics at 200 yards. Well, with a 25-yard zero, the 200-yard drop for John’s 40gr Tenex ammo is 54 inches, assuming 0.145 G1 BC and 1085 fps muzzle velocity per ELEY website. And at 200 yards, a 10 mph crosswind will push that little bullet 15.3 inches! We’re told the winds were pretty tricky when Lavary shot his record group. This makes his achievement all the more impressive — we have to admire John’s wind-reading ability.
This ELEY ammo has proven to be exceptionally accurate. Here is a short video showing TEN rounds of Tenex shot from a machine rest with target at 50 meters.
The shape of powder grains has a profound effect on the performance of the powder charge, as it concerns both pressure and velocity. There are multiple powder shapes including flake, ball, and extruded or “stick” (both solid and perforated).
So how does powder grain shape affect pressure and muzzle velocity?
In general, it can be said that powder that burns progressively achieves a desired muzzle velocity at lower maximum pressure than a powder that burns neutrally, not to mention a degressive powder. As grain size increases, the maximum pressure moves towards the muzzle, also increasing muzzle blast. Muzzle velocity and pressure can be adjusted by means of the amount of powder or loading density, i.e. the relationship between the powder mass and the volume available to it. As the loading density increases, maximum pressure grows.
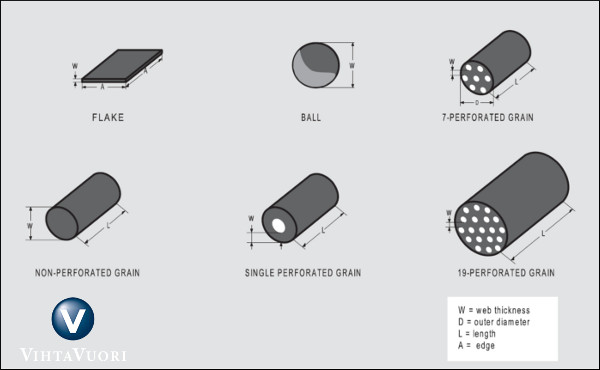
All Vihtavuori reloading powders are of the cylindrical, single-perforated extruded stick type. The differences in burning rate between the powders depend on the size of the grain, the wall thickness of the cylinder, the surface coating and the composition. Cylindrical extruded powders can also have multi-perforated grains. The most common types are the 7- and 19-perforated varieties. A multi-perforated powder grain is naturally of a much larger size than one with a single perforation, and is typically used for large caliber ammunition.
Other types of powder grain shapes include sphere or ball, and flake. The ball grains are typically used in automatic firearms but also in rifles and handguns. The ball grain is less costly to produce, as it is not pressed into shape like cylindrical grains. Flake shaped grains are typically used in shotgun loadings.
Web thickness in gunpowder terminology means the minimum distance that the combustion zones can travel within the powder grain without encountering each other. In spherical powders, this distance is the diameter of the “ball”; in flake powder it is the thickness of the flake; and in multi-perforated extruded powders it is the minimum distance (i.e. wall thickness) between the perforations.
The burning rate of powder composed of grains without any perforations or surface treatment is related to the surface area of the grain available for burning at any given pressure level. The change in the surface area that is burning during combustion is described by a so-called form function. If the surface area increases, the form function does likewise and its behavior is termed progressive. If the form function decreases, its behavior is said to be degressive. If the flame area remains constant throughout the combustion process, we describe it as “neutral” behavior.
The cylindrical, perforated powders are progressive; the burning rate increases as the surface area increases, and the pressure builds up slower, increasing until it reaches its peak and then collapses. Flake and ball grains are degressive; the total powder surface area and pressure are at their peak at ignition, decreasing as the combustion progresses.
At the request of our readers, we provide select “Deals of the Week”. Every Sunday afternoon or Monday morning we offer our Best Bargain selections. Here are some of the best deals on firearms, hardware, reloading components, optics, and shooting accessories. Be aware that sale prices are subject to change, and once clearance inventory is sold, it’s gone for good. You snooze you lose.
NOTE: All listed products are for sale to persons 18 years of age or older. No products are intended for use by minors.
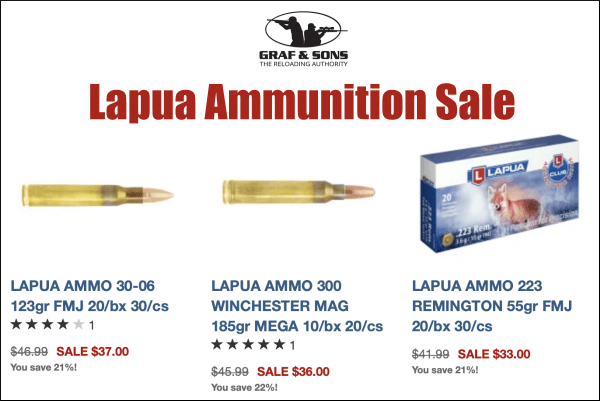
Graf & Sons — Lapua Ammo Sale, Save 14-25%
⏺️ » Superb Lapua rifle ammunition with significant savings
Sometimes you need quality ammo but don’t want to spend the time loading and testing. Lapua Ammunition is a great option, using ultra-high-quality Lapua brass and bullets. With this Lapua ammo you can feel confident that on your next hunt you’ll have the best ammo possible when the shot is on the line. Right now Graf’s has Lapua ammo, in many popular cartridge types, on sale with 14-25% savings.
MidwayUSA — Major Athlon Optics Sale, Save up to 53%
⏺️ » Major discounts on wide selection of Athlon scopes and more
Athlon makes a variety of high-quality products, including rifle scopes, spotting scopes, thermal scopes, rangefinders, radar chronographs, and binoculars.
Right now at MidwayUSA you can get discounts up to 53% on a large selection of quality Athlon products. For example the Athlon Talos Spotting Scope is just $128.57, 41% off the regular price. And the Athlon Cronus ATS Thermal Scope is now $1199.99, a stunning 53% ($1400) savings off the regular price.
John Nosler lived 97 years, passing in 2010. During his long lifetime, John was an iconic figure in the shooting and hunting world. Considered a true pioneer in bullet and ammunition design, Nosler developed the famous Partition bullet in the 1940s. Born on April 4, 1913 in Brawley, California, John built his business from scratch. He founded his bullet company in 1948. He was considered to be one of the great innovators whose designs helped create the premium bullet category and influenced ammunition manufacturers worldwide.
Moose-Hunt Inspires Partition Bullet Design
While hunting in Canada, John experienced a bullet failure on the hide of a mud-caked bull moose. He then began developing a revolutionary new projectile, which he called the “Partition”, because of the barrier that separated the bullet into two sections. One year later, John and a friend traveled back to British Columbia with his new Partition bullets, which were designed to provide deep penetration and expansion. The men bagged two moose with two shots, and the rest is history.
NRA Golden Bullseye Pioneer Award
In recognition of his contribution to the shooting sports industry, John was the unanimous choice for the inaugural 2007 NRA Golden Bullseye Pioneer Award. The award was the highlight of a long and fruitful career. Even though he officially retired in 1988 when his son and daughter-in-law, Bob and Joan Nosler purchased the company, John still managed to come to the office on a daily basis until his health declined.
Today, John’s son Bob Nosler still presides over the company as president and CEO of Nosler, Inc., based in Bend, Oregon. Along with bullets, the company now produces cartridge brass, loaded ammunition, and hunting rifles.
To learn more about John Nosler and his innovative bullet designs, get your hands on Going Ballistic, a “Professional Memoir” told by John Nosler to outdoor writer Gary Lewis. CLICK HERE to find the Going Ballistic book on Amazon. It is offered in paperback for $19.99 or hard-cover for $53.76. There is also a $6.99 Kindle edition.
John Nosler remained an avid hunter and shooter even late in life. Gary Lewis recalled that, at age 92, John Nosler attended the opening of a new shooting range outside Bend, Oregon. Even in his nineties, Nosler managed to drill two shots inside nine inches at 1000 yards. John Nosler leaves a legacy that will benefit hunters and shooters’ nationwide. The John A. Nosler Endowment of The NRA Foundation, sponsors the NRA’s Basic Rifle Training Program which instructs novices in safe rifle handling.


 Bullet 1 (L-R), the RN/FB, has a very slight taper and only reaches its full diameter (0.284 inch) very near the cannelure. This taper is often seen on similar bullets; it helps reduce pressures with good accuracy. The calculated BSL of Bullet 1 was ~0.324″. The BSL of Bullet 2, in the center, was ~0.430″, and Bullet 3’s was ~ 0.463″. Obviously, bullets can be visually deceiving as to BSL!


 The Sporting Arms and Ammunition Manufacturers’ Institute (
 We are not suggesting you disregard the risks of ammo “cooking off” in a fire, but you will learn the realities of the situation by watching the video. There are some amazing demonstrations — including a simulated retail store fire with 115,000 rounds of ammo in boxes. As cartridges cook off, it sounds like a battery of machine-guns, but projectiles did not penetrate the “store” walls, or even two layers of sheet-rock. The fire crew puts out the “store fire” easily in under 20 seconds, just using water.
 On the highly-respected Riflemans’ Journal blog, created by our late, dear friend German Salazar*, there was an excellent article about Cartridge Case-Head Separation. In this important article, Salazar (aka GS Arizona) examined the causes of this serious problem and explained the ways you can inspect your brass to minimize the risk of a case-head separation. As cases get fired multiple times and then resized during reloading, the cases can stretch. Typically, there is a point in the lower section of the case where the case-walls thin out. This is your “danger zone” and you need to watch for tell-tale signs of weakening.

 Anschutz 54 Benchrest Rig
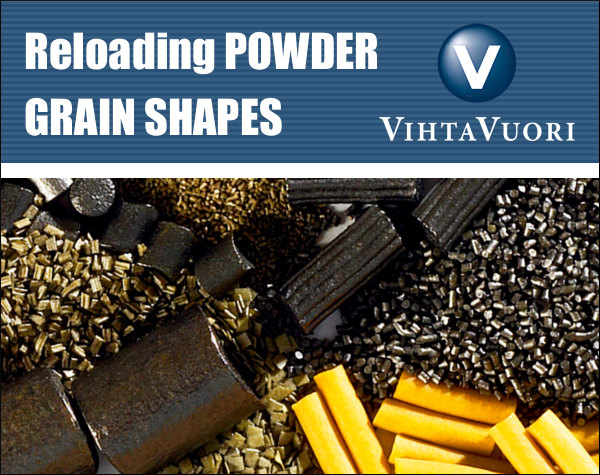


 NRA Golden Bullseye Pioneer Award
 To learn more about John Nosler and his innovative bullet designs, get your hands on Going Ballistic, a “Professional Memoir” told by John Nosler to outdoor writer Gary Lewis.


