Left to Right, Sherri Jo Gallagher, Mother Nancy Tompkins, and Michelle Gallagher — All Champions.
Happy Mother’s Day
Today we want to wish Happy Mother’s Day to all the moms around the world. All of us must remember that we literally owe our lives and our well-being to our mothers, who brought us into the world. Without the love, support, caring, and nurturing of our mothers, none of us would be here. So to mothers everywhere, we say:
“Thank you. Bless you. May your lives be filled with happiness today and everyday.”
At the top is a cherished photograph of the one of the greatest moms in the shooting community, Nancy Tompkins, along with her two little girls (who both turned into pretty darn good shooters themselves). On Nancy’s right is Michelle Gallagher, multi-time National Long-Range Championship. On the left is Sherri Jo Gallagher, who was the second woman in history to capture the NRA National High Power Championship at Camp Perry. Who was the first woman ever to accomplish that feat? You guessed it — Nancy Tompkins, Sherri’s mom, was the first-ever female High Power Champion. Nancy is married to another great shooter, Mid Tompkins. This is truly America’s “First Family of shooting”.
Nancy Tompkins is one of the greatest long-range shooters in American history. She has won the National Long Range Championship 5 times (1986, 1997, 1999, 2003, and 2015), the across-the-course National High Power Championship (1998), the Metric Smallbore Nationals (2012), and the Fullbore Nationals (2012). She has also been the Wimbledon Cup winner (1993) and a 7-time Leech Cup winner (1995, 1997, 1999, 2003, 2005, 2011 and 2012). She has won both team and individual medals in the World Championships and has been on 8 Palma Teams (as both a shooter and a coach).
Tompkins’ treatise, Prone and Long Range Rifle Shooting, is a must-read for serious Palma, F-Class, and High Power shooters. The revised Second Edition includes F-Class equipment and techniques, and newly updated information. Topics include Mental and Physical training, Reading Wind and Mirage Shooting Fundamentals, International Competition, and Loading for Long Range.
Shooting Sports USA Editor John Parker presents Rob Leatham with NRA Golden Bullseye Competitor Award at the 2025 NRA Annual Meetings and Exhibits. SSUSA photo by Peter Fountain.
Rob Leatham Wins Golden Bullseye Award
Renowned competitive pistol shooter Rob Leatham has received the inaugural (first-ever) Shooting Sports USA Golden Bullseye Competitor Award. Leatham received the award at the 2025 National Rifle Association Annual Meetings & Exhibits in Atlanta, Georgia. CLICK HERE for full story.
Winners of NRA Golden Bullseye Awards are determined by NRA Media staff, who represent more than a century of collective experience in the shooting industry. In particular, the NRA Golden Bullseye Competitor Award recognizes a competitive shooter who has displayed outstanding performance in competition and has “given back” to the shooting sports world by providing guidance and support to the next generation of competitive shooters.
“This award honors the highest level of achievement in competitive shooting — and there is no one more deserving to receive it first than Rob Leatham”, said John Parker, Editor-in-Chief ofShooting Sports USA. “For more than 40 years, Rob has set the bar — not just with his championship titles, but with his relentless pursuit of excellence, his sportsmanship and his influence on generations of competition shooters. He’s a competitor, a pioneer and a true ambassador of the shooting sports.”
Interview with Rod Leatham for The Armory Life
Competing since 1978, Leatham has amassed a remarkable record of success over the past four decades — eight-time IPSC World Champion, 11-time NRA Bianchi Cup Action Pistol Champion, 34-time USPSA/IPSC National Champion (Overall & Aggregate), eight-time Steel Challenge World Speed Shooting Champion, seven-time IDPA champion, and more.
Rob Leatham, By the Numbers:
34X USPSA / IPSC NATIONAL CHAMPION (Overall and Aggregate)
11X NRA BIANCHI CUP ACTION PISTOL CHAMPION
8X IPSC WORLD CHAMPION
4X USPSA CLASSIC NATIONALS AGGREGATE CHAMPION
14X USPSA / IPSC NATIONAL “SENIOR” CHAMPION
10X IPSC WORLD “TEAM” CHAMPIONS #TeamUSA
19X SINGLE STACK CLASSIC CHAMPION
3X AMERICAN HANDGUNNER WORLD SHOOTOFF CHAMPION
8X STEEL CHALLENGE WORLD SPEED SHOOTING CHAMPION
7X IDPA NATIONAL CHAMPION
2019 IDPA WORLD SENIOR CHAMPION
2006 ICORE INTERNATIONAL REVOLVER WORLD CHAMPION – LIMITED DIVISION
“I am truly honored to have been selected as the first recipient of this new award from NRA’s Shooting Sports USA,” said Rob Leatham. “I have loved shooting all my life, and I’m humbled and thankful that I’ve had the opportunity to do this for a living with Springfield Armory. Thank you to Dennis Reese and the Springfield Armory team for making my dreams come true.”
Rob Leatham has more than four decades behind the trigger as a professional shooter, trainer and expert. It is this background that has earned him the moniker of “The Great One”, or simply TGO. In fact, Springfield Custom created the “TGO 1″ handgun named in his honor and designed by the man himself. This special edition featured the Rob Leatham signature on the wood grips.
The NRABlog has interviewed seven prominent lady shooters, asking them for tips for other lady shooting sports enthusiasts, particularly new shooters. Top female competitors such as 2016 Bianchi Cup Winner Tiffany Piper and Team S&W Co-Captain Julie Golob offer good advice on competitive shooting as well as using firearms for self-defense. Read the full article here.
Here Are Some of the Top Tips from Leading Ladies:
Theresa Vail, Hunter and Host of NRA All Access “If you’re new to shooting or wanting to start, find some girlfriends that are interested in trying it with you. Having female friends go to the range with you takes the pressure off and makes a typically male-dominant arena much less intimidating. There is such thing as strength in numbers!”
Tiffany Piper (Action Pistol): The best piece of advice I would give is practice makes perfect. In New Zealand, we barely get enough range time with our noise restrictions so muscle memory and technique are key. Study up on shooting techniques, watch YouTube videos of other professional women shooters, and try out what you see. Don’t get intimidated thinking it’s a male’s sport[.]”
Julie Golob (Team S&W, 3-Gun and Pistol): “If something isn’t clear, just ask about it! Shooters are some of the best people you’ll ever meet, but we can be confusing and use a lot of shooter slang and lingo. When in doubt, ask!”
Tori Nonaka (Team Glock): “I always recommend to new shooters to first concentrate on the basics of gun safety. That way they will be more comfortable when they next learn about the particular gun…. Their confidence will grow as they familiarize themselves with their specific weapon. Then, it’s all about practice at the range.”
Corey Cogdell (Olympic Trap Shooter): “It’s empowering for women to know how to use a firearm in a sporting atmosphere as well as for self-defense. So if you are new to firearms, check out your local gun club and take a lesson! There you’ll find instructors and other shooting sports enthusiasts who will be more than willing to help you.”
British Lee-Enfield Model SHT’22/IV Rifle, courtesy www.iCollector.com.
Our friend Dennis Santiago was a technical advisor for History Channel’s Top SHOT TV show. One of the notable Top Shot episodes involved the “Mad Minute”, a marksmanship drill practiced by the British Army in the decades preceding World War I. Dennis observed that the Top Shot competitors didn’t fare too well in their “Mad Minute” attempts, not scoring many hits in the allotted one-minute time period. That prompted Dennis to give it a try himself — seeing how many hits he could score in one minute with an authentic Lee-Enfield rifle. So, a while back, Dennis ran the drill at a range in California.
Dennis, an active high power rifle competitor and instructor, explained that a “Mad Minute” exercise takes practice to perfect: “Here is a ‘Mad Minute’ drill, done using a period correct Lee-Enfield (SMLE) No.1 Mk III rifle and Mk VII ammo. I got to the Queen’s Regulations (15 hits in one minute) on the second run and put a good group on the target at 200 yards. This is ‘jolly good fun’ to do every once in a while. This is ‘living history’ — experiencing a skill from a time when the sun never set on the British Empire.”
“Mad Minute” was a pre-World War I term used by British Army riflemen during training at the Hythe School of Musketry to describe scoring a minimum of 15 hits onto a 12″ round target at 300 yards within one minute using a bolt-action rifle (usually a Lee-Enfield or Lee-Metford rifle). It was not uncommon during the First World War for riflemen to greatly exceed this score. The record, set in 1914 by Sergeant Instructor Alfred Snoxall, was 38 hits. (From WikiPedia.)
History of the MAD MINUTE Commentary by Laurie Holland, UK Shooter
The original military requirement of the “Mad Minute” saw the soldier ready to fire with a round in the chamber, nine in the magazine, safety on. This course of fire is still followed by the GB Historic Breechloading Arms Association and other bodies in their recreated “Mad Minute” competitions.
The first 10 would go quickly, but reloads were critical, this not done by a magazine change as Gary did with the RTM or in a modern tactical or semi-auto rifle, but through slick use of ‘chargers’. It is this aspect which fouls so many of my colleagues up as it is very easy to cause a jam and a large part of 60 seconds can go in sorting it out!
Charger clips were selected for those that just held the rounds firmly enough to stop then falling out, were sand-papered and polished with a stove / fireplace polish called ‘Zebrite’ so that the rimmed rounds would slip through the clips like corn through a goose.
If you’re unfamiliar with the cock-on-closing Enfield action, it seems clumsy. With intensive practice it is very smooth and can be operated incredibly quickly. The trick is to whip the bolt back onto its stop and initiate a rebound movement that takes it and the cartridge well into the chamber thereby reducing the effort required to close the bolt and chamber the round.
The MAD MINUTE Training Standards and Target
“Mad Minute” was a pre-World War I term used by British Army riflemen during training at the Hythe School of Musketry to describe scoring a minimum of 15 hits on a target at 300 yards within one minute using a bolt-action rifle (usually a Lee-Enfield or Lee-Metford rifle). It was not uncommon during the First World War for riflemen to greatly exceed this score. The record, set in 1914 by Sergeant Instructor Alfred Snoxall, was 38 hits.
Royal Scots Fusiliers soldiers train with SMLE Mk III Lee–Enfield rifle.
Listed as “Practice number 22, Rapid Fire” of The Musketry Regulations, Part I, 1909, this drill required at least 15 shots on the Second Class target at 300 yards. The exercise was just one of several annual tests to classify a soldier as a sharpshooter, first or second class shooter depending on the points achieved.
Research indicates the Second Class target was a 48″ x 48″ square with 24″ inner circle and 36″ outer circle. The sight mark was a central 12″ x 12″ shape representing a soldier. ALL hits scored points (3 for center circle, 2 for outer circle, 1 for outer square). NOTE: Though some sources say the Mad Minute drill used a 12″-diameter round target, this appears to be a mistake from Ian Hogg’s book “The Encyclopedia of Weaponry”. No other source mentions a 12″ circle, which would be a mere 3.82 MOA. In reality the true drill target was a 48″ x 48″ square, roughly 15 times larger. (From No.WikiPedia.)
This story is about a great shooter, Joe Hendricks Jr., and his Eliseo RTS Tubegun, chambered in 6mm Competition Match. With this versatile rifle, Joe Hendricks Jr. won the 2019 CMP Cup Aggregate Title for Match Rifles. Joe comes from a long line of talented marksmen. His father AND his grandfather are elite competitive shooters. His dad has been a National Champion, and all three generations have shot together, shoulder to shoulder, on the Remington Rifle Team. Like grandfather, like father, like son.
Joe says: “I think it’s pretty cool that there have now been two major Across the Course Championships won by a Hendricks using a Gary Eliseo chassis, one by me this year, and one in 2014 when my father (Joe Hendricks Sr.) won the NRA National Championship.”
Photography by Meghan Hendricks.
Joe Hendricks Jr.’s Rifle — Eliseo RTS Chassis, Rem 40X Action, Krieger Barrel
Joe’s rifle is built on a Competition Machine RTS Target Model chassis. This Tubegun features a Remington 40X action with Pacific Tool & Gauge Bolt and Jewell trigger. The scope is a Leupold 6-18x40mm. The barrel is a Krieger chambered in 6mm Competition Match. Joe explains: “The 6mm Competition Match is a cartridge that my dad came up with. It is basically a .243 Winchester with a 31° shoulder.”
If you look carefully in the photo below, you’ll note the silver-toned, adjustable butt-plate. That’s an upgrade Joe added: “I did a small modification to the stock, where I put on an Anschutz buttplate instead of the standard one Gary Eliseo uses. This Anschutz hardware provides a little bit more adjustability.”
Here Joe Hendricks Jr. fires at 200 yards from the standing position.
The Standing Position — Why It’s Critical to Match Success
Joe told us: “As far as shooting strategies and training methods go, I shoot a lot of standing practice — at least 50 shots per session. I still train the other positions of course, but I believe if you start your day off with a great standing score, it really makes the rest of the day easy because then you don’t feel like you’re playing catch-up the whole time.”
Joe explains: “When I’m shooting standing, I shoot in a manner very similar to the way that Carl Bernosky does. He’s written a few articles about the standing position. He always talks about making sure the shot goes off inside his hold, and I’m the same way. I don’t try to do too much. I just let the gun do its thing and when/if it stops in the Ten Ring, I shoot the shot. If it doesn’t, I don’t.”
About the CMP Cup Two-Day Course of Fire
The CMP Cup is a two-day match comprised of two, 1000-point Aggregates, for a 2000-point Grand Agg. Each day, the competitors fire 100 shots total from the 200, 300, and 600 yard lines. The match starts with 20 shots slow fire standing at 200 yards. Next are two, 10-shot, rapid fire strings in 60 seconds from the sitting position. Next are two, 10-shot strings in 70 seconds prone at 300 yards (rapid fire prone). Each day’s course of fire concludes with two, 20-shot sequences of slow-fire prone at 600 yards.
6mm Competition Match Cartridge — Slower Powder Yields Better Barrel Life
My dad was shooting a 6XC for a while and was getting tired of going through almost two barrels a year. So, he came up with the 6mm Competition Match. Like I said, it is a .243 Winchester with a 31-degree shoulder. This delivers the same (if not better) velocity as the other popular 6mm cartridges, but we get almost double the barrel life because we increased the case capacity, so we can shoot a slower burning powder. The barrel I took to Camp Perry that won the CMP Cup had over 3700 rounds on it when I was finished. [EDITOR: Take note readers! Most 6mm barrels are toast after 2500 rounds.] Granted it definitely needed to come off at that point, but it obviously was still shooting well enough to win!
Accurate Load with Peterson Brass, Berger Bullets, and Vihtavuori N165
The two loads I shot all week were Berger 108gr BT behind Vihtavuori N165 in Peterson Cartridge Company brass for 200 and 300 yards, and then Berger 115 VLD behind N165 in Peterson brass for 600 yards. Both loads are easily going over 3000 FPS. I try to only use the best components for reloading, so that’s why I go with Berger, Vihtavuori, and Peterson. Obviously Berger and Vihtavuori quality are pretty known, but I believe Peterson is right up there with Lapua[.] I’ve visited the Petersen factory many times. I’m always blown away by the time and effort Peterson puts into everything.
Winning Marksmanship — the Mental Game
The other big thing I’ve been focusing on lately is my mental game. In order to be at the top of a sport, regardless of the sport, the athlete has to have a solid mental approach. For me, I’ve learned that my key is confidence. A good shooting buddy, who was with me the first day of the CMP Cup, suggested I was arrogant because I kept telling him I was going to win. Then I told him it was confidence not arrogance. If I was confident in my ability, I did not think there was any way I could lose. [Editor: To help build confidence and visualize success, we recommend With Winning in Mind, by Lanny Bassham, an Olympic gold-medal winning marksman.]
All in the Family — Three Generations of Hendricks Marksmen
Joe’s father, Joseph Hendricks Sr., has been a National Champion rifle shooter. Joe’s grandfather, Gary Hendricks, is also a talented marksman. In fact, all three men — grandfather, father, and son — shot together on the Remington Rifle Team. Joe says that the shooting sports have helped build strong family bonds. He and his father enjoy shooting together, and competing against one another: “I learn so much just by watching my dad… shoot. Even though I have been competing for 10 years now, I’m still incredibly new to the shooting sports compared to my dad. My father is always there to help.”
“I feel very privileged to have grown up in the family that I did, with not only my father as a competitive shooter, but my grandfather as well. I definitely would not be the person I am today, let alone the shooter, without either of them. At one point, all three of us were on the Remington Rifle Team. I’ve had the opportunity to shoot team matches with all three of us on one team, as recently as this past summer.”
“Initially when I began shooting competitively, I was putting a lot of pressure on myself. I wanted to be as good a shooter as my dad and grandfather. I was trying so hard that it was really affecting my scores negatively. Then one year, I told myself I was just going to have fun, and not worry about match scores. That year was the year I really started to win things, and shoot some good scores.”
“When my father won the NRA National Championship in 2014, I was so proud, but along with being proud, all it did was make me more motivated. Ever since I started shooting, I wanted to win a National Championship, but after he won, it just fueled my fire more. There is a bit of father/son rivalry. It’s a lot of fun if we are shooting right next to each other at the same time. We just give each other crap about shooting a bad a shot, or shooting a lower score by a point or an X.”
“My dad started shooting when he was around 10, so he has a vast amount of knowledge compared to most people, especially me. He is always there to help whenever I have a question on anything firearm or shooting related. To this day, whenever I’m done with a match, I always talk to my dad. He always has time to listen to what I have to say.”
We created the above target 15 years ago. Since then it has been used by tens of thousands of shooters. It has proven very popular as a load development target, since all your load data fits neatly in the boxes under each target. In fact this target is being employed by both rifle-makers and barrel-makers (including Criterion) to test their products. The target was designed for aiming efficiency. The diamonds have 1/2″ sides and you can align your reticle cross-hairs on the horizontal and vertical lines. It is a clean design that is easy to see even at 200 yards with a 20X scope. When we test, we usually crank in a little elevation, setting the point-of-impact higher, so that our shots fall in the gray circles. That way you leave the red diamonds intact for precise aiming. CLICK HERE to download Load Dev target.
We also use these two targets for load development and precision practice. The circle dot target can also be used for informal rimfire competition at 50 yards.
Right-Click Each Target to Download Printable PDFs.
How to Print Your Targets
Most of us have access to a printer at home or at work. That means you can print your own targets. You’ll find hundreds of free target designs online, including dozens of downloadable targets on our AccurateShooter.com Target Page. If you’re feeling creative, you can design your own target with a computer drawing program such as MS Paint.
Paper Stock Is Important
If you want your self-printed targets to show shots cleanly (and not rip when it gets windy), you should use quality paper stock. We recommend card stock — the kind of thick paper used for business cards. Card stock is available in both 65-lb and 110-lb weights in a variety of colors. We generally print black on white. But you might experiment with bright orange or yellow sheets. Forum Member ShootDots report: “They sell cardstock at Fed-Ex Kinko! I use either Orange or Yellow. That makes it easy to see the bullet holes clearly.” NOTE: Test before you use the 110-lb Cardstock. On some printers, with the heavier 110-lb card stock, you will need to have the paper exit through the rear for a straighter run.
Here are some Target-Printing Tips from our Forum members:
“Staples sells a 67-lb heavy stock that I have settled on. I use the light grey or light blue, either of these are easy on the eyes on bright days. I have used the 110-lb card stock as well and it works fine. It’s just a little easier to print the lighter stuff.” (JBarnwell)
“Cardstock, as mentioned, works great for showing bullet holes as it doesn’t tear or rip like the thin, lightweight 20-lb paper. I’ve never had a problem with cardstock feeding in the printer, just don’t stick too many sheets in there. If I need three targets, I load only three card stock sheets”. (MEMilanuk)
“20-lb bond works pretty well for me if I use a spray adhesive and stick the entire back of the paper’s surface to the backer board.” (Lapua40X)
Precision Rifle fans should watch Shooting USA this week. On Wednesday, April 30, 2025 Shooting USA features the sixth annual Armageddon Gear (AG) Cup Invitational. The 3-day AG Cup posts the biggest cash money match in precision rifle competition. This challenging multi-stage, elimination-format competition took place in December 2024 at the Clinton House Plantation Range in South Carolina. On the final day, the top competitors face ten courses of fire to determine who will claim the Armageddon Gear AG Cup. This is an invitation-only match for America’s top Precision Rifle shooters, with the potential reward of huge cash prizes — $20,000 for the winner plus $1000 for each top scorer on the ten final courses of fire.
This Video Shows Highlights of the Armageddon Cup
Shooting USA runs on the Outdoor Channel Wednesdays 9:00 PM Eastern and Pacific, 8:00 PM Central. No Outdoor Channel on cable or if you miss the regular broadcast, you can stream the show online at any time on Vimeo for $0.99 per episode.
The AG Cup is the brainchild of Tom Fuller, the owner of Armageddon Gear, and to say it’s a success is a bit of an understatement. This invitation-only match is the richest tactical/precision competition on the planet.
This AG Cup video has good footage of the stages in a previous 2022 AG Cup.
Celebrating the Winners in 2024 AG Cup
This video shows the 2024 AG Cup winners celebration at the Clinton House Plantation Range.
Armaggedon Gear — Tactical Accessories Armageddon Gear, founded by former U.S. Army Ranger Tom Fuller, sells support bags, gun cases, slings, suppressor covers, scope covers, and a wide variety of other accessories popular with the PRS/NRL crowd. Armageddon Gear now provides products to the U.S. Military, Law Enforcement, as well as PRS/NRL competitors.
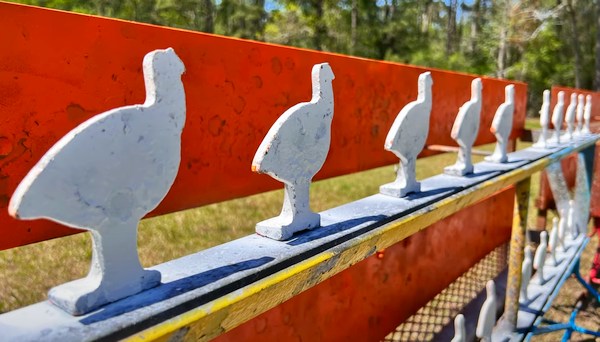
Shooting steel silhouettes is fun. For many of us, the “instant gratification” of knocking down steel is more fun than shooting paper. In fact, this very website came into being because the founder enjoyed shooting 600-yard steel silhouette matches in Southern California. That lead him to building a 6mmBR rifle and starting 6mmBR.com which evolved to become AccurateShooter.com.
Today’s video showcase covers a variety of metallic silhouette shooting disciplines. There are the classic smallbore and centerfire silhouette formats, shot from a standing position. One of the world’s top silhouette shooters, Eric Mietenkorte, shows how to shoot silhouette standing. But we also show varmint silhouette matches shot from prone position and from the bench. The Editor’s 600-yard silhouette matches were initially shot from prone (F-class style), and then later from a bench. Both formats were fun.
We also feature a cool video from New Zealand, showing handgun silhouette matches hosted at a beautiful, verdant range in Kiwi country. The handgun shooters use a reclined, foot-forward prone position.
So, whether you shoot prone, sitting, or standing, shooting metallic silhouettes is fun and challenging. Hearing the clang of steel and seeing a metal silhouette tip over is true “instant gratification”.
Metallic Silhouette — A Mexican Import
Silhouette shooting came to this country from Mexico in the 1960s. It is speculated that sport had its origins in shooting contests between Pancho Villa’s men around 1914. After the Mexican Revolution the sport spread quickly throughout Mexico. ‘Siluetas Metalicas’ uses steel silhouettes shaped like game animals. Chickens up front followed by rows of pigs, turkeys, and furthest away, rams. Being that ‘Siluetas Metalicas’ was originally a Mexican sport, it is common to hear the targets called by Spanish names Gallina (chicken), Javelina (pig), Guajalote (turkey) and Borrego (ram). Depending on the discipline one is shooting, these animals are set at different distances from the firing line, but always in the same order. CLICK HERE for NRA Rifle Silhouette Rules.
In this next video, silhouette champion Eric Mietenkorte talks about proper hold: “Consistency is key! Form a solid stance that is repeatable and allows you to have a natural point of aim. If you don’t come down on target adjust your feet, don’t rotate your body with your torso muscles.”
Erich explains his aiming method: “Pick a spot on the target and shoot for that. Try not to hesitate, if you’re on target, take the shot. It’s easy to get locked up by trying to make a great shot better. Make sure to follow through, keep that trigger pulled back. Don’t forget to have fun!”
Beautiful Rosebud Silhouette Range in Alberta, Canada
This video was created at the scenic Rosebud Silhouette and Benchrest Club in Alberta, Canada. The video offers an introduction to both centerfire (High Power) and smallbore Metallic Silhouette Rifle disciplines, including equipment and match format. These fun and challenging sports can be shot year-round, as you can see in the video below, which includes winter sequences.
Texas Varmint Benchrest Silhouette
If you like accurate rifles and reactive targets, you’ll enjoy this 48-minute video from Shooting USA TV, which features long-range varmint silhouette competition in Texas, the Lone Star State. We have participated in these kind of matches on the West Coast — they are definitely a ton of fun. The sport combines the pure accuracy of benchrest competition with the fun of knocking down critter targets. These are smaller than standard silhouettes, so it’s quite a challenge to hit them at 300 yards and beyond.
In this episode, host John Scoutten competes with his 6.5 Creedmoor PRS rifle. He found that 1-MOA Coyotes offered plenty of challenge at 385 meters! Most shooters at this Texas match use benchrest-grade rifles with premium front rests.
A similar Varmint Silhouette bench/prone match is held monthly at the Pala Range in Southern California. Prone shooters compete side-by-side with bench shooters. Ten steel “critter” targets are set at each of five yardages: 200m – Field Mice (“pikas”); 300m – Crows; 385m – Ground Squirrels; 500m – Jack Rabbits; 600 yards – Prairie Dogs. Competitors shoot 50 targets, 10 each at five different yardages, alternating among the five distances. So you might start at 500m then do 200m next, then do 600 yards etc. — the target distances are in mixed order to enhance the challenge.
Rimfire Speed Silhouette from the Bench
Fast and full of action, the Speed Silhouette competition is an exciting event shot on the clock. Competitors take 16 shots from 30 to 60 yards. The event is timed and the timer stops whenever the shooter finishes their final target by knocking it down. This event is a blast to shoot, and may even be more fun to watch live, as the results unfold within seconds of each relay start.
New Zealand Handgun Metallic Silhouette
New Zealand is one of the world’s most beautiful island nations, so we can’t think of a better venue for a silhouette match. This video features a handgun silhouette match with targets at multiple distances. The competitors use a special reclining position on the ground, with the handguns (mostly revolvers) aligned on the side of the leg.
Silhouette Shooting Scoring Procedures
This video from the Metallic Silhouette Shooters Society (MSSS) covers the basic rules of rimfire and centerfire silhouette matches. And then the video explains how the shooting strings during silhouette matches are scored. Yes the system is binary (knock-down vs. miss), but there are details, such as when a plate is hit but doesn’t fall. CLICK HERE for a second MSSS video that explains how to get started in silhouette shooting and lists the equipment you’ll need.
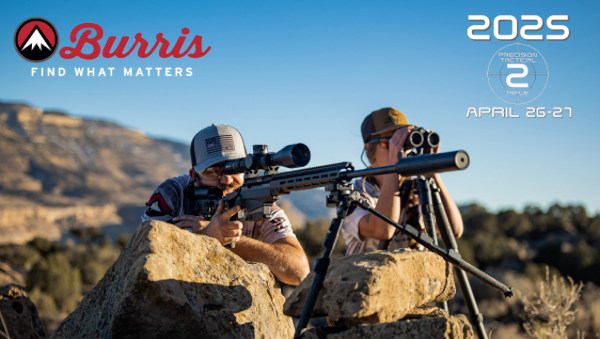
The 2025 Precision Tactical 2-Rifle Match runs this weekend, April 26–27, 2025 at the NRA Whittington Center in Coal Canyon, New Mexico. This unique event challenges competitors with eight dynamic stages designed to test their skills with two rifles — an AR-15 (.223 Rem/5.56 NATO) and a precision rifle (.223 Rem to .300 WinMag). This event is challenging — shooters must carry all their gear including bipods, packs, rangefinders, slings, and optics. The stages are quite varied, with everything from close rapid-fire challenges to 1,000-yard precision shots. Match stages include both field and stationary formats. Competitors transition between rifles while managing gear, movement, target acquisition, and time limits.
The NRA Whittington Center, nestled in the Sangre de Cristo Mountains in New Mexico, provides a world-class backdrop for this tactical challenge. Match directors state: The “Two-rifle match at the NRA Whittington Center in Coal Canyon is a rugged and demanding shooting competition set against a stunning New Mexico backdrop. The event is designed for competitors looking to put their skills to the test. Competitors will tackle eight stages across two days, each crafted to challenge their proficiency with two different rifles. These stages require shooters to adapt to various positions and distances. The natural terrain adds to the excitement of the match.”
Advanced Optics with HUD and Custom Ballistic Profiles
Among the high-tech gear being used in this match is the new Burris XTR Precision Shooter (XTR PS) riflescope. Available in 3-18x50mm and 5.5-30x56mm models, XTR PS has a Programmable Elevation Knob (PĒK) system. Even more impressive, this optic boasts an integrated HUD (“Heads Up Display”). The digital HUD delivers real-time data — elevation, wind hold, angle compensation, and countdown timer. The scope’s HUD works with custom ballistic profiles via the BurrisConnect™ App.
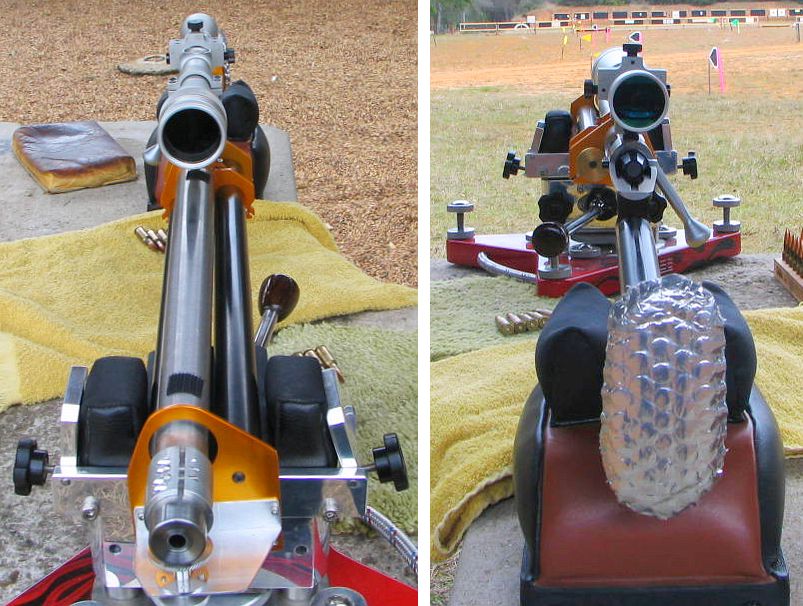
Editor’s NOTE: Shelley Davidson passed away in 2008 after a courageous battle with cancer. He was one of the great innovators in benchrest rifle design. This article, written before Shelley died, showcases Shelley’s creative talents at their best. His “Tinker Toy” design will always be a tribute to Shelley’s fabricating skills and imagination.
Shelley Davidson — a brilliant innovator. R.I.P. Shelley — you will not be forgotten.
Shelley Davidson’s peers called his radical rifle the “Tinker Toy” gun. We call it revolutionary. Even now, 14 years after its creation, there’s nothing quite like it. This innovative, skeleton design threw conventional wisdom to the winds. Shelley readily concedes he “broke the rules” of benchrest rifle building. But this was inspired rule-breaking, because Davidson’s rifle shot like a house on fire. The Tinker Toy gun won its first matches, both for Score AND for Group. And this rifle also delivered many “zero groups” in Gene Begg’s Texas Tunnel. Hats off to Shelley for conceiving and building a truly radical rifle that was also wicked accurate and successful in competition.
Tinker Toy 30 BR — Radical As It Gets
Report by Shelley Davidson
Although I’m not big on naming rifles, my shooting buddies have christened the gun “Tinker Toy.” I can live with that as it does kind of look as if it was made with a Tinker Toy set.
Origins of the Project
This project began with some wild ideas I had in the fall of 2006 about using magnets to tune a barrel. My idea was to use one magnet on the barrel and another on the stock so they pushed against each other to counter gravity-induced barrel sag (and possibly) tame barrel vibration in a beneficial manner. The only way to test these ideas was to build the device and mount it on a gun. That meant I had to build a new rifle because there was no place to mount a magnet on the stock of a conventional benchrest rig. I had a Kelbly-stocked heavy varmint stock with a Michael Kavanaugh paint job on it. I didn’t think Kav would ever forgive me if I started drilling holes in one of his works of art. My light varmint was in a carbon fiber Scoville stock that costs about a grand. Drilling into the Scoville for an experiment just smacked of bad judgment. So, the magnet thing was my first motivation for designing a new stock. As long as I was building from scratch I decided to offset the barrel and action 0.75″ to the right to counteract the spin/torque from the bullet.
Although there’s nothing new here, my second motivation was to build a 30BR that could shoot in the 10.5 lb light varmint class in NBRSA. The magnetic tuner will automatically make this gun illegal in the IBS. The IBS has declared all barrel attachments un-safe and have outlawed them. I personally feel that the IBS really outlawed all barrel attachments to prevent experimentation and innovation. But at least we have NBRSA matches.
Designing the New Gun — Thinking “Outside the Box”
Once I’d decided to build a lightweight stock that could support experimental devices out near the muzzle, I started drawing up some rough plans. I also took a trip to Jerry Stiller’s shop in Wylie, Texas for a brainstorming session with Jerry, the maker of Viper and other Benchrest actions. Jerry is a school-trained mechanical engineer and thinks differently than I do. I came away from Stiller’s shop with my design roughed out and sketched on paper. The design violated several covenants of conventional wisdom for building competition BR rifles. For instance, two-piece stocks stress the action. Stress reduction is why most BR rifles are glued into the stock. Another myth is that metal stocks vibrate too much so wood or foam-filled fiberglass or carbon fiber are used.
Tinker Toy Rifle DESIGN FEATURES
Shelly Davidson’s Rifle was so innovative, that almost every feature, except the bare action, is very different than you’ll find on most Benchrest rigs. Accordingly we felt it would be useful to isolate and describe the key design features, from stem to stern. Click thumbnails to view FULL-SIZE PHOTOS.
Front Bracket with Magnetic Tuner
The tuner consists of one rare earth magnet attached to the stock and another attached to a barrel sleeve with the magnets oriented so as to make the magnetic force repel each other. The purpose is to counter “barrel droop” and, hopefully, dampen barrel vibration. The lower magnet is carried on a threaded shaft (with lock ring), allowing the magnet to be raised up and down to adjust the “up push” on the barrel.
Tubular Fore-Arm Supported by Brackets
Three brackets support two tubes, one on either side of the barrel. The rear-most bracket is sandwiched between the barrel and the action. Four inches forward (max distance allowed for barrel blocks) a second bracket grips the barrel. Near the muzzle a third bracket secures the ends of the tubes and holds the magnetic tuner. To allow barrel offset, the left tube is 1″ diameter tube while the right tube is 5/8″ diameter.
Offset Barrel The rifle rests on a 3″ wide plate attached to the underside of the two fore-end tubes. With the plate centered in the front sandbag, the barreled action is actually offset 0.75″ to the right (looking forward from the breech). The purpose of this offset is to keep more weight on the right side to counter the tendency of the rifle to torque counter-clockwise. Two different diameter tubes allow for the built-in offset.
Floating Action without Sub-Support or Bedding
On the Tinker Toy gun, the action serves as a load-bearing assembly, holding the barrel in the front, and the skeleton buttstock (or “keel”) in the rear. Shelley was told that accuracy would suffer if you stressed a benchrest action in this manner but that proved untrue. It is a very simple solution to building a rifle, and it eliminates the need to bed the action. The forearm attaches to the action via a bracket installed like a recoil lug.
Skeleton Rear “Keel” Affixed Directly to Action
Davidson’s Tinker Toy does not have a conventional rear buttstock. Instead there is low-profile, v-shaped metal “keel”, as Davidson calls it, that rides the rear bag. The keel is supported by a tubular backbone that attaches at the rear of the Diamondback action. At the butt end is an aluminum plate covered with bubble wrap that serves as a butt pad. The skeletonized rear section helps the rifle maintain a very low center of gravity.
Locked Scope with External Windage and Elevation Adjustment
Shelley ran an older Leupold 36X Benchrest Scope with front-adjusting objective. To eliminate slop or loose tolerances in the erector mechanism that could cause changes in point of impact, the internals have been locked up by Jackie Schmidt. To move the cross-hairs relative to the bore axis, Shelley has a special Jewell/Foster rear ring that allows a limited amount of lateral and vertical movement of the entire scope body.
TINKER TOY SPECIFICATIONS
Action: Stiller SS Diamondback Drop-Port (1/2″ short), with .308 Bolt Face.
Barrel: Shilen .308 caliber, 17-twist, HV.
Chambering: 30BR, .330″ neck, Pacific Tool & Gauge Robinett Reamer.
Stock: Davidson Custom Tubular Stock with 0.75″ Offset Barreled Action.
Tube Construction: 6061 Aluminum, 1″ diameter (left), 5/8″ diameter (right).
Load: H4198 powder and 118gr Ronnie Cheek bullets. Loaded to 2980 fps.
Trigger: Jewell, 2 ounce BR.
Tuner: Custom, Adjustable with Opposing Magnets.
Optics: Leupold 36X (locked by J. Schmidt).
Rings: Jewell Foster External Adjusting Rings.
Stiller Diamondback Action and Shilen 17-Twist Barrel
I had wanted to use an aluminum Stiller Cobra drop port with a 6mmBR bolt face but Jerry had none in stock and he estimated it would be a year before one was available. Although I’ve waited for up to a year for an action in the past, I wanted to build this rifle during the fall of 2006 while the weather was pleasant enough to work in my unheated and un-air-conditioned garage shop. Jerry did have a 1/2″ short stainless steel Diamondback in stock so I purchased it even though it would add 3 ounces to the gun compared to the aluminum Cobra. Three ounces is a lot of weight when you’re working with a 10.5-lb limit. I had a heavy varmint contour Shilen 17-twist barrel that would work nicely and I had a Jewell trigger on a rifle that I wasn’t using at the time. I also decided to use my Leupold 36X (locked-up by Jackie Schmidt) with the Jewell/Foster adjustable rings.
Building the Tube Fore-Arm and Brackets
I took a wild guess as to tubing thickness and settled on .035″ for the 1″ left fore-arm tube and .058″ for the 5/8″ right fore-arm tube. All of the flat stock and tubes are 6061 Aluminum. I did the lathe work and the mill work and every evening I’d put the parts together and think about the proper way to proceed.
When the parts were mostly made, I started thinking that this was a truly ugly rifle. I thought about painting it but that wasn’t a good option as many of the parts are designed to slide over others and glue together. Anodizing was the best answer so while looking on the Internet for local anodizing shops I Googled “Home Anodizing”. Sure enough there were a few sites that told about how to anodize at home. I picked up some battery acid from NAPA Auto Supply, some Rit Clothes Dye from Wal-Mart, and a bunch of distilled water from the grocery store. Using an old battery charger as my dc power supply I started anodizing and dying the eighteen parts that went into the stock. Although I had to strip and re-anodize some of the parts, the work turned out acceptable.
Putting it All Together–Lug-Mounting the Fore-Arm and Lots of Epoxy
The barrel contour had to be modified to work with the stock which attaches by way of a rear plate which mounts like a recoil lug and a plate that ties the barrel and the stock tubes together 4″ forward of the bolt face. The four-inch maximum distance is a NBRSA rule concerning barrel blocks.
The recoil lug-style stock mount is probably the only truly innovative thing I did other than the opposing-magnet tuner. Basically, the rear bracket is sandwiched between the receiver face and the barrel shoulder–positioned where a conventional recoil lug would go. I also added a brass ring (visible in photo) between the anodized bracket and the barrel. This was done to distribute loads over a wider surface area. (I was concerned that the bracket material was fairly soft and I didn’t want to crush it as I torqued the barrel in place.) After fitting the barrel and plates I glued the entire gun together using epoxy and various LocTite adhesives. The rest of the parts were assembled but I did not Loctite the scope bases since I thought I’d be disassembling the rifle for re-work after the first trials. That came back to bite me during later testing when the gun started shooting erratically and I went down a couple of blind alleys before finding the loose bases.
Range Testing–Results Are Very Positive
The first range session was a real shocker. Even though the wind was up to 10mph and twitchy, the rifle showed promise from the very first shot. I really didn’t expect that kind of performance without, at least, some rework. After sighting in, I shot five, 5-shot groups that, when averaged together, measured .223″. That’s good enough to win some benchrest group matches. But I wasn’t finished with the gun yet–I still wanted to try out my magnetic tuner concept.
The Magnetic Tuner
Next, I built the magnetic tuner. The tuner consists of one rare earth magnet attached to the stock and another attached to a barrel sleeve with the magnets oriented so the magnetic forces repel each other. In order to test the magnets and to determine if the rifle really shot as well as it seemed to, I took it to Gene Beggs’s shooting tunnel in Odessa, Texas. I spent two days at the tunnel testing loads and then installed the magnetic tuner. The gun shoots well with the magnets and shoots well without them. I suppose I can’t make any claims as to how much, if any, improvement the magnets make. Gene said that my gun was the most accurate rifle to be tested at his one-year-old shooting facility: “Shelley Davidson brought one of the most unusual rifles I had ever seen; he called it his ‘Tube Gun.’ And boy, did it ever shoot! It still holds the record in the tunnel as the rifle that shot more zeros than any other to date.” I definitely recommend Gene’s facility for testing and refining shooting techniques and loads.
Competition — Tinker Toy Won Both Score and Group Matches
Finally the big day arrived when I’d shoot the first match with my new gun. The North Texas Shooters Association was holding its first club match of the 2007 season. At the Denton, Texas matches we shoot a Score Match in the morning and a Group Match in the afternoon. The March event was at 100 yards and the April match will be at 200 yards and so on alternating throughout the benchrest season.
Match One–Tinker Toy Wins Score with a 250 – 17X
Since the gun is chambered in 30BR and that chambering is almost immune to tuning woes, I preloaded 130 rounds with H4198 powder and 118gr Cheek bullets. I used my SEB front rest and rear bag which are made by Sebastian Lambang in Indonesia. Everything came together, and Tinker Toy demonstrated that the accuracy it showed in the tunnel was no fluke. The gun shot great and I won the morning match with a 250, 17X. The day was quite windy and the next best shooter scored a 250, 15X. So I’d chalked up my first win.
Match Two–Tinker Toy Wins Group with a .2282″ Agg Tinker Toy won the afternoon group match I entered with a five-group Aggregate of .2282″. (The second place score was .2568″.) My groups were .149″, .197″, .243″, .302″ (oops), and .250″. You know how some folks say a 30BR can’t be competitive with a PPC? Well that .2282″ Agg won’t break any records, but it is good enough to win some regional registered BR matches. So this rifle has demonstrated an ability to win in both Score and Group matches. Obviously I have a very good Shilen barrel, great Cheek bullets and the rest of the components are doing their jobs as well. But, the stock is also working well.
Score Shooting vs. Group Shooting–The Rules
In a score match, the shooter shoots one bullet at each of five record targets, which are clustered on one target sheet. The Aggregate score of five of these targets determines the winner. If the shooter touches the 10 ring on all of his 25 targets he can score a “clean” 250 score. Usually there will be more than one shooter who scores a 250 so the winner is determined by the X-count. The 1/2″ 10-point ring has a 1/16″ dot in its center. Touching the X dot adds to the shooters X count. In short-range group matches, the shooter must try to put five bullets through the same hole. At each distance (100 or 200), five, 5-shot matches are scored, the group sizes are added together (MOA equivalent at 200) and the total is divided by five to arrive at an Aggregate score.


 Happy Mother’s Day
Nancy Tompkins is one of the greatest long-range shooters in American history. She has won the National Long Range Championship 5 times (1986, 1997, 1999, 2003, and 2015), the across-the-course National High Power Championship (1998), the Metric Smallbore Nationals (2012), and the Fullbore Nationals (2012). She has also been the Wimbledon Cup winner (1993) and a 7-time Leech Cup winner (1995, 1997, 1999, 2003, 2005, 2011 and 2012). She has won both team and individual medals in the World Championships and has been on 8 Palma Teams (as both a shooter and a coach).


 Lee-Enfield No. 4 Rifle (1943), courtesy


 Research indicates the Second Class target was a 48″ x 48″ square with 24″ inner circle and 36″ outer circle. The sight mark was a central 12″ x 12″ shape representing a soldier. ALL hits scored points (3 for center circle, 2 for outer circle, 1 for outer square). NOTE: Though some sources say the Mad Minute drill used a 12″-diameter round target, this appears to be a mistake from Ian Hogg’s book “The Encyclopedia of Weaponry”. No other source mentions a 12″ circle, which would be a mere 3.82 MOA. In reality the true drill target was a 48″ x 48″ square, roughly 15 times larger. (From


 How to Print Your Targets


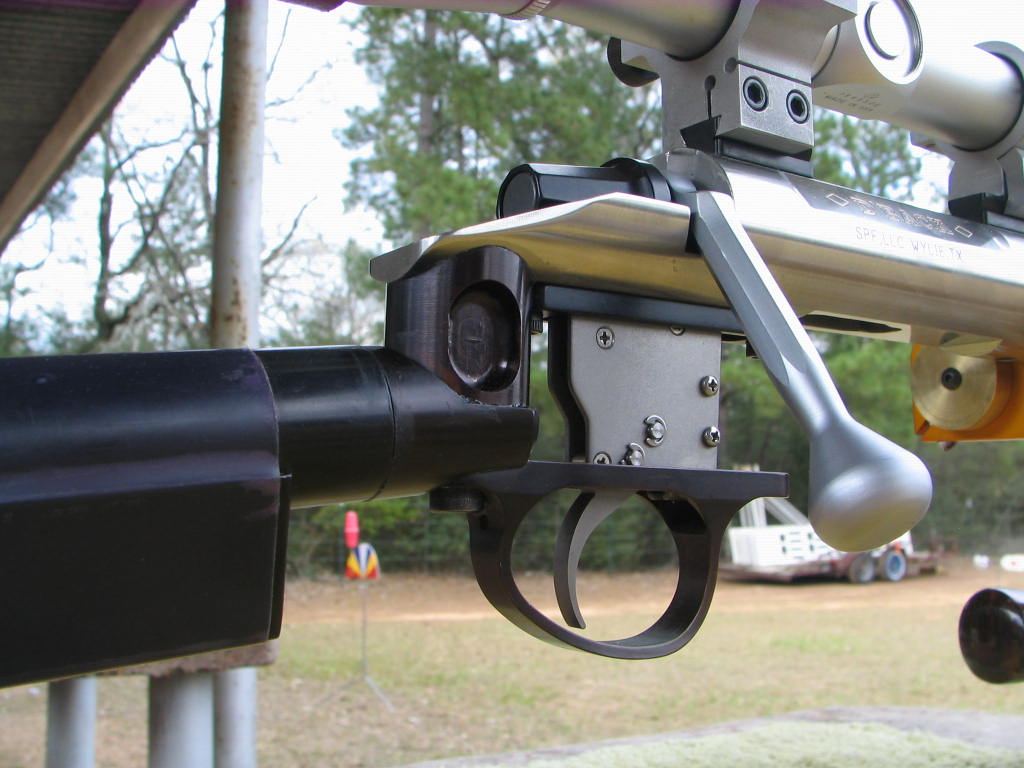


 The recoil lug-style stock mount is probably the only truly innovative thing I did other than the opposing-magnet tuner. Basically, the rear bracket is sandwiched between the receiver face and the barrel shoulder–positioned where a conventional recoil lug would go. I also added a brass ring (visible in photo) between the anodized bracket and the barrel. This was done to distribute loads over a wider surface area. (I was concerned that the bracket material was fairly soft and I didn’t want to crush it as I torqued the barrel in place.) After fitting the barrel and plates I glued the entire gun together using epoxy and various LocTite adhesives. The rest of the parts were assembled but I did not Loctite the scope bases since I thought I’d be disassembling the rifle for re-work after the first trials. That came back to bite me during later testing when the gun started shooting erratically and I went down a couple of blind alleys before finding the loose bases.

 Match One–Tinker Toy Wins Score with a 250 – 17X


