AR-15 Cartridge line-up image from 80% Arms, used with permission. This selection omits our favorite alternative — the 20 Practical (.223 Rem necked down to .204 Caliber).
Instead of using the standard .223 Remington or 5.56x45mm NATO round, you have many options for an AR-15, as shown above. This photo is from Complete Guide to Alternative AR-15 Rounds in the 80% Arms Blog. Some of the most notable alternative chamberings for AR-15s are:
20 Practical — Simply the .223 Rem necked down to .204 caliber. Requires new barrel. Same bolt, same magazines. Best Bang for the Buck. 6.5 Grendel — Moderately expensive, 6.5 Grendel requires a new barrel, bolt, and magazines. Most use the 6.5 Grendel for competitive shooting and/or hunting. .300 Blackout — Moderately expensive, the .300 Blackout requires a barrel change. This is used for home defense, and hunting. WARNING — with some bullets this round can be chambered in a .223 Rem barrel, with disastrous consequences. .458 SOCOM — Pretty expensive, requires new barrel and bolt. The .458 SOCOM round is typically used for hunting though it was originally designed for Close Quarters Battle (CQB). .50 Beowulf — The most expensive alternative AR-15 cartridge, this requires new barrel and bolt. The .50 Beowulf was created for game hunting, but most hunters use something more practical.
Of these five options, our top choice is the 20 Practical, followed by the 6.5 Grendel. Check out our featured 20 Practical AR Rifle Report. This 20 Practical cartridge is highly effective on small varmints, and has shown outstanding accuracy in AR-platform rifles crafted by Robert Whitley.
20 Practical — High-Velocity, Affordable Alternative
The 20 Practical is simply a .223 Remington necked down to .204 caliber. This efficient little cartridge can launch 32-grainers at over 4200 fps, with impressive results on P-Dogs. This makes the 20 Practical a great choice for an AR-based varmint rifle.
20 Practical Ultimate Varminter
A decade ago, as a “proof-of-concept”, AccurateShooter.com created a 20 Practical AR15 Ultimate Varminter with a custom 20-caliber upper from Robert Whitley of AR-X Enterprises, LLC. That project rifle was ultra-accurate — every 5-shot group out of the gun was less than the size of a dime. That gun was auctioned off, but Robert Whitley continues to produce custom 20 Practical AR15 uppers. (The 20 Practical cartridge is simply the .223 Rem necked down to 20 caliber — you can use standard .223 brass and load with standard .223 Rem dies. Just swap in a smaller expander and use smaller neck bushings.)
The 6.5 Grendel — Accurate, Plus Good for Hunters
The 6.5 Grendel round is one of the most accurate cartridges for the AR-15 platform. The 6.5 Grendel round offers a larger-diameter, .264-caliber (6.5mm) bullet running at good velocities. This provides ample energy for smaller game and deer. The 6.5 Grendel is often used for hunting deer up to 300 yards.
History of the 6.5 Grendel Cartridge
The 6.5 Grendel originated as a 6mm PPC necked up to 6.5 mm. After Alexander Arms relinquished the “6.5 Grendel” Trademark, the 6.5 Grendel was standardized as an official SAAMI cartridge. It has become popular with target shooters and hunters alike because it is accurate, efficient, and offers modest recoil. Good for small to medium game, the 6.5 Grendel is becoming a popular chambering in lightweight hunting rifles, such as the Howa 1500 Youth Model.
The .300 Blackout — Risky Business
The .300 Blackout appeals to folks who want a .30-caliber defense round. This can be loaded at various velocities. Loaded at subsonic speeds and shot with a suppressor, the .300 BLK offers very low sound levels. Unfortunately, that .300 Blackout cartridge can fit in a .223 Rem chamber. Shooting a .308-caliber bullet in .223 bore is a recipe for disaster.
The .300 AAC Blackout aka “300 BLK”, is a compact 30-caliber cartridge designed to work in AR-15 rifles. It has a shorter cartridge case to accommodate the bigger 30-caliber bullet while still fitting in a standard AR-15 magazine. Unfortunately, that’s the danger. A careless shooter can toss a .300 Blackout cartridge in with .223 Rem rounds without noting. And because the case-head size is the same as the .223 Rem (5.56×45) the rifle’s bolt assembly will happily chamber and fire the .300 BLK round. Problem is, that forces a .308 diameter bullet down an undersized .223-caliber bore. Not good!
This images were provided by Tactical Rifle Shooters on Facebook. The message was clear: “Don’t try to run 300 Blackout in your .223/5.56mm. It won’t end well. The problem is identical rifles and identical magazines but different calibers.”
Image from Accurate Shooter Forum. Cutaway shows the jammed .30-Cal bullet:
For those who MUST have a .300 Blackout, here are some things you can do:
1. Use different colored magazines for .300 Blackout vs. .223 Remington.
2. Mark .223 Rem upper handguards with the caliber in bright paint.
2. Fit all your uppers with caliber-labeled ejection port covers.
4. Mark all .300 BLK Rounds with heavy black marker.
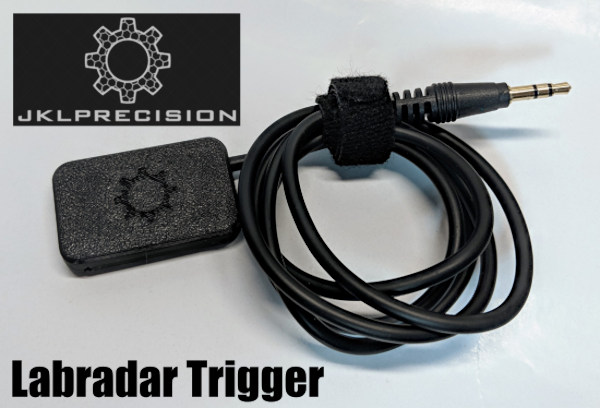
SUMMARY: This article reviews a device that “triggers” the LabRadar chronograph to register bullet speed. Rather than activate by sound or Doppler reading, this $35 JKL Inertial Trigger works from the rifle’s instantaneous recoil pulse when a shot is fired. After some frustration with his LabRadar when shooting at a range with reflective surfaces, our tester is now reporting that 100% of his actual shots are being captured correctly by his LabRadar chrono equipped with the JKL Inertial Trigger. He won’t use his LabRadar without it now. Other users have become instant fans of this inertial LabRadar trigger as well. It is very affordable and it works great. VIEW LARGE PHOTO.
JKL Inertial Trigger for LabRadar Chronograph
Product Review by F Class John
The LabRadar chronograph has been one of the most revolutionary tools in the shooting world because of how it collects velocity data, how it reports (and stores) that data, and, ultimately, the ease with which it can be positioned and operated. However, it’s not a perfect system. A majority of the complaints come from users whose LabRadar’s sometimes fail to record all the shots fired in a string. For the average plinker, this may not be an issue. But for serious shooters trying to do ladder tests or load development requiring all shots to be reported, it can be frustrating when a shot is missed.
Traditionally, LabRadar has recommended trying different settings that compensate for the gap between the unit and muzzle as well as well as having different options for how the unit recognizes a shot fired. While these options work to some degree, they aren’t a guaranteed fix especially when shooting at ranges with concrete baffles or with roofs, walls, and dividers that can alter sound waves. While nobody can precisely explain why shots are lost under certain circumstances, the fact remains it DOES happen. In addition, the default system can sometimes pick up stray shots from nearby rifles.
Not willing to give up on this sophisticated chronograph, many shooters have looked for a foolproof way to prevent such failures from happening. In fact, for this shooter, the frustration was so high that I actually sold my first LabRadar and went back to another chronograph before ultimately buying another LabRadar almost a year later. But I made that repeat purchase only after vowing to finding a way to make the LabRadar work — EVERY time, for EVERY shot.
See How JKL Inertial Trigger Works in this Video
JKL Inertial Trigger — Outstanding Product That Works Great
Enter the JKL Trigger for the LabRadar. This is an easy-to-use, inertial-driven trigger that activates simply from the recoil of your gun. The unit consists of a small rectangular pad attached to a long audio cable. All you do is plug in the audio cable, attach the pad to your gun with the provided hook and loop (Velcro) material. Then (important), you must change the LabRadar trigger settings from “Doppler” to “Trigger”. The unit works great and is easy to set up. In my experience, the unit will activate no matter where you place it on a stock. However the recoil of every gun is slightly different, so you will need to make sure you find a location that doesn’t interfere with your shooting setup.
An unexpected benefit of using the JKL trigger is that it gives you a larger area in which to place your Labradar unit, making it more convenient to setup on benches or range stations. I found this a welcome relief since the LabRadar originally seemed somewhat fussy about where I placed it. Now I can place the LabRadar in more convenient locations — as long as it’s still near my gun and pointed at the target correctly, I get consistent bullet speed data.
Are There Issues with “False Positives”?
If there is any downside to using the JKL Inertial Trigger, it’s that a very hard bump or aggressive working of the action can trigger a false reading. However these are easy to identify in your data, because the speed value is way lower than true fired shot values. Simply remove that low entry or otherwise ignore it in your calculations. To be fair, this “bump activation” really doesn’t happen very often once you get used to using the inertial trigger.
SUMMARY — Outstanding Accessory for LabRadar Users
Bottom line — if you own a LabRadar, then definitely get a JKL Inertial Trigger. Priced at just $35.00 this device is not expensive, yet it’s one of the most effective accessories you can buy for the LabRadar. I’ve recommended these inertial triggers to dozens of shooters. Every one of those guys who did buy a JKL trigger says they can’t imagine using a LabRadar without one. If you love what the LabRadar can do, but have been frustrated with shots not getting recorded 100% of the time, then definitely get yourself a JKL Inertial Trigger. It turns a good system into an amazing system. JKL Industries states that its inertial trigger “will work on anything from a .22 LR to a suppressed system or with standard rifle and brake.”
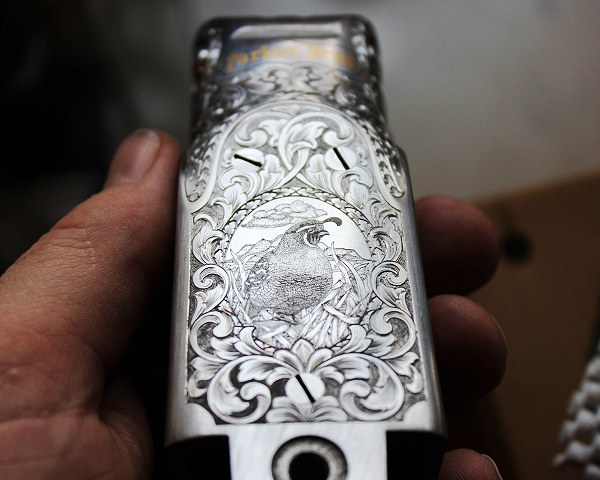
Impressive engraving by Jesse Kaufmann. Note how the scope rings have been engraved to perfectly match the engraving pattern on the Remington 547 action.
Who says fine craftsmanship is dead? There’s a fellow up in South Dakota, Jesse Kaufmann, who produces some of the most handsome engraving we’ve seen. Jesse, who operates Black Hills Gunstocks and Engraving LLC, is a true master at metal engraving and he also does superb stock checkering. Here are some examples of Jesse’s engraving work:
About Jesse Kaufmann, Master Engraver
Jesse Kaufmann was a professional stockmaker for Dakota Arms for over a decade. In 2009, he was inducted in the American Custom Gunmakers Guild as a checkering specialist. In January 2017, Jesse was awarded his Master Engraver certification by the Firearms Engravers Guild of America. With his broad skill set, Jesse is able to offer his clients a unique and complete package of stock work, finish, checkering, and engraving for a custom package that is all completed under one roof by his own hands.
Jesse Kaufmann’s work has been featured in American Rifleman, American Hunter, FEGA’s The Engraver, Sports Afield, Waidmannsheil Journal of German Gun Collectors Assn., Gun Digest 71st Edition, Modern Custom Guns Volume 2, Dangerous Game Rifles 2d. Edition. For more info, visit BlackHillsgunstocksandengraving.com, email blackhillsgunstocks [at] gmail.com, or call Jesse at (605) 499-9090.
At the request of our readers, we provide select “Deals of the Week”. Every Sunday afternoon or Monday morning we offer our Best Bargain selections. Here are some of the best deals on firearms, hardware, reloading components, optics, and shooting accessories. Be aware that sale prices are subject to change, and once clearance inventory is sold, it’s gone for good. You snooze you lose.
⏺ Amazing deal for under $290 — Sights, good ergos, action and forearm rails
Looking for a semi-auto defensive 12 gauge? This Citadel Warthog offers reliable function, nice ergonomics, and the features you want, all for just $288.99 cash price ($297.66 Credit Card). This nice scattergun boasts a black metal finish and black synthetic stock with black pistol grip. It comes standard with raised tactical rear sight and ghost ring front sight plus a Picatinny rail on the action and on the forearm (for lights etc.). This shotgun includes 3 extended choke tubes. A recent buyer was pleased: “Reliable, great ergonomics, will cycle everything”.
⏺ Killer Deal, Save $300 — better than other brands costing hundreds more
Guys, here’s a GREAT Nikon deal at Grafs.com. These very same Nikon LaserForce 10×42 LRF Binoculars are $1199.95 at Optics Planet and $1196.95 on Amazon. These feature HD Glass with long eye relief, 1900-yard range (on reflective targets), Incline/Decline “smarts”, and OLED display with 4-step intensity adjustment. Hunters — you won’t find better LRF binoculars at anywhere near this price. NOTE: This has sold out at this $300 OFF price. However, many of our readers were able to purchase these LRF binocs. Remember to check for Monday Deals as early as possible.
3. KYGUNCO — Anderson AM-15 (AR) Lower Receiver, $79.99
⏺ More gun control is coming — get an AR lower while you can
With the developments in Washington, it will likely become more difficult to purchase an AR-platform rifle in the future. You may want to get an AR lower now, while you can, at a reasonable price. KYGUNGO (Kentucky Gun Co.) is selling the Anderson AM-15 AR15 Lower Receiver for just $79.99 (cash price) or $82.39 (credit card). This is a mil-spec 7075 T6 Forged aluminum lower, Type 3 Hard Anodized. Flat-Rate Shipping to your FFL is just $11.99. These could sell out quickly.
4. Amazon — Double Rifle Backpack Case from $66.99 (36″)
⏺ Great cases 36″ to 55″, many compartments, good shoulder straps
It’s hard to find quality tactical gun cases that fit long match rifles. This Savior Gun Case (55″ model) can hold two rifles up to about 54″ OAL. Five (5) sizes are available: 36″, 42″, 46″, 51″, and 55″. This is a great choice for PRS. The Savior 51″ version in FDE Tan is $94.12 while the biggest 55″ Savior Tactical case starts at $97.99 on Amazon in black. Either is big enough for most PRS rifles, even with long barrels. The shorter 36″ case is just $66.99. These Saviour cases, #1 Best Sellers on Amazon, come in multiple colors: FDE Tan, OD Green, Multi-Cam, Black, and Gray.
5. Amazon — Vortex Diamondback HD Spotting Scope, $399.00
⏺ Great Spotting Scope Deal — hard to beat at twice the price
Whether hunting or target shooting, spotting scopes get you on target faster and easier than bare eyes or riflescope. If you need a good HD-grade spotter, check out the Vortex Diamondback HD 16-48x65mm angled spotting scope for $399.00. It offers great clarity and rock-solid lifetime guarantee. Relatively compact and weighing 49.8 ounces, this is a good choice for a hunter. There’s also a straight version for $399.00, with same 16-48X power and 65mm objective. If you need more magnification and low-light performance, Vortex offers the 20-60x80mm Diamondback HD spotter for $499.00.
6. Midsouth — Berry’s Tri-Can Ammo Carrier, $23.99
⏺ Very Handy New Product has Three Clear-Top Compartments
Midsouth now sells the new Tri-Can Utility Box Carrier for $23.99. This Tri-Can (from Berry’s) is a handy, versatile organizational tool that simplifies range trips. The tough injection molded plastic base and lids, rubber seal gaskets, and cam-lock latches keep contents safe. The Tri-Can boasts a strong, handy carry handle. The Tri-Can is made up of three individual translucent-lid containers which can be customized with up to three individual cells.
7. Amazon — Wheeler Digital Trigger Pull Gauge, $41.30
Every serious shooter should have a good trigger gauge. The Wheeler digital trigger gauge is precise and repeatable, measuring pull weights up to 12 pounds, making it suitable for all types of firearms. The load cell directly contacts the trigger making it extremely accurate with +/- 0.2 ounce precision. There are two modes: “Peak” and “Live.” Peak mode shows max force for each pull and calculates the minimum, maximum and average pull weights. Live mode continuously shows the force on the sensor. It even has a special adapter for Savage-style triggers with bladed inserts.
8. Brownells — Wipe-Out Foam Cleaner, $10.99
⏺ Wipe-Out Foam is effective, particularly when used right after shooting
Walking the firing line of the Berger SW Nationals this year, one cleaning product was mentioned over and over again and for good reason. Sharp Shoot R Wipe-Out foaming bore cleaner is a no-nonsense, easy-to-use bore cleaner that does a great job. We get best results with two applications of Wipe-Out after some wet patches. If you’re tired of long brushing sessions, give Wipe-Out a try — it really reduces brushing required. This is a great deal. The same 5 oz. can is $21.44 on Amazon.
⏺ Dual-purpose Empty Chamber Indicator that racks AR bolt
The Hornady Safe Cycle Rapid Rack is an empty chamber indicator (ECI) that also operates as a load assist device. The bright red lever visually displays that your AR’s chamber is empty. To “make ready”, simply shoulder the firearm, grab the lever and pull straight back and allow the Rapid Rack to fall to the ground as the now-charged bolt springs forward to feed a round into the chamber. You can also charge your AR normally as the Rapid Rackwill not interfere with standard operation. Just “grip it and rip it” with the inexpensive Hornady Rapid Rack, now just $9.90 at Midsouth.
10. Amazon — Real Avid Chamber Boss for ARs, $29.99
⏺ Essential tool for AR owners — handy, effective, self-contained
Cleaning AR-platform rifle chambers can be a pain, especially when it comes to removing the carbon. We found the Real Avid Chamber Boss is very effective on those dirty AR chambers and internals. The Chamber Boss includes a carbon scraper specifically designed for the AR chamber extension. This kit also include a chamber brush, and 5 special star-chamber cleaning pads. All these components fit right into the Chamber Boss’s handle, making transport simple and easy.
Do you have .20-Cal fever? Do you yearn to see what a 4200+ fps projectile can do to an unsuspecting prairie dog? Well you could go out and purchase a 204 Ruger rifle, fork over the money for a new, complete die set, and hope that the brass is in stock. Warren B (aka “Fireball”) has a more cost-effective solution. If you have .223 Rem dies and brass, all you need to shoot the 20 Practical is a new barrel and a .230″ bushing to neck down your .223 cases. Warren’s wildcat is simple, easy, and economical. And the 20 Practical matches the performance of the highly-publicized 20 Tactical with less money invested and no need to buy forming dies or fire-form cases. Warren’s cartridge was aptly named. Practical it is.
20 Practical Tikka Bolt Action for Varminting
by Warren B (aka “Fireball”) and Kevin Weaver
After building my 20 PPC, I wanted to do another .20 caliber, this time a repeater for predator hunting that could also serve as a gopher/prairie dog rifle. I wanted to use a Tikka M595 stainless sporter I had. This rifle is the ultimate repeater with an extremely smooth-feeding cycle from its single-column magazine. Since the Tikka was a .223 Remington from the factory, I first looked at possible case designs that would fit the magazine. The 204 Ruger was a very new round at the time and brass was scarce. I also didn’t care for the overly long case design or the standard throat dimensions of the cartridge. I then looked at the 20 Tactical. It was a nice cartridge but I didn’t like the fact that (at the time) an ordinary two-die Tac 20 set with just a plain full-length die and standard seater were $150. Not only did the costs bother me, but I was accustomed to using a Redding die set featuring a body die, a Type-S bushing neck die, and a Competition seater. To be honest, I also didn’t care for the 20 Tactical’s name–there is absolutely nothing tactical about the cartridge. I didn’t want to adopt a new cartridge based on what I perceived to be a marketing gimmick (that “tactical” title).
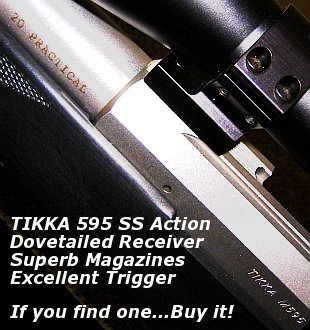
Warren B, aka “Fireball”, with his Tikka 595. With its smooth action and phenolic single-column mag, it cycles perfectly in rapid fire.
Simply Neck Down .223 Rem to Make a 20-223 Wildcat
I decided the best thing to do for my purposes was to simply neck down the .223 Rem case and make a 20-223. I already had the dies, the brass, and a rifle that would feed it perfectly. I decided to call the cartridge the 20 Practical because as you will see in this article, it truly is a very practical cartridge. In addition to the generous and inexpensive availability of brass and dies, the 20 Practical is an easy case to create, requiring no fire forming as a final step. Simply neck your .223 Rem cases down, load and shoot.
[Editor’s Note: Over the years, other shooters have experimented with .223 Remington cases necked down to .20 caliber, some with longer necks, some with different shoulder angles. Warren doesn’t claim to be the first fellow to fit a .20-caliber bullet in the .223 case. He gives credit to others who did pioneering work years ago. But he has come up with a modern 20-223 wildcat that involves no special case-forming, and minimal investment in dies and tooling. He commissioned the original PTG 20 Practical reamer design, and he and Kevin did the field testing to demonstrate the performance of this particular version.]
I chose Kevin Weaver at Weaver Rifles to fit and chamber the barrel to my rifle. Kevin does excellent work and is great to work with. Kevin liked the idea of the 20 Practical so much he agreed to purchase the project reamer. (BTW Kevin didn’t even need to purchase a Go/No-Go gauge, he just used an existing .223 Rem gauge.)
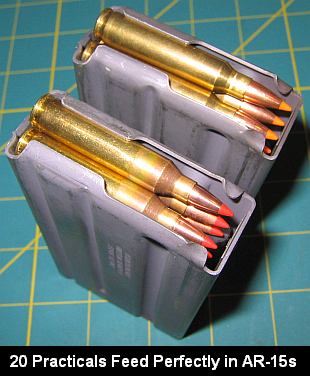
Before Kevin ordered the reamer, I talked over the reamer specs with him. My priorities were tolerances on the tight end of the .223 Rem SAAMI specification, a semi-fitted neck with no need for neck-turning, and a short throat so that we could have plenty of the 32gr V-Max in the case and still touch the lands. I also wanted this short throat in case [anyone] wanted to chamber an AR-15 for the 20 Practical. A loaded 20 Practical round will easily touch the lands on an AR-15 while fitting into the magazine with no problem. With its standard 23-degree shoulder, the 20 Practical case also feeds flawlessly through an AR-15.
As for the barrel, I only use Liljas on my rifles. I have had great luck with them. They have always shot well and they clean up the easiest of any barrels that I have tried. I had previously sent my Tikka barreled action to Dan Lilja so that he could program a custom contour into his equipment and turn out a barrel that would perfectly fit the factory M595 sporter stock. There isn’t much material on an M595 sporter stock so the contour had to match perfectly and it did. Dan Lilja now has this custom contour available to anyone who would like to rebarrel their M595 sporter with one of his barrels.
There Are Plenty of Good .204-Caliber Varmint Bullet Options
How to Form 20 Practical Cases — Simple and Easy
Forming 20 Practical cases is very easy. No fire-forming is required. Start with any quality .223 Rem brass. Then simply run the case into your bushing die with the appropriate bushing and call it done.
Project Componentry
My 20 Practical rifle started out as a Tikka Model 595 Stainless Sporter in .223 Remington. Though the M595 is no longer imported, if you shop around you can find M595 Sporters for bargain prices. Mine cost under $500. I think the action alone is worth that! The receiver has a milled dovetail for scope rings plus a side bolt release like expensive BR actions. The bolt cycles very smoothly. Ammo is handled with super-reliable 3- or 5-round detachable single-column magazines (FYI, Tikka’s M595 22-250 mags will feed a 6BR case flawlessly.) We kept the standard Tikka trigger but fitted it with a light-weight spring. Now the trigger pull is a crisp 1.8 pounds–about as good as it gets in a factory rifle. We replaced the factory tube with a custom, 24″, 3-groove Lilja 12-twist barrel. Dan Lilja created a special M595 sporter contour to allow a perfect “drop-in” fit with the factory stock. For optics, I’ve fitted a Leupold 4.5-14x40mm zoom in low Talley light-weight aluminum mounts. All up, including optics and sling, my 20 Practical weighs just under 8.5 pounds.
Test Report–How’s It Shoot?
I sent the barrel and barreled action to Kevin and in a very short time it was returned. Kevin did a perfect job on the rifle. I had asked him to try to match the bead blasted finish of the Tikka when he finished the new barrel. It came out perfect and the only way one can tell it is a custom is the extra two inches of length and the “20 Practical” cartridge designation.
So, no doubt you’re asking “how does she shoot?” Is my “prototype”, first-ever 20 Practical an accurate rig? In a word, yes. Even with the standard factory stock, and light contour barrel, it can shoot 3/8″ groups. Take a look at the typical target from this rifle. This is from an 8.5-pound sporter with a very skinny fore-end and a factory trigger.
Gunsmith’s Report from Kevin Weaver The 20 Practical: Origins and Development
Editor’s NOTE: We can’t say for sure who first necked down the .223 Rem to .20 caliber and chambered a rifle for that wildcat (as opposed to the .20 Tactical). But here is an account from way back in 2006 when the Warren B first came up with the idea of a .20 Practical cartridge, complete with reamer specs.
A year ago I received a call from Warren with a great idea. Warren asked “Why couldn’t we simply neck down the .223 Remington case to 20 caliber and get basically the same performance as the 20 Tactical? This way you can forgo the expensive forming dies that are needed for the 20 Tactical.” The idea made perfect sense to me, and I saw no major technical issues, so we got started on the project. I ordered a reamer from Dave Kiff at Pacific Tool & Gauge (PTG) with a .233″ neck. The .233″ neck should allow for a simple necking-down of the 223 Remington case to produce the 20 Practical in just one step. No fire-forming necessary! Furthermore, the PTG 20 Practical reamer Dave created should work with any available .223 Rem brass, commercial or military.
The first 20 Practical round was launched down range (through Warren’s Tikka) just a few months later. The brass formed as easily as expected. All one needs is a Redding type “S” bushing die with a .230 bushing and with just one step I had a .20 caliber case ready to shoot. Warren is brilliant. [Editor’s Note: We concur. For more details on Warren’s case-forming methods and his tips for adapting .223 Rem dies, read the technical sections further down the page.]
It would be almost six months later until I got around to building a dedicated test rifle chambered for the 20 Practical. I used a Remington 722 action, Remington synthetic semi-varmint stock, and a 24″ Douglas stainless steel XX 12-twist barrel. I formed and loaded about 30 cases using Remington brass in about 20 minutes. I used a .223 Rem seating die to seat the 20 Practical bullets. The .223 seating stem seated the small 20-Cal bullets just fine. The first loads sent the 40gr Hornady V-Max bullets down range at a modest 3500 FPS. I did not shoot for groups. I just wanted to use this load to sight in the rifle and break in the barrel. Load development was painless–I used reduced .223 Rem loads for 40gr bullets and worked up from there. In the table below are some of my preferred loads as well as Warren’s favorite recipes for his 20 Practical.
Bullet Wt.
Powder
Charge Wt.
Velocity FPS
Comments
32GR
H4198
24.1
4025
Warren’s lighter gopher load
32GR
AA2460
27.8
4154
Warren’s coyote/prairie dog load
32GR
N133
26.0
4183
Coyote/PD load, clean burn
33GR
H4198
26.0
4322
Hot Load. Use with Caution!
33GR
N133
27.0
4255
Kevin: 0.388” 5 shot group
40GR
H335
25.0
3583
Kevin’s barrel break-in load
40GR
H4198
24.0
3907
Hodgdon “Extreme” Powder
40GR
IMR4895
26.0
3883
Kevin: 0.288″ 5-shot group
40GR
N133
25.0
3959
Kevin: 0.227″ 5-shot group
Warren’s Load Notes: My pet loads are all with IMI cases, 32gr Hornady V-Maxs, and Fed 205 primers (not match). These are the most accurate loads in my rifle so far. I haven’t even bothered with the 40s as I have the 20 PPC and 20 BR for those heavier bullets. I prefer the lighter bullets in the 20 Practical because I wanted to keep speed up and recoil down in this sporter-weight predator rifle. Also, the 32gr V-Max is exceptionally accurate and explosive. I like N133 the best as it burns so clean. IMI cases are tough and well-made.
Kevin’s Load Notes: I used Remington 223 cases, Hornady V-Max bullets, and Remington 6 1/2 primers to develop the above loads. CAUTION: all loads, both Warren’s and mine, should be reduced 20% when starting load development in your rifle. All load data should be used with caution. Always start with reduced loads first and make sure they are safe in each of your guns before proceeding to the high test loads listed. Since Weaver Rifles has no control over your choice of components, guns, or actual loadings, neither Weaver Rifles nor the various firearms and components manufacturers assume any responsibility for the use of this data.
Comparing the 20 Practical and 20 Tactical
Kevin tells us: “The 20 Practical and the 20 Tactical are almost identical cartridges. There are only slight differences in case Outside Diameter, shoulder angle, and case body length. The neck length on the 20 Tactical is a bit longer, but there is still plenty of neck on the 20 Practical to grip the popular bullets, such as the 32gr V-Max. Here are some specs:
Cartridge
Bolt face to shoulder
Shoulder O.D.
Shoulder Angle
Total length
20 Tactical
1.5232″
.360
30°
1.755″
20 Practical
1.5778″
.3553
23°
1.760″
Both the 20 Tactical and the 20 Practical are fine .20 caliber cartridges. At present, the 20 Tactical is the more popular of the two because it has had more publicity. However, my favorite would be the 20 Practical. Warren’s 20 Practical gives the SAME performance as the 20 Tactical without fire-forming, or having to buy expensive forming dies. So with the 20 Practical you do less work, you shell out a lot less money, yet you give up nothing in performance. What’s not to like? To create 20 Practical cases, just buy a .223 Rem Redding Type “S” Bushing Die set with a .230 or .228 bushing and have fun with this great little cartridge.”
A while back, Cal Zant at PrecisionRifleBlog.com did a big muzzle brake comparison test. Along with measuring recoil reduction, Cal’s team recorded sound levels in PRB’s exhaustive muzzle brake field test. In the PRB archives you’ll find comprehensive muzzle brake sound test results, with hard data on 20 different muzzle brakes.
Sound can be a tricky subject, but Cal Zant, the editor of PrecisionRifleBlog.com, presents everything an informed shooter should know about muzzle brake noise in a straightforward and practical way. Most sound tests are measured from the side of the muzzle, in accordance with mil-spec standards, and Cal did that. But he also measured the sound level of each brake from behind the rifle, closer to the shooter’s position. This provides a more accurate indicator of the actual sound levels firearms operators will encounter while shooting.
Muzzle brakes ARE really loud — that’s something most active shooters have observed. But this study finally gives us some hard data and makes objective comparisons. The difference between brakes was quite significant. Some brakes were ear-splitting — more than twice as loud as other brakes tested.
As a bonus, Cal also provides data on how the new Ultra series suppressors from Thunder Beast Arms Corp (TBAC) compare in terms of sound level behind the rifle.
Useful reloading gear does not have to be costly. Here are ten handy (and very inexpensive) items that belong on your loading bench or in your range kit.
• Magnifying Glass – We use a flat, 2″x2″ pocket 4x-8x magnifier. This folds up on itself. Very handy, we use it to inspect bullets and brass. Use this to check your flash holes for burrs, and check the meplats of your bullets before loading.
• Clear 35mm Film Cannister – Use this to transfer the thrown powder charge to the little measuring cup that sits on your scale. That way you don’t get any kernel splash. Also if the charge weight is obviously off, it’s easy to dump back in the measure. A film canister works pretty well as a trickler too.
• Compressed Air in a Can -- Get these at office supply stores. Use the can (with tube attached) to blow crud out of cases after cleaning the neck with a brush, and blast loose debris out of primer pockets.
• Pin Vise – A simple pin vise with a #53 bit is perfect for deburring Lapua PPC and BR flash holes without reaming the flash-holes any larger. The Lapua PPC/BR flash-hole diameter is 1.5 mm, or 0.059″. Amazon.com sells a handy $8.99 pin vise kit with 10 bits, including the ideal 1.5mm bit. Other vendors offer a #53 pin vise bit that measures .0595″ or .060″ (depending or source). You can find pin vises and bits at hobby stores — here’s an example below with ten bits including 1.5mm. Pin vise sets can be found from $7 to $15.
• Bounce Dryer Sheets – The common dryer sheets eliminate “static cling” on your plastic reloading parts such as powder measure cylinders, powder funnels, and reloading press plastic bins. Thanks to Doc76251 for this tip.
• Ballistol Aerosol – Try using this versatile lubricant/solvent for full-length sizing. Spray some on a patch and you can wipe the carbon off your case necks. Then, continue to apply a very small amount of Ballistol on the case bodies — just thin sheen is all you need. Ballistol is super slippery, and easy to remove. For general full-length sizing (on small cases) it works great and doesn’t leave a gooey, waxy, or chalky residue. For heavier case-forming jobs, we recommend Imperial Die Wax.
• Shotgun Mop – Stick this in the chamber when using Wipe-Out foaming bore cleaner. This will seal off the chamber so the foam doesn’t flow into your action. For long chambers screw on one section of cleaning rod to aid extraction.
• Colored Sharpie Marking Pens – Mark your bullets ahead of the bearing surface, and the color transfers to the target. This way you can shoot multiple loads at the same point of aim and discern which load shoots the tightest. (Recommended for 300 yards and beyond). With colored bullet tips you can test multiple loads “round robin” to equalize wind effects. When testing seating depths for example, you can mark the longer-seated set of bullets red and the shorter-seated set green and shoot them during the same sequence. Just look at the colored marks on the target to see which grouped better.
• Thin Latex Gloves – You should keep a box of inexpensive, disposable latex gloves (the kind doctors use) in your loading room. These will prevent contamination of primers or powder kernels that you handle directly. Also, use the gloves when handling fine blued tools or firearms to prevent transfering body oils and salts that promote rust.
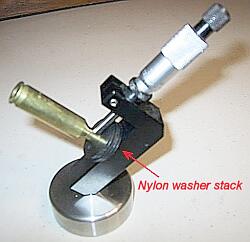
• Plastic Washers for Neck Mic – If you use a Sinclair Neck-wall Micrometer Gauge with integral stand, you can use thin plastic washers to adjust the height of the case on the mandrel. This makes it much easier to measure the same point on the case neck every time. Thanks to MikeCR for this tip (and photo).
Can a $1300 Ruger compete with a $7000 high-end sniper rifle from the UK? That was the question posed a few years back by Frank Galli, Head Honcho of Sniper’s Hide. Galli, aka “Lowlight”, conducted an interesting comparison test, running the $1300 Ruger Precision Rifle (RPR) vs. a $7000 Accuracy International AX in a 450-yard “mad minute” drill. The goal was to see how many shots could be put on a 12″ steel target in one minute. Both rifles were chambered for the 6.5 Creedmoor and were fed with Hornady 140gr Amax ammo. The much cheaper Ruger did surprisingly well, though the AI AX did come out on top. Galli got 19 rounds on target in one minute with the AI AX compared to 14 rounds with the Ruger.
Watch the “Mad Minute” face-off in this video:
Galli notes: “The target is 450 yards away, and, as noted in the video, we have winds gusting anywhere from 10 to 18 mph out on the Front Range of Colorado today. So my job is to not only hit the target as fast as possible, but to also manage the conditions.”
In Summary
Frank Galli says the Ruger offers a lot of bang for the buck:
“For those looking to get into competitive tactical shooting, like a PRS Event, there is absolutely no excuse. This rifle will allow you to be competitive, the only thing that would hold a person back is themselves. The more this rifle is shot, the more impressive it is. Would I trade my Accuracy International for one? Well, odd question, but no. However for those on a budget I would recommend the Ruger in a heartbeat.”
Upgrades for Ruger Precision Rifle — RPR Enhancements
After conducting this test, Galli added some upgrades to his first-generation RPR, with bolt-on parts. Improvements included new barrel, stock, grip, and handguards. The first video below runs through the selection and installation of parts, while the second video shows the upgraded RPR being tested in the field. These two videos have been watched over half-a-million times combined. Note, the current-generation RPR has different handguards than shown in the photos.
Magpul MOE Grip
Magpul PRS Stock
Seekins Precision “Triangle” Handguards
LongRifles Inc. (LRI) Aluminum Bolt Shroud
Custom K&P “Pre-Fit” Barrel from LRI (chambered in 6.5 Creedmoor)
If you’re a fan of “Heavy Artillery” here’s an impressive rifle that Forum member “Straightpipes” crafted himself nearly a decade ago. Even today, it remains a state-of-the-art engineering Tour De Force, complete with a custom-built, joy-stick REAR rest. We’re mightily impressed by the innovative design and superb metal-work displayed by this “home-built special”. ‘Straightpipes’ certainly proved that American “know-how” and creativity is still alive….
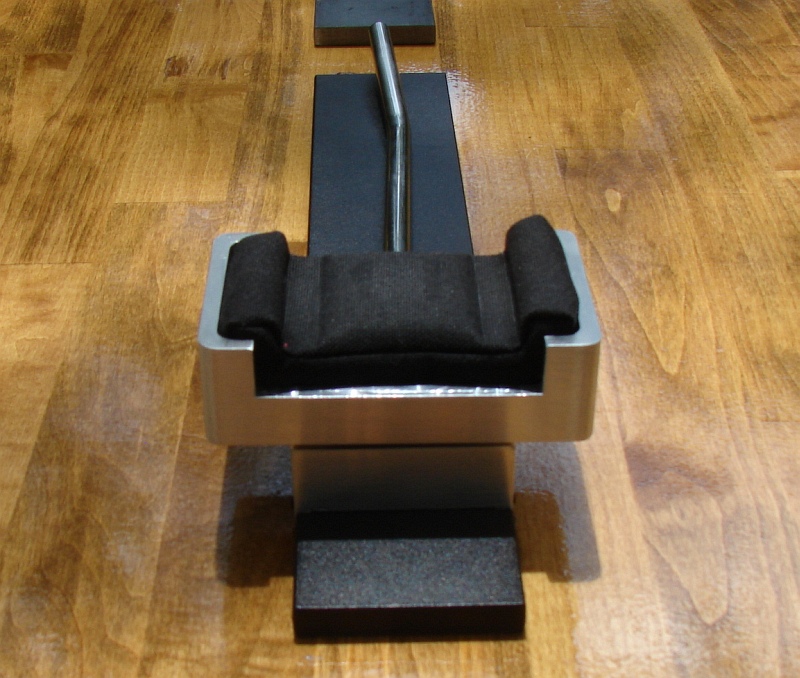
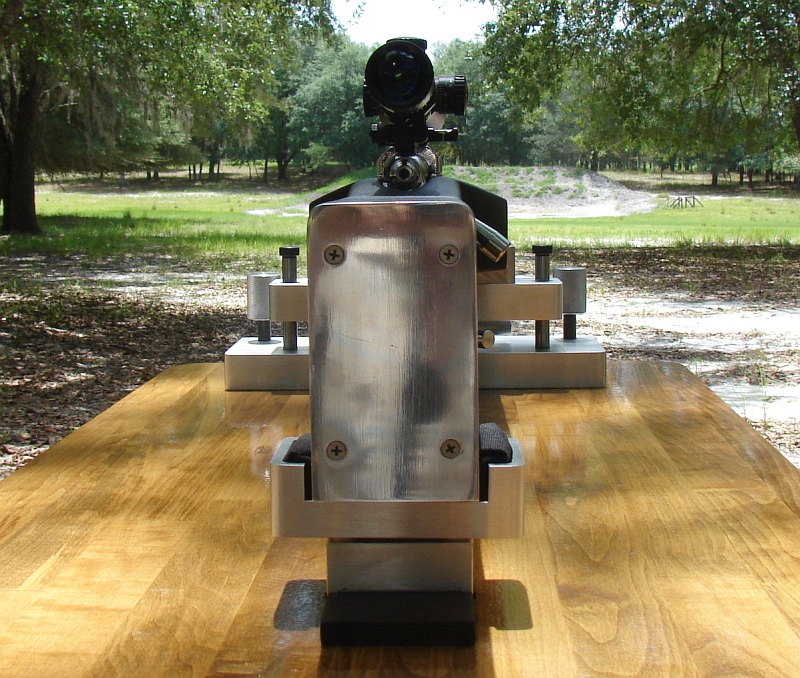
Coaxial (joy-stick) rests allow both vertical and horizontal movement with a single control. If you want to make a diagonal shift in point of aim, you can do this with one, smooth, continuous movement. Until now, this advantage has been limited to front rests. Well there’s some new technology in the benchrest world. Forum member ‘Straightpipes’ has created a coaxial rear joystick rest. He built this simple, compact rear rest in his home workshop for use with his 40-lb Heavy Gun. In combination with a vertically adjustable front rest, this innovative rear joystick rest allows aiming to be controlled from the rear, with your left hand in a comfortable position. Yes this kind of adjustable rear rest is legal in NBRSA HG and LG classes, and in IBS Heavy Gun class.
Straightpipes Rear Coaxial Rest — Design and Features
The rear rest is crafted from aluminum with a stainless steel forward-pointing joystick. Total weight, including the long, stabilizing base foot, is about 10 pounds. Though the rear rest doesn’t seem to have a large movement range, the system offers plenty of “on-target” travel. At 100 yards, the rest offers 10 MOA left, 10 MOA right, 5 MOA up, and 5 MOA down adjustment. That’s plenty of range for most targets, once you center the Point of Aim vertically using the captain’s wheel on the front rest, which Straightpipes also crafted himself. Click Square Photos Below to see Large Images.
Inside the rear cradle sits a Protektor rear sandbag, with Cordura fabric filled with ordinary sand. This fits the 3″-wide bottom of Straightpipes’ 40-lb heavy gun. There are some sophisticated components you can’t see in the photos. The rear rest can pivot (right or left slightly) to stay aligned with the front rest (as adjusted to level the cant of the rifle). Straightpipes says: “With the pivot, whatever I do to the front, the rear follows.” The basket (cradle) also employs a 20-lb bias spring system to handle the weight of the Heavy Gun. This prevents the co-axial system from binding, so it is fluid and easy to operate. Even with 20 pounds of gun weight on the rear, the joystick can be easily manipulated with a light touch of thumb and fore-finger.
Video Shows Rear Coaxial Rest in Action
Watch the video below to see how the joystick controls the rear rest. Total joystick movement is about a 2.5″ sweep. This gives 20 MOA total windage adjustment at 100 yards, and about 10 MOA vertical.
About the Straightpipes Front Rest
The coaxial rear rest is designed to work with the massive front rest as a system, though they are NOT connected, so as to comply with IBS Heavy Gun rules. The 30-lb front rest supports exactly half the weight of the rifle and is used to set gross elevation. Windage and fine elevation is controlled in the rear. Straightpipes also designed and built his beefy front rest himself. As with his rear coaxial unit, the front rest pieces were all shaped by hand on a belt sander after being milled out. Straitpipes even “finish-sculpted some pieces with hand files the old craftsmen way.” The main center support column was milled with extremely fine threads. This allows the captain’s wheel to turn with little effort and no locking mechanism is required. Straightpipes does not need to fuss with locking knobs when he sets gross elevation. To help keep the unit from binding, there are stainless guide shafts on the left and right. These shafts slide in oil-impregnated bronze bushings.
40-lb Barrel Block Heavy Gun with Savage Action
Straightpipes built this beautiful set of rests to work with his 40-lb Heavy Gun. Chambered in 7mm WSM, the gun features a Savage Target Action, and a Brux 32″, 1.300″ straight-diameter barrel fitted with a custom barrel nut. The barrel is clamped forward of the action in a 9″-long barrel block. This allows the Savage action to free-float. The block, also built by Straightpipes, looks fairly standard, but it has some clever design features. Between the barrel and the block there is sleeve that is slightly compressed when the block’s bolts are tensioned. This sleeve, made of a proprietary material, eliminates metal to metal contact between barrel and block. Straightpipes believes this enhances accuracy and provides some damping. Other shooters with barrel-block guns have used epoxy between block and barrel, but that makes disassembly difficult. The sleeve system on Straightpipes’ gun allows the barreled action to be easily removed from the stock. In addition, the compressed sleeve system is very stable — Straightpipes doesn’t have to fiddle with the bolt torques on his block.
‘Black Beauty’ Stock Made from Resin-Soaked Laminated Wood, with Rust-Oleum Finish
Straightpipes built the beefy stock himself. It is made from “red oak” wood soaked in resin and then laminated together with JB Weld. The rear section features a polished aluminum buttplate and twin metal “runners” on the underside, where the stock rides the Protektor Cordura bag. Straightpipes says the stock is very stable: “it absolutely does not flex or warp with changes in temp or humidity”. We asked Straightpipes about the stock finish. To our surprise, “Pipes” revealed he used inexpensive Rust-Oleum fine texture outdoor furniture paint. “Pipes” told us: “I’ve been using this stuff for years. It’s abrasion proof and tough as nails — the bags won’t wear it off. It’s solvent-proof, won’t get soft or bubble up. It cleans up with a damp cloth, just rub it down and it looks like new.”
As designed and crafted by Straightpipes, this Heavy Gun rest system is impressive. The rear rest is brilliantly simple, and beautifully finished. But the important question is: “how does it shoot?”. Straightpipes reports that the whole system exceeds his expectations: “The rear rest actuation is smooth and positive. It works smoothly in conjunction with the front rest. Everything is working together — there’s nothing that’s fighting another element of the system. The gun tracks straight. When it returns to battery, the thing is pretty much waiting for you shot after shot.” The rear rest’s small footprint allows the “driver” to sit comfortably behind the rig. Straightpipes reports: “Shooters can ‘address the rifle’ just like a Light Gun — you’re not straining to wrap your arm around something overly massive. Anybody can shoot this, it’s a very easy gun to shoot.”
Is it accurate? In a word, “Yes”. Straightpipes doesn’t want to make claims before the rig has been tested in competition, but he says it has “shot groups at 600 and 1000 yards that would be very competitive.” We promised not to publish group sizes yet, but we can tell you that at 600 yards in good conditions it drilled some “scary small” 5-shot groups, well, well under 1/4 MOA.
Here’s a cleverly-designed product that adds versatility to any rifle with a front sling swivel stud. This clever Stud Rail Adapter (SRA) allows you to mount a Picatinny Rail on a sling swivel stud. With the SRA in place, you can attach any accessories that clamp to a Pic rail, such as lights, lasers, pistol grips, or rail-affixed tactical bipods. And look carefully — the SRA’s designers included a sling swivel at the inboard end of the unit. That way you can mount Picatinny-rail accessories and still use your carry sling.
Sold by Harrisbipods.com, the SRA Stud Rail Adapter retails for $47.85. This adapter is crafted in the USA by MIM Mfg. from 6061 TG Aluminum with a black anodized finish. This can be used with the RBA-1 and RBA-2 bipod adapters.
This adapter is a useful invention, particularly for those who might want to mount a light or clamp-on bipod to a varmint rifle. Most hunting rifles have a front sling swivel stud and there is now a very wide selection of Picatinny-rail-mounted accessories.
NOTE: HarrisBipods.com is a web retailer. This is NOT Harris Engineering, the manufacturer of Harris bipods. HarrisBipods.com does sell the full line of Harris bipods and most Harris accessories.
Product tip from EdLongrange. We welcome reader submissions.


 20 Practical Ultimate Varminter


 The .300 AAC Blackout aka “300 BLK”, is a compact 30-caliber cartridge designed to work in AR-15 rifles. It has a shorter cartridge case to accommodate the bigger 30-caliber bullet while still fitting in a standard AR-15 magazine. Unfortunately, that’s the danger. A careless shooter can toss a .300 Blackout cartridge in with .223 Rem rounds without noting. And because the case-head size is the same as the .223 Rem (5.56×45) the rifle’s bolt assembly will happily chamber and fire the .300 BLK round. Problem is, that forces a .308 diameter bullet down an undersized .223-caliber bore. Not good!




 About Jesse Kaufmann, Master Engraver


 After building my 20 PPC, I wanted to do another .20 caliber, this time a repeater for predator hunting that could also serve as a gopher/prairie dog rifle. I wanted to use a Tikka M595 stainless sporter I had. This rifle is the ultimate repeater with an extremely smooth-feeding cycle from its single-column magazine. Since the Tikka was a .223 Remington from the factory, I first looked at possible case designs that would fit the magazine. The 204 Ruger was a very new round at the time and brass was scarce. I also didn’t care for the overly long case design or the standard throat dimensions of the cartridge. I then looked at the 20 Tactical. It was a nice cartridge but I didn’t like the fact that (at the time) an ordinary two-die Tac 20 set with just a plain full-length die and standard seater were $150. Not only did the costs bother me, but I was accustomed to using a Redding die set featuring a body die, a Type-S bushing neck die, and a Competition seater. To be honest, I also didn’t care for the 20 Tactical’s name–there is absolutely nothing tactical about the cartridge. I didn’t want to adopt a new cartridge based on what I perceived to be a marketing gimmick (that “tactical” title).
 Simply Neck Down .223 Rem to Make a 20-223 Wildcat
 I chose Kevin Weaver at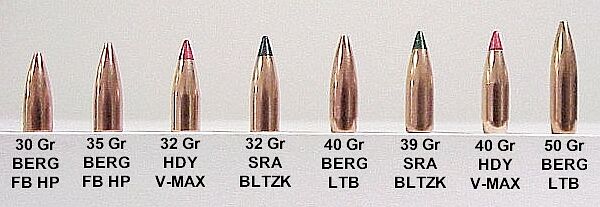
 Project Componentry
 Test Report–How’s It Shoot?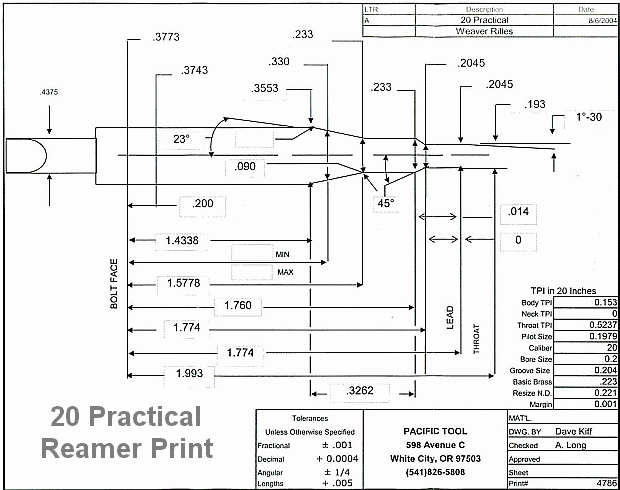
 Comparing the 20 Practical and 20 Tactical

 • Magnifying Glass – We use a flat, 2″x2″ pocket 4x-8x magnifier. This folds up on itself. Very handy, we use it to inspect bullets and brass. Use this to check your flash holes for burrs, and check the meplats of your bullets before loading.
 • Ballistol Aerosol – Try using this versatile lubricant/solvent for full-length sizing. Spray some on a patch and you can wipe the carbon off your case necks. Then, continue to apply a very small amount of Ballistol on the case bodies — just thin sheen is all you need. Ballistol is super slippery, and easy to remove. For general full-length sizing (on small cases) it works great and doesn’t leave a gooey, waxy, or chalky residue. For heavier case-forming jobs, we recommend Imperial Die Wax.