A 7mm Snake for Santiago
Our friend Dennis Santiago has a reptilian rig in his arsenal. It’s actually an Eliseo R1 single-shot tubegun chambered in .284 Winchester. The eye-catching aspect of Santiago’s .284 bolt-gun is the snakeskin dip job on the exterior. This really creates a distinctive look. Dennis tells us: “It was Gary Eliseo’s idea to try a water-transfer printing finish for this rifle. There are many patterns to choose from — this is the WTP-260 Snakeskin Illusion-Fall Copper from WaterTransferPrinting.com. For a single shot LR gun, I figured something on the bright side would be interesting and pick up less heat from the sun in the summer.”
Dennis uses this eye-catching rifle in prone matches, where a single shot works fine. He says: “Underneath the hood, it’s a Rem 700 Long Action, chambered in .284 Win. Yes it’s a single shot! I don’t need anything else for a prone gun. Nothing to get in the way of building the perfect position.”
Dennis says: “Length of pull, offset and cast initially set the same as my similar RTS .308. My gun, my body dimensions.”
R1 Testing with Advanced Electronic Shot-Plotting System
Now that winter is here, Dennis plans to do some serious load development with this rifle: “I acquired a new ShotMarker electronic target system. I’ll be using that to test a variety of powders and bullets.” Dennis has previously loaded his .284 Win R1 with Hodgdon H4831 powder, but he hopes to test alternatives from Alliant and IMR as well. There are many interesting 7mm bullet options, such as Sierra’s impressive, factory-pointed 183gr MatchKing with 0.707 G1 BC, and Berger’s new 184gr F-Open Target Hybrid with 0.695 G1 BC.
The ShotMarker is a unique 8-sensor acoustic electronic target that instantly plots shot locations and transmits the data via WiFi to a mobile device. Dennis is eager to try his new Shot-Marker. The system can measure group size, velocity, and SD. The Shot-Marker App can then store your strings for later review, add notes to the target, and export data to spreadsheets.
A FFP 6-24x50mm Sightron Rides on Top
The optic is a Sightron 6-24x50mm, FFP MOA-2. Dennis reports: “I looked at many scopes (within my determined price range), and this is the one that had the best combination of features for for this gun’s particular application. The sight line sits about 3 inches above bore line on these guns. It’s been leveled, bore-sighted and pre-dialed for a 200-yard estimated zero for the ammo I plan to use. Those are Gen II A.R.M.S. rings. Super easy to tailor to different rail widths. Same rock-steady steel performance.”
Check out that 0.188″ group. Can you believe that was shot with factory .308 Win ammo? A couple seasons ago our friends at Criterion Barrels tested some .308 ammo from Creedmoor Sports. This was loaded with Lapua’s 175gr Scenar HPBT bullet. The results speak for themselves. Any time factory ammo can shoot inside quarter-MOA, that’s impressive. This ammo was used in a “Rem/Age” project rifle. That term refers to a Remington action rifle that has been re-barreled with a pre-fit Criterion barrel. The new barrel is secured with a Savage-style barrel nut. Hence the term “Rem/Age” or “Rem-Age”.
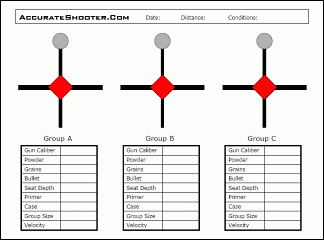
Criterion posted: “I think we may have a new favorite factory match load for the nitrided Rem/Age build.” Another reader added: “[Creedmoor’s] 175 Scenar .308 ammunition is top notch.” FYI, this group was shot on our load development target, which you can download for free from our Targets Page.
Why do Criterion barrels shoot so well? One reason is that Criterion’s barrel steel is carefully stress-relieved. In the photo below, Criterion Rack 1A (aka the “Coffin”) has been loaded with barrel blanks — made ready for the stress-relieving process.
Working with Pre-Fit Barrels
While they may require the purchase of some additional tools and a bit of a learning curve to install, using Rem/Age pre-fit barrels offer advantages over gunsmith chambering and barrel-fitting. In this video, 8541 Tactical explains how to install a Criterion 6.5 Creedmoor “pre-fit” barrel. You save money and time — you don’t have to wait for a gunsmith to chamber the barrel. While Criterion recommends that a competent gunsmith oversee the pre-fit installation, if you understand the use of go/no-go gauges and you have a barrel vise and action wrench set up to remove the original barrel, putting on a pre-fit barrel CAN be a DIY project. You don’t have to pack up your rifle to ship it off to a smith.
If you’re planning a build with a Remington or Rem-clone action, take heed. Here’s a trigger upgrade worth considering for an F-Class or Long-Range rig. David Tubb offers an excellent two-stage trigger for Remington 700 rifles, the Model T7T. Priced at $349.00, the Tubb T7T Trigger is a true two-stage design: first and second stages are independently adjustable for both weight and feel. Overall (combined stage) trigger pull weight can be adjusted from just under 1 pound to slightly over 3.5 pounds.
If you are interested in the T7T, watch these two videos. The first shows how to adjust pull-weights for both stages. The second video shows how to modify your stock to provide clearance for the T7T.
This video shows how to adjust the new Tubb T7T two-stage trigger for Remington 700s:
The new T7T is a quality product. We’ve received good feedback from “early adopters” who tell us the two-stage function works well. While installation of the T7T may require minor modifications to your action, most gun owners with basic mechanical skills can install the T7T by themselves. The T7T is made using stainless steel and aluminum for maximum corrosion resistance. Note, a full installation of the T7T trigger (either Right-Hand or Left-Hand) also requires a companion T7T bolt release, offered by DavidTubb.com for $10.00.
This video shows how to modify your stock to fit the T7T trigger:
Mirage shields are useful for all shooters, not just hard-core competitors. A mirage shield helps you see your target better, without distortion caused by heat waves coming off your barrel. This isn’t rocket science — it’s a simple, inexpensive way to see better and shoot more accurately. We’ve advocated that varmint shooters give mirage bands a try on those hot summer groundhog and prairie dog expeditions. And we observed that practically every F-Class shooter at the recent Berger SW Nationals was using a mirage shield of some kind.
Make Your Own Mirage Shiels from Venetian Blind
Criterion Barrels shows how you can make your own mirage shield from an ordinary Venetion blind.
A mirage shield is an extremely cost-effective way to eliminate a commonly-encountered problem. Making your own mirage shield is easy. Using old venetian blind strips and common household materials and tools, you can construct your own mirage shield for under one dollar. READ FULL Article
Materials Required:
1. Vertical PVC Venetian blind panel
2. Three 1”x1” pieces adhesive-backed Velcro
3. Ruler or tape measure
4. Scissors or box cutter
5. Pencil or marker
Make Your Own Mirage Shield from X-Ray Film
Forum member Fabian from Germany, whose Sako 6BR rifle was featured as a Gun of the Week, has devised a clever and inexpensive mirage band option. Fabian is a radiologist by trade. He notes that many X-ray machines require a daily test film for calibration. These are normally just discarded in the trash, so you can get them for free.
Fabian explains: “I’m a radiologist, so I handle medical x-ray films every day. Modern X-ray machines use laser-based printers and they need to print a test-film every day. One x-ray film is about 43×35 cm (16.9″ x 13.7″). Made from polyester, the films are very stable and only 0.007″ inches thick. They are light-weight, semi-transparent, and very stable. Using normal scissors, you can easily cut four mirage shields from a single sheet of film. Then glue on some velcro to attach to your barrel. Try it, you will not be disappointed.”
High-Tech Carbon Fiber Mirage Shield
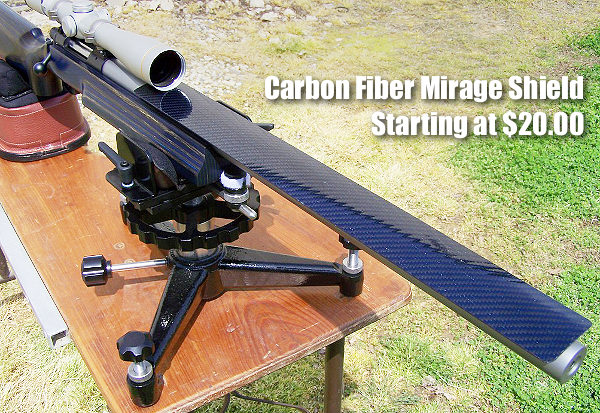
If you’re not into making your own mirage shield, aka “mirage band” or “mirage shade”, you can also purchase a cool carbon fiber mirage shield from Accurateshooter Forum member Mark Nagel. These custom Carbon-Fiber Mirage Shields start at $20.00. GET More INFO HERE.
Mossberg has a pretty nice rifle that would work well for varminting and tactical/practical games out to 1000 yards. You may not have seen this before, but we think it offers a decent turn-key solution for around $700. Mossberg’s MVP Long Range (LR) boasts a nice adjustable stock and some innovative features. The LR model comes with a 20″ or 22″ (6.5CM) barrel in three popular chamberings: .223 Remington, 6.5 Creedmoor, and .308 Winchester. All barrels are threaded for suppressors or muzzle-brakes and come with a protective thread cap. Street price, without optics, is about $695.00 for 6.5 CM version. The .223 Rem accepts AR15 magazines while the .308 Win accepts AR10 and/or M1A mags. The LBA trigger adjusts from 3-7 pounds — we’d like to see it go a little lower for varmint work.
The MVP Long Range feature an adjustable-comb stock that’s comfortable and strong. The bottom (“toe”) of the rear stock is flat and straight, so it works well in a bag — that’s notably different than most factory rifles in this price range. We like this stock for shooting prone or from a portable bench on a varmint hunt. Gun weight is pretty light, 8 pounds (without optics) for the 6.5 Creedmoor version with 22″ barrel.
The MVP LR model features a pillar-bedded OD green stock with push-button adjustable Mosscote™ cheekpiece, patented LBA Adjustable Trigger (3-7 lbs.), oversized bolt handle, and Picatinny rail. All barrels are threaded for suppressors or muzzle brakes and come with a protective thread cap.
Mossberg’s MVP also comes in a shorter-barreled version with a more conventional stock and back-up iron sights. See that version in Mossberg’s article about Long Range shooting.
Function and Accuracy Field Testing
So how does it shoot? Sniper Central did a full review of the rifle, chambered in .308 Win. They praised the gun’s general build quality and liked the stock. Bench testing yielded 0.8 to 1.5 MOA groups with four kinds of factory ammo. In fairness, Sniper Central’s set-up looked very wobbly, with cheap sandbags front and rear. We bet the MVP LR would shoot better with a proper front rest, or even a quality bipod.
Sniper Central did complain about feeding from the magazine: “The most glaring [fault was] the stiffness with which the rifle feeds from the magazine when there is more than one round in it. The feeding process is rough and stiff, which we think can be attributed to those two protrusions on the bottom of the bolt that aide in feeding from the double stack AR-style magazines.” (See photo below.) Sniper Central also was not impressed with the trigger: “As we mentioned earlier, the trigger has some take up before let-off and that take up is notchy and not very smooth, so there is some improvement to be had there.” The trigger did come in about 2.5 lbs on the test rifle, “light for a factory installed trigger”.
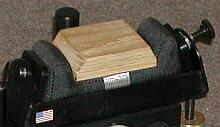
Here’s a simple solution for lumpy front sandbags. Cut a small block the width of your fore-end and place that in the front bag between matches. You can tap it down firmly with a rubber mallet. This will keep the front bag nice and square, without bunching up in the center. That will help your rifle track straight and true. Rick Beginski uses wood (see photo), while our friend John Southwick uses a small block of metal. The metal block might work a little better, but the wood version is easier to make with simple tools. John Loh of JJ Industries offers a slick Delrin block with a built-in bubble level. Loh’s block helps ensure that the actual top surface of your front bag is level, as distinct from the front rest assembly.
“The blue plastic barrels that we have to shoot through are the idea of the local police — to ensure that we keep our rifles pointing at the targets!” — David Sharp
Here’s a great story from the other side of the pond — the United Kingdom. Shooting a .308 Win factory Savage rifle, a novice benchrest shooter set two new 1000-Yard UK Factory Sporter Class records with a group barely over three inches plus a 6.756″ four-group Aggregate. The Savage had been upgraded with an inexpensive aftermarket stock and Timney trigger, but was otherwise “as manufactured” — with factory barrel.
At Ingleston, competitors shoot for group size only — so there are no scoring-rings on the targets.
On October 14, 2018 David Sharp had a memorable performance at the Ingleston Range in Scotland. David Agg’d 6.756 inches for all four 5-shot groups, a new UK 1000-Yard record for the Factory Sporter Class. His smallest group measured 3.090 inches, which is also a new UK Factory Sporter record. Great Shooting David — congrats!
Sharp Sets Two New UK Factory Sporter Class 1000-Yard Records
Report by Vince Bottomley
In the UK, long-range benchrest is far more popular than short-range. The UKBRA (United Kingdom Benchrest Association) holds shoots at three venues: Diggle (100, 600 & 1000 yards), Bisley (100 yards only) and Ingleston in Dumfries, Scotland (1000 yards).
The Scottish venue is the UK’s latest 1000-yard facility. It was established just three years ago yet it is already holding well-attended monthly shoots. It is operated by the Galloway Small Arms Club and, as you may imagine, it is situated in the beautiful wild Scottish countryside.
The UKBRA operates under IBS/NBRSA rules for the Light and Heavy Gun Classes but, many of the Scottish members are also deer stalkers and came to the benches with their hunting rifles, so we also run a Factory Sporter Class. Factory Sporter rifles must be the original manufacturer’s barreled-action but a more benchrest-compatible stock may be used or ‘bag-rider’ attachments may be fitted to the butt and fore-end. The barreled-action must however be totally as it left the factory — no re-chambering or throating, though the crown may be re-cut. To discourage potentially dangerous trigger modifications, an after-market trigger may be fitted.
The Factory Sporter Class is very popular and Savage rifles, chambered for the 6mmBR, 6.5-284, and .308 Win are the favored factory-classers. These have produced some remarkable performances over the years, often out-performing custom rifles!
David Sharp is a True Sharp-Shooter
David Sharp is a relatively new benchrest shooter, though he has decades of firearms experience. David started his shooting days wild-fowling and rough shooting with a shotgun over 50 years ago. After retiring, he moved to Dumfriesshire and began shooting again — clay pigeon, wildfowling on the Solway, driven pheasant and deer stalking. As a stalker, David keeps his eye in by shooting targets on a local range using his .308 Mannlicher.
Eventually, the pains of old age began taking their toll and stomping up hills was becoming more difficult. Fortunately, David heard about the Ingleston 1000-yard range and joined the Galloway Small Arms Club in 2016. As a complete novice to benchrest shooting, David relied on the guidance and advice from his fellow Club members and eventually purchased a Savage Model 12 F-TR rifle in .308 Winchester to compete in the Factory Class.
Here’s the view looking downrange. What a beautiful place to shoot…
.308 Win Factory Savage with Choate Stock and Vortex Scope
David’s rifle has some upgrades, as permitted for Factory Sporter Class. The Savage trigger was replaced with a Timney. The Savage F-TR stock was replaced with a Choate Varmint stock fitted with a Sinclair front bag-rider. The Choate’s butt was home-modified to better ride the Edgewood bag. The rifle is fitted with a Vortex Golden Eagle 15-60 scope mounted on a 20 MOA Ken Farrell rail via Vortex rings. Dave shoots off a SEB Mini front rest. As the Mini is lighter to lug around than the SEB NEO (and less expensive), the Mini is becoming popular with UK shooters.
David reports: “My rounds are nothing special — I’m using Sierra 2155 155 grain bullets over Vihtavuori N140 powder and CCI 200 primers. I use Lapua brass (large primer) full-length sized in a Redding S bushing die to give 0.002″ neck-tension.”
Although the Ingleston Range is a beautiful place to shoot, as you can imagine conditions can vary dramatically and it is not known for mild days! However, at 9:00 am on the day of David’s record shoot, it was clear and quite still with the flags barely lifting. The temperature was already 15 deg C (59 deg F). What more could any benchrest shooter ask for?
In the photo of David above, you can just see the four 1000-yard targets in the extreme top right of the picture — up near the tree-line. Note, at Ingleston, competitors shoot for group size only. Hence there are no scoring-rings on the target. However, Vince Bottomley says score shooting may begin at some UK ranges: “This year we have purchased a set of electronic targets. The IBS target face can be inputted so we will now start to shoot for score as scores are registered instantly. Previously, it just took too long to score the targets as well as measure the groups.”
Leupold recently annouced a new, premium spotting scope with outstanding low-light performance. Leupold’s new Santium SX-5 Spotter features a jumbo 80mm objective with a 27-55X zoom eyepiece. The SX-5 is offered in both straight and angled versions. Suggested retail price (including eyepiece) is $2339.00. Best “street price” should be around $1800.00. That positions Leupold’s SX-5 above Vortex, Burris, and Pentax price-wise, but the SX-5 is over $1000 less than high-end, 80mm-class Swarovski and Leica spotters which approach $3000 with eyepiece.
We’re interested to see how this new Leupold stacks up against the Kowa TSN-880 Prominar spotter ($2450.00 on Amazon) which has been a benchmark in the 80mm class. Leupold worked hard to give the SX-5 “second to none” low-light performance. The goal was to create a truly superior optic for hunters who may spend long periods “glassing” for game at dawn and dusk.
The SX-5 features High Definition (HD) glass with proprietary lens coatings to maximize light transmission and color fidelity. Zac Bird, Product Manager for Leupold states: “The human eye is most sensitive to colors outside the middle of the spectrum during dawn and dusk, when game is moving — the Twilight Max HD Light Management System literally helps you see more in less light. The superior glare reduction it offers ensures the maximum amount of usable light gets to your eye. Our proprietary lens coatings and superior optical design help deliver the very best contrast and resolution”
Features of New SX-5 Santiam HD 27-55x80mm Spotting Scope: – Full-Diameter Focus Ring for smooth and precise focusing
– Oversized Eyepiece for reduced fatigue
– Guard-Ion Rain-Shedding Lens Coating
– Built-in Retractable Lens Shade
– Tough Rubber Armor Coating
– Full Lifetime Warranty
Price vs. Performance in the Field
Should a hunter spend a couple grand ($2000) on a spotting scope? It depends on your priorities. Leupold says: “Don’t underestimate the importance of a quality spotting scope. Your spotter can mean difference between tagging out or going home empty-handed…. Ultimately, you can’t shoot what you can’t find.”
In another month or two many Eastern and snow-belt shooting ranges halt operations for the winter. If you’re an avid rifleman who enjoys shooting regularly, the dark days of winter can bring withdrawal pains. The closure of outdoor ranges can mean months of forced inactivity… unless you have an all-weather indoor shooting solution.
Some clubs maintain their own indoor air rifle ranges where you can continue to shoot and train throughout the winter. If there are no such facilities nearby, Creedmoor Sports now offers a great solution for those who want to shoot indoors — even in your own basement or garage.
Creedmoor’s patented 10m Air Gun Range provides a target holder and a curtain-type backstop capable of stopping pellets with a muzzle velocity up to 600 fps. The target boxes can be positioned at various heights for prone, kneeling, and standing. Creedmoor says the hardened steel target boxes provide 100% containment for any pellet passing through the target.
The 10M Air Gun Range is sold as a 3-station configuration for $1514.00 (item 3AGR), or as a one-station (single-point) range for $325.00 (item AGR-SINGLE). Creedmoor’s Air Gun Range is a proven, heavy duty product — the only Air Rifle target system ever tested and approved by the U.S. Military. This system is now being used in more than 800 schools nationwide, as well as the CMP shooting facility in Alabama. The 3-station range easily dis-assembles for transport and storage, fitting inside a 34″ x 10″ x 8″ carry duffle. The one-station range measures 84″ high x 30″ wide when assembled.
The Portable Air Gun Range comes with a durable curtain/ backstop that sets up quickly and easily. Velcro edging allows multiple curtains to be joined together. The curtain provides ample stopping power for air pellets. However, this is NOT to be used with high-energy pneumatic hunting rifles (such as the .357 Benjamin Rogue) or rimfire or centerfire rounds. This is for standard airguns only. That could be a $100 Crosman, or a $3600.00 Model 9003 S2 Anschutz:
This 2010 story is reprinted at readers’ request.
In the past few years, tubeguns have really taken over in high power circles. At most matches you’ll see more tubeguns than conventional prone rifles, and a high percentage of those tubeguns will have been built using an Eliseo (Competition Machine) CSS chassis kit.
Step-By-Step Guide to Stock Set-Up
If you are a new tubegun shooter, or if you are planning a tubegun build this winter, our friend “GS Arizona” has prepared a comprehensive set-up guide for Eliseo tubeguns. Eliseo’s CSS chassis system affords a myriad of adjustments. Initially, one can be overwhelmed by all the variables: Length of Pull, Length to Sights, Length to Handstop, Cheekpad Height, Buttstock Offset, Buttstock Cant Angle, Handstop Angle, and Forearm Rotation.
In his Guide to Configuring the Eliseo Tubegun, GS Arizona shows how to adjust the Tubegun so that a shooter’s prone position is stable, repeatable, and comfortable. The article covers each adjustment, step by step. If you follow the instructions, starting with setting Length of Pull, you should find that your hold becomes more stable, the gun moves less from shot to shot, and your eye position relative to the sights is improved.
About the Set-Up: “Adjusting the stock is a process that you must work at and it builds on itself. As you get one adjustment right, the others begin to fall into place. Our hope is that you take from this article a system for adjusting the stock, not an exact set of dimensions; and that you understand that it will take continuous work over a period of time to really refine the adjustments. Your goal is not to obtain a ‘perfect set of dimensions’ but rather a perfect feel that accomplishes the three objectives of stability, durability and comfort and the knowledge of how to change the adjustments to achieve those objectives under varying conditions such as sloped firing lines or other terrain features.”


 A 7mm Snake for Santiago






 Here’s a simple solution for lumpy front sandbags. Cut a small block the width of your fore-end and place that in the front bag between matches. You can tap it down firmly with a rubber mallet. This will keep the front bag nice and square, without bunching up in the center. That will help your rifle track straight and true. Rick Beginski uses wood (see photo), while our friend John Southwick uses a small block of metal. The metal block might work a little better, but the wood version is easier to make with simple tools. John Loh of


 In another month or two many Eastern and snow-belt shooting ranges halt operations for the winter. If you’re an avid rifleman who enjoys shooting regularly, the dark days of winter can bring withdrawal pains. The closure of outdoor ranges can mean months of forced inactivity… unless you have an all-weather indoor shooting solution.

 In his


