Need a top-notch Ballistics App for your iPhone or iPad? Start with Ballistic: Advanced Edition (AE), the number 1 (i.e. most installed) App for iOS systems (iPhones and iPads). Ballistics AE (Advanced Edition) is the most popular iOS ballistics program for many good reasons. It offers a full feature set with Ballistic Solver, Ballistic Comparison (with up to 8 projectiles), Target Log (records group sizes), Advanced WindKit, and more. The Ballistic: Advanced Edition software is easy to use, with nice controls. Underneath it all is the proven JBM Ballistics calculator. And here’s the kicker — this excellent mobile App software is now FREE to download and install on iPhones and iPads!
This Video Explains How to Set Up and Use Ballistic: Advanced Edition
Full-featured and easy to use, Ballistics AE has been refined over many years, and it supplies rock-solid solutions derived from JBM Ballistics solver (created by James B. Millard). Unlike some other Apps, Ballistics AE is STABLE on iPhones (with various OS levels). What’s cool is that Ballistics AE is now available for FREE for both iPhones and iPads. This software is now provided by Federal Premium Ammunition, with in-App purchase functionality.
We’ve used the Ballistic: Advanced Edition program on an iPhone 5S, iPhone 6, and iPad, and it performed well. Here are some of the features we liked:
1. Mirrors output from online version of JBM Ballistics we often use for initial calculations.
2. Controls are simple to use and (mostly) intuitive.
3. Handy comparison feature lets you compare ballistics for different projectiles side by side.
4. Advanced Wind Kit allows you to account for complex wind situations.
5. Projectile and BC Databases are very comprehensive.
6. Software is regularly updated to match Apple OS changes.
This article is Copyright 2025 AccurateShooter.com. No republication is authorized. Any appearance of this story on another site obliges that site to pay liquidated damages and/or licensing fees.
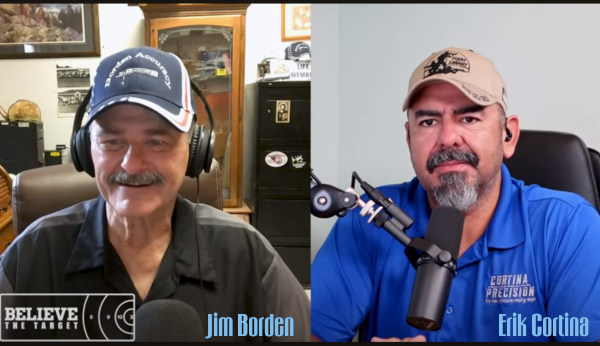
Every wondered how modern rifle actions are designed and crafted? Want to know the fine details of firing pin function and bolt lock-up? Then you should definitely watch this highly informative YouTube video. Top F-Class shooter Erik Cortina of Cortina Precision interviews Jim Borden, an engineer whose Borden Accuracy company produces some of the best rifle actions ever made. This is one of the better Erik Cortina video interviews. You’ll learn quite a bit from watching the video. The full video runs over two hours, so you may want to watch in segments over a couple of days.
Viewers have praised this interview, saying it has a wealth of information:
Gunsmith Alex Wheeler observed: “I consider Jim a friend even though we have never met. Definitely one of the guys that really gets actions. There’s not as many of them as you would think. He was the first timed action out there that had good ignition, at least in my opinion. It was a great interview. I do hope he has him on again.”
“Agreed. Jim is full of information and really does a good job on his actions. This [Cortina] interview with Jim Borden was excellent.” — Jud96
“I really like Jim’s explanations on why ductility is so important in an action. Especially in the critical areas that basically form 90 degree surfaces, such as where bolt lugs meet the bolt body. There is a lot of great info in this interview.” — Jackie Schmidt
“I have enjoyed all of Erik’s interview videos, which are very informative. But I agree [that] this interview with Jim Borden is the best. I learned a lot. Thank you Erik and Jim!” — Alexander-M
About Jim Borden and Borden Accuracy
Jim began shooting high power silhouette and benchrest matches in the mid 1970s while working for a Fortune 500 company as an engineer. In the early 1980s he began building rifles for himself and then for others. Jim has a background as a gunsmith, machinist, registered mechanical engineer, engineering instructor, project manager, hunter, and benchrest competitor.
In benchrest competition Jim has set ten world records and won 11 National Championships thereby earning induction into the Benchrest Hall of Fame. Jim also served six terms as President of the International Benchrest Shooters (IBS).
Jim operates Borden Rifles/Borden Accuracy with his wife Joan, sons Jim Junior and John, daughter Andrea Mecca and son-in-law John (Mike) Mecca. Jim is also an outstanding photographer. Below is a stunning eagle image photographed by Jim Borden.
Borden Accuracy — A Success Story
Borden Accuracy/Borden Rifles has been a source for precision benchrest and hunting rifles for many years. Jim started doing his own gunsmithing while competing in benchrest and High Power silhouette matches. Jim launched his business in 1987, working nights and weekends while still employed at P&G. The business became full-time in 1995 with Jim and his wife Joan doing the work. The business was expanded in 1999 with the construction of the new Springville, PA facility and the addition of sons Jim Jr. and John to the staff. Daughter Andrea Mecca joined the staff in May 2016 as machinist and machine operator and Son-in-law John Mecca came onboard in January 2000.
Jim and company began making Rimrock benchrest and Rimrock hunting actions in 2001. They added Borden Alpine and Timberline actions in 2006. These actions are made in an advanced manufacturing facility which has three CNC vertical machining centers, 1 CNC lathe and 2 CNC turning centers, three manual lathes, a manual knee mill, a surface grinder, a cylindrical grinder and wire EDM machine. To learn more, visit BordenRifles.com, call 570-965-2505, or send email to info [at] bordenrifles.com.
At the request of our readers, we provide select “Deals of the Week”. Every Sunday afternoon or Monday morning we offer our Best Bargain selections. Here are some of the best deals on firearms, hardware, reloading components, optics, and shooting accessories. Be aware that sale prices are subject to change, and once clearance inventory is sold, it’s gone for good. You snooze you lose.
NOTE: All listed products are for sale to persons 18 years of age or older. No products are intended for use by minors.
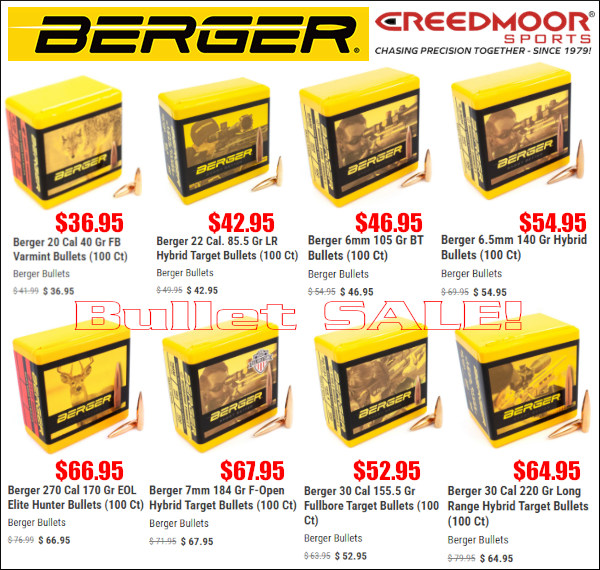
Creedmoor Sports — Major Berger Bullet Sale
⏺️ » Great savings on high quality Berger match and hunting Bullets
When it comes to competition, Berger Bullets are among the very best with countless wins in PRS, High Power, F-Class, and other disciplines. Berger also makes great varmint and hunting bullets. With the current Berger Sale at Creedmoor Sports you can enjoy major savings on hunting and match bullets in all popular calibers. Save now with this major sale, which includes top benchrest, fullbore, and F-Class bullets.
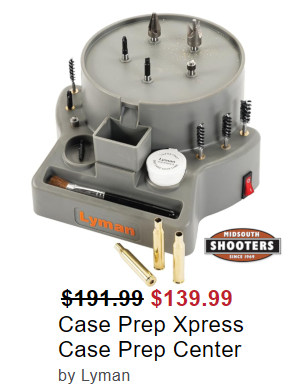
Graf & Sons — Lyman Ultimate Reloading System, $549.99
⏺️ » Complete system with turret press, powder measure, tumbler and more
Here is a truly great combo reloading kit at a fantastic price, just $549.99 at Grafs.com (Save $74!). The Lyman Ultimate Reloading System includes top-of-the-line tools including 8-station Turret Press, Gen 6 Digital Powder System, Universal Case Trimmer, Pro 1200 Turbo Tumbler, and everything else needed to turn out high quality rounds fast. Here is a list of everything you get with this Lyman combo kit:
All American 8-Station turret press
Gen 6 Electronic Powder Dispenser/Scale
Universal Case Trimmer
Pro 1200 Turbo® Tumbler
E-ZEE Prime Hand Priming Tool
Case Prep Multi-Tool
Magnum Inertia Bullet Puller
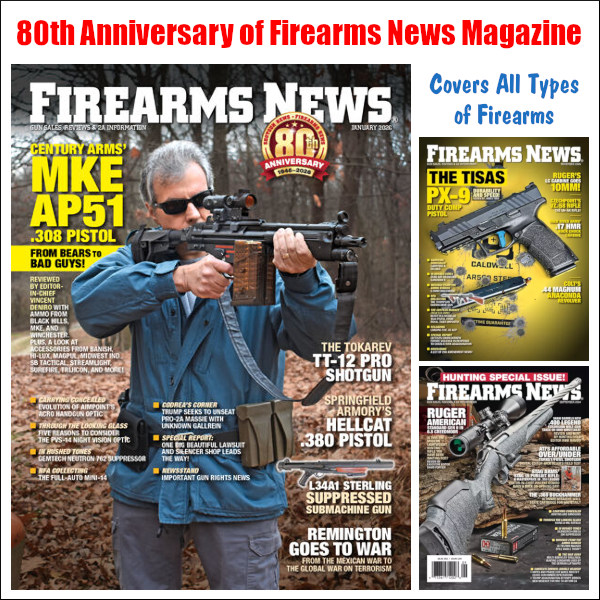
Firearms News marks its 80th Anniversary with the release of its January 2026 issue. For eight decades, this magazine, originally “Shotgun News”, has served as a cornerstone for the firearms community. This 80th Annniversary edition is packed with exclusive reviews, historical deep dives, and cutting-edge commentary about modern gun issues. Firearms News is available now at newsstands, including Walmart, Barnes & Noble, and other major book retailers.
“For 80 years, from its beginnings as Shotgun News to its current standing as Firearms News, this publication has been an unwavering voice and an essential resource for the Second Amendment community,” said Vincent L. DeNiro, Editor-in-Chief. “This anniversary issue is more than just a magazine; it’s a testament to our enduring commitment to providing our readers with the most comprehensive reviews, in-depth historical content, and unfiltered industry news. We are immensely proud of this legacy and are excited to continue serving firearms enthusiasts for many years to come.”
To commemorate the publication’s history, Editor-in-Chief Vincent L. DeNiro wrote a special feature, “Happy 80th Anniversary Shotgun News/Firearms News!” This reflects on the magazine’s journey over the last 80 years. In this landmark issue DeNiro also provides an in-depth review of the MKE/Century AP51 pistol, which is based on the HK 51 rifle. In addition to hardware reviews, the January edition has important industry news and legal updates.
Other Feature Stories in the 80th Anniversary Firearms News Print Edition:
Product Showcase: New and exciting gun stuff (for 2026)
The Tokarev TT-12 Pro Shotgun
Springfield Armory Hellcat .380 Pistol
The L34A1 Sterling Suppressed Submachine Gun
Carrying Concealed: Aimpoint’s ACRO Handgun Optic
Through the Looking Glass: Five Reasons to Consider the PVS-14 Night Vision Optic
Remington Goes to War! From the Mexican Revolution to the Global War on Terror
Gemtech Neutron 762 Suppressor by Patrick Sweeney
Firearms News Website Has Tons of FREE Content
Firearms News also has a modern website with hundreds of articles and gun reviews — which you can read for FREE. Here are examples of current features online at www.FirearmNews.com:
Yes, as we start 2026, there’s snow on the ground in many parts of the nation. There have been some big snow-storms in the northeast, with very cold weather in many parts of the country.
Rifle Transformed from Ordinary Varmint Rig to a Stunning F-TR Machine
As an antidote to these weather-related worries, for this Sunday GunDay we’re offering a bit of beauty amidst snow — a handsome rifle showcased in a white winter wonderland. This handsome rifle started life as a rather ordinary .204 Ruger Rem VSSF varmint rig. With a new barrel, a new stock, and a stunning flame-pattern hydro-dip coating, this is now an ultra-accurate .223 Rem F-TR competition rifle.
Flames in the Snow…
Forum Member Brandon Schlund (aka “Bois Blanc Boy”), photographed this handsome flame-themed F-TR rifle against the snowy background of Michigan’s Bois Blanc Island. Brandon posted this to our long-running Pride and Joy Rifle Forum thread. He notes: “This is my first F-TR build, which started out as a stock Remington .204 Ruger. I had the action blue-printed, firing pin was bushed by Speedy, and I had a new bolt handle and knob installed by John Pierce.” This rifle is now fitted with a 3-groove Pac-Nor 1:6.5″-twist barrel chambered in .223 Remington to shoot the 90gr Bergers. Other components are: Kelbly KTS stock, Phoenix bipod, and Sightron 8-32x56mm SIII scope. Brandon says: “It took a long time to get this gun where it is now but I’m truly happy with it!” Here’s the “before” photo:
The Transformation — F-TR Comp Rig Made from Rem .204 Ruger Varminter Report by Brandon Schlund
This rifle started out as a “plain Jane”, factory Remington VSSF II. I shot it on varmint hunts in factory configuration. Then I decided to transform the rifle into a .223 Rem F-TR gun. As the .204 has the same bolt face as a .223 made sense to go in that direction since I would be able to use the gun for varmint hunting as well as F-TR.
While I had shot some F-Class matches with my dad (Joe Schlund aka Bench on AccurateShooter) it wasnt much. When we did a PD hunt in Wyoming I primarily shot my .204 but I decided I wanted a cartridge that could reach out a little further and also do double duty — competition and varminting.
The first step in transforming this rifle was selecting a barrel. We ordered a Pac-Nor, 1:6.5″-twist, 3 groove, 30.5″ heavy Palma contour. This was then chambered with a PTG .223 ISSF reamer with 0.169″ freebore to run the .224 caliber heavies. I went with Pac-Nor because both my father and my brother Mark (aka Labrador2 on AccurateShooter) owned Kelbly-built F-TR rifles with the same barrels. Mark and my father couldn’t be happier with the results. Pac-Nor has great customer service along with a short wait time.
I sent the barrel and the factory Remington 700 action down to Kelbly’s where they did the chambering and cut the threads. While Kelbly’s had my action I had them blueprint it. A Kelbly KTS stock with the three-way buttplate and adjustable cheek piece came next. After getting behind Dad’s rifle and Mark’s gun there was no reason to look any further. With all its adjustments, the KTS stock fits very comfortably.
Loading for the .223 Rem with H4895 and 90gr Bergers
As a .223 Rem, this rifle has proven very accurate — it’s a bullet-hole cutter at 100 yards (low twos easy). Our best load is with Hodgdon H4895, 90gr Berger VLDs, CCI BR4 primers. This load is running at about 2835 FPS but YMMV (remember this is a LONG 30.5″ barrel). The Bergers are loaded .008″ into the lands with base-to-ogive of 2.035″.
Our loading technique may be tedious — with lots of sorting and measuring. But brother Mark, father Joe, and I all enjoy the steps. Our three .223 Rem match guns all love the same load which makes loading much easier. Believe it or not we use a Hornady Lock-N-Load progressive ammo plant, which is great when loading for three guns. Our consistency is fantastic with run-out a mere .001-.0015.
We also turn necks and weigh our primers. Does neck-turning and primer weighing really make a difference? Who knows but we try to eliminate more variables since we have to the time to do it, and we actually enjoy the procedures.
Pierce Engineering Installed Action and Modified Bolt
Being from Michigan, Pierce Engineering has done a lot of work for my family’s guns. For this project the Pierce team bedded the action and glued in a single-shot follower. The stock bolt handle/knob was too short for comfort in the KTS stock. Pierce added a longer handle and tactical knob to the bolt. I then installed a .223 Rem Lapua case base into the knob.
The complete .223 Rem rifle ready to shoot F-TR, as fitted with 8-32X56mm Sightron and Phoenix Bipod, weighs 17 pounds, 15 ounces.
Flame Graphics by Camo Creek Hydrographics
After the action was bedded by Pierce, the stock was sent to Camo Creek Hydrographics in Fenton, Michigan. I selected a flame-style design which Camo Creek applied through hydro-dipping. The stock went back to Pierce’s shop, which applied three coats of clear over the entire stock. The clear-coating really enhanced the flame graphics.
Firing Pin Bushed by Speedy
I sent the bolt to Thomas “Speedy” Gonzalez to have the firing pin hole bushed as otherwise the load could crater the primers pretty bad. Knowing I’d be shooting heavy-weight .22-Cal bullets with a stout load this was a good idea. Speedy also cut his trademark grooves into the bolt shroud which looks amazing. His work is top notch! There is zero cratering now, even with the hottest of loads.
Competition Components — 8-32x56mm Sightron and Phoenix Bipod
For an F-TR rig you need a quality high-magnification optic and a premium, wide-base bipod. I installed a 8-32x56mm SIII Sightron. This was another easy choice because of the attractive price and because my family has four other Sightrons that work great.
I installed a fore-end Picatinny rail to attach a Phoenix Bipod. I extended the Mariners wheel handles by adding short sections from an aluminum arrow shaft. This lets me adjust elevation without stretching forward. I also installed a Calvin Elite Timney Trigger set at 6 ounces.
$2500.00 Invested in Rifle Transformation and Upgrade
How much did this all cost? Brandon tells us “I have roughly $2500 into the rebuild of the gun from a .204 Ruger to the .223 Rem.”
Bois Blanc Island in Michigan
Here on Bois Blanc Island we don’t have many amenities, but we do have the ability to shoot 550 yards at our local gravel pit on state land. It’s snow-bound right now as you can see. But later in the year this will be our close-to-home training center.
Winter at Bois Blanc Island, Michigan — Here’s the gravel pit where we can load test during warmer weather. When I took this photo, it was a “balmy” 10-degree day.
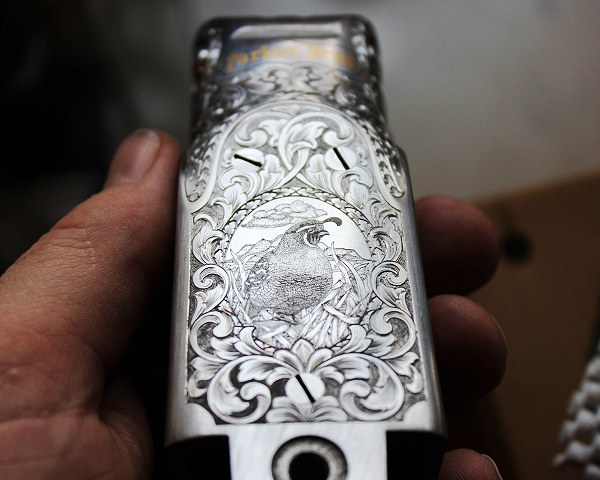
Impressive engraving by Jesse Kaufmann. Note how the scope rings have been engraved to perfectly match the engraving pattern on the Remington 547 action.
Who says fine craftsmanship is dead? There’s a modern day engraving wizard up in South Dakota, Jesse Kaufmann, who produces some of the most handsome engraving we’ve seen. Jesse, who operates Black Hills Gunstocks and Engraving LLC, is a true master at metal engraving and he also does superb stock checkering. Here are some examples of Jesse’s engraving work:
This 14-minute video showcases dozens of Jesse Kaufmann’s Engraving examples:
About Jesse Kaufmann, Master Engraver
Jesse Kaufmann was a professional stockmaker for Dakota Arms for over a decade. In 2009, he was inducted in the American Custom Gunmakers Guild as a checkering specialist. In January 2017, Jesse was awarded his Master Engraver certification by the Firearms Engravers Guild of America. With his broad skill set, Jesse is able to offer his clients a unique and complete package of stock work, finish, checkering, and engraving for a custom package that is all completed under one roof by his own hands.
Jesse Kaufmann’s work has been featured in American Rifleman, American Hunter, FEGA’s The Engraver, Sports Afield, Waidmannsheil Journal of German Gun Collectors Assn., Gun Digest 71st Edition, Modern Custom Guns Volume 2, Dangerous Game Rifles 2d. Edition. For more info, visit BlackHillsgunstocksandengraving.com, email blackhillsgunstocks [at] gmail.com, or call Jesse at (605) 499-9090 after 5:00 pm. SEE Gallery of Work.
Here’s a helpful, time-saving tool for handgun owners. MidwayUSA’s online Holster Finder lets you quickly find the right holsters for virtually all popular makes and models of pistols and revolvers. The wide variety of carry styles, materials, and features can make finding the right holster difficult or confusing. Drawing on a database of over 125,000 gun/holster combinations, the MidwayUSA Holster Finder turns that complex task into an easy three-step process.
The selection process is simple: 1. Choose Pistol or Revolver; 2. Select Make and Model of Handgun (and barrel type/length); 3. Click to view results. Just choose your gun type, select your make, model and barrel, then view the results. All major holster types are included: Ankle, Belly Band, Belt (outside waistband), Chest, Competition, Drop Leg, Inside Waistband (IWB), Paddle, Pocket, and Shoulder. Check out the MidwayUSA Holster Finder at MidwayUSA.com/holster-finder.
Looking for a fun, DIY project this winter? Here’s a useful project — a handy ammo caddy you can craft at home pretty easily. And your shooting buddies will be impressed with your ingenuity. Plus the wife won’t mind having a spare knife-holder for the kitchen.
Forum member Alex W. (aka “zfastmalibu”) came up with a clever adaptation of an item you may already have on your kitchen counter. By drilling a few strategically-placed holes in a wood knife-holding block, Alex created a handy, 20-round ammo holder for the bench. We’re not sure the wife will appreciate the new holes in her kitchen accessory, but we think this is a smart invention. Alex asked fellow Forum members: “What do you think, is there a market for it?” We think there is. Of course, with a ruler and an electric drill you could probably make your own version easily enough.
Our take on Bore-Store Gun sleeves is simple: They work great, so buy them and use them — for ALL your valuable firearms.
Winter’s here, with rain and snow in much of the country. We known readers will have their guns in the safe for long periods. For winter storage, we recommend Bore-Stores. These thick, synthetic-fleece sacks cushion your guns, preventing nicks and scratches. The breathable fabric wicks away moisture, and the fibers are coating with corrosion inhibitors. I personally use Bore-Stores for in-safe storage with all my guns, and I have never had one of my guns rust inside a Bore-Store, even when I lived a stone’s throw from the ocean and its salty air.
Bore-Stores are offered in a range of sizes to fit everything from a snub-nosed revolver to a 33″-barrelled Black Powder Rifle. Bore-Stores can be purchased for $9.99 – $28.99 from Borestores.com. For most scoped rifles, we recommend the 10″x46″ SCR-1 case ($25.99). The Bore-Store manufacturer, Big Spring Enterprises will also craft custom sizes on request. For a long-barreled F-Class or ELR rig you may need a custom length. Or you can remove the scope and use the 7″x52″ SG-1 Shotgun Bore-Store for up to 32″ barrel ($28.99).
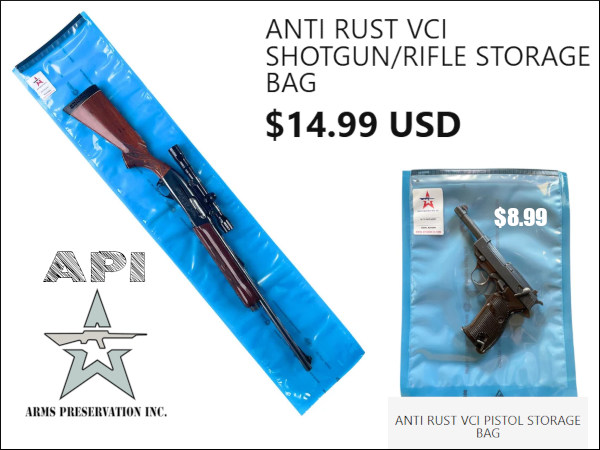
API-Brand Anti-Rust VCI Storage Bags — Affordable and Effective
Consider VCI Bags for Long-Term Storage
While we prefer Bore-Stores for regularly-used guns, if you have heirloom firearms that will be kept in storage for very long periods without seeing any use, you may want to grease them up and place them in the thin, but rugged API brand VCI Storage Bags. The interior VCI lining emits a safe corrosion inhibitor vapor. The multi-layer exterior locks out humidity and airborne contaminants. These bags are also resistant to petroleum-based chemicals and seal out moisture. They have a handy velcro opening.
Here’s one VITAL bit of advice for using sealed gun storage bags. Be absolutely sure, before you seal up the bags, that your guns are DRY and that all metal surfaces have been coated with an effective anti-corrosive, such as BoeShield T9 or Eezox. NOTE: If you can’t afford the $15 API sacks, Brownells offers a three-pack of 12″x 60″ anti-rust rifle sacks for $22.99 — under 8 bucks a gun. That’s certainly cheap insurance for rifles and shotguns that may cost many thousands of dollars.
Get Your Guns Out of Foam-lined Cases — They Are Rust Magnets
Just about the worst thing you can do for long-term storage (short of leaving your rifle outside in the rain) is to store firearms in tight, foam-padded cases. The foam in these cases actually collects and retains moisture from the air, acting as the perfect breeding ground for rust. Even in warm summer months, humid air can leave moisture in the foam.
Remember, those plastic-shelled cases with foam interiors are for transport, not for long-term storage. Don’t repeat the mistake of a wealthy gun collector I know. He stored four valuable Colt Single Action Army (SAA) revolvers in individual foam-padded cases, and locked these away in his gun safe. A year later, every one of his precious SAAs had rusted, some badly.
NRA Media offers a series of 40 informative videos about the Science of Shooting, covering a wide range of topics, from eye dominance to long-range ballistics. These videos feature high production values, with super-slow motion segments, as well as helpful computer graphics to illustrate the principles covered.
The videos are narrated by Jessie Duff, a top action pistol shooter (and the first women ever to achieve USPSA Grand Master status). Jessie is assisted by talented shooters such as Top Shot Season 4 Champion Chris Cheng. There are forty videos in the Firearm Science Video Series. Here are five NRA videos, with links to others below. You’ll find all 40 NRA Firearm Science Videos HERE.
Eye Dominance — How to Determine Which Eye is Dominant
Host Jessie Duff and longtime shooter Krystie Messenger demonstrate how eye dominance affects aim and teach you how to determine your dominant eye in this edition of Firearm Science. There are very simple tests you can do to determine your eye dominance. This Editor is right-handed but left-eye dominant. All competitive shooters should check for eye dominance. If you are cross-dominant, you can alter your head position or put a paper patch on one frame of your shooting glasses.
Eye Protection — Effect of Different Color Lenses
No matter what you’re shooting, eye protection should always be worn. But with so many choices, what should you wear? In this edition of Firearm Science, two-time Olympic trap shooter Corey Cogdell explains lens color options for protective eyewear. Different colors may be selected according to the light conditions and the sport. For most rifle shooters using magnified scopes, clear lenses are probably the best choice, except on very bright summer days.
Iron Sights vs. Optics
Host Jessie Duff and shooter Krystie Messenger demonstrate the benefits and drawbacks of using iron sights and optics in this edition of Firearm Science. For AR-type rifles, choosing the right option depends on the intended use of the rifle and the rules of competition. For example, a “Standard military Rifle” for CMP competition must have iron sights. But current NRA service rifle competition (and CMP unlimited military rifle class) allows scopes. Olympic smallbore shooters and Palma shooters have shown that extreme accuracy IS possible with sophisticated target sights. Below is the iron-sights Palma rifle with which John Whidden (Whidden Gunworks) won NRA Long-Range National Championships.


 Need a top-notch Ballistics App for your iPhone or iPad? Start with Ballistic: Advanced Edition (AE), the number 1 (i.e. most installed) App for iOS systems (iPhones and iPads). Ballistics AE (Advanced Edition) is the most popular iOS ballistics program for many good reasons. It offers a full feature set with Ballistic Solver, Ballistic Comparison (with up to 8 projectiles), Target Log (records group sizes), Advanced WindKit, and more. The Ballistic: Advanced Edition software is easy to use, with nice controls. Underneath it all is the proven JBM Ballistics calculator. And here’s the kicker — this excellent mobile App software is now FREE to download and install on iPhones and iPads!


 About Jim Borden and Borden Accuracy
 Borden Accuracy — A Success Story


 Flame Graphics by Camo Creek Hydrographics


 About Jesse Kaufmann, Master Engraver
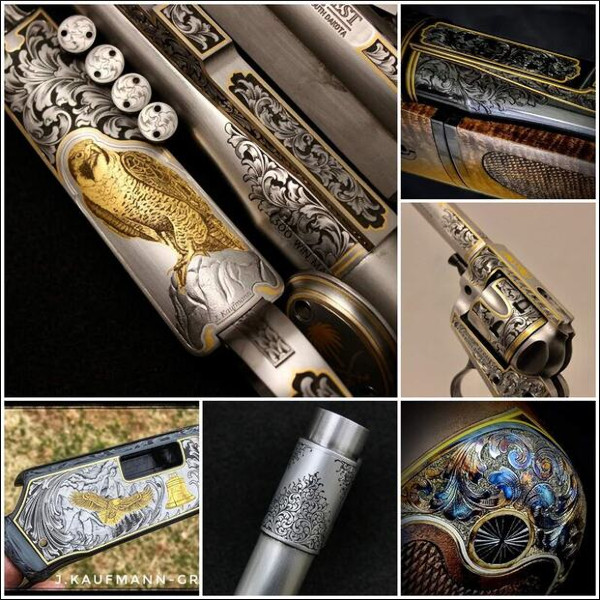


 Here’s one VITAL bit of advice for using sealed gun storage bags. Be absolutely sure, before you seal up the bags, that your guns are DRY and that all metal surfaces have been coated with an effective anti-corrosive, such as BoeShield T9 or Eezox. NOTE: If you can’t afford the $15 API sacks, Brownells offers a three-pack of
  Remember, those plastic-shelled cases with foam interiors are for transport, not for long-term storage. Don’t repeat the mistake of a wealthy gun collector I know. He stored four valuable Colt Single Action Army (SAA) revolvers in individual foam-padded cases, and locked these away in his gun safe. A year later, every one of his precious SAAs had rusted, some badly.


