Report by Forum Member Ian S. (aka “Nightowl”)
After taking a few years off from competitive shooting, in 2012 Mike Gaizauskas returned to the long-range rifle scene in a big way. During the course of the Virginia 1000-Yard Benchrest Club’s 2012 season, Mike set three new IBS 1K multi-match Aggregate records. Mike broke into the record-books using a very unique 300 WSM rifle that incorporates a lot “brainstorming” and help from Mike’s friends and colleagues. The record-setting rifle features a super-wide forearm which is also offset. (As viewed from the shooter’s position, the stock is wider on the left, off-setting the barreled action to the right). This Heavy Gun has proven to be super-accurate — Mike barely missed setting a new IBS 10-shot-group HG record by a couple thousandths.
IBS 1000-Yard Records by Mike Gaizauskas:
IBS 1000-Yard Heavy Gun Ten-Match Group Aggregate (5.6664 inches)
IBS 1000-Yard Heavy Gun Ten-Match Score Aggregate (95.30)
IBS 1000-Yard Heavy Gun Six-Match Group Aggregate (4.4935 inches)
Missed a Fourth IBS Record by a Whisker (or Two…)
In 2012, Mike came “oh-so-close” to breaking the current IBS 1000-Yard Heavy Gun 10-shot small group record of 3.044”. Using his offset HG shown below, Mike drilled a 3.046″ 10-shot group, just two thousandths of an inch (.002″) off the current record. FYI, the thickness of a typical human hair is .001″ — you can’t get much closer than that!
The record-setting gun was built with components gathered over time, which were then fitted into a new ultra-wide stock. Mike ordered two custom stock blanks from Richards Micro-Fit Stocks of Sun Valley, CA roughed to Mike’s specifications. One was for a Light Gun, and the other was for a Heavy Gun. Mike had been thinking about an offset design for some time. During the 2007 Nationals held at the Virginia 1000-Yard Club, Mike just happened to sit next to Dave Tooley for a day. Mike and Dave discussed at length Dave’s experiences and conclusions regarding offset stocks. Dave explained that an asymmetrical or offset forearm is designed to counter the longitudinal torque that occurs when the gun is fired. You can find these concepts featured a few years back in the 6mmBR.com Blog.
In addition to tapping into the mind of Dave Tooley, there was a LOT of debate among Mike’s friends regarding what shape and which side of the stock would work best to counter the barrel torque generated when launching a bullet utilizing a right-hand twist. Should the stock be wider on the left or wider on the right? Mike eventually decided to widen the forearm on the left side and apparently that was a wise decision — just check out the trophies this big rig has already hauled in:
Heavy Gun Is a 300 WSM
This record-setting Heavy Gun was chambered in 300 WSM by Mark King. The gun features a BAT Model M action mated with a 30″, 1:10″ twist Krieger chambered to a .338 neck and finished off with a muzzle brake of Mark’s design. The barreled action is held with a clamp-style barrel block. The stock incorporates stainless steel rails fashioned by Mike’s friend and machinist Steve Reimers.
… Stay tuned to the Daily Bulletin. We hope to provide a follow-up story with more photos and more information on Mike’s record-setting rifle (and the ultra-accurate ammo he feeds it).
This story first appeared last year. We’re featuring it again by popular request.
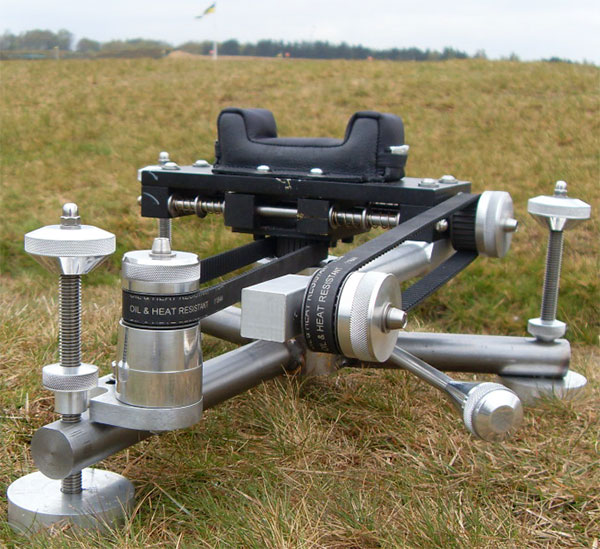
Some of our mechanically-skilled readers chamber their own barrels or bed their own stocks. But these are relatively simple tasks compared to the jobs of constructing an entire rifle plus building an advanced front rest from scratch. Well that’s exactly what Forum member Steve B. (aka Essexboy) did. He built his own rifle and an impressive twin-belt-drive pedestal rest. (Click photo below to see large version). And get this, Steve’s home-made rifle was victorious in its first-ever match. Steve reports: “I shot my first Comp with the rifle this weekend and managed to win with a score of 239-21!” (The match was shot at 300/500/600/1000/1100 with English scoring of 5 points for center bullseye).
Do-It-Yourself F-Open Rig from England
Steve, who hails from Essex in the UK, constructed virtually every component of his skeleton-style rifle except the 28″ HV Bartlein barrel (chambered as a 6mm Dasher) and the Tikka 590 donor action. Steve also did all the design and fabrication work on his one-of-a-kind front rest. Steve tells us: “Over the last year or so, I made this rifle stock and rest. I managed to make it all on a little Myford Lathe, as you can tell I’m no machinist but it saved me a load of money — so far I’ve got about $200 invested plus the barrelled action. The stock is aluminum except for the stainless steel bag runner. The rifle came in at one ounce under weight limit for F-Class Open division.” Steve did get help with the chambering and barrel-fitting, but he hopes to do all the barrel work himself on his next project.
The gun is very accurate. Steve notes: “I have shot the rifle to 1100 yards and it shoots well. Last time out the rifle dropped just one point at 1000 yards and 5 points at 1100 yards [English scoring system]. I know it’s not pretty, but it got me shooting long range F-Class for peanuts.” Message to Steve: Don’t worry how it looks. As another Forum member observed: “Any rifle that shoots well at 1100 yards is beautiful….”
Steve started with a Tikka 590 action: “The whole stock was made on a small (6.5×13) lathe and a vertical slide. This caused a few head scratching moments, figuring out how to hold the T6/HE30 alloy for the milling/turning operations, but it did teach me a few things. The hardest parts were clamping the longer sections (such as the fore-end) and keeping it all square. Due to the short cross-slide travel I had to keep re-setting the parts. I managed to keep all measurements to .0001″ (one thousandth). I’m most proud of the trigger guard (photo below). This took a full day but came out really well, even if I say so myself.”
Belt-Driven Front Rest
We’re impressed with Steve’s ingenious front rest. Steve explains: “The rest is belt-driven and still in the experimental stage — hence no powder coating or polishing yet. I may have gone over the top as the key moving parts (the pulleys) run on three (3) types of bearings: radial; reamed bush; and a ball race. The main post runs on a radial bearing and the feet even have bearings in them, so when I raise the main body up (for rough height adjustment) the foot stays static.”
Will Steve build another rifle? Steve says he will, and he’s upgraded his tools: “Since building the rifle I have acquired a bigger lathe (Harrison m250) and a milling machine. For the next project I hope to be able to do the barrel work (threading, chambering, crowning) as well.” The next gun might be another Dasher. Steve explains: “After extensive reading on AccurateShooter.com, I chose the 6mm Dasher chambering, as I have a shoulder problem and can’t shoot a rifle with a lot of recoil.”
Report by Richard King (King’s Armory, Texas; ‘Kings X’ on our Forum)
With all the talk from Vince Bottomley in the April issue of Target Shooter about aluminum stocks, I thought you might like to see my latest project. This is my personal gun, built the way I wanted it. I know it’s radical and some may not care for it. But it works.
This is pretty much an all-aluminum rifle. The action is a Kelbly F-Class with a Shilen stainless steel competition trigger. The scope is a 1″-tube Leupold 36X with a Tucker Conversion set in Jewell spherical bearing rings. The .223 barrel is Pac-Nor 3-groove, 1:6.5″-twist mounted in a “V”-type barrel block. The bipod has vertical adjustment only via a dovetail slide activated by a stick handle. It works like a joy-stick, but for vertical only. I adjust for windage by moving the rear sandbag.
The 30″ barrel is 1.250″ in diameter. With the barrel block forward, the vibrations should be at a low frequency. Instead of one long rod whipping, I now have two short rods (barrel haves) being dampened. This is my fourth barrel block gun. They work, but so does a good pillar-bedded action. I just do stuff a little different.
The vertical “keel” down the bottom of the stock stops the “spring” of a flat-bar stock. There is little, if any, noticeable flex before or during recoil. The long length of the stock, the fat barrel, and the forward-mounted barrel block work together to keep the gun from rising off the ground. BUT, remember this is a .223 Rem rifle. A .308 Win version might act very differently. I may try a .308-barreled action soon, just to see what happens. But I will stick with the .223 Rem as my choice for match shooting.
The offset scope idea came from a benchrest “rail” gun. In truth, the whole concept came from a rail gun — just adapted to being shot off a bipod. Sure it isn’t directly over the bore. It is about 1.5″ over to the left. So if you want the scope to be zeroed on the center of the target, you have to adjust for the offset. At 100 yards that is 1.5 MOA. But at 300 it is only 0.5 MOA, at 600 only a ¼-MOA, and at 1000 about 1 click on my scope.
What the offset DOES do for me is eliminate any cheek pressure. My cheek never touches the stock. Since this is only a .223 Rem, I don’t put and shoulder pressure behind it. And I don’t have a pistol grip to hang on to, but I do put my thumb behind the trigger guard and “pinch” the two-ounce trigger.
The offset scope placement could interfere with loading a dual-port action from the left. That’s not a problem for me as I set my spotting scope up on the left side very close to the rifle. I have plenty of time to reload from the right side while the target is in the pits being scored.
Again — this is my rifle. It is designed for my style of shooting. It is not meant to be a universal “fit all” for the general public. However, I will say the design is adaptable. I can easily convert the system to run in F-Open Class. I would drop a big-bore barreled action into the “V” block, slide on a heavier pre-zeroed scope and rings, add plates on the sides up front to bring the width to 3”, and maybe a recoil pad. It might be interesting to offset the wings up from to counter torque of the big bullets. But I would also have to offset the rear bag rider to get the gun to recoil straight back.
How the Gun Performs
I have had “T” to the range only twice for load development. It groups like my present barrel-blocked 223 F-TR gun. But it’s much easier to shoot and it only moves about 3/4” — straight back. I tried to build am omni-directional joy-stick bipod but I could not get all the side-to-side wiggle out of it. So I have set it up so it only moves up and down (horizontal movement is locked-out). As it works now, the joystick on the bipod lets me set elevation on the target quickly (with up/down adjustment). Then, to adjust for windage, I slide my rear bag side-to-side as needed. Once set, I just tickle the trigger and smile.
Gun Handling — Shoot It Like a Bench-Gun
I basically shoot the gun with no cheek or body contact. I don’t grip it, other than maybe a pinch on the trigger guard. The scope was offset to the left to help the shooter move off the gun and avoid the possibility of head/cheek contact with the stock.
Listen to Richard King Explain How He Shoots his ‘Texas-T’ Rifle:
[haiku url=”http://accurateshooter.net/Video/RichKingTalks.mp3″ Title=”Richard King Talks”]
Brownells now offers free firearms maintenance videos on the Brownells.com website and the Brownells YouTube channel. Brownells President/COO, Matt Buckingham says: “These videos are great for any firearm owner, regardless of skill or experience level. If you’re a new owner, they’ll be extremely helpful; if you’re a longtime gun owner, they’re a great refresher.”
These how-to videos guide viewers through the steps of proper disassembly, cleaning, lubrication, reassembly, and function testing of some of today’s most popular firearms. For each firearm type, a series of FOUR video segments are offered. These are professionally filmed, with multiple camera angles and detailed close-up shots.
Watch m1911 Pistol Disassembly Video (Part 1 of 4-part m1911 series)
Watch Remington 870 Shotgun Disassembly Video (Part 1 of 4-part Rem 870 Series)
Founded in 1939, Brownells is an Iowa-based, family-owned company that sells more than 75,000 firearms parts, gunsmithing tools, accessories, and reloading components. Brownells offers a lifetime guarantee on EVERY product sold. To place an order, or for more information, call 800-741-0015 or visit Brownells.com.
Secure Firearm Products (SFP) has introduced a new Spring Tester that measures the “pull weight” of a wide variety of springs used in handguns and rifles. With this new Spring Tester you can measure recoil springs, mainsprings, firing pin springs, and much more. The SFP Spring Tester comes with a digital scale. The complete Spring Tester kit (Model # 11490-SR-D) retails for $40.99.
The Spring Tester, which comes complete with a compact digital pull-weight scale, is simple to use. Just insert the spring on bolt, insert that assembly in the red tool housing, then attach the coupler and scale. Pull until proper compression length* is achieved, and record your reading. Note: the Spring Tester Tool is marked with a line at 1.625″ which is the Mil-Spec compression length of a 1911 recoil spring. The SFP Spring Tester currently ships with an adapter that lets you test small springs such as mainsprings, firing pin springs or other small springs used in pistols, rifles or revolvers.
*NOTE: The appropriate compression length varies with the spring and the application. You may need to get this compression length specification from the manufacturer.
SFP Spring Tester Demo Video
Why do you need a spring tester? SFP’s David Surgi explains: “It’s important to be able to sort and organize all of them properly and know that when a spring needs replacing, that you are putting in the right one with the proper tension.” Dan Kidder of Sportsman’s Warehouse concurs: “The Spring Tester from SFP gave me the ability to take a drawer full of recoil, main springs, firing pin springs and others, and easily identify their tension. I no longer have to try to label springs or worry about them getting in the wrong spot.”
Sometimes you’ll get a barrel that doesn’t stabilize bullets the way you’d anticipate, based on the stated (or presumed) twist rate. A barrel might have 1:10″ stamped on the side but it is, in truth, a 1:10.5″ twist or even a 1:9.5″. Cut-rifled barrels, such as Kriegers and Bartleins, normally hold very true to the specified twist rate. With buttoned barrels, due to the nature of the rifling process, there’s a greater chance of a small variation in twist rate. And yes, factory barrels can be slightly out of spec as well.
Before you purchase a bunch of bullets and set off to develop loads it’s wise to determine the true twist rate of your new barrel. Sinclair International, in its Reloading Press Blog provides a simple procedure for determining the actual twist rate of your barrel. Read on to learn how….
How Twist Rate Affects Bullet Stability
Most of you know that the twist of the rifling in the barrel is what puts spin on the bullet. As a bullet is pushed down the barrel and compressed into the rifling, the bullet follows the path or twist of the rifling. The combination of velocity and bullet spin is what stabilizes the bullet. Finding the twist rate for your barrel will help you in selecting appropriate weight bullets for your firearm. Remember, the general rule is that the faster the twist rate for a given caliber, the longer the bullet (of that caliber) you will be able to stabilize. (Generally speaking, a longer bullet will also be a heavier bullet, but the bullet geometry dictates the needed twist rather than the weight per se.)
Determining Barrel Twist Rate Empirically
Twist rate is defined as the distance in inches of barrel that the rifling takes to make one complete revolution. An example would be a 1:10″ twist rate. A 1:10″ barrel has rifling that makes one complete revolution in 10 inches of barrel length. Rifle manufacturers usually publish twist rates for their standard rifle offerings and custom barrels are always ordered by caliber, contour, and twist rate. If you are having a custom barrel chambered you can ask the gunsmith to mark the barrel with the twist rate.
Sinclair’s Simple Twist Rate Measurement Method
If are unsure of the twist rate of the barrel, you can measure it yourself in a couple of minutes. You need a good cleaning rod with a rotating handle and a jag with a fairly tight fitting patch. Utilize a rod guide if you are accessing the barrel through the breech or a muzzle guide if you are going to come in from the muzzle end. Make sure the rod rotates freely in the handle under load. Start the patch into the barrel for a few inches and then stop. Put a piece of tape at the back of the rod by the handle (like a flag) or mark the rod in some way. Measure how much of the rod is still protruding from the rod guide. You can either measure from the rod guide or muzzle guide back to the flag or to a spot on the handle. Next, continue to push the rod in until the mark or tape flag has made one complete revolution. Re-measure the amount of rod that is left sticking out of the barrel. Use the same reference marks as you did on the first measurement. Next, subtract this measurement from the first measurement. This number is the twist rate. For example, if the rod has 24 inches remaining at the start and 16 inches remain after making one revolution, you have 8 inches of travel, thus a 1:8 twist barrel.
This rifling illustration was created by Danish graphic artist Erik Dahlberg. It is published here courtesy FireArmsID.com, an excellent website for forensic firearms examiners.
Canadian Fred Harvey of Star Shooter Precision recently posted photos of an interesting metal-stocked F-TR rifle, fitted with a Star Shooter CF-SS Bipod with carbon-fiber legs. This handsome .308 Winchester rifle features a Barnard S action, 30″ Krieger barrel (1:11.25″ twist), and aluminum stock/chassis from Dolphin Gun Company in the UK.
The all-up weight of this rig, including the Star Shooter bipod and mounting rail is 17 pounds, 15 ounces. (F-TR weight limit is 8.25 kgs, approx. 18.15 pounds). Gunsmith was Ian Robertson.
Dolphin Gun Company Aluminum F-TR/Tactical Rifle Stock
Dolphin’s modular, CNC-crafted F-TR/Tactical stocks are fully adjustable. Fore-ends are interchangeable and the pistol grip even adjusts for length of pull. Dolphin offers single shot and repeater inlets for Rem 700-style actions, Barnard S & SM actions, RPA Quadlite actions, plus BAT VR and Savage actions. Three types of fore-ends are available: short tactical style, long F-TR style, and a wide F-Open style. Repeater versions accept AI magazines. Dolphin claims the repeaters “feed faultlessly with any action fitted”. The aluminum Dolphin F-TR/Tactical stock comes with an adjustable buttplate fitted with Morgan Recoil pad. The bag-rider height also adjusts. These stocks sell for £630 (about $960 USD) with either Dura-coat or hard-anodized finish. A variety of anodizing colors are offered.
If you do home gunsmithing or swap barrels frequently, you need a good barrel vise. PMA Tool is now carrying a quality 6061 Aluminum barrel vise, with spring-loaded clamps and a durable, baked-on powdercoat finish.
PMA’s Pat Reagin tells us: “These Deluxe Barrel Vises are made by our friend Bob ‘The Viper’ Pastor. Bob’s barrel vises feature hardened bolts and nuts along with fully-captured return springs. The return springs prevent the top of the vise from flopping around, making inserting and removing barrels from the vise much quicker and easier.” This feature, along with the non-slip powdercoat finish, protects your barrels from scratches and, importantly, protects the crown of the muzzle. Pat says: “You will not find a higher quality barrel vise with these features anywhere.” Price for the Pastor barrel vise, machined from 6061 Aluminum, is $60.95. CLICK HERE to order.
Product tip by EdLongrange. We welcome reader submissions.
BAT .50 BMG — Now That’s an Action!, by GAS
A while back, I stopped into Bruno Shooters Supply for a jug of powder and looked into the display case where the new actions are kept. Amid the usual array of BAT Machine, Stolle and other actions, there was something unlike any action I’d seen before — all I can call it is the BIG BAT. I wasn’t too surprised at the weight (a beefy 13.7 lbs.), but until you lift it it’s hard to appreciate how solid, chunky, hefty, massive (pick your favorite adjective) this thing really is. The action is a 2.5″-diameter, 12″-long BAT for the .50 BMG cartridge. It is simply the biggest, slickest custom action on the planet. In order to give you some sense of scale, I photographed the action alongside a conventional BAT action for short-range Benchrest shooting and I put a .220 Russian case and a .30-06 case into the picture. I’ve handled and fired other .50 BMG actions/rifles before, but this BAT puts them all to shame, as far as fit and finish go.
The action is actually quite conventional in design and execution. The bolt is fluted and has two front lugs with a conventional, although super-sized, firing pin assembly. Any Remington-style trigger will mount by way of a normal trigger hanger, allowing for simplified maintenance or replacement in the field. The loading port is 5.5″ long and the barrel threads are 1.5″ x 16 tpi — nothing about this beast is small! There is a conventional rocker-type bolt release on the left side of the receiver body and a recoil lug is built into the bottom of the receiver. In reality, the action is very similar to any other BAT except for the size and it adheres to all of BAT’s high standards for quality of design, manufacture, fit, finish and just plain good looks. Slide that bolt back and it feels as tight as a small Benchrest action!
Given the BIG BAT’s $3,285.00 sticker price (2011 pricing), not many of us will ever have the opportunity to own or shoot one of these beauties (I certainly won’t). However, it is nice to know they exist and can be bought and enjoyed in many places.
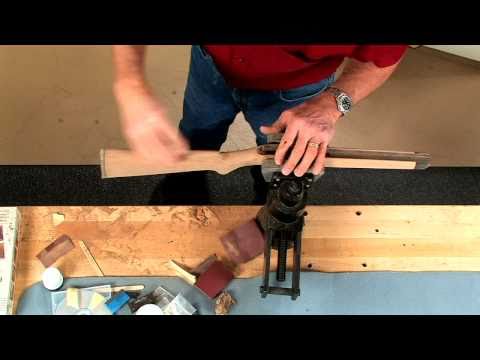
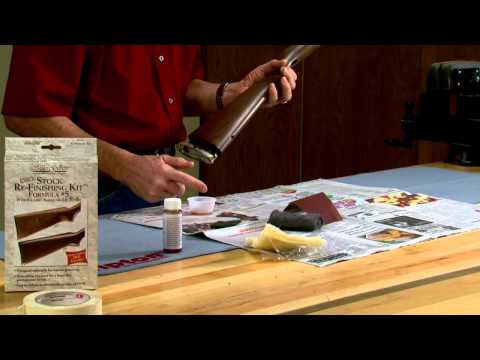
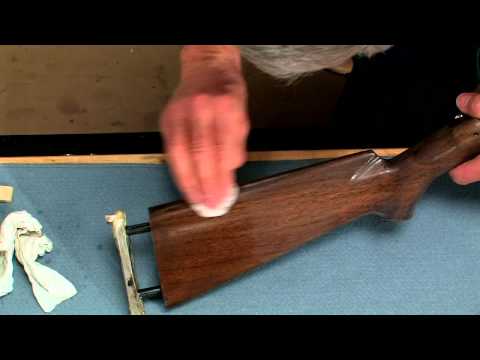
In a series of YouTube videos, Larry Potterfield of MidwayUSA shows how to prepare, finish, and polish a wood gunstock. The first video covers sanding, sealing, and filling. The second video shows how to apply a multi-coat finish by hand, with light sanding between coats. In the third video, Larry applies a final polish to his project stock. The principles illustrated in these videos can be applied to most types of stocks. However, keep in mind that Larry is working with a hardwood stock.
By contrast, with a typical Rutland laminated stock, the finishing process is somewhat different and (usually) more time consuming. You’ll probably have to do more aggressive sanding, and the sealing process can be more time-consuming because laminates typically have very porous surfaces that soak up a lot of sealant. You may have to do multiple sealant passes with aggressive sanding in-between. Alternatively, you can use multiple coats of high-solids clear coat to fill the pores.
How to Prepare a Riflestock for Finishing
How to Apply a Multi-Coat Finish
How to Polish the Finish on a Riflestock
Clear-Coating Your Stock
While you can put an oil-type finish on a Rutland laminate, we think these often look best finished with an automotive clear coat. Rub-on finishes can cause small changes in stock coloration. If you want to preserve the colors in your laminated stock, a quality, spray-on clear-coat is probably the best way to go. CLICK HERE for expert tips on how to prep and clear-coat a laminated stock.


 The gun is very accurate. Steve notes: “I have shot the rifle to 1100 yards and it shoots well. Last time out the rifle dropped just one point at 1000 yards and 5 points at 1100 yards [English scoring system]. I know it’s not pretty, but it got me shooting long range F-Class for peanuts.” Message to Steve: Don’t worry how it looks. As another Forum member observed: “Any rifle that shoots well at 1100 yards is beautiful….”
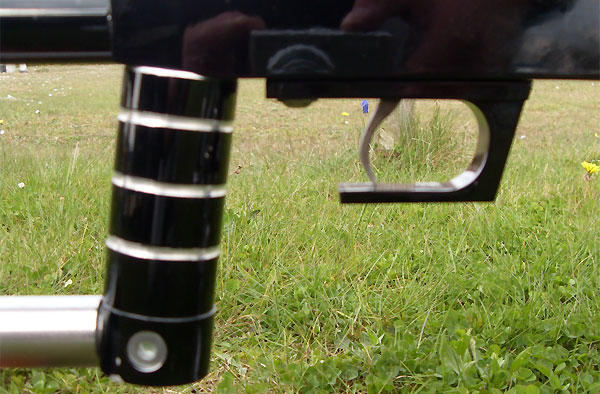


 The offset scope idea came from a benchrest “rail” gun. In truth, the whole concept came from a rail gun — just adapted to being shot off a bipod. Sure it isn’t directly over the bore. It is about 1.5″ over to the left. So if you want the scope to be zeroed on the center of the target, you have to adjust for the offset. At 100 yards that is 1.5 MOA. But at 300 it is only 0.5 MOA, at 600 only a ¼-MOA, and at 1000 about 1 click on my scope.


 Brownells now offers free firearms maintenance videos on the
 Sometimes you’ll get a barrel that doesn’t stabilize bullets the way you’d anticipate, based on the stated (or presumed) twist rate. A barrel might have 1:10″ stamped on the side but it is, in truth, a 1:10.5″ twist or even a 1:9.5″. Cut-rifled barrels, such as Kriegers and Bartleins, normally hold very true to the specified twist rate. With buttoned barrels, due to the nature of the rifling process, there’s a greater chance of a small variation in twist rate. And yes, factory barrels can be slightly out of spec as well.
 Canadian Fred Harvey of


 If you do home gunsmithing or swap barrels frequently, you need a good barrel vise.