AR owners know that their black rifles require regular cleaning and maintenance. And this modular platform allows many options for stocks, fore-arms, and optics mounting. That ability to customize is one of the AR’s major attractions, but customization requires solid understanding of the AR’s design and components.
To help AR owners optimize their rifles and maintain their rifles properly, Gun Digest Media has just released a new, 320-page illustrated book: AR-15 Setup, Maintenance and Repair. Authored by Patrick Sweeney, this book is a “one-stop guide to repairing, maintaining and modifying America’s favorite rifle.” The MSRP for the book is $35.99 from Gun Digest, but it is available on Amazon for $30.11* in paperback. Digital editions are offered by GunDigest for $31.99.
If you need to disassemble and maintain your AR rifle, swap barrels or handguards, add optics, or customize the stock, Gun Digest’s AR-15 Setup, Maintenance and Repair book tells you what you need to know. From field-stripping to barrel mounting and trigger installations, the book covers a wide range of topics. The book provides step-by-step instructions for set-up and maintenance, with hundreds of detailed photos. The book also includes AR gunsmithing chapters with reviews of recommended tools.
Author Patrick Sweeney is a certified master gunsmith and armorer instructor for police departments. Sweeney has also authored the notable 4-volume Gunsmithing the AR-15 series (Vol. 1, Vol. 2, Vol. 3, and Vol. 4) and 20+ other titles for Gun Digest Books.
Whether you want to learn about disassembling your AR for regular maintenance, field-stripping, swapping out parts, adding optics or customizing a stock, AR-15 Setup, Maintenance and Repair guides you through everything you need to know to keep your AR-platform rifle running well. There are also tips on how to improve accuracy, and maintain your bolt carrier group properly.
Authored by Patrick Sweeney
Published by Gun Digest Books
ISBN-13: 978-1951115470
320 pages, softcover, 8 ¼ x 10 7/8 inches
Editor’s NOTE: The key to keeping an AR running reliably is proper lubrication (in the RIGHT places), and regular cleaning of the bolt carrier and bolt, including ejector recess and extractor recess. The majority of non-functioning ARs we’ve seen had gunk, lube, carbon, and brass shavings in those recesses.
Other AR Books by Patrick Sweeney
Bonus Video — AR15 Maintenance with Jerry Miculek
In this helpful video, legendary shooting Jerry Miculek explains how he cleans and maintains his AR-platform rifles. Miculek shoots ARs in three-gun competitions.
* There are other Amazon third-party sellers offering the book starting at $25.48 plus $3.99 shipping.
Ever wish you could look inside your rifle, to see how the trigger and fire-control system work? Well now that is possible with the magic of 3D computer graphics. Modern software allows detailed “cutaway” side-views (see below), as well as 3D views with 360° rotation. The software can also provide X-Ray-type views into the gun’s internals — as you can see above. And computer animation can show the complete firing process from trigger pull to chambering of the next round.
Rem 700 Cutaway View from Right Side
This article provides some very cool 3-D “Cutaway View” animations of the popular Remington 700 action, probably the most successful American bolt-action ever created.
READERS — Take the time to watch the video! The Rem 700 animation is really outstanding! EVERY bolt-action shooter should watch this video all the way through.
Cutaway 3D Animation of Rem 700 Action — Watch Video
The Model 700 series of bolt-action rifles have been manufactured by Remington Arms since 1962. All are based on basically the same centerfire bolt action. They are typically sold with an internal magazine depending on caliber, some of which have a floor-plate for quick-unloading, and some of which are “blind” (no floor-plate). The rifle can also be ordered with a detachable box magazine. The Model 700 is a development of the Remington 721 and 722 series of rifles, which were introduced in 1948.
The Remington 700 is a manually-operated bolt action with forward, dual opposed lugs. It features “Cock On Opening”, meaning the upward rotation of the bolt when the rifle is opened cocks the firing pin. A cam mechanism pushes the firing pin’s cocking piece backward. The bolt face is recessed, fully enclosing the base of the cartridge. The extractor is a C-clip sitting within the bolt face. The ejector is a plunger on the bolt face actuated by a coil spring. The bolt is of 3-piece construction, brazed together (head, body. and bolt handle). The receiver is milled from round cross-section steel.
This video was made with the help of the World of Guns: Gun Disassembly interactive encyclopedia with 3D rendering. This remarkable web-based software allows users to view the inner workings of hundreds of different rifles and pistols — everything from a .22 LR Ruger to a .55-caliber Boys Anti-Tank rifle. There are also 25,000+ parts diagrams. This is a remarkable technical resource. SEE MORE HERE.
Looking for a superb illustrated coffee table book about guns? Yes there is such a thing, a great book we highly recommend — The Illustrated History of Fireams (2nd Edition). This full-color 320-page hardcover book features more than 1,700 photos compiled by NRA Museums curators Jim Supica, Doug Wicklund, and Philip Schreier. This Second Edition includes 300 photos more than the original, plus dozens of new profiles of important persons who influenced firearms development.
This follow-up to the best-selling original NRA Museums book is loaded with great images, historical profiles, and technical data on old, new, and currently-manufactured firearms that have changed history. Covering the earliest matchlocks to modern match-grade superguns and everything in between, The Illustrated History of Firearms provides a fascinating education on how guns evolved, where they originated and how they worked.
The Illustrated History of Firearms, 2nd Edition
– Authored by the experts at the NRA Firearms Museums
– Published by Gun Digest Books
– 9 ½ x 11 1/2 inches, hardcover with dust jacket
– 1,700 full-color photos
– 320 Pages
– Price: $39.99 (MSRP); $29.12 on Amazon
The Illustrated History of Firearms, 2nd Edition is available from Amazon direct for $29.12. Amazon also lists the book starting at $25.12 from a variety of other book vendors. You’ll also find the book at major bookstores such as Barnes & Noble, but it’s probably easier to purchase online.
Historic American Arms — Teddy Roosevelt’s Lever Guns
These two lever action rifles, owned by President Theodore Roosevelt, are part of the NRA Museum collection. First is a Winchester 1886 rifle known as the tennis match gun because Roosevelt used winnings from a tennis match to buy it. Below that is a suppressed Winchester model 1894 rifle. Roosevelt liked to shoot varmints around Oyster Bay (Long Island, NY) with this gun so he wouldn’t disturb his neighbors — the Tiffany and Du Pont families.
About the NRA Museums
The NRA opened the original National Firearms Museum at its Washington DC Headquarters in 1935. In 2008 the Francis Brownell Museum of the South West opened at the NRA’s Whittington Center in Raton, NM. Then, in 2013, the National Sporting Arms Museum opened at the Bass Pro Shops store in Springfield, MO. Every year, at these three museum facilities, over 350,000 persons visit to see the impressive exhibits and many of America’s most famous firearms. For more information, visit www.NRAMuseum.org.
Are you seeing unpredictable changes in Point of Impact on your target? Think you may have a scope issue? Well maybe not — when was the last time you checked your BARREL?
Yes scopes do fail, and scope bases/rings do get loose. But sometimes problems with erratic POI shifts are caused by a LOOSE BARREL. This issue came up recently in our Shooter’s Forum. One member complained that his zero was shifting from day to day — by as much as two inches at 100 yards. He was convinced he had a scope problem, based on erratic POI:
“I think my scope loses 1 to 3 MOA per day. When I shot my rifle Monday it was dead on. On Tuesday it was 1″ low. Then on Wednesday it was 1 or 2″ lower. I don’t get it. — the elevation knob never touched. Scope will track and return to zero that day perfect. Yes EVERYTHING has been checked, nothing loose. What is the chance the erector tube spring has gone south? For the record this is a Vortex GE. Never had a bad scope, but this has me wondering”. — LB
On Forum member told LB to send the scope right back to the manufacturer. Two other members suggested mounting the scope on a different rifle to test. Good advice. That’s generally a smart strategy before you conclude a scope has gone bad…
Could Problem Be the Scope Base?
Two Forum members, ExPiper and Dickn52, suggested checking the scope base, recounting their past experiences with troublesome bases. This was intelligent — anyone with a POI problem should check all the optics attachments:
“Went crazy one day chasing my impacts on a 100-yard target. Shots would group fine for three then go nuts for 4-5. I cranked and un-cranked for about an hour. Then I reached up and the base wobbled on the rifle. Removed scope, tightened base screws and back in business.” — Dickn52
“Years ago I had a problem [where] shots were climbing with almost every shot. I was blaming the scope. However, when removing the scope I noticed that the 20 MOA base was cracked and getting wider with every shot. Needless to say I replaced the base and the problem was solved. — ExPiper
Eureka Moment — The problem was the BARREL, not the Scope
There were many helpful suggestions, but member PirateAmmo steered LB to the real problem — a loose BARREL: “We had a problem on a home-built AR-platform rifle once, barrel was loose a tad…”
Member Snert chimed in: “Yep — I had a PPC that suddenly went 19″ low. Picked up gun off bench by barrel and felt a wiggle. I tightened the barrel and the POI went 19 inches up”.
Problem Solved — Barrel Tightened up and POI Back to Normal
The gentleman with the POI problem took the advice of PirateAmmo and checked his barrel. BINGO! Low and behold, the barrel WAS loose.
LB posted: “Barrel loose by about 2%, checked it twice before and didn’t find it the first two times”.
After LB re-tightened his barrel, his rifle started shooting normally again. No more shooting low by 1-2 inches. Problem solved. The fix didn’t cost a penny and now LB doesn’t have to send a perfectly good optic back to the manufacturer.
Lesson learned? Check ALL the variables before you assume a scope has gone bad. Along with the barrel, also check your action screw tension, and of course the scope base and rings.
Most of us own a .223 Rem rifle. Now, thanks to our friends at Rifleshooter.com we can assess exactly how velocity changes with barrel length for this popular cartridge.
Rifleshooter.com performed an interesting test, cutting the barrel of a .223 Rem rifle from 26″ all the way down to 16.5″. The cuts were made in one-inch intervals with a rotary saw. At each cut length, velocity was measured with a Magnetospeed chronograph. To make the test even more interesting, four different types of .223 Rem/5.56 ammo were chron’d at each barrel length. The Rifleshooter.com team that conducts these tests has a full-service gun shop, 782 Custom Gunworks — visit 782guns.com.
Test Barrel Lost 25.34 FPS Per Inch (.223 Rem Chambering)
How much velocity do you think was lost, on average, for each 1″ reduction in barrel length? The answer may surprise you. The average speed loss of the four types of .223/5.56 ammo, with a 9.5″ shortening of barrel length, was 240.75 fps total (from start to finish). That works out to an average loss of 25.34 fps per inch.
5.56/.223 Barrel Cut-Down Speed Test 26″ to 16.5″
Start FPS at 26″
End FPS at 16.5″
Total Loss
Average Loss Per Inch
UMC .223 55gr
3182*
2968
214
22.5 FPS
Federal M193 55gr
3431
3187
244
25.7 FPS
Win m855 62gr
3280
2992
288
30.3 FPS
Blk Hills .223 68gr
2849
2632
217
22.8 FPS
*There may have been an error. The 25″ velocity was higher at 3221 fps.
Rifleshooter.com observed: “Cutting the barrel from 26″ to 16.5″ resulted in a velocity reduction of 214 ft/sec with the UMC 223 55-grain cartridge, 244 ft/sec with the Federal M-193 cartridge, 288 ft/sec with the Winchester M855 cartridge and 217 ft/sec with the Back Hills 223 68-grain match cartridge.”
How the Test Was Done
The testers described their procedure as follows: “Ballistic data was gathered using a Magnetospeed barrel-mounted ballistic chronograph. At each barrel length, the rifle was fired from a front rest with rear bags, with five rounds of each type of ammunition. Average velocity and standard deviation were logged for each round. Once data was gathered for each cartridge at a given barrel length, the rifle was cleared and the bolt was removed. The barrel was cut off using a cold saw. The test protocol was repeated for the next length. Temperature was 45.7° F.”
See More Barrel Cut-Down Tests on Rifleshooter.com
Rifleshooter.com has performed barrel cut-down tests for many other calibers/chamberings including 6mm Creedmoor, .308 Winchester, and .338 Lapua Magnum. See these test results at Rifleshooter.com.
Much Different Results with 6mmBR and a Longer Barrel
The results from Rifleshooter.com’s .223/5.56 test are quite different than the results we recorded some years ago with a barrel chambered for the 6mmBR cartridge. When we cut our 6mmBR barrel down from 33″ to 28″ we only lost about 8 FPS per inch. Obviously this is a different cartridge type, but also our 6mmBR barrel end length was longer than Rifleshooter.com’s .223 Rem start length. Velocity loss may be more extreme with shorter barrel lengths. And, of course, different cartridge types and powder/bullet combinations will yield different results.
Blaser Group will soon be offering a rare selection of Sauer rifles — the J.P. Sauer and Sohn’s 270th Anniversary Collection of rifles. Only 10 sets of this special limited-edition collection were made and only one set is currently available for sale here in the United States. The set includes four rifles: a Sauer 100, Sauer 101, and Sauer 404 all chambered in .270 caliber, along with a Sauer 303 in .308 caliber. Designed to be beautiful, accurate, and museum-grade in appearance, these rifles feature stunning wood stocks (Grade 5 in the Sauer 100 and Grade 7 in the S101, S303 and S404). These Limited Edition rifles boast the most modern materials and technology available, with Sauer’s 270th anniversary logo in black and gold on the custom grip cap.
“These elegant and accurate Sauer rifles represent 270 years of craftsmanship from Germany’s oldest hunting rifle manufacturer, and they are rare with only 10 sets made for the entire world,” said Jason Evans, CEO of Blaser Group. “We are now offering Set Number Three for sale here in the United States.”
In this 54-minute video interview, Ken Clemens, co-owner of Brux Barrels, is interviewed by F-Class ace Erik Cortina for the Cortina Precision YouTube Channel. A lot of ground is covered, with many fascinating insights into barrel-making revealed. Watch and learn:
Interview with Ken Clemens, Co-owner of Brux Barrels
If you are involved in competitive shooting, and especially if you compete in F-Class or long-range benchrest, we recommend you take the time to watch this interview, perhaps in a couple of sessions because it runs for a lengthy 54 minutes. Ken Clemens explains the important procedures that go into making match-grade, cut-rifled barrels. Ken also explains some factors to consider when choosing a barrel-maker and specifying length, contour, land/groove configuration, and twist rates.
About BRUX Barrel-Making Methods
Brux starts with 4150 chrome-moly or 416R stainless steel double-stress-relieved bar stock — the best available. Barrels are bored with the Barnes gun drill, and reamed with an industry-standard Pratt & Whitney reamer. Brux uses solid carbide cutter hooks and employs special methods to achieve best results.
After the bore-cutting process is complete, each barrel is hand-lapped to high-precision standards. Multi-point inspections and meticulous hand processes (not possible in mass production) ensure extremely high quality. The Brux website says: “If there is the slightest deviation in surface finish or tolerance, the barrel is discarded.”
BRUX Specializes in Cut-Rifled Gun Barrels
Brux produces custom cut-rifled barrels, precision-crafted by professionals with extensive experience in both machine tools and competitive shooting. While Brux earned its reputation building great barrels for F-Class, benchrest, and long range competition, Brux also crafts hunting barrels. Brux states: “Hunters, big game and varmint, can benefit from the accuracy and dependability of a custom barrel made to your specifications.”
BRUX Barrels’ Owners Are Competitive Shooters
Brux owners and machinists are shooters themselves. So they understand how important a truly top-quality barrel can be. Everything else about a rifle can be great, but you need a superb barrel to win at the highest level. Owners Ken Clemens (pictured above) and Norm Brux are both seasoned shooters with years of experience using their own products.
Made in the USA — About the Home of Brux Barrels
The Wisconsin River Valley near Lodi has a storied history of hunting and shooting. The glacier spared many granite escarpments, leaving secluded glens and a topography rich in soil and wildlife habitat, which attracted families with old-world values and skills. Many of their descendants turned raw steel and iron into the tools necessary for farming – and some evolved to precision tooling and making gun barrels.
Wisconsin River Valley near Ferry Bluff State Natural Area.
Our featured rifle this Sunday is a one-of-a-kind memorial project, crafted in 2008 to honor Michelle Sutton and her service to the sport of Benchrest. Michelle passed away in 2007 after a long, courageous fight with cancer. This special custom 6 PPC benchrest rifle was built in order to raise money to fight cancer. On August 15, 2008, at the 2008 IBS Nationals, the rifle was awarded at a special drawing. Individuals who made a $20.00 contribution to the American Cancer Society were offered a chance to win the rifle, Leupold 45X Comp scope, and an array of shooting accessories (shown below). We’re proud to showcase this unique rifle once again, and help honor Michelle’s memory.
Michelle Sutton–Her Contribution to Benchrest Shooting by Jim Borden
Michelle Sutton contributed significantly to the growth of Benchrest shooting in general and the International Benchrest Shooters in particular. She was involved in Benchrest shooting from an early age, attending shoots with her family (P.J. and Kaye Hart, Clyde and Mickey Hart). She was an active competitor in her early years and then later provided her leadership, labor and planning skills to make sure that shoots were conducted in an efficient and effective manner. As time passed, she gave up her personal shooting to schedule and plan shoots and to provide the target scoring at matches for 3 to 4 different clubs. It was during her measuring of targets that her famed and sought-after “Smiley Faces” were developed.
Michelle made a practice of hand-penciling a Smiley Face on very good targets. (Sometimes she handed out a “frowney face” when someone did themselves grievous harm with one shot.) It came to the point that you could hear on the firing line: “I just shot a small one — I hope it’s small enough to get one of Michelle’s Smiley Faces.”
Michelle spent over 15 years as the Chairperson of the IBS Records Committee and she was an instrumental part of the Group Committee, including chairing that Committee for almost 10 years. She and her husband Jack developed the ideas and plans for the four Benchrest Shooting Schools and she led the planning and running of those training programs. She was instrumental in helping a number of the clubs organize and run the IBS Shooters Championship matches.
Michelle battled cancer for over 10 years while at the same time attending to family, friends, business, and the game of Benchrest shooting. She was always an upbeat person and was a joy to be around. Her strength and character set an example for the rest of us to follow.
The Michelle K. Sutton Memorial Rifle Project
Shortly after Michelle’s death in August 2007, Gerry Malerba started organizing the creation of a special rifle to honor Michelle’s memory. The rifle would be the Grand Prize in a Sweepstakes drawing and all net proceeds would support efforts to fight cancer. Gerry enlisted the help of Jim Borden, Mike Mastrogiavanni, and Ward Tarasek to make the project a reality. Thanks to many generous individuals and companies in the shooting industry and Benchrest community, a spectacular custom 6 PPC rifle was built, with a complete inventory of matched shooting accessories.
Nick Coppogreco provided gold-plated cases with silver-plated bullets, all housed in a custom, fancy wood cartridge box provided by John Petteruti and Fred Weing. The box has a special engraved message, “Magic Bullets to Cure Cancer” with Michelle’s signature “Smiley Faces”.
Remembering Michelle — P.J. Hart’s Little Girl
I guess my best recollection of Michelle was back in 1971 or 1972. (How time flies….) I saw this little slender girl at the matches at South Creek. I was there with Frank James and some other noted shooters. Michelle was going to shoot the junior match. Here dad P.J. Hart was coaching her. In those days the 222 Rem was king and Michelle proved her shooting skills right away–she took first place, winning a silver tray.
I remember the photo session. The little girl with Popsicle legs and big pink glasses and a pretty pink dress. She was a sweet child. I remember how proud her dad, P.J. Hart, was of her.
After that I saw little of Michelle. Once in a while I would see her at Hart’s shop or at a match with her grandmother Mickey Hart. Michelle was at the age to excel in her studies and I saw very little of her until she started working at Hart Rifle Barrels some years later.
She met Jack Sutton and they married. They had quite a lot in common. Both of them loved to hunt and fish–the perfect match. As time passed, Michelle had some medical problems. The “Big C”, cancer. This was very bad news. She fought the disease fiercely. I would ask her from time to time how she was, on my visits to the shop. Her reply would be “I’m OK”. She never complained, even though she felt terrible. Jack would say very little but you could tell he was deeply concerned. He fought the illness with her, always loyal and faithful by her side. They were a team, and hoped to beat the cancer together.
She tried her hardest to beat this. I remember the last match she scored, at Camillus. I was so proud of her. Even though she was quite sick, she wanted to score for our club.
She was very special… we miss her so much. – Gerry Malerba
The Michelle Sutton Memorial Pink Rifle
How the Rifle Came Together
Gerry Malerba explained how the project got started: “I was shooting at Canastota Conservation Club last year. We had lost Michelle recently, and that was the ‘last straw’ for me in a series of losses to cancer. I vowed to do something about it, so I decided to build a special rifle to raise money to fight cancer. I figured if we could double the build cost of the rifle I’d be happy.
I approached Joan Borden about getting a gunsmith’s price on an action and a Robertson stock. Joan indicated her support for the idea. I was prepared to buy the action and stock, but before long, folks were donating key components. I mentioned the project to Paul Ryan, who donated a Jewell trigger, saying: ‘count me in, I have lost a lot of family to [cancer].’ Then David Apple generously donated a certificate for a new Borden action and Harley Baker kicked in a new Hart Barrel. We were in business!”
Smithing the Pink Rifle
Jim Borden started on the action and was getting it ready when he called Ian Robertson about the stock. Ian not only donated the stock, he put the special pink color (Michelle’s favorite), in his line-up. I guess Michelle was everyone’s friend.
Jim Borden also installed the trigger and bedded the rifle. His son Jim Borden, Jr. donated a butt plate and Jay Lynn Gore did a beautiful 100% coverage engraving on the buttplate. The barrel was sent to Hart and special fluting was done by Michelle’s brother in law Billy Sutton. Michelle’s brother Jim Hart did the chambering job. Many other special items were donated for the rifle, as listed below.
All the Pink Rifle Components Were Donated:
The Rimrock Right Bolt, Left Port, Right Eject Action was donated by David Apple (via certificate). The action carries serial number MKS007. The action was polished by Jim Borden, and Michelle’s Smiley Faces have been engraved on the receiver. Paul Ryan donated the Jewell Trigger fitted to the action. Jim and Joan Borden also donated a polished trigger guard.
Robertson Composites donated the special Pink/Black Robertson Rimrock pattern stock. Ian Robertson created this new color expressly for this benefit project and has added it to his inventory.
The one-of-a-kind pink and black anodized Leupold 45X Competition Scope was donated by Leupold & Stevens through Allen Tucker. Kelbly Inc. donated the coated Rings.
The Hart Barrel Blank was donated by Harley Baker. Michelle’s brother in law Billy Sutton did the special fluting and her brother Jimmy Hart did the barrel fitting and chambering.
Jim and Joan Borden donated the polished trigger guard and polished bases. Jim also donated his labor for the inletting, bedding, and action glue-in.
Jimmy Borden donated the polished buttplate. The plate was elaborately engraved by Jay Lynn Gore, with Michelle’s well-known Smiley face in the center of the engraving design.
Treasure Trove of Shooting Gear
Donated Shooting Accessories, Components, and Gear
As an effort to raise money for cancer research, the pink rifle and an array of other items were offered in 2008. Individuals who made a $20.00 contribution to the American Cancer Society were offered a chance to win the rifle. As shown here, the full prize package included: Sinclair Hand Priming Tool (donated by Mike Bryant), Sinclair Reloading Press and Neck-Turning Kit (donated by Sinclair Int’l through Fred Sinclair), Big Foot Rear Bag and Front Bag (donated by SEB and Paul Schmid), 1000 BIB 6mm bullets (donated by Randy Robinette), Farley Coax II Front Rest (donated by Farley Mfg.), Pink Bore Guide (donated by Russ and Martha Haydon), Certificate for 3000 Berger Bullets (donated by Berger Bullets through Eric Stecker), Custom Cartridge Box (donated by John Petteruti and Fred Weing), 100 Lapua 220 Russian prepped cases (donated by Glen Jackson), Gold-Plated Cases with Platinum-Plated Bullets (donated by Nick Coppogreco), Redding Competition Die Set (donated by Redding Hunter), Edgewood Front and Rear Bags (Donated by Jack Snyder).
Jack Snyder of Edgewood Bags crafted custom, ‘hot pink’ Front and Rear Bags. Farley donated its Coax II Front Rest, and the Bordens donated a Jackson/Borden Farley Bag container. Other donated accessories not shown in photo include: Jackson/Borden Farley Bag Containter (donated by Jim and Joan Borden), Aluminum Rifle Case (donated by Gerry Malerba), Action Cleaning Kit (donated by Dave Short), Wind Flag set and Carry Case (donated by David Halblom), Wind Flag Poles and Carrier (donated by Randy Perkowski), Gun Tent/Bolt Folder/Stock Boot, Pink with Smiley Face (donated by Bill Gammon).
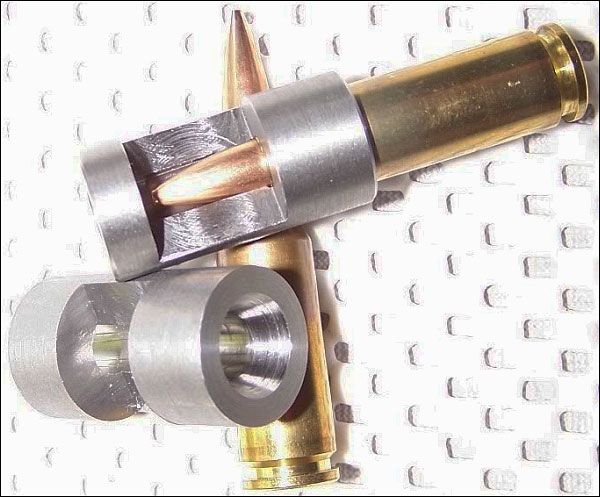
How and Why to Create a Dummy Round
When you have a new custom rifle built, or a new barrel fitted to an existing rifle, it makes sense to create a dummy round. This should have your preferred brass and bullet types, with the bullet positioned at optimal seating depth. A proper dummy round helps the gunsmith set the freebore correctly for your cartridge, and also ensure the proper chamber dimensions.
Respected machinist, tool-maker, and gunsmith Greg Tannel of Gre-Tan Rifles explains: “I use the dummy round as a gauge to finish cut the neck diameter and throat length and diameter so you have [optimal] clearance on the loaded neck and the ogive of the bullet just touches the rifling.” He recommends setting bullet so the full diameter is just forward of the case’s neck-shoulder junction. “From there”, Greg says, “I can build you the chamber you want… with all the proper clearances”.
Greg Tannel has created a very helpful video showing how to create a dummy round. Greg explains how to measure and assemble the dummy and how it will be used during the barrel chambering process. Greg notes — the dummy round should have NO Primer and NO powder. We strongly recommend that every rifle shooter watch this video. Even if you won’t need a new barrel any time soon, you can learn important things about freebore, leade, and chamber geometry.
Must Watch Video — This has been viewed over 772,000 times on YouTube:
This has been a very popular video, with 772,000 views! Here are actual YouTube comments:
That is the best explanation I’ve ever seen. Thank you sir. — P. Pablo
Nice video. You do a very good job of making this easy for new reloaders to understand. I sure wish things like this were available when I started reloading and having custom rifles built. Once again, great job, and your work speaks for itself. — Brandon K.
Beautiful job explaining chambering clearances. — D. Giorgi
Another Cool Tool — The Stub Gauge
When you have your gunsmith chamber your barrel, you can also have him create a Stub Gauge, i.e. a cast-off barrel section chambered like your actual barrel. The stub gauge lets you measure the original length to lands and freebore when your barrel was new. This gives you a baseline to accurately assess how far your throat erodes with use. Of course, as the throat wears, to get true length-to-lands dimension, you need take your measurement using your actual barrel. The barrel stub gauge helps you set the initial bullet seating depth. Seating depth is then adjusted accordingly, based on observed throat erosion, or your preferred seating depth.
Stub Gauge — Useful Device
Forum member Rich DeSimone uses a handy “Stub Gauge” for setting shoulder “bump” and seating depth. The gauge is made from a section of barrel lopped off when the muzzle is crowned. The chambering reamer is run in about 1/4 of the way, enough to capture the neck and shoulder area of the case. Rich then uses his full-length die to “bump” a master case with the ideal amount of headspace for easy feeding and extraction. He takes that case and sets it in this Stub Gauge, and measures from the front of the gauge to the rim. He can then quickly compare any fired case to a his “master” case with optimal headspace. Since the gauge measures off the shoulder datum, this tells him how much to bump his fired brass.
In addition, the Stub Gauge can be used to set bullet seating-depth. Rich has a channel cut transversely on one side of the gauge, exposing the throat area. Since the interior of the gauge is identical to the chamber in his gun, this lets him see where a seated bullet engages the rifling. He can tinker with bullet seating length until he gets just the right amount of land contact on the bullet, confirmed visually. Then he measures the case OAL and sets his seating dies accordingly. This is much handier than using a Hornady Tool to measure distance to the lands.
But what happens when the throat wears and moves out on your live barrel — making the actual length to lands different (slightly longer) than before. Well, the stub gauge is still valuable as a known starting point. As your barrel’s throat wears, you may seat your bullets out further to “chase the lands”, but the gauge provides a constant land engagement point, in the barrel’s “as new” condition. By measuring the difference between the land contact point on the gauge and the actual contact point on your barrel, you can determine throat “migration”.


 This video was made with the help of the


 Michelle spent over 15 years as the Chairperson of the IBS Records Committee and she was an instrumental part of the Group Committee, including chairing that Committee for almost 10 years. She and her husband Jack developed the ideas and plans for the four Benchrest Shooting Schools and she led the planning and running of those training programs. She was instrumental in helping a number of the clubs organize and run the IBS Shooters Championship matches.

 I remember the photo session. The little girl with Popsicle legs and big pink glasses and a pretty pink dress. She was a sweet child. I remember how proud her dad, P.J. Hart, was of her.

 The Rimrock Right Bolt, Left Port, Right Eject Action was donated by David Apple (via certificate). The action carries serial number MKS007. The action was polished by Jim Borden, and Michelle’s Smiley Faces have been engraved on the receiver. Paul Ryan donated the Jewell Trigger fitted to the action. Jim and Joan Borden also donated a polished trigger guard.


 Stub Gauge — Useful Device


