For today’s Sunday GunDay story, we look at the legendary Remington 700, perhaps the most popular American bolt-action rifle of all time. After covering the history of the Rem 700 rifle, we provide an inside look at the Rem 700 through a series of cutaway animations. Then we explain how gunsmiths can enhance a Remington 700 action through “blueprinting” procedures.
Remington 700 Origins and History
After World War II, Remington Arms engineer Mike Walker began designing lower-cost alternatives to the Model 30, which resulted in the Model 721. These used a cylindrical receiver produced from cylindrical bar stock that could be turned on a lathe, rather than machined in a series of milling operations, which significantly reduced the cost of production. Further developments of the basic 721 action under the direction of Walker produced the Model 722 and Model 725, and ultimately in 1962, the Model 700.
Walker sought to increase the accuracy of the rifles, by utilizing tight tolerances in the chamber and bore, a short leade, and a very fast lock time. Like the earlier 721, the Remington 700 action was designed for mass production. Remington initially produced two variants of the Model 700, the ADL and BDL, in both long- and short-action versions. In 1969, Remington introduced upgrades for the rifle, including a longer rear bolt shroud, a jeweled bolt, and improved stock finishing. Four years later, production of left-handed Rem 700s began, to compete with the Savage Model 110, at that time the only major American-made left-bolt rifle.
Other Rem 700 versions include the titanium receiver 700ti, the 700 SPS (which replaced the ADL in 2005), and the CDL model. In addition to its development as a hunting rifle, the Model 700 also provided the basis for military and police sniper rifles, starting with the M40 rifle in 1966, which was initially ordered by the U.S. Marine Corps. The U.S. Army adopted the M24 Sniper Weapon System in 1986.
The Remington 700 is sold in both short action and long action variants. This photo is from the Big ED YouTube video comparing the two action lengths.
The Remington 700 is a manually-operated bolt action with two forward dual-opposed lugs. The bolt face is recessed, fully enclosing the base of the cartridge, The extractor is a C-clip sitting within the bolt face. The ejector is a plunger on the bolt face actuated by a coil spring. The bolt is of 3-piece construction, brazed together (head, body and bolt handle). The receiver is milled from round cross-section steel.
Chassis Systems for Remington 700s
With the popularity of the Remington 700 series rifles, and the availability of Rem 700 barreled actions by themselves, many companies have created after-market chassis systems. This Brownells Video reviews modern Accuracy Int’l chassis systems configured for Remington 700 barreled actions. Modular chassis systems have become particularly popular with PRS/NRL competitors.
Rem 700 Cutaway Video Shows Components + Operation
Ever wish you could look inside your rifle, to see how the trigger and fire-control system work? Well now that is possible with the magic of 3D computer graphics. Modern software allows detailed “cutaway” side-views (see below), as well as 3D views with 360° rotation. The software can also provide X-Ray-type views into the gun’s internals — as you can see above. And computer animation can show the complete firing process from trigger pull to chambering of the next round.
READERS — Do take the time to watch the video! This Rem 700 animation is really outstanding! EVERY bolt-action shooter should watch this video all the way through.
The Model 700 series of bolt-action rifles have been manufactured by Remington Arms since 1962. All are based on basically the same centerfire bolt action. They are typically sold with an internal magazine depending on caliber, some of which have a floor-plate for quick-unloading, and some of which are “blind” (no floor-plate). The Model 700 is a development of the Remington 721 and 722 series of rifles, which were introduced in 1948.
The Remington 700 is a manually-operated bolt action with forward, dual opposed lugs. It features “Cock On Opening”, meaning the upward rotation of the bolt when the rifle is opened cocks the firing pin. A cam mechanism pushes the firing pin’s cocking piece backward. The bolt face is recessed, fully enclosing the base of the cartridge. The extractor is a C-clip sitting within the bolt face. The ejector is a plunger on the bolt face actuated by a coil spring. The bolt is of 3-piece construction, brazed together (head, body. and bolt handle). The receiver is milled from round cross-section steel.
Blueprinting Rem 700 Action — Making a Good Action Better
You may have heard the phrase “blueprinting an action”, but do you know what that really means? Do you know what operations are done to an action during the blueprinting process? To help you understand, gunsmith Bill Marr of RifleShooter.com has created a helpful article showing a Rem 700 blueprinting job start to finish. This article spotlights how the procedures can be done with manual tools. Bill, who runs 782 Custom Gunworks Ltd., can also perform many of these operations with modern automated machinery. In fact, Bill has written a follow-up article on Truing a Rem 700 receiver with a Lathe.
Bill explains: “Blue-printing, or truing a rifle action, ensures the receiver face, threads, lugs, bolt lugs, and bolt face are square to the center line of the receiver.” In Bill’s informative article, Bill shows how he blueprints a Remington 700 short action receiver with .308 Win bolt face. He covers the following procedures step by step:
Action Disassembly
Ream Minor Diameter of Receiver Threads
Square the Receiver Lugs
Square the Face of the Receiver
Lap the Bolt Lugs
Square the Bolt Face
Using the receiver facing tool, the front of the receiver is trued. The tool is placed over the tap and turned by hand. We used Do Drill to lubricate it.
2. Lapping the Lugs
The bolt lapping tool screws into the front of the action and applies rearward pressure on the bolt face. A little bit of lapping compound is placed on the front of the receiver lugs. The bolt handle is then raised and lowered repeatedly. Note — it is critical that we do not get any lapping compound on any other surfaces.
3. Truing the Bolt Face
On this bolt, the central part of the bolt face was low. After the truing operation, this Rem 700 bolt face is now completely square to the action.
IMPORTANT: Rifleshooter.com states: “This article highlights our project and is presented for information purposes only. This provides an overview of the process and should not be attempted without the guidance and supervision of an experienced gunsmith“.
If you like the idea of a Blueprinted action, but do not have a good gunsmith nearby (or don’t want to wait many weeks), you can order high-grade blueprinted Remington 700 actions from Pacific Tool & Gauge starting at $637.99 (see above).
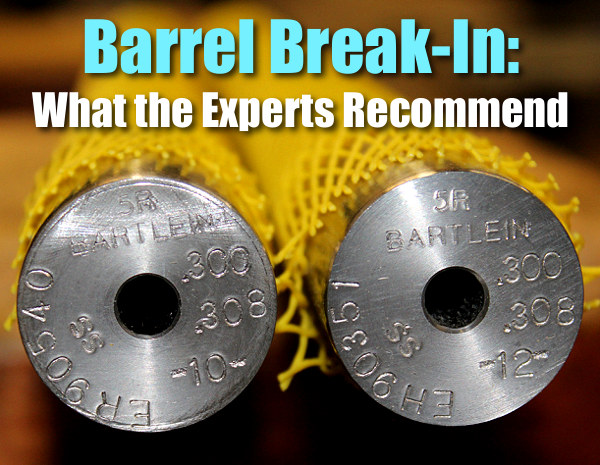
The question of barrel break-in is controversial. Some folks advocate an elaborate, lengthy cycle of shooting and brushing, repeated many times — one shot and clean, two shots and clean and so on. This, it is argued, helps barrels foul less and shoot more accurately. Others say minimal break-in, with patching and brushing after 10-15 rounds, is all you need. Still others contend that break-in procedures are a total waste of time and ammo — you should just load and shoot, and clean as you would normally.
We doubt if there will ever be real agreement among shooters concerning barrel break-in procedures. And one must remember that the appropriate break-in procedure might be quite different for a factory barrel vs. a custom hand-lapped barrel. This Editor has found that his very best custom barrels shot great right from the start, with no special break-in, other than wet patches at 5, 10, and 15 rounds. That said, I’ve seen some factory barrels that seemed to benefit from more elaborate break-in rituals.
What’s the best barrel break-in procedure? Well our friend Eric Mayer of Varminter.com decided to ask the experts. A while back Eric interviewed representatives of three leading barrel manufacturers: Krieger, Lothar-Walther, and Shilen. He recorded their responses on video. In order of appearance in the video, the three experts are:
Do I Need to Break-In a New Rifle Barrel?
Eric Mayer of Varminter.com says: “That is a simple question, [but it] does not necessarily have a simple answer. Instead of me repeating my own beliefs, and practices, on breaking-in a new rifle barrel, I decided to answer this one a bit differently. While we were at the 2016 SHOT Show, we tracked down three of the biggest, and most popular, custom barrel makers in the world, and asked them what they recommend to anyone buying their barrels, and why they recommend those procedures. We asked the question, and let the camera run!” Launch the video above to hear the answers — some of which may surprise you.
Long-Term Barrel Care — More Experts Offer Opinions
Apart from the debate about barrel break-in, there is the bigger question of how should you clean and maintain a barrel during its useful life. Some folks like aggressive brushing, other shooters have had success with less invasive methods, using bore foam and wet patches for the most part. Different strokes for different folks, as they say. In reality, there may not be one solution for every barrel. Different fouling problems demand different solutions. For example, solvents that work well for copper may not be the best for hard carbon (and vice-versa).
“Why worry about a little barrel fouling when the throat is subjected to a brutal 5,600° F volcano at 55,000 PSI? To investigate these and other questions about taking care of a match barrel, we spoke with a dozen experts and share their knowledge in this first of a series of articles.
After listening to folks who shoot, build barrels or manufacture cleaning solvents for a living, we concluded that even the experts each have their own unique recommendations on how to care for a match barrel. But they all agree on one thing — the gun will tell you what it likes best. Because the life expectancy of a match barrel is about 1,500 to 2,500 rounds, the objectives of cleaning one should include: preserve accuracy, slow the erosion, and remove fouling — all without damaging the gun. This article doesn’t claim that one cleaning method is better than the next. Rather, we set out to interject a little science into the discussion and to share some lessons learned from experts in the field.” — Chip Lohman
With all the blacktical rifles and plastic tacticool gear on the market these days, it is great to see some old style craftsmanship — hand-built rifles with colored case-hardened receivers, fine engraving, rich bluing, and beautiful wood. We found just that at the Shiloh Sharps booth at SHOT Show a few years back. There were handsome firearms, with beautiful metal and stunning wood. The heritage style of the Shiloh Sharps rifles harkens back to another era, when the West was still wild, and gifted smiths crafted rifles with pride, skill, and true artistry.
The cartridges shown in the photo (left to right above rifle) are: 45-110, 50-100, 45-90, and 40-70.
This video shows how Shiloh Sharps crafts its rifles, from “Foundry to Finish”:
The Historic Sharps 1874 Lever Action Rifle, An American Classic Shooting USA has featured the 1874 Sharps rifle, a side-hammer breech-loader favored by plains buffalo hunters. Christian Sharps patented his signature rifle design in 1848. The Sharps Model 1874 (shown below) was an updated version, chambered for metallic cartridges. According to firearms historian/author Garry James, the Sharps rifle “came in all sorts of different calibers from .40 all the way up to .50, and jillions of different case lengths and styles and configurations”.
Sharps rifles have enjoyed a bit of modern-day notoriety, thanks to Hollywood. Tom Selleck starred as Matthew Quigley in the hit movie Quigley Down-Under. In a famous scene, Quigley used his 1874 Sharps to hit a wooden bucket at very long range. The Sharps rifles used in the movie were made by Shiloh Rifle company (Powder River Rifle Company). There were actually three Sharps rifles made for the movie. One went to the NRA’s National Firearms Museum while another was raffled off to support NRA shooting programs. The third rifle (Selleck’s Favorite) was sold at auction in 2008.
Today’s feature story showcases an impressive 6.5×47 Lapua benchrest rifle crafted by Gavin Gear of UltimateReloader.com. A gifted writer, video producer, and gear reviewer, Gavin has also acquired some serious gunsmithing skills over the past few years.
For this project, the multi-talented Mr. Gear did ALL the work himself — barrel chambering, muzzle crowning, stock inletting, action bedding, and yes even the stock painting. That brilliant red design with white and black stripes is an “homage” to the famous “Frankenstrat” guitar played by Rock N’ Roll legend Eddie Van Halen (EVH). That red/white/black guitar was the inspiration for this tribute rifle.
Gavin explained: “I decided to build a benchrest rifle as a tribute to Eddie Van Halen as I’ve been inspired by his guitar playing, his energy, and himself as a person. This is my first benchrest rifle build. And when I set out to build this rifle I was looking around at what other people were doing in the benchrest community in terms of stock graphics, and I decided I needed to do something ‘loud and crazy’ and when I thought about that, the first thing that came to mind was Eddie Van Halen’s iconic Frankenstrat guitar.”
Here it is! My first all-out benchrest build! This rifle will serve as a test bed for the evaluation of different cartridges and components. In this multi-part series, I’ll walk through the … process of building this rifle including the barrel work, stock inletting, stock bedding, and some paint work that will be “a little different”. — Gavin Gear
Rifle Components — BAT Action, Krieger Barrel, Wheeler Stock, Sightron Scope Bat Model B Action, .308 Win Bolt Face (modular), octagonal profile, integral recoil lug
Bix’n Andy Remington 700 Competition Trigger (from Bullet Central)
Wheeler Engineering LRB Stock with 4″ fore-end and steerable buttstock rudder
Sightron SV 10-50x60mm ED SFP Scope (FCH Target Dot Reticle) in 34mm BAT Rings
Painting the Eddie Van Halen Tribute Rifle
Gavin told us: “I’ve long been inspired and impressed by Eddie Van Halen (EVH). He changed the game for guitar in the late 1970s, and the world took notice! I’ve been a Van Halen fan for a long time, and that’s where the inspiration for my latest rifle build came from. Benchrest rifles are known for their loud and vivid paint jobs, and that made me think: ‘I need to do an EVH Frankenstrat paint job!’. In this video I share my experiences putting together this automotive-style rifle paint job.”
Gavin painted the stock himself with red/black/white graphics inspired by the rock legend’s famous guitar. Gavin actually has some serious painting skills learned decades ago. When Gavin was 16 he was “hell-bent on learning auto body prep and paint work”. He managed to score a job with a local shop, and did his first complete professional paint job (on a Toyota Supra) when he was just 17 years old.
The EVH tribute stock was painted in multiple stages, with masking to create the stripes after the bright red was applied. For the finishing touch, the entire stock was sprayed with Omni clearcoat: “This [clear-coating] is when things really start to look good because you’re covering up all those masked transitions between the striping and the backgrounds.” Gavin says the key to clear-coating is “seeing the reflection of the light on the surface. This gives you visual feedback”. Watch the video above to see the entire painting process. CLICK HERE for Gavin’s full write-up on the stock painting job with many photos.
Barrel Break-In and Load Testing
The rifle showed great accuracy right from the get-go. In fact, the very first three shots through the barrel formed a 0.298″ group at 100 (see video at 05:35)! Then the gun produced a series of good three-shot groups (high 2s and low 3s), demonstrating the quality of the Krieger barrel and Gavin’s chambering work. CLICK HERE for testing target showing multiple groups.
Gavin selected top components for his loads: Lapua 6.5×47 brass, Berger 140gr Hybrid 6.5mm bullets, and Hodgdon Varget powder (unobtanium these days). To find promising starting loads, Gavin went straight to the best 6.5×47 Lapua resource on the web — AccurateShooter.com’s 6.5×47 Cartridge Guide. Researched by the 6.5 Guys (Ed and Steve), our Cartridge Guide includes recommended accuracy loads for a wide variety of bullets and powders.
Stock Work and Bedding
In this Part 2 video, Gavin reveals the extensive work he did to prepare the stock for the barreled action. This video shows multiple operations: barrel channel and receiver inletting; machining of custom pillars; stock bedding, and trigger guard installation. Yes, Gavin did all the final inletting using his own machines, and he even created his own precision pillars. Watch the above video to see the entire inletting job followed by the action bedding process. Gavin’s skills are impressive.
This Alex Wheeler LRB stock has some very innovative features, such as the adjustable “rudder” (or keel) on the bottomside of the buttstock. This helps ensure great tracking. Alex has noted: “This stock tracks exceptionally well due to the adjustable rudder system and 4″-wide fore-end. Aluminum rails in the front prevent rocking on the front bag as well as form small trenches to aid tracking. The adjustable rudder in the rear allows you to fine tune the bag riding surfaces until exactly parallel. The 4″-wide fore-end is legal in Benchrest and helps control torqueing in the bag.”
Chambering the Barrel for 6.5×47 Lapua
Gavin did ALL the gunsmithing for the project, including chambering the Krieger barrel, and headspacing it for the BAT M Action. Gavin also crowned the muzzle. He did this all on his own advanced Precision Matthews PM-1440GT Lathe using Triebel Guntools 6.5x47mm body/neck finisher reamer, 6.5x47mm throater reamer, and Go and No-Go gages.
Clearly, this is not your average DIY project — Gavin performed ALL the most critical and demanding gunsmithing tasks. He trained himself to do these tasks working with ace gunsmith Gordy Gritters. You can see all the chambering and barrel-fitting functions in this revealing video:
Muzzle Work — Cutting Threads and Target Crown
This photo shows the finishing of the barrel’s muzzle end. Gavin notes: “For the muzzle end, I again used the True Bore Alignment System. Above you can see the SSG Range Rod I used which features two tight-fitting bushings that ride on the barrel lands. This makes for quick barrel dial-in! I then cut an 11-degree target crown, as recommended by Gordy Gritters.”
The next step with this EVH Tribute rifle will be fitting the barrel for an Erik Cortina (EC) tuner, and proceeding with further load tuning. But that will have to wait for spring, when the snow has melted….
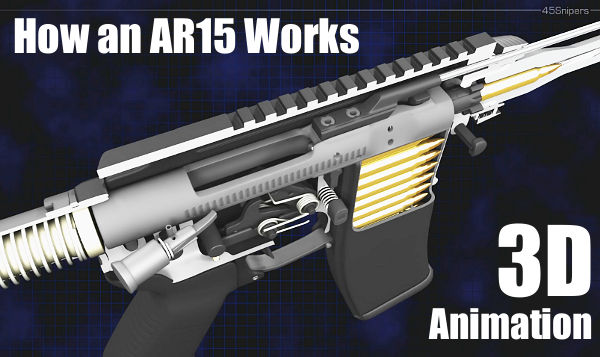
Americans love AR-platform rifles. However, they can be maintenance-intensive, as hot gasses are directed right back into the action to operate the bolt. Because ARs have a somewhat unique (and dirty) semi-auto operating system, we think all AR owners should learn how their rifles operate — from the inside out. This feature provides an “inside look” at the AR, with X-Ray and Cutaway views created through advanced 3D computer modeling.
AR15 Functions Revealed with 3D Computer Animation
Ever wondered how the parts inside an AR15 work together? Just exactly how does the reciprocating bolt carrier feed rounds from the magazine? How do the elements in the trigger group work and reset after each shot? How does the gas system bleed gas from the barrel and operate the bolt carrier? These and other questions are answered in this eye-opening video from 45Snipers. Using “cutaway” 3D computer animation, this 5-minute video shows all features of an AR15 inside and out. This fascinating firearms animation allows the viewer to look inside the upper and lower receivers, into the bolt carrier, chamber, barrel, and magazine.
This video starts off slow and has annoying background music, but it is well worth watching if you own or shoot any AR-platform rifle. It illustrates all the key operations during the charging, loading, firing, and ejection processes. The cutaway animation shows how rounds are stripped from the magazine and then chambered. It then shows how every part of the trigger group works, and how the firing pin strikes the primer. You can even watch the bullet move down the barrel before the empty shell casing is removed from the chamber and tossed out the ejection port. Here are sample frames from the video:
How AR-Platform Rifles Work — General Introduction
To help reader understand the general operation of AR-type rifles, this video shows the control functions of an AR and how the upper and lower sections work together.
Cutaway 3D Animation of AR15/M16 Action — Watch Video
Here is an excellent “cutaway” animation by Thomas Schwenke that shows how an AR-15 functions — how the entire loading cycle works from start to finish.
AR platform rifles are semi-automatics version of the M16. These feature distinctive upper and lower receivers which can be readily separated via front and rear pins. The upper includes the barrel, handguard, forward gas tube, and bolt assembly, while the lower contains grip, trigger group, fire selector, and mag well. In addition the lower is attached to the stock which encloses the buffer assembly.
The original ArmaLite AR-15 was a select-fire, air-cooled, gas-operated, magazine-fed rifle designed by American gun manufacturer ArmaLite in 1956. It was based on Armalite’s AR-10 rifle chambered for the 7.62×51 NATO (.308 Win). In 1959, ArmaLite sold its rights to the AR-10 and AR-15 to Colt. Some key modifications were made — most notably, the charging handle was re-located from under the carrying handle to the rear of the receiver. The redesigned rifle was adopted by the U.S. military as the M16 carbine, which went into production in March 1964.
For today’s Sunday GunDay story we showcase seven interesting metal-chassis rifles. While we love the look and feel of wood and fiberglass, metal does have its advantages. It can be crafted very straight and true, and the designs can achieve a very low center-of-gravity without sacrificing rigidity. In addition, a precisioned machined metal chassis tends to track extremely well.
Massive IBS Heavy Gun Milled from Solid Aluminum Billet
This remarkable 70-lb IBS Heavy Gun, was machined from solid aluminum billet, by Bruce Baer. It rests on a G&G Alvey rest split in the middle to comply with rules. This “heavy metal” CNC-machined wonder is a work of art designed for the 1000-yard game in the Heavy Gun class. Wood stocks, and to a lesser extent fiberglass stocks, are more forgiving, offering greater damping and recoil absorption. However, metal stocks offer superior rigidity, and the CNC machining allows tracking surfaces to be perfectly parallel.
Williamsport limits Heavy Guns to 100 pounds. Under IBS and NBRSA rules weight is unlimited. You will see a few massive 200-lb behemoths at IBS matches, but most competitors find that something in the 60-90 pound range works best. Bruce Baer explains, “You can’t stop a gun from recoiling. If it doesn’t recoil it will jump. If it jumps you might as well go home because you won’t shoot a good group. So it is pointless to try to build a gun so heavy as to eliminate all recoil. The more you restrict the rifle’s recoil the more temperamental that rifle will be. The 200-pounders just don’t out-perform something in the 60- to 80-pound range, and I think the optimal weight is 60-70 pounds.”
Bruce Baer likes the 70-lb overall weight for a heavy gun: “Extreme mass is not necessarily an advantage. Watch a locomotive starting up from zero–it will vibrate from one end to another. If the gun is too heavy I think it will vibrate at the start of recoil and that will kill accuracy. I want the gun to start from recoil with very little effort so it will be smooth from start to stop.”
Water-Cooled World Record-Setting Wondergun
We like “outside of the box” thinking. And in the world of competitive shooting, it can’t get more unconventional than this. But this radical liquid-cooled benchrest rig wasn’t just a crazy experiment — it actually delivered the goods. This IBS Heavy Gun, built by Joel Pendergraft, produced a superb 10-shot, 3.044″ group that stood as an International Benchrest Shooters (IBS) 1000-Yard Heavy Gun record for seven years, not being broken until 2016.
Using this water-cooled wondergun, Joel shot the record-breaking group in April 2009 at Hawks Ridge, NC. This monster features a .30-Caliber 12-twist, 4-groove Krieger barrel inside a water-filled sleeve (like on a liquid-cooled machine gun). Joel shot BIB 187gr flat-based bullets in Norma brass, pushed by a “generous amount” of Alliant Reloder 25 and Federal 210M primers. The cartridge was a big custom wildcat Joel listed as “.300 Ackley Improved”.
Pendergraft’s 3.044″ 10-shot group was a great feat, breaking one of the longest-standing, 1000-yard IBS World Records. And Joel’s 3.044″ record stood for 7 years!
Richard King’s Radical .223 Rem F-TR Skeleton Rifle
Here’s something exotic from our Gun of the Week archives. We like this rig because it is so radical (we doubt that you have ever seen anything quite like it). Gun-builder Richard King calls this his “Texas-T”, noting that “this is my personal gun, built the way I wanted it. I know it’s radical and some may not care for it. But it works.” The rig was designed to shoot F-TR, but it can also be converted easily to shoot F-Open with a front rest.
Richard reports: “This is pretty much an all-aluminum rifle. The action is a Kelbly F-Class with a Shilen stainless steel competition trigger. The scope is a 1″-tube Leupold 36X with a Tucker Conversion set in Jewell spherical bearing rings. The .223 barrel is 30″ Pac-Nor 3-groove, 1:6.5″-twist mounted in a V-type barrel block. The bipod has vertical adjustment only via a dovetail slide activated by a stick handle. It works like a joy-stick, but for vertical only. I adjust for windage by moving the rear sandbag.”
Richard likes how the barrel block works: “With the barrel block forward, the vibrations should be at a low frequency. Instead of one long rod whipping, I now have two short rods (barrel halves) being dampened. This is my fourth barrel block gun. They work, but so does a good pillar-bedded action. [This rifle] is designed for my style of shooting. It is not meant to be a universal ‘fit all’ for the general public. However, I will say the design is adaptable. I can easily convert the system to run in F-Open Class. I would drop a big-bore barreled action into the V-block, slide on a heavier pre-zeroed scope and rings, add plates on the sides up front to bring the width to 3″, and maybe a recoil pad.”
F1 F-Open Chassis from Competition Machine
Along with his famed tube-guns, Gary Eliseo of Competition Machine has designed a modern, low-profile chassis system for F-Open competition. Assembled with Cerakoted aluminum beams, these F1 F-Open chassis systems offer great tracking with an ultra-low center of gravity.
Here is the F1 Chassis with “Marine Corps Red” powder coat finish. Read Full Report.
This F1 aluminum alloy chassis stock features a super-low center of gravity, plus adjustable length of pull, cheek rest, and drop. The stock is available in a wide choice of Cerakote finishes. The current Model F1 chassis features a action block mounting system to fit most actions. There was also an earlier version that had a free-floated action with the barrel in a barrel block, secured with epoxy. Both F1 versions (action block and barrel block) shot great, with excellent performances in competition.
Gen 1 F1 F-Open Chassis System with Barrel Block
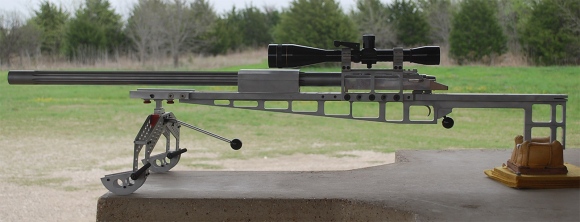
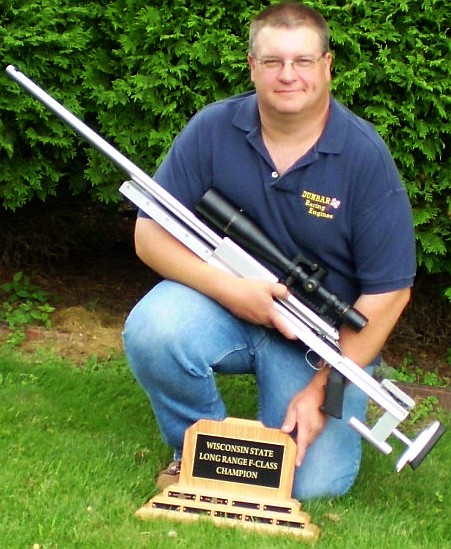
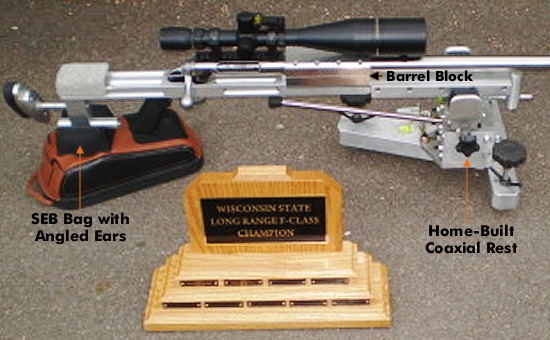
State Championship Win with Home-Built Aluminum Stock
While most of the stocks featured above were crafted by professionals, the properties of aluminum allow it to be used by persons with some basic mechanical skills and metal-working tools. Here’s proof. Back in 2009, Forum Member John Dunbar (aka JD12) crafted his own aluminum F-Open stock. And he used that impressive metal stock to win the Wisconsin State F-Class championship. READ Full Story.
The stock for John’s “home-built” .284 Winchester was mated with a Savage target action. John designed and fabricated the aluminum stock himself. It features a central barrel block clamping a 32″ Brux barrel. Get this — John completed the rifle only 5 days before the match: “I finished machining/assembly on Monday night, did load workup Wednesday and Thursday nights, loaded rounds Friday night, and headed to Lodi at 4:30 on Saturday morning.” John even made his own co-axial front rest (see below)
When Fiberglass Fails, Aluminum Stock Saves the Day
Australian Mark Fairbairn performed a “Quick Fix” during the 2018 Berger SW Nationals. Mark’s F-Open rifle, in a conventional fiberglass stock, was giving him random vertical during one yardage: “I had a bit of a problem with elevation — the stock was hitting somewhere [causing vertical]. I was X-X-X then a shot popped up in the 9 ring with no good reason. So I figured I better put a new stock on it. I got my old aluminium stock I brought from Australia and quickly adjusted it to fit on the Stolle.”
Right on the firing line berm Mark swapped his barreled action into the metal stock of his own design. The clock was ticking… but the story had a happy ending. For the next yardage Mark shot a brilliant 150-7X, not dropping a point. So the “Quick Fix” did the trick. As they say Down Under — “Good on Ya, Mate!”
Home-Built Aluminum Chassis with Innovative A-Arm Bipod
Here is another home-built rig featuring an aluminum chassis mated to a Savage barreled action via a forward-mounted barrel block. This rig was crafted by Forum member Patrick Lundy, who followed the maxim: “If you can’t buy it, then build it.”
Patrick Lundy was so impressed with a fellow shooter’s barrel-block rifle, that he build a similar match gun himself, complete with barrel block and aluminum chassis. Patrick was inspired by a metal stock belonging to Peter Gagne. But he added his own custom touches, including an innovative “A-Arm”-design bipod for shooting in F-TR class. The gun has been very successful in competition. READ FULL Report
Pat told us: “This new stock was a milestone in my shooting career — it was my very first attempt to build a stock. I wasn’t much of a wood worker but I did have a talent for building with metal. The stock was fabricated from 6061 T6 aluminum. With this gun I was able to shoot from a rest or a bipod.”
Pat crafted the bipod from aluminum tubing: “The bipod was a very rigid A-frame design with welded aluminum tubing. I added slippery feet under the pod skis to facilitate smoother recoil. I realized that a wide-stance bipod had to recoil the same on both sides or the group would string horizontally.” Here is the innovative “A-Arm” bipod that Pat Lundy built for his rifle.
Most competitive shooters are pretty good about bore cleaning (some may even clean their bores too aggressively). However, we’ve found that many shooters neglect the chamber area and the bolt lug recesses. It’s too easy to clean the bore, slip out the guide rod and say “I’m done.” Sinclair Int’l explains why it’s important to clean the action interior: “Shooters use a lot of grease and oil on their bolts to reduce friction and to prevent wear[.] Unfortunately, both of these compounds attract grit, powder and primer residues. Cleaning your receiver is especially critical [with] custom actions where the fit between the action and bolt is held to very tight tolerances. Routine cleaning of the action will prevent unnecessary wear on the bolt body, locking lugs, and the action raceways/guide rails. Frequent action cleaning is also essential to keeping the trigger area free of debris which can cause trigger hang-ups and failures.”
Your rifle deserves a clean action and lug recesses. For action cleaning, our friend Danny Reever favors the PMA Action Cleaning tool. This handy tool speeds up the cleaning process, letting you do a better job in less time. Danny reports: “I’ve been using the PMA Action Cleaning Tool Kit for quite some time. Previously, I used one of the old style (round knob) action-cleaning tools with cylindrical cotton rolls. I think the PMA Action Cleaning Tool Kit is easier to use, and possibly achieves better results. Read Full Tool Review.
Cleaning the Chamber
Combustion by-products, lubricants, and solvent residues can collect in your chamber. Severe build-up of grease and carbon can interfere with chambering. Also some solvents will promote corrosion. You need to keep your chambers clean.
1) Install a clean cotton mop of the correct size on the end of a chamber rod and insert the mop into the chamber. Rotate the mop several times to remove any brush bristles left behind and any excess solvent that was between the rod guide snout and the end of the chamber. Make sure the chamber is dry. Prior to storing a rifle you can oil the chamber but make sure the oil is removed prior to firing the rifle.
2) Alternatively, install an old bore brush on a chamber rod, overlap a couple of patches on the brush bristles, and wrap them around the brush completely. Then insert the patch-covered brush into the chamber while rotating it to remove the excess solvent and debris. Push it firmly into the neck area of the chamber. A similar method is to pierce a large patch on the end of the brush loop and insert it into the action, again rotating the brush as you push the patch up against the breech.
Cleaning the Lug Recess Area
The action lug recess area is one of the dirtiest places on a bolt-action rifle. To properly clean this area, always use a tool designed for the task, such as the $29.99 Sinclair Action Cleaning Tool (part # ACT1) which is part of the full Sinclair Action Cleaning Tool Kit ($49.99, part #ACT2).
1) Insert a cotton roll or cleaning felt into your lug recess cleaning tool and wet both ends and the face of the cotton roll/felt with solvent.
2) Insert the tool into the action and push it forward until it is positioned fully in the lug recess area and rotate the tool head several times. Then reverse the rotation for another few turns. While rotating the tool move it slightly in and out to cover the entire recess area and to also clean the breech face.
3) Remove the tool from the action and inspect the surface of the felt or cotton roll. If there is quite a bit of residue on both sides of the felt/roll, then repeat with another wet felt/roll.
4) When you feel the recess area is completely clean, insert a dry cotton roll into the tool and rotate the tool head to remove any remaining solvent and debris. If necessary, use a second dry cotton roll.
5) You can follow this step up with another pass of a mop or patches into the chamber to get any debris or solvent that pushed forward out of the lug recess area.
Forum member Roy Bertalotto did a real nice off-set scope installation on a bolt gun to help a sight-challenged shooter. Roy explains: “A friend of mine shoots left-handed and has lost the sight in his left eye. I built him a scope mount so he can still shoot left-handed, but now use his right eye.” Roy’s fabrication work is impressive and we praise his efforts to help a fellow shooter stay in the game.
Roy bolted a plate to the existing scope rail on the top centerline of the Rem 700 action. This plate extends a few inches to the right. On the outboard end of the plate, Roy fitted a second scope rail, aligned with the bore. Weaver-based rings are then clamped to the outboard (right side) auxiliary rail.
Be Careful of Canting Issues with Offset Scope Installations
We’re pleased to see that Roy developed a solution for a shooter with an optical disability, but we want to stress that this is a specialized installation that can create some problems with point of impact shift if the gun is not maintained perfectly level. With the amount of horizontal offset (between the scope’s optical axis and the bore axis) built into this rig, if the rifle is canted, point of impact can shift rather dramatically. For a southpaw who is willing to adapt his/her shooting style, it may be better, in the long run, to learn to shoot right-handed if his/her right eye is the only good eye. Likewise, if a right-handed shooter can only see well through his left eye, he may benefit from learning how to hold the stock and work the trigger with his left hand. The shooter could still work the bolt with his non-trigger hand. Changing from right-hand to left-hand shooting (or vice-versa) may require a stock swap if the stock is not ambidextrous.
Barrel nut system allows “Pre-Fit” barrel installation on a Remington action. CLICK photo to zoom.
REMAGE Project Report by Bill, Rifleshooter.com Editor
Installing a new barrel on your Remington 700 (especially without a lathe) may seem like a daunting task, but thanks to companies like McGowen Precision Barrels and Criterion Barrels there are easier alternatives. By adopting a Savage-style barrel nut on a 1 1/16″ thread for a Remington 700 receiver, pre-chambered (aka “pre-fit”) barrels can be easily swapped with just a few hand tools. This system is sometimes called a REMAGE conversion (for “REMington savAGE”). With simple tools a “Pre-fit” 6mmBR-chambered barrel was installed on the author’s Remington action — no machining or lathe-work required.
The existing barrel is simply removed from the action (normally the hardest part) and the new barrel is screwed on with the Go Gauge in place. After headspace is verified with the Go Gauge, the barrel nut is tightened against the action and you are off to the range. It takes all of the machine work out of the barreling process.
Note: Because barrel nut has a slightly larger diameter, some stocks may require minor inletting. Also, if you are shooting fired brass from another rifle with the same chambering, you should FL-size the brass before loading it for your new pre-fit barrel. And always check the set-up with a dummy round loaded to normal cartridge length BEFORE you head to the range. With Pre-Fits, the freebore should be adequate for your cartridge, but always check and adjust your seating depth as needed.
Bill has been a serious shooter for over 20 years. A former Marine Corps Sergeant, he’s competed and placed in High Power Rifle, ISPC, USPSA, IDPA, 3-Gun, F-Class, and precision rifle disciplines. In addition to being an NRA-certified firearms instructor and range officer, Bill has hunted big game in North America, South America, and Africa. Bill writes extensively about gunsmithing, precision rifles, and the shooting sports on his blog, Rifleshooter.com.
Here is a Black Friday video bonus for our Daily Bulletin readers. Today we showcase three of the most amazing 3D “cutaway” gun animations ever created. Watch the operations of a pump shotgun, bolt-action rifle, and semi-automatic pistol. The superb cutaway views show details of the firearms’ internal parts, and show how ammunition cycles start to finish. Each of these videos took hundreds of man-hours to create, and each has been watched many millions of times.
Remington 870 Pump-Action Shotgun
This 3D animation shows how a Remington 870 pump-action shotgun works. The animation is superbly done, showing every aspect of the internal operation. Folks, if you have any interest in shotguns you should definitely watch this video start to finish. This shotgun video has received 3.9 million views in just 10 days!
The video’s talented creator, Matt Rittman states: “Cinema 4D was used to create each individual part, as well as animating everything. Substance Painter was used to create the wood stock and fore-end textures. Corona renderer was used for final output of lighting and textures.” See more of Matt’s 3D videos on his popular YouTube Channel.
This 3D animation showing how a Mauser Karabiner 98K (KAR 98K) bolt-action rifle works. The Karabiner 98K is a controlled-feed bolt-action rifle based on the famous Mauser M98 system. Video creator Matt Rittman notes: “Cinema 4D was used to create each individual part, as well as animating everything. Substance Painter was used to create the wood stock texture. Corona renderer was used to render everything. This animation took me over 500 hours to create.” This video has been watched over 21 million times!
Every bolt-action rifle owner should watch this remarkable video. It shows key processes which are common to many actions — Cocking the Bolt, Feeding from magazine, Engagement of Bolt Lugs, Activation of Trigger and Movement of Firing Pin, and Extraction with Ejection. The modeling of the inside of the bolt and fire-control group is excellent. This really is a superb video that will help rifle owners understand what happening inside their guns as the bolt is cycled. See more of Matt’s 3D videos on his popular YouTube Channel.
This 3D animation demonstrates how a modern semi-automatic, double-action-only Glock 19 handgun works. Cinema 4D was used to create each individual part, as well as animating everything. Substance Painter was used to create the main textures. Corona renderer was used to render everything. This animation took me over 500 hours to create. one of the most-watched gun videos ever created, this Glock 19 animation has been viewed over 78.6 MILLION times!
Video Highlights for Glock 19 Pistol
0:00 Intro
0:11 Basic Function
0:39 Case Extraction
0:47 Cartridge Loading
1:02 Trigger Reset
About Matt Rittman, the 3D Animator/Artist These three amazing videos were all created by the gifted computer graphics artist Matt Rittman. On his Matt Rittman YouTube Channel, Matt states: “I’m a 3D Generalist/Motion Designer from Des Moines, Iowa. I have always enjoyed animation and illustrating how things work. I’m especially interested in cars and anything mechanical.
My aim for this channel is to provide easy to understand how-it-works 3D animations. I will occasionally be releasing tutorials centered around Cinema 4D and the different capabilities of the software.”


 After World War II, Remington Arms engineer Mike Walker began designing lower-cost alternatives to the Model 30, which resulted in the Model 721. These used a cylindrical receiver produced from cylindrical bar stock that could be turned on a lathe, rather than machined in a series of milling operations, which significantly reduced the cost of production. Further developments of the basic 721 action under the direction of Walker produced the Model 722 and Model 725, and ultimately in 1962, the Model 700.


 You may have heard the phrase “blueprinting an action”, but do you know what that really means? Do you know what operations are done to an action during the blueprinting process? To help you understand, gunsmith Bill Marr of RifleShooter.com has created a helpful article showing a Rem 700 blueprinting job start to finish. This article spotlights how the procedures can be done with manual tools. Bill, who runs 782 Custom Gunworks Ltd., can also perform many of these operations with modern automated machinery. In fact, Bill has written a follow-up article on Truing a Rem 700 receiver with a Lathe.


 Do I Need to Break-In a New Rifle Barrel?


 Forum member Roy Bertalotto did a real nice off-set scope installation on a bolt gun to help a sight-challenged shooter. Roy explains: “A friend of mine shoots left-handed and has lost the sight in his left eye. I built him a scope mount so he can still shoot left-handed, but now use his right eye.” Roy’s fabrication work is impressive and we praise his efforts to help a fellow shooter stay in the game.


 These three amazing videos were all created by the gifted computer graphics artist Matt Rittman. On his


