In our Shooters’ Forum, one member recently asked: “What makes an AR accurate? What parts on an AR can really affect accuracy — such as free-floating handguards, barrels, bolts, bolt carriers?” He wanted an honest, well-informed answer, not just sales pitches. Robert Whitley posted a very comprehensive answer to this question, based on his experience building and testing dozens of AR-platform rifles. Robert runs AR-X Enterprises, which produces match-grade uppers for High Power competitors, tactical shooters, and varminters.
Building an Accurate AR — What is Most Important
by Robert Whitley
There are a lot of things that can be done to an AR to enhance consistent accuracy, and I use the words “consistent accuracy” because consistency is a part of it (i.e. plenty of guns will give a couple great 5-shot groups, but won’t do a very good 10- or 20-shot groups, and some guns will shoot great one day and not so good on others).
Here are 14 key things we think are important to accuracy.
1. Great Barrel: You’ll want a premium match-grade barrel, well-machined with a good crown and a match-type chambering, true to the bore and well cut. The extension threads must also be cut true to the bore, with everything true and in proper alignment.
2. Rigid Upper: A rigid, heavy-walled upper receiver aids accuracy. The typical AR upper receiver was made for a lightweight carry rifle and they stripped all the metal they could off it to make it light to carry (which is advantageous for the military). The net result are upper receivers that are so thin you can flex them with your bare hands. These flexible uppers are “strong enough” for general use, but they are not ideal for accuracy. Accuracy improves with a more rigid upper receiver.
3. True Receiver Face: We’ve found that truing the receiver face is valuable. Some may argue this point but it is always best to keep everything related to the barrel and the bore in complete alignment with the bore (i.e. barrel extension, bolt, upper receiver, carrier, etc.).
4. Barrel Extension: You should Loctite or glue the barrel extension into the upper receiver. This holds it in place all the way front to back in the upper receiver. Otherwise if there is any play (and there typically is) it just hangs on the face of the upper receiver completely dependent on the face of the upper receiver as the sole source of support for the barrel as opposed to being made more an integral part of the upper receiver by being glued-in.
5. Gas Block: You want a gas block that does not impose pointed stress on the barrel. Clamp-on types that grab all the way around the barrel are excellent. The blocks that are pinned on with tapered pins that wedge against the barrel or the slip on type of block with set screws that push up from underneath (or directly on the barrel) can deform the bore inside of the barrel and can wreck the accuracy of an otherwise great barrel.
6. Free-Float Handguard: A rigid, free-float handguard (and I emphasize the word rigid) really makes a difference. There are many types of free-float handguards and a free-float handguard is, in and of itself, a huge improvement over a non-free-float set up, but best is a rigid set-up. Some of the ones on the market are small diameter, thin and/or flexible and if you are shooting off any type of rest, bipod, front bag, etc., a rigid fore-end is best since ARs want to jump, bounce and twist when you let a shot go, as the carrier starts to begin its cycle before the bullet exits the bore.
7. Barrel Contour: You want some meat on the barrel. Between the upper receiver and the gas block don’t go real thin with a barrel (we like 1″ diameter if it’s workable weight-wise). When you touch off a round and the bullet passes the gas port, the gas system immediately starts pressuring up with a gas impulse that provides vibrations and stress on the barrel, especially between the gas block back to the receiver. A heavier barrel here dampens that. Staying a little heavier with barrel contour through the gas block area and out to the muzzle is good for the same reasons. ARs have a lot going on when you touch off a round and the gas system pressures up and the carrier starts moving (all before the bullet exits the bore) so the more things are made heavier and rigid to counteract that the better — within reason (I’m not advocating a 12-lb barrel).
8. Gas Tube Routing Clearance: You want a gas tube that runs freely through the barrel nut, through the front of the upper receiver, and through the gas key in the carrier. Ensure the gas tube is not impinged by any of them, so that it does not load the carrier in a stressed orientation. You don’t want the gas tube bound up so that when the gas tube pressures up it immediately wants to transmit more force and impulse to the barrel than would normally occur. We sometimes spend a lot of time moving the gas block with gas tube on and off new build uppers and tweaking gas tubes to get proper clearance and alignment. Most gas tubes do need a little “tweaking” to get them right — factory tubes may work OK but they typically do not function optimally without hand-fitting.
9. Gas Port Tuning: You want to avoid over-porting the gas port. Being over-gassed makes the gas system pressure up earlier and more aggressively. This causes more impulse, and increases forces and vibration affecting the top end and the barrel. Tune the gas port to give the amount of pressure needed to function properly and adequately but no more.
10. Front/Back Bolt Play: If accuracy is the game, don’t leave a lot of front/back bolt play (keep it .003″ but no more than .005″). We’ve seen factory rifles run .012″ to .015″ play, which is OK if you need to leave room for dirt and grime in a military application. However, that amount of play is not ideal for a high-accuracy AR build. A lot of front/back bolt play allows rounds to be hammered into the chamber and actually re-formed in a non-consistent way, as they are loaded into the chamber.
11. Component Quality: Use good parts from a reputable source and be wary of “gun show specials”. All parts are NOT the same. Some are good, some are not so good, and some aftermarket parts are simply bad. Don’t be afraid to use mil-spec-type carriers; by and large they are excellent for an accuracy build. Also, remember that just because a carrier says “National Match” or something else on it does not necessarily mean it’s any better. Be wary of chrome-plated parts as the chrome plating can change the parts dimensionally and can also make it hard to do hand-fitting for fit and function.
12. Upper to Lower Fit: A good upper/lower fit is helpful. For quick and dirty fit enhancement, an Accu-Wedge in the rear helps a lot. The ultimate solution is to bed the upper to a specific lower so that the upper and lower, when together, are more like one integral unit. For the upper receivers we produce, we try to get the specs as close as we can, but still fit the various lowers in the market place.
13. Muzzle Attachments: Don’t screw up the muzzle (literally). Leave as much metal on the barrel at the muzzle as you can. People like to thread the muzzle for a flash hider, suppressor, muzzle brake, or some other attachment, but if you really want accuracy, leave as much metal as you can there. And, if you have something that screws on, set it up so that it can be put on and have it stay there without putting a lot of torque and stress on it right where the bullet exits the bore. If you are going to thread the end of the barrel, make it concentric with the bore and make sure what you screw on there is as well. For all muzzle attachments, also ensure that the holes through which the bullet passes through are dead true to the bore. Many aftermarket screw-on things are not so good that way. Anything that vents gas should vent symmetrically (i.e. if it vents left, it should vent equally right, and likewise, if it vents up, it should vent down equally). Uneven venting of gas can wreck accuracy.
14. Quality Ammunition: Ammo is a whole story by itself, but loads that are too hot typically shoot poorly in an AR-15. If you want accuracy out of an AR-15, avoid overly hot loads. Shown below are test groups shot with four (4) different uppers, all with moderate loads. These four uppers all pretty much had the same features and things done to them as explained in this article, and they all shot great.
“Ultimate PPC” by Speedy with engraved Stiller Viper action. Titanium Rest by John Loh (R.I.P.).
Just in time for Christmas, today we feature a beautiful red rifle built by West Texas gunsmith Thomas “Speedy” Gonzalez many seasons back. With an eye-catching, one-of-a-kind engraved Stiller Viper action, and gorgeous red/black gelcoat finish, we think this rifle is one of the prettiest benchrest rigs ever made — and the color scheme fits the holiday season.
When Speedy set out to build the “ultimate PPC” for his own use, he wanted it to be as handsome as it was accurate. This stunning 6 PPC combines some very trick components with old-world detailing. When was the last time you saw an engraved receiver on a “race gun”? This rig combines modern high-tech components with classic good looks — the best of both worlds.
This competition benchrest rig features an engraved Stiller Viper action, with integral scope rail, SAKO Extractor and non-fluted bolt. The action sits in a new Millenium BR-X carbon-fiber stock built by Robertson Composites (now closed). The bold red-on-black marbled finish is how the gelcoat came from Ian Robertson’s factory — the stock has not been painted. The slick front rest is a titanium Ultra-Rest machined by the late, great John Loh with design input by Speedy. John built only two of these in titanium, one for himself and one for Speedy. We’re sad to say John recently passed. R.I.P. John. The Leupold Competition scope sits in quad-screw bedded rings from S.G.& Y. Precision Rifles.
Speedy picked a very special barrel for this project–a 1:14 twist, 20.5″, 6-groove barrel, the last original Pat McMillan-crafted barrel in Speedy’s inventory. Speedy runs a .263″ neck. Bushing size depends on the load and the condition of his brass. Speedy’s match load is about 29.2 grains of the IMR 8208 “ThunderBird” powder (he stockpiled this great propellant years ago). Speedy feels that T-Bird may be the most user-friendly BR powder ever made: “Once you have a good load worked up with T-Bird, you can shoot it at most any location in the country, and in almost any conditions. It’s not fussy about temperatures or humidity.”
A Very Unique Viper Action, Two Years in the Making
This is no ordinary Viper action. The full engraving attracts your attention, but there are some slick “performance mods” Jerry Stiller added at Speedy’s request.
First, the action features a plain-Jane unfluted bolt, with a slight taper in the middle, a bit of a wasp-waist. Speedy prefers an unfluted design because it has superior wear characteristics. He’s found, when working with an aluminum action such as the Viper, the sharp flutes on the bolt will wear the inside of the action faster. In the interest of reduced wear, Speedy also requested a smaller-sized loading/ejection port. This provides for a larger front and rear receiver ring, which enhances bolt bearing surface. More bearing surface reduces point loading for less internal wear.
We were surprised that Speedy did not order a drop port for his Viper. He explained: “I’m a bag squeezer, so I keep my forearm right where the cases would exit the drop port. I’ve used the drop ports, but given my shooting style, I prefer a conventional port.” Speedy did decide to fit the bolt with a SAKO-style extractor. He believes this is easier to tune and can contribute to accuracy. Speedy told us: “With a conventional sliding plate extractor, like you find on the Stolle actions, there can be a bit of a side push as you chamber the round. I think this can affect the way the bullet enters the chamber. With the SAKO extractor there is no side-push so I can reduce the possibility of bullet misalignment.”
BR-X Stock — American Design, Canadian Craftsmanship
The BR-X carbon fiber stock represents a third-generation design. The original Millenium, built by Lee Six, was a hollow shell. This modern BR-X is carbon fiber over a foam core. In Light Varmint trim, it weighs just 1.5 pounds. Speedy tells us: “this BR-X has a low center of gravity, slight pistol grip, and the angles are really straight and true. It tracks well in the bags, and won’t lift out of the rear bag during recoil. That’s one of the purposes of the wedge-shaped rear section.”
Speedy looked at the various benchrest stocks, and, with input from Tony Boyer, he worked out a design that mirrored many of the better features of existing designs with some significant enhancements. The first thing you’ll notice is that the geometry is very uniform. The flats on the side of the fore-arm are perfectly parallel. The underside of the fore-arm is seamless and completely flat. Speedy explained “one problem we’ve seen with stocks that have a mold seam in the middle is that sometimes the two halves of the mold don’t mate perfectly. Sometimes the mold is mismatched so one side is on a different plane. That creates all kinds of handling issues. If the bottom of the stock is convex, even a little bit, you lose a lot of stability.”
Much thought went into the rear section of the stock. Speedy and Tony found that many stocks would start off tracking well, but by the end of the string they were pulling themselves out of alignment. Speedy noted that with some more conventional designs, they tended to ride up out of the rear bag after two or three shots. The BR-X works differently. It uses a wedge design, rather than a radius, so it tends to drive itself down into the bag on recoil. The BR-X is not the only stock to use a wedge in the rear, but it is different than other wedge designs. According to Speedy: “On most other wedge stocks, the wedge tapers towards the pistol grip, making the ‘V’ wider towards the end of the buttstock. This will change point of aim as the stock moves. The BR-X has a wedge that is a constant ‘V’, with no taper from the end to the pistol grip. This does make the gun track better and stay on target better.”
Competition Benchrest Terminology
Bughole: Very small group.
Mothball: The 10-ring on the standard Benchrest Target.
Tomato Stake: A worn out or otherwise inaccurate rifle barrel.
Screamer: A group measuring less than 0.100″ at 100 yards or less than 0.250” at 200 yards.
Weather Report: A Group “scattered” as a result of poor wind doping.
Wailing Wall: Place where targets that have been scored can be viewed by competitors.
Dope the Wind: Ccompensate for the effects of wind by shifting aiming points on the target.
Barrels–The Hunt for a ‘Hummer’
Top 6 PPC competitors often run through a number of barrels in the quest for a “hummer” that performs optimally. In addition to the Pat McMillen tube on this gun, Speedy uses barrels from Hart, Krieger, and Shilen. He’s tried a few from some other boutique barrel makers and they shot well, but he wasn’t satisfied with the barrel life. Some of them lost their competitive edge after just 500-600 rounds. He won’t name names in print, but you can call and ask. When choosing a barrel, Speedy recommends that you invest the time and call a few well-known smiths who regularly compete in high-level BR matches. Find out what’s working real well currently.
Speedy says, “you can read the equipment lists from the big shoots, but the printed results can be deceiving. That winning barrel might have been produced a couple of years ago. Barrel-makers do have good runs and not-so-good runs. Do your homework and find out what’s working best right now.” Speedy prefers 6-groove barrels: “I’ve shot em all one time or another. It seems that the 6-groove barrels are easier to get to shoot. It seems at 200 yards bullets from a 4-groove barrel move more than from a 6-groove barrel. Both windage and elevation. I think Tony Boyer feels the same way.” [Editor’s Note: Speedy’s groove observations were made many seasons ago. Today, many top shooters are using 4-groove and 5-groove barrels, and 3-grooves have been successful in score competition.]
We asked about Speedy’s signature “SpiderWeb finish”. While the web design has esthetic appeal, there is a functional side as well: “Tests have shown that a bead-blasted barrel will shed heat faster than a highly polished barrel. With the SpiderWeb, we leave most of the bead-blast finish on the barrel, but the web effect gives the tube some visual appeal.”
Speedy Speaks — How to Succeed in Benchrest Competition
Let me begin by saying that benchrest competition is the most difficult sport I’ve ever tried. For the newcomer, it can be daunting. From the very word “go” you are thrown to the wolves. Most new competitors have about a two and a half or three-year window. After that, if they are not meeting their expectations, they get fed up and leave the sport. Considering the time, effort, and money they may have expended in that time, that’s an unfortunate outcome.
So, how does one improve as a shooter and get to the point where you are meeting your goals? First you need to break down the shooting process into its parts–gun handling, loading technique, wind awareness, time management, bag set-up, and what I call ‘bench management’. Then you need a mentor. Benchrest is like golf–you can have the best equipment (best action, best stock, best rest) but you won’t get far without a knowledgeable veteran to monitor your progress and observe your technique. Without a mentor, benchrest is a rough game to play and you can reach a frustration point after a couple of years.
If you don’t have somebody who can sit and evaluate your loading style, bolt-working, follow-through, and wind-reading etc., you can develop bad habits that are hard to break. If there’s no one to monitor your shooting and see what you’re doing wrong, you’ll keep making the same mistakes. So how does one find a mentor? Well it’s not a bad idea to attend one of the shooting schools. But one-on-one training is best. Look for someone with a strong record in competition, but a person who is also patient. And when you find that person, show some loyalty. With most people who have been involved in the sport a while, if you show them allegiance, they will return that allegiance.
6mm PPC Basics — About the Cartridge
Developed by Louis Palmisano and Ferris Pindell (left and right in photo), the 6 PPC is the “King of the Hill” in short-range benchrest competition, the most accurate cartridge ever invented. It still completely dominates 100- and 200-yard Group BR Shooting. If you want to win in that game, you pretty much have to shoot a 6 PPC, or some close variant of the 6 PPC cartridge design.
Easily made from Lapua 220 Russian brass, the 6mm PPC has a small primer and small flash hole. The small flash hole/primer accounts for much of the 6 PPC’s superior accuracy, though nobody really knows precisely how or why. The “short, fat” shape and nearly straight body contribute to efficient, consistent combustion and good “chamber behavior”.
While SAKO has created an official SAAMI 6mm PPC round, called the 6PPC USA, most American 6 PPC shooters run tight match chambers cut with custom reamers. There will be variations from one reamer to another, enough so that custom dies are generally recommended for match guns. Here is a PT&G reamer spec’d by Speedy a while back. He prefers a .263″ neck because that works better than .262″ when he needs to use his tightest bushings to get more neck tension.
The 6 PPC’s case capacity, case size to bore ratio, and combustion properties seem to be just about ideal for the short 6mm match bullets. A 6BR can come close, but when the goal is shooting “zero” groups at 100 and 200 yards, the 6 PPC is the clear winner. Currently most 6 PPC shooters form their cases from Lapua 220 Russian brass. Norma also makes factory-formed 6 PPC cases, but Norma brass is not commonly used as most shooters believe it is less “tough” than Lapua brass and accordingly won’t last as long with very stout match loads.
John Whidden’s Championship-Winning Rifle
For this Sunday GunDay we feature John Whidden’s very special Palma rifle, the rig that carried him to his 5th NRA Long Range National Championship in 2017. John captured his fifth Long Range crown with a superb performance in the Palma match. The caliber is .308 Win, as dictated by the Palma rules.
This unique .308 Win prone rifle from Whidden Gunworks features a Barnard “P” action in a converted aluminum Anschutz “Precise” smallbore (rimfire) stock. The combo of Barnard action and Anschutz ergonomics is hard to beat, says John, who told us: “this is easily the best Palma rifle I’ve ever had.” John told us this gun handles like no other: “After recoil, with this Anschutz stock, the sights fall right back on target — better than any other prone rifle I’ve shot”.
As a bonus, the Barnard “drop-in” required no major modification of the Anschutz Precise stock. This means John can actually swap in his rimfire barreled action and shoot smallbore with the same stock.
Whidden’s Perfect Palma Match
Whidden secured the 2017 LR Title by shooting “clean” (not dropping a point) in the tough Palma competition. In the NRA Palma match, rifles must be .223 Rem or .308 Winchester, with metallic sights (no scopes). The match is conducted at three yardages, 15 shots at each distance of 800/900/1000 yards, with unlimited sighters at 800 and two sighters at 900 and 1000.
Sling Rifle Evolved: The Ultra-Accurate Hybrid Palma Rifle
by John Whidden of Whidden Gunworks
The mental component of Long Range competitive shooting is always challenging but having tremendous confidence in the accuracy of your equipment is a huge benefit. There’s nothing to start your Palma match off well like knowing that you are shooting the most accurate Palma rifle you’ve ever owned.
Whidden Palma Rifle
Action: Barnard “P” (three lugs, 60° bolt lift)
Barrel: Bartlein 32″, Light Palma contour, cryo-treated by 300 Below.
Stock: Anschutz Precise aluminum smallbore stock, set up for centerfire barreled action.
Trigger: Barnard Two-Stage adjustable
Whidden’s Wonder-Gun: German Stock, New Zealand Action, American Barrel
John built this Palma rifle in early 2016. With it, John won back-to-back long-range Championships in 2016 (Camp Perry) and 2017 (Camp Atterbury). The major components are: Barnard ‘P’ action, Anschutz Precise smallbore stock, and Bartlein barrel. The caliber is .308 Win, as dictated by the Palma rules. Palma matches are fired from 800, 900, and 1000 yards utilizing iron sights only. No optical sights are allowed.
The Anschutz Precise stock is so well-designed that once I finished adjusting the details, I realized that my hold was about 1/3 smaller than with the stocks I shot previously. While in recoil the gun will track vertically and fall back down right on my own target just as it should. In the past, with my other Palma rifles, it was frankly sometimes a struggle to get them to settle back on target after a shot.
Whidden Gunworks has installed a variety of different actions in the Anschutz Precise stocks. Though the stocks are designed for the .22 LR caliber 2013 action rifles, we’ve successfully installed Barnard, Kelbly, Bat, Nesika, and Remington clone actions into them. The Barnard Model P makes a particularly simple installation because there is no modification necessary to the stock at all. A competitor can then shoot both his centerfire rifle as well as his smallbore gun in the exact same stock. The location of the trigger and bolt handle on the Barnard are positioned just right to make this work. Other actions do require at least some amount of modification to the stock, and we have found the Barnard works the best.
Barnard manufactures several models of actions as part of their lineup. All of the actions in the lineup use three lug bolts which give a shorter 60-degree bolt lift when opening and closing. All of the critical surfaces are machined after heat treating. This means that they are exceptionally true and square, more so than other actions. The Model P action is most familiar to Palma and F-Class shooters and are commonly seen on the firing line. The fact that Model P actions include an excellent two-stage trigger makes also the pricing very attractive.
Based on my previous excellent experiences, I selected Bartlein barrels for this rifle. When shooting internationally in the Palma matches we are restricted to 155 grain .308 bullets, but I made the unusual choice of a 1-10″ twist for these bullets. I’ve shot this fast twist for some years with the 155s with good success and it’s pleasing to know that Bryan Litz is finding benefits in some cartridges to shooting faster twist rates than we previously thought we needed. The load is Vihtavuori N140 Powder with Berger 155gr Hybrid bullets. The chamber is the 2011 Palma and the barrel is a Light Palma contour finished at 32” length. The barrel was cryo-treated by 300 Below. The point of impact isn’t changed at all by barrel heating and the accuracy is incredible regardless of the temperature of the barrel. This can’t be said of all the barrels I’ve owned.
Get Your Own Whidden Wonder-Gun
Like this Anschutz-Barnard hybrid rifle? Whidden Gunworks can build you a rig like this, fitting a centerfire barreled action in the Anschutz Precise stock. John tells us: “The price of a rifle like this one but without sights or mounts would be under $5000.00. We attempt to keep all of the parts except the stock in inventory, so lead time should be under eight (8) weeks.”
Stock Offers Great Adjustability One thing that is quickly noticed about the Anschutz Precise stock is its adjustability. The engineers did a very good job of allowing many of these adjustments to be made while in the shooting position, most notably the cheekpiece adjustments. When a shooter picks up a Precise stock for the first time they also notice how narrow the fore-end is. This really contributes to reducing the pain in the forward hand in prone when shooting with a sling. This stock is, by far, the most comfortable sling stock I’ve ever handled.
This rifle was very accurate right away and very comfortable to shoot. I’ve built some really good shooting Palma rifles but this is easily the best Palma rifle I’ve ever had. The Barnard action with its superb quality and excellent two-stage trigger has been the best choice I could have made. When you can go to the firing line knowing that you have the very best, the foundation for success has been set.
Gavin Gear of UltimateReloader.com recently tested Hawkeye Borescopes from Gradient Lens Corp., along with the impressive Hawkeye Video Slide System. Gavin observed: “When it comes to gunsmithing, gun inspection, and gun maintenance, a borescope can tell you things that nothing else can. And that’s why a borescope is an invaluable tool for gunsmiths, competition shooters, and gun enthusiasts.”
UltimateReloader.com MUST WATCH Video — See What Hawkeye Borescope Reveals:
A good borescope reveals the reality inside your barrel(s). There’s no more guesswork. All the issues associated with barrel will be revealed — carbon build-up, copper fouling, fire-cracking and more. Within a few seconds you can judge the state of your bore, and diagnose problems such as copper fouling and fire-cracking. Check out these two images. On the left is a brand new hand-lapped barrel. On the right is a barrel with heavy fire-cracking.
Gavin tested both 7″ and 17″ versions of the Hawkeye Borescope. He tested straight versions, and both long and short borescopes with a 90° eyepiece. For most tasks we prefer the 90° eyepiece. In addition to these systems, Gavin tested the the Hawkeye Video Slide and video image acquisition system, shown below.
The features are: 1. Video Slide support system; 2. Pistol barrel being inspected; 3. Borescope with quick-coupler equipped Sony camera; 4. Windows 10 PC Laptop running Hawkeye App with VIDEO Feed; 5. LED illumination for borescope.
“The Hawkeye Video Slide and video image acquisition system are not intended for consumers. They are primarily used by laboratories, gun OEMs, and other commercial customers,” Gavin notes. He used the Video Slide to provide the “next best thing” to viewing through the Hawkeye itself.
What You Can See with a Hawkeye Borescope
This Gradient Lens video shows how to correctly borescope your barrel:
A precision optical borescope is a pricey tool, but it performs critical tasks for gun-owners, and a Hawkeye’s rigid optic tube offers some important advantages over a cheap endoscope on a flexible cord. To learn how a Hawkeye borescope can help you diagnose barrel issues, you should read a Rifle Shooter magazine feature story, What the Eye Can See.
In this article, writer Terry Wieland shows how to inspect for defects in new barrels, how to recognize different kinds of fouling (in both barrels and brass), and how to spot throat erosion in its early stages. Terry uses a Gradient Lens HawkEye BoreScope. The current generation of HawkEyes can be attached to a still or video camera to record digital images. The most interesting part of the article is on the second page. There, author Wieland provides photos of various types of internal flaws that can appear in barrels. This will help you spot pitting, excessive land wear, rust damage, and damage from corrosive primers.
Wieland notes that BoreScopes aren’t just for barrels: “The borescope has other uses as well. It can be used to examine the interior of a cartridge case to look for the beginnings of a case separation or to examine the interior of a loading die that is giving you trouble. When you consider the number of tubular objects that play such an important role in rifle shooting, it is a wonder we were ever able to function without such a method of studying bores.”
Emil Kovan is one of the top F-Class shooters in the world. He won the 2014 United States F-Open Championship, and finished second in F-Open Division at the 2016 Canadian National F-Class Championship in Ontario. He is a great shooter and a great gun-builder as well.
“What are the best components for an F-Open class rifle, and why?” That’s a question that I get asked all the time and will try to answer in this article. Two months ago, I was contacted by Duane, a gentleman I met at the 2015 F-Class Nationals. He was interested in building a rifle with the new Master Class Low Profile F-Open Stock, created by Carl Bernosky and Alex Sitman of Master Class Stocks.
I have known Alex Sitman for many years, and use his stocks exclusively, but was not very familiar with his new Low Profile F-Open stock. After a brief conversation with Alex, I placed an order, and had the stock inletted and bedded at my shop in a month. My first impression was “Wow that’s a long stock” — the forearm is significantly longer than on the original Master Class F-Class prone stock. I bolted the barreled action in, and squeezed the end of the forearm and barrel together, the stock flexed a little bit, but not as much as other designs that I have tested. I think that’s due to having “more meat” in the receiver area. The full stock depth continues farther forward that on some other “low profile” designs. That makes the stock stiffer in the vertical plane, reducing the hinging effect forward of the action. The stock was finished in gloss black per the customer’s request. Interestingly, I found that the multiple layers of paint and clearcoat stiffened the stock up quite a bit.
CLICK IMAGE below for full-screen version
Low Center of Gravity Tames Torque
Compared to the original Master Class F-Open stock, the barrel sits about an inch lower. Lower center of gravity equals less torque, and that is very important when shooting heavy bullets in fast twist barrels. Another significant improvement is that the toe of the stock is flat and parallel to the forearm. I added a 3/4″ track rail in the rear, and milled the underside of the fore-end to create two parallel “rails” in the front to help the stock track better.
One of the biggest reasons why I like Master Class stocks, is the pistol grip. I don’t shoot “free recoil” and a comfortable pistol grip is super important to me when selecting a stock. The new Master Class Low Profile stock shares the same grip as the old model. This allows the stock to accommodate either a “hard hold” style or a more free-recoil style of shooting — whatever the rifle’s owner prefers. This design versatility is one reason I recommend Master Class stocks. Shooters may experiment with either shooting style to find what suits them best.
Cartridge Choice — A 40° .284 Win Improved
Duane decided to have the barrel chambered for my 284 KMR IMP (Improved) wildcat. What is .284 KMR IMP and why choose it over the straight .284 Winchester? Improved by definition means “made better”, I took a great cartridge, and modified it to increase capacity, reduce pressure, and increase brass life.
There are many “improved” variants of the original .284 Winchester: 7mm Walker, .284 Shehane, .284 Ackley and so on. My version, the 284 KMR IMP, shares the .010″ blown-out sidewalls of the .284 Shehane, but I have further increased the case capacity by changing the shoulder angle from 35 to 40 degrees. The 284 KMR IMP allows you to almost match magnum cartridge velocity in a standard-bolt-face action. If you want to run 180gr-class 7mm bullets over 2900 FPS, it is cheaper and more convenient to have a barrel chambered in 284 KMR IMP than to spend $650 for a magnum bolt.
Tuning Loads for the .284 Win Improved Cartridges
The 284 KMR IMP seems to have two nodes, one around 2820 fps and other at 2940 fps. My match load clocks at 2935 fps with single-digit ES. Note –I selected that load based on accuracy, NOT raw speed. A lot of novice (or hard-headed) shooters make the mistake to push their cartridges to the max, and disregard more accurate loads at lower velocity.
The sport of F-Class is rapidly growing, and the equipment used is improving constantly. I remember that only few years ago, an F-Open rifle that could shoot sub-one-inch of vertical at 300 yards was considered competitive. Now, we are pursuing sub-one-inch vertical at 600 yards! It takes a great rifle to approach that goal, but it is also up to the shooter to learn and experiment as much as possible in order to achieve success.
Dies for an Improved .284 Win Cartridge
One of the biggest challenges in campaigning a wildcat cartridge has been obtaining great dies. When searching for custom dies, it almost seems like that the odds are stacked against us. The most common problem is wait-time — custom die orders can take months to be completed. Also, most custom die makers want you to send them two or three cases, each fire-formed three times. I find that funny because if could somehow properly size the cases for three fire-forming cycles, I would not need a sizing die.
Custom-made dies should size the case just right, but sometimes the die’s internal dimensions are slightly off, and this leads to problem number two: dies sizing too much (or even worse) too little. I had a one “custom” die that would not size the bottom of the case enough. This made the extraction of fired cases very difficult. I feel that the best option (if available) for shooters interested in wildcat chambers is to have their gunsmiths make the dies. I offer that die-making service in addition to barrel chambering.
BAT Machine “M” Action
Duane decided to use a BAT M action for this rifle, and I think that he could not have made a better choice. We are blessed with many good match-quality receivers: Barnard, BAT, Borden, Kelbly, Nesika, and Stiller just to mention a few. These are all very well-made and suitable for F-Class. Among BAT Machine Co.actions, I like BAT models M, MB, and 3LL best. I prefer these because because of their size (large bedding footprint) smoothness, timing, options available, and last but not least visual appearance.
Trigger: I recommend and use Jewell triggers. Other good options are: Kelbly, CG Jackson (good 2-Stage) Anschutz (best 2-Stage for Bat and Kelbly actions), Bix’N Andy, and David Tubb.
Barrel: Duane made another good choice here. He decided to go with a Brux 1:8.5″-twist, 4-groove cut-rifled barrel. If you look at the F-Class and Long Range benchrest equipment lists, you will see that cut-rifled barrels are currently dominating. Many records have been shot with both button-rifled, and cut-rifled barrels. I have shot both, and prefer cut-rifled barrels. I am not saying that button-rifled barrels are not capable of shooting as well as cut-rifled barrels, but on average, in my experience, four out of five cut-rifled barrels (from top makers) will shoot well, vs. three out of five buttoned barrels. YMMV, but this is what I’ve observed.
Scope: Duane’s rifle was fitted with a Nightforce 15-55x52mm Competition scope with DDR-2 reticle. This optic is ultra clear, reasonably lightweight (28 oz.), super reliable, and has 1/8 MOA clicks — what you want for long range F-Class competition. In this 15-55X NF model, I like the DDR-2 reticle best, because fine cross hairs (FCH) are hard to see in heavy mirage. The DDR-2 has a heavier horizontal line, with a center dot. March scopes are also very popular and very well-made.
Thanks for reading, and keep ‘em in the middle…
Emil Kovan Competition History:
– 2014 F-Class Open National Champion
– 2016 F-Class Open Canadian Championship, Silver Medal (tied for first on score)
– 2015 F-Class Open National Championship, Silver Medal
– F-Class Open National Championship Teams, 2015, 2014, 2013, Shooting Team Member
– Over 15 wins in Regional and State Championships in Palma, F-TR, F-Open
Legendary shooter Jerry Miculek recently visited the CMP where he looked at the vast inventory of military rifles, including 80,000+ M1 Garands recently received from the Philippines. CMP tech staff showed Jerry some rare Garands that had never been issued. If you’re interested in classic military arms, you should definitely watch Jerry’s video:
Gina Johnson, CMP’s general manager, told Guns.com that: “We have roughly 86,000 rifles from the Philippines and roughly 13,000 rifles from Turkey in our possession”.
The arrival of these 99,000 M1 Garands is great news for rifle collectors. Garands have been in short supply in recent years, as the Obama administration opposed repatriation of surplus military rifles from overseas allies. Garands were getting harder to acquire from the CMP. In fact, over the past two years, many common Garand varients have been “sold out” on the CMP site.
The CMP Moves Tens of Thousands of M1 Garands into CMP Warehouses:
While we’ve known about the Philippine Garands for quite some time, Guns.com reports that collectors were surprised to learn about the Turkish Garands: “The Philippino guns have been on the radar for months while CMP has kept the news on the Turkish M1s closer to the vest. The influx of vintage rifles…is one of the biggest stockpiles the [CMP] has received in recent years.”
How to Order an M1 Garand from the CMP
To purchase an M1 Garand through the CMP, you must be an adult U.S. Citizen, and a member of an affiliated organization who has participated in a “Marksmanship Activity”. This basically meas you need to join a a gun club and participate in a clinic or match. Proof of club membership and citizenship is mandatory for all ages. However, the marksmanship requirement is waived for those over 60 years. Garands must be ordered by mail or through official CMP Auctions. CLICK HERE to Start Order.
This popular Tips and Tricks Video has been viewed over 500,000 Times on YouTube.
Recommended M1 Garand Manual
Among the many M1 Garand manuals available, we recommend the CMP’s U.S. Rifle, Caliber .30, M1: ‘Read This First’ Manual. This booklet covers take-down, reassembly, cleaning, lubrication, and operation. The manual comes with CMP rifles or can be purchased for $3.50 from the CMP eStore. The author of Garand Tips & Tricks says: “It’s one of the best firearms manuals I’ve seen and I highly recommend it.” The CMP also offers many other M1 Garand print resources including:
Our friend Dennis Santiago is a talented Service Rifle shooter, who normally competes with an AR shooting the .223 Rem cartridge. Recently he decided to go over to the “dark side”, putting together a Palma (fullbore) rifle chambered for the .308 Winchester. Dennis selected a Competition Machine (Gary Eliseo) R1 Chassis for the project. Here’s Santiago’s account of his “true blue” Palma build…
Palma Rifle Report by Dennis Santiago
“Here’s my new project — a .308 Win Palma rifle with an Eliseo R1 chassis, Rem 700 action (blue-printed with PT&G upgrades), Jewell trigger, Boots Obermeyer 1:11″-twist barrel, and Phoenix sights holding Gehmann apertures. Next comes chassis and sling set-up, initial mechanical zeroing, and load development. Yup, I have a bunch of Peterson small primer .308 brass, Sierra #2156 155gr MKs, and Varget to get started with. I’m told I can drive 155gr pills to stay supersonic to 1K. Should make for an interesting 2020. My goal is to be cozy with this blue beast by the time the Berger Southwest Nationals kick off in February 2020. Hey, you gotta have goals!”
CLICK Imagefor full-screen photo with more detail.
Pinning the Picatinny — For a Super-Solid Mount
One of the key parts of the build, Dennis explains, is mounting the top rail with pins: “Once the rail is aligned using a spin-centered optic, it locks down with three 3/16″ roll pins. That way there is no reliance on screws that can come loose. Above is a photo of the top of the Eliseo tube chassis showing the three, 3/16″ roll pins that unitize the Picatinny rail. You can also see the four brass screws that just kiss the action to fully stabilize it in the tube. The recoil ring buttresses completely around the action with metal to metal contact. There are a million details hidden inside a Gary gun.”
Phoenix Sights Front and Rear
Rise of the Phoenix — Here are the sights for the Eliseo R1. There are very few manufacturers left making these kinds of ultra-precise and repeatable iron sights.
These Ray-Vin tools help set mechanical zero on the sights. Dennis notes: “Finally a reason to pull out the Ray-Vin calibration paraphernalia to set up a mechanical zero. This photo is for all of you who still remember that those barrel flats and screws in our sight towers actually had a purpose once upon a time.”
Sling ‘N Irons — Classic Palma Configuration Dennis plans to use an Eric Hollis sling with his new blue Palma rifle.
Peterson Small Primer .308 Win Brass for Santiago’s Rig
Dennis plans to use Peterson Cartridge Small Rifle primer .308 Win brass. Peterson offers a “Select” version weight-sorted and length-sorted at the factory. All Select casings (in a 50ct box) are guaranteed to be within 1 grain in weight and .001″ in OAL. Peterson Select brass is available for 20 different cartridge types, including .308 Win both small primer/small flash hole and large primer/large flash hole.
Getting the Blue Rifle Ready for the 2020 Berger SW Nationals
Dennis plans to campaign his rifle at the 2020 Berger Southwest Nationals (SWN). He may shoot iron sights, or fit a scope and shoot in the “Any Sights” category. That’s not yet decided. The week-long Berger SWN is the biggest rifle match in the Western United States. Hundreds of shooters compete in both individual and team events. The SWN begins with the Mid-Range Nationals at 600 yards. Then the Long-Range matches are held, with targets out to 1000 yards. Watch the video to see the Ben Avery facility, home of the Berger SWN:
Chassis-maker Gary Elesio at the 2017 Berger SW Nationals. Gary shoots what he sells:
Want to build your own accurized M1 Garand? Then consider signing up for the CMP’s Advanced Maintenance Class (AMC), a 3-day program for students with mechanical aptitude and a desire to work on M1 Garand rifles. Each student will assemble his own CMP Special M1 Garand Rifle with a USGI receiver. This will be a “keeper” Garand that the AMC student takes home. Tuition cost for the 2020 AMC is $1018.50. In addition, participants purchase a rifle at extra cost — $850 for a Field Grade Special, or $1050 for a CMP Special. Students must provide their own accommodations in Anniston, Alabama.
Class Registration is Now Open
You can now register for the Civilian Marksmanship Program’s (CMP) 2020 Advanced Maintenance Clinics. Interested persons may register now through January 31, 2020 with a lottery held 2/1/20 to choose participants. Individuals may register through the CMP Website HERE.
Students will build and purchase either a CMP Special Rifle or a CMP Field Grade Special during the 3-day course. The receiver will be a USGI manufacture. Each 3-Day Advanced Maintenance Class will be led by highly-qualified Custom Shop staff members. On the third day, students will visit the Talladega Marksmanship Park as VIP guests of the CMP. At Talladega, each AMC student will have a chance to fire the M1 Garand they built in the class, shooting at Talladega’s high-tech electronic targets.
CMP 2020 Advanced Maintenance Class (AMC) Dates:
February 25-27; February 28-March 1 (Buddy Class)
March 31-April 2
April 3-5; April 17-19; April 20-22 (Buddy Class)
May 12-14; May 15-17
June 9-11; June 12-14 (Buddy Class)
August 18-20; August 21-23
October 13-15 (GCA Event); October 16-18 (Apple Seed Event)
December 8-10; December 11-13 (Buddy Class)
This class is not intended for gunsmiths — no prior armorer experience is required. Students will assemble their own CMP Special rifle, priced at $850 or $1050. Class topics will include:
– Commercial barrel installation, chambering, and headspace
— Component function, selection, and inspection
— Fitting and proper assembly of a complete CMP Special rifle
— Discussion of malfunctions and their remedies
— Accurizing techniques for the M1 Garand
How to Register
Applicants must register via the CMP Competition Tracker system website before February 1, 2020. An electronic Registration Lottery will randomly assign the 20 available seats for each class date. NOTE: Registering for multiple classes is permitted, but no applicant will be selected for more than one slot. Total cost for the 2020 AMC will be $1,868.50 or $2,068.50, depending upon rifle selection (Field Grade or CMP Special). FORMER AMC PARTICIPANTS MAY REGISTER FOR 2020.
What would you do if you had a LIVE Round stuck in a chamber? Well, don’t hammer a wood dowel in the barrel, that’s for sure. Here is a tale of stupidity that could have injured the rifle owner. This account appeared on the Facebook Page of Brock & Norris Custom Rifles, a gunsmith shop in the United Kingdom.
Live, Loaded Round Stuck in Chamber — What NOT to Do!
Commentary by gunsmith Mike Norris
Here is a cautionary tale. A client came into the workshop with a problem which could have had very serious [even deadly] consequences. And it is not the first time we have seen this. Firing neck-sized-only ammunition, the client attempted to load a round which then jammed solid in the chamber. The bolt would not close and the round was unable to be extracted.
The problem was compounded by various attempts to push the loaded round from the chamber with cleaning rods and the assistance of a hammer (I kid you not!). All of which damaged the bore and the crown, culminating in a wooden dowel being hammered into the barrel which subsequently broke off in the bore. The end result was a barrel that was totally wrecked.
One Facebook friend posted: “Fortunate avoidance of a ‘Darwin Award’. I can hear it: ‘Go on hammer the bolt, she’ll go!’. We’re missing a ‘face palm’ emoji here.”
The Problem Started with a Neck-Sized Case
The moral of this story is DO NOT NECK SIZE cases. Mike advises: “Full-length size cases correctly. You only move the shoulder back 1 to 1.5 thousandths and the case will feed and extract EVERY TIME. Yes you will have to trim cases occasionally but it is one hell of a site cheaper and safer than jamming a live round in the barrel and wrecking the barrel trying to remove it. Not to mention the risk to life and limb!”
What Should Have Been Done in this Situation?
Mike was asked the best method for removing a stuck round. He stated: “The Grease Gun Method on a threaded barrel works*. However, in this case, this was not remotely possible due to 20 inches of wooden dowel being broken off in the bore as well. The live round (yes it was live!) was attempted to be removed by hammering on a brass cleaning rod (an actual hammer was used) to try to dislodge it. That brass rod broke, so then a wooden dowel was employed, and THAT broke as well.”
Mike cautions that, when a live, loaded round is involved you must be very careful: “Do not be taking chances with your own safety or others around you. When it is safe to do so, get the rifle to a professional. By the way he WILL [chide you] for being daft in the first place and then bringing the problem into his premises. Expect to be charged for the expertise to remove said obstruction, In the past I even had a client send me a loading die with a live .338 Lapua round in it through the Post no less!”
* This YouTube Video shows the successful removal of a jammed FIRED (not live) case from an AR15 barrel. You can see the fired case eject at 15:35 time-mark, after the primer pops out first. But note, this was NOT a live, loaded round. Extreme caution must be excercised with live rounds.
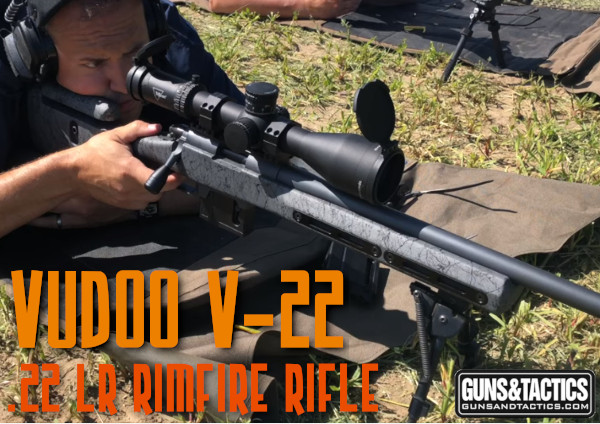
This Sunday GunDay story features a .22 LR rifle built around a Vudoo Gun Works V-22 rimfire repeater action. The V-22 action, arguably one of the best tactical rimfire actions available, owes its lineage to the respected Remington 40X action. Many rimfire matches have been won with 40X actions, so we understand why Vudoo chose that design for a starting point. Vudoo then added some important enhancements, including a controlled-feed design. This makes the Vudoo a great choice for rimfire cross-training, rimfire tactical matches, and NRL22 competition. In the video below you can see the Vudoo Gun Works rifle used an a PRS-style, long-range precision rimfire match in Minnesota.
As it has the same footprint as a Remington 700, the Vudoo Gun Works V-22 action is 100% compatible with a wide variety of Rem 700 chassis, triggers, and rifle accessories. This allows you to have a rimfire trainer with near-identical ergonomics as a centerfire match rifle. Rimfire training provides valuable trigger time with dramatically lower ammo costs. Along with actions, Vudoo sells barreled actions, and complete rifles through its website: VudooGunworks.com.
In this video, Dave Timm of GunsandTactics.com employs a Vudoo V-22 in the Minnesota .22 LR Long Range Precision Rimfire Match at the Rush Lake Range. This PRS-style match had targets out to 300 yards during the main match, followed by a long range challenge out to 465 yards. Dave’s Vudoo Gunworks V-22 rifle features a Grayboe Ridgeback stock, Harris bipod, and Trijicon Accupower 4.5-30x56mm FFP scope. Dave was shooting Lapua Center-X .22 LR ammunition.
This course of fire was challenging. Dave explains: “Stages included barricades and barrels and props to shoot out to targets at 100, 169, and 214 yards. So we’re shooting a 6″ piece of steel at 214 yards with an awkward position and a .22! It’s a good challenge and it really forced you to get all your fundamentals together. You’d be surprised at how much movement [there is]. You feel that you’re steady but all of a sudden that reticle just doesn’t want to stop moving.”
This Minnesota Match is similar to a PRS-style competition, but for rimfire rigs. Dave said “This match was an absolute blast and pushed out the .22 LR round out to some distance.”
About the V-22 Action — Controlled-Feed Design
Vudoo Gun Works states: “Our V-22 runs a full-size short action bottom metal (DBM) and our V-2210 magazine has a [full-size] AICS form factor. The V-22 is the only controlled-round-feed .22 LR receiver out there. The bolt has full capture control of the cartridge from the time it leaves the magazine until it ejects the spent round out the ejection port. That means the round never touches anything during feed travel so the bullets won’t be nicked/dented during rapid cycling.”
V-22 Product Description from Vudoo Gun Works:
The V-22 has been designed from the ground up as a true-to-scale Rimfire receiver that fits the Rem 700 footprint [for] stocks and chassis[.]. It also runs a full size short action bottom metal (DBM) and our V-2210 magazine has an AICS form factor[.]
The V-22 has a very unique control-round-feed protocol. The bolt has full-capture control of the cartridge from the time it leaves the magazine until it ejects the spent round out the ejection port. The significance of that is two-fold. Great feed and extraction reliability and…equally as important, the cartridge is controlled in a way that it never touches anything on its entrance into the bore. There is no feed ramp, nor does the projectile go in at an angle that would damage it in any way. We all know how susceptible the soft lead of the .22 LR is to accuracy-degrading damage and minor nicks during the chambering process. [That kind of bullet damage] is eliminated in the V-22 geometry.
About Dave Timm — Dave is a police officer serving his community on night patrol. Dave serves as his agency’s lead firearms and use of force instructor. He also owns and operates the Learning Firearms training operation in Baxter, Minnesota. Dave’s company offers realistic practical training solutions.


 5. Gas Block: You want a gas block that does not impose pointed stress on the barrel. Clamp-on types that grab all the way around the barrel are excellent. The blocks that are pinned on with tapered pins that wedge against the barrel or the slip on type of block with set screws that push up from underneath (or directly on the barrel) can deform the bore inside of the barrel and can wreck the accuracy of an otherwise great barrel.


 Just in time for Christmas, today we feature a beautiful red rifle built by West Texas gunsmith Thomas “Speedy” Gonzalez many seasons back. With an eye-catching, one-of-a-kind engraved Stiller Viper action, and gorgeous red/black gelcoat finish, we think this rifle is one of the prettiest benchrest rigs ever made — and the color scheme fits the holiday season.
 First, the action features a plain-Jane unfluted bolt, with a slight taper in the middle, a bit of a wasp-waist. Speedy prefers an unfluted design because it has superior wear characteristics. He’s found, when working with an aluminum action such as the Viper, the sharp flutes on the bolt will wear the inside of the action faster. In the interest of reduced wear, Speedy also requested a smaller-sized loading/ejection port. This provides for a larger front and rear receiver ring, which enhances bolt bearing surface. More bearing surface reduces point loading for less internal wear.
 Much thought went into the rear section of the stock. Speedy and Tony found that many stocks would start off tracking well, but by the end of the string they were pulling themselves out of alignment. Speedy noted that with some more conventional designs, they tended to ride up out of the rear bag after two or three shots. The BR-X works differently. It uses a wedge design, rather than a radius, so it tends to drive itself down into the bag on recoil. The BR-X is not the only stock to use a wedge in the rear, but it is different than other wedge designs. According to Speedy: “On most other wedge stocks, the wedge tapers towards the pistol grip, making the ‘V’ wider towards the end of the buttstock. This will change point of aim as the stock moves. The BR-X has a wedge that is a constant ‘V’, with no taper from the end to the pistol grip. This does make the gun track better and stay on target better.”
 Speedy says, “you can read the equipment lists from the big shoots, but the printed results can be deceiving. That winning barrel might have been produced a couple of years ago. Barrel-makers do have good runs and not-so-good runs. Do your homework and find out what’s working best right now.” Speedy prefers 6-groove barrels: “I’ve shot em all one time or another. It seems that the 6-groove barrels are easier to get to shoot. It seems at 200 yards bullets from a 4-groove barrel move more than from a 6-groove barrel. Both windage and elevation. I think Tony Boyer feels the same way.” [Editor’s Note: Speedy’s groove observations were made many seasons ago. Today, many top shooters are using 4-groove and 5-groove barrels, and 3-grooves have been successful in score competition.]
 So, how does one improve as a shooter and get to the point where you are meeting your goals? First you need to break down the shooting process into its parts–gun handling, loading technique, wind awareness, time management, bag set-up, and what I call ‘bench management’. Then you need a mentor. Benchrest is like golf–you can have the best equipment (best action, best stock, best rest) but you won’t get far without a knowledgeable veteran to monitor your progress and observe your technique. Without a mentor, benchrest is a rough game to play and you can reach a frustration point after a couple of years.
 Developed by Louis Palmisano and Ferris Pindell (left and right in photo), the 6 PPC is the “King of the Hill” in short-range benchrest competition, the most accurate cartridge ever invented. It still completely dominates 100- and 200-yard Group BR Shooting. If you want to win in that game, you pretty much have to shoot a 6 PPC, or some close variant of the 6 PPC cartridge design.


 One thing that is quickly noticed about the Anschutz Precise stock is its adjustability. The engineers did a very good job of allowing many of these adjustments to be made while in the shooting position, most notably the cheekpiece adjustments. When a shooter picks up a Precise stock for the first time they also notice how narrow the fore-end is. This really contributes to reducing the pain in the forward hand in prone when shooting with a sling. This stock is, by far, the most comfortable sling stock I’ve ever handled.


 Gavin tested both 7″ and 17″ versions of the Hawkeye Borescope. He tested straight versions, and both long and short borescopes with a 90° eyepiece. For most tasks we prefer the 90° eyepiece. In addition to these systems, Gavin tested the the Hawkeye Video Slide and video image acquisition system, shown below.
 A precision optical borescope is a pricey tool, but it performs critical tasks for gun-owners, and a Hawkeye’s rigid optic tube offers some important advantages over a cheap endoscope on a flexible cord. To learn how a Hawkeye borescope can help you diagnose barrel issues, you should read a


 Emil Kovan Competition History:


 Class Registration is Now Open