Report by Corbin Shell
Not long ago, I learned of the King of 2 Miles (KO2M) shoot held in Raton, NM and was fortunate enough to get an entry slot. I will be shooting with David Tubb, multi-time High Power and Long Range National Champion, on a team we call the “Second Amendment Cowboys”. Given such short notice, I scrambled to find the necessary components to build a suitable rifle for the event. I turned to longtime friend and owner of X-Treme Shooting Products (XTSP), Tom Myers, to see if he might have a suitable action. XTSP is known for its premium titanium rifle receivers, however XTSP also manufactures stainless actions. As luck would have it, Tom was completing a small run of .338 Lapua Magnum-sized stainless steel single-shot actions. Other components were sourced as quickly as possible and the building began in earnest.
Before acquiring the first component for this build I already knew who was going to perform the work, Doyle Anglin at Dixie Guns, inc.. Doyle’s attention to detail and rifle building knowledge is second to none! I came to Doyle with the idea of building a rifle to shoot in the King of 2 Miles match and his ears perked up. Once all the components were in hand Doyle began construction. Doyle was given free liberty to build whatever he felt best for the job given the time constraints and components that were readily available on such short notice. I cannot thank Doyle Anglin enough for the stellar job he did!
KO2M .338 Lapua Magnum Improved — Rifle Components
— Custom laminated stock Doyle Anglin designed and created from scratch
— 10″-long aluminum barrel block designed and made by Doyle Anglin
— XTSP (X-Treme Shooting Products) PH420 stainless single shot receiver 1.450” diameter. PVD-coated receiver body. FNC-coated one piece bolt.
— XTSP +35 MOA and +60 MOA tapered Picatinny rails, PH420 stainless, PVD-coated
— XTSP two-stage trigger with safety
— Krieger 1:9.3″-twist barrel. 1.450” for 6.5” tapering to 1.100” at the muzzle. 33.5″ finished length
— Piercision Rifles 3/4×24 slab-sided, 5-port muzzle brake
— BAT stainless trigger guard
— Masterclass cheek piece with extended rods
— Masterclass butt plate hardware
— Duplin Bipod
— Spuhr +20.6 MOA one piece scope mount
— Ivey +175 MOA adjustable scope mount
— Sightron SIII 6-24x50mm MOA-value scope (100 MOA of total travel)
— Geier & Bluhm 10 minute precision bubble level mounted to barrel block via extension rod
— Manson .338 Lapua Magnum Improved 30-degree reamer, .375” neck diameter
Load Information
— Sierra 300 grain MatchKing, meplats trimmed and pointed, seated .010″ into lands*
— Hodgdon Retumbo Powder, 101 grains
— Peterson .338 Lapua Magnum brass
— Federal 215 primers
— Jim Carstenson custom reloading dies: inline seater, full-length bushing, neck bushing and threaded micrometer seating die
This load has achieved 3050fps with low single-digit SDs
Given the 12-pound barrel weight, Doyle strongly suggested a barrel block to offer additional support and increase rigidity. Doyle created a split ten-inch aluminum barrel block and mating steel plate that is inletted into the forend of the custom laminated stock. The 1:9.3″-twist Krieger barrel is epoxied into the barrel block as well as being held in place by the ten socket head cap screws. Two hardened and ground pins locate and index the barrel block onto the steel mating plate. The steel mating plate acts as the recoil lug which mates up to the cut on the reward section of the barrel block. The Krieger barrel is chambered with a 30-degree Lapua Magnum Improved reamer and throated accordingly, yielding a loaded round of approximately 4.000 inches.
The barrel is capped with a very effective Piercision Rifles 3/4×24 slab-sided, five port muzzle brake. The size proportions of the muzzle brake work well with the 1.100” muzzle diameter, however it will work on barrels up to 1.450″ in diameter.
Doyle Anglin worked his creative magic and constructed the multi-color laminated stock from a blank. The five inch fore-end allows the rifle to be utilized in a dual role — either benchrest or prone with bipod. The cheek piece hardware is from Master Class Stocks and is adjustable for cast on/off with preset elevation settings via half-moon shaped clips. The two-way adjustable butt plate hardware also comes from Alex Sitman at Master Class Stocks. The multi-colored laminate stock is clear-coated with special marine UV inhibitor paint. The glass smooth finish makes the wood appear wet and is extremely smooth to the touch.
Lots of Elevation on Tap with Angled Rails, Spuhr and Ivey Mounts
Topping off the rifle is either a +35 or +60 MOA X-Treme Shooting Products Picatinny scope rail. The receiver and scope rails are pinned for accurate repeatability when interchanging. Five 8×40 socket head cap screws firmly hold the scope rail in place. A SPUHR +20.6 MOA tapered, one-piece scope mount securely grasps the Sightron SIII 6-24x50mm MOA scope. I cannot say enough good things about the quality of the SPUHR scope mount! This is the only fixed scope mount that I will use going forward and a special thanks goes out to Ulf at SPUHR! The 35 MOA rail and 20.6 MOA SPUHR mount setup allows full utilization of the Sightron’s 100 MOA of internal travel. The second scope setup is comprised of an Ivey +175 MOA adjustable scope base and Sightron SIII 6-24x50mm optic.
Scope in SPUHR mount shown below:
Scope in IVEY Mount with barrel block-mounted precision bubble level:
When shooting extended long range (ELR) it is important that the scope’s crosshairs remains level. Should the crosshairs be canted it will induce impact shift which increases with the angle of cant and distance. The decision was made not to use any of the lesser quality/precision bubble levels that currently flood the market. These levels have poor resolution usually between one and two and a half (1-2.5) degrees. It must be noted that not all levels are created equal. The fine folks at Geier & Bluhm offered up a solution with a precision glass vial horizontal level with an accuracy of ten minutes. As a refresher, one degree is comprised of 60 minutes of angle. The level setup we chose for this rifle is, at minimum, six times more accurate than the best scope or picatinny level on the market. The 10 MOA bubble level sensitivity is just about perfect and does not create a situation of having to “chase” the bubble left and right when in position.
A portable 150 MOA tall target was created to test both scope tracking and crosshair alignment. When testing at the local 100-yard range I got a lot of strange looks and a few inquiries as to why in the world was I shooting thirteen FEET above the aiming bullseye.
As the F-TR shooters have learned, it is very important that the rifle travel freely and repeatable under recoil. I turned to Ray Gross who custom made a rubber and Cordura shooting mat which the bipod rides on. This mat is of the same material and construction that most of the F-TR team is utilizing. The rubber durometer is correct so the rifle does not bounce or hop when fired. The bipod skis slide very easy on the Cordura-topped mat. A big thanks goes to Ray Gross for assisting with the mat setup. In addition, high molecular weight polyethylene (HMWPE) tape was applied to the butt stock of the rifle. The HMWPE tape allows for extremely low friction between the butt stock and rear sand bag. This configuration tracks very well and slides rearward like it is on rails.
As load development progressed I tested three different brands of projectiles. A ladder test was performed at 300 yards to determine where the node was with my barrel and powder combination. The rifle liked between 99-101 grains of Hodgdon Retumbo. I then proceeded to shooting ten shot groups at 1000 yards. In this rifle the Sierra 300gr Matchking was hands down the winner for smallest groups and the best elevation at 1000 yards. The load settled on is 101 grains of Retumbo and 300 grain Sierra Matchking. 500 Sierra bullets were measured base to ogive and the spread over the entire 500pc measured .003” with 490pc varying by .001”. Keep up the good work Sierra Bullets! A special thank you goes to John Whidden for generously allowing me to come to his shop and repoint the Sierra .338 projectiles and allowing me to test at his 1000 yard range.
Preparation for the King of 2 Miles match has been a great learning experience and a lot of fun! Next year’s rifle design is already in the works and should be an over the top build. Stay tuned to AccurateShooter.com for further details!
* The Sierra 300gr MatchKings were meplat-trimmed and pointed using the original pointing system made by Ferris Pendell for Jim Hardy. A big thank you goes out to John Whidden for allowing me to come to his shop and use the original bullet pointing system.
What does a two-time High Power National Champion choose for PRS comps? A set of twins. Twin rifles that is. SFC Brandon Green of the USAMU is one of America’s best marksmen. He’s excelled in Service Rifle and High Power disciplines, and now he’s getting very serious about the Precision Rifle Series (PRS). Brandon recently took delivery of “Twins” — two impressive rifles optimized for PRS competition. Green told us: “The Twins are ready for business! The silver one is a 6XC and the black one is a 6.5×47 Lapua”. Both rifles feature Impact Precision actions (with AICS-type mags), 24″ Proof stainless barrels, and Fat Bastard muzzle brakes. Rifle work was done by Stuteville Precision (Wade Stuteville) and Exodus Rifles (Joe Walls).
In the 6XC, Brandon runs Berger 105gr VLDs in Norma 6XC brass. For the 6.5×47 Lapua he shoots 140gr Berger Hybrids or 143gr Hornady ELD-Xs in Lapua brass. Both rifles have stainless steel Proof barrels, but the 6.5x47L has a matte black Cerakote finish.
Brandon loves his new Twins. He said he likes the “feel” of the guns with the Foundation stocks: “These rifles weigh around 17 pounds with optics. They feel very solid under recoil — without the ‘tuning fork’ vibration you can get with a metal-chassis gun. They feel like a good wood-stocked gun, but the material is stronger and more rigid than wood. I’ve heard that guys are having success with these Foundation stocks with the actions installed without pillars or conventional bedding.” Currently Brandon is running both guns without action-screw pillars. He did have one skim-bedded, but he doesn’t think that was really needed. “Both rifles hammer now”, Brandon tells us.
Green Runs Vortex Razor HD Gen II 4.5-27x56mm FFP scopes on both rifles:
High-Tech Micarta Stock Material
At first glance, those stocks may look like wood, but they are actually a special “Micarta” material that is strong, durable, and stable. Micarta, often used for knife handles, is a “a brand name for composites of fiberglass, carbon fiber, or other fabric in a thermosetting plastic.” The stock-maker, Foundation Stocks, says Micarta offers some distinct advantages over laminated wood or conventional fiberglass: “The solid block of material gives us a dense, homogenous material that is absent of any voids or air pockets commonly found in composite stocks. The high compression strength of the material allows us to build an action/DBM specific stock that requires no bedding or pillars. The material is very durable and stable in extreme environments. We use advanced CAD software to design and model our stocks, working in conjunction with action manufacturers and rifle builders to provide exact fitment.”
Here is a close-up of a Foundation Stock showing the distinctive Micarta texture:
Tactical Competition vs. NRA High Power Competition
Brandon says PRS competition is tough: “PRS can be pretty humbling, but it’s been a lot of fun and a great challenge. For a shooter (like me) with a Service Rifle/High Power background, the variations in stages combined with the time limits can be very challenging. And the unusual shooting positions put a new spin on things. PRS is definitely a different ball game, but I really enjoy it. After the National Championships this summer I hope to shoot three or four PRS matches in September and October.”
SFC Brandon Green honored as the 2015 High Power National Champion.
Life before the Twins… Here is Brandon, with his previous PRS rig, at the MasterPiece Arms Precision Rifle Shootout, a PRS event at the CORE Shooting Solutions Range in Florida:
Kelbly makes outstanding actions, including the Stolle Pandas. In the past 20 years, Pandas have probably won more benchrest matches than any other action (though BATs and Bordens are increasingly in the winning circle). Recently gunsmith Alex Wheeler of Wheeler Accuracy worked his magic on an aluminum Panda, optimizing the “ignition timing” of the action. This involves many small mods to bolt, camming surfaces, trigger, and firing pin: “The whole cam helix and detent shelf is re-cut. The firing pin and cocking piece are modified as well.” When executed properly, Ignition Timing has a number of benefits, including a smoother bolt opening/closing, improved firing pin fall, and enhanced accuracy (though the accuracy improvements can be subtle).
BEFORE Action Timing — Stiff and Clunky
Alex reports: “Normally Panda actions have plenty of firing pin fall. For one reason or another this one was very low. Before timing, firing pin fall was .210 with a Bix’N Andy (BNA) trigger. After trigger timing firing pin fall is .244 with zero cock on close.” Here is how the action functioned before timing work:
CLICK Photo to start VIDEO
Alex notes: “As you can see, after the cocking piece rides out of the detent notch it thenfalls to the trigger and is then re-cocked. This is normal on most un-timed actions.”
AFTER Action Timing — Smooth and Refined
Alex explains the modifications he made for this Panda action: “Moving the trigger back adds cock on close. The whole cam helix and detent shelf is re-cut. The firing pin and cocking piece are modified as well. I do love a timed Panda. In fact, I like aluminum actions, I think there is something to them. But yes, I also recommend Borden as my first choice.’
CLICK Photo to start VIDEO
Fix for Right-Bolt Actions Only
After seeing these videos on Facebook, one poster asked: “I do like my Panda but this is exactly why I bought a Borden action and I love it. It’s good to know you can make a Panda better. Alex, can you time a left bolt Panda?”
Alex replied: “No, the tooling I built is all for right hand actions sorry….”
We’ve been telling folks that the Japanese Howa 1500 barreled actions are an attractive option for a hunting, varminting, or tactical rifle. Priced at under $450.00, these barreled actions include the excellent HACT two-stage trigger. These Howa 1500 actions are smooth-running (noticeably more so than some “major-brand” domestic receivers).
Our friends at RifleShooter.com recently acquired a Howa 1500 barreled action in 6.5 Creedmoor and installed it in an MDT ESS modular chassis. This project turned out well. The barreled action mated well to the ESS chassis, providing an ergonomic platform with comfortable grip, adjustable cheekpiece, and adjustable LOP. Most importantly the gun shot well. With virtually no load development, the project rifle delivered 3/4-MOA accuracy right out of the gate.
As tested with Hornady brass and Hodgdon Varget powder pushing Sierra 123gr MatchKings, the Howa 1500 MDT showed good accuracy right from the start. With more load development (and a few more rounds through the new barrel), half-MOA groups may be possible.
Brownells now sells barreled Howa actions in a variety of configurations. Rifleshooter.com acquired a Howa 1500 barreled action with a 24″ #6 contour barrel chambered in 6.5 Creedmoor. RifleShooter.com plans to test this barreled action in multiple modular chassis systems. That should provide an interesting comparison test, providing the pros and cons of various stock/chassis configurations.
RifleShooter.com’s Editor writes: “I was pleasantly surprised by the number of chassis and stock offerings for the Howa barreled action.” For this project rifle, RifleShooter.com chose the Modular Driven Technologies (MDT) Elite Sniper System (ESS) chassis, for the initial build.
Like MDT’s other chassis systems, the ESS uses any AR-15/M16 M4 pistol grip. The ESS departs from the rest of the MDT product line it does not use a standard AR-15/M16 M4 stock. Eliminating this interface allows for a design that does not increase the length of pull. The stock has an adjustable comb, adjustable length of pull, and horizontally adjustable recoil pad. Comb and LOP adjustments are accomplished with a hand wheel, plus a cap screw and clamp system.
RifleShooter.com’s Howa 6.5 Creedmoor rifle has the following components:
While the HACT 2-stage trigger is very good, RifleShooter.com’s Editor replaced the HACT with a Timney because he favors a single-stage design. The Timney adjusts lower than the HACT, allowing a crisp pull at ~1.5 pounds: “You’ll notice I swapped out the factory trigger in favor of a Timney. I’ve had great luck with their products and Timney’s Howa trigger was no exception. Adjusted to 1.5 pounds, it is a pleasure to shoot with.”
Jonathan Ocab, a High Power shooter from California, had gunsmith Doan Trevor install a Sako-style extractor in the Rem 700 bolt in Ocab’s 6mmBR Eliseo R5 tubegun. Jonathan produced an excellent video showing how the Sako extractor improves the ejection of the short, fat 6mmBR cartridges in his rifle. Jonathan’s video demonstrates 6mmBR case ejection with an unmodified Rem 700 factory bolt versus a factory bolt fitted with a Sako-style extractor.
Johnathan explains: “Note how even when slowly operating the bolt, the bolt with the Sako extractor easily ‘kicks’ out the brass on ejection with minimal chance of operator error resulting in a failure to extract. While the unmodified bolt has issues ejecting brass on slow operation, it will eject if the operator pulls the bolt back quickly (fast and with some force).
While a Sako-style extractor isn’t an absolute necessity, this video shows the definite improvement this modification provides. For short cartridges like the 6mmBR, this is very useful. This modification is highly recommended for competition shooters, especially High Power competitors who seek improved function in rapid-fire stages. This modification is fairly inexpensive and any competent gunsmith should be able to perform the work (usually under $100 with parts and labor).”
EDITOR’s NOTE: In his video, Jonathan deliberately worked the unmodified Remington bolt slowly to show how the standard Rem extractor can struggle with short fat cases like the 6mmBR. In fact, when you work a standard, unmodified bolt more quickly, the extraction can be much more positive. Cycling the bolt with more “snap” provides more energy to eject the cases. We have run an R5 Tubegun chambered in 6mmBR with an unmodified Rem 700 bolt (no SAKO extractor), and the extraction was reliable, provided the bolt was worked quickly.
Gunsmith/stockmaker Alex Wheeler is a very smart guy. Among his many clever innovations is an adjustable bag-rider that fits on the underside of the buttstock at the rear. Alex calls this a “Rudder” because it allows the shooter to align the tracking perfectly. The rudder assembly can swing left and right using an adjustment bolt. You can also adjust the Rudder’s vertical “angle of attack” with simple shims. Some guys like the Rudder’s 3/4″-wide bottom perfectly parallel with the bore axis. Others prefer a slight angle so the stock slides down a bit during recoil.
Adjustable Rudders Now For Sale
Alex has fitted these innovative, adjustable Rudders in the stocks and complete rifles he sells.And now owners of other stocks can benefit from Wheeler’s invention. Alex is offering the Rudders for sale: “I have made my adjustable Rudders for sale. Price including mounting hardware is $125 shipped. These are the same rudders I install in most ever stock I build. They’re the only way to achieve perfect tracking every time.”
Watch how the Wheeler Rudder works in this video. Alex explains: “If you pull your rifle back in the bags and the cross-hair moves, your stock is not straight. The easiest fix is to use an adjustable Rudder. They come standard on all my stocks. The white box on the 1000-yard target is 4″. With a properly-adjusted rudder it’s easy to obtain less than 1″ of cross-hair movement at 1000 yards.”
Rudder-Equipped Stock In Action (with 1000-Yard Champ Tom Mousel)
This second video shows how well a Rudder-equipped stock performs. This shows IBS 1000-yard Champ Tom Mousel running five (5) shots with his 17-lb Light Gun chambered in 6BR Ackley Improved. Note how perfectly the stock tracks. It runs smoothly straight back then comes right back on target when pushed forward by Mousel. Check it out — this is impressive.
It’s relatively easy to install these rudders on most wood and wood laminate stocks. Alex says: “Just notch the stock, and install the anchors for the adjustment bolts.” In addition, McMillan will soon be offering fiberglass stocks with a notch designed to fit the Wheeler rudder. Based on Alex’s Deep Creek Tracker stock design, these new McMillan stocks with have metals rails in the front also.
New Rudder-Equipped McMillan LRB Stock
Alex explains: “The new McMillan Rudder-equipped stock will be a version of the Deep Creek Tracker, most likely called a Wheeler LRB (Long Range Benchrest). It will feature factory installed 1/2″ wide aluminum rails in the 4″ fore-arm. It will come with the rear notch molded in for the Rudders which I will install on each stock. I will be exclusive dealer on these and hope to see the first one in June. I also have got with Edgewood to make 4″ wide front bags that will fit a standard rest top and will cost the same as their standard 3″ bag. I will have some in stock but anyone can order them direct and not have to pay the $125 price for a custom bag.”
Wipe-Out foam bore cleaner is a product we’ve used with great success on many rifles. With sufficient dwell time, it removes both carbon and copper fouling. You can combine it with Wipe-Out Accelerator or Patch-Out liquid to speed up cleaning time. Many shooters, including this editor, find that bore-brushing has been virtually eliminated with the regular use of Wipe-Out. (With some barrels however, you may still have to brush or use a bore paste if you notice stubborn carbon build-up in the throat area.)
Method One: Apply Through Muzzle
Out standard procedure with Wipe-Out is to insert an O-ring-sealed cleaning rod guide into the chamber and then squirt through the muzzle in short puffs. Put a towel or rag on the comb of your stock and watch for a little bit of foam to exit the rod guide. We usually wait 30 minutes for the bubbles to dissipate, then do a second foam application. Be sure to clean off any excess foam before it drips on your stock. It is important to keep the foam off fine wood or paint finishes.
Our actual routine normally starts with 3-4 wet patches with Carb-Out (to get the loose black stuff out), followed by the two foam cycles as explained above. Then we plug both ends of the barrel, drive home from the range and dry-patch out on arrival at the house. If the gun is going to be used again soon, that’s all we do. If there will be long-term storage we’ll run some Eezox down the bore.
Method Two: Apply Wipe-Out from Breech
You can also apply Wipe-Out from the breech. To allow breech-first application, Wipe-Out cans now come with a short plastic tube and a plastic tip that fits in your chamber. These can also be purchased separately for $2.50. However, we’ve found the plastic tip is too big for some chambers and it is not always easy to get a good, secure seal even if it does fit. Jason Baney has come up with a solution. READ Jason’s Wipe-Out Article.
Use Fitted Tubing for Breech-First Applications of Wipe-Out
You can apply Wipe-Out through the breech very effectively if you use fitted, plastic tubing. While this works well for bolt-actions, breech application is particularly handy for the Garand, M1A and other semi-autos. Jason Baney has written a short article describing this process. In a nutshell, you need one piece of tubing that fits the chamber tightly and then connects with a second, smaller diameter tube that attaches to the Wipe-Out can. This avoids any “over-spray” of foam in the action area, providing a clean, simple solution. Just squirt for a second or so, and wait for white foam to come out of the muzzle. Be sure to keep Wipe-Out off fine wood stocks.
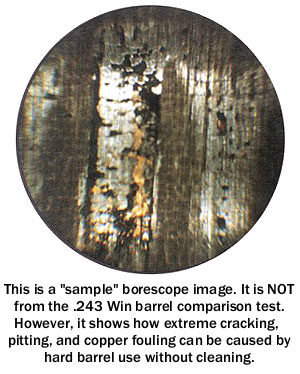
Can sustained rapid-fire shooting with no cool-down period wear out a quality barrel more quickly? The answer is “Yes” according to Forum member LCazador, who did an interesting comparison test with two .243 Winchester barrels. He started off with two, identical, match-grade HV taper stainless barrels. Both were NEW at the start of testing, and LCazador shot the same load through each: 95gr match bullets with 38 grains of Hodgdon Varget. After giving both barrels the same, gentle 20-round break-in, 300 rounds were then fired through each barrel — in very different ways. Barrel condition and wear were monitored with a borescope.
Barrel One — Slow Fire, Cool Down Periods, Cleaning Every 50 Rounds
At the end of the 300-round test, Barrel One looked brand new. There was none of the severe fire cracking found in Barrel Two. This barrel was shot no more than 10 times without a cool down and firing was done at a much slower pace. Cleaning for this barrel was done every 50 shots.
Barrel Two — Fast Firing, No Waiting, Cleaning Every 100 Rounds
The second barrel, which received hard use and minimal cleaning, was severely damaged with severe fire cracking at the leade and throat. As a result, the barrel had to be re-chambered. This barrel was shot 100 rounds at time without cleaning and was shot up to 20 times in succession without a cool down.
LESSON LEARNED — Heat Kills Barrel Life
Don’t let your barrel get too hot, and keep it clean. One afternoon can ruin a barrel!
Monitoring Barrel Wear with Borescope
Some folks worry too much about what their borescopes reveal — many barrels do not have to be “squeaky clean” to perform well. In fact some barrels run better after ten or more fouling shots. However, a borescope can be very helpful when your barrel starts losing accuracy for no apparent reason. Forum member FdShuster writes:
“A borescope is a positive way of backing up your suspicions when the rifle starts to throw an occasional (soon followed by more frequent) wild shot. Using the scope is also an excellent way to determine that the cause is barrel wear and not simply a need for a concentrated cleaning session to remove built up copper and more importantly, carbon fouling.
I’ve had a few barrels that gave every indication of being shot out. But I ‘scoped them out and found the cause to be nothing more than requiring a good cleaning. They then returned to their usual performance. There’s no guessing involved when you are able to get ‘up close and personal’ using the scope. The borescope also provides an excellent view of the all-important condition of the crown. My borescope is one of the most valuable investments I’ve ever made.”
There’s a talented new team getting ready for the 2017 King of 2 Miles (KO2M) Competition in Raton, NM next month. The team features ace F-Class shooters Ian Klemm and Dan Pohlabel. Here’s a build report from X-Treme Shooting Products, which supplied the impressive XTSP action and two-stage trigger.
Big Gun for King of 2 Miles Event at Raton
XTSP: “It’s exciting — we’re getting closer to the 2017 King of 2 Miles match next month. Here are a few pictures of one of the rifles we will be shooting. Owned and built by Dan Pohlabel, it’s a .338 Lapua Magnum Improved. It has a 40° shoulder and we plan on shooting .338 Caliber 300 grain Berger OTM projectiles at around 3,100 fps.”
“We started off with an XTSP .338 Magnum receiver, custom-built as a single shot with a solid bottom for stiffness. We built +60 MOA rails for each of the rifles. Of course we’re using the XTSP two-stage trigger! We added a 34″-long Bartlein gain-twist barrel which is 1.450″ at the shank tapering to 1.2″ at the muzzle. At the end we added Piercision Rifles’ 3/4 x 24 slabbed 5-Port ‘Muscle Brake’. The action is bedded in a McMillan Super Magnum stock. On top sits a Vortex Optics HD Razor in Vortex 35mm rings. We’ll have another rifle just like it shortly with the machine work by Dan Pohlabel again. That second rifle will be finished up and shot by Ian Klemm of Vortex Optics.”
Here’s a file photo of a .338 Lapua Magnum Improved, alongside a standard .338 Lapua Magnum. We’re not sure about the shoulder angle on this particular example. For the XTSP project, the angle is 40 degrees (40°). Photo Courtesy LongRangeHunting.com.
We have always liked Tikka actions, and now there is a great re-barreling option for Tikka T3 owners. Criterion Barrels Inc. (CBI), makers of “pre-fit” barrels for Savage, Remington, and Rem-clone actions, will soon be offering Tikka pre-fits. These pre-chambered barrels for Tikka T3 actions will be headspaced with a barrel nut, just like a Savage.
Click image for full-screen version
The new Tikka T3 pre-fit barrels will be sold through Solid Accuracy, a respected Texas-based outfit that sells high-end scopes, stocks, barrels and other rifle components. Criterion tells us: “The Solid Accuracy barrel nut and wrench design has been finalized, the prototype barrels tested and the barrel nuts are now going through production (with an expected ETA of 2-3 weeks). All orders for these pre-fits barrels are currently heading out to the shop floor for production. Orders placed this week can expect a conservative estimated lead time of 14-16 weeks.”
The accuracy has been impressive with Solid Accuracy’s test rifle, which features a Tikka T3 action mounted in a KRG X-Ray chassis. This prototype rifle is chambered in 6.5 Creedmoor. The group below was shot with a stout load of H4350 and Sierra 140 grain MatchKings seated .009″ in the lands.
The folks at Criterion are excited about the Tikka pre-fit project: “We’re looking forward to getting these barrels out the door and on to some custom rifle builds.” One of Criterion’s staffers was so impressed with the initial test results that he is building his own T3 project, with a Criterion pre-fit of course…


 Method Two: Apply Wipe-Out from Breech


 Monitoring Barrel Wear with Borescope


