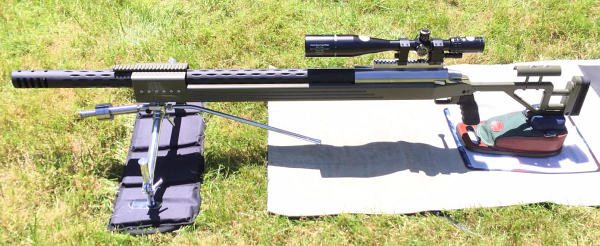
When evaluating firearm finishes, one should consider hardness, chemical resistance, lubricity, abrasion resistance, and color. However, none of these factors are as critical as corrosion protection. The average firearm owner deals with corrosion more than any other finish-related problem. Accordingly, when selecting an exterior finish for the metal components of your guns, you should look for a product with superior corrosion resistance. Thanks to Cerakote, we now have some science to help you make that decision….
How well do various firearm finishes resist corrosion?
Watch the video below to find out.
Eight Gun Finishes Tested — With Surprising Results
Eight (8) various finishes are tested, including Blueing, Cerakote, DuraCoat, FailZero, Ion Bond, KG Gun Kote, NiBX, and Phosphate (Parkerizing). Eight metal firearm components (each with a different finish) are placed into the salt chamber to see how long it takes for each finish to show initial signs of corrosion. To provide a baseline for comparison, a “naked” 416 stainless steel barrel was also placed inside the test chamber. The test was started, and for each coating, the time was recorded when corrosion started to appear. FYI, if you thought “stainless steel” can’t rust, think again. The stainless barrel sample (along with the blued metal sample) showed visible corrosion after just 24 hours!
After 24 Hours in Salt Chamber
After 48 Hours in Salt Chamber
After 172 Hours in Salt Chamber
Salt Chamber Testing — 5% Salt Concentration at 95°F
According to ASTM B117-03, the Corrosion Test provides a controlled corrosive environment which has been utilized to produce relative corrosion resistance information for specimens of metals and coated metals exposed in a given test chamber. The salt chamber is set to a temperature of 95 degrees Fahrenheit with a 5% salt concentration. Salt Chamber testing is used to draw a comparison between metals and finishes and does not correlate to a specific number of hours of real world use.
Story tip by EdLongrange. We welcome reader submissions.
With today’s plastic-framed Glocks and Keltecs, aesthetics have been sacrificed on the altar of functionality. Not so in the early 20th century — in that period, the best firearm designers created guns that looked as good as they worked. One example is the classic Colt Woodsman. This design came from the legendary John Moses Browning and was later refined by Colt before the pistol’s introduction in 1915. The Colt Woodsman’s frame design evolved over time in three distinct series: Series One 1915–1947, Series Two 1947–1955, and Series Three 1955–1977. Shown below is a stunning Carbonia-blued and engraved Third Series model with ivory grips.
Click Photo to View Larger Image Photo courtesy NRA Museum
Engraved Colt Woodsman from NRA Museum
In the NRA Museum’s Robert E. Petersen Gallery are many fine engraved arms. This Colt Woodsman .22 pistol is one of the Third Series guns that were made until 1977. Heavy barrels in either 4.5 or 6 inch lengths were offered in this variation. The Museum’s staff says: “We think the poised golden rattlesnake near the serial number is the [best] embellishment without putting down in any way the ivory grip panels or gold outline inlays.”
You can see this lovely Colt and countless other fine firearms at the NRA Museum in Fairfax, Virginia. The Museum is open every day from 9:30 am to 5:00 pm, and admission is free.
Now through April 20, 2015, the Museum hosts a Theodore Roosevelt exhibit: “The Trappings of an Icon”. This includes Roosevelt memorabilia on loan from Sagamore Hill National Historic Site.
Our friend Robert Whitley of ARX Enterprises LLC has learned, through careful measurement and testing, that some barrels threaded 5/8″ x 24 tpi at the muzzle may not deliver optimal accuracy. The reason is that the end of the barrel can bell out slightly, like a trombone, because too much steel has been removed. This is particularly true with .30-caliber barrels, but it can also be a problem with smaller caliber barrels (even 6mm). Robert demonstrates this phenomenon in the video below. All gunsmiths, and anyone considering threading a barrel, should watch the video. At 1:00 – 1:30 Robert gauges a 5/8″ x 24-threaded .30-Caliber barrel. You can see the belling effect clear as day.
“When setting up a commercial barrel in the lathe, we noticed that the maximum-sized bushing that would fit in the bore at the chamber end was almost .0015” smaller [than what would fit] at the muzzle. That precipitated my pin-gauging of a number of different commercial barrels that were threaded for 5/8” x 24 tpi. What I found is what’s shown on the video.” – R. Whitley
Solve Problem with a Larger Thread Diameter
If 5/8″ x 24 threading is potentially harmful to accuracy, is there a solution? Yes, you simply need to leave a little more steel on the barrel. (See Video starting at 02:40.) Frank Green of Bartlein barrels states: “We get these questions all the time. I say run the largest thread diameter that is possible.” Robert Whitley has found that a 3/4″ x 28 tpi threading does not cause the “belling effect”. Accordingly Robert recommends 3/4″ x 28 if you need to thread your barrel for a muzzle brake or suppressor. Robert explains: “We only make 3/4” x 28 tpi muzzle brakes and that’s what we recommend to customers.”
“See how much meatier the 3/4″ threading is vs. the 5/8″. The 3/4″ threading offers a lot more metal around the bore. There’s a lot less opportunity for the bore to become bell-mouthed…” – Robert Whitley
Barrel Threading Diameter — What’s Important to Know By Robert Whitley
In truth, the 5/8” x 24 tpi threading never came out of any accuracy-based think tank or set-up, it’s a military .30-Cal threading for barrels that someone has to carry around (they needed to keep the barrel weight down so it was smaller in diameter and the threading had to work with that situation). People have somehow assumed because the military uses that threading for certain things that it must mean that it’s also fine for a highly accurate rifle too, but that’s not really correct.
I don’t think there is any better and realistic option than the 3/4” muzzle threading, and we also do it so there is no relief cut behind the threads on the barrel (i.e. put the relief cut on the brake or jam nut, don’t chop down on the muzzle of the barrel). For some reason many have a hard time grasping that the metal at the muzzle end of a rifle is “sacred” and you should not cut it down any more than absolutely necessary. A little threaded pencil diameter nub on the end of a barrel is not ideal for accuracy especially if it’s threaded and you need to torque on it. I cringe when I see a barrel with something like an MTU or Heavy Varmint contour, only to have an itty-bitty pencil thin threaded nub right at the muzzle so someone can “screw on a can” or a muzzle brake.
Lessons Learned Over the Years
A number of years ago I did a 30BR rifle project with Craig Kostyshyn who was big in the 30BR game and he made some of the best 30BR rifle barrels for benchrest competition. When I did the project I wanted a medium-heavy Palma type contour barrel I could use and also have a muzzle turndown for a front sight band. When he found out I was going to have the muzzle turned down he said “whoa, I need to provide for that when I make the barrel because if you turn the front down later you’ll be shooting a trombone” (i.e. the muzzle bore dimension would open up).
What he did was rough contour the barrel with the turndown (about .010” oversize) before he lapped the barrel, then when he lapped the barrel he took it easy in the muzzle area and worked the back of the barrel more. I thought he was a little bit excessive in his concerns but the barrel shot great and I wasn’t going to argue with him, after all he was shooting groups in the ones. I kind of just filed that away and never thought about it until recently when I went to have Fred from Sabreco do some chamber re-work on a commercial .30-caliber barrel I had. When setting up the barrel in the lathe and indicating things Fred noticed that the maximum-sized bushing that would fit in the bore at the chamber end was almost .0015” smaller [than what would fit] at the muzzle and he mentioned it to me. That precipitated my pin- gauging of a number of different commercial barrels I had that were threaded for 5/8” x 24 tpi. What I found is what’s shown on the video.
NOTE: This is a copyrighted article. Do not reproduce or re-link more than 75 words without written permission from AccurateShooter.com.
Advancements in barrel technology in recent decades have been impressive. Today’s premium barrels deliver accuracy that could only have been dreamed-of decades ago. And now a new development promises to help barrel-makers craft the most uniform, consistent, and stable barrels ever.
What’s the new technology? You may be surprised. It’s not a surface treatment, or a cryogenic bath. The latest development in barrel manufacturing is Degaussing — the process of de-magnetizing metal objects. Degaussing is now used in many industries to uniform metallic products and to prevent unwanted interactions with magnetic fields. LEARN MORE.
Degaussing is the process of decreasing or eliminating a remnant magnetic field. It is named after the gauss, a unit of magnetism, which in turn was named after Carl Friedrich Gauss.
At the recent IWA show in Germany, Vallon GmbH, a German manufacturer of degaussing machines, told us that two major Wisconsin barrel-makers have purchased Vallon industrial degaussing units. The units sold to the American barrel-makers are similar to Vallon’s EMS unit show below. This can degauss (i.e. de-magnetize) 50 barrel blanks in one pass.
The Vallon degausser works by passing the barrel steel through a coil. Vallon explains: “The density of magnetic field lines is at its maximum in the coil centre, and is strongly decreasing towards the outside. If a ferromagnetic work piece (steel) is introduced into the coil, the field lines are concentrating and flooding the work piece. The conductivity of steel is up to 800 times higher than that of air. Degaussing is done during a continuous movement of the work piece, leading out of the coil. Decreasing field strength is achieved by a slow extraction from the coil.”
How Degaussing Improves Barrel Steel and Rifle Performance
So what does magnetism have to do with barrel performance? How can degaussing help make a barrel better? Vallon’s scientists tell us that degaussing has three major benefits. First, it aligns ferrous elements within the barrels, strengthening the steel at the molecular level from the inside out. Second, by reducing static surface charges, degaussing reduces chatter during drilling, which creates a straighter bore with a better surface finish. Lastly, there is evidence that degaussed barrels produce slightly more velocity. When a copper-clad bullet spins through a non-degaussed (magnetically-charged) barrel, this creates waste electrical energy. The energy expended reduces velocity very slightly. You can see this effect yourself if you spin a copper rod in the middle of a donut-shaped magnet. This creates an electrical charge.
Here a barrel is checked after degaussing with a Vallon EMS. The meter records a zero magnetic value, showing complete degaussing success.
Degaussing Will Add $50.00 to Barrel Cost
We know what you’re thinking: “All right, degaussing seems beneficial, but how much will this add to the cost of my new barrel?” Based on off-the-record conversations with two barrel-makers, we estimate that degaussing will add less than $50.00 to the cost of a new barrel blank. That’s a small price to pay for greater accuracy and barrel life.
Ask a Sailor — F-Class Champion and U.S. Navy Veteran Explains Degaussing
We asked reigning F-TR Champion James Crofts about barrel degaussing. A U.S. Navy veteran, he immediately understood the potential benefits of this process. “I served in nuclear submarines. Since before World War II, the U.S. Navy degaussed its subs and smaller warships. This had many benefits. Principally, it helped reduce the risk of triggering magnetic mines. But that wasn’t the only benefit — the degaussing process gave the steel greater resilience and longevity. And that’s why the Navy degaussed non-combat vessels as well. Will a degaussed barrel shoot better? Honestly I can’t say. But based on my Navy experience, I bet degaussed steel will be more uniform and will last longer. I’m glad somebody is trying this out on rifle barrels. Put me on the waiting list!”
The above photo show a U.S. nuclear submarine during a degaussing (also called “deperming”) session. This reduces the vessel’s electromagnetic signature, making it more stealthy. Deperming also adds to the vessel’s longevity. With steel-hulled ships, static electricity builds up as the hull slices through the water. A powerful, constant static charge will cause the steel to deteriorate. Degaussing (deperming) helps prevent this, extending the life of the hull.
Even wonder how a pump shotgun works? Then watch this fascinating video from MidwayUSA. The operation of a pump-action shotgun is illustrated with a special cut-away version of a Winchester Model 12. The shotgun has been modified to reveal the inner workings. This cut-away Model 12 still loads and ejects dummy shells, but you can see how the lugs, slides, locks, ramps, springs and other internal parts work. You’ll be amazed how complicated this old pump-gun is. (The Model 12, Winchester’s first hammerless shotgun, is one of the most popular scatterguns ever made. Over 2,000,000 were sold.)
Skip Ahead to 3:00 to See Cut-Away in Action
To see how the Model 12 works, you can skip forward to the 3:00 minute mark in the video. The first part of the video shows how the Model 12 was “sliced and diced” to expose the inner workings. Larry Potterfield of MidwayUSA explains that “the factories often used cut-aways as sales tools to show how a specific model operated”. In addition the U.S. Military used cut-aways for training purposes.
Here is the cut-away completed. Even the pump grip has been sliced to reveal the inner workings.
Here’s a close-up, showing how the bolt retracts to eject a round.
A round has been picked up from the feed tube, and then is lifted into the chamber.
In a corner of the Blaser booth at the IWA show in Germany was a very special rifle — Blaser R8 Serial Number 100,000. This one-of-a-kind Blaser is blinged to the max, befitting its milestone status as the 100,000th R8. “Designed without compromise” this rifle features mind-blowing wood, and elaborate engraving. It is highly decorated with images of the Argali, a type of big-horned sheep.
CLICK Photo to See Large, Full-Screen Image (More Detail)
What’s in a number? Blaser tell us: “In serial number 100,000… Nothing short of perfection would be acceptable from the masters of wood and steel. Two internationally recognized artists were selected, each working in their unique mediums. Painter Rudi Kohl has drafted, in his signature style, a painstaking depiction of Argali, the king of wild sheep, in their natural habitat. Engraver Jürgen Göser was then responsible for implementation of the drafts. The master engraver went about his task in his usual manner, meticulously and with absolute attention to detail.” Skeletonized octagonal pistol grip cap and steel butt plate, inlayed with ebony, were then added to complete the frame.
This R8 has some interesting hardware. The barrel is a fluted octagonal tube, the first of its kind on a Blaser R8. Front and rear sights were custom-machined from billet to blend with the silhouette of the rifle. Both receiver and bolt housing were shaped and polished by hand.
Story Tip from EdLongrange. We welcome reader submissions.
How’d you like to run AR-15 Mags in your Rem 700 bolt gun? Sound far-fetched? Well think again. Pacific Tool and Gauge has developed a unique bottom metal system for Rem 700 short actions that works with standard AR-15 mags, providing reliable function with .223 Rem (5.56x45mm) rounds. The AR-mag compatible Rem 700 Bottom Metal costs $129.00 by itself, or $149.00 with a C-Products 10-round magazine.
The system works with straight 5-round, 10-round, and 20-round metal mags as well as larger, angled 30-round metal mags. (Because they are thicker, Magpul mags and other polymer magazines do not work with this PT&G bottom metal system.)
At SHOT Show, Dave Kiff showed us the AR-Mag compatible bottom metal. “It took a lot of time to get the geometry just right, but we’re proud of this product”, Dave said. A PT&G exclusive, this special bottom metal as been designed to fit in all Remington 700 standard factory stocks right off the shelf with minimal inletting. This bottom metal features a handy mag release button incorporated into the side of the bottom metal (this is more reliable and secure than a mag release in the trigger guard).
Slight Modification Required During Installation
Customers purchasing this bottom metal will need to modify their Rem 700 actions very slightly, to create a little extra clearance. The Feed Bevel (left photo) needs to be opened to 0.660″, while the mag well needs to be opened to 0.900″.
Product tip from EdLongrange. We welcome reader submissions.
In the video below, Forum Member Thomas Haugland (from Norway) shows how to install a Picatinny-type rail on a Sako action. Every stage of the process is illustrated — removing the barrel from the action, drilling/tapping the action, aligning/attaching the rail, and finally mounting the scope and test-firing the rifle. Note that the action is removed using a large adjustable-end wrench with brass disks to protect the finish. This is possible because this particular Sako action has a flat bottom and top. With a different action you’ll want to use a custom action wrench.
In the video, Thomas and his assistant actually fabricate the rail from scratch. That’s probably beyond the ability of most do-it-yourselfers. You can purchase precisely machined Picatinnny rails from Seekins Precision and other sources instead. Still, it is interesting to see the milling of the rail. Note that, before screwing the rail to the top of the action, Thomas applies a marine epoxy (timeline 3:18). This effectively beds the rail to the top of the action and provides a more secure installation.
You can find more interesting gunsmithing, hunting, and long-range shooting videos on Thomas Haugland’s YouTube Channel.
Black Rifle Gone Bad…
Take a close look at this AR-15 bolt. Notice something missing — namely all the lugs? A healthy AR-15 bolt has seven (7) bearing lugs (plus an extractor hump). For all seven lugs to have sheared “clean off”, something serious must have happened to this bolt assembly. The folks at Brownells published this “lost luggage” image on Facebook to spur discussion. So, you AR experts out there — what do you think caused the problem here? Was it over-pressure, metal defect, headspace problem, gas system malfunction (or some combination of issues)? Post your theories in the comment section below…
With barrels, one always wonders “Can a little more length provide a meaningful velocity gain?” To help answer that question, Rifleshooter.com performed an interesting test, cutting the barrel of a .223 Rem rifle from 26″ all the way down to 16.5″. The cuts were made in one-inch intervals with a rotary saw. At each cut length, velocity was measured with a Magnetospeed chronograph. To make the test even more interesting, four different types of .223 Rem/5.56 ammo were chron’d at each barrel length.
Test Barrel Lost 25.34 FPS Per Inch (.223 Rem Chambering)
How much velocity do you think was lost, on average, for each 1″ reduction in barrel length? The answer may surprise you. The average speed loss of the four types of .223/5.56 ammo, with a 9.5″ shortening of barrel length, was 240.75 fps total (from start to finish). That works out to an average loss of 25.34 fps per inch. (See inch-by-inch data HERE.)
5.56/.223 Barrel Cut-Down Speed Test 26″ to 16.5″
Start FPS at 26″
End FPS at 16.5″
Total Loss
Average Loss Per Inch
UMC .223 55gr
3182*
2968
214
22.5 FPS
Federal M193 55gr
3431
3187
244
25.7 FPS
Win m855 62gr
3280
2992
288
30.3 FPS
Blk Hills .223 68gr
2849
2632
217
22.8 FPS
*There may have been an error. The 25″ velocity was higher at 3221 fps.
Rifleshooter.com observed: “Cutting the barrel from 26″ to 16.5″ resulted in a velocity reduction of 214 ft/sec with the UMC 223 55-grain cartridge, 244 ft/sec with the Federal M-193 cartridge, 288 ft/sec with the Winchester M855 cartridge and 217 ft/sec with the Back Hills 223 68-grain match cartridge.”
How the Test Was Done
The testers described their procedure as follows: “Ballistic data was gathered using a Magnetospeed barrel-mounted ballistic chronograph. At each barrel length, the rifle was fired from a front rest with rear bags, with five rounds of each type of ammunition. Average velocity and standard deviation were logged for each round. Once data was gathered for each cartridge at a given barrel length, the rifle was cleared and the bolt was removed. The barrel was cut off using a cold saw. The test protocol was repeated for the next length. Temperature was 45.7° F.”
Much Different Results with 6mmBR and a Longer Barrel
The results from Rifleshooter.com’s .223/5.56 test are quite different than the results we recorded some years ago with a barrel chambered for the 6mmBR cartridge. When we cut our 6mmBR barrel down from 33″ to 28″ we only lost about 8 FPS per inch. Obviously this is a different cartridge type, but also our 6mmBR barrel end length was longer than Rifleshooter.com’s .223 Rem start length. Velocity loss may be more extreme with shorter barrel lengths.