|
|
November 15th, 2013
Replace your scope with an iPhone? That is now possible with the Inteliscope. This new product provides a rigid mount for an iPhone that attaches to your firearm’s Picatinny rail. A special software App allows the Inteliscope to be zeroed, with a variety of user-selectable reticles. Simply tap a button on the iPhone screen to switch reticles. You can even record video of your shooting session. The Inteliscope system costs $99.00, which includes rail mount, iPhone holder, and iOS App.


This set-up offers some benefits for short-range plinking and tactical-style shooting with relatively large targets. It may be best for Paintball and Airsoft applications. The built-in Shot Timer is useful for action shooting events. However, we have concerns about the long-term durability of an iPhone when used on a centerfire rifle. In addition, this kind of set-up is cumbersome and not particularly weatherproof. Therefore it has questionable utility for a hunter in the field.
On the other hand, this device could be a superb training aid. The Inteliscope provides a large display that can be viewed from a relatively wide angle. This allows a trainer/instructer to see how the shooter is aiming the rifle. The iPhone’s video-capture capability lets the shooter record his practice session. The ability to “share the view” (with an instructor) and record video (for later analysis), makes the Inteliscope a very valuable training tool. We know that juniors will enjoy seeing their targets through a digital screen.
Watch Video to See How Inteliscope App Displays Reticle on Gun-Mounted iPhone


Is There an Optical/Digital System in Your Future?
We doubt that most of our readers will want to purchase an Inteliscope. Since magnification is limited to the zoom capability of the iPhone, and the lens is small and cheap, this device will never provide the sharpness, clarity, or resolution of a fine rifle-scope. However, we think the Inteliscope is important because it shows how a small lens, combined with a digital viewing screen, can completely replace iron sights or a conventional optical scope.
We think the Inteliscope is important as a precursor of future integrated optical + digital technologies. In truth, a combined optical/digital system may be more suited to benchresters than hunters. A small, high-magnification optic (not much bigger than a pill bottle) could be mounted to the scope rail of a benchrest rifle. Windage and elevation could be adjusted externally, or via software. Light would pass through the optic’s lens to a high-resolution sensor — the kind already used in quality digital cameras. Then the “view” from the lens could be passed to a digital screen (or iPhone) via a cord, or via a wireless blue-tooth or WIFI connection. The screen (or iPhone) could then be placed on the bench in a position most convenient for the shooter. The Inteliscope demonstrates how software can provide the aiming reticle. With the very best high-magnification competition scopes now approaching $3000.00, it is time to look at other solutions. By reducing the size of the lens system and outputting the “view” to an iPhone or similar device, the entire cost of the rifle-mounted optic could be much less than we are paying now for premium rifle-scopes.
November 15th, 2013
 Forum Member Okey developed a cool, low-budget, long-range target cam system that displays target views on a large, flat-screen TV. Initial testing shows the system works very well. The TV monitor is installed in a Shooting Shack that allows year-round shooting, even in cold weather. The big monitor allows shooters to easily see their groups from any shooting position in the shack. Forum Member Okey developed a cool, low-budget, long-range target cam system that displays target views on a large, flat-screen TV. Initial testing shows the system works very well. The TV monitor is installed in a Shooting Shack that allows year-round shooting, even in cold weather. The big monitor allows shooters to easily see their groups from any shooting position in the shack.
Okey tells us: “Here’s a system my buddy and I put together. He is the brains behind it. I had the charge card. This is a home-made wireless target cam for long range shooting. It runs off a motorcycle or car battery. It uses a plain old camcorder camera, and a 2.4 GHz wireless digital link. The goal was to design something that has at least a 1000-yard range with good battery life. The transmitter puts out less than a watt, and runs on 12 volts. The camera runs on 7 volts, so there’s an on-board voltage regulator. The system draws a little less than one amp, so battery life estimate is simply the amp-hour rating of the battery. Everything was done to permit fairly rough handling, but it’s obviously not bullet-proof. It will last until somebody puts a 6mm hole in it.”


Back at the shack, there’s a high-gain receiving antenna, the receiver, and a wall-mounted flat TV. Okey notes: “Since the transmitter is fairly low power, we needed lots of antenna gain. We cobbled the system together and tested it at 100 yards before the conversion to DC power. It had lots of headroom, and should perform well without adding any more antenna gain. The system has worked well at 600 yards, with a reliable signal and good image. Look below for the image of the targets at 600 yards. We had the image zoomed to eight sheets of paper and could still see the hits.”

Recommended Equipment Sources
The 700mW 2.4 GHz A/V transmitter and receiver were sourced from ProtectionDepot.com. Combo price for both transmitter and receiver was a reasonable $179.00 (NOTE: it is $159.99 ON SALE right now, November 2013). The 2.4 gHZ, 24 dBi antenna cost only $57.99 from L-Com.com.
 
November 14th, 2013
 Wouldn’t it be great if you could apply a durable, two-part, commercial-grade coating on gun parts, with the ease of “rattle can” spraying. Until recently, you had to have some pro-grade equipment to apply multi-stage coatings. Now that has changed thanks to a new “can-in-a-can” developed in Europe. DuraCoat® can now be applied, in your choice of nine colors, from a single, convenient rattle can. The secret is the new type of twin-chamber can construction. An inner chamber holds the DuraCoat hardener (catalyst), while an outer chamber contains the DuraCoat color coating liquid. Wouldn’t it be great if you could apply a durable, two-part, commercial-grade coating on gun parts, with the ease of “rattle can” spraying. Until recently, you had to have some pro-grade equipment to apply multi-stage coatings. Now that has changed thanks to a new “can-in-a-can” developed in Europe. DuraCoat® can now be applied, in your choice of nine colors, from a single, convenient rattle can. The secret is the new type of twin-chamber can construction. An inner chamber holds the DuraCoat hardener (catalyst), while an outer chamber contains the DuraCoat color coating liquid.
The “can-in-a-can” design keeps the two elements completely separate until you are ready to apply the coating. It’s really quite ingenious. Duracoat’s owner, Steve Lauer, found this innovative dual-chamber aerosol can design in Europe. We believe his company, Lauer Custom Weaponry is the first to introduce this spray can technology in the American gun coating market.

Video Shows How to Apply DuraCoat with New Twin-Chamber Aerosol Can
 DuraCoat is a two-part coating system. Once the DuraCoat is mixed with the hardener, a chemical reaction occurs. That is why the two fluids must be kept separated until it’s time to coat a project. When you’re ready, you mix the two products by pushing a plunger in the bottom of the can. This is done by attaching a red button to the bottom of the can. Push down on the can and you’ll here a “pop” that indicates the hardener can migrate into the main chamber. Shake the can for a couple minutes and you are good to go (provided the product to be coated has been prepped properly.) DuraCoat is a two-part coating system. Once the DuraCoat is mixed with the hardener, a chemical reaction occurs. That is why the two fluids must be kept separated until it’s time to coat a project. When you’re ready, you mix the two products by pushing a plunger in the bottom of the can. This is done by attaching a red button to the bottom of the can. Push down on the can and you’ll here a “pop” that indicates the hardener can migrate into the main chamber. Shake the can for a couple minutes and you are good to go (provided the product to be coated has been prepped properly.)

DuraCoat is Versatile
Duracoat can be used on carbon steel, stainless steel, aluminum, metal alloys, wood, plastic and many other surfaces. No baking or pre-heating is required. DuraCoat is not just a thin cosmetic layer like conventional paint. When properly applied, DuraCoat offers good abrasion resistance and very effective protection against corrosion. DuraCoat Aerosol is currently offered in nine (9) popular colors: Matte Black, Woodland Green, Parkerized Gray, OD Green, White, Combat Gray, Pink Lady, Magpul Flat Dark Earth, and Blackhawk Coyote Tan. View DuraCoat Color Chart.
November 13th, 2013
Steven Blair’s recent report on the .300 WSM for F-Class stirred quite a bit of interest. If you’re a serious F-Open competitor, you’ll definitely want to read that article, which covers the pros and cons of the .30-Cal WSM loaded with the ultra-high-BC 230gr Berger Hybrid bullets.
If you’re thinking about building a .300 WSM for F-Class, here’s a rig that can give you some design and hardware ideas. This eye-catching custom .300 WSM F-Open rig belongs to Forum member Keith T. (aka “KT”). With its striking “bumblebee” color scheme, it will certainly get noticed on the firing line.
Click Photos to see full-screen versions.
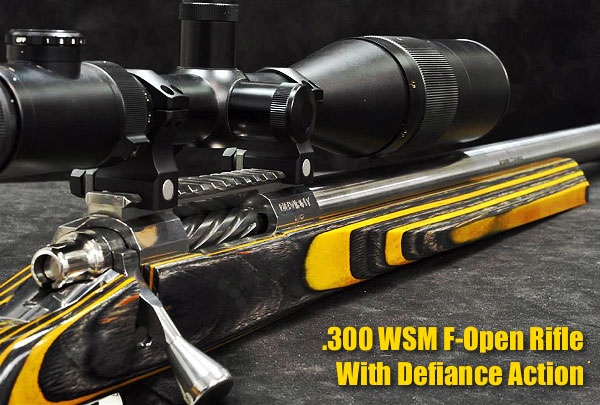
Bold Bumblebee .300 WSM for F-Class
Forum member Keith T. (aka “KT”) just got his hands on his new .300 WSM for F-Class and long-range competition. It’s a handsome brute, decked out in a “bumblebee” (yellow and black) laminated stock. Keith’s rifle features a Defiance Machine Deviant Long Magnum action (with Jewell trigger) in a Precision Rifle & Tool (PR&T) F-Class Lowboy stock. Keith has two 30″-long, 1:9″-twist barrels for the gun, one made by Brux Barrels, and the other by Bartlein. Both barrels have identical .300 WSM chambers cut with the same reamer. Keith will test both and then use the best-performing of the two in competition. Riding on top is a Nightforce 12-42x56mm Benchrest Model scope. All the work was done by Accurate Ordnance (AO), based in Winder, Georgia.
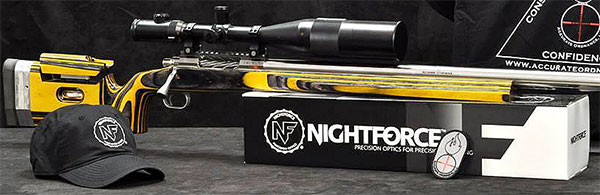
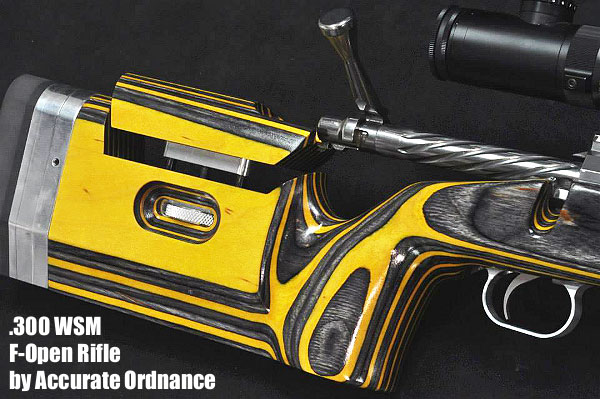
Keith reports: “This one took a while to get built due to parts availability issues, but I’m glad it’s done! Thanks to Accurate Ordnance and Nightforce and all their help.” NOTE: Accurate Ordnance tells us that a rifle like this can normally be completed in 6-8 weeks, once all key parts are in hand.
November 12th, 2013
 Hornady plans to start producing .50 BMG ‘Match Grade’ Cartridge Brass. MSRP is $131.99 for twenty (20) cases (Item #8772). Hornady claims the new brass will have very uniform case wall thickness, and very consistent case weight and internal capacity. Hornady has not stated when its .50 BMG brass will start shipping. When the Hornady .50 BMG brass (Item #8772) does hit the market, we expect it will be in high demand. Our friends at the Fifty Caliber Shooters Association (FCSA) tell us that it is “getting harder and harder to get your hands on good .50 Cal brass these days.” Hornady plans to start producing .50 BMG ‘Match Grade’ Cartridge Brass. MSRP is $131.99 for twenty (20) cases (Item #8772). Hornady claims the new brass will have very uniform case wall thickness, and very consistent case weight and internal capacity. Hornady has not stated when its .50 BMG brass will start shipping. When the Hornady .50 BMG brass (Item #8772) does hit the market, we expect it will be in high demand. Our friends at the Fifty Caliber Shooters Association (FCSA) tell us that it is “getting harder and harder to get your hands on good .50 Cal brass these days.”

Grafs.com lists the new Hornady .50 BMG brass in its catalog at $101.99 for 20 cases, but inventory (Item HRN8772) is not yet in stock. CLICK HERE to check for updates.
Product tip from EdLongrange. We welcome reader submissions.
November 9th, 2013
Could your next metal scope rings, trigger guard, or muzzle brake be crafted with a 3D printing process? It’s possible. In fact, a wide variety of metal parts (even a complete handgun) can be printed using the latest 3D Direct Metal Laser Sintering (DMLS) process. The way this works is as follows: powdered metal is heated by a laser, causing the metal particles to fuse and solidify. This is progressively repeated, in vertically-stacked layers, until the entire metal part is complete. It’s like building a metal layer cake with the shape/size of each thin layer defined by a precise laser beam. The laser is guided by computer-controlled servos following a CAD “blueprint”.
This video demonstrates how metal parts are 3D printed using the DMLS process. This technology is offered by Solid Concepts, a leading rapid prototyping and manufacturing services company.
The Solid Concepts 1911 — World’s First 3D-Printed Metal Firearm
Solid Concepts has manufactured the world’s first 3D-printed metal gun using a laser sintering process and powdered metals. The gun, a .45 acp 1911 clone, has already handled 50 rounds of successful live-fire testing. A 1911 design was chosen because the “blueprint” is public domain. The gun is composed of thirty-three, 17-4 Stainless Steel and Inconel 625 components, crafted through the DMLS process. Even the carbon fiber-filled hand grips are 3D printed, using a Selective Laser Sintered (SLS) process.

Except for the springs, all the parts of this 1911 handgun were printed using the metal laser sintering process. Yes even the highly-polished slide, the barrel, the frame, and the hammer were printed. There are no forgings, castings, or conventionally-machined parts. With the exception of springs, all 30+ components in this prototype pistol were printed using Direct Metal Laser Sintering (DMLS) technology. Watch the video for a glimpse into the future of gun-making:
World’s First 3D-Printed Metal Gun Test Firing
Solid Concepts believes that its fully-functional, 3D-printed 1911 handgun proves the viability of 3D printing for gun parts, even highly-stressed components. Kent Firestone, V.P. of Additive Manufacturing at Solid Concepts, states: “We’re proving this is possible, the technology is at a place now where we can manufacture a gun with 3D metal printing. And we’re doing this legally. In fact, as far as we know, we’re the only 3D printing service provider with a Federal Firearms License (FFL). Now, if a qualifying customer needs a unique gun part in five days, we can deliver.”

Will we see complete 3D-printed metal guns on the market soon? That’s unlikely. It’s still more economical to produce complete guns the old-fashioned way. However, we may see 3D printing used for rapid prototyping. In addition, 3D metal printing has advantages for hard-to-machine parts with complex geometries. Solid Concepts reports that its 3D printed metal has fewer porosity issues than an investment cast part and better complexities than a machined part. It will be interesting to see what unfolds in the years ahead.
November 9th, 2013
 The first edition of Modern Custom Guns hit bookstores 16 years ago. Next month Gun Digest will release the long-awaited Second Edition of Modern Custom Guns. This is a richly-illustrated, 8.2″x11″ hard-cover book, with approximately 200 color photos. Written by Tom Turpin and published by Gun Digest Books, this 208-page volume is now available for pre-order, with a December 11, 2013 release date. The first edition of Modern Custom Guns hit bookstores 16 years ago. Next month Gun Digest will release the long-awaited Second Edition of Modern Custom Guns. This is a richly-illustrated, 8.2″x11″ hard-cover book, with approximately 200 color photos. Written by Tom Turpin and published by Gun Digest Books, this 208-page volume is now available for pre-order, with a December 11, 2013 release date.
CLICK for FREE Preview of Modern Custom Guns
This 208-page Second Edition of Modern Custom Guns is not just a coffee-table book. In addition to the nice color photography, the book examines the processes and techniques used to craft ultra-high-end custom rifles. Author Turpin has interviewed many gifted rifle-makers and artisans who create showpiece rifles. Turpin explains how these craftsman work magic with wood and metal. Specific chapters are dedicated to: Stock-making, Metal-smithing, Actions, Barrels, Sights, Engraving/carving, and other topics. Chapter 10 spotlights two dozen master engravers, while Chapter 11 profiles 39 leading custom gun-builders. A helpful Appendix provides contact information for custom gun-makers and engravers.

About the Author – Tom Turpin has been a professional writer in the outdoor industry for over 40 years. He has written several hundred published articles, four books, and he is presently a contributing editor to the Gun Digest Annual.
In this new edition of Modern Custom Guns, Tom Turpin sought to showcase the exceptional craftsmanship found in high-end customs. Tom explains: “My preference runs to classic styling, and I follow the principle that if any one facet of a custom rifle immediately jumps out at you, it is surely overdone. Quiet elegance is best for me.”
November 2nd, 2013
 Many folks struggle when they sight-in a scoped rifle for the first time. A very common mistake is clicking the turrets in the wrong direction. That’s frustrating and it wastes ammo. Another common problem occurs when people sight-in at a distance other than 100 yards. People sometimes struggle to figure out how many clicks they need to correct point of impact if they’re zeroing at 200, 250, or 300 yards. Many folks struggle when they sight-in a scoped rifle for the first time. A very common mistake is clicking the turrets in the wrong direction. That’s frustrating and it wastes ammo. Another common problem occurs when people sight-in at a distance other than 100 yards. People sometimes struggle to figure out how many clicks they need to correct point of impact if they’re zeroing at 200, 250, or 300 yards.
To make the sight-in process more fool-proof, AccuScope has released two handy Apps for smart phone users. Whether used for initial sight-in or in-the-field adjustments, these smartphone Apps can get you zeroed quickly and reliably.

Using the Apps is easy. First, boresight the gun to get on paper. After the gun is fouled-in (so it is shooting normally) shoot a carefully aimed 3-shot group. Then go to the target and measure the vertical and horizontal distance from the 3-shot group center to your aiming point. Input those numbers into the App, along with your sight-in distance (from muzzle to target). The App then calculates exactly how many elevation and/or windage clicks you must crank into your scope to move point-of-impact to point of aim. Put in the specified clicks and then take a fourth shot to confirm your zero. The fourth shot should impact right on your point of aim (within the limits of the gun’s inherent accuracy.)
Given Murphy’s Law, a shooter can still mess things up if he inputs left clicks when the App calls for right clicks, or inputs down clicks when he needs up clicks. But as long as you look at the “R/L” and “Up/Down” labels on your turrets before spinning the knobs, you shouldn’t have any problems.
AccuScope is available in two versions, Standard and Premium. The $4.99 Standard version works for 1/4 MOA-click-value scopes. The $9.99 Premium version works with all scopes and any click values. The Premium version works with 1/8 MOA clicks, 1/4 MOA clicks, Metric clicks, or Milrad segment click values. So, if you have a scope with 1/8 MOA clicks, you’ll need the Premium version.
AccuScope iPhone Apps are available through Apple’s App Store: Standard | Premium
AccuScope Android Apps are available through the AppBrain Store: Standard and Premium
Editor’s Comment: Does this App really provide a solution you can’t figure out yourself with simple arithmetic? No, but some math-challenged guys may find that the App prevents errors. Additionally, following the step-by-step process used by the App will probably help some shooters avoid confusion, and avoid wasting ammo clicking in the wrong directions.
Note however, that there is an even simpler way to zero, if you have a very solid front and rear rest that will hold the gun absolutely steady while you click. After bore-sighting, fire a couple rounds (with the same point of aim). Then place the rifle so the center of the cross-hairs is exactly on your original point of aim. Next, without disturbing the gun in any way, dial your turrets so that the center of the cross-hair moves over the center of your group. That’s it. You’re now zeroed (though you may want to repeat the process for confirmation). Again, this only works if the gun doesn’t shift one bit when you’re clicking. Having a helper steady the gun as you click the turrets will make this “no-math” method work more effectively.
Click-to-Initial POI Zeroing Method Demonstrated
Product Tip by EdLongrange. We welcome reader submissions.
October 31st, 2013
 AR-platform rifles are fun to shoot, but .223 Rem centerfire ammo can get expensive if you put a lot of rounds downrange. Dedicated .22 LR uppers let you do live-fire training with more affordable rimfire ammo while retaining the weight, balance, and feel of your AR-platform rifle. You use your regular lower, so the ergonomics and grip feel the same. Likewise, the trigger group is the same, so you don’t need to adapt to a different trigger pull. With these .22 LR upper conversions you can shoot reactive targets at relatively close range, with less noise and recoil. (But remember that rimfire bullets can ricochet, so always shoot at a safe distance and always wear eye and ear protection). AR-platform rifles are fun to shoot, but .223 Rem centerfire ammo can get expensive if you put a lot of rounds downrange. Dedicated .22 LR uppers let you do live-fire training with more affordable rimfire ammo while retaining the weight, balance, and feel of your AR-platform rifle. You use your regular lower, so the ergonomics and grip feel the same. Likewise, the trigger group is the same, so you don’t need to adapt to a different trigger pull. With these .22 LR upper conversions you can shoot reactive targets at relatively close range, with less noise and recoil. (But remember that rimfire bullets can ricochet, so always shoot at a safe distance and always wear eye and ear protection).
Dedicated .22 LR Rimfire Uppers for AR-Platform Rifles
A number of companies offer dedicated .22 LR rimfire uppers that work with any standard AR15-platform lower. Brownells carries dedicated .22 LR AR uppers starting at $419.99. Brownells offers flat-top AR uppers, allowing you to easily mount the aiming system (iron sights or optics) of your choice. Brownells offers a 100% satisfaction guarantee on all products it sells, including .22 LR uppers.

AR-Style .22LR Rimfire Rifles (Complete Guns)
Another option is to purchase a complete AR-style rimfire rifle chambered for the .22 LR cartridge. This option may be more affordable than you think. Right now Impact Guns is selling the Smith & Wesson M&P 15-22 with 16″ barrel for just $509.99 (marked down from $649.99). It’s a nice little rifle. The M&P 15-22 is designed and built as a true .22 LR semi-auto from the ground up, with ergonomics (and most operating controls) identical to a centerfire M&P 15 rifle. Here’s the black and tan version:

H&K offers the HK 416 D145RS, a dedicated .22 LR rimfire rifle. Engineered and built in Germany by Carl Walther, the HK 416 D145RS features a match-grade precision barrel, metal upper and lower receivers, retractable stock, and machined rail interface system with on-rail iron sights. These HK rimfire rifles (which employ a blow-back action) are accurate and reliable. Current ‘street price’ is around $660.00. One purchaser writes: “Great .22. I have had this gun a couple of months and have put about 500 rounds of 5 different brands of ammo through it. Not one FTE. I have shot other brands that can’t get through one 30-round mag without a failure. [The 416] is a little pricey compared to the competition but you get what you pay for.”

October 24th, 2013
 The Applied Ballistics Kestrel 4500 Shooters’ Weather Meter has a new software upgrade available. You will find instructions for connecting and upgrading your Kestrel 4500 at this link: The Applied Ballistics Kestrel 4500 Shooters’ Weather Meter has a new software upgrade available. You will find instructions for connecting and upgrading your Kestrel 4500 at this link:
CLICK HERE for Applied Ballistics
Kestrel Software Upgrade.
Read Comments on Sniper’s Hide Forum
Also, there is a thread on the Snipers Hide Forum in which Applied Ballistics and Kestrel Pro Staff are responding to questions/issues related to use of the Applied Ballistics Kestrels.
Bryan Litz of Applied Ballistics LLC wants to express appreciation for Kestrel users who have posted input: “Thanks to the users who provided valuable feedback that was used to make the product better.”
|


