The 17th Edition of the Cartridges of the World was released in June, 2022, so it is still quite current. This massive 704-page reference contains illustrations and load data for over 1500 cartridge types. That makes it a unique, very valuable resource. If you shoot a wide variety of cartridges, or are a cartridge collector, this book is a “must-have” resource. The latest 17th Edition includes 30+ new cartridge types and 1500+ photos. The print version costs $26.69 at Amazon.com (with possible free shipping on orders over $35.00). Or you can get the print book from Amazon 3rd party sellers starting at $26.35 delivered. The Kindle eBook version costs $16.21.
CLICK HERE for a large FREE Content Sample from the Kindle eBook version.
On the page that loads, click on the “Read Sample” button.
Updated 17th Edition with Feature Articles
The 17th Edition of Cartridges of the World includes cartridge specs, plus tech articles on Cartridge identification, SAAMI guidelines, wildcatting, and new cartridge design trends. Cartridges of the World, the most complete cartridge reference guide in print, includes a full-color section with feature articles such Cartridges of the AR-15, Creedmoor Cartridge Family, .404 Jeffrey, .30 Carbine, plus “Cartridges and Cans” (suppressors).
View Free Book Sample Content
FREE STUFF for You: If you want to see what you are getting, there is a very large sample section of the 17th Edition available online with over 100 pages of content and dozens of photos and illustrations. To access all this FREE INFO, CLICK HERE, then click on the cover photo where it says “Look Inside” or “Read Sample”. It may take a few moments to fully load the sample pages.
NOTE: This is content from the 16th Edition, but most is the same in the 17th Edition.
Cartridges of the World 17th Ed. CHAPTERS:
Chapter 1: Current American Sporting Cartridges
Chapter 2: Obsolete American Rifle Cartridges
Chapter 3: Wildcat Cartridges
Chapter 4: Proprietary Cartridges
Chapter 5: Handgun Cartridges of the World
Chapter 6: Military Rifle Cartridges of the World
Chapter 7: British Sporting Rifle Cartridges
Chapter 8: European Sporting Rifle Cartridges
Chapter 9: American Rimfire Cartridges
Chapter 10: Shotgun Shells
Chapter 11: U.S. Military Ammunition
Chapter 12: Cartridge ID by Measurement
Can you form a wildcat cartridge such as the 6 Dasher without expending primer, powders, and bullets? Absolutely. Using the hydro-forming method you can form improved cases in your workshop with no firing whatsoever, so there is no wear on your precious barrel. Watch this video to see how it’s done:
6 Dasher Case Hydro-Forming Demonstration:
Forum member Wes J. (aka P1ZombieKiller) has produced a helpful video showing how to form Dasher cases use the Hornady Hydraulic forming die kit. This includes a two-part die (body and piston), and a special shell holder. To form the case, you insert a primer in your virgin brass, top the case off with with a fluid (water or alcohol), then run the case up into the Hydro-forming die. A few stout whacks with a hammer and your case is 95% formed.
This same procedure can be accomplished with a Whidden Gunworks 6mm Dasher hydraulic form die. We like the Whidden hydro-forming die for its production quality and consistent results. This Whidden system works great according to our Forum members.
Hydro-Forming Procedure Step-by-Step:
1. Insert spent primer in new 6mmBR brass case.
2. Fill with water or alcohol (Wes prefers alcohol).
3. Wipe excess fluid off case.
4. Place case in special Hornady shell-holder (no primer hole).
5. Run case up into Hydraulic forming die.
6. Smack top piston of forming die 3-4 times with rubber mallet or dead-blow hammer.
7. Inspect case, re-fill and repeat if necessary.
8. Drain alcohol (or water) into container.
9. Remove primer (and save for re-use).
10. Blow-dry formed case. Inspect and measure formed case.
Wes achieves very uniform cartridge OALs with this method. He measured ten (10) hydro-formed 6 Dasher cases and got these results: two @ 1.536″; 2 @ 1.537″; and 6 @ 1.538″.
Three or Four Whacks Produces a 95%-Formed Case
With a Whidden or Hornady hydro-forming die, hydraulic pressure does the job of blowing out the shoulders of your improved case. The process is relatively simple. Place a spent primer in the bottom of a new piece of brass. Fill the case with water, and then slip it into a special Hornady shell-holder with no hole in the middle. Then you run the case up into the forming die. Now comes the fun part. You gently insert a plunger (hydraulic ram) from the top, and give it three or four stiff whacks with a mallet (or better yet, a dead-blow hammer). Remove the plunger and you have a 95% formed case, ready to load.
Special Shell-Holder
Hornady supplies a shell holder made specifically for the hydro die; there’s no hole in the bottom of it. Just insert a spent primer into the primer pocket and you’re ready to go. The spent primer, combined with the solid shell holder, keeps the water from seeping out of the primer pocket. The primer pushes out a little bit during this process, but it’s impossible for it to come out because of the way the shell holder is designed. The shell holder has a grove which allows the case to slide out of the shell holder even when the primer protrudes a bit.
Sooner or later, every hand-loader will get a cartridge case stuck in a die. Perhaps you forgot to lube a case, or maybe you even ran the wrong cartridge into the die. Thankfully, there are affordable solutions to the problem. Lyman offers a very handy Stuck Case Remover Kit. This compact Kit ($29.99 on Amazon) (#ad) contains ALL the tools you’ll need to remove most stuck rifle cases and pistol cases. (No separate tap holder is required.) Basically you drill and tap the stuck case, insert a cap screw, then use the wrench to remove the case from the die through a camming action. The Lyman kit, part #7680350, includes a unique, dual-purpose threaded cap that screws over the end of the die. This cap acts as both a drill guide and a guide for the pulling screw. An extra-long hex wrench is included which provides plenty of leverage when removing stuck cases and also doubles as a handle for the tap wrench.
How Stuck Case Removers Work — RCBS Videos Show Process
The new Lyman Kit isn’t the first stuck case remover device on the market. RCBS also offers a Stuck Case Remover Kit that costs just $21.99 on Amazon.com (#ad). The RCBS unit works fine, but you will need a separate tool handle to hold the tap. This video shows how to remove stuck cases with the RCBS tool. The operation is similar with the new Lyman tool.
Product Tip from ELR Researcher. We welcome reader submissions.
Today is March 8, 2025, the eighth day of the third month — so it’s officially 3/08 today. That 3/08 date has inspired Creedmoor Sports to run a special on .308 Winchester dies for the next couple of days. You can save 10% on all .308 Win dies and die sets through 3/10/2015 at 11:59 pm CST. CLICK HERE to see the die deals.
Creedmoor Sports is running a good sale right now, with significant discounts on TriggerTech triggers, Sierra bullets, Real Avid tools, Anschutz shooting coats, Reloading dies and more. You can save up to $100 on TriggerTech triggers with this Creedmoor Sports Midweek Markdown Sale and save over $60 on Sierra Bullets (.22 Cal 90gr 500ct). One tip — to find the best bargains, when the landing page opens, look for the “Sort By” control, then choose “Relevance”.
Here are some of the best deals this week. If you need a trigger for your AR or bolt-action rifle, this is a great opportunity. See more discounted products on the Creedmoor Sports Bargain Bunker Page.
Midweek Markdowns at Creedmoor Sports (Bargain Bunker)
As we wrap up the winter season there remains plenty of rain and snow in many areas of the country. With rain and snow comes increased moisture in the air, i.e. increased humidity. And that, in turn, can affect how your powders perform by altering their burn rates.
Most shooters realize that significant changes in temperature will alter how powders perform. That’s why you want to keep your loaded ammo out of the hot sun, and keep rounds out of a hot chamber until you’re ready to fire. But there are other factors to be considered — HUMIDITY for one. This article explains why and how humidity can affect powder burn rates and performance.
We’ve all heard the old adage: “Keep your powder dry”. Well, tests by Norma have demonstrated that even normal environmental differences in humidity can affect the way powders burn, at least over the long term. In the Norma Reloading Manual, Sven-Eric Johansson, head of ballistics at Nexplo/Bofors, presents a very important discussion of water vapor absorption by powder. Johansson demonstrates that the same powder will burn at different rates depending on water content.
Powders Leave the Factory with 0.5 to 1.0% Water Content
Johansson explains that, as manufactured, most powders contain 0.5 to 1% of water by weight. (The relative humidity is “equilibrated” at 40-50% during the manufacturing process to maintain this 0.5-1% moisture content). Importantly, Johansson notes that powder exposed to moist air for a long time will absorb water, causing it to burn at a slower rate. On the other hand, long-term storage in a very dry environment reduces powder moisture content, so the powder burns at a faster rate. In addition, Johansson found that single-base powders are MORE sensitive to relative humidity than are double-base powders (which contain nitroglycerine).
Tests Show Burn Rates Vary with Water Content
In his review of the Norma Manual, Fred Barker notes: “Johansson gives twelve (eye-opening) plots of the velocities and pressures obtained on firing several popular cartridges with dehydrated, normal and hydrated Norma powders (from #200 to MRP). He also gives results on loaded .30-06 and .38 Special cartridges stored for 663 to 683 days in relative humidities of 20% and 86%. So Johansson’s advice is to keep powders tightly capped in their factory containers, and to minimize their exposure to dry or humid air.”
Confirming Johansson’s findings that storage conditions can alter burn rates, Barker observes: “I have about 10 pounds of WWII 4831 powder that has been stored in dry (about 20% RH) Colorado air for more than 60 years. It now burns about like IMR 3031.”
What does this teach us? First, all powders start out with a small, but chemically important, amount of water content. Second, a powder’s water content can change over time, depending on where and how the powder is stored. Third, the water content of your powder DOES make a difference in how it burns, particularly for single-base powders. For example, over a period of time, a powder used (and then recapped) in the hot, dry Southwest will probably behave differently than the same powder used in the humid Southeast.
Reloaders are advised to keep these things in mind. If you want to maintain your powders’ “as manufactured” burn rate, it is wise to head Johannson’s recommendation to keep your powders tightly capped when you’re not actually dispensing charges and avoid exposing your powder to very dry or very humid conditions. The English-language Norma Reloading Manual (2d. Edition) is available from the Norma Brand Shop and ReloadingSolutions.com.
Real-World Example — “Dry” H4831sc Runs Hotter
Robert Whitley agrees that the burn rate of the powder varies with the humidity it absorbs. Robert writes: “I had an 8-lb. jug of H4831SC I kept in my detached garage (it can be humid there). 43.5-44.0 gr of this was superbly accurate with the 115 Bergers out of my 6mm Super X. I got tired of bringing it in and out of the garage to my house for reloading so I brought and kept the jug in my reloading room (a dehumidified room in my house) and after a few weeks I loaded up 43.5 gr, went to a match and it shot awful. I could not figure out what was going on until I put that load back over the chronograph and figured out it was going a good bit faster than before and the load was out of the “sweet spot” (42.5 – 43.0 gr was the max I could load and keep it accurate when it was stored in less humid air). I put the jug back in the garage for a few weeks and I now am back to loading 43.5 – 44.0 gr and it shoots great again. I have seen this with other powders too.”
If you have two jugs of the same powder, one kept in a room in your house and one somewhere else where it is drier or more humid, don’t expect the two jugs of the same lot of powder to chrono the same with the same charge weights unless and until they are both stored long enough in the same place to equalize again.
We’ve told fans of Hodgdon H4350 to give Alliant Reloder 16 (RL16) a try. In our tests, Reloder 16 has proven a very promising rival to H4350 for accuracy, low ES/SD, and temp stability.
Now you can get the advantages of Reloder 16 in a slower powder formulated for magnum cartridges — Reloder 26 (RL26). Alliant says RL26’s burn speed falls between that of Reloder® 22 and Reloder® 33. That means it’s slower than H4831 but faster than powders that would suit the .338 Lapua Magnum. Reloder 26 has a high bulk density that allows larger powder charges, and high velocities. RL26 also provides a consistent, controlled response to temperature changes.
We are hearing very good things about RL26 from friends and Forum members who are testing it with big calibers for Long Range applications. Accuracy is good and velocities are impressive. Alliant says RL26 “incorporates EI® technology to produce extremely high velocities in magnum cartridges”. In big magnums, shooters have reported gaining 100+ fps with RL26 compared to H1000 or Retumbo. And to our surprise some guys have even tried replacing H4350 with RL26 (in smaller cartridge types) and they have picked up meaningful velocities. We don’t think Alliant ever intended RL26 as a substitute for H4350, but if you’ve got the case capacity… it may be worth a try.
Alliant Reloder 26 Features
EI® technology delivers high velocities in magnum cartridges
Contains proprietary de-coppering additive
Controlled temperature stability
Excellent lot-to-lot consistency
Formulation contains no DNT or DBP
Made in Switzerland for Alliant Powder
Alliant’s Tech Expert Talks about Reloder 26
What are the characteristics of Reloder 26? That question was answered recently by Paul Furrier who works for ATK, the parent company of Alliant Powders. Posting in our Shooters’ Forum, Paul writes:
“Reloder 26 is produced in Switzerland by our extremely capable partner Nitrochemie. I have seen it stated that they [it is] made by Bofors, so that is incorrect. I have also noticed people are equating … Reloder 26 to Reloder 25. Reloder 26 is definitely slower burning than Reloder 25, so there shouldn’t be any confusion there either.”
Speed and More Speed with RL 26
Think of Reloder 26 as a high-velocity powder for big cartridges. Furrier explains: “Reloder 26 is produced with Nitrochemie’s latest generation EI® process technology. This is the same impregnation coating process used to produce Reloder 17, Reloder 33, and Reloder 50 for us, and it is fantastic. Reloder 26 [offers] great ballistic efficiency, high bulk density so you can get more of the slow powder into the case to harness the energy, and decent, predictable extreme temp response. Reloder 26 is not as flat at temps as the TZ or Australian materials, but it is very manageable, usually in the 0.5 fps/°F range (depending on the application). Just as important, the pressure increases at hot are very manageable. We are using quite a bit of this RL26 powder in our Federal factory ammo due to the fantastic ballistics and accuracy.” — Paul Furrier, ATK
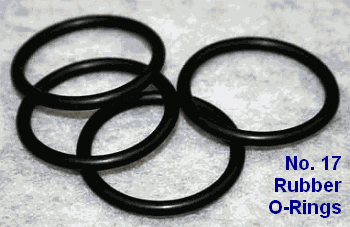
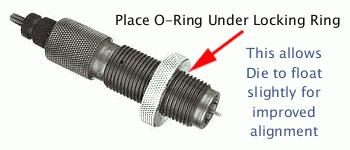
Here’s an inexpensive procedure that can help you load straighter ammo, with slightly better measured concentricity (i.e. less run-out) on the case necks and bullets. Simply use a Rubber O-Ring on the underside of the die locking ring. This allows the die to self-align itself (slightly) to the case that is being sized. Without the O-Ring, if the flat surface on the top of your press is not perfectly square with the thread axis, your die can end up slightly off-angle. This happens when the bottom of the locking ring butts up tight against the top of the press. The O-Ring allows the die to float slightly, and that may, in turn, reduce the amount of run-out induced during case sizing.
Top prone shooter GSArizona, who sadly passed in 2022, tried this trick and said it works: “Go to your local hardware store and get a #17 O-Ring (that’s the designation at Ace Hardware, don’t know if its universal). Slip the O-Ring on the die and re-adjust the lock ring so that the O-Ring is slightly compressed when the die is at the correct height. Size and measure a few more cases. You will probably see a slight improvement in neck concentricity as the die can now float a bit as the case enters and leaves it. This isn’t going to be a dramatic improvement, but it’s a positive one.”
We want to stress that adding O-Rings to sizing dies may help some reloaders, but we don’t offer this as a panacea. Try it — if using the O-Ring reduces measured runout that’s great. If it doesn’t, you’ve only spent a few pennies to experiment.
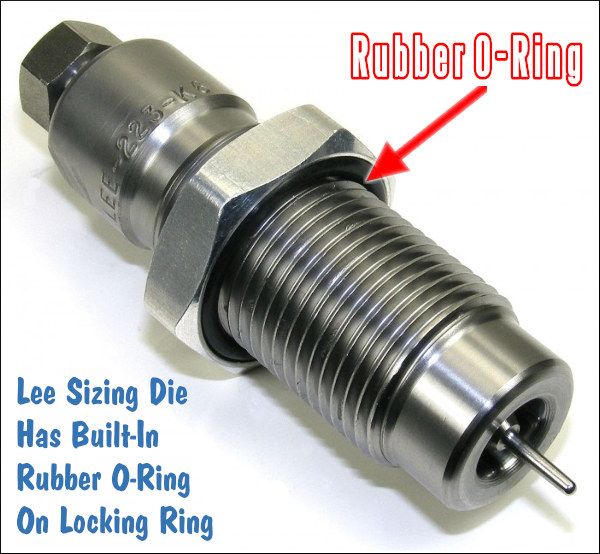
Lee Precision makes die lock rings with built-in O-Rings. Lee’s distinctive lock ring design allows the same kind of self-alignment, which is good. However, Lee lock rings don’t clamp in place on the die threads, so they can move when you insert or remove the dies — and that can throw off your die setting slightly. By using an O-Ring under a conventional die lock ring (that can be locked in place), you get the advantages of the Lee design, without the risk of the lock ring moving.
Here are some really smart tips for hand-loaders compiled by Sierra Bullets. These suggestions were submitted by Sierra’s Facebook fans — and some are very valuable indeed. Some of these tips will help you load more accurate ammo. Other selections will help you stay SAFE — which should always be your #1 priority. For example, we concur with the advice to “Check and Double Check. Everything. Every Time”. Also definitely keep “One powder on the bench at a time” — that could be a life-saver. You may want to print these “words of wisdom” and place them on a wall in your loading room.
Reloading Safety Tips — Sound Advice
ALWAYS START LOW: “Just because a load manual says X grains of X powder with X bullet is max, your rifle could reach max pressure a grain or two before what the book says. Start low and work up.” — Walter Coats
BE SAFE and CAREFUL: “Check and double check. Everything. Every time. Only one type of powder on the bench at a time.” — Glen Lundgren
DON’T RUSH: “Be patient, don’t be in a hurry, have fun and find your rhythm. Just tell your family you’re putting yourself in ‘time-out’. They will understand.” — Erik Dyal
POWDER RULE #1: “One powder on the bench at one time, it might save your life.” — James A. Kimery
STAY FOCUSED: “Relaxed but concentrated attention. Have fun enjoying a great hobby and pastime but stay focused.” — Jim Caldwell
POLICE LOADING AREA: “Keep your reloading bench area clean and put items away ASAP.” — Eric J. Ford
BE PATIENT: “Focus, Focus, Focus — be patient — it AIN’T a race.” — William Stanley
RECORD YOUR LOADS: “Write down on a small card what you’re loading – bullet weight, powder weight, type of powder, and primer. And put it in the powder hopper. I am unloading .45 FMJ because I forgot what type powder was in the hopper.” — Michael Conniff
HAVE a PROCEDURE for INTERRUPTIONS: “If, for any reason, you have to leave the bench while in the process of dropping powder charges, turn the next case to be charged upside down in the loading block so you know where you left off.” — Bill Tinsley
LABEL EVERYTHING: “OCD is a good habit to have with your loading bench. CLEARLY label everything!” — Andy Pynckel
HAVE a GOAL: “Never start reloading or developing a load without a specific goal in mind. Second keep meticulous records.” — Peter Eick
RESEARCH THE JOB: “Read all you can about it before you start!” — Keith Shively
KEEP TRACK of the Brass: “I put all my primed brass upside down (primer up) and as I charge the casing, I (of course) flip it primer down.” — Mark Ewing
Powder Valley Outdoors is one of the most respected suppliers of reloading components — powder, primers, brass, and bullets. And Hodgdon sells some of the most popular powder types for numerous disciplines — F-Class, PRS/NRL, Short-Range Benchrest, High Power, Mid-Range and Long-Range Benchrest, Silhouette, ELR, Varmint shooting, Long-range hunting and more.
If you are looking for popular Hodgdon powders, head over to Powder Valley today. You’ll find a large selection of top-tier Hodgdon powders. In stock now are: H4895, Varget, H4350, CFE223, H1000, H380, H50BMG, H322, Benchmark and 20 other powder types. For most of the powders both 1-lb containers and 8-lb jugs are in stock currently.
Here is a sample of the popular Hodgdon Powders in stock today, 2/25/2025. Along with the six (6) types shown, there are nearly two dozen other Hodgdon powders in stock at Powder Valley Outdoors.


 Updated 17th Edition with Feature Articles


 Hydro-Forming Procedure Step-by-Step:
 Special Shell-Holder


 Tests Show Burn Rates Vary with Water Content