More and more shooters are “wet-tumbling” their brass (in liquid) with reusable polishing media, rather than using dry media in a vibratory tumbler. The “wet-cleaning” method works best with a rotary tumbler fitted with a water-tight, horizontal drum to hold your brass, cleaning solution, and stainless, pin-type media. The rotary tumbler of choice has been the Thumler’s Tumbler Model B Heavy-Duty. That is a great, sturdy machine, but now you have a more affordable option.
Frankford Arsenal offers “Platinum Series” rotary tumblers designed to clean cartridge brass with liquid and stainless media. The watertight, polymer drum rides on four rollers which rotate the drum around its horizontal axis. Two filters are provided so you can quickly separate your brass and media. A built-in timer allows you to set tumbling sessions up to three hours. There is a large, 7-liter unit and a smaller, 3.3-liter tumbler. Frankford Arsenal says the big version will clean up to 1000 cases of .223 Rem brass. That’s impressive capacity.
Rotary Tumbler Sources Online
The Frankford Arsenal Platinum Series rotary tumblers are sold by major retailers including Grafs.com, Midsouth, MidwayUSA, and Amazon. It’s wise to shop multiple vendors to find the best current pricing.
Amazon often has very competitive pricing on the Frankford Arsenal Rotary Tumblers, both the big, high-capacity 7-liter unit ($179.97) and the smaller 3.3-liter tumbler ($84.99).
How to Wet-Clean Your Brass in a Rotary Tumbler On our main Accurateshooter.com website, you’ll find a comprehensive review of the STM system for cleaning cartridge brass with stainless media. To clean brass with stainless media, start with five pounds of small stainless pins sold by StainlessTumblingMedia.com. Place these along with a gallon of water, a little liquid cleaner, and two pounds of cartridge brass in a rotary tumbler, and run the machine for one to four hours. After cleaning be sure to inspect all your primer holes. CLICK HERE for Brass Cleaning System Review.
Forum Member Tests STM System
Our reviewer, Forum member Jason Koplin, purchased the STM media and a new Thumler’s Tumbler. He then tested the STM cleaning procedure on his own brass, including some extremely dirty and tarnished “range pick-up” brass. Jason was thoroughly impressed with how well the STM process worked — as you can see from the “before and after” photos below. Brass which looked like it was ready for the scrap heap was restored to “like-new” appearance. The process works equally well on both rifle brass and pistol brass. Jason observed that one surprise benefit of the STM cleaning procedure is a big reduction in noise. Jason said the water-filled rotary tumbler was much quieter than his vibratory tumblers. One tip though — you should always inspect every cartridge carefully after wet-tumbling with stainless media. With large-flash-hole brass it is possible to have a pin stuck in a flash hole. This is rare, but it CAN happen.
Today we showcase five YouTube videos that explain basic reloading processes. This article primarily focuses on the .45 ACP cartridge because this a very good choice for hand-loaders getting started. The .45 ACP is one of the easier cartridges to reload, because it has a large case diameter and large primer pocket, and because it operates at relatively low pressures (compared to rifle rounds).
We recommend that new reloaders consider starting with the .45 ACP cartridge. There are many reasons why the .45 ACP is a good choice for those just getting started in hand-loading:
1. The case is fairly short but has a relatively large diameter (and minimal taper), so it is easy to see inside the case. That helps you quickly check powder levels.
2. Many good powders (for the .45 ACP) will fill the case over 60%, so you will have an obvious overflow if you double-charge by accident.
3. The .45 ACP round runs at relatively low pressures, but delivers excellent accuracy.
4. Good .45 ACP brass lasts a long time, is easy to size, and is good for many reloads.
5. Along with 1911s, there are fine .45 ACP revolvers that shoot the round with moon clips.
6. The vast majority of .45 ACP brass uses large pistol primers (although there ARE some small primer pocket varieties*). We find that large primers are easier to pick up and handle if you are using a single primer tool.
The .45 ACP (Automatic Colt Pistol) cartridge is a rimless straight-walled handgun cartridge originally developed in 1904 by John Moses Browning for use in his prototype Colt semi-automatic pistol. After successful military trials, it was adopted as the standard chambering for Colt’s M1911 pistol.
For reloading, there are many good powder choices. We recommend Vihtavuori N320. This is very accurate and burns cleaner than some otherwise good powders, such as Accurate (AA) No. 5 and Unique.
Basic Reloading for the .45 ACP Cartridge
This is the most-viewed .45 ACP reloading video on YouTube. It is directed primarily for the novice or prospective reloader. It covers the basic processes: case inspection, cleaning, trimming, sizing, priming, powder filling, bullet seating, and crimping. The video creator notes: “Trimming pistol/revolver brass is optional and usually not necessary. it was included because that is what I did when I first began reloading, before I found out that handgun brass does not stretch as much as bottleneck rifle brass.”
How To Reload .45 ACP Start to Finish on Progressive Press
This is a detailed 19-minute video that shows the reloading process start to finish, along with an bit of history on the .45 ACP cartridge. The video begins with case cleaning using a tumbler. The cartridges are loaded with Hodgdon CFE pistol powder, Federal primers, and 230gr plated bullet. Equipment used in the video are: Hornady LnL progressive press, Hornady Carbide die set and taper crimp die, RCBS 505 balance scale, and harbor freight wet tumbler. While we like the efficiency of a progressive press, we recommend that novice hand-loader begin with a single stage or turret press. We recommend a powder that fills the .45 ACP case pretty full. That reduces the risk of double-charging.
Safety First When Loading All Cartridges
Along with the first two instructional videos above, we include two important videos focused on reloading safety. In the first video, UltimateReloader’s Gavin Gear explains how to check your cartridge during the loading process to eliminate squib loads and other defects. In the second video, Starline Brass tech Hunter Pilant explains how to avoid double charges.
Load .45 ACP Safely — Avoid Squib Loads and Overcharges
You need to check the powder level of EVERY round you load. Do this visually BEFORE seating a bullet. (Or, with a progressive press, use a lock-out die that monitors powder levels). This is very important because a squib load (with little or no powder) can leave a bullet lodged in the barrel. A subsequent full, live round can cause a Kaboom with dire consequences.
Preventing Double Charges — Use a Case-filling Powder with .45 ACP
IMPORTANT TIP: Use a bulky powder that fills your case more than half way with a correct charge. “This will over-fill the case if it is double-charged, making it impossible to load. This is one safeguard that can keep you from making a big [mistake]” (Hunter Pilant, Starline). A bulky powder with high fill level will also be easier to see inside the case.
Good Powder Choices for the .45 ACP
We know that many of our readers own .45 ACP handguns and load for this extremely accurate “classic” cartridge. When selecting a powder for the .45 ACP, there are many good options. All the major powder manufacturers make propellants with appropriate density and burn rate characteristics for the .45 ACP. Popular choices include: AA #5 (Accurate Powder); Bullseye (Alliant); Clays, HP-38, and Titegroup (Hodgdon); VV N310 and N320 (Vihtavuori); and WW 231 and WST (Winchester). We’ve tried all those powders in a variety of .45 ACP handguns. When we consider all the factors that make for a good pistol powder, we think Vihtavuori N320 is one of the best available propellants for the .45 ACP.
Vihtavuori N320 is very accurate, it meters well, and it burns clean, with minimal smoke and flash. If you haven’t tried VV N320 yet, you should.
Pros and Cons of Different Powders for the .45 ACP
This Editor has personally tried out eight or more different powders for the .45 ACP. Bullseye works but it is very dirty (both smoke out the barrel and sooty powder fouling on case). Though it otherwise burns clean, Titegroup leaves a singular (and nasty) high-temp flame streak on your brass that is hard to remove. AA #5 is a good choice for progressive press newbies as you use more powder so a double charge will (usually) be obvious. I like AA #5 but N320 was more accurate. Clays burns clean but some powder measures struggle with flake powders like this. WW 231 offered excellent accuracy and metered well, but it kicked out sparks with little pieces of carbon that would hit me in the face.
The Progressive Option — Loading .45 ACP on the Dillon 550B
Once you have mastered the basics of reloading for the .45 ACP, if you require large quantities of ammo, you may want to consider getting a progressive press. Progressive presses can significantly increase your ammo output, but there are also important safety considerations. You need to be careful about powder levels and priming. In this video, Gavin Gear explains how to reload safely with a Dillon 550B progressive press. The equivalent current model is the Dillon 550C.
.45 ACP Ammunition Loading Guide — Nosler Data
If you “roll your own” .45 ACP cartridges, there are many good powder choices. Our favorites are Vihtavuori N320, AA No. 5, and Hodgdon TiteGroup, but there are many other good choices. You’ll find these three recommended powders (plus many others) in the .45 ACP Load Data Charts from Nosler. Shown below are the Nosler Guides for 185gr bullets and 230gr bullets. Right-click each image below to access/download printable PDF files.
Click for PDF File
Click for PDF File
* However, be aware that CCI and other companies are now manufacturing .45 ACP brass with SMALL PRIMER POCKETS. Whenever you get new brass, be sure so check ALL the cases for primer size, and segregate large and small in two groups. Attempting to push a large primer into a small primer hole can lead to jams, or worse, dangerous detonation. Be CAREFUL!
One side of this gauge is the “go” side which quickly tells you the depth of a primer pocket, whether any crimp is properly removed, and whether the primer pocket is loose. If it feels loose on the “go” side, use the other end of the tool, the “no go” side, to test to see if the primer pocket is too loose to hold a primer. If the no-go slides into the pocket, then you know to junk that brass.
Primer Pocket Growth and Useful Case Life
Repeated firings at stout pressures can cause primer pockets to grow in diameter. This can create an unsafe condition if your primers are not seating properly. Are your primer pockets “good to go”, or have they been pushed to the point of no return? Do you really know? Many guys try to gauge primer pocket tightness by “feel”, as they seat the primer. But that method isn’t precise. Now there’s a better way…
The folks at Ballistictools.com have created a handy set of precision-machined gauges that let you quickly and accurately check your primer pockets. These gauges (aka “gages”) are offered in two sizes — for large and small primer pockets. A two-piece set of both large and small gauges costs just $25.99. These gauges let you quickly measure the depth of a primer pocket, and check if the crimp has been removed properly. Most importantly, the gauge tells you if the primer pocket has opened up too much. One side of the gauge has an enlarged diameter plug. If that “No-Go” side fits in the primer pocket, you should ditch the case — it’s toast.
Precision ground from O-1 tool steel, The Ballistic Tools primer pocket gauges serve multiple functions. The inventor of these tools explains: “I created the prototype of this tool for my own use in brass processing. I needed a way to quickly and easily measure primer pockets that was reliable and did not require wasting a primer. This tool has been indispensable for me and I would never go back to the old method of uncertainty and guessing.”
Product tip from Boyd Allen. We welcome reader submissions.
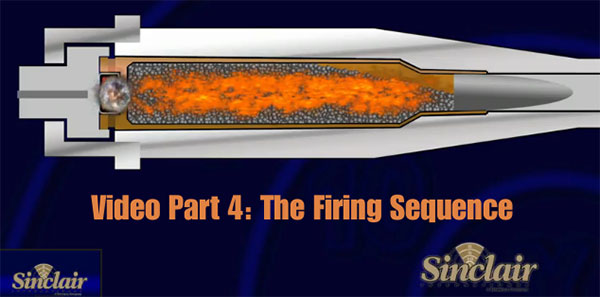
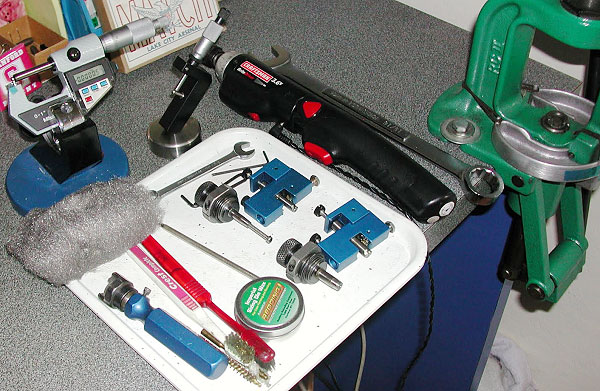
Sinclair International has created a series of instructional videos illustrating the basics of metallic cartridge reloading. The 8-Part series starts with reloading basics and provides step-by-step, how-to instructions that will help new reloaders get started. Detailed, animated illustrations show you what happens inside the chamber when shooting, and inside the dies during each step of reloading. The videos can be viewed on Sinclair International’s YouTube channel. Shown below is the first video in the series:
Each of the Sinclair videos is hosted by then Sinclair Int’l President Bill Gravatt (now with Creedmoor Sports). Bill doesn’t just show you “how”, he tells you “why”. The how-to segments cover case inspection, proper die set up, case sizing, primer installation, powder measuring, bullet seating, crimping, and even goes into the record keeping needed for the handloader. “We wanted to give shooters who haven’t reloaded a look at all the advantages of creating your own ammo and how easy it is to get started,” said Gravatt, “without telling them they had to have any certain brand or type of equipment to do the job.”
The Eight Video Topics Are:
Part 1 — Intro to Video Series
Part 2 — Intro to Reloading Safety
Part 3 — Metallic Cartridge Components
Part 4 — The Firing Sequence
Part 5 — Tools for Reloading
Part 6 — Loading Bottle-Neck Cartridges (2 videos)
Part 7 — Loading Straight Wall Cartridges
Part 8 — Reloading Series Conclusion
Reloading Tools
Shown below is Part 5 of the video series, covering the tools used for precision reloading.
We also strongly recommend the Part 4 Video to readers who are getting started in reloading. This “How Things Work” segment covers the sequence of events inside the chamber (and barrel) when the cartridge is fired. The video includes helpful graphics that show what happens to the primer, powder, cartridge, and bullet when the round is fired. The video also illustrates “headspace” and explains how this can change after firing. We think this video answers many common questions and will help reloaders understand the forces at work on their brass during the firing process.
I have seen it time and time again, shooters on the line wrestling with their rifle trying to get the bolt closed while the wind is switching. They were too focused trying to get their bolt to close and getting their rifle settled back on the bags that they missed the wind switch. Bang… Eight! The straw that broke the camel’s back for me was at the 2017 Canadian Nationals. I was paired up with a young girl and she would try really hard to close the bolt on her rifle. The majority of the time she would get it to close, but often times she could not even get the round to chamber. She was focused on her rifle the entire time rather than on the conditions. When we completed our strings, she had five rounds that did not chamber our of 15! That is way too many!. I told her she needed to think about Full-length sizing with 0.002″ shoulder bump, or Controlled Full-length Sizing like I call it. I told her not to worry about losing accuracy. I told her that I full-length size all my rounds and asked if she noticed how smooth my bolt was and noticed my score. She said yes, they were both great!
Controlled Full-length Sizing Does NOT Harm Accuracy
I have found that Controlled Full-length Sizing does NOT hurt accuracy or shorten brass life. I find that I can focus much more on the conditions when I don’t have to think about chambering a round nor extracting it. It has become second nature. After firing, I keep my head welded to the stock, I open the bolt by placing my thumb on top of stock and rotating hand upwards. I reach in and retrieve spent case, place it back in ammo box, and pick up another loaded round and put in chamber. I verify conditions and when ready, I push the bolt in and close it with my index and middle finger.
With Controlled Full-length Sizing you “bump” the shoulder around .002″ for bolt guns.* Image courtesy Sinclair International which carries a variety of Full-length dies.
Whidden Full-Length Sizing Dies by AccurateShooter.com Editor
For proper full-length sizing, you want a quality die that’s a very good match to your chamber. For our project rifles we usually turn to Whidden Gunworks which offers both bushing and non-bushing FL dies. And if you want the hot new option, check out Whidden’s patent-pending, click-adjustable FL-sizing die. This gives instant, precise control over shoulder bump. It works great.
*With gas guns, such as the AR10, you may want to increase shoulder bump to .003″ or more. With some benchrest cartridges, .0015″ bump may prove optimal. But .002″ is a good starting point.
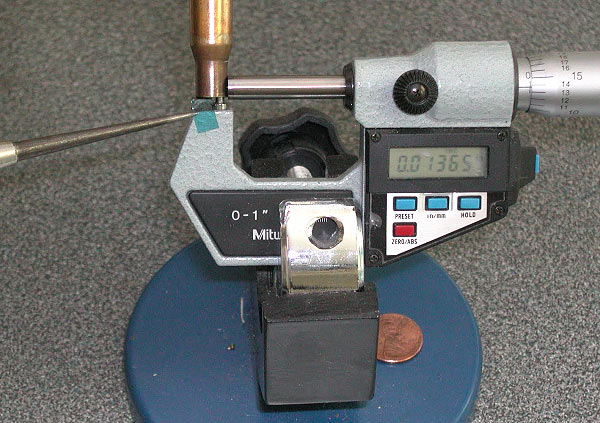
On our main AccurateShooter.com site, you’ll find a good article by GS Arizona on the Basics of Neck Turning. If you’re new to the neck-turning game, or are just looking for good tips on improving your neck-turning procedures, you should read that article. Below we offer some highlights and photos from the article, but you’ll need to read the whole story to view all the illustrations and follow all the procedures step by step.
Why Should You Consider Neck Turning?
Let’s assume that your rifle doesn’t have a tight neck chamber that requires neck turning; if you have a tight neck chamber, of course, the answer to the question is “because you have to”. For the rest of us, and that includes the vast majority of Highpower shooters, neck turning isn’t a requirement, but it can be a useful way to bring your ammunition a small but meaningful step closer to that pot of gold at the end of the rainbow: perfection. I’m not talking about a theoretical improvement, but a real one, an improvement that lies in equalizing and optimizing the neck tension of your loaded rounds. Inconsistent neck tension is a real contributor to increased muzzle velocity variance which itself is a significant factor in increased elevation dispersion at long range. So there’s our basic reason for neck turning: to equalize and optimize neck tension in order to reduce elevation dispersion.
The Tools of the Trade
Here you see everything I use and a bit more. The press, a cordless screwdriver (always plugged in, turning is tough on the old battery), a couple of K&M neck turners (one set up for 6mm, the other for .30 caliber) an expander for each size, some Imperial lube, an old toothbrush or two to keep the cutter clean, a handle with a caseholder (for those emergencies when the screwdriver dies and there’s just one more case to go!), steel wool and a tubing micrometer finish the list of tools. Hey, I left the dial calipers out of the picture! They’re always handy, keep them around, but they are useless for measuring neck thickness, so don’t try. I usually use an Optivisor magnifier while I turn necks, very handy for a clear view of what’s happening on the neck.
Expanding the Neck
Put some lube on the inside of the case neck and run it into the expander. Really, this isn’t hard. I prefer to expand each case immediately before turning it as opposed to expanding all the cases and then turning them. Brass is somewhat springy and will tend to go back toward its original size; therefore, by expanding and turning immediately, you are more likely to have all cases fit the mandrel with the same degree of tightness and to get a more consistent depth of cut.
Cutter Adjustment for Cut Depth and Length
All the tools I’ve seen have pretty good adjustment instructions. The only thing they don’t tell you is that you should have five to ten spare cases to get it right initially. Anything of the right diameter will do while you learn, for instance, just use that cheap surplus .308 brass to do initial setup and save the precious .30-06 for when you know what you’re doing. Be patient and make your adjustments slowly; you’ll need to set the cutter for thickness as well as length of cut (just into the shoulder). The depth of cut (brass thickness) takes a bit of fiddling, the length of the cut is generally easy to set.
The Finished Product — A Perfectly Uniform Neck
If you read the whole article, and follow the procedures using quality tools, you should get very good results — with a little practice. To demonstrate, here’s an example of my finished, neck-turned brass. You’ll see there is a perfect, 0.0125″ thick neck. It’s very uniform around the circumference, usually I only see 1 or 2 ten-thousandths variance. Now, with the necks uniformed like this, we can select the bushing size that will give us our preferred neck tension and experiment with various levels of tension, secure in the knowledge that all of the cases will actually have the desired neck tension.
About the author — “GS Arizona” was the writing handle for German Salazar, a top-tier rifleman and gun writer. Sadly, German passed from a medical condition in 2022. German was instrumental in helping this website and our Forum get started, and we remember him as a very dear, valued friend.
German was a great individual, and a great asset to the sport. An attorney by trade, with an engineering background, German was one of the very best gun writers, who had high master shooting skills to match his writing abilities.
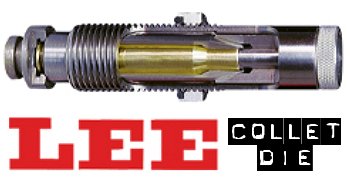
For those who prefer to neck-size their brass (rather than full-length-size), the LEE Collet Die is a popular, inexpensive option. It works by having collet tangs or “fingers” press the neck against a central mandrel. The benefit is that you get a very straight neck, which is sized consistently from top to bottom. Canadian shooter Jerry Teo explains: “LEE Collet Dies produce sized cases with very low runout (measured runout is under .001″ using a Sinclair concentricity gauge). You also don’t get the build-up of brass at the base of the neck, as can happen with bushing neck dies. The neck-shoulder junction stays nice and crisp.”
NOTE: For most handloading, we recommend FULL-LENGTH sizing of cases. You should always have a good Full-length sizing die for your brass. But there are some situations where neck-sizing may be useful. This article explains how to neck-size effectively with a LEE Collet Die.
Here’s a good video that explains how to use a Lee Collet Die to Neck-Size .243 Win brass:
TIP ONE — Adjusting Tension
LEE Collet dies don’t have a specific mechanical adjustment for neck tension. But you CAN easily modify the die to provide more or less tension. If you want to adjust the neck tension using a Lee Collet die, you can simply chuck the mandrel in a drill and reduce the diameter with some sand-paper (to increase neck tension) or you can order a mandrel the next caliber larger and turn it to whatever diameter you want (the larger the mandrel diameter, the less the neck tension). You can also order custom mandrels from Lee sized to any diameter you want.
Regarding neck tension, Boyd Allen makes an important point: “The only way to properly get more neck tension with collet dies is to either reduce the diameter of the mandrel, or order a smaller-diameter mandrel from Lee. I remind folks that adjusting the die position to have more toggle at the top of the ram stroke (not the factory recommended method), or leaning on the press handle with more force than recommended will NOT increase neck tension.”
TIP TWO — Polish and Tune for Easy Case Removal
Some users have complained that their Collet Dies grab the case-neck too firmly, making the case hard to remove. There are solutions to this problem. First inspect the collet fingers and smooth the inner surface up a bit with polishing compound or an extra-fine sanding pad. Second, you can open up the fingers a little bit. LEE recommends that if your Collet Die is sticking, take a steel punch and tap the fingers apart a little bit so that the natural “unloaded” position is wider. Lastly, you should lightly lubricate the outside of the collet fingers (see arrows) before you re-assemble the die. This will ensure they slide smoothly. Also, to prevent the collet fingers from closing too tight, never load up the die with your press without putting a case in place first. Without a case neck between the collet fingers and the mandrel, the collet can clamp itself too tight as you raise the ram.
TIP THREE — Always Have a Case Inside When Operating Collet Die
Our friend Boyd Allen tells us that you need to follow directions and NEVER operate the die without a case inside. Boyd explains: “This is because doing so will spring the quadrants of the collet inward so that they interfere with the insertion of a case, and the user will have to figure out how to undo the damage if the die is to operate properly. This advice would not be needed if everyone read the instructions before using the die…. but many times, they don’t. Another thing that I tell new users is to take the die apart so that they will have a better chance of understanding how it works.”
TIP FOUR — Size Twice and Spin Your Case 1/8th Turn
After reaching fully “down” on your press handle, withdraw the case about an inch and manually rotate it about 1/8th (NOT 1/4 or 1/2) turn while still in the shell-holder, then size again. This will place the die’s collet petals on the four “high spots” of the case neck and will result in a rounder, more evenly-sized neck with slightly more bullet tension. This takes only about one second more per case and is well worth the slight extra effort. (We thank reader Stonecreek for this smart tip).
Get CUSTOM Lee Collet Dies for Your Brass
Yes LEE does make custom collet neck-sizing dies! LEE Precision currently offers Custom Collet Neck-Sizing Dies, made from two of your fired cases. LEE offers custom standard-thread (7/8×14) collet dies for $100.00 (plus S/H) and custom large-thread (1¼x12) collet dies for $160.00 (plus S/H). This is a good option if you run wildcats or have unusual chamber dimensions. CLICK HERE to ORDER.
A while back, we featured a portable reloading bench built on a Black & Decker Workmate. That proved a VERY popular do-it-yourself project so we’re showing it again, in case you missed it the first time.
Texan Robert Lewis made himself a great portable reloading bench from plywood mounted to a Black & Decker Workmate. The bench, roughly 22″ x 19″ on top, folds up to fit easily in your car’s trunk or behind the seats in a pick-up truck cab. Four recessed bolts hold the wood top section to the collapsible B&D Workmate. The sides and back of the unit are attached to the base with small nails. There is a small shelf (also nailed in place) which can be used to clamp a powder measure or hold a scale. Shown in the photo is a Harrell’s Benchrest measure and Harrell’s single-stage “C” press.
Originally, the whole unit could be built for about $65.00 with pine, or $80.00 with oak (as shown). Robert explained: “The Workmate was $40. If someone bought a 2’x4′ sheet of 3/4″ oak plywood, I think it is around $30. Using pine plywood would be about half that. Fasteners were $3. Spar Urethane would be $5.” [Editor: We have seen major inflation — the Workmate is now $90+ and you’ll be spending more for the wood, so figure the whole project might be $150.00.]
Robert told us: “I used a couple ideas I found on the web. The Larry Willis website gave me the idea to use the Black and Decker Workmate as a base. I found the Workmate on sale for $40 and the top is made from oak plywood I had in my shop. I sealed the wood with three coats of Spar Urethane. The whole thing folds into a nice package for transportation to and from the range.”
NOTE: Since we first ran this story, the price of a Black & Decker Workmate WM225 has increased substantially. But good news — Amazon is currently selling WM225-A Workmates for $77.78, a decent price, particularly for Prime members who get FREE shipping. And for the same $77.78 price at Home Depot, you can get the Workmate WM225 with Local Store Pickup or home delivery (in most states).
Do you use bushings to size your case-necks? Are you assuming that your bushings are actually round on the inside, with a hole that’s centered-up properly? Well you may be in for an unpleasant surprise, based on what our friend Jim de Kort recently discovered. Jim was concerned about the run-out on his brass. His cases went into his bushing-equipped FL die pretty straight, but came out of the die with up to .004″ run-out. “What gives?”, Jim wondered. “Could the problem be the bushings themselves?”
To answer that question, Jim decided to examine his bushings. Using an Accuracy One Wheel-drive concentricity gauge, Jim checked out some of his neck bushings. What he discovered may surprise you…
Neck Bushing Flaws Revealed
Trust no one… — Jim de Kort
Jim writes: “I measured the concentricity of my 6BR rounds today. I noticed they went into the neck-bushing equipped full-length sizing die with less than .001″ deviation but came out with .003-.004″. The culprit, it appears, was the bushing itself. Without it the cases stayed within .0005″ to .001″ deviation, so something was happening with the bushing.
One bushing had .00025″ deviation on the outside, yet almost .003″ on the inside, so it is crooked. But even when using a bushing that is within .001″ I still get .003″ runout after sizing. I repeated the same procedure for my 6×47 and got the same results. When using the bushing, concentricity suffers a lot.”
Before we bash the bushing-makers, we must acknowledge that many different things can contribute to excessive run-out and/or mis-alignment of case-necks. We don’t have all the answers here, and Jim would be the first to say that some mysteries remain. Still, these are interesting results that give all precision hand-loaders something to think about.
Jim Borden of Borden Accuracy also offers this tip: “Check the trueness of the face of the die cap. That has more to do with trueness than the bushing. Also check perpendicularity of hole in bushing to top surface. When I was making dies, the cap was made by threading and facing the threaded tenon in same setup.”
Editor’s Comment: Many people have great results with neck-bushing dies, but Jim isn’t the only fellow who has seen some very odd results. I personally employ honed, non-bushing dies for many of my chamberings. These non-bushing dies (with the necks honed for .002-.003″ neck tension) produce extremely straight ammo, with run-out consistently under .0015″.
Reader Mike Etzel has come up with a simple, cost-effective way to apply moly or danzac coatings to your bullets. And you won’t need any expensive gear other than your regular vibratory tumbler and some small plastic containers.
Mike explains: “For a number of years I have been using a very convenient way of coating my projectiles with DANZAC in a tumbler. Instead of using a separate tumbler filled with DANZAC and stainless steel balls for coating applications, use small resealable plastic cake or pudding cups filled with stainless balls and DANZAC. Each cup will accommodate between 20 to 70 projectiles depending on caliber once the polishing balls and DANZAC are added. When I need to polish some cases, I insert the sealable plastic container(s) into the polishing material in the tumbler, add cases to the media, and in the process clean cases and coat the projectiles simultaneously in one tumbler. This does two operations in one session, saving on time and resources.”
While Mike uses DANZAC (Tungsten DiSulfide or WS2), you can use the same impact-tumbling-in-a-cup method to moly-coat your bullets, or to apply HBN (Hexagonal Boron Nitride).
TIPS for COATING your BULLETS, by “GS Arizona”
1. Start with Clean Bullets. This is simple enough, but some people overlook it and others overdo it. Get the bullets out of the box, wash them with warm water and dish soap and dry them. No need for harsh chemicals, after all, we’re only removing some surface dirt from shipping and maybe some left over lanolin from the forming process. Don’t handle them with bare hands once they’re clean, your skin oils will contaminate them.
2. Get Everything Hot — Real Hot. This is probably the single most important element in producing good-looking moly-coated bullets. I put the tumbler, the drum and the bullets out in the sun for at least 30 minutes before starting and then do all the tumbling in direct sunlight. On a summer day in Arizona, everything gets to the point that its uncomfortably hot to handle. If you are tumbling in the winter, you should heat the bullets in some form, a hair dryer can be useful, but they will cool off in the drum if you’re tumbling in cold temperatures. Your best bet is to plan ahead and do your coating in the summer. I coated about 3000 bullets in a couple of days recently to see me through our winter season (we’re a bit reversed from the rest of the country in terms of shooting season).


 On our main Accurateshooter.com website, you’ll find a comprehensive review of the STM system for cleaning cartridge brass with stainless media. To clean brass with stainless media, start with five pounds of small stainless pins sold by StainlessTumblingMedia.com. Place these along with a gallon of water, a little liquid cleaner, and two pounds of cartridge brass in a rotary tumbler, and run the machine for one to four hours. After cleaning be sure to inspect all your primer holes. CLICK HERE for Brass Cleaning System Review.


 Good Powder Choices for the .45 ACP

 The folks at


 TIP ONE — Adjusting Tension
 TIP TWO — Polish and Tune for Easy Case Removal
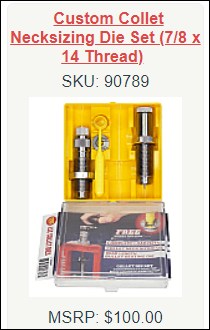
 A while back, we featured a portable reloading bench built on a Black & Decker Workmate. That proved a VERY popular do-it-yourself project so we’re showing it again, in case you missed it the first time.


 Reader Mike Etzel has come up with a simple, cost-effective way to apply moly or danzac coatings to your bullets. And you won’t need any expensive gear other than your regular vibratory tumbler and some small plastic containers.
 2. Get Everything Hot — Real Hot. This is probably the single most important element in producing good-looking moly-coated bullets. I put the tumbler, the drum and the bullets out in the sun for at least 30 minutes before starting and then do all the tumbling in direct sunlight. On a summer day in Arizona, everything gets to the point that its uncomfortably hot to handle. If you are tumbling in the winter, you should heat the bullets in some form, a hair dryer can be useful, but they will cool off in the drum if you’re tumbling in cold temperatures. Your best bet is to plan ahead and do your coating in the summer. I coated about 3000 bullets in a couple of days recently to see me through our winter season (we’re a bit reversed from the rest of the country in terms of shooting season).


