Shown is the Redding Model 15-P Competition Piloted Inside Chamfering Tool with pilot rod that centers in the case flash hole. Also shown is a Forster 45° Rocket Tool.
There are a wide variety of reloading tools designed to cut a slight chamfer in case necks and deburr the edge of the case mouth. You don’t need to spend a lot of money for an effective tool. A basic “rocket-style” 45° chamfering tool, such as the Forster, actually does a pretty good job taking the sharp edge off case mouths, particularly if you use a little scotch-pad (or steel wool) to smooth the edge of the cut. The Forster chamfer tool, shown below, is a nicely-made product, with sharper cutting blades than you’ll find on most other 45° chamferers. It costs $24.99 at Brownells.com.
Redding sells a handy piloted chamfering tool with a 15° inside cutting angle and removable accessory handle. This Redding Model 15-P chamferer works really well, so long as you have consistent case OALs. The pilot rod (which indexes in the flash hole) is adjustable for different cartridge types (from very short to very long). This ensures the concentricity of the inside neck chamfer to the case mouth. This quality tool works with cases from .22 to .45 Caliber, and retails for $36.99.
Sinclair International offers a 28° carbide chamferer with many handy features (and sharp blades). The $28.99 Sinclair Carbide VLD Case Mouth Chamfering Tool will chamfer cases from .14 through .45 caliber. This tool features a removable 28° carbide cutter mounted in the green plastic Sinclair handle. NOTE: A hex-shaft cutter head power adapter can be purchased separately for $19.99 (Sinclair item 749002690). This can be chucked in a power screwdriver or used with dedicated power drives when doing large volumes of cases.
Many folks feel they can get smoother bullet seating by using a tool that cuts at a steeper angle. We like the 22° cutter sold by Lyman. It has a comfortable handle, and costs just $12.99 at MidsouthShooterssupply.com. The Lyman tool is an excellent value, though we’ve seen examples that needed sharpening even when new. Blade-sharpening is easily done, however.
K&M makes a depth-adjustable, inside-neck chamferer (“Controlled Depth Tapered Reaper”) with ultra-sharp cutting flutes. The latest version, which costs $59.95 at KMShooting.com, features a central pin that indexes via the flash hole to keep the cutter centered. In addition, the tool has a newly-designed handle, improved depth-stop fingers, plus a new set-screw adjustment for precise cutter depth control. We caution, even with all the depth-control features, if you are not careful, it is easy to over-cut, slicing away too much brass and basically ruining your neck. We think that most reloaders will get better results using a more conventional chamfer tool, such as the Forster or Redding 15-P.
One last thing to note — tools like the K&M and the Sinclair chamferer are often described as VLD chamferers. That is really a misnomer, as bullets with long boat-tails actually seat easily with very minimal chamfering. In reality, these high-angle chamferers may be most valuable when preparing brass for flat-base bullets and bullets with pressure rings. Using a 22° or 28° chamferer can reduce the risk of cutting a jacket when using VLD bullets though — so long as you make a smooth cut.
For this Saturday-at-the-Movies session we offer a selection of videos featuring interesting tools and products for handloaders. If you spend much time in your reloading room, these tools can save you time and help you load better ammo in less time. Today’s feature products range from sophisticated, premium tools such as 21st Century powered neck-turning lathe, to basic add-ons such as Lee Breech Lock Bushings, which are very handy if you load a variety of cartridge types.
21st Century Powered Neck-Turning Lathe
Power is activated by the red button on the end of the blue, horizontal feed handle:
Do you neck-turn hundreds of cases annually? Then you deserve this outstanding tool. The 21st Century Innovation Powered Neck-Turning Lathe may well be quite simply the best system ever created for quickly and precisely uniforming (and reducing) the neckwall thickness of cartridge brass. We have the original manual 21st Century neck-turning lathe, and can attest that it works great. With this powered system you can turn necks faster and more efficiently, with less effort. This is like going from a stick shift to an automatic transmission. The cases feed very smoothly and the results are beautiful. Note: The videos show the version as first marketed by 21st Century Shooting, which now operates as 21st Century Innovation.
The Powered Neck-Turning lathe is a modular system. Swing the bar from right to left to feed the case. The power head (with case holder) glides on stainless steel rails for smooth movement. This allows very precise feed rate. Power is supplied via a button that is built into the end of the feed handle. Push the red button to make the case spin. It’s as simple as that.
Hornady OAL Tool and Hornady Bullet Comparator
Gun Tech Steve Ostrem explains how to properly use Hornady’s Overall Length Gauge to determine length-to-land precisely. The OAL Gauge uses a “Modified Case” that threads onto the tool and holds a bullet. Push on the back of the gauge until you feel the bullet just touch the rifling. (We do this gently at first, tapping the rod a couple time to ensure the bullet is aligned correctly). Once you’ve got the length, then use the tool with a comparator on your calipers to get the length-to-lands. NOTE: We recommend taking the measurement 3-4 times in a row to get a reliable number. With a little practice your should be able to get repeatable measurements within .0015″.
Henderson Power Case Trimming/Chamfering Machine Test
F-Class John tests some of the finest reloading and shooting equipment you can buy. Recently he added the impressive Henderson Gen 3 Powered Trimmer to his inventory of tools. John is now a Henderson fan. He likes the speed, precision, and repeatability of the $779.00 Henderson machine, which trims-to-length and chamfers the case mouth all in one pass. Unlike some other trimming tools, the Henderson indexes off the overall case length NOT the shoulder. John found this worked just fine for his .284 Winchester brass, which has all been full-length sized prior to trimming.
Watch the video to see the Henderson trimmer in action. The dual, parallel horizontal support shafts provide precise alignment of the case as it moves inward toward the cutter blade. The Taper-Lock cutter provides a 14-degree inside chamfer and 30-degree outside chamfer. The trimming process is very consistent case after case, and the Henderson’s design captures brass shavings effectively.
This related video shows a comparison with the popular Giraud Powder Trimer
As noted in this comparison, John liked the precision of the Henderson trimmer and the overall design of the machine, which offers good ergonomics and very precise alignment of the cases. Cycling is smooth and positive, as you can see from the videos. The Giraud is also an excellent machine for bulk trimming/chamfering but the Henderson has some advantages.
Concentricity Checking with Accuracy One Gauge
Every serious hand-loader needs a quality concentricity gauge. The Accuracy One Concentricity Gauge boasts a smart design that delivers precise, repeatable results. We like the unit’s easy adjustability and its ability to work in a variety of configurations. The Accuracy One Gauge measures internal and external neck runout of cartridge cases as well as seated bullet runout. It can also measure the runout of the ogive, bearing surface, and boat-tail of individual bullets. And it can even measure your primer pocket runout.
Tools Galore — Affordable Tools and Accessories for Reloaders
This detailed 15-minute video from the Bolt Action Reloading YouTube Channels, features a variety of lower-cost products/tool that help with key reloading tasks. The video looks at hand priming tools, case prep tools, Lyman stepped loading blocks, powder tricklers, expander mandrels, powder trickler, long-tube funnels and more! If you are getting started in hand-loading, this is a very helpful video to watch. It covers a lot of ground, illustrating options for tool types.
This Lyman case prep tool is one of many products reviewed in this 15-minute video.
Sinclair International has created a series of instructional videos illustrating the basics of metallic cartridge reloading. The 8-Part series starts with reloading basics and provides step-by-step, how-to instructions that will help new reloaders get started. Detailed, animated illustrations show you what happens inside the chamber when shooting, and inside the dies during each step of reloading. The videos can be viewed on Sinclair International’s YouTube channel. Shown below is the first video in the series:
Each of the Sinclair videos is hosted by then Sinclair Int’l President Bill Gravatt (now with Creedmoor Sports). Bill doesn’t just show you “how”, he tells you “why”. The how-to segments cover case inspection, proper die set up, case sizing, primer installation, powder measuring, bullet seating, crimping, and even goes into the record keeping needed for the handloader. “We wanted to give shooters who haven’t reloaded a look at all the advantages of creating your own ammo and how easy it is to get started,” said Gravatt, “without telling them they had to have any certain brand or type of equipment to do the job.”
The Eight Video Topics Are:
Part 1 — Intro to Video Series
Part 2 — Intro to Reloading Safety
Part 3 — Metallic Cartridge Components
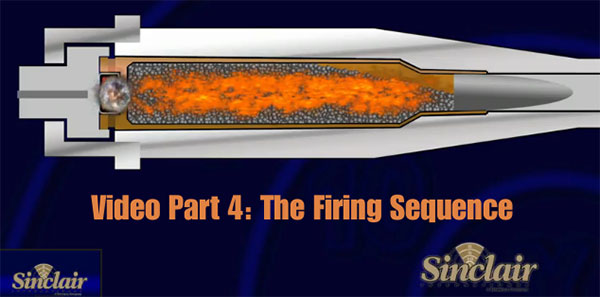
Part 4 — The Firing Sequence
Part 5 — Tools for Reloading
Part 6 — Loading Bottle-Neck Cartridges (2 videos)
Part 7 — Loading Straight Wall Cartridges
Part 8 — Reloading Series Conclusion
Reloading Tools
Shown below is Part 5 of the video series, covering the tools used for precision reloading.
We also strongly recommend the Part 4 Video to readers who are getting started in reloading. This “How Things Work” segment covers the sequence of events inside the chamber (and barrel) when the cartridge is fired. The video includes helpful graphics that show what happens to the primer, powder, cartridge, and bullet when the round is fired. The video also illustrates “headspace” and explains how this can change after firing. We think this video answers many common questions and will help reloaders understand the forces at work on their brass during the firing process.
More and more shooters are “wet-tumbling” their brass (in liquid) with reusable polishing media, rather than using dry media in a vibratory tumbler. The “wet-cleaning” method works best with a rotary tumbler fitted with a water-tight, horizontal drum to hold your brass, cleaning solution, and stainless, pin-type media. The rotary tumbler of choice has been the Thumler’s Tumbler Model B Heavy-Duty. That is a great, sturdy machine, but now you have a more affordable option.
Frankford Arsenal offers “Platinum Series” rotary tumblers designed to clean cartridge brass with liquid and stainless media. The watertight, polymer drum rides on four rollers which rotate the drum around its horizontal axis. Two filters are provided so you can quickly separate your brass and media. A built-in timer allows you to set tumbling sessions up to three hours. There is a large, 7-liter unit and a smaller, 3.3-liter tumbler. Frankford Arsenal says the big version will clean up to 1000 cases of .223 Rem brass. That’s impressive capacity.
Rotary Tumbler Sources Online
The Frankford Arsenal Platinum Series rotary tumblers are sold by major retailers including Grafs.com, Midsouth, and MidwayUSA. Shop multiple vendors to find the best current pricing.
Amazon often has very competitive pricing on the Frankford Arsenal Tumblers, both the 7-liter unit and the smaller, 3.3-liter tumbler.
How to Wet-Clean Your Brass in a Rotary Tumbler On our main Accurateshooter.com website, you’ll find a comprehensive review of the STM system for cleaning cartridge brass with stainless media. To clean brass with stainless media, start with five pounds of small stainless pins sold by StainlessTumblingMedia.com. Place these along with a gallon of water, a little liquid cleaner, and two pounds of cartridge brass in a rotary tumbler, and run the machine for one to four hours. After cleaning be sure to inspect all your primer holes. CLICK HERE for Brass Cleaning System Review.
Forum Member Tests STM System
Our reviewer, Forum member Jason Koplin, purchased the STM media and a new Thumler’s Tumbler. He then tested the STM cleaning procedure on his own brass, including some extremely dirty and tarnished “range pick-up” brass. Jason was thoroughly impressed with how well the STM process worked — as you can see from the “before and after” photos below. Brass which looked like it was ready for the scrap heap was restored to “like-new” appearance. The process works equally well on both rifle brass and pistol brass. Jason observed that one surprise benefit of the STM cleaning procedure is a big reduction in noise. Jason said the water-filled rotary tumbler was much quieter than his vibratory tumblers. One tip though — you should always inspect every cartridge carefully after wet-tumbling with stainless media. With large-flash-hole brass it is possible to have a pin stuck in a flash hole. This is rare, but it CAN happen.
Forum member F-Class John is an avid F-Class competitor and expert handloader. This week he won the NRA F-0pen Mid-Range National Championship. John reviews reloading hardware and shooting-related products for his popular F-Class John YouTube Channel, which now boasts 540+ videos. John also does product testing for AccurateShooter.com and his new FClassJohn.com website. On his YouTube channel, John has reviewed many of the latest and greatest reloading tools and accessories. Below are three interesting F-Class John tool and reloading product reviews.
If you like these informative videos, consider joining F-Class John’s Patreon Channel for live video meetings, more in-depth videos, and detailed explanations.
Here are three of John’s most interesting gear review videos for products that can benefit all serious handloaders.
21st Century Hydro Press and Standard Arbor Press
John notes: “You can’t really talk about precision reloading without taking about inline dies and arbor presses. For my money there’s nothing better than the lineup from 21st Century Shooting. They offer the Hydro Seater which is hands-down the best manual seater out there as well as their standard arbor press which is great for taking on the road to push back bullets as needed.”
Henderson and Giraud Power Trimmer Comparison Review
In this video John reviews two high-quality powered case trimmers that help handloaders rapidly process large volumes of brass. He says these are “arguably the two best trimmers on the market” and are “both worth the money if you do a lot of trimmming”. The Giraud Power Trimmer is rugged and popular with high-power shooters. The advanced, red Henderson Precision Gen 3 Trimmer offers some advantages for precision trimming and John likes the Henderson layout and ergonomics.
Concentricity Checking with Accuracy One Gauge
Every serious hand-loader needs a quality concentricity gauge. The Accuracy One Concentricity Gauge boasts a smart design that delivers precise, repeatable results. We like the unit’s easy adjustability and its ability to work in a variety of configurations. The Accuracy One Gauge measures internal and external neck runout of cartridge cases as well as seated bullet runout. It can also measure the runout of the ogive, bearing surface, and boat-tail of individual bullets. And it can even measure your primer pocket runout.
Whidden Gunworks makes great sizing and seating dies. The Whidden full-length sizing die with neck bushing is very popular because it allows you to “tune” the neck tension by using different bushings, with larger or smaller inside diameters. In this video, John Whidden explains how to choose a the right bushing size for use with your neck-sizing and full-length sizing bushing dies.
For most applications, John suggest starting with the caliper-measured outside diameter of a loaded cartridge (with your choice of bullet), and then SUBTRACT about three thousandths. For example, if your loaded round mics at .333, then you would want to start with a 0.330 neck bushing. John notes, however, that you may want to experiment with bushings, going down a thousandth and up a thousandth. With thin In addition, as your brass ages and the necks harden, you may want to change your bushing size.
Quick Tip: Try Flipping Your Bushings
You may also want to experiment with “flipping” your neck bushings to alternate the side that first contacts the neck of the case. (One side of the bushing is usually marked with the size, while the other side is unmarked.) So try “number side up” as well as “number side down”.
Some folks believe that one side of the bushing may allow a smoother entry, and that this can enhance concentricity. Other people think they can get very slightly more or less neck tension depending on how the bushing is oriented. This is a subtle effect, but it costs nothing to experiment.
If one bushing orientation proves better you can mark the “up” side with nail polish so that you can always orient the bushing optimally. NOTE: We have confirmed that some bushings are actually made with a slight taper. In addition, bushings may get distorted slightly when the brand name and size is stamped. Therefore there IS a reason to try both orientations.
Progressive reloading presses offer shooters speed and efficiency in producing custom-tailored rifle and pistol ammunition. However, there is a wide choice of Progressive Presses and a bewildering array of options to consider. In this video, the 6.5 Guys and UltimateReloader.com’s Gavin Gear provide an overview of the leading Progressive Presses on the market along with key considerations for precision rifle shooters. If you are considering getting a Progessive for rifle ammo reloading, you should watch this informative, 25-minute video.
10 Tips for Reloading Rifle Ammo on a Progressive Press:
1. Make sure the brass is very clean. Don’t mix old range pick-up brass with newer brass.
2. Apply a thin, spray lube to all cases before the sizing/loading cycle.
3. Consider priming your brass separately (with a hand or bench tool) before the operation. Then inspect the primers before loading powder and bullets.
4. Always wear eye protection when loading with the Progressive, particularly if you are priming cases.
5. With masking tape, mark the powder measure/dropper with the powder type and cartridge charge weight. Check the charge mass multiple times (see below).
6. Cycle a few cases, sizing and adding powder but NOT seating bullets. Weigh the powder charges to ensure the powder measure is dispensing the correct charge. Sometimes this will change a couple tenths as it “settles down” after the first few charges.
7. Check the brass for shoulder bump and bullet seating depth carefully for the first few rounds, then check again periodically.
8. Try to maintain a steady pace and operate the handle the same way every time.
9. Visually inspect the powder charge in each case (before bullet seating), and use a lock-out die if your Progressive Press has enough stations.
10. Never, ever mix pistol and rifle powders! If you have previously loaded pistol ammo with your Progressive, make sure ALL the powder (every flake and kernel) is removed from all parts of the powder-dropping system before you add rifle powder.
Visit these sites for more Reloading and Precision Shooting Videos:
This shocking Revolver Kaboom resulted from “user error”. Our friends at Midsouth Shooters provided this cautionary tale, noting that you must ALWAYS be careful when hand-loading any ammo. Check your loads and don’t have multiple powder containers in your reloading area.
“Ever wonder what happens when you don’t pay attention to detail? A word of advice from the reloader who brought this in — always double-check the load data.
Thankfully, the shooter was unharmed in the explosion. A live round we recovered from the remaining portions of the cylinder contained 12.8 grains of powder. The shooter had multiple powders on his bench and was unable to recall which one had been used while loading.” — Midsouth Shooters
How to Avoid Kabooms
1. Never have more than one powder container open on your reloading bench at the same time — when you are finished with a powder, seal the bottle and put it away.
2. If there is already powder sitting in your dispenser, and you’re not 100% sure what it is — throw it out. We suggest, whenever you fill a powder hopper, put a piece of paper in the powder hopper with the name of the powder and the date.
3. When loading a new cartridge or when using a new powder, get load data from more than one source. Always load conservatively to start!
4. Always double-check your Load Data before starting the loading process.
5. In short handgun cases, bullet seating depth can make a BIG difference in pressure levels. Be sure to check your Cartridge OAL.
Hardware Choices: Actions, Stocks, Barrels, Optics and More Tech Talk by Jeff Stover
This article was prepared by past IBS President Jeff Stover based on results from the 2019 IBS 100/200 Group Nationals held August 12-17, 2019 at the Holton Gun & Bow Club in western Michigan.
Let’s examine the Top Ten rifles from the IBS Group Nationals in the 10.5-lb Light Varmint Class. We’ll focus on the most popular rifle components — the choices for Actions, Stocks, Barrels, and Scopes.
Hall of Famer Jeff Gaidos taking aim at the 2018 IBS Group Nationals. He has a low-profile carbon-fiber stock with a Leupold fixed-power scope.
For some years now, BAT has been the predominant action. This year BAT actions held nearly 100% of the Top Ten places in all the Bag Gun equipment lists. Bruce Thom’s Idaho-crafted actions, except for a couple stray actions in Heavy Bench, swept the top rankings.
Next, look at barrels. Bartlein or Krieger seem to rule with upstate New York’s venerable Hart barrels as competitive. Shooters tend to go with winners, so Wayne Campbell and Jeff Peinhardt dominate as gunsmiths for the top benchrest shooters.
In stocks there seems to be variety, but there is some commonality. The Scoville and Scarbrough stocks, both Michigan-made, are laminated wood (balsa and other wood) with carbon fiber and wrapped in carbon fiber. The Scoville stock on my 10.5-lb rifle weighs 18 ounces but is full size with a nice long fore-end. Bob Scarbrough makes a very similar product. Both are winners — it’s a choice of Ferrari or Lamborghini. The Roy Hunter and Terry Leonard stocks among these top rifles take a different route to winner’s circle. Both are wood (cedar or other), but super high-tech as they are laminated with carbon fiber. They are beautiful to boot. High-magnification Leupold, March, and Nightforce scopes rule the roost among benchrest optics.
Bullets and Powder
Bullets are important. Really important. A hot bullet gives you “Teen Aggs” and lots of trophies. An average bullet does not. Most of these are 68 grain 6mm boattails. The Peinhardt (StaMoly Precision) bullet is well represented on this list, but some top shooters make their own as you can see. Bullet jackets are likely StaMoly or J4. For powder, nearly everyone shoots Vihtavouri N133 except a few guys running LT30/32 or surplus 8208.
Intro: Ron Dague wanted a new gun that was similar to his trusty .223 Rem rifle, but which fired 6mm bullets. There is a superb choice of bullets in this caliber, and Ron found that the 95gr Berger VLD could be driven to a healthy 2604 FPS by the small .223 Rem case. This 6mm wildcat based on the common .223 Remington offers excellent accuracy and very low recoil — something very important in the cross-the-course discipline. In addition, Ron’s 95gr load with Alliant Reloder 15 delivered an ES of just 4 fps over ten shots. That exceptionally low ES helps achieve minimal vertical dispersion at 600 yards.
I have watched a change in thinking for NRA High Power across the course in match rifles and calibers. There are several [popular chamberings]: 6mm AR, 6.5 Grendel, 6XC, and 6.5 Creedmoor. I have seen these rifles perform and all have done very well.
When I started this project I was looking for a cartridge that shoots and feeds well from a magazine[.] I had shot the .223 Rem in my 722 Remington and knew it had fed well so I chose the .223 Remington necked up to 6mm.
The 6mm-223 gives me what I have in the standard .223 only with a better selection of bullets. I wanted a better 600-yard bullet with a higher BC than provided by the 80 and 82 grain bullets. I also wanted a 600-yard line bullet with a .500 or better B.C. for those shots that should be 10 ring or better but seem to find the 9 ring no matter how well I held and broke the shot.
Putting the 6mm-233 Project Together
My project started with ordering a 6mm barrel from Bartlein with a 1-8″ twist. I called Pacific Tool and ordered the 6mm-223 reamer. I found a used Remington 700 action at a local gun shop and already had a Remington 40X stock. I then started putting the gun together.
I already had a .223 Remington match rifle, and I wanted the 6mm-223 to be as close to the same as I could make it. I installed the barreled action in a wood 40X stock to work up load data and work out any magazine feeding issues. While I was working on that, I looked for a McMillan Baker Special stock and finally found one to finish this project. I bedded the action and stock, then took the rifle to the range to check zeros on the sights and scope. I was surprised that I didn’t have to change anything on the sights. I thought changing the stock would cause sight changes. The thought went through my head, “Maybe the 40X stock isn’t all that bad”.
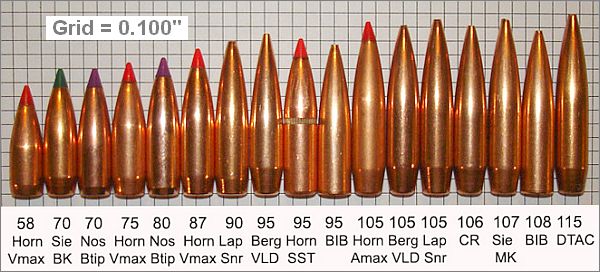
Here’s line-up of 6mm bullets. The Berger 95gr VLD is in the middle.
I took the new rifle to the first match of the year, a National Match Course match, and my off-hand score was 83, rapid sitting 95, rapid prone 95, and slow fire prone 197 — for total aggregate 470. This may not be my best work, but on match day the wind was blowing about 15 mph and the temp was around 40° F, with rain threatening. This was a reduced course of fire — we shot at 200 and 300 yards on reduced targets.
I used 70gr Berger bullets for this match, loaded in Remington brass with 25 grains of VihtaVuori N540 and Federal 205M primers. When I worked up loads for this rifle, N540 gave the best accuracy with the best extreme spread — 2,950 fps with an extreme spread of 20 fps on a 10-shot string. The load for 600 yards was with a 95gr Berger VLD bullet, with 23.0 grains of Reloder 15, Lapua cases, and the same Federal 205M primers. This load is 2,604 fps, with an extreme spread of 4 fps over a 10-shot string. I’ve shot this load at several 3×600 yard matches, and the accuracy has proven to be very good. At the last 3×600 match, my scores were as follows: 199-10x and 198-11X with scope, and 193-10X with iron sights. Best 600-yard score so far with iron sights was 198-12X.
6mm-223 Rem Rifle Specifications: 700 BDL action and floor plate, Bartlein 6mm 1:8″ twist, McMillan Baker Special stock in Desert Camo, Centra front and rear sights, Ken Farrell bases with stripper clip guide, Sinclair hand stop, and Jewell trigger. Gunsmith Neil Keller helped me with the metal work and instructed me on the action work and rebarreling.


 On our main


 Forum member F-Class John is an avid F-Class competitor and expert handloader. This week he won the NRA F-0pen Mid-Range National Championship. John reviews reloading hardware and shooting-related products for his popular
 Quick Tip: Try Flipping Your Bushings


 By Ron Dague, Sinclair Reloading Tech
 Putting the 6mm-233 Project Together