Today’s Saturday showcase features a variety of notable products. We start with the excellent new-generation Micron seating dies. These precision dies deliver very low run-out and very consistent base-to-ogive numbers. Next we highlight the superb Bix’n Andy triggers, both single-stage and 2-stage models. Then Ultimate Reloader reviews the Longshot Hawk Spotting scope camera. This is followed by a detailed video on the state-of-the-art, computer-controlled AMP Mark II DB annealer, an amazing product that can enhance accuracy while dramatically extending useful brass life. For ELR shooters and 50 BMG fans, we include a review of Forster’s Co-Ax XL press. And finally you’ll find a video showing Caldwell’s handy and affordable “Flash Bang” hit detector.
New Micron Seating Dies from Bullet Central
This F-Class John video covers the impressive Micron Precision Series eating dies, both the threaded version and the Arbor Press model. These are beautifully made with very precise seating depth adjustments. John starts by showing the full operation of the Micron Arbor Press Die. Then, at the 12:05 time-mark, John shows the Micron threaded die used in the impressive new Short Action Customs Nexus Press. John explains how to back off the dies to work towards your desired seating depth in stages. Use code MICRON15 at Bullet Central to save 15% on your Micron purchase.
Bix’n Andy Triggers — Single-Stage and 2-Stage
Bix’N Andy triggers are now widely used by top long-range, F-Class, and Palma competitors. These triggers are precise, easy to adjust and available for a wide range of actions. The availability of Bix’N Andy triggers is more important than ever before because Jewell triggers has halted production and it is now difficult to get spare parts for Jewell triggers. In this video, F-Class John shows the features of both single-stage Comp and 2-stage Comp triggers, with different trigger blades. At the 16-minute mark, John shows the triggers in use at the range on both benchrest and NRL22-style rimfire rifles. NOTE: For a limited time save $30 off order of $300 or more at BulletCentral.com with code FCJ30.
Longshot Hawk Spotting Scope Camera
The LongShot Hawk Spotting Scope Camera is a great accessory. Attached to the eyepiece of your spotting scope, it will send the “view” to a tablet or smartphone placed next to your rifle. With this system you can see the shot impact in normal firing position your cheek resting against the rifle. That is impractical with the cheaper phonescope systems attached to a spotting scopes. NOTE: Any device that you’ll use to connect to the HAWK (phone or tablet) will need to be Wi-Fi capable. The HAWK has built-in Wi-Fi and broadcasts an SSID to connect with your phone/tablet. It doesn’t need an internet connection to work — but it uses the wireless connection for streaming the video signal.
Annealing Made Perfect AMP Mark II DB
This detailed 9.7 minute review outlines the features of the latest AMP electronic annealing machine, the AMP Mark II DB. This uses a computer control to deliver precise annealing times and temperatures with a profile for your specific lot and brand of brass. One user praised this new AMP machine: “The touch screen is much more intuitive than the old one.” Another stated: “If you want to anneal the best way possible this is it. Does a torch work? Sure it does. The AMP does it far better and far more consistently.” A buyer confirmed this sophisticated new AMP is fast and efficient: “Just got one, a few days ago and it’s so easy to use. Without even trying, I easily anneal eight rounds per minute”.
Forster Co-Ax XL Press — Great Option for Very Large Cartridges
If you load very long cartridges, such as the .375 CheyTac, .416 Barrett, or 50 BMG, you will need a specialized press with more space inside the frame and enhanced vertical die travel. The relatively new Forster Co-Ax XL press, introduced at the 2023 SHOT Show, fills the bill. In this Ultimate Reloader video, Gavin Gear shows how to set up the XL press. Then he shows how to adapt the press to different die sizes. He finishes by sizing a 50 BMG case. Gavin notes that this press has beefy construction and ball bearings in the linkage plates. Like what you see? You can purchase this press direct from Forster for $1295.00.
Caldwell Flash Bang Device Shows Hits
If you are shooting steel or reactive targets at long range, sometimes it is difficult to see the hit, particularly if you are shooting lighter-weight bullets or if the target hasn’t recently been painted. Caldwell has a solution — the battery-powered Flash-Bang. A bright-green strip light flashes on impact. The Flash-Bang unit attaches with adhesive to the rear of the target, extending to the left or right side. CLICK HERE for another Caldwell Flash Bang field test from the HarleyWood YouTube Channel.
TEN Shots in 0.303″ (0.289 MOA) at 100 Yards
Look at that target showing TEN shots at 100 yards, with eight (8) shots in the main cluster at the top. The ten-shot group measures .303″ (0.289 MOA), as calculated with OnTarget Software. Not bad for a handgun — a very nice bolt-action XP-100 pistol! What do you think, can your best-shooting rifle match the 10-shot accuracy of this XP-100 pistol?
Report by Boyd Allen
This story goes back a few seasons… this remarkable XP-100 pistol belongs to Dan Lutke, a Bay Area benchrest shooter who publishes the results for the Visalia matches to the competitors and the NBRSA. He has been an enthusiastic competitor for an number of years, at various ranges, notably Visalia and Sacramento. The action is a Remington XP-100, to which a Kelbly 2 oz. trigger has been fitted. On top is an old Japanese-made Tasco 36X scope (these were actually pretty darn good). The Hart barrel (a cast-off from Dan’s Unlimited rail gun) was shortened and re-chambered for the 6x45mm, a wildcat made by necking-up the .223 Remington parent case. The custom stock/chassis was CNC-machined by Joe Updike from 6061 Billet Aluminum to fit the XP-100 action and mount a target-style AR grip with bottom hand rest. The gun was bedded and assembled by Mel Iwatsubu. In his XP-100 pistol, Dan shoots 65gr custom boat-tails with Benchmark powder.
This diagram shows the most common 6x45mm wildcat, which is a necked-up version of the .223 Remington parent cartridge. NOTE: The dimensions for Dan Lutke’s benchrest version of this cartridge may be slightly different.
ACAD drawing by Peter Gnanapragasam CC by SA 3.0, via Wikimedia Commons. Title Added.
Story tip from Boyd Allen. We welcome reader submissions.
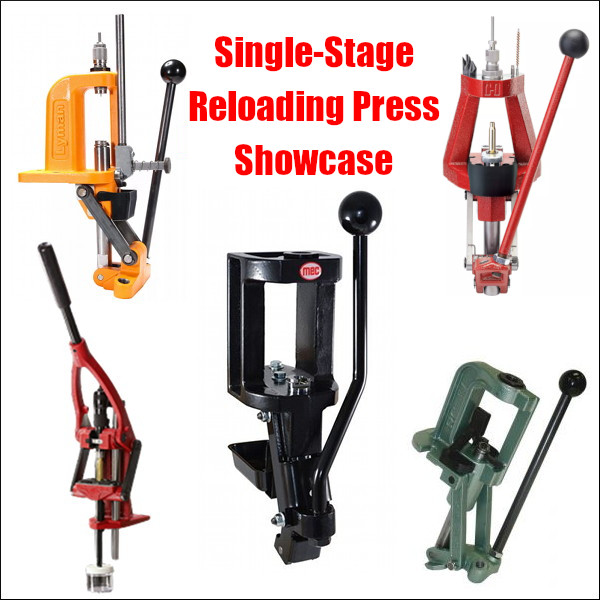
Hand-loaders have never had so many great choices in single-stage presses, with many different configurations and features. There are classic O-Frame presses, Coax-style presses, Open-front presses, Pyramid presses, and compact C-Frame presses. Here is our 2019 Single Stage Press Showcase with products from Forster, Hornady, Lee, Lyman, MEC, and RCBS. We’ve included short videos showing the features of these reloading presses.
If you are shopping for a new press you should look at the various features of each. You may prefer something classic like a Rock Chucker, or the innovative open-front MEC. If you are looking for a compact press to use at the range, the Lyman C-Frame is very impressive for the price. And the Forster Co-Ax remains a great addition to any loading room.
MEC Marksman Single-Stage Press
If you are looking for a new, full-size single-stage reloading press, definitely consider the MEC Marksman. Created by the makers of the popular MEC shotshell reloading systems, the MEC Marksman combines a sturdy cast-iron frame with a modern open-front design. If you are looking for a new, full-size single-stage reloading press, definitely consider the MEC Marksman. Created by the makers of the popular MEC shotshell reloading systems, the MEC Marksman combines a sturdy cast-iron frame with a modern open-front design. With a $245.49 street price, the MEC Marksman press now costs more than an RCBS Rock Chucker Supreme press, but the MEC offers some distinct advantages — such as an open front plus a floating shell-holder system.
Our friend Gavin Gear of UltimateReloader.com got his hands on a MEC Marksman press and put it through its paces. He came away impressed with the product, saying it delivers excellent performance, and has many impressive features. Gavin tells us: “Cast iron tools and machines are a lifetime investment. The made-in-USA MEC Marksman features ductile cast-iron construction, an open-front frame design for easy cartridge access, a new floating shell-holder design with a unique retention system, and ambidextrous handle setup.” MEC also offers a wide selection of accessories for the Marksman press, including a press riser/mount, shell-holder caddy, and die trays.
Forster Co-Ax Press
If you are not yet familiar with the many unique features of the Forster Co-Ax, we recommend you watch the video above, a very thorough video review by Rex Roach. This shows how the press operates and highlights the design elements which set the Co-Ax apart from every other reloading press on the market. This 14-minute video shows the key Co-Ax features, explaining how the floating case-holder jaws work (3:30 time-mark), how the dies are held in place (4:40 time-mark), how spent primers are captured (6:10 time-mark), and how to set the primer seating depth (10:00 time-mark). We’ve used a Co-Ax for years and we still learned a few new things by watching this detailed video. If you are considering purchasing a Co-Ax, definitely watch this video start to finish.
In recent years, Forster Co-Ax® presses have been somewhat hard to find, as demand has out-stripped supply. The Co-Ax has many dedicated fans, given its unique features, such as the floating case-holder jaws, and easy, rapid slide-in/slide-out die placement. We’ve also found that Co-Ax presses load very straight ammo and we like the ability to switch between short handle (good for bullet seating) and long handle (ideal for heavy case-sizing tasks). We also think the Forster Co-Ax has one of the best spent primer capture systems on the market — a straight drop into a removable plastic cup. Simple and it works.
Lyman Brass Smith Victory Single-Stage Press
Lyman’s sturdy Victory Single-stage Press is a full-size unit that competes with the RCBS Rock Chucker Press. With beefy cast iron construction, the Victory’s strength and leverage rivals the Rock Chucker. The press operates smoothly and the handle can be mounted on either side.
If you like to prime cases using a press, this Victory press has a priming system that’s much easier to use than the RCBS Rock Chucker system. The priming tube is right up front, with multiple primers loaded vertically in a tube. Simply push the shuttle at the button of the tube to advance the primer into place.
For convenience, the entire primer-loading system can also be removed so it doesn’t interfere with case and bullet-handling operations. We generally prefer to prime cases separately using a dedicated hand- or bench-mounted tool, but the Victory press does the job nicely.
Overall, the Victory is a great value in a full-size “O-Frame” press with sturdy construction and a solid Lyman warranty. It is available now for $219.99 on Amazon.
RCBS Rock Chucker Supreme Single-Stage Press
Nearly every serious hand-loader has owned or used the RCBS Rock Chucker press. This Editor still uses a Rock Chucker passed down by his brother 20 years ago. And yes, it is still going strong. The latest Rock Chucker Supreme single-stage press features an improved “upside-down Y-path” dual-bin spent primer catcher. Otherwise the Rock Chucker Supreme remains big, strong, versatile and sturdy. It has very strong linkages, with a compound leverage system providing plenty of power — FL-sizing is a breeze even with large, magnum cases. The 1″-diameter ram has 12.5 sq. inches of ram-bearing surface.
The Rock Chucker offers a secondary 1 1/4″ x 12 thread for shotshell reloading dies and Piggyback 3 upgrade. The Rock Chucker Supreme retails for $234.99 now at Midsouth. The Rock Chucker Supreme combines easy operation, ambidextrous handle, and outstanding strength. It has a big 4.25″ loading window that works even for big magnum cases. The long handle and central pivot design provide outstanding leverage. The RCBS Rock Chucker is definitely a quality product that can last a lifetime. For heavy-duty sizing chores this remains one of the best choices in single-stage presses.
Lyman Brass Smith Ideal C-Frame Compact Press
The Lyman Brass Smith Ideal Press is a very affordable, cast iron C-Frame reloading press. We think it is the new “class leader” in compact presses. This works great as a secondary press for your reloading room or a small press you can take to the range. The large front opening allows you to access the shell holder without hitting the support bar on other types of presses. Unlike other compact presses made from aluminum, Lyman’s Ideal press is cast iron so it is rigid and strong. The high-quality steel ram is one inch in diameter. The Brass Smith is a true ambidextrous press that can be accessed from either side and mounted the same. This is a great choice for a second, auxiliary press for depriming and bullet seating. It is now just $134.99 at MidwayUSA.
Hornady Iron Single Stage (Open-front) Press
In this “Reloading with Rosie” video, the attractive female host loads some ammo using the Hornady Iron Press. With a beefy, pyramid-style cast-iron frame with an open front, this press offers some advantages over a traditional “O-Frame” type press. Access is considerably easier, for one thing. And the top of the press includes slots to hold dies and tools — that’s really a very nice feature that saves time. Also an optional “automatic” priming system shuttles primers from a vertical tube in the back to the shell-holder in the front. That’s clever. Over all the Iron Press is a nice piece of engineering — good job Hornady. It is offered for $289.99 at Midsouth.
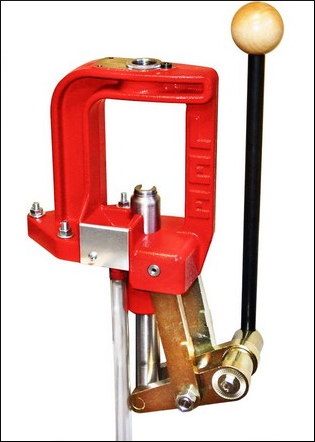
Lee Classic Cast (Iron) Breech Lock Press
The Lee Classic Cast Breech Lock Press offers excellent value for the money ($190.99 at Midsouth). Based on the proven design of the Classic Cast press, the updated Breech Lock series adds the quick-change die bushing and an improved primer drop system. This press is strong, with cast iron frame, all-steel linkage, and 12 square inches of ram bearing surface.
Lee says this press has the “largest opening and the longest stroke in the industry” among O-frame type presses. The handle can be mounted on either side. We love the fact that the handle ANGLE can be adjusted, as well as the lever arm length — that allows you to adjust travel and leverage to suit your preference. Smart engineering.
The new spent primer drop features a large-diameter hollow ram with clear hose that drops primers straight to a bin — that’s simple and effective. The press is very rigid and the base is wide enough for good stability. We have one of these Classic Cast Breech Lock Presses in our reloading room and it works well.
Sinclair Internationalhas released an interesting article about Case Concentricity* and bullet “run-out”. This instructional article by Bob Kohl explains the reasons brass can exhibit poor concentricity, and why high bullet run-out can be detrimental to accuracy.
Concentricity, Bullet Alignment, and Accuracyby Bob Kohl
The purpose of loading your own ammo is to minimize all the variables that can affect accuracy and can be controlled with proper and conscientious handloading. Concentricity and bullet run-out are important when you’re loading for accuracy. Ideally, it’s important to strive to make each round the same as the one before it and the one after it. It’s a simple issue of uniformity.
The reason shooters work with tools and gauges to measure and control concentricity is simple: to make sure the bullet starts down the bore consistently in line with the bore. If the case isn’t properly concentric and the bullet isn’t properly aligned down the center of the bore, the bullet will enter the rifling inconsistently. While the bore might force the bullet to align itself with the bore (but normally it doesn’t), the bullet may be damaged or overstressed in the process – if it even it corrects itself in transit. These are issues we strive to remedy by handloading, to maintain the best standard possible for accurate ammunition.
The term “concentricity” is derived from “concentric circle”. In simple terms it’s the issue of having the outside of the cartridge in a concentric circle around the center. That goes from case head and center of the flash hole, to the tip of the bullet.
Factors Affecting Concentricity
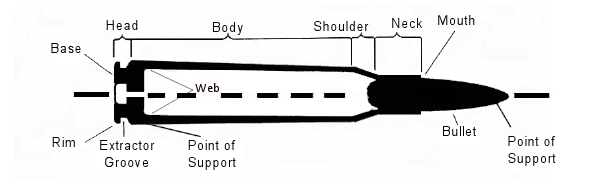
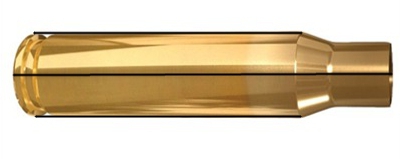
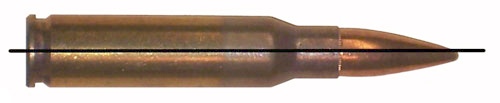
The point of using this term is to identify a series of issues that affect accurate ammunition. Ideally this would work best with a straight-walled case; but since most rifle cartridge cases are tapered, it equates to the smallest cross section that can be measured point by point to verify the concentric circle around the center. For the examples below, I’m working with .308 Winchester ammo.
Figure 1: The cartridge.
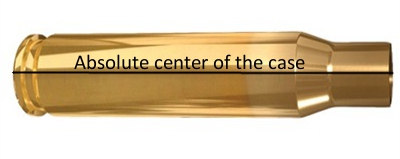
Figure 2: Centerline axis of the case, extending from flash hole to case mouth.
The case walls have to be in perfect alignment with the center, or axis, of that case, even if it’s measured at a thousandth of an inch per segment (in a tapered case).
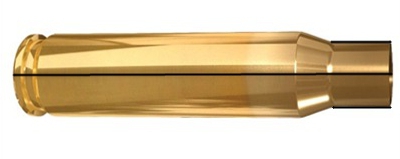
Figure 3: Case body in alignment with its axis, or centerline, even in a tapered case.
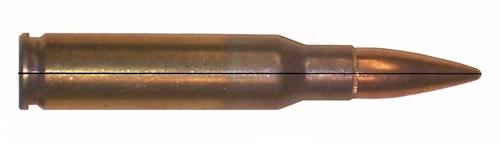
The case neck must also be in alignment with its axis. By not doing so you can have erratic bullet entry into the bore. The case neck wall itself should be as uniform as possible in alignment and in thickness (see the M80 7.62x51mm NATO cartridge in Figure 5) and brass can change its alignment and shape. It’s why we expand the case neck or while some folks ream the inside of the neck and then turn the outside for consistent thickness, which affects the tension on the bullet when seated.
Figure 4: Neck in alignment with center of the case axis.
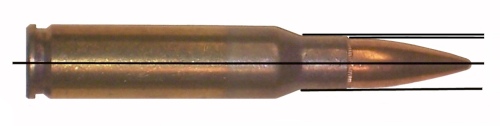
Figure 5: Variations in case neck wall thickness, especially on some military brass, can cause an offset of the bullet in its alignment. This is an M80 ball round. Note the distinct difference of the neck walls.
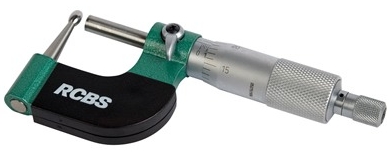
Having a ball micrometer on hand helps, especially with military brass like 7.62x51mm in a semi-auto rifle, where there are limits as to how thin you want the neck walls to be. In the case of 7.62 ball brass you want to keep the wall to .0145″.
Figure 6: A ball micrometer like this RCBS tool (#100-010-268) can measure case neck thickness.
Turning the outside of the neck wall is important with .308 military cases regardless of whether you expand or ream the neck walls. There are several outside neck turning tools from Forster, Hornady, Sinclair, and others. I’ve been using classic Forster case trimming (#100-203-301) and neck turning (#749-012-890) tools for 40 years.
Bullet Run-Out
The cartridge, after being loaded, still needs to be in alignment with the center of the case axis. Figure 7 shows a bad example of this, a round of M80 ball. A tilted bullet is measured for what’s known as bullet “run-out”.
Figure 7: An M80 round with the bullet tilted and not aligned with the axis. This will be a flyer!
Run-out can be affected by several things: (1) improperly indexing your case while sizing, which includes not using the proper shell holder, especially while using a normal expander ball on the sizing die (it also can stretch the brass). (2) The head of a turret press can flex; and (3) improper or sloppy bullet seating. This is also relevant when it comes to using a progressive press when trying to load accuracy ammo.
Mid Tompkins came up with a simple solution for better bullet seating years ago. Seat your bullet half way into the case, back off the seater die and rotate the case 180 degrees before you finish seating the bullet. It cuts down on run-out problems, especially with military brass. You also want to gently ream the inside of the neck mouth to keep from having any brass mar the surface of the bullet jacket and make proper seating easier. A tilted bullet often means a flyer.
Figure 8: Proper alignment from the center of the case head to the tip of the bullet.
(NOTE: This links to a Web Archive version of the original Sinclair Int’l article.)
*Actually some folks would say that if we are talking about things being off-center or out-of-round, we are actually talking about “eccentricity”. But the tools we use are called “Concentricity Gauges” and Concentricity is the term most commonly used when discussing this subject.
Fire-Form with Foulers
Here’s a tip for guys who shoot the 6 PPC, 6 Dasher, 6 BRA, .284 Shehane, or other wildcat cartridges that require fire-forming. Use your fouler shots to fire-form new cases. That way your fouler shots do “double-duty” and you get your brass fire-formed without putting extra rounds through your expensive barrel.
This procedure is recommended by Joel Kendrick, the 2004 IBS 600-yard Shooter of the Year. After he cleans his barrel, Joel knows it takes two or three shots to foul in the bore before accuracy returns. (YMMV — some barrels may need five or six foulers.) When shooting his PPC, Joel uses those fouler shots to fire-form his new brass. Joel explains: “I like to have relatively new brass always ready. By fire-forming a couple cases after each barrel-cleaning during a match, by the end of the weekend I’ve got a dozen or more freshly fire-formed cases to put into the rotation. If you do this with your fouler shots you get your fire-forming accomplished without using up any extra barrel life.”
This not only saves barrel wear, but it saves you trips to the range for the purpose of fire-forming. We thank Joel for this smart suggestion. For those who do not have a dedicated barrel for fire-forming, this should help keep your round-count down. Note: With this fouler fire-forming routine, you should ALWAYS do the fire-forming with the SAME POWDER you load for your match ammo. Joel currently works as the Supplier Quality Process Engineer for Parker TruTec — MMI Inc., a company that offers barrel surface coatings that can further extend your barrel life.
In years past, the U.S. Army Marksmanship Unit published weekly reloading “how-to” article on the USAMU Facebook page. Here is a very informative USAMU article the subject of case lubrication. Tasked with producing thousands of rounds of ammo for team members, the USAMU’s reloading staff has developed very efficient procedures for lubricating large quantities of cases. This article reveals the USAMU’s clever “big-batch” lube methods. For other helpful hand-loading tips, visit the USAMU Facebook page on upcoming Wednesdays.
Rapid, High-Volume Case Lubrication
Today’s topic covers methods for quickly applying spray lube to cartridge cases prior to sizing. A typical order for this shop may be 25,000 rounds, so [speeding up] the lubrication process can be a real time-saver. While your ammunition lots probably aren’t this large, the efficient methods discussed here may help save a considerable amount of time over your handloading career. Our case lubrication rates range from 1500-1600 cases per hour, to 2400-2500 cases per hour, depending on caliber.
This shop uses virgin brass, whereas most home handloaders use fired brass, which necessitates some small changes at times. These will be discussed as they arise. Begin with fired brass that has been tumbled clean.
Ensure as much tumbling media as possible is removed from the brass, as when it gets into a size die, it can dent cases significantly. This is a good time to round out dents in the case mouths using a tapered tool to prevent damage from the decapping stem.
First, dump the clean cases into a large box or reloading bin. Shake the bin back and forth so that many cases are oriented with the mouths up. Next, pick up as many cases as is convenient with the mouths “up”, from natural clusters of correctly-oriented cases. With 7.62mm-size cases, this is usually 3-4, and with 5.56mm cases, this can be up to 8-10. Place the cases into the rack slots, mouth-up. Doing this in groups rather than singly saves considerable time. Once these clusters have been depleted, it will be time to re-shake the bin to orient more cases “up.”.
This photo shows a case lubrication rack made by a USAMU staffer.
Naturally, adjust the spacing to best fit the calibers you reload. We have found this size … convenient for handling through the various phases of case lubrication/transfer to progressive case feeders for processing. Note that the 1/2-inch angle does not cover much of the critical case area at the base, just forward of the extractor groove, where most re-sizing force will be exerted. As the USAMU uses virgin brass, less lubrication is required for our brass than would be needed for Full Length (FL) sizing of previously-fired brass.
NOTE: The amount applied using our rack is easily enough for our purpose. If using fired brass, be sure to adequately lube this base area to avoid having cases stick in the full-length sizing die.
Using a spray lube, coat the cases adequately, but not excessively, from all sides. Be sure to get some lube into the case mouths/necks, in order to reduce expander ball drag and case stretching/headspace changes. The spray lube this shop uses does not harm primers or powder, and does not require tumbling to remove after lubing.*
Take a close look at the photo above. The USAMU shop uses a common kitchen turntable, which allows the rack to be rotated easily. We place this in a custom-made box which prevents over-spray on to floors and walls.
Angled Box Method for Smaller Cases to be Neck-Sized
A refinement of the above method which especially speeds processing of 5.56x45mm cases is as follows. A small cardboard box which holds about 100 cases is fitted with an angled “floor” secured by tape. With the smaller 5.56mm cases, usually about 8-10 cases per handful can be picked up, already correctly-oriented, and placed into the box together. This prevents having to place them into the rack slots, saving time.
HOWEVER, note that this does not allow nearly as much lube access to the case bodies as does the rack. For our purposes — neck-sizing and setting neck tension on new brass, this works well. If using this procedure with fired brass, take steps to ensure adequate lube to prevent stuck cases.
As always, we hope this will help our fellow handloaders. Good luck, and good shooting!
*A two-part test performed here involved spraying primed cases heavily, while getting more lube into the case mouth/body than even a careless handloader would likely apply. The second part of the test involved literally spraying considerable quantities of the lube directly into the cases, drenching the primers. After a several-day wait to allow the lube to penetrate the primers, they were then fired in a test barrel. All fired normally; no unusual reports were noted. This bolstered confidence that normal amounts of the lube would not adversely affect our ammunition, and we have been pleased with the results over several years.
A while back, we featured a portable reloading bench built on a Black & Decker Workmate. That proved a VERY popular do-it-yourself project so we’re showing it again, in case you missed it the first time.
Texan Robert Lewis made himself a great portable reloading bench from plywood mounted to a Black & Decker Workmate. The bench, roughly 22″ x 19″ on top, folds up to fit easily in your car’s trunk or behind the seats in a pick-up truck cab. Four recessed bolts hold the wood top section to the collapsible B&D Workmate. The sides and back of the unit are attached to the base with small nails. There is a small shelf (also nailed in place) which can be used to clamp a powder measure or hold a scale. Shown in the photo is a Harrell’s Benchrest measure and Harrell’s single-stage “C” press.
Originally, the whole unit could be built for about $65.00 with pine, or $80.00 with oak (as shown). Robert explained: “The Workmate was $40. If someone bought a 2’x4′ sheet of 3/4″ oak plywood, I think it is around $30. Using pine plywood would be about half that. Fasteners were $3. Spar Urethane would be $5.” [Editor: We have seen major inflation — the Workmate is now $85+ at many vendors and you’ll be spending more for the wood, so figure the whole project might be $150.00.]
Robert told us: “I used a couple ideas I found on the web. The Larry Willis website gave me the idea to use the Black and Decker Workmate as a base. I found the Workmate on sale for $40 and the top is made from oak plywood I had in my shop. I sealed the wood with three coats of Spar Urethane. The whole thing folds into a nice package for transportation to and from the range.”
NOTE: Since we first ran this story, the price of a Black & Decker Workmate WM225 has increased substantially. But good news — Amazon is currently selling WM225-A Workmates for $74.99, a nice price, particularly for Prime members who get FREE shipping. And the WM225-A Workmate is currently $85.88 at Home Depot, with FREE Local Store Pickup or home delivery (in most states).
Conventional brass jags work great — except for one thing. They can react to solvents, leaving a blue “false positive” on patches. In recent years, jag-makers have experimented with many different materials in an effort to cure the solvent-reaction problem. Today we have polymer jags, nickel-plated jags, and stainless steel jags. And the latest innovation is the aluminum jag from Dewey.
J. Dewey Mfg. offers a series of “Copper Eliminator” jags and brush adapters made from aircraft-grade aluminum with the same hardness as brass. Dewey claims that its aluminum jags will not become embedded with grit or particles that could harm your bore. At the same time, Dewey’s aluminum jags will not react to ammoniated bore solvents that can turn patches blue green when used with brass jags. Dewey aluminum jags are offered with either male OR female 8/32 threads.
Hornady has just revealed its new products for 2026. Along with new ammo types and new bullet varieties, there is a new press, an interesting priming tool, and a variety of lock boxes and security cabinets. The video below covers the highlights.
Hornady’s New Products for 2026
Hornady announced its 2026 product lineup on October 15, 2025, revealing new ammunition, bullets, reloading tools, and storage hardware. The new ammo and bullets should offer enhanced performance for hunting and precision shooting. Below is a list of key new offerings, with descriptions based on official announcements. Products will be available through stocking dealers and retailers starting in early 2026.
New Hornady Bullet Types
Hornady will be offering a variety of new bullets this coming year. This will include pistol projectiles, hunting bullets, varmint bullets, and target bullets. Watch the video below to see the notable new-for-2026 Hornady bullet types.
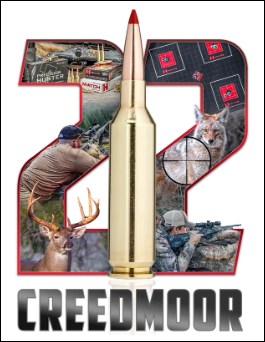
22 Creedmoor Ammunition
The most notable new cartridge for 2026 is the 22 Creedmoor. This could be a good long-range varmint round. Engineered as a high-speed .22 caliber cartridge, this new round delivers very flat trajectories, minimal wind deflection, and great hitting power on small and medium game or predators. Hornady sees the 22 Creedmoor as the “new predator hunting king,” compatible with modern rifles for varmint and hunting applications.
While this will doubtless be a good new cartridge, for small varmints we would still prefer a 22 BR or a 20 Practical, the latter simply being the .223 Rem necked down to .20 caliber. But for very long-range Groundhog hunts or varmint matches this could become popular. There’s also a possiblity of adoption by some target shooters, although Hornady brass has never really been as long-lasting and consistent as Lapua and other premium brands.
Versa-Prime™ Bench Priming Tool
Hornady will offer a new benchtop tool machined from 6061 billet aluminum with hardened steel internals. With a primer feed tube, this allows users to prime multiple cases efficiently. The handle can be switched to right or left side to fit user preference. Consistency is assured by the unit’s strength and tight tolerances. Hornady says its new priming tool “offers smooth, precise operation to streamline workflows and ensure consistent results in high-volume sessions.”
Lock‑N‑Load Classic Pro Press
Built on the solid foundation of the trusted Classic Press, the new Classic Pro features precision‑machined surfaces, linkage pins, brass bushings, and primer cups for tighter tolerances that provide a smoother feel and consistent results. This employs the Hornady Lock‑N‑Load® die bushing system for fast, easy die swaps and repeatable, consistent accuracy. The press has a cast aluminum frame and toggle with precision machined surfaces for exceptionally tight tolerances and repeatable accuracy. Smooth Operation — brass bushings and polished steel components provide a smooth, consistent press stroke.
Hornady Handbook of Cartridge Reloading (12th Edition, 2026)
Hornady’s updated Reloading Handbook includes data for over 400 cartridges and 24+ calibers. The new manual introduces load data for new bullets: CX, ELD-VT (varmint), and Sub-X (subsonic), plus expanded info on ELD Match and SST. Updated propellants include Winchester’s StaBall Match.
Find More Info on the Hornady New Products Website
For the complete new product list and high-resolution images, visit Hornady’s 2026 New Products Page. The Podcast below covers many of the new products as well as new ammo and bullet types.
Hornady New Product Overview sourced from ELR Researcher.
One side of this gauge is the “go” side which quickly tells you the depth of a primer pocket, whether any crimp is properly removed, and whether the primer pocket is loose. If it feels loose on the “go” side, use the other end of the tool, the “no go” side, to test to see if the primer pocket is too loose to hold a primer. If the no-go slides into the pocket, then you know to junk that brass.
Primer Pocket Growth and Useful Case Life
Repeated firings at stout pressures can cause primer pockets to grow in diameter. This can create an unsafe condition if your primers are not seating properly. Are your primer pockets “good to go”, or have they been pushed to the point of no return? Do you really know? Many guys try to gauge primer pocket tightness by “feel”, as they seat the primer. But that method isn’t precise. Now there’s a better way…
The folks at Ballistictools.com have created a handy set of precision-machined gauges that let you quickly and accurately check your primer pockets. These gauges (aka “gages”) are offered in two sizes — for large and small primer pockets. A two-piece set of both large and small gauges costs just $25.99. These gauges let you quickly measure the depth of a primer pocket, and check if the crimp has been removed properly. Most importantly, the gauge tells you if the primer pocket has opened up too much. One side of the gauge has an enlarged diameter plug. If that “No-Go” side fits in the primer pocket, you should ditch the case — it’s toast.
Precision ground from O-1 tool steel, The Ballistic Tools primer pocket gauges serve multiple functions. The inventor of these tools explains: “I created the prototype of this tool for my own use in brass processing. I needed a way to quickly and easily measure primer pockets that was reliable and did not require wasting a primer. This tool has been indispensable for me and I would never go back to the old method of uncertainty and guessing.”
Product tip from Boyd Allen. We welcome reader submissions.


 If you are not yet familiar with the many unique features of the Forster Co-Ax, we recommend you watch the video above, a very thorough video review by Rex Roach. This shows how the press operates and highlights the design elements which set the Co-Ax apart from every other reloading press on the market. This 14-minute video shows the key Co-Ax features, explaining how the floating case-holder jaws work (3:30 time-mark), how the dies are held in place (4:40 time-mark), how spent primers are captured (6:10 time-mark), and how to set the primer seating depth (10:00 time-mark). We’ve used a Co-Ax for years and we still learned a few new things by watching this detailed video. If you are considering purchasing a Co-Ax, definitely watch this video start to finish.
 Lyman’s sturdy Victory Single-stage Press is a full-size unit that competes with the RCBS Rock Chucker Press. With beefy cast iron construction, the Victory’s strength and leverage rivals the Rock Chucker. The press operates smoothly and the handle can be mounted on either side.
 Nearly every serious hand-loader has owned or used the RCBS Rock Chucker press. This Editor still uses a Rock Chucker passed down by his brother 20 years ago. And yes, it is still going strong. The latest Rock Chucker Supreme single-stage press features an improved “upside-down Y-path” dual-bin spent primer catcher. Otherwise the Rock Chucker Supreme remains big, strong, versatile and sturdy. It has very strong linkages, with a compound leverage system providing plenty of power — FL-sizing is a breeze even with large, magnum cases. The 1″-diameter ram has 12.5 sq. inches of ram-bearing surface.

 The Lee Classic Cast Breech Lock Press offers excellent value for the money (


 Fire-Form with Foulers


 A while back, we featured a portable reloading bench built on a Black & Decker Workmate. That proved a VERY popular do-it-yourself project so we’re showing it again, in case you missed it the first time.


 22 Creedmoor Ammunition
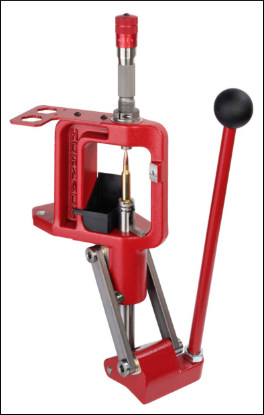 Lock‑N‑Load Classic Pro Press
 Hornady Handbook of Cartridge Reloading (12th Edition, 2026)
 The folks at


