Here’s a feel-good story. ELR ace Paul Phillips took his 9-year-old daughter Addison to the range this past weekend, to try shooting at 1000 yards. Guess what, Addison got hits at 1000! That’s impressive enough, but get this, Addison made those shots with a .22 LR rimfire rifle! Yes a .22 LR will fly that far — but it took a whopping 342 MOA of elevation and five seconds of flight time.
Paul says: “So proud of my 9-year-old making impact at 1000 yards with her .22 rimfire. My 82-year-old dad also got hits at 1000. Amazing!” Paul adds: “My daughter is very excited to get into shooting sports. The .22 ELR game is very fun for her especially shooting suppressed subsonic. It helps her to learn the fundamentals without flinching.” After her success at 1000 yards, the little lady then made multiple hits on a silhouette at 322 yards (see below).
After Addison checked the ELR box at 1000 yards, she tried a 322-yard steel silhouette target. No problem — after many hits in the center, she put three into the top without any misses. This little girl can shoot!
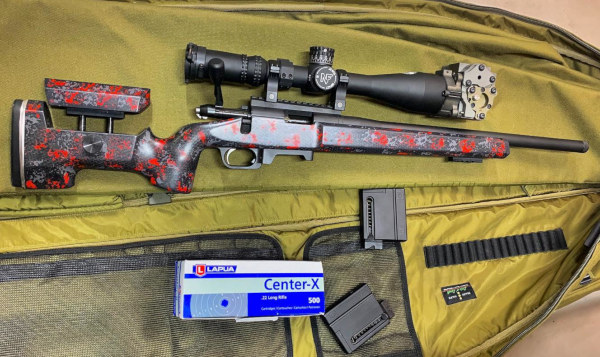
The rifle features a Vudoo Gun Works rimfire action bedded in McMillan A6 stock by Alex Sitman. The barrel is a 20″ Bartlein, fitted with a GSL Technologies suppressor (see second photo above). On top is a Nightforce ATACR 7-35x56mm F2 scope fitted with a TACOM Charlie TARAC prism system that provides +800 MOA beyond the scope’s internal elevation. The rifle rested on a Phoenix Precision bipod. The ammo was Lapua Center-X subsonic, running 1090 FPS at the muzzle. Paul notes: “The 22 GSL silencer had no noticeable point of impact shift. It actually shot better groups with it on.”
Addison’s impressive shooting was done at the Marksmanship Training Center in Lake City, Michigan. This veteran-owned shooting facility is a very scenic venue as you can see:
Ballistics Prediction Was Nearly Perfect
The Applied Ballistics solution was within one MOA at 1000 yards. 1000 yards required 342 MOA up from the 100-yard zero. Flight time was over 5 seconds! MV was 1090 FPS. The target was a 6′ x 6′ F-Class frame, covered with white paper. That’s roughly 7 MOA, equivalent to about 3.5″ at 50 yards.
Comments from Facebook Fans (and Bryan Litz)
It’s in her genes — Brian R.
Like father like daughter! — Daryll B.
Dang! And I thought my son hitting at 400 was good! — George W.
Most people I know including myself did not believe that the .22 LR genuinely flew that far (despite the warning labels). — Robert S.
Applied Ballistics was within 1 MOA on a 342 MOA solution. We’ll have to tighten that up. — Bryan Litz
All in the Family — Three Generations
Along with Addison, father Paul Phillips and grandfather Rusty Phillips (right) all took shots at 1000 yards, and all three generations of Phillips got hits. The threesome took a total of 145 shots at 1000 yards and impacted 13 times. Paul observed: “We hit almost 1 in 10 shots [with] lots of close misses. Believe it or not, most were due to elevation not wind. There were 3-5 mph winds from 3-9 o’clock. To help see hits, John Droelle was spotting for us in the 1000-yard pits.”
Competing at the Camp Perry National Matches is a “bucket list” item for every serious marksman. The National Matches were first held in 1903, moved to Camp Perry, Ohio, in 1907 and continue to take place every summer at Camp Perry. The National Matches have become a huge, national shooting sports festival with well over 6,000 annual participants.
Year 2019 Camp Perry NM Competition activities begin with NRA/CMP pistol matches on July 8-14, 2019. The CMP Junior Rifle Camp, USAMU SAFS, and Smallbore matches run the next week, with the hugely popular Rimfire Sporter Match on July 21. High Power Rifle events kick off on July 23 with the 4-Man Team Match and rifle events run continuously for the next two and a half weeks.
Here are some key dates for RIFLE events:
July 27 – CMP/USAMU Rifle SAFS
July 29 – President’s 100 Rifle Match
July 30 – National Trophy Individual Rifle Match
July 31 – National Junior Team Match
August 1 – National Trophy Team Match, National Carbine Match
August 2 – National Trophy Infantry Team Match (“Rattle Battle”)
August 3 – M1 Garand Match, Springfield/Vintage Bolt Rifle Match
August 4 – M1A Match, Springfield/Vintage Bolt Rifle Match
August 5 – CMP Vintage Sniper Rifle Match
August 5-8 – CMP Long Range Individual Matches
August 9 – Camp Perry Palma Match
Precision rifle shooters don’t have to hit a big-league fastball, or launch a top-fuel dragster in the blink of an eye. Nonetheless, reaction times are important in our sport — both for competitive shooters and hunters. Want to catch that prairie dog before he slips down his hole? You’ll need to be quick. Want to win at short-range benchrest? Then you’ll need to watch your windflags and respond quickly to a change. Miss a major wind-shift and you could ruin your whole weekend.
Here’s a fun test of reaction times from HumanBenchmark.com. The way it works is that, after clicking “Start”, you wait until the background color changes from red to green. The instant you see green, immediately click your mouse. The average (median) reaction time is 215 milliseconds.
Tips for Faster Times
Here are three tips to speed up your reaction times:
1) Respond to the color change, rather than wait to read “CLICK!”.
2) Try focusing at the corner of the colored box, rather than the center.
3) Have your index finger “poised and ready” over the left button–you can shave milliseconds by very slightly depressing the button before you actually click.
Shooters from across the nation and many foreign competitors will compete this year at the CAAFTC held at the Rochester Brooks Int’l Skeet and Trap Club.
Upstate New York heats up in the summer with the largest field target event in the country — the Crosman All-American Field Target Championship (CAAFTC). This very popular airgun event takes place June 21-23, 2019 in upstate New Yorkat the Rochester Brooks International Skeet and Trap Club in Rush, New York. 0ver 100 air rifle and air pistol competitors will participate in the big event hosted by Crosman. This event attracts top Airgunners from across the nation (and some foreign countries). Along with regular Field Target matches, there will be specialty side matches, plus a factory tour. The event is free to the public.If you are a Field Target Shooter and want to attend, don’t hesitate — registration closes soon.
After getting squared away with check-in and some practice rounds on Friday, take part in the pistol match and the Quigley Bucket Challenge (see video below). For the Quigley Bucket Challenge, competitors must try to hit a 1.75″ target from 55 yards away, using open sights (no scopes).
The three-day competition features multiple shooting matches including the main two-day rifle event. There are four divisions for competitors: Open, Hunter, WFTF, and Pistol. In addition to the main rifle event, this year will also feature a pistol match, the Quigley Bucket Match and the Pyramyd Air Gunslinger match. The Bucket match re-creates famous scene in the movie Quigley Down Under in which the lead character shoots a bucket at 700 yards. Here the distances are scaled down a wee bit (wink). Competitors, using iron sights only, get 5 shots at a 1.75″ bucket placed at 55 yards.
Tech Talk: Why the Big Side-Wheels on the Scopes?
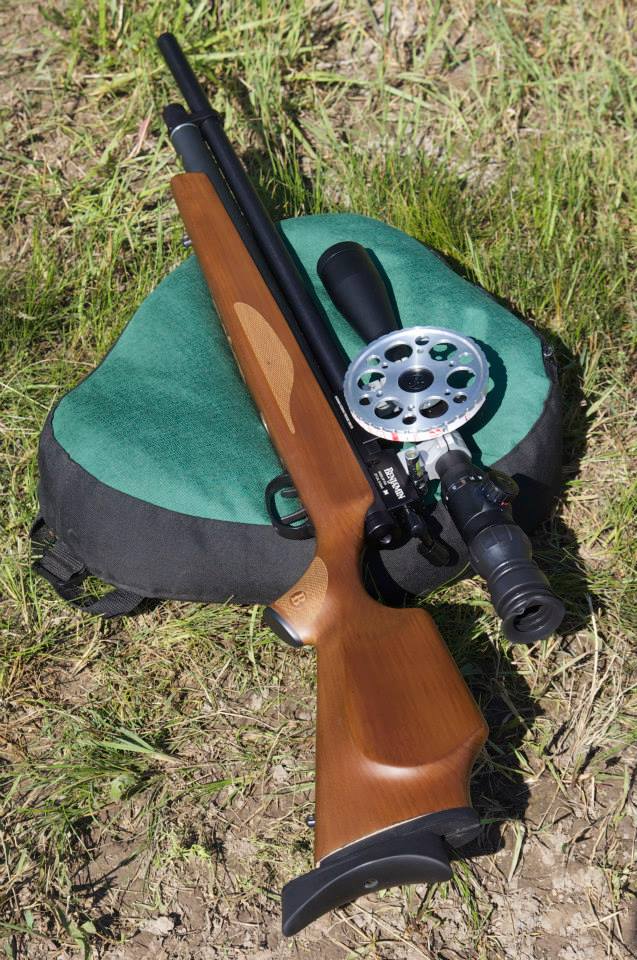
Field Target rifles shoot pellets propelled by compressed air. These light-weight, low-BC projectiles drop very quickly, with a looping trajectory. In order to hit targets at distances out to 50 yards or so, you have to adjust your scope to compensate for pellet drop. But you can’t set the scope correctly without knowing the precise range to the target. This is the function of the big wheels on the side of the scope. Field Target Competitors use the parallax adjustment on high-magnification scopes to determine target range. The big wheel allows quick, yet precise parallax adjustment. Markings on the wheel show the shooter the scope settings required for the distance “dialed-in” via the over-size parallax wheel.
The CAAFTC is sanctioned by the American Airgun Field Target Association and is a featured AAFTA Grand Prix event. The 120-shot match has competitive rifle divisions based on allowable gun and support equipment. Here are the main air rifle classifications:
Hunter Division – rifle fires at a maximum 20 foot pounds of energy (FPE), shooter may use a non-attached bipod, non-restrictive clothing, and sitting stool. Open Division - maximum 20 FPE maximum rifle, shooter may wear a body harness, no bipod, 6″ maximum height seat. World Field Target Federation (WFTF) – similar to Open but shooters compete according to international standard of maximum 12 fpe for rifles. Freestyle Division – 20 FPE maximum rifle, no other restrictions. (This is new for 2016).
The pistol competition includes similar divisions based on shooting styles. Both rifle and pistol divisions include sub-classes based on the air rifle powerplant: piston driven or pre-charged pneumatic.
“If you want to see some of the country’s finest airgun shooters, this is the hottest event of the summer and it’s free for the public,” says Chip Hunnicutt, Marketing Manager for Crosman. “Alongside the world-class shooters, we’ll have enthusiasts simply having a good time and even parents bringing their kids for some good fun outdoors.” (NOTE: Click framed images below to zoom.)
The NRA Blog ran an feature on Silhouette shooting by NRA Silhouette Program Coordinator Jonathan Leighton. Here are selections from Leighton’s story:
NRA Silhouette Shooting
The loud crack from the bullet exiting the muzzle followed by an even louder ‘clang’ as you watch your target fly off the railing is really a true addiction for most Silhouette shooters. There is nothing better than shooting a game where you actually get to see your target react to the bullet. In my opinion, this is truly what makes this game so much fun.
Metallic Silhouette — A Mexican Import
Silhouette shooting came to this country from Mexico in the 1960s. It is speculated that sport had its origins in shooting contests between Pancho Villa’s men around 1914. After the Mexican Revolution the sport spread quickly throughout Mexico. ‘Siluetas Metalicas’ uses steel silhouettes shaped like game animals. Chickens up front followed by rows of pigs, turkeys, and furthest away, rams. Being that ‘Siluetas Metalicas’ was originally a Mexican sport, it is common to hear the targets referred to by their Spanish names Gallina (chicken), Javelina (pig), Guajalote (turkey) and Borrego (ram). Depending on the discipline one is shooting, these animals are set at different distances from the firing line, but always in the same order.
Before Steel There Was… Barbeque
In the very beginnings of the sport, live farm animals were used as targets, and afterwards, the shooters would have a barbeque with all the livestock and/or game that was shot during the match. The first Silhouette match that used steel targets instead of livestock was conducted in 1948 in Mexico City, Mexico by Don Gonzalo Aguilar. [Some matches hosted by wealthy Mexicans included high-ranking politicians and military leaders]. As the sport spread and gained popularity during the 1950s, shooters from the Southwestern USA started crossing the Mexican border to compete. Silhouette shooting came into the US in 1968 at the Tucson Rifle Club in Arizona. The rules have stayed pretty much the same since the sport has been shot in the US. NRA officially recognized Silhouette as a shooting discipline in 1972, and conducted its first NRA Silhouette Nationals in November of 1972.
Now There Are Multiple Disciplines
The actual sport of Silhouette is broken into several different disciplines. High Power Rifle, Smallbore Rifle, Cowboy Lever Action Rifle, Black Powder Cartridge Rifle, Air Rifle, Air Pistol, and Hunter’s Pistol are the basic disciplines. Cowboy Lever Action is broken into three sub-categories to include Smallbore Cowboy Rifle, Pistol Cartridge Cowboy Lever Action, and regular Cowboy Lever Action. Black Powder Cartridge Rifle also has a ‘Scope’ class, and Hunter’s Pistol is broken into four sub-categories. Some clubs also offer Military Rifle Silhouette comps.
Where to Shoot Silhouette
NRA-Sanctioned matches are found at gun clubs nation-wide. There are also many State, Regional, and National matches across the country as well. You can find match listings on the Shooting Sports USA website or contact the NRA Silhouette Department at (703) 267-1465. For more info, visit SteelChickens.com, the #1 website dedicated to Silhouette shooting sports.
This .308 Win was purpose-built for PRS/NRL tactical competition. With all the focus on the 6.5 Creedmoor, 6mm Creedmoor, and smaller 6mm cartridges, it’s easy to forget that the PRS has a Tactical Division limited to .223 Rem and .308 Winchester. This gun was built by Jim See of Elite Accuracy LLC to compete in that class, which also has a .308 bullet-weight limit of 178 grains, and a velocity limit of 2800 fps.
With those restrictions, this is truly a Tactical Tack-Driver, as you can see from those 100-yard targets in the photo above. This gun seems to shot great with everything Jim has tried. He started the season with Sierra 168gr Tipped MatchKings. Later he switched to 168gr Berger Hybrids. For both bullet types he uses Varget powder, CCI 200 primers, and Lapua large primer .308 Win brass. His current match load runs about 2765 FPS, with impressive 5-7 FPS standard deviation. The gun hammers — even at very long range. Jim told us: “That soda bottle was shot at one mile with a 168gr Berger Hybrid on top of Varget.” Jim says the 1:9″ twist rate helps deliver a “clean sub-sonic transition” at that distance.
With its heavy-contour barrel, the gun weighs in at a hefty 22 pounds, including optics and bipod. If you like this rig, Jim See can build you one just like it, or with the chambering of your choice. Visit EliteAccuracy.com to learn more about Jim’s gunsmithing services.
This rig features a RBRP Impact Precision 737 Action which was designed specifically for PRS-type tactical applications. This action features an integral lug, and built-in +20 MOA Picatinny rail. Both receiver and bolt are black-nitrided for slickness and durability. Jim loves the action: “It is really slick operating. It functions really well and doesn’t get gummed up with dirt or grit, so it has caught on for the PRS/NRL game. This action has won a major share of 2-day PRS matches this past season.”
Barrel Is a Resurrected .300 WSM
This rifle has one “resurrected” component — the barrel. The 1.25″ straight-contour, 1:9″-twist Brux was originally chambered as a .300 WSM finished at 30 inches. As acquired from Pat Scully, the barrel had 1200 WSM rounds through it. See then re-chambered the Brux as a .308 Winchester, finished it at 25 inches, and attached a 4-baffle side-discharge muzzle brake. Jim says the brake really helps control muzzle lift.
Jim See .308 Win Tactical Rifle Specifications:
Action: Impact Precision 737R
Action Finish: Black Nitride (bolt + body)
Barrel: Brux 1:9″ twist, 25″ finished
Chambering: .308 Win, PT&G Std. Match Reamer
Muzzle Brake: Custom 4 baffle, side discharge
Trigger: Trigger-Tech Diamond, straight shoe
Magazine: Accuracy International
Scope: Vortex Razor HD Gen II, 4.5-27x56mm FFP EBR reticle
Scope Base: Integral +20 MOA rail
Stock: J. Allen Enterprises (JAE) chassis
Front Rail: JAE Swiss ARCA rail
(extends bipod mount 2″ forward)
Bipod: Atlas PSR
Running the Rifle in Competition
Jim says this rifle performed well right out of the gate: “For about three years I wanted to shoot Tactical division and in 2018 it happened to work out. I decided it was a good year to test the .308 Win waters and see how the .308 could stack up competitively against the Open Class rifles.
I dug around the shop and found an 11-twist 30″ M-24 from an old F-class rifle and chopped it down to 23″ and fit it to an Impact action. [EDITOR: This barrel was later replaced with the 1:9″ Brux finished at 25 inches.] I had not received my 168gr Berger Hybrids yet so I ran the Sierra 168gr Tipped MatchKings in the first couple matches of the season. Those SMKs were used for the target and chrono pictures here.
The first spring match was ‘The Battle for Breakneck’ in Nebraska. This is a true field match with mostly prone stages with a few natural rock barricades thrown in for positional shooting. The yardages went out to a little over 1400 yards. I went in feeling good and shot very well in the windy conditions, hitting targets out to 1350 yards. I finished with a score of around 105 out of 135 points. The Open Class winner shot a 117 score I believe. I ended up being First-Place Tactical and 16th overall in a field of 100 shooters.”
Consistency and Preparation — Keys to Success in PRS/NRL Competition
Through his Elite Accuracy LLC company, Jim offers skills training for tactical shooters. When we asked Jim if he had any advice for PRS/NRL competitors, Jim replied: “Consistency is what will continually put you at the top of a match. In addition, your gear needs to be prepared (100% sorted out) and your mind needs to be prepared and ready. Don’t let your mind get in your own way. Mental preparation and confidence will be key to success.”
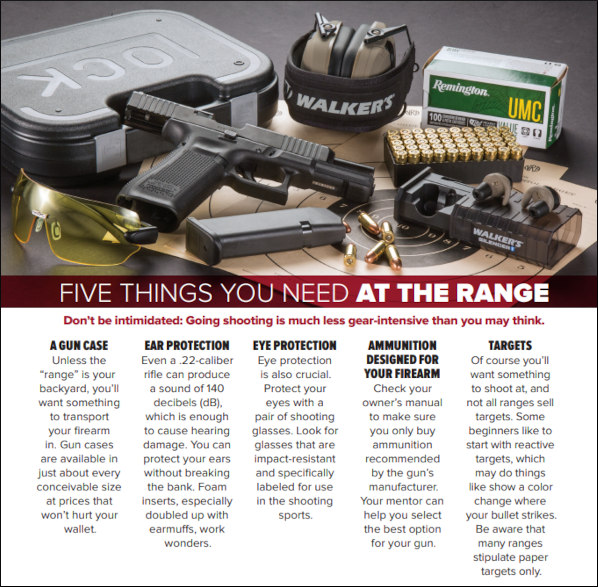
While this site focuses primarily on accurate rifles, we know that most of our readers also own pistols (and many shoot them competitively). After rimfire pistols, probably the most popular handguns in America are 9mm semi-auto pistols. Here are five products we use with our favorite 9mm semi-autos — H&K P7M8 and SIG Sauer P226. You’ll find a great carry case, high-quality electronic muffs, a pistol “range station”, affordable 9mm ammo, and two cool training targets.
1. HQ Issue Handgun Carry Case
Do you often take multiple handguns to the range? Here’s a large (16″ x 13″ x 8″) handgun hard case that will easily haul your arsenal. The HQ Issue Case can hold up to eight (8) handguns, or six with room for magazines. Since the foam is customizable, you can also use this case to carry cameras, rangefinders, binoculars, Kestrels, or other valuable hardware. While we wouldn’t drop this in the water, the case does have an O-Ring seal for water resistance, and a manual valve for pressure modulation. NOTE: This nice case is just $34.99 for Sportman’s Guide Buyer’s Club Members.
2. Impact Pro Electronic Muffs 30 dB Noise Reduction Rating
When shooting pistols indoors we recommend quality muffs with earplugs underneath, offering double protection. When inside an enclosed range, with other shooters blasting away right next to you, you really need effective hearing protection. But you also need to hear range commands and be able to communicate with your fellow shooters. That’s why we recommend electronic muffs with plugs underneath. That gives you serious hearing protection during live fire, with the ability to hear voices and converse.
For pistol shooting, we like the latest Howard Leight Impact Pro Muffs. These offer an impressive 30 dB Noise Reduction Rating (NRR). In addition, these muffs are pretty comfortable and offer Headphone Functionality so you can connect to your smartphone, MP3 player, or other audio device. These muffs are a good value. They are currentely offered for $58.84 on Amazon.com.
3. Range Station for Pistol Shooters
The Range Station combines an ammo compartment with a roll-out mat. Great idea. Some gun ranges only have concrete benches, or shooting stations with horizontal surfaces covered with dirt, powder residues, and other debris. You don’t want to put your $2000 blued Colt Python on that mess. The 12″x24″ Padded Gun Mat stays put on the counter-top and holds guns and gear. The case snaps to either the right or left side of the mat. Interior trays are sized for standard ammo boxes and magazines. Separate compartments hold smaller range gear such as rulers, pens, target markers, and more. When finished, the mat can be rolled and stored neatly and compactly in the case, which fits most range bags.
4. Sellier & Bellot 9x19mm (9mm Luger) Ammunition
We have shot thousands of rounds of Sellier & Bellot 9x19mm Ammo through our 9mm Luger handguns. This ammo has proven very reliable, but also very cost effective. Right now Sportsman’s Guide Members can get 1000 rounds for just $167.19 — just 17 cents per round. We also favor Federal American Eagle 9x19mm ammo, which likewise offers excellent “bang for the buck”.
5. High Contrast Pistol Training Targets
Here are two of our favorite pistol targets. The Splatterburst 12″ x 12″ sight-in target works great for handguns in indoor ranges. Bullet holes appear as bright neon yellow halos. And the contrasting grid lines let you quickly estimate your group size. Each target has five diamonds, and the top of each diamond provides a precise aim point for your front sight. The 12″ Bullseye Pistol Diagnostic Target diagnoses common problems based on shot impact zones. While this target is designed for righties, left-handed shooters can use the target too. Just observe the opposite tips.
Firing an “off-the-rack” M1903 Springfield, using GI-issue “tin-plate” ammunition, George Farr shot 71 consecutive bullseyes at 1000 yards (70 for record), a record that has never been broken.
Today’s Sunday GunDay story is, literally, a blast from the past — 1921 to be precise. We feature a “magic rifle” that set one of the most impressive records in history — one that has never been broken. Here is George Farr’s legendary .30-06 M1903 Springfield. This story is provided courtesy the NRA Blog with photos supplied by the NRA Museums.
An Old Man at the National Matches:
‘Dad’ Farr’s Golden Afternoon at Camp Perry by Doug Wicklund, NRA Museums Senior Curator
It was 1921. Warren Harding was President of the United States, and “The War to End All Wars” was less than three years past. The nation was getting back to a normal routine, and for competitive shooters, that meant an annual pilgrimage through the state of Ohio to the shores of Lake Erie, where the National Matches had been held since 1907 at Camp Perry. In those lighter days of the “Roaring Twenties”, marksmen from states banded together to make the journey, housing together in tent clusters on green lawns well behind the firing points.
The silver plate affixed to George Farr’s M1903 Springfield states: “With this rifle and using issued ammunition Mr. G.R. Farr of Seattle Wash in the Wimbleton Match, 1921, Camp Perry O., made 71 consecutive bulls eyes at 1000 yards”.
But one man at the 1921 National Matches stood out amongst the rest. George “Dad” Farr was a 62-year-old man from the state of Washington, and this was his first time heading east to shoot in the “big leagues”, as some of his fellow Evergreen State friends termed the annual competitions.
Aptly nicknamed, “Dad” was a good bit older than the average shooter during that late summer season, striding forward hesitantly clad in a khaki shirt and dungarees. He wasn’t a practiced High Power shooter — he showed up at Camp Perry without a rifle, and relied on a crude monocular for a spotting scope that he had fashioned from a pair of French opera glasses.
Counting his second sighting shot, George Farr fired 71 consecutive bullseyes at 1,000 yards using an unfamiliar rifle plucked from an ordnance rack earlier that day. It was an amazing feat.
At the previous day’s shooting, he had experienced issues with the initial .30-06 rifle he had chosen from the rack, a Model 1903 Springfield that didn’t seem to hold a consistent zero. This day, he chose a different gun, just another off-the-rack rifle no different from the one next to it. Though he didn’t realize it, George Farr had just made the best selection of his life.
Farr readied his bolt-action and prepared a clip of five rounds of Government Issue ammunition, then went to his position. He was ready to fire on a 1,000-yard target with a rifle he had never shot before.
Perhaps he had resigned himself somewhat to the outcome — after all, it was the last relay of the day on September 9. Off to the west, the sun was beginning its slow trip down to the horizon. But Farr shouldered his Springfield and prepared to fire. The time was 4:30 p.m. Shooters nearby were puzzled by this shooter who squirmed and shifted repeatedly, but were amazed as he made his first hits on paper. Farr was shooting Frankford Arsenal tin-plate ammunition, the standard G.I. .30-06 rounds. More experienced marksmen, like Marine Sgt. John Adkins — who had just won the Wimbledon Cup — were using commercial Remington match ammunition and had spurned the government ammo.
The Historic String of Bullseyes
At that distant 36-inch target, Farr scored two hits for his two sighters, with the last sighter being a bullseye. He then prepared to fire 20 shots for record. Each of those 20 shots went into the center. Each scored as a “5”. At the end of this amazing string, Farr gathered up his monocular and prepared to depart. His fellow shooters quickly advised that match rules required him to continue firing until he missed “the black”, the inner 5-Ring bullseye at the center of the target. Farr had only brought one box of ammunition with him to the firing line, and had run out. As he waited for more of the tin-plate ammo he had been using, the sun continued its retreat. Farr continued his shooting, racking up growing strings of bullseyes – 30, 40 50, 60 – each impact on target being carefully recorded on his scorecard in the growing darkness.
Then, at the 71st shot with daylight completely gone, the bullet strayed outside the target center, and Farr’s incredible string came to its conclusion. But counting his second sighting shot, George Farr had fired 71 consecutive bullseyes at 1,000 yards using an unfamiliar rifle plucked from an ordnance rack earlier that day. It was an amazing feat, one immediately recognized by those in attendance. His fellow shooters quickly took up a generous collection, contributing in recognition of Farr’s natural skill and enabling him to purchase that bolt-action Springfield he had worked magic with on that distant target. Enough funds remained that a silver presentation plate, inscribed with the names of the states whose competitors had contributed, was ordered and mounted on the side of the rifle’s buttstock.
The next year, the Civilian Team Trophy was re-designated as the Farr Trophy, and George Farr’s record, fired on the old target system, was never beaten. Farr’s rifle went home with him to Washington and remained there, never again traveling eastward to Camp Perry. In 2011, The Farr family donated this legendary piece of shooting history to the NRA National Firearms Museum collection.
In 2013, as NRA Museums curators began assembling the collection for display at the NRA National Sporting Arms Museum at Bass Pro Shops in Springfield, Missouri, the museum staff created a unique exhibit featuring George Farr’s Model 1903 Springfield rifle and its special place in competitive shooting history. Alongside the rifle rests Farr’s simple monocular, another mute witness to Camp Perry history made on that September evening in 1921.
Farr’s Springfield… is one of thousands of historically significant firearms found in the NRA Museums collections on display across three locations. To view the collection and learn more about the incredible stories behind each gun, visit the NRA Museums in person or browse the NRA Museums website.
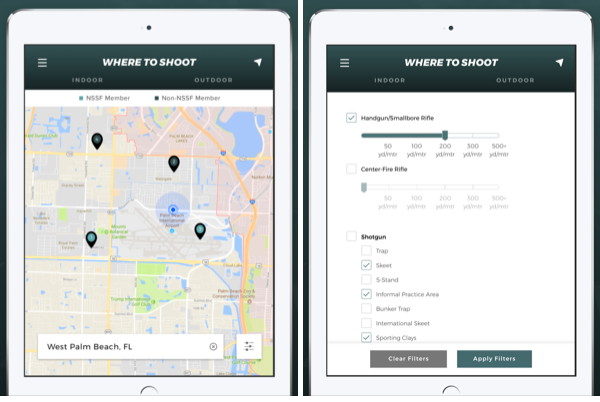
The Where To Shoot Mobile App quickly locates shooting ranges near you, drawing on North America’s most comprehensive directory of shooting ranges. Users can search by current location, state, or zip code. Once you locate a range, you can view activities offered along with a summary of range facilities. You can even get driving directions.
The app is modeled after NSSF’s popular WhereToShoot.org® website and is updated frequently with range information for every U.S. state and Canadian province. Once you’ve located a place to shoot, the App can provide directions to the range. The App also includes video tips for shooters, news, and firearm-safety information.
To help the shooting sports thrive, we need to introduce new participants. And now is a great time to bring a new shooter to the range — the NRA promotes May as Mentor Month. This month, make a commitment to enlist a new shooter. You’ll be helping the fight for the Second Amendment, PLUS you can get a chance to win valuable prizes in the NRA Mentor Sweepstakes.
Tips for First-Time Range Sessions with New Shooters:
1. Start with rimfire — bring a .22 LR rimfire pistol and rifle if possible.
2. Shoot a variety of targets, both paper and steel. The satisfying “clang” and movement of a hit on steel provides “instant gratification” that can make shooting more fun.
3. Invite a buddy AND his spouse. It’s great to get couples involved in the shooting sports — we need more lady shooters. And there’s evidence that women learn faster than guys!
4. Be sure to bring good ear and eye protection for yourself and all guests. We recommend ear-plugs under muffs for maximum sound protection.
The NRA Mentor Initiative is designed to bring new participants, of all ages, into the shooting sports. The aim is to expand interest in firearms, and foster hunting, competitive shooting, and support for Second Amendment rights. CLICK HERE to find a range near you. On that page click the “Places to Shoot” button and type in your Zip Code.
Former NRA President Pete Brownell states: “May has been designated NRA Mentor Initiative month. We are calling on … NRA Members [and] the firearm community, to find someone who has never fired a firearm before, take them to the range and help them put their first rounds on target. It’s been my experience that within minutes of the safety briefing, a lesson on marksmanship and the first pull of the trigger, all of the preconceived notions and media-fueled biases melt away…”
The NRA has a good resource for mentors (and their students). The NRA’s A Guide for New Shooters contains essential safety information and range etiquette instructions. You’ll want to download this PDF to share with your trainee(s).
Click photo to download PDF Guide for New Shooters.
The NRA offers helpful, short videos for new shooters. This video covers safety basics, with a focus on indoor pistol shooting. We actually prefer to start novices at an outdoor range, shooting .22 LR rimfire rifles. Indoor ranges tend to be dark and noisy. The outdoor experience is more like a day at the park.




 Upstate New York heats up in the summer with the largest field target event in the country — the Crosman All-American Field Target Championship (CAAFTC). This very popular airgun event takes place June 21-23, 2019 in upstate New Yorkat the Rochester Brooks International Skeet and Trap Club in Rush, New York. 0ver 100 air rifle and air pistol competitors will participate in the big event hosted by Crosman. This event attracts top Airgunners from across the nation (and some foreign countries). Along with regular Field Target matches, there will be specialty side matches, plus a factory tour. The event is free to the public.If you are a Field Target Shooter and want to attend, don’t hesitate — registration closes soon.



 The
The 
 Metallic Silhouette — A Mexican Import
 Before Steel There Was… Barbeque


 When shooting pistols indoors we recommend quality muffs with earplugs underneath, offering double protection. When inside an enclosed range, with other shooters blasting away right next to you, you really need effective hearing protection. But you also need to hear range commands and be able to communicate with your fellow shooters. That’s why we recommend electronic muffs with plugs underneath. That gives you serious hearing protection during live fire, with the ability to hear voices and converse.