A while back, the Precision Rifle Blog conducted a fascinating study of Muzzle Brakes. PRB figured out a way to show the actual “blast pattern” of gasses ejecting from the ports of muzzle brakes. The result was a fascinating (and eye-catching) series of images revealing the distinctive gas outflows of 20+ different types of muzzle brakes. If you are considering buying and installing a muzzle brake on your rifle, you should definitely review this important PRB Muzzle Brake Test.
For a prone shooter, particularly on dusty, dirty or sandy ground, muzzle blast is a major bummer. Muzzle blast can be very disturbing — not just for the trigger-puller but for persons on either side of the gun as well. Some muzzle brakes send a huge shockwave back towards the shooter, and others send blast towards the ground, kicking dirt and debris into the prone shooter’s face. If there was a way to illustrate those factors — shockwave and debris — that might help shooters select one brake design over another.
Cal Zant at PrecisionRifleBlog.com applied a unique blend of creativity and resourcefulness to try to answer that question for 20+ muzzle brakes. Using high-speed photography and household products, he captured the blast pattern of 20+ different brake designs for easy side-by-side comparison. Can you figure out how Cal managed to show muzzle brake blasts so clearly? His “hi-viz” solution, revealed in the article, is very clever. See the eye-opening results for 20+ brakes, with illustrative photos, by visiting the Precision Rifle Blog Muzzle Brake Ground Signature Test Page.
Kevin Muramatsu’s black rifle book, the Gun Digest Guide to Customizing Your AR-15, is a great resource for fans of AR-platform rifles. All the AR options you can imagine are covered: suppressors, premium barrels, adjustable stocks, free-float handguards, ergonomic grips, buffer systems, tactical lights and much more. Those planning an AR rifle build will find application-specific suggestions for 3-Gun, Service Rifle, High Power (Space Gun), Hunting, and Self-Defense use.
Firearms expert Muramatsu offers advice on choosing the right stock/barrel/optics configuration for your particular game. He also discusses the wide variety of options for slings, grips, magazines and other accessories. With over 520 photos, the book includes a large photo gallery of customized ARs, and includes bonus coverage of the FAL and other “tactical” firearms. The Gun Digest Guide to Customizing Your AR-15 is available from Amazon.com (#ad) for $35.95, and a Kindle eBook version is offered for $14.99. The book is also sold by Barnes & Noble, and most other major booksellers.
This video starts off slow, but it is worth watching if you own any AR-platform rifle. It illustrates the key operations during the charging, loading, firing, and ejection processes. The cutaway animation shows how rounds are stripped from the magazine and then chambered. It then shows how every part of the trigger group works, and how the firing pin strikes the primer.
As an Amazon affiliate, this site can earn revenues through sales commissions.
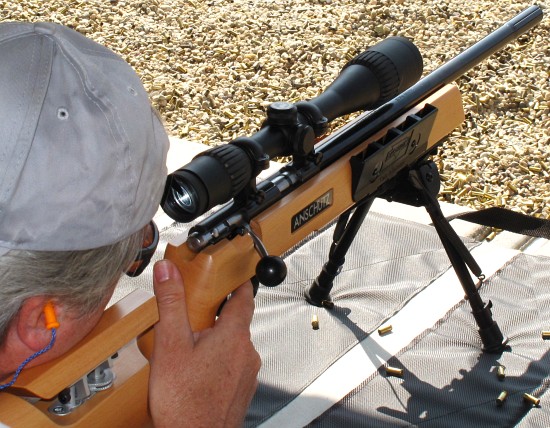
AccurateShooter’s Editor trains with .22 LR Anschutz model 64R back in 2008.
Rimfire Tactical Matches Aren’t Really New
NRL22 and PRS 22 rimfire shooting disciplines are fun, affordable forms of competition. We’re pleased to see the rapid growth of NRL22 and PRS rimfire. However, the concept of a rimfire tactical/practical match is not new — at least on the West Coast. Way before anyone every heard of PRS, California shooting clubs conducted “Rimfire Tactical” matches. These matches were first fired nearly two decades ago. CLICK HERE to read our comprehensive Rimfire Tactical report from way back in 2008. That article includes free targets, ballistics charts, and a complete run-down on suitable rimfire rifles.
The Concept Behind the Rimfire Tactical Match by Bill Erwin
Many guys who shoot long-range tactical matches practice with .22 LR rifles of similar configuration. Rimfire ammo is way more affordable than centerfire, you do not need a big range facility, and shooting rimfire saves wear and tear on your centerfire rifle. Further, for learning how to read the wind, there really is no better training tool than a 22 LR, even as close as 50 yards. Check out this table showing how a .22 LR ballistics compare to .308 Win:
.22 LR vs. .308, Distances for Equal 10 MPH Wind Drift
This table shows the corresponding distances at which a 10 mph full-value crosswind pushes a .22 LR bullet and .308 projectile the same amount. Values are based on 0.130 BC for a 40gr .22 LR bullet, and 0.496 BC for 175gr .308 bullet.
22 LR 40gr 1050 fps
50 yd Wind 1.0″
75 yd Wind 2.2″
100 yd Wind 3.8″
125 yd Wind 5.8″
150 yd Wind 8.2″
175 yd Wind 11.0″
200 yd Wind 14.3″
.308 Win 175gr 2650 fps
130 yd Wind 1.07″
180 yd Wind 2.15″
230 yd Wind 3.68″
280 yd Wind 5.63″
330 yd Wind 7.98″
380 yd Wind 10.71″
440 yd Wind 14.56″
This table shows how the .22 LR can be an effective substitute for a .308 Win during training. Because the smaller bullet drifts more in the wind, a .22 LR rimfire shooter will experience roughly the same crosswind effects as if he was shooting a 175gr .308 Win twice as far out. So, rimfire work can teach you to dope the wind like a .308 Win, but at less than half the distance. Shooting a .22 LR at 100 yards is like shooting a .308 Win (with 175gr SMK) at 230 yards.
SPECIAL BONUS–Rimfire Tactical Precision Targets
These FREE targets by DesertFrog are offered in Adobe Acrobat format for easy printing. CLICK HERE to download all six targets as a .ZIP archive.
Rimfire Training Target for Fun Matches
Here’s a rimfire training target with “big to small” target circles. Start with the largest circles, then move to the smaller ones in sequence. This systematic drill provides increasing challenge shot-by-shot. Novices often are quite surprised to see their accuracy improve as they move from bigger to smaller aiming points. That provides positive feedback — always a good thing.
Right Click and “Save as” to download printable PDF versions of target.
Today we feature a modern switch-barrel PRS chassis rifle set up for quick changes between 6mm Creedmoor and 6.5 Creedmoor barrels. The owner, Forum member Jeff Cosgrove (aka “Punkur67″) uses the 6 CM barrel for competition, favoring the reduced recoil over its 6.5 mm big brother. He does use the 6.5 CM barrel for practice (given its better barrel life). The 6.5 CM barrel also gives him the chance to shoot a variety of factory 6.5 Creedmoor ammo.
- Terminus Zeus action with Quick Change (QC) barrel option.
– 6mm Creedmoor Pre-Fit Bartlein Heavy Varmint 400MODBB barrel for matches
– 6.5 Creedmoor Pre-Fit Benchmark Heavy Palma barrel for training
– MPA BA Competition chassis with full weight kit
– Zero Compromise Optic ZCO 5-27x56mm FFP scope
– TriggerTech Diamond trigger
This rifle represents an evolution for Jeff. Each step along the way in his PRS journey, he has learned more about what he wants and needs in a competition rifle. And what you see here, from the $3760 ZC527 scope to his high-tech reloading equipment, represents pursuit of excellence. Jeff even created a modern, spacious man cave/reloading center in his new house (photos below).
Quick-Change Barrel System with Terminus Zeus QC Action
This rifle has two pre-fit barrels that work with the Terminus Zeus QC Action for fast and easy barrel swaps. To remove a barrel, you simply release two tension screws on the front of the action and then unscrew the barrel. To swap in a different pre-fit barrel, reverse the process and then tension the screws. The Terminus Zeus is 3-lug receiver with 60° bolt and integral recoil lug. Both the receiver and bolt are DLC-treated. Jeff reports this action is extremely smooth and has met all of his expectations. Some other Zeus features are threaded trigger pins for quick/easy trigger installation, and a roller-tipped cocking piece.
PRS Discipline Offers Fun, New Challenge for Long-Time Shooter
My name is Jeff Cosgrove, I live in Winchester, California and do commercial heating and air conditioning. I have shot for 20+ years but I found my interest in shooting was dwindling over time. I got somewhat bored with shooting paper at 100 yards or plinking cans out in the desert. About 18 months ago I decided I wanted to shoot long range. I picked up a used MPA in .300 Winchester Magnum and started shooting long range with a new buddy. That day I fell in love with guns all over again with more intensity than ever.
How I Got Started in PRS
With that new .300 WM I soon found my reloads were not up to my expectations (high ES/SD), so I purchased all new reloading hardware. One of my purchases was a used Benchsource Annealer. The guy I bought that from asked if I had ever tried PRS and he invited me to check out a match. So I went to a local PRS event as a spectator. I looked at many rigs on the firing line and took notes. By the end of the day I knew this was something I really wanted to do. I then acquired a used chassis rifle that I thought would work well for PRS. I went to a PRS match the following month but shot poorly.
After working with that first PRS rifle, a 6.5 CM with Stiller Tac30 action, MDT chassis, and Proof Carbon-wrapped barrel, I quickly learned that gun did not handle and balance the way I hoped.* It was too light in the front, the ergos were poor, and scope eye relief was not optimal. So I decided to build my own GEN 2 PRS rifle. This is the story of how I put together my new switch-barrel rig that I now use in competition.
PRS Rifle and Gear Selection — Learning What Works
Barrel availability was limited given the current shortages. Luckily I was able to obtain a 6mm Creedmoor pre-fit Bartlein Heavy Varmint 400MODBB from Southern Precision Rifles. The 6mm Creedmoor is notorious for being a barrel burner cartridge so I went with the special 400MODBB metal. Bartlein says that barrel life expectancy is 1.5 to 2 times longer than the standard 416 grade steel. I also purchased a 6.5 Creedmoor pre-fit Benchmark Heavy Palma barrel for training (Source: Straight Jacket Armory). With the Terminus Zeus quick change system I am able to swap from my match barrel to my trainer barrel in just a couple minutes. I loosen two set screws, unthread the barrel, thread the new barrel on, and torque the set screws to 10 inch-pounds. This also affords me caliber options in case I’m in a pinch for ammo. If I have some 6.5 CM loaded up and don’t have time to load 6mm Creedmoor for a match, then I’m covered.
For the trigger, I went with a TriggerTech Diamond Pro curve model. I have Timney, Jewell, and TriggerTech triggers in other rifles. I like them all but I liked the feel of the TT Diamond the best so that is what I used on this build. I set my triggers around 18-20 oz. — I am not a fan of ultra-light trigger pulls.
MPA BA Competition Chassis with Added Weight
I went with an MPA BA Comp chassis with full internal and external weight kit. I also have Gray Ops external weight on the handguard. I had the same chassis on my .300 WinMag and felt very comfortable with it. I took a PR1 class and found that, with a different gun, I had to force a comfortable hand position for proper trigger pull. After that class I grabbed my MPA and my hand fell in to the perfect position. I did not need to hunt or index my hand with the MPA. The built ARCA rail (RAT) lowered the rifles center of gravity more than my old setup with the ARCA rail bolted to the bottom of the handguard. With the current configuration, the rifle weighs in at 24 lbs. and balances three inches in front of the magwell. I now have the flexibility to add, subtract, or move approximately 6 lbs. of weight.
The Attraction of PRS/NRL Practical Competitions
I really enjoy PRS-style shooting because there seems to be a new challenge every time you compete — no matter what. With PRS I am shooting many different positions and ranges with the pressure of a stopwatch. This keeps things interesting for me. I have taken a few training classes to help establish good, clean fundamentals.
Jeff says it is hard to practice for the many unconventional shooting positions at PRS matches.
My biggest challenges so far have been: 1) building stable shooting positions that I have not practiced enough; 2) proper equipment selection; and 3) time management. Regarding the shooting positions — PRS/NRL is not like F-Class where you can always practice from one position. And it’s hard to practice for unusual set-ups (barriers and positions) you’ve not encountered before. Concerning equipment — you need some experience in the game to determine what really works best for you.
Innovative Zero Compromise Optic — Optimized for the Tactical Game
The scope is a Zero Compromise ZC527 (5-27x56mm FFP) with MPCT2 reticle. Zero Compromise Optic is a relatively new manufacturer, but their scopes are top-flight. The First Focal Plane ZCO has excellent glass that is extremely bright and clear. With a big 36mm main tube, the ZC527 offers 35 Mils Elevation and 21 Mils Windage adjustment. The field of view is 21 feet at 100 yards — one of the widest in the industry. The ZC527 also offers illuminated reticle and locking turrets. When I was at my first PRS match I looked through several different scopes. When I got behind a ZCO scope I knew this was what I wanted — the ZCO scope was super clear, super sharp, with very positive controls.
I put a protective wrap on the scope because with some of our PRS stages it is easy to scratch or dent the scope tube. You don’t want to bang up an expensive scope — the ZC527 retails for $3760.
Reloading for 6mm Creedmoor and 6.5 Creedmoor
When starting out with a new cartridge I like to search places like AccurateShooter.com and UltimateReloder.com for popular recipes used by knowledgeable shooters. I am all about paving your own way on certain things but with the consistency, higher cost, and limited supply of components these days I try to stick with the most common loads. I also want to limit barrel wear and get through load development quickly. I don’t want to chase loads for 300 rounds to ultimately land in the same place that so many other people have already found.
I start my new barrels with virgin brass and load three rounds at each charge weight in 0.2 grain increments. I put the most popular charge weight (for my chosen bullet) in the middle of my load range and load above and below to find a good node while paying close attention for pressure signs along the way. I use the 6.5 Guys spreadsheet (see below) to help analyze my results. With those results I like to re-test a narrower range with 5-10 rounds each charge weight in 0.2 grain increments. I again use the 6.5 Guys spreadsheet to make a final charge weight selection and then I move on to seating depth. I will load different depths to tighten the groups up.
Load Development Using 6.5 Guys Custom Spreadsheet
To hold and analyze my load development data I use the spreadsheet from 65Guys.com. It helps a ton with making a decision on your final load. This Excel spreadsheet works great and makes it simple to analyze your data. You can even copy and paste your chronograph data if your chrono logs on to a SD card.
In this 6.5 Guys video Steve provides an overview and tutorial for using the Excel load development analysis model that he has developed. The Excel Load Development Analysis Spreadsheet version 2.0 is FREE. Download from the 6.5 Guys Website.
In this video Steve explains some key statistical concepts for performing load data analysis. He also provides tips and guidance for determining the optimal load for your rifle as you analyze the load data you’ve collected.
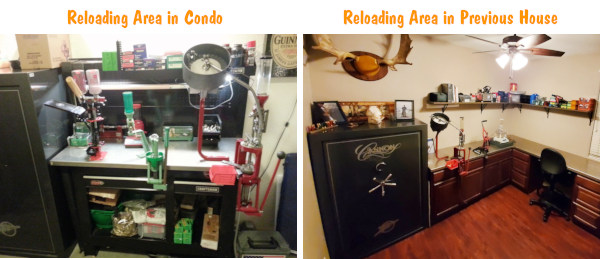
New House, New Man Cave/Reloading Room
Jeff recently moved with his family into a great new house. One bonus of this move was that he upgraded from a cramped reloading area to a dedicated “Man Cave” that has ample space for his gun safes, multiple presses, and all his reloading components. Large upper and lower cabinets plus a dedicated “gun closet” provide plenty of storage. Read all about this move in this AccurateShooter Forum Thread.
Here is Jeff’s first reloading area years ago: “My first reloading setup was smashed in my two-bedroom condo so I had a very small bench that was very cluttered. I had to deal with the limited space I had but I made it work. Then in our first house I had a larger bench/cabinet, but it was still not ideal.”
Here is the new Man Cave in the new house — very open, spacious, with plenty of storage.
This animated GIF shows the new Man Cave move-in process start to finish:
Hornady has announced a new 25 Creedmoor cartridge. The SAAMI-accepted 25 Creedmoor is a necked-down version of the popular 6.5 Creedmoor. It’s primarily designed for hunters who prefer a compact 25-cal cartridge. Some PRS/NRL shooters may also turn to the 25 Creedmoor because it offers heavier bullets than the 6mm Creedmoor. This allow easier perception of hits on steel at longer ranges. The bigger bullet transfers more energy.
“The 25 Creedmoor is the end result of our constant pursuit of maximizing ballistic potential” states Jayden Quinlan, Hornady Senior Ballistician. “This cartridge fills that competitive niche between 6mm and 6.5mm — providing shooters the absolute best blend of moderate recoil, flat trajectory, and superior wind resistance.”
Hornady claims that, given its up-to-date case design, the “25 Creedmoor is the first SAAMI-accepted 25 caliber cartridge that was explicitly designed to take full advantage of the sleek, low-drag bullets that are now available.” As you might expect, the 25 Creedmoor has a 2.800″ overall length to function properly from AICS-style magazines.
“Variants of the 25 Creedmoor have existed in the wildcat space for quite some time and for good reason … it gives the discerning shooter a competitive advantage. Now we can offer that same level of performance to the shooter with factory ammo offerings” added Quinlan. Hornady claims that the 25 Creedmoor is the “first SAAMI‑accepted .25 caliber cartridge purpose‑built to harness today’s sleek, low‑drag bullets.”
Filling the gap between the 6mm and 6.5mm, Hornady claims that this new 25-caliber cartridge delivers exceptional accuracy and functions perfectly in AICS‑style magazines. For PRS/NRL shooters this offers a middle range of recoil between the 6mm Creedmoor and 6.5mm Creedmoor. Hopefully Hornady’s 25-caliber bullets will prove accurate. Initially you’ll have a choice of a 128gr ELD-X hunting bullet and a 134gr ELD Match gullet — both offered in Hornady factory ammo:
For the new 25 Creedmoor cartridge, Hornady will be offering modified cases and a variety of die sets.
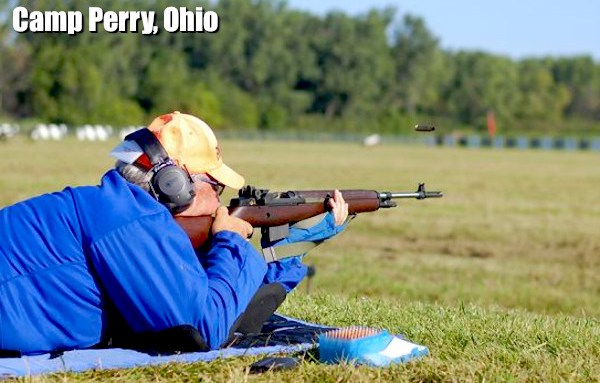
The CMP M14 Heritage Match was held Sunday, August 3, 2025 at the Viale Range at Camp Perry.
M1A rifles at M14 Heritage Match at Camp Perry
Today we feature the M1A rifle. Last week, the rugged M1A rifle, descended from the M1 Garand and M14, was the star of the show at Camp Perry. The M14 Heritage Match was held last Sunday, August 3, 2025, at the CMP 2025 National Rifle Matches.
History of the M14 Heritage Match and Springfield M1A Match
The M14 Heritage Match, previously the Springfield Armory M1A match, began with one man’s concept. Springfield Armory’s Mike Doy witnessed the waning of classic M1 Garand and M1A rifles from the competitive High Power firing lines. “I really wanted to get those M1A rifles out of safes and closets and back out onto the field. So [in 2008] I promoted the idea of running an M1A-specific match at Camp Perry. That first year we had over 600 competitors and spectators.” After running as a Springfield Armory-sponsored match (with cash prizes) for many years, the match is now the “M14 Heritage Match”.
Folks, take the time to WATCH this 3-minute video. It has great match footage of Camp Perry and interviews with M1A competitors. Well worth watching!
Nick Till in 2009 M1A Match. Nick was the 2007 Service Rifle Nat’l Champion. Photo courtesy NRA Blog.
M1A Competition at Camp Perry National Matches
For many years, the semi-auto version of the M14 was “top dog” in iron sights Service Rifle competition. Now that discipline is dominated by .223 Rem (5.56×45) AR-type rifles, but the bigger .308-caliber rifle, now sold as the M1A, remains popular. The CMP hosts a major M1A Match every year at Camp Perry now called the “M14 Heritage Match”. Significant prizes are awarded. In past years M1A Match competitors took home over $25,000 worth of cash and merchandise when the match was sponsored by Springfield Armory.
Photo courtesy Civilian Marksmanship Program.
M1A Match 2016 — Rapid Fire Sitting Stage
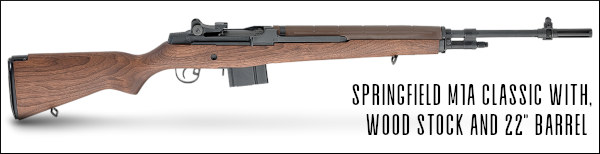
In the April 2018 issue of Shooting Sports USA, you’ll find a good article on the civilian version of the M14, now sold commercially as the Springfield M1A. An evolution of the battle-proven M1 Garand, the M14 was designed to shoot the 7.62×51 (.308 Win) round instead of the larger .30-06 Springfield cartridge used in WWI, WWII and Korea. While the vast majority of today’s M1As are chambered for .308 Win/7.62×51, Springfield Armory also produces a 6.5 Creedmoor version.
Dick Jones reports that accurized M14/M1As could post remarkable scores: “The accuracy potential of the M14/M1A is unquestionable. During their reign as service rifles, they produced multiple perfect 200 scores at 600 and 1000 yards in the hands of top shooters. This is a difficult feat with a modern, scoped, magnum-caliber rifle and remarkable with an iron-sighted battle rifle. Good competition rifles can group 10 shots under one MOA, and the meticulously-massaged rifles used by the top shooters during my career would consistently put up 10 shots under an inch at 200 yards off a test cradle.”
In this video, YouTube Reviewer Hickok 45 compares the M1 Garand and the M14/M1A:
“Descended from the M1 Garand, the M14 utilized multiple improvements that made it a far superior firearm for combat and a much better rifle for competition.” — Dick Jones, Shooting Sports USA.
M1A Match Equipment Rules and Course of Fire
Renewed interest in the M1A led to the first dedicated Camp Perry M1A match in 2008. That first-ever match drew over 500 shooters. Match equipment rules allow pretty much all types/grades of M1As. The one-day course of fire consists of 50 shots at 300 yards on the NRA MR-65F target, as follows: 5 sighters; 20 shots slow-fire prone; 10 shots rapid-fire prone; 10 shots rapid-fire, kneeling or sitting; and 10 shots slow-fire standing. Here are photos from the 2014 MIA match, courtesy NRA General Operations.
See how the modern M1A is built in this Springfield Armory Video:
As racing improves automobiles, competition improves firearms, and the current crop of Springfield M1As, from the Basic to the top-of-the-line Super Match and Loaded models, reflects the years of development. The M14 and its variants are … still considered by many to be the best battle rifle in the history of the U.S. Military. — Dick Jones, Shooting Sports USA
So you’re thinking of buying a suppressor (aka “moderator”, “silencer”). You can’t just get one off the shelf at Walmart. Acquiring a suppressor requires filling out paperwork and paying a Federal $200 Tax Stamp. Plus there is typically a pretty long wait. However, the good news is that suppressor ownership is now legal in 42 of the 50 American states — that’s 84%! For most American adults, getting a suppressor is legal, provided the buyer passes the required background checks (explained below). The 42 “suppressor-friendly” states are shown as RED in the illustration below.
States Where Suppressor Ownership is Allowed
These 42 states allow private ownership of suppressors: AL, AK, AZ, AR, CO, CT, FL, GA, ID, IN, IA, KS, KY, LA, ME, MD, MI, MN, MS, MO, MT, NE, NV, NH, NM, NC, ND, OH, OK, OR, PA, SC, SD, TN, TX, UT, VT, VA, WA, WV, WI, WY. Note: Even if you live in one of the states listed, you should still verify that owning a suppressor is legal in your area. Some states may have municipal- or county-based restrictions.
“Suppressor ownership [has] boomed in the 21st century. Thanks in part to companies like Silencer Central that streamline the purchasing process, the number of registered suppressors has grown from 285,000 in 2010 to over 2.6 million in 2020.” — GunsAmerica Digest
States Which Prohibit Suppressor Ownership
The eight states which prohibit suppressor ownership are: California, Delaware, Hawaii, Illinois, Massachusetts, New Jersey, New York, and Rhode Island. These states are shown in GRAY in the map.
Good News — Suppressor Tax Will Be Eliminated Next Year
The suppressor transfer tax has not been eliminated yet, but it will be reduced to $0 (zero) starting January 1, 2026. This law change was effectuated by recent Federal legislation through Congress and signed by President Trump. The “One Big Beautiful Bill”, passed by Congress and signed into law by President Trump on July 4, 2025, includes a provision reducing the NFA tax stamp on suppressors and short-barreled firearms to $0. The Silenco Video below from 8/4/2025 explains the new law changes.
Current Status: As of today, August 10, 2025, the $200 tax stamp is still required for the purchase of suppressors and other NFA items.
Effective Date: This change to a $0 tax stamp will take effect on January 1, 2026.
Interim Period (August 2025 – December 2025): Some retailers, like Silencer Central, are offering promotions to cover the $200 tax stamp fee on select suppressors purchased before the $0 tax stamp becomes effective, according to Silencer Central.
NFA Regulations Still Apply: Even after the tax stamp is eliminated in 2026, suppressors will still be regulated under the National Firearms Act (NFA). This means you’ll still need to go through the ATF process, including fingerprinting and background checks, to acquire a suppressor.
Qualifications to Obtain a Suppressor
To legally obtain a suppressor, you must fill out Federal Forms and pay a $200 fee to the ATF. You must also pass BATFE background checks and otherwise comply with Federal and state laws. States can regulate suppressor ownership or use, so be sure to check the laws in your area. On the federal level, the process to acquire a suppressor is regulated under the National Firearms Act of 1934. According to the American Suppressor Association, to own a suppressor in the United States you must:
1. Be at least 21 years of age to purchase a suppressor from a dealer.
2. Be at least 18 years of age to purchase a suppressor from an individual on a Form 4 to Form 4 transfer (contingent on state laws).
3. Be at least 18 years of age to possess a suppressor as a beneficiary of a trust or as a member of a corporation (contingent on state laws).
4. Be a resident of the United States.
5. Be legally eligible to purchase a firearm.*
6. Pass a BATFE background check with a typical process time of 8 to 10 months.
7. Pay a one time $200 Transfer Tax. NOTE: This tax will be eliminated as of 1/1/2026.
*That fifth requirement, “be legally eligible to purchase a firearm”, involves a list of factors. The prohibitions are set forth in the “prohibited person” list found on ATF Form 4473.
This Gun Digest book has become a “go-to” resource for NRL22 and PRS Rimfire shooters. Key topics included in this 2021 Edition full-color Gun Digest book include: rimfire semi-autos and how they work; bolt-action accuracy; match shooting skills; DIY precision gunsmithing; hunting with rimfires; and the future of the rimfire market.
With the growth of rimfire tactical competition, the .22-Caliber rimfire rifle is more popular than ever. Every major gun manufacturer has brought at least one new .22 LR rimfire rifle to the market in the last two years. Gun Digest’s Rimfire Revolution has extensive coverage of new models from major manufacturers.
The .22 Long Rifle (.22 LR) is the planet’s most popular ammunition type and firearm chambering. The .22 LR is used in the Olympics by 3P marksmen, but it also serves benchrest competitors, NRL22 shooters, backyard plinkers, small-game hunters, and tactical trainers. With the expansion of NRL22 matches (and the PRS equivalent), the humble .22 LR is undergoing a major resurgence in the USA. And with centerfire reloading components being so costly and difficult to find, many folks are shooting less centerfire, but way more rimfire.
Plus Coverage of .17-Caliber Rimfire Rifles — 17 HM2, 17 HMR, 17 WSM
This 272-page book also covers .17-caliber rimfire cartridges: 17 HM2 (Mach 2), 17 HMR, and 17 WSM. These are all excellent varmint rounds, with the 17 WSM effective out to 250 yards. The 17 HM2 will run in a normal .22 LR action and feed from standard .22 LR magazines. So, for most rifles, all you need to do a .22 LR to 17 HM2 conversion is a barrel switch. That gives your rimfire rig twice the versatility. Shoot .22s and .17s with the same gun.
NRL22 — Challenging Practical Competition with .22 LR Rifles
The USA has seen a big growth in rimfire tactical matches over the last five years. Right now there are probably ten times as many rimfire tactical matches as sanctioned PRS and NRL centerfire matches. The reason is simple — rimfire ammo is much less costly, and clubs can run challenging rimfire tactical matches at nearly any outdoor gun range that allows shooting out to 200+ yards.
NRL22 Competition — Tactical Rimfire Matches
The NRL22 match format is a great shooting discipline. NRL22 offers a high fun factor at relatively low cost. You don’t have to reload match ammo. A couple of 50-round boxes of .22 LR ammo will get you through the match. While some people bring lots of gear to matches, that’s by choice and not by necessity. You can keep it simple and still be competitive (and win).
Tips for NRL22 Competitors by Jonathan Ocab
I am a match director at my gun club and run our local NRL22 matches. People often ask me for tips for competing in NRL22. First, I recommend getting the course of fire for the month in advance and practicing those stages at the range. Here are other specific tips that should help NRL22 competitors improve their gun-handling and match results.
1. Dry Fire Practice — If you are not able to do live fire practice at the range, I encourage shooters to practice their shooting positions at home via dry fire. Setup props or barricades with pasters or other faux targets on a wall in the garage or inside the house and run through each stage.
2. Scope Magnification Level — The most common issue I see with newer shooters in NRL22 is the tendency to maximize their scope magnification. The timer will start, and the shooter gets into position on a target, but the scope is set to 15x or higher and the shooter can’t find the target. The shooter lowers the magnification, locates the target, and then increases the magnification again, takes the shot, transitions to another target, and repeats the process of decreasing magnification, locating target, etc. Novice NRL22 shooters should try using the mid-range magnification. Try shooting 7x-12x and learn to balance field of view and target image.
Are you looking to get started in PRS and NRL practical precision rifle competition? Or perhaps you’d like to advance your skill set so you can place higher in big matches (and get your hands on those prize table items)? Of course there is no substitute for trigger time in the field, but there ARE some great print resources. These four books can help you select the right equipment, improve your shooting skills, make better wind calls, increase your fitness, and develop a more efficient between-match training program.
1. Precision Rifle Marksmanship: The Fundamentals
Frank Galli, $21.13 Paperback, $20.07 Kindle
Frank Galli (aka “LowLight”) is the founder/head honcho of SnipersHide.com, the most active tactical community on the internet. Galli is also a retired USMC scout-sniper. Practical Precision Rifle shooting is one of the hottest trends in competitive shooting today. PRS and NRL matches draw big turn-outs and boast impressive prize tables. Galli’s Precision Rifle Marksmanship (#ad) book covers the fundamentals of precision marksmanship with easy-to-understand methodology. The book uses the same instruction process that Galli uses in his live marksmanship classes.
As Sniper’s Hide guru Frank Galli explains, there is no voodoo when it comes to precision rifle marksmanship, but there are techniques that, when practiced, make the difference between good marksmanship and great marksmanship. Understanding the reasons that a bullet hits or doesn’t hit its intended target at ultra-long distances is a crucial element to learning. Galli’s explanations of how to understand and compensate for wind speed and direction are excellent — great wind-reading advice.
Published in 2020, this 272-page well-illustrated book covers the latest equipment (scopes, LRFs, chassis systems, mags, bags, bipods, tripods) favored by tactical competitors in PRS/NRL type matches.
2. Long Range Shooting Handbook
Ryan Cleckner, $24.95 Paperback, $9.99 Kindle
Ryan Cleckner’s Long Range Shooting Handbook (#ad) is the best-selling modern book on practical rifle skills. A former U.S. Army sniper instructor, Cleckner is knowledgeable, and his text is well-organized and chock full of good information. You can view Sample Chapters on Amazon.com.
Ryan Cleckner’s highly-regarded Long Range Shooting Handbook is designed as an intro to important fundamental concepts such as MOA vs. Mils, External Ballistics, and Environmental Effects. Included are personal tips and advice based on Cleckner’s years of experience as a sniper instructor.
The Long Range Shooting Handbook is divided into three main categories: What It Is/How It Works, Fundamentals, and How to Use It. “What It Is/How It Works” covers equipment, terminology, and basic principles. “Fundamentals” covers the theory of long range shooting. “How to Use It” gives practical advice on implementing what you’ve learned, so you can progress as a skilled, long range shooter. This book will benefit any long-range shooter, not just PRS/NRL competitors.
3. IMPACT! — Training and Preparing for Precision Rifle Matches
Rodney Maze, $14.99 Paperback, $4.99 Kindle
Impact!, by PRS competitor Rodney Maze, is an entry/intermediate level guide to preparing yourself and your equipment to compete in precision rifle type matches. It will also benefit anyone looking to learn about practical-style long range and precision shooting. We recommend you check it out for yourself — there are 20 Pages of free sample content (#ad) on Amazon. Topics covered include:
— Rifle, optic, and equipment selection
— Setting up your rifle, bags, tripods for PRS/NRL matches
— Understanding ballistics and how to record and use ballistic data
— Techniques for using holdovers for multi-target stages
— Gun skills, rapid fire techniques, clearing malfunctions
— Shooting off of barricades, and specialty stages
— Effects of wind and how to improve your wind calls
— Tips for live fire and dry fire practice
— Preparing yourself and your equipment for a match
— Mental strategies and techniques
Impact! is illustrated with plenty of photographs. Topics are divided logically, and concepts are explained in clear language. Also included is an extensive glossary of terms used in precision shooting and a list of additional resources you can use to further pursue your precision shooting knowledge. This book also includes a handy Appendix with formatted pages for recording data about your rifle, scope, and ammunition. There is also a Wind table for recording your rifle “dope” and wind hold-offs. Lastly, Impact! has a useful table of unit conversions.
4. Practical Shooter’s Guide
Marcus Blanchard, $19.98 Paperback, $9.99 Kindle
Thinking of getting started in the Practical/Tactical shooting game? Looking for ways to be more stable when shooting from unconventional positions? Then you may want to read Marcus Blanchard’s Practical Shooter’s Guide (A How-To Approach for Unconventional Firing Positions and Training) (#ad). Unlike almost every “how to shoot” book on the market, Blanchard’s work focuses on the shooting skills and positions you need to succeed in PRS matches and similar tactical competitions. Blanchard provides clear advice on shooting from barricades, from roof-tops, from steep angles. Blanchard says you need to train for these types of challenges: “I believe the largest factor in the improvement of the average shooter isn’t necessarily the gear; it’s the way the shooter approaches obstacles and how they properly train for them.”
As an Amazon affiliate, this site can earn revenues through sales commissions.
Do you know someone who recently purchased his/her first handgun and is getting started in the shooting sports? Or do you need to brush up your own pistol skills? Then check out a new FREE video training series from the SIG Sauer Academy: Shooter’s Edge — Learning to Shoot.
Here is the Second Video from the Shooter’ Edge series, covering Basic Rules of Firearms Safety:
This video series features foundational handgun classes at the SIG Sauer Academy in New Hampshire. The ten-episode series takes viewers into the classroom and onto the range as the instructors walk through the fundamentals of handgun safety, shooting techniques, practice and training exercises, along with instruction in equipment options and handgun selection. The series was shot on location during several of the Academy’s introductory classes.
Click Below to Access Full Video Series on SigSauer.com:
The Shooter’ Edge Series includes the following episodes: Learn to Shoot at SIG Sauer Academy; Basic Rules of Safety; Types of Handguns and Ammunition; Foundational Shooting Techniques; How to Practice and Train Effectively; Choosing the Right Gun; Equipment and Its Purpose; Holsters — Presentation and Recovery; Magazines — Loading and Unloading; and What Happens After Learning to Shoot.