A while back, Cal Zant at PrecisionRifleBlog.com did a big muzzle brake comparison test. Along with measuring recoil reduction, Cal’s team recorded sound levels in PRB’s exhaustive muzzle brake field test. In the PRB archives you’ll find comprehensive muzzle brake sound test results, with hard data on 20 different muzzle brakes.
Sound can be a tricky subject, but Cal Zant, the editor of PrecisionRifleBlog.com, presents everything an informed shooter should know about muzzle brake noise in a straightforward and practical way. Most sound tests are measured from the side of the muzzle, in accordance with mil-spec standards, and Cal did that. But he also measured the sound level of each brake from behind the rifle, closer to the shooter’s position. This provides a more accurate indicator of the actual sound levels firearms operators will encounter while shooting.
Muzzle brakes ARE really loud — that’s something most active shooters have observed. But this study finally gives us some hard data and makes objective comparisons. The difference between brakes was quite significant. Some brakes were ear-splitting — more than twice as loud as other brakes tested.
As a bonus, Cal also provides data on how the new Ultra series suppressors from Thunder Beast Arms Corp (TBAC) compare in terms of sound level behind the rifle.
Is The Challenge Of Big Bore Extreme Range Shooting Right For You? By James Patterson
This article originally written for the Sinclair Reloading Press
Handling a .50 BMG Rig
Is a .50 BMG caliber rifle difficult to shoot? Not at all. The relatively heavy weight of a standard rifle at 30 pounds or more combined with a very efficient muzzle brake makes it a pleasure to shoot. The typical recoil can be compared to a .243 rifle or a 12 gauge trap load. On the other hand, the burning of a typical load of 230 grains of powder combined with that muzzle brake makes the muzzle blast experience exhilarating. A first time shooter will fire, pause for a moment in awe at the muzzle blast, and then break out into what has become known as “The 50 Caliber Grin”, almost impossible to wipe from ones face. My daughter started competing with the .50 BMG at 18 (115 lbs of tall skinny girl) and happily shoots 100+ rounds in the course of a match, her grin on the last round is as wide as on the first! Many members and competitors in the FCSA are women and many have distinguished themselves as excellent marksman having set world records on numerous occasions.
Cost of Big-Bore Shooting
Is owning and shooting a .50 BMG caliber rifle expensive? Relatively speaking yes, but one must put it into perspective. Rifles may run from $2500 to $7000, maybe even more for a top of the line custom rifle. A good scope will set you back $1000 to $3500. And while excellent commercial ammo is made, it is hard to find these days and runs from $4 to $6 a round. Most serious shooters start reloading for the rifle as soon as practical, not only for the economics of reloading but also for the ability to fine tune custom ammo for their specific rifle. It’s a very rare match that is won shooting commercial ammo. I recently compared the cost of my hobby — owning, shooting, and competing with the 50 BMG — with a friend whose hobby is snowmobiling. Factoring in the cost of equipment, licensing, gasoline, clothing, etc. it was soon obvious that my hobby was significantly less expensive than his.
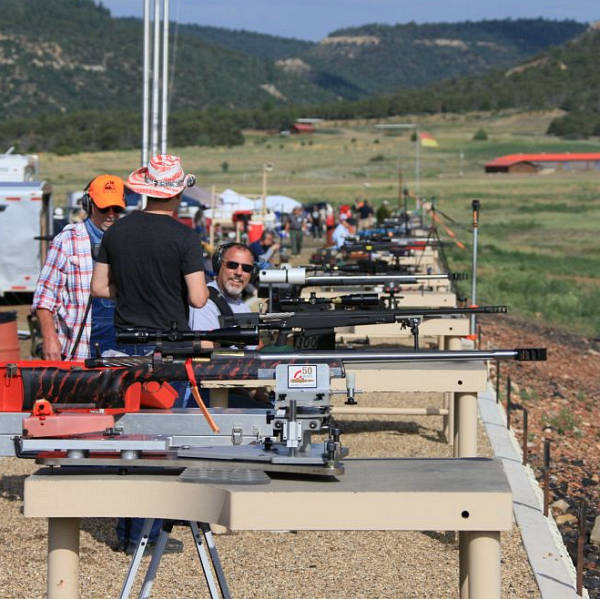
Getting Started So how does one get started? You could do as I did, purchase a rifle not knowing what you were really getting into; or you could come out to a FCSA-sponsored event, shoot a number of different rifles, rub shoulders with those who have already taken the plunge, and see if this sport is right for you. While membership in the Fifty Caliber Shooters Association (FSCA) is required to compete at a FSCA event, membership is not required to come and experience first hand what is going on. If you have any inclination that you are interested in the extreme sport of long rang, big bore shooting then a year’s membership in the FCSA is only $60 ($20 for active duty military) a significant bargain if it helps you make just one well-informed equipment choice. In addition one of the primary functions of the FCSA is helping to identify active members near you who can help you understand just what is involved and help you ‘get your feet wet’ in this challenging sport.
On the Applied Ballistics Facebook page a few seasons ago, Ballistician Bryan Litz posed a “Tuesday Trivia” question about ballistics. This being Tuesday we thought we’d bring back this interesting brain-teaser — a true/false question about bullet stabilization. On shooting forums you often find heated arguments about “over-stabilization”. Bryan wants readers to consider the issue of over-stabilization and answer a challenge question…
Is This Statement TRUE or FALSE?
“The problem with ‘over-stabilizing’ a bullet (by shooting it from an excessively fast twist rate) is that the bullet will fly ‘nose high’ on a long range shot. The nose-high orientation induces extra drag and reduces the effective BC of the bullet.”
True or False, and WHY?
Click the “Post Comment” link below to post your reply (and explain your reasoning).
Bullet Movement in Flight — More Complicated Than You May Think
Bullets do not follow a laser beam-like, perfectly straight line to the target, nor does the nose of the bullet always point exactly at the point of aim. Multiple forces are in effect that may cause the bullet to yaw (rotate side to side around its axis), tilt nose-up (pitch), or precess (like a spinning top) in flight. These effects (in exaggerated form) are shown below:
Yaw refers to movement of the nose of the bullet away from the line of flight. Precession is a change in the orientation of the rotational axis of a rotating body. It can be defined as a change in direction of the rotation axis in which the second Euler angle (nutation) is constant. In physics, there are two types of precession: torque-free and torque-induced. Nutation refers to small circular movement at the bullet tip.
Bushnell offers a good FREE new Ballistics App powered by the Applied Ballistics Ultralite Engine. The new Bushnell Ballistics App easily calculates ballistic solutions for any popular cartridge type once you input velocity, BC, and atmospherics. The App features trusty Applied Ballistics bullet data, and it can even pull in atmospheric data from web weather sources. This allows you to calculate hold-overs and make precise wind corrections. The App is offered in both iOS (Apple) and Android OS versions.
“The Bushnell Ballistics App is powered by the Applied Ballistics Ultralite engine, the most trusted ballistics data-cruncher in the industry,” said Bushnell Marketing Manager Matt Rice. “This App allows users to easily build and modify gun profiles and build range cards to calculate firing solutions based on their specific scope and ammunition choices. All of our Bushnell scopes and reticles have been pre-loaded [in the App].”
The Bushnell App features AB Connect, a live library of G1/G7 data, plus the Applied Ballistics Bullet Library with 740+ pre-loaded bullet profiles. The Bushnell scope library features 150+ scopes and 30 reticle options. Atmospheric data can be updated manually or directly from the internet (when connected). Angle range compensation is also calculated. Gun profile management provides up to five saved profiles with reticle-based firing solutions. A multiple target feature saves up to five targets. Range cards can be shared or printed using the Email Range Card Function.
The FREE App works on both Android and iOS operating systems, and is available on Google Play and the Apple App Store. It is optimized for Bushnell riflescopes and reticles, but is compatible with all optics. Once downloaded, the App functions off the grid — no cell service required.
“The new Bushnell Ballistic App puts the power of long-range, first-shot accuracy into the hands of any shooter,” Rice said. “it was designed to perform in any condition and to offer our consumers true value, with features that far exceed the price — which, in this case, is free!”
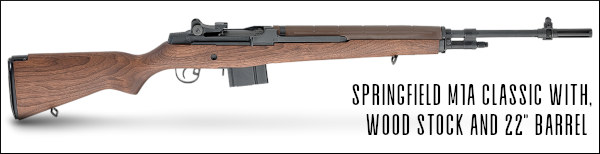
Do you own a Springfield M1A (or wish you did)? Then you should watch this 5-minute video from the American Gunsmithing Institute (AGI). This video shows the basics of the operation of the popular M1A rifle, the civilian version of the military M14. In this video, gunsmith John Bush field-strips the M1A and shows how the bolt, op rod, and trigger group fits together and operates. This video contains excerpts from the M1A Rifle Armorer’s Course, AGI Course #1584. The full Armorer’s Course is available on DVD from www.AmericanGunsmith.com.
Watch Highlights of AGI M1A Rifle Armorer’s Course:
2021 CMP Springfield M1A Match at Camp Perry
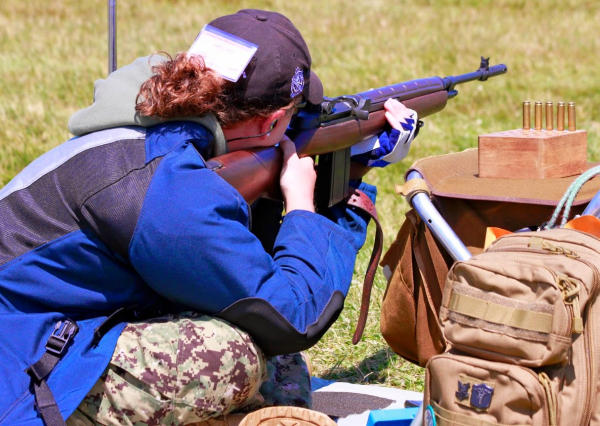
The 14th annual Springfield Armory M1A Match will take place during the 2021 CMP National Rifle Matches. The CMP will host the event on Sunday, August 8, 2021. Competitors of all experience levels are encouraged to bring their M1A rifles to Camp Perry and compete. CMP Online Registration commenced April 1, 2021. The match is open to all individuals ages 12 and above. For more information contact the CMP at competitions@thecmp.org or call 419-635-2141 ext. 724 or 714.
The Springfield Armory M1A match began with one man’s idea and passion. Springfield Armory’s Mike Doy witnessed the waning of classic M1 Garand and M1A rifles from the competitive High Power firing lines. “I really wanted to get those M1A rifles out of safes and closets and back out onto the field. So 11 years ago, I promoted the idea of running an M1A-specific match at Camp Perry. That first year we had over 600 competitors and spectators.” Now the match offers some of the biggest pay-outs at Camp Perry. In recent years, Springfield Armory has donated over $25,000 worth of cash and prizes, including a $2,000 cash award to the overall winner.
We all know reloading powder is in VERY short supply these days. And the most popular propellants, such as Varget, H4350, and Reloder 16, are almost impossible to find at reasonable prices. Thankfully, there is a new solution in the works — smaller containers. This should give handloaders a whole new way to source those precious powders needed for a day at the range. And even if the volume is limited, something is ALWAYS better than nothing, right?
The big (and small) news for reloaders is that the major powder suppliers plan to start shipping powders in more compact, easy-to-ship containers. Instead of buying a pound of powder, you will be able to purchase an efficient, handy 1000 grain container. These are light weight (just 1/7th of a pound) so they are convenient to transport and carry. And you’ll never have the problem of over supply. A 1000-grain container with load approximately 33 6mm BR rounds — that should be plenty for a day at the range. We’re blessed to have this new compact powder option thanks to the U.S. Department of Transportation (DOT).
The U.S. Department of Transportation (DOT) recently approved new smaller containers for shipment of smokeless powder. The new containers are designed to hold 1000 grains, exactly one-seventh of a pound. That works out to 2.29 ounces of powder — quite a bit less than you are getting currently with one-pound (16 oz.) containers.
Here how it works out:
7000 grains = 1 pound = 16 ounces
1000 grains = 0.143 pounds = 2.29 ounces
Many products — from cereal boxes to Snickers bars — have been down-sized in recent years. Now downsizing has come to the powder marketplace. The strategy behind the smaller containers is simple. In a market where demand vastly outstrips available supply, the smaller containers allow powder-makers to generate more revenue with a given amount of powder inventory. Will consumers accept the smaller powder containers? Probably so — 1000 grains is enough to load 20-22 rounds of .308 Winchester. In the current marketplace (with many powders virtually impossible to find), most consumers would probably prefer to get 2.3 ounces of their favorite powder, rather than nothing at all. (NOTE: The major powder suppliers will continue to offer popular powders in 1-lb, and 8-lb containers. The new 1000-grain containers will be phased-in over time, as an alternative to the larger containers).
Why the small bottles? One industry spokesman (who asked not to be named) explained: “We’ve had a severe shortage of smokeless powder for nearly two years. The powder production plants are running at full capacity, but there’s only so much finished product to go around. By moving to smaller containers, we can ensure that our customers at least get some powder, even if it’s not as much as they want.”
Why are the new containers 2.3 ounces rather than 8 ounces (half a pound) or 4 ounces (one-quarter pound)? One of the engineers who helped develop the new DOT-approved container explained: “We looked at various sizes. We knew we had to reduce the volume significantly to achieve our unit quantity sales goals. Some of our marketing guys liked the four-ounce option — the ‘Quarter-Pounder’. That had a nice ring to it, but ultimately we decided on the 1000 grain capacity. To the average consumer, one thousand grains sounds like a large amount of powder, even if it’s really only 2.3 ounces. This size also made it much easier to bundle the powder in six-packs. We think the six-packs will be a big hit. You get nearly a pound of powder, but you can mix and match with a variety of different propellants.”
Less Bang for Your Buck?
We’re told the new 2.3-ounce powder bottles will retail for around $11.99, i.e. about $5.21 per ounce. At that price, it may seem like you’re getting less bang for your buck … but hey, something is better than nothing, right?
Currently, when you can find them, quality reloading powders are going for $45-$60 per pound (in 1-lb containers). At $45 per pound, you’re paying $2.81 per ounce. That means that the new mini-containers will be roughly twice as expensive as current one-pounders ($5.21 per ounce vs. $2.81 per ounce).
Along with the 2.3-ounce containers, the DOT has approved “six-pack” consolidated delivery units that will hold six, 1000-grain containers. Some manufacturers plan to offer “variety packs” with a selection of various powders in the 1000-grain bottles. Wouldn’t it be cool to have a six-pack with H322, H4895, Varget, H4350, H4831sc, and Retumbo?
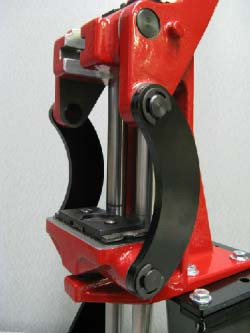
Forum member Erik Cortina has produced a series of YouTube videos about reloading hardware and precision hand-loading. Here we feature Erik’s video review of the Forster Co-Ax® reloading press. The red-framed Co-Ax is unique in both design and operation. It boasts dual guide rods and a central handle. You don’t screw in dies — you slide the die lock ring into a slot. This allows dies to float during operation.
Erik does a good job of demonstrating the Co-Ax’s unique features. At 1:00 he shows how to slide the dies into the press. It’s slick and easy. At the two-minute mark, Erik shows how sliding jaws clasp the case rim (rather than a conventional shell-holder). The jaws close as the ram is raised, then open as it is lowered. This makes it easy to place and remove your cases.
At the 5:20 mark, Erik shows how spent primers run straight down into a capture cup. This smart system helps keep your press and bench area clean of primer debris and residues.
While many Co-Ax users prime their cases by hand, the Co-Ax can prime cases very reliably. The priming station is on top of the press. Erik demonstrates the priming operation starting at 4:20.
Smart Accessories for the Co-Ax from Inline Fabrications
Forum member Kevin Thomas also owns a Co-Ax press, which he has hot-rodded with accessories from Inline Fabrications. Kevin tells us: “Check out the add-ons available from Inline Fabrications for the Co-Ax. I recently picked up a riser mount and a set of linkages for mine and love the results. The linkages are curved. When you replace the original straight links with these, the work area opens up substantially and the the press becomes much easier to feed.” CLICK HERE for Co-Ax Accessories.
Inline Fabrications Forster Co-Ax Accessories
Forster Co-Ax Curved Side Linkage (For Better Access)
This article was originally written by noted rimfire gunsmith Bill Myers. Sadly, Bill passed away in May 2010, but his legacy lives on. He pioneered many advancements in rimfire gunsmithing and Myers-built guns still win matches in benchrest competition.
Crafting competitive rimfire benchrest rifles is considered an art as much as a science. The smith must understand subtle, yet critical aspects of vibration control, barrel tuning, and rifle balance. In the United States, only a handful of gunsmiths consistently turn out rimfire BR rifles that consistently run at the front of the pack at major matches. Bill Myers was one of those master craftsmen. In this article Bill discussed the process of building a winning rimfire BR rig. He reveals some interesting secrets, including his procedures for testing bedding performance and his barrel indexing system. Bill’s methods obviously work, as the Suhl-actioned rifle featured here won a truckload of trophies in its very first match.
Building a Match-Winning Rimfire Benchrest Rig
by Bill Myers
In my opinion, a winning rimfire benchrest rifle is probably twice as difficult to build as a competitive centerfire rifle. The relatively slow .22 LR bullets stay in the barrel much longer than centerfire bullets. This means that vibration control is critical. Likewise bedding is critical. Bore finish and lapping are very important. The amount of bore taper or “choke” can have a huge effect on accuracy. Ignition is also very important and above all, rimfire BR rifles need a very stable stock that tracks perfectly. A rimfire that shoots great is a complete marriage of all components and of the shooter’s need to be aware of everything possible.
Click Photo to Zoom
The rifle featured in this article was built from scratch with attention to all the details that go into accuracy. The goal was to build a gun that could win from the get-go. This would be a “Spec Gun”, meaning a rifle that was personally tested and tuned by me for optimum performance before it went out to the customer.
The Suhl trigger is as good as it gets so no change was needed. It easily adjusts down to about 2 ounces.
Baer Stock in Bubinga Wood
There are many choices when you start to build a complete rifle. It has to shoot well and it has to catch ones eye, or it’s just another rifle on the line. I prefer wood stocks on rimfires for two reasons: they are very stable if the right wood is used and they have a certain traditional appeal to many shooters. I chose Bubinga wood for this particular gun because it is very stable and heavy, it has a very dense grain and a very pronounced figure with a natural red color. The Bubinga is a very forgiving wood to work with.
Gerry and Bruce Baer in Pennsylvania do all my stock blanks. I do all my own inletting and bedding. The blank weighed 4.5 pounds when it came off of Bruce Baer’s duplicator. This Bubinga wood is so hard that it did not need pillars, but I put them in anyway. I bed all my stocks with Loctite Steel Bed liquid and add filler to desired thickness. The final bedding is done with an aircraft tooling epoxy that does not deteriorate over time. The stock has an ebony butt plate and six (6) coats of automotive clear, polished to a “high buff” finish.
Suhl 150-1 Action Accurized and BN-Nickel Plated
I used a new, unfired Suhl 150-1 action. As explained in the sidebar below, the Suhl 150 actions were originally crafted in East Germany for position rifles. They have a very fast lock-time and come with an outstanding trigger. However, they need some work when adapted to a modern BR gun. The action needed to be accurized and threaded. I have a special tool that I use to accurize actions. It uses two sets of spiders for dialing-in the bolt raceway. After the bolt raceway is running true, one can thread and true up all bearing surfaces so that everything is in perfect alignment with the action raceway bore.
BN-Nitride Plating on Action
I decided to plate the action and all bolt parts with Boron Nitride nickel plating. I bough the BN Electroless Nickel Kit from Caswell Plating and did the job myself. I started by bead-blasting the action so that it would end up with a “satin” finish. The plating material is then applied in a tank. The Boron Nitride goes directly into the plating solution, but you need to use a pump to keep the solution agitated so the BN distributes evenly.
Once the action is completely ready (the metal must be perfectly prepped, with no contaminants), the process goes easily and can be completed in about half an hour. The end result is a very slick, low-friction finish, that is .0002″ (two ten-thousandths) thick and hard as glass. The Boron Nitride makes everything very smooth. After the plating job, the action was noticeably slicker than before.
The cone breech (photo below) permits the barrel to be INDEXED (rotated around bore axis) to any position on the clockface. You then test various rotation settings to find the best accuracy. The system does work. Some barrels shoot best in a particular rotational setting. E.g. with index mark at 3 O’clock vs. 12 O’clock.
Fitting and Chambering the Barrel
As for a barrel, I had two good choices: one Shilen 1:16″-twist, 4-groove ratchet and one Benchmark 1:16″-twist, 3-groove. Both barrels were very accurate and at the end, I decided to leave the Shilen on the rifle because I wanted to put the Benchmark on another Suhl I’ve set aside for myself. I chambered the barrel for Eley flat nose EPS. We’ve found the gun also shoots the new Lapua X-ACT ammo very well.
The barrel finished at 25″ long and features a tuner by the Harrell brothers of Salem, Virginia. I use a flat 90° crown–it’s the most accurate and its gives a good seal against the tuner. I also use a 45°, 12-flute cutter that leaves no burr when cutting the crown. This chamfer protects the crown when cleaning the barrel. There is no sharp edge for the brush or jag to hit on the return stroke. The barrel was headspaced at .043″ and I use a tapered reamer ground by Dave Kiff of Pacific Tool & Gauge in Oregon. The chamber leade area is lightly polished to remove reamer burrs. The breech end of the barrel is machined with a 1/2″ ball end mill to produce what I call a “Myers cone breech.” Technically, it has a sloping radius as you can see, rather than a straight-sided cone. Finishing the breech in this fashion facilitates indexing the barrel, as the barrel can be rotated to any position (on the clockface), without requiring new extractor cuts.
Barrel Indexing — Finding the “Sweet Spot”
When indexing a barrel, one rotates it to different clockface positions relative to the action. Imagine marking a barrel at TDC or 12 o’clock, and then rotating it so the mark is at 3 O’clock, 6 )’clock, 9 O’clock and so on. At each position one shoots groups to determine at which index setting best accuracy is achieved.*
I know that barrel indexing is controversial. I don’t want to get into a lengthy debate other than to say that I believe that careful and thorough testing can reveal a “preferred” index position for a good barrel. With the barrel set in that particular position relative to the action I believe the barrel can yield optimal performance.
I perform the indexing tests indoors at 50 yards. I use a rail-gun with floating action. The barrel is held in place with a clamping fixture similar to an Anschutz 2000-series action. Basically, two vertically-stacked metal blocks clamp around the barrel. I can index the barrel this way simply by unclamping the barrel blocks, rotating the barrel and then re-clamping the system. I have a special system so the action can stay in the same position, even as the barrel is rotated.
It takes time and effort to get solid indexing results. Normally I shoot at least 400 rounds of ammo in 3-4 indexing sessions. Shooting a handful of groups is not enough. You may think you’ve identified the best index position, but you need to shoot many more rounds to verify that. Also, in a very good barrel, the effects of indexing may be subtle, so it will take many groups to confirm the optimal position. In my experience, really good “hummer” barrels do not benefit as much from indexing as an “average” barrel.
Accuracy Testing with Both Barrels
I tested the rifle indoors at 50 yards at the Piney Hill Benchrest Club range. There was no finish on the stock, but it shot well in my one-piece rest with the Benchmark 16-twist, 3-groove barrel and no added weight on the tuner. I shot 30 rounds of Eley Match EPS Black Box (1064 fps) and had 25 Xs and five 10s on the IR 50/50 style target. Not too shabby for a new barrel with no special break-in.
When the Shilen barrel arrived, I installed it on the rifle. By this time the stock had been clear-coated and finished, and the action had been polished and plated. I shot the Shilen barrel outside since it was too hot in the building. The first target was a 250-19X with a new lot of Eley Match EPS Black Box (1054 fps). The gun shot well. My friend Tony Blosser asked to shoot the gun, and he drilled a 250-20X in a steady wind using the same Eley ammo. See target at right.
Advanced Procedures — Vibration Control and Tuner Position
Barrel Tuning Using 2-Way Electronic Indicators
Before competing with this rifle, I put it in a firing fixture I use to tune the barrel. I employ a pair of very expensive Swiss 2-way electronic min/max hold indicators. These measure both up movement and down movement of the barrel as the gun is fired. I can measure the actual vertical travel of the barrel at any position from the front of the receiver to the tuner. I can also tell how long the barrel vibrates, time-wise. Using this fixture I found that the Shilen barrel was very consistent in readings and seemed to work well with no additional weight on the tuner. No barrel ever stops vibrating completely — but this was close, showing less than .002″ of total movement.
Bedding and Vibration Control
I have found that measuring the actual movement of the barrel during firing tells me a lot about the quality of the bedding. I have learned that if I see very big movements (e.g. .010″ up and .005″ down), then there may be a problem with the bedding. I saw this kind of big swing on a rifle with bedding that had not cured properly.
Another pattern I watch for is uneven vertical movement. For example, if the barrel vibrates .008″ up but only .002″ down, that tells me the bedding has issues. As noted above, I look for minimal vibration travel (after the tuner is fitted and optimized), and I also want that travel to be relatively equal both up and down. Good rimfire gunsmiths agree that proper bedding has an important influence on vibration control and tuning. By measuring actual barrel movement during firing, we can, to an extent, quantify how well the bedding is working. At a minimum, we can see if there’s a serious bedding problem.
Trial by Fire — Shooting the Gun in Competition
After semi-gluing in the action, the rifle was shooting great. So, I decided to take it to the Maryland State Unlimited Championship to see if it was truly competitive — whether it could “run with the big dogs”. As it turns out, the Bubinga Suhl was more than just competitive. The rifle won three of the six cards and won the meters championship. In the photo below you can see all the trophies the gun won in its very first match. One of the other competitors in Maryland, dazzled (and perhaps a bit daunted) by the Bubinga Suhl’s stellar performance, told me: “Sell that gun Bill. Whatever you do, just get that darn rifle out of here.” Confident that this was a rifle capable of winning major matches, I packed up the rifle and shipped it to Dan Killough in Texas. Killough has shot some impressive scores with the gun.
Suhl Target Rifles — East Germany’s Legacy
Suhl 150 rifles were manufactured in former East Germany (GDR) by the Haenel firearms factory in the town of Suhl. This region has a long history in arms production. In 1751, Sauer & Sohn founded the first German arms factory in Suhl. Following WWII, Suhl 150s were produced for Communist Bloc marksmen, including East German Olympic shooters. Prior to German unification, the East German national shooting arena was located at Suhl and hosted many top-level competitions including the 1986 ISSF World Championships.
Superb Rifles with Amazing Triggers
As a product of East Germany, the “mission” of the Suhl 150 was to rival the accuracy of the Anschütz, Walther and other premium match rifles built in the West. East German shooting teams wanted to finish on top of the podium, so they needed a rifle with superb inherent accuracy. The Suhl 150s have an outstanding trigger that can be adjusted down to about two ounces. The Suhl 150 action, like the Anschütz 54, boasts an extremely fast lock-time — an important factor in a position rifle. And Suhl barrels were legendary for accuracy.
Suhl 150 Benchrest Conversions
Many of the first used Suhl 150s that made it to America were converted to Benchrest rifles because the action/trigger/barrel combination was unbeatable for the price. Some of the barrels on these “surplus” Suhls were phenomenal — as good as any custom barrels available today. It was not unknown for a Suhl 150 barreled action, transplanted into a benchrest-style stock, to win BR matches with the original barrel. Today, however, most of the Suhl benchrest conversions end up with modern, American-made barrels. While some older Suhl barrels can “shoot with the best of ‘em”, new barrel designs optimized for use with tuners have an edge, at least in benchrest circles. That’s why builders such as Bill Myers swapped out the Suhl barrel with something like a Benchmark reverse-taper two-groove.
Today Suhl 150 rifles are very hard to find in North America. In 2006, a used Suhl 150, even without sights, might fetch $1200.00 or more. Then, in 2007 through early 2008, hundreds of Suhl match rifles were imported. This drove prices down, and those “in the know” snapped up complete Suhl 150s at prices ranging from $450 to $850 (see 2007 advert at right), depending on condition.
Many of these rifles were left “as built” and used successfully in prone competition. Others were converted into benchrest and silhouette rifles, “parted out” for the actions and triggers. If you were able to grab one of those imports at a good price–consider yourself lucky.
* Bill Myers actually created his own clamping rimfire action to facilitate barrel indexing. CLICK HERE for Myers Rimfire Action. To index the barrel, Myers simply loosened three clamping-bolts and rotated the barrel in the action. Because there is no thread to pull the barrel in or out, the headspace stays the same no matter how much the barrel is rotated. With a threaded action, you might have to use shims to test different rotational positions, or otherwise re-set the shoulder with each change.
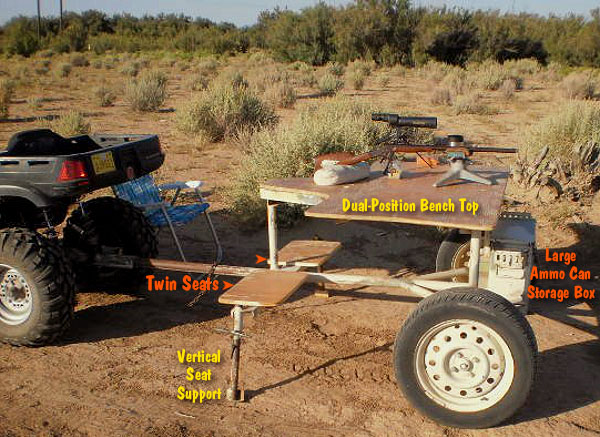
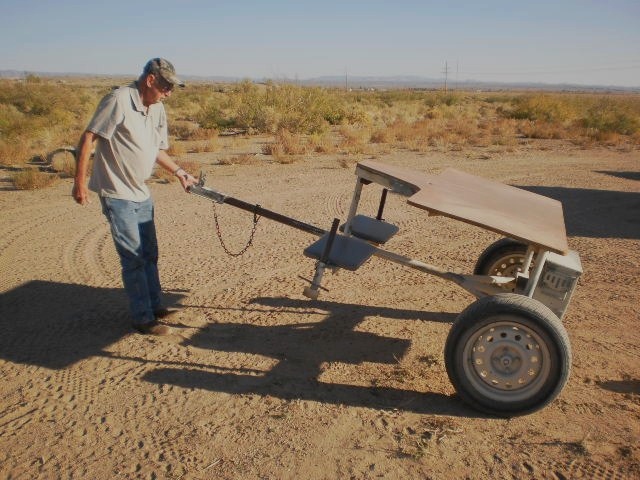
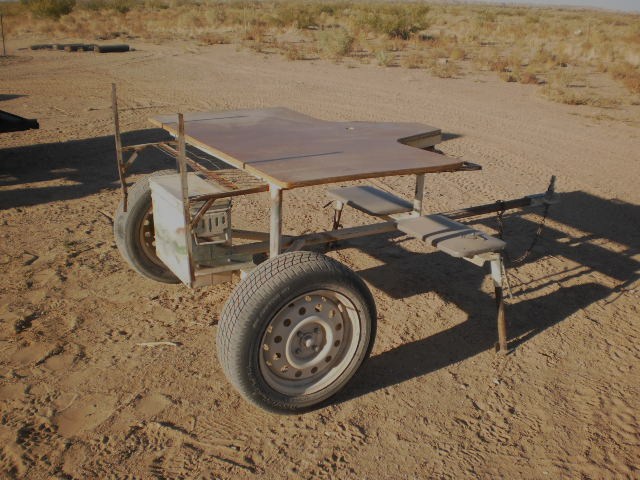
AccurateShooter Forum member John H. of New Mexico (aka “Skratch”) has created an impressive mobile shooting bench that he can haul with his ATV. This trailer-mounted, movable bench is built on a central tubular spine that also serves as the tongue for the trailer, which attaches to a standard hitch. The bench offers two (2) shooting positions so it works for both left-handed and right-handed shooters.
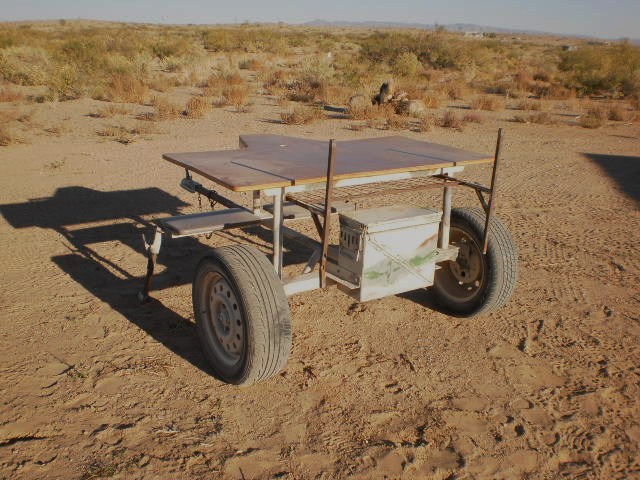
Up front, for storage, a surplus .50-Cal ammo can is secured to the trailer frame. The V-shaped middle section of the wood benchtop looks to be reinforced with a metal stiffener frame on the underside. The front section of the bench is supported by twin tubular uprights attached to the box-section axle housing. The two wooden bench-style seats (on left and right) ride on a cross-tube. At the ends of that cross-tube are adjustable legs for additional support.
Great Rig for New Mexico Varmint Hunting
There are plenty of great varmint hunting areas in Skratch’s home state of New Mexico — you’ll find some huge prairie dog fields there. But to get the best results on a varmint-hunting field session, you need a solid shooting station that can be easily hauled to new locations as needed. It looks like John (aka “Scratch”) has come up with an outstanding “War Wagon” for his New Mexico varmint safaris.
Click on image frames to see full-size photos
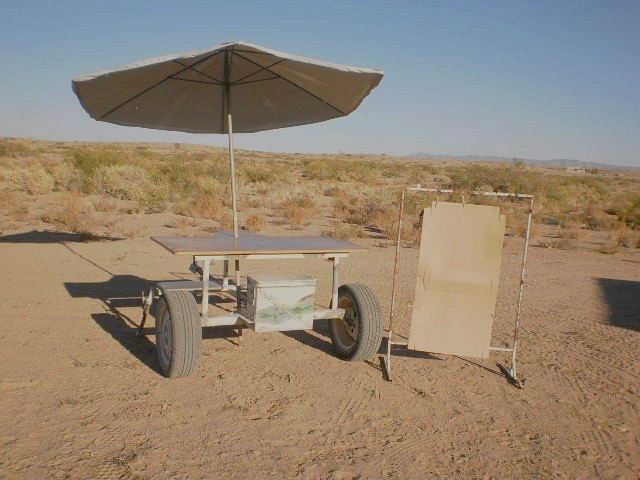
Some readers wanted to know how John’s War Wagon is positioned in the field and if it is ever detached from John’s ATV. John answers: “We do unhook the 4-wheeler for target-checking unless we have an extra along which is usually the case. That way we can level the table front to rear. We have an umbrella from a patio table to provide shade on extra warm days.”
War Wagon Construction Details
John told us: “My brother-in-law and I built this mobile bench a few years ago. The axle, wheels and tire are a tag axle from a small Chevy car, obtained from a salvage yard for about $35-$40 a decade ago. The tubular frame is drill stem, while the bench-top and seats are 3/4′” plywood. Under the plywood we fitted rails so we can slide our target stand under the benchtop for secure travel. The total cost for everything (including storage box) was about $250-$300.”
We set the bench and seat heights so that, with adults, the rifle sets straight level to the shoulder. For the smaller ‘younguns’ we just use a sofa pillow to raise them up. (Yes, adjustable seat heights would be great.) The ammo box holds our rifle rest, sand bags, spotting scope, and miscellaneous gear. Options are a couple of lawn chairs, and a cooler of brew (for after the shooting is done).
In April 2020, the National Rifle Association (NRA) launched NRAWomen.com, a website dedicated to the fastest-growing group of firearm owners — America’s women. This website serves the increasing number of female gun owners, huntresses, and competitive shooters. Female involvement in firearms is growing significantly. Consider these numbers: Statistica estimates that 19% of women in the USA owned firearms in 2020, while 23% of women surveyed in a 2011 Gallup Poll stated they owned a gun.
Here are four videos from the NRAWomen.com website, all worth watching. For each example, click the links to read the related articles on NRAWomen.com.
1. How to Sight-In Your Hunting Rifle
This video and related article offer good basic advice for sighting-in a hunting rifle. There are a series of six points covered. Here’s Tip #1: “Find a safe place to shoot your rifle with a backstop. If possible, use a bench and a rock-solid shooting rest. Sighting-in is all about consistency, so the less human error you have, the better. For safety, be sure to also bring ear and eye protection.” READ FULL ARTICLE on NRAWomen.com.
2. Buying Your First Handgun — Factors to Consider
Buying your first firearm can be overwhelming, with all the choices available. And personal preference/fit are especially important with handguns that may be carried on your person. This video follows two first-time buyers as they select their first handgun. The video explains factors to consider: Ergonomics, Accuracy, Caliber, Concealability, Recoil, Reliability, and Price. RELATED Articles on NRAWomen.com.
3. Cartridge Case Material Varieties — Brass, Nickle-Plated Brass, Aluminum, Steel Alloy
The case of a cartridge holds bullet, powder, and primer. Brass cases are most popular, but nickle-plated brass cases are also common and reloadable (though they generally don’t last as long as plain brass). Major manufacturers produce aluminum-cased pistol ammo, such as CCI Blazer. Aluminum pistol cases can shoot great, but are not (normally) reloadable. Finally, some large manufacturers, mostly foreign, produce steel-cased ammo. All different case types have certain advantages and disadvantages, though conventional brass is definitely the best choice for hand-loaders. This video explains pros and cons of each type of cartridge case construction. RELATED Articles on NRAWomen.com.
4. Modular Safes — Smart Option for Easier Moving
This article features a great video showing how to assemble a modular safe in under 30 minutes. This article also explains the benefits of modular gunsafes — primarily easier transport and installation. “Modular safes have been around for a few years now and are becoming more popular. Here’s why: The safe comes delivered to you in panels, so you can bring them into your home one at a time and put it together anywhere you like. This makes it easy to carry up and down stairs, onto elevators or anywhere! Security — Is it as secure as one that comes pre-assembled? The answer is, absolutely.” READ FULL ARTICLE on NRAWomen.com.




 So how does one get started? You could do as I did, purchase a rifle not knowing what you were really getting into; or you could come out to a FCSA-sponsored event, shoot a number of different rifles, rub shoulders with those who have already taken the plunge, and see if this sport is right for you. While membership in the
 On the




 The U.S. Department of Transportation (DOT) recently approved new smaller containers for shipment of smokeless powder. The new containers are designed to hold 1000 grains, exactly one-seventh of a pound. That works out to 2.29 ounces of powder — quite a bit less than you are getting currently with one-pound (16 oz.) containers.
 Currently, when you can find them, quality reloading powders are going for $45-$60 per pound (in 1-lb containers). At $45 per pound, you’re paying $2.81 per ounce. That means that the new mini-containers will be roughly twice as expensive as current one-pounders ($5.21 per ounce vs. $2.81 per ounce).




 Accurized and BN-Nickel Plated
 BN-Nitride Plating on Action
 Fitting and Chambering the Barrel
 Accuracy Testing with Both Barrels


 Today Suhl 150 rifles are very hard to find in North America. In 2006, a used Suhl 150, even without sights, might fetch $1200.00 or more. Then, in 2007 through early 2008, hundreds of Suhl match rifles were imported. This drove prices down, and those “in the know” snapped up complete Suhl 150s at prices ranging from $450 to $850 (see 2007 advert at right), depending on condition.