Here’s a simple solution for lumpy front sandbags. Cut a small block the width of your fore-end and place that in the front bag between matches. You can tap it down firmly with a rubber mallet.
The block will keep the front bag nice and square, without bunching up in the center. That will help your rifle track straight and true. Rick Beginski uses wood (see photo), while our friend John Southwick uses a small block of metal. The metal block might work a little better, but the wood version is easier to make with simple tools. Shown above is a slick Delrin block with a built-in bubble level used with a quality J.J. Loh front rest. Using a good block on your front bag helps ensure that the actual top surface of your front bag is level, as distinct from the front rest assembly.
Jim Borden, the very knowledgeable owner of Borden Accuracy, provided an interesting historical insight about barrel fitting and the term “blueprinting”. Jim has posted on his Borden Accuracy Facebook page an explanation of the term “blueprinting” as it originally was used with respect to barrel/shoulder/lug fitting.
Barrel/Shoulder Fit and Blue-Printing
Jim told us: “Something often overlooked on barrel installation is the shoulder fit. Many are so overly obsessed with doing a crank-on fit of threads that the shoulder contact is overlooked. Full, solid barrel shoulder to recoil lug or action face is critical to optimum accuracy and precision.
Many years ago part of the ‘blueprinting’ of an action was the use of Prussian blue to ‘blueprint’ lug fit, thread fit, and barrel shoulder fit. It was a colloquial expression that had nothing to do referring to a blueprint or drawing of the action.” Bet you didn’t know that!
About the photo below, Jim noted: “the fuzzy look on the threads is a liberal coating of Never-Seez thread lubricant.”
Look carefully to see the Prussian Blue applied to the barrel shoulder, plus Never Seez on threads.
The USAMU has published a “how-to” article about bullet sorting. While many of us may sort bullets by base-to-ogive length (and/or weight), the USAMU story explores the “how and why” of sorting bullets by Overall Length (OAL). Read the article highlights below, and make your own decision as to whether OAL sorting is worth the time and effort. Bryan Litz of Applied Ballistics says that sorting by OAL is not a bad idea, but base-to-ogive bullet sorting probably represents a better investment of your time.
Bullet Sorting by Overall Length
We’d like to share a specialized handloading technique which we’ve long found beneficial to our long-range (600 yards and beyond) accuracy. Sorting of bullets for extreme long range (LR) accuracy is not difficult to do, but some background in theory is needed.
Here at USAMU’s Handloading Shop, we only sort individual bullets for the most demanding Long-Range applications and important competitions. Only the most accurate rifles and shooters can fully exploit the benefits of this technique. The basic sorting process involves measuring the Overall Length (OAL) of the bullets, and grouping them in 0.001″ increments. It’s not unusual to find lots of match bullets that vary as much as 0.015″-0.020″ in length throughout the lot, although lots with much less variation are seen as well. Even in bullet lots with 0.015″ OAL variation, the bullet base-to-ogive length will show much less variation. Hence, our basic sort is by bullet OAL. One obvious benefit of sorting is easily seen in the attached photo. The few bullets that are VERY different from the average are culled out, reducing probable fliers.
How does one know what OAL increments to use when sorting? The answer is simple. As each lot of bullets is unique in its OAL distribution, it’s best to sample your bullet lot and see how they are distributed. In the attached photo, you will see a set of loading trays with a strip of masking tape running along the bottom. Each vertical row of holes is numbered in 0.001″ increments corresponding to the bullets’ OAL. A digital caliper makes this task much easier. As each bullet is measured, it is placed in the line of holes for its’ OAL, and gradually, a roughly bell-shaped curve begins to form.
Note that near the center, bullets are much more plentiful than near the edges. At the extreme edges, there are a few that differ markedly from the average, and these make great chronograph or sighting-in fodder. We recommend using a sample of 200 bullets from your lot, and 300 is even better. Some bullet lots are very consistent, with a tall, narrow band of highly-uniform bullets clustered together over just a few thousandths spread. Other lots will show a long, relatively flat curve (less uniform), and you may also see curves with 2 or more “spikes” separated by several 0.001″ OAL increments.
Bullet Sorting — OAL vs. Base-to-Ogive vs. Weight
Expert advice from Bryan Litz, Applied Ballistics
I’m often asked what is a the best measure to sort bullets by, and the answer (to this and many other questions in ballistics) is: it depends.
Choosing to sort by overall length (OAL), base to ogive (BTO), bearing surface, weight, etc. can get overwhelming. Shooters typically look for something they can measure, which shows a variation and sort by that. It’s common for dimensional variations to correlate. For example, bullets which are longer in OAL are typically also shorter in BTO, and have longer noses. All these are symptoms of a bullet that was pushed a little further into the pointing die, or possibly had more than average lube while being swaged. So in essence, if you sort by BTO, you’re measuring one symptom which can indicate a pattern in the bullets shape.
So, the question still stands — what should you measure? You’ll always see more variation in OAL than BTO, so it’s easier to sort by OAL. But sometimes the bullet tips can be jagged and have small burrs which can be misleading. Measuring BTO will result in a lower spread, but is a more direct measure of bullet uniformity.
Then there’s the question of; how much variation is too much, or, how many bins should you sort into? Shooters who see 0.025” variation in BTO may choose to sort into 5 bins of 0.005”. But if you have only 0.005” variation in the box, you’ll still sort into 5 bins of 0.001”. What’s correct? You have to shoot to know. Live fire testing will answer more questions, and answer them more decisively than any amount of discussion on the subject. The test I recommend is to identify bullets on the extreme short end of the spectrum, and some on the extreme long end. Load at least 10 rounds of each, and take turns shooting 5-shot groups with them. If there is a difference, it will be evident. The results of the testing will answer your question of: should I sort based on X, Y, or Z?”
You can read more discussions on this and other similar subjects in our Accurateshooter.com Shooters’ Forum. Here’s a link to a thread discussing bullet sorting: Bullet Sorting Thread
Ask 10 shooters about barrel cleaning and you’ll get 10 different opinions. This reflects that fact that different fouling problems demand different solutions. For example, solvents that work well for copper may not be the best for hard carbon (and vice-versa). To come up with the right solution, first you must understand the nature of the fouling in your barrel.
John Krieger Interview with AccurateShooter at SHOT Show:
The debate about the proper care of a match barrel is a hot one, spiked with folklore and old wives’ tales, Lohman said. He and his staff set out to set the record straight: “We tried to interject some science into the discussion of cleaning a match barrel,” he explained. In his article, Lohman writes:
Why worry about a little barrel fouling when the throat is subjected to a brutal 5,600° F volcano at 55,000 PSI? To investigate these and other questions about taking care of a match barrel, we spoke with a dozen experts and share their knowledge in this first of a series of articles.
After listening to folks who shoot, build barrels or manufacture cleaning solvents for a living, we concluded that even the experts each have their own unique recommendations on how to care for a match barrel. But they all agree on one thing — the gun will tell you what it likes best. Because the life expectancy of a match barrel is about 1,500 to 2,500 rounds, the objectives of cleaning one should include: preserve accuracy, slow the erosion, and remove fouling — all without damaging the gun. This article doesn’t claim that one cleaning method is better than the next. Rather, we set out to interject a little science into the discussion and to share some lessons learned from experts in the field.
For more Shooting Sports USA articles, visit www.ssusa.org.
We have used NO-LEAD Cleaner in rimfire benchrest rifles similar to this modified Suhl 150-1. It helped restore accuracy with minimal brushing.
Made by the same smart folks that created Wipe-Out™, and Carb-Out™, NO-LEAD Brushless Lead Remover™ really works. Honest. If you are an active rimfire shooter, or if you shoot cast lead-alloy bullets in centerfire rifles and pistols, you should try this product. We now use NO-LEAD in our rimfire benchrest rifles, and in some centerfire guns that receive a steady diet of soft-alloy cast bullets (90%+ lead). (With rimfire guns, you don’t need to use NO-LEAD very often — maybe every 300-400 rounds unless you have a real fouler of a barrel.)
If you’ve got stubborn lead fouling in a rimfire barrel, or on a pistol’s muzzle brake/compensator, you should definitely give this stuff a try. We don’t know how but it does soften lead deposits. The manufacturer says you don’t need brushes, but we found that a bit of brushing (after NO-LEAD application) can help remove more serious lead build-up.
Yes we were surprised to find a lead remover that really works. We tried a half-dozen other lead “cleaners” that promised to dissolve lead and most of them, we discovered, are nearly useless. There’s a reason for that, as the lead alloys used in bullets don’t react to typical petrochemical-based solvents. It took the Wipe-Out chemists over five years to perfect this water-based solution that really does dissolve lead.
NO-LEAD Cleaning Procedure — Read Carefully NO-LEAD Lead Remover is a clear, red gel that is easy to apply. Just swab it in your bore (or on muzzle brakes) with wet patches or bore mop and let it sit for a few minutes. (The manufacturer says you can leave the NO-LEAD for up to 20 minutes, but that long of a dwell time does not seem necessary with our rimfire barrels.) When it contacts lead it will start to foam and you’ll see that the NO-LEAD solvent turns a pastel pink when it dissolves lead. The pink comes from the formation of lead oxide. After the recommended dwell time, simply patch out the dissolved lead deposits (you can also use a nylon brush for stubborn lead build-up).
NOTE: After cleaning, it is very important that you get all the NO-LEAD out of your barrel, and neutralize it. We recommend following the application of NO-Lead with Wipe-out or Patch-Out to neutralize the NO-LEAD, clear the bore, and remove residual carbon and copper fouling. If you don’t have Wipe-Out or Patch-out, flush the barrel thoroughly with Rubbing Alcohol or even a solution of Dawn dish detergent — then re-oil the bore.
Be Sure to Neutralize NO-LEAD After Use
Remember that N0-LEAD is a strong, slightly acidic chemical that needs to be neutralized after use. If you leave it on a nice, blued barrel for too long, it can harm the bluing. NO-LEAD will remove all the surface oils from the barrel bore. For this reason it is recommended that you neutralize NO-LEAD with Wipe-Out, or Patch-Out, which both contain effective corrosion inhibitors. If you don’t have those products, once you’ve flushed the NO-LEAD with something like rubbing alcohol, then follow with a gun oil. Caution: A petroleum-based gun oil will NOT, by itself, neutralize NO-LEAD. You need to neutralize first, then apply the corrosion inhibitor (or do it all in one step with Wipe-Out or Patch-Out).
Where to Buy NO-LEAD Lead Remover
NO-LEAD Lead Remover costs $18.55 for an 8 oz. squeeze bottle with a flip-top spout. This product is sold directly by Sharp Shoot-R Precision Products through Sharpshootr.com, or you can purchase NO-LEAD through many other online vendors. For more information, send an email via the Sharp Shoot-R Contact Form or or contact SharpShoot-R at (785) 883-4444. You can ask for Terry Paul, Sharp Shoot-R’s owner and the master chemist who developed the NO-LEAD formula.
If you are shopping for a new rimfire rifle, particularly a .22 LR, you may want to pick up a copy of Small-Bore Rifles: A Guide for Rimfire Users by C. Rodney James. This provides a detailed history of rimfire cartridges and provides a look at a variety of rimfire rifles for various applications — target, plinking, varminting. SSUSA.org explains this book covers “every aspect of rimfire shooting, from a detailed history of its calibers and platforms, to a discussion of proper maintenance and expected accuracy[.]” American Rifleman Editor-in-Chief, Mark Keefe, writes: “This little book is the most useful treatment of the [.22 Long Rifle] I have read, and it is highly recommended for anyone serious about being a rimfire rifleman.”
The 248-page book is available for $17.99 from Skyhorse Publishing in both paperback and ebook formats. You can view a 40-page sample of this book, including the index, on Amazon. CLICK HERE, then, when the page opens on Amazon.com, click the “READ SAMPLE” link below the book cover image. Amazon offers the book in Kindle format for $12.99.
This book focuses primarily on the .22 LR (Long Rifle) cartridge. However, it does include extensive information on other rimfire chamberings, including .17 PMC/Aguila, .17 HMR, and .22 WMR. Here’s part of the 22 WMR section:
Here are reviews by recent verified purchases of the book:
“Everything you could ever want to know about the development of the .22 round, the ballistics of the same and the history of early bolt-action .22 rifles are presented in an easy-read style by a very knowledgeable author. There are plenty of color photographs and a lot of useful maintenance information throughout the book. I do have one complaint… the book has almost no information on semi-automatics.” — K. Greene
“A must-read book for the rimfire enthusiast. Much accurate information presented in an enjoyable format. From the earliest rimfire rounds to the latest 17s [are] all are covered in this book. Bolt actions, semi-autos and single-shot rifles are covered with the pros and cons of each. What makes for accuracy from the rifle to the cartridge is well covered.” — Ken Cook
by Sierra Bullets Ballistic Technician Paul Box
All of us who have been in reloading and shooting for any period of time have read how sectional density has been regarded as a bullet’s ability to penetrate. Back before high velocity came along and modern bullet design, the easiest way to get more “power” and penetration was by increasing the diameter and mass. After all, a bowling ball will hurt more than a golf ball, right?
Let’s take a closer look at sectional density.
The formula for calculating sectional density is pretty simple and straight forward. Take the bullet weight and divide by 7000. This number is then divided by the bullet diameter squared Two bullets of equal weight and the same diameter will have equal sectional sectional density. No regard is given to the bullet construction. This is where the fly hits the soup in considering sectional density as far as penetration is concerned.
Section Density Formula: (Bullet Weight divided by 7000) divided by Bullet Diameter squared.
Bullet construction is the biggest factor in how it is able to penetrate. The best example I can think of here is to look at the Sierra .224 55 Gr. FMJBT GameKing #1355 compared to the 55 Gr. BlitzKing #1455. Both are .224 and weigh 55 grs. Both have a sectional density of .157. But there is a huge difference in their construction. The FMJ has a thick jacket and is designed to penetrate. The BlitzKing is designed for fast and rapid expansion with little concern for how deep they will penetrate.
The next time you’re choosing a bullet, look at the construction and less at the sectional density number. It’s all about the construction anyway. If you have any questions or would like to discuss sectional density or bullet penetration further, please give us a call at 800-223-8799 or shoot us an email at sierra@sierrabullets.com.
If the battery on your safe’s electronic lock is more than a year old, or if it is not giving you the right voltage, replace it today!
This time of year, many readers are putting their guns away in a safe for the winter. It’s easy to just tuck the guns away and forget about them. But there’s something you should do before you shut the safe door.
If you have a safe with an electronic keypad, you should replace the battery every year as a precautionary measure. Trust us, you don’t want to come back in a few months and find that the keypad memory is kaput, and you’re locked out. That can lead to an expensive locksmith visit.
NOTE: Some lock systems use more power and you may need to change your batteries TWICE a year. Batteries aren’t that expensive — you may want to replace batteries TWICE a year if you open and close your safes very frequently.
Low Voltage Battery? You May Be Locked Out…
Here’s a true story. I have one safe with a Sargent & Greenleaf (S&G) keypad. A couple years back, in early December, I went to get into the safe. I punched in the correct combination, but all I got was a rapid “beep, beep, beep, beep” after I finished the last combination entry. I tried again to ensure I entered the combination correctly (I did). But again, the locking system responded with multiple rapid beeps indicating something was wrong. And the safe would not open. Now I was worried….
I popped out the battery holder (which slides in from the bottom of the keypad housing on the door). I removed the battery and tested it with a volt-meter. The 12-month-old Duracell 9-volt battery only registered 6.1 volts.
Low voltage was the problem. I went down to the store and got a couple new 9V batteries. I tested the new batteries and both measured 9.4 volts output. I slipped one of the new 9V batteries into the keypad housing, punched in the combination and everything worked OK again. Eureka.
Most electronic locks for safes WILL “remember” the combination for a period of time even when the battery is low (and the keypad’s “brain” should retain the combination when you remove the battery for replacement). However, a dead battery, or extended periods of low voltage can give you problems. Don’t rely on wishful thinking…
In this interesting video, Brownells Gun Tech Caleb Savant covers the topic of linear compensators, aka “blast diffusers” or “linear blast devices”. These are quite different in function from a typical muzzle brake and they are NOT a sound suppressor. Unlike a traditional muzzle brake, a linear compensator directs the muzzle blast forward, AWAY from the shooter. This is not only good for the shooter but also for folks next to the shooter, either at the range or in a CQB law enforcement or military situation.
A “Linear Compensator”, also known as “blast diffuser”, my look similar to a muzzle brake. But it works differently. A typical muzzle brake shoots blast out the side, and can be pretty annoying for someone positioned next to the shooter. By contract, the Linear Compensator direct blast force more forward. This helps reduce perceived recoil, and importantly doesn’t send hot gasses left and ring to nearby shooters or observes. Muzzle brake output can be very annoying. This Editor once was shooting next to a .338 Lapua Magnum with a brake, just a couple feet away. With each .338 LM shot I could feel heat on arms/hands and actually feel the bones in my forearm vibrate.
Attachment Methods — Direct Thread Mounting vs. Quick-Attach Mounting
Linear compensators have become much more popular in recent years as AR-15 pistols and SBRs have proliferated. Some linear comps, such as popular models from Midwest Industries and the Troy Claymore, attach directly to the muzzle, just like a traditional flash hider or muzzle brake.
Other Linear Compensators are slip-on, quick-attach components that mount OVER another muzzle device. For example, the VG6 Precision CAGE Device (Concussion Altering Gas Expansion) attaches directly over one of their standard muzzle devices. Almost every company that makes a sound suppressor also offers a linear compensator, which typically attaches to the muzzle the same way as the silencer.
Video find by Boyd Allen. We welcome reader submissions.
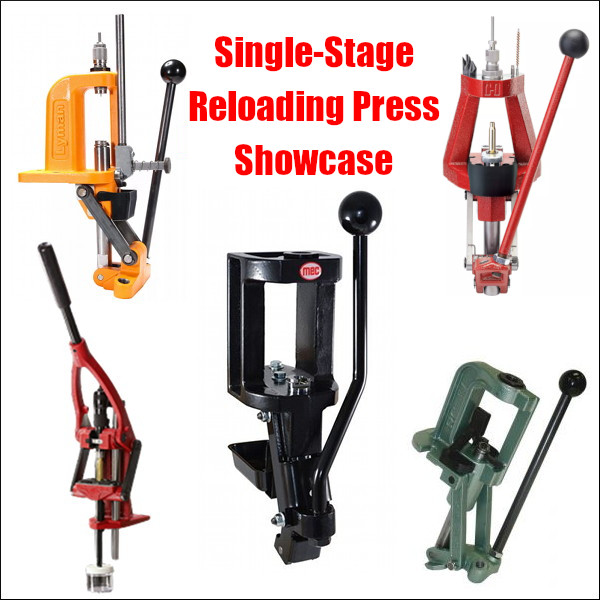
Hand-loaders have never had so many great choices in single-stage presses, with many different configurations and features. There are classic O-Frame presses, Coax-style presses, Open-front presses, Pyramid presses, and compact C-Frame presses. Here is our 2019 Single Stage Press Showcase with products from Forster, Hornady, Lee, Lyman, MEC, and RCBS. We’ve included short videos showing the features of these reloading presses.
If you are shopping for a new press you should look at the various features of each. You may prefer something classic like a Rock Chucker, or the innovative open-front MEC. If you are looking for a compact press to use at the range, the Lyman C-Frame is very impressive for the price. And the Forster Co-Ax remains a great addition to any loading room.
MEC Marksman Single-Stage Press
If you are looking for a new, full-size single-stage reloading press, definitely consider the MEC Marksman. Created by the makers of the popular MEC shotshell reloading systems, the MEC Marksman combines a sturdy cast-iron frame with a modern open-front design. If you are looking for a new, full-size single-stage reloading press, definitely consider the MEC Marksman. Created by the makers of the popular MEC shotshell reloading systems, the MEC Marksman combines a sturdy cast-iron frame with a modern open-front design. With a $245.49 street price, the MEC Marksman press now costs more than an RCBS Rock Chucker Supreme press, but the MEC offers some distinct advantages — such as an open front plus a floating shell-holder system.
Our friend Gavin Gear of UltimateReloader.com got his hands on a MEC Marksman press and put it through its paces. He came away impressed with the product, saying it delivers excellent performance, and has many impressive features. Gavin tells us: “Cast iron tools and machines are a lifetime investment. The made-in-USA MEC Marksman features ductile cast-iron construction, an open-front frame design for easy cartridge access, a new floating shell-holder design with a unique retention system, and ambidextrous handle setup.” MEC also offers a wide selection of accessories for the Marksman press, including a press riser/mount, shell-holder caddy, and die trays.
Forster Co-Ax Press
If you are not yet familiar with the many unique features of the Forster Co-Ax, we recommend you watch the video above, a very thorough video review by Rex Roach. This shows how the press operates and highlights the design elements which set the Co-Ax apart from every other reloading press on the market. This 14-minute video shows the key Co-Ax features, explaining how the floating case-holder jaws work (3:30 time-mark), how the dies are held in place (4:40 time-mark), how spent primers are captured (6:10 time-mark), and how to set the primer seating depth (10:00 time-mark). We’ve used a Co-Ax for years and we still learned a few new things by watching this detailed video. If you are considering purchasing a Co-Ax, definitely watch this video start to finish.
In recent years, Forster Co-Ax® presses have been somewhat hard to find, as demand has out-stripped supply. The Co-Ax has many dedicated fans, given its unique features, such as the floating case-holder jaws, and easy, rapid slide-in/slide-out die placement. We’ve also found that Co-Ax presses load very straight ammo and we like the ability to switch between short handle (good for bullet seating) and long handle (ideal for heavy case-sizing tasks). We also think the Forster Co-Ax has one of the best spent primer capture systems on the market — a straight drop into a removable plastic cup. Simple and it works.
Lyman Brass Smith Victory Single-Stage Press
Lyman’s sturdy Victory Single-stage Press is a full-size unit that competes with the RCBS Rock Chucker Press. With beefy cast iron construction, the Victory’s strength and leverage rivals the Rock Chucker. The press operates smoothly and the handle can be mounted on either side.
If you like to prime cases using a press, this Victory press has a priming system that’s much easier to use than the RCBS Rock Chucker system. The priming tube is right up front, with multiple primers loaded vertically in a tube. Simply push the shuttle at the button of the tube to advance the primer into place.
For convenience, the entire primer-loading system can also be removed so it doesn’t interfere with case and bullet-handling operations. We generally prefer to prime cases separately using a dedicated hand- or bench-mounted tool, but the Victory press does the job nicely.
Overall, the Victory is a great value in a full-size “O-Frame” press with sturdy construction and a solid Lyman warranty. It is available now for $219.99 on Amazon.
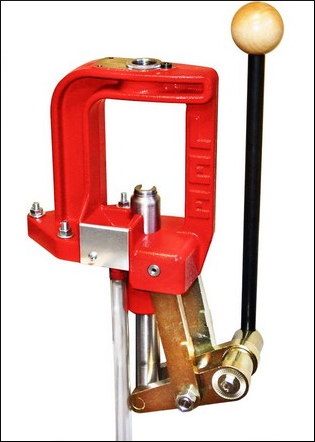
RCBS Rock Chucker Supreme Single-Stage Press
Nearly every serious hand-loader has owned or used the RCBS Rock Chucker press. This Editor still uses a Rock Chucker passed down by his brother 20 years ago. And yes, it is still going strong. The latest Rock Chucker Supreme single-stage press features an improved “upside-down Y-path” dual-bin spent primer catcher. Otherwise the Rock Chucker Supreme remains big, strong, versatile and sturdy. It has very strong linkages, with a compound leverage system providing plenty of power — FL-sizing is a breeze even with large, magnum cases. The 1″-diameter ram has 12.5 sq. inches of ram-bearing surface.
The Rock Chucker offers a secondary 1 1/4″ x 12 thread for shotshell reloading dies and Piggyback 3 upgrade. The Rock Chucker Supreme retails for $234.99 now at Midsouth. The Rock Chucker Supreme combines easy operation, ambidextrous handle, and outstanding strength. It has a big 4.25″ loading window that works even for big magnum cases. The long handle and central pivot design provide outstanding leverage. The RCBS Rock Chucker is definitely a quality product that can last a lifetime. For heavy-duty sizing chores this remains one of the best choices in single-stage presses.
Lyman Brass Smith Ideal C-Frame Compact Press
The Lyman Brass Smith Ideal Press is a very affordable, cast iron C-Frame reloading press. We think it is the new “class leader” in compact presses. This works great as a secondary press for your reloading room or a small press you can take to the range. The large front opening allows you to access the shell holder without hitting the support bar on other types of presses. Unlike other compact presses made from aluminum, Lyman’s Ideal press is cast iron so it is rigid and strong. The high-quality steel ram is one inch in diameter. The Brass Smith is a true ambidextrous press that can be accessed from either side and mounted the same. This is a great choice for a second, auxiliary press for depriming and bullet seating. It is now just $134.99 at MidwayUSA.
Hornady Iron Single Stage (Open-front) Press
In this “Reloading with Rosie” video, the attractive female host loads some ammo using the Hornady Iron Press. With a beefy, pyramid-style cast-iron frame with an open front, this press offers some advantages over a traditional “O-Frame” type press. Access is considerably easier, for one thing. And the top of the press includes slots to hold dies and tools — that’s really a very nice feature that saves time. Also an optional “automatic” priming system shuttles primers from a vertical tube in the back to the shell-holder in the front. That’s clever. Over all the Iron Press is a nice piece of engineering — good job Hornady. It is offered for $289.99 at Midsouth.
Lee Classic Cast (Iron) Breech Lock Press
The Lee Classic Cast Breech Lock Press offers excellent value for the money ($190.99 at Midsouth). Based on the proven design of the Classic Cast press, the updated Breech Lock series adds the quick-change die bushing and an improved primer drop system. This press is strong, with cast iron frame, all-steel linkage, and 12 square inches of ram bearing surface.
Lee says this press has the “largest opening and the longest stroke in the industry” among O-frame type presses. The handle can be mounted on either side. We love the fact that the handle ANGLE can be adjusted, as well as the lever arm length — that allows you to adjust travel and leverage to suit your preference. Smart engineering.
The new spent primer drop features a large-diameter hollow ram with clear hose that drops primers straight to a bin — that’s simple and effective. The press is very rigid and the base is wide enough for good stability. We have one of these Classic Cast Breech Lock Presses in our reloading room and it works well.


 Here’s a simple solution for lumpy front sandbags. Cut a small block the width of your fore-end and place that in the front bag between matches. You can tap it down firmly with a rubber mallet.
 Barrel/Shoulder Fit and Blue-Printing


 Made by the same smart folks that created Wipe-Out™, and Carb-Out™,
  Where to Buy NO-LEAD Lead Remover


 This time of year, many readers are putting their guns away in a safe for the winter. It’s easy to just tuck the guns away and forget about them. But there’s something you should do before you shut the safe door.

 If you are not yet familiar with the many unique features of the Forster Co-Ax, we recommend you watch the video above, a very thorough video review by Rex Roach. This shows how the press operates and highlights the design elements which set the Co-Ax apart from every other reloading press on the market. This 14-minute video shows the key Co-Ax features, explaining how the floating case-holder jaws work (3:30 time-mark), how the dies are held in place (4:40 time-mark), how spent primers are captured (6:10 time-mark), and how to set the primer seating depth (10:00 time-mark). We’ve used a Co-Ax for years and we still learned a few new things by watching this detailed video. If you are considering purchasing a Co-Ax, definitely watch this video start to finish.
 Lyman’s sturdy Victory Single-stage Press is a full-size unit that competes with the RCBS Rock Chucker Press. With beefy cast iron construction, the Victory’s strength and leverage rivals the Rock Chucker. The press operates smoothly and the handle can be mounted on either side.
 Nearly every serious hand-loader has owned or used the RCBS Rock Chucker press. This Editor still uses a Rock Chucker passed down by his brother 20 years ago. And yes, it is still going strong. The latest Rock Chucker Supreme single-stage press features an improved “upside-down Y-path” dual-bin spent primer catcher. Otherwise the Rock Chucker Supreme remains big, strong, versatile and sturdy. It has very strong linkages, with a compound leverage system providing plenty of power — FL-sizing is a breeze even with large, magnum cases. The 1″-diameter ram has 12.5 sq. inches of ram-bearing surface.

 The Lee Classic Cast Breech Lock Press offers excellent value for the money (


