Most modern match rifle barrels are stainless steel alloy. These are from Benchmark Barrels.
Though some grades of stainless are more corrosion-resistant, ALL varieties of stainless steel can rust if they are not handled and stored properly.
Some folks feel that they don’t have to worry about rust and corrosion on stainless steel barrels, actions, and other components. That’s not really true. “Stainless” is a bit of a misnomer. First, there are different types of stainless steel alloys, with different degrees of rust resistance. 300 series stainless is more corrosion resistant than the 416 stainless commonly used in barrels. The composition (by percentage weight) of 416 stainless is 0.15% carbon, 12-14% chromium and the rest iron. 416 stainless steel lacks the roughly 10% nickel content that makes the 300 series more corrosion resistant in atmospheric conditions. But because 416 handles pressure better and is easier to machine (than 300 series steel), 416 stainless remains the better choice for barrels.
Though some grades of stainless are more corrosion-resistant, ALL varieties of stainless steel can rust if they are not handled and stored properly. Forum reader Kells81 observed: “Wanna see some rusted stainless? Go to the big “C” brand store in Ft. Worth. Every stainless gun they have on the used gun rack is rusted.” Tom Easly of TRE Custom explains: “Sweat is very corrosive. Sweat and blood will rust many stainless steels. I hate to handle my guns or drip on them when I sweat. It really helps to just wipe them good with a wet rag, dry and wipe on a light coating of gun oil. I think most stainless barrels are made from type 416 stainless, and it is generally pretty corrosion resistant, but not when exposed to sweat, blood, or chlorates (corrosive priming), and some other electrolytes.”
Forum member Jacob, who is studying materials science at LSU, provides this technical information: “The basic resistance of stainless steel occurs because of its ability to form a protective coating on the metal surface. This coating is a ‘passive’ film which resists further ‘oxidation’ or rusting. The formation of this film is instantaneous in an oxidizing atmosphere such as air, water, or other fluids that contain oxygen. Once the layer has formed, we say that the metal has become ‘passivated’ and the oxidation or ‘rusting’ rate will slow down to less than 0.002″ per year (0.05 mm per year).
Unlike aluminum or silver, this passive film is invisible in stainless steel. It’s created when oxygen combines with the chrome in the stainless to form chrome oxide which is more commonly called ‘ceramic’. This protective oxide or ceramic coating is common to most corrosion resistant materials.
Halogen salts, especially chlorides, easily penetrate this passive film and will allow corrosive attack to occur. The halogens are easy to recognize because they end in the letters ‘ine’. Listed in order of their activity they are: fluorine, chlorine, bromine, iodine, astatine.
These are the same chemicals that will penetrate Teflon and cause trouble with Teflon coated or encapsulated O-rings and/ or similar coated materials. Chlorides are one of the most common elements in nature and if that isn’t bad enough, they’re also soluble, active ions. These provide the basis for electrolytes. The presence of electrolytic solutions can accelerate corrosion or chemical attack.”
CONCLUSION: Stainless steel barrels and components won’t rust nearly as fast as blued steel, but you still have to take precautions — particularly removing sweat and corrosive salts from the barrel. Also, don’t let moisture build up inside or outside of the barrel. We recommend wiping your barrels and actions with Eezox, or Corrosion-X after each use. These are both extremely effective rust-fighters that go on thin, without leaving a greasy residue. (Eezox leaves a clear finish, while Corrosion-X has a slightly waxy finish.) Also store your guns in Bore-Store bags when the guns go in the safe. Bore-Stores wick away moisture, and the synthetic fleece inner surface is treated with rust-fighting chemicals. Bore-Stores also protect your guns against dings and scratches.
With the Whidden Click-Adjustable Sizer Dies, you can change shoulder bump by .001″ (one-thousandth) with a simple click. Fast. Easy. Precise.
As handloaders have become more aware of shoulder bump and proper adjustment of the sizer die in recent years, there has become a need for an easier way to adjust the sizer die properly. For most folks, with their conventional dies, it takes lengthy trial trial and error to get the shoulder setback correct. Anyone who has done this can attest that it can be a slow and annoying job.
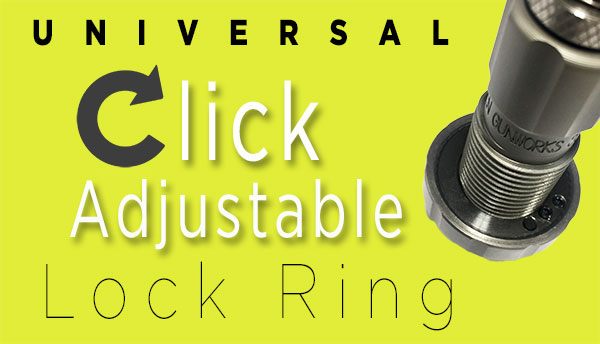
Whidden Gunworks has solved the problem with the innovative Click Adjustable Sizer Die. Patent No: 10,393,488. This die and lock ring work together to give the user a clicking feel to the adjustment just like a high end rifle scope. Each click moves the shoulder bump exactly .001″ so you can easily find the exact shoulder bump that you desire.
The Click Adjustable option is available on Whidden Custom Sizer dies as well (7/8”-14 format dies only)! Included with the Click Adjustable Sizer Die is a Shoulder Bump Gauge. This gauge attaches to standard calipers and allows measurement from the case shoulder to the base. Using the Shoulder Bump Gauge with the Click Adjustable Sizer Die will make the proper sizer die setup easier than ever before.
Click-adjustable die sets are available with both bushing and non-bushing configurations. Along with these complete die sets, Whidden Gunworks offers a separate click-adjustable ring to use with existing dies. Priced at $58.99, the Whidden Click-Adjust Lock Ring represents a modest investment for a major gain in die ease-of-use and precision adjustability.
The Whidden Universal Click Adjustable Lock Ring you can instantly turn your sizer die into a Click Adjustable Die. This ring works with any 7/8 OD sizer of any brand with adjustable shoulder bump. Simple in design, the inner and outer ring can rotate independently of each other. Each click is metered in true 1 thousandths adjustment and has 0.100″ total available travel. These work great with nearly all sizing 7/8 OD sizing dies, and one verified purchaser noted: “Not only are they useful on reloading dies, but it’s the cat’s meow on the Giraud Power Trimmer Case Holders.”
Dillon Users Take Note: The Whidden Click Adjustable Sizing Die will not work with the Dillon 550 or 650 progressive reloading press systems. The Universal Click Adjustable Lock Ring is not compatible with the Dillon floating toolhead.
The late Bill Myers was recognized as one of greatest rimfire smiths who ever lived. Myers crafted many match-winning, record-setting rimfire benchrest rigs. Here we feature one of Bill’s most interesting creations — a clamping action that allows a rimfire barrel to be indexed (rotated) around the bore axis.
Bill was a creative thinker, and his own exhaustive testing has convinced him that barrel indexing can enhance accuracy in rimfire benchrest guns. Myers did acknowledge that, particularly with a very good barrel, the advantages of indexing may be subtle, and extensive testing may be required. Nonetheless, Myers believed that indexing could improve rimfire accuracy.
Indexing with the Myers’ Clamping Action
To index the barrel, Myers simply loosens the three clamping-bolts and rotates the barrel in the action. Because there is no thread to pull the barrel in or out, the headspace stays the same no matter how much the barrel is rotated. In other words you can rotate the barrel to any position on the clockface and the headspace remains unchanged.
The Challenge of Barrel Indexing With a conventional barrel installation, employing a shoulder with a threaded tenon, it is difficult to index the barrel. Even with a cone breech (photo right) that eliminates the problem of extractor cuts, you’d have to use shims to alter the barrel index position, or otherwise re-set the shoulder each time you screwed the barrel in further.
Clamping Action Allows Barrel to Be Rotated to Any Position
Bill has come up with a masterful solution to barrel indexing. He designed and built his own prototype custom action that clamps the barrel rather than holding it with threads. The front section of the action is sliced lengthways, and then clamped down with three bolts. A special bushing (the gold-color piece in photos) fits between the barrel and the action. By using bushings of different inside diameters, Bill can fit any barrel up to an inch or so diameter, so long as it has a straight contour at the breech end. To mount the barrel, Bill simply places the fitted bushing over the barrel end-shank, then slips the “sleeved” barrel into the front end of the action. Tighten three bolts, and the barrel is secure.
This stunning Westley Richards & Co. shotgun was made for the 1981 nuptials of Lady Diana Spencer and HRH Prince Charles. It is rare, has a unique history of ownership, and is also elaborately decorated.
Jim Supica, Director of the NRA Firearms Museum, has written a trio of articles about gun collecting. If you are thinking of starting your own collection of firearms, you should read Supica’s informative articles. The first talks about the basics of gun collecting, the second explains the five key factors that govern gun values, and the third article explains where to find rare and valuable arms. Today we want to highlight the five factors that contribute most to a gun’s value, according to Supica:
Make and Model, Condition, Rarity, History, Art — These are the five factors that … appeal to collectors and help determine the value of collectible guns.
Make and model tends to be the starting point for evaluating collectible guns for most collectors and will be a basic threshold requirement for those with specialized collections.
Factors here include the quality of a particular manufacturer’s products, the historical usage of the guns in question, and the brand’s aura of romance. As an example of that last (and most intangible) factor, consider that Colt Single Action Army revolvers were for several decades the most prevalent focus for collectors interested in full-size revolvers from the post-Civil War to turn of the 20th Century-era, and there is no question that Colts were widely used during that time. In recent years, there has been a refreshing trend in gun collecting to look at a broader range of guns than the traditional blue chip Colts, Winchesters, and Lugers.
Colt Single Action Army Revolvers remain among the most prized (and collectible) firearm.
2. Condition (and Originality)
Obviously, condition plays a major role in the value of a collectible firearm. The classic advice to new collectors in this regard has always been to hold out for guns in the best condition and pay the extra premium they demand. This condition-emphasis seems to have developed in the 1970s and 1980s. In the early post-WWII years of gun collecting there was more interest in rare variations and history, and fewer collectors to whom a few percentage point difference in remaining original finish was of much concern.
Although the highest-condition guns continue to bring record prices, it seems that the pendulum is beginning to swing back the other way, a trend met with my hearty approval. The appeal of “mint” guns has been largely lost on me, and seems to be more appropriate to coin or stamp collecting than a field in which the possible historic usage of the artifact holds so much interest and significance. There is a definite segment of the collector market that is not overly concerned with perfect condition, so long as the gun is original and has not been messed with in a more recent (and, in my opinion, usually misguided) attempt to enhance its desirability.
3. Rarity
In terms of rarity, the well-worn saying that “just because a gun is rare doesn’t mean it’s valuable” remains true to a certain extent. There may only be five known examples of a particular gun, but if only three people care about it, the market is saturated. However, there does seem to be more interest in cornering the rare variations within established collecting fields. There is a bit of a resurgence of the collecting philosophy of completing a punchlist of models and variations within a specialization, and this lead to vigorous competition for the rarest examples in these fields. In emerging collecting fields, when new research is published revealing the rarity of certain variations there can develop a brisk interest in those guns.
4. History
Individual guns with a known history of ownership by a specific individual or usage in a specific historical event have always captured the fascination of collectors, as well as historians and the general public. This seems to reflect a basic human interest and shows no sign of abatement. A positive trend here seems to be an increase in general understanding of the type of documentation which must accompany a historically attributed firearm to give it the credibility to justify a premium price, and the importance of creating and preserving such documentation.
This Beretta has extra value because it was owned by pilot Chuck Yeager. Photo NRA Museum.
5. Art (Decorative Embellishment)
Fine engraved guns are collected more for their artistic value than for their worth as firearms. Here the market for classic works by the great engravers of the 19th and early 20th Centuries remains strong, as well as for factory-engraved pieces from more recent years. Interest in recent non-factory engraving seems to have diminished, as has… the trend of adding modern engraving to older firearms.
Here is a matching set of three three beautifully engraved pistols by the late Indiana engraving wizard Ben Shostle — a Luger, a Mauser, and a Colt. Photo courtesy Amoskeag Auction Company.
Factory-custom engraving should not be confused with mass-produced, factory-made commemorative firearms, which flooded the market in the 1960s and 1970s. A couple of major manufacturers worked this genre to death, and prices on commemoratives have been stagnant for many years now, although the market for these shows some signs of renewal.
CAUTIONARY WORDS about RESTORATION
With prices for high-condition original finish guns running away from the budgets of many collectors, period-of-use refinished guns and older factory-refinished guns are finding more enthusiastic buyers than they did a few years ago.
The availability of excellent-quality restoration services is another factor that I anticipate may impact collector preferences in the future. The top restoration artists are reworking guns to “as new” condition with such skill that it has become increasingly difficult for even knowledgeable collectors to distinguish mint original finish guns from the best restorations.
When such restoration is disclosed to a prospective buyer (as it ethically should be), the prices the gun will bring are significantly below a similar gun with original finish, and may be less than the original cost of the pre-restoration gun plus the cost of the rework. This creates a mighty incentive for deception by a motivated seller, either by active misrepresentation (a.k.a. “fraud”) or passively by simple failure to mention the modification.
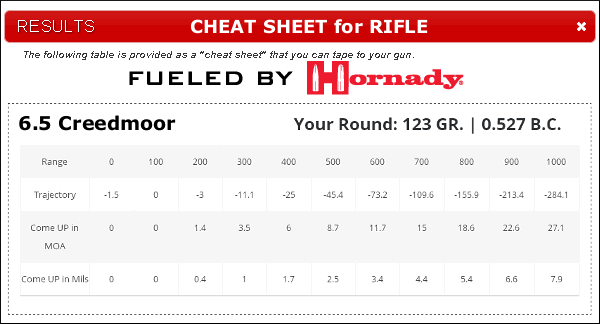
Need a simple, easy-to-use drop chart for your rifle? Something you can tape right to the buttstock? Then check out Hornady’s handy Online Ballistics Calculator. This user-friendly calculator will compute your drops accurately, and output a handy “Cheat Sheet” you can print and attach to your rifle.
Here’s how it works. From the Ballistics Calculator Page, first select 4DOF or Standard. Next input G1 or G7 BC values, muzzle velocity, bullet weight, zero range, and a few other variables.
Click “Calculate” to view the full chart (shown below). Then click “View Cheatsheet” and the simpler, 4-line Drop Chart (shown above) appears. Click “Print” and you’re done!
Choose Basic Table or Advanced Version with More Variables
The online ballistics caculator is easy to use. You can select the basic version, or an advanced version with more data fields for environmental variables (altitude, temperature, air pressure, and humidity). You can also get wind drift numbers by inputing wind speed and wind angle.
Conveniently, on the trajectory output, come-ups are listed in both MOA and Mils — so this will work with either MOA clicks or Mil-based clicks. There are more sophisticated ballistics solvers available on the web, such as the outstanding Applied Ballistics Online Calculator, but the Hornady Calculator is very simple and easy to use. If you just want a basic drop chart, you may want to check this out.
Sometimes you’ll get a barrel that doesn’t stabilize bullets the way you’d anticipate, based on the stated (or presumed) twist rate. A barrel might have 1:10″ stamped on the side but it is, in truth, a 1:10.5″ twist or even a 1:9.5″. Cut-rifled barrels, such as Kriegers and Bartleins, normally hold very true to the specified twist rate. With buttoned barrels, due to the nature of the rifling process, there’s a greater chance of a small variation in twist rate. And yes, factory barrels can be slightly out of spec as well.
After buying a new barrel, you should determine the true twist rate BEFORE you start load development. You don’t want to invest in a large supply of expensive bullets only to find that that won’t stabilize because your “8 twist” barrel is really a 1:8.5″. Sinclair International provides a simple procedure for determining the actual twist rate of your barrel.
Sinclair’s Simple Twist Rate Measurement Method
If are unsure of the twist rate of the barrel, you can measure it yourself in a couple of minutes. You need a good cleaning rod with a rotating handle and a jag with a fairly tight fitting patch. Utilize a rod guide if you are accessing the barrel through the breech or a muzzle guide if you are going to come in from the muzzle end. Make sure the rod rotates freely in the handle under load. Start the patch into the barrel for a few inches and then stop. Put a piece of tape at the back of the rod by the handle (like a flag) or mark the rod in some way. Measure how much of the rod is still protruding from the rod guide. You can either measure from the rod guide or muzzle guide back to the flag or to a spot on the handle.
Next, continue to push the rod in until the mark or tape flag has made one complete revolution. Then re-measure the amount of rod that is left sticking out of the barrel. Use the same reference marks as you did on the first measurement. Next, subtract this measurement from the first measurement. This number is the twist rate. For example, if the rod has 24 inches remaining at the start and 16 inches remain after making one revolution, you have 8 inches of travel, thus a 1:8″-twist barrel.
Determining Barrel Twist Rate Empirically
Twist rate is defined as the distance in inches of barrel that the rifling takes to make one complete revolution. An example would be a 1:10″ twist rate. A 1:10″ barrel has rifling that makes one complete revolution in 10 inches of barrel length. Rifle manufacturers usually publish twist rates for their standard rifle offerings and custom barrels are always ordered by caliber, contour, and twist rate. If you are having a custom barrel chambered you can ask the gunsmith to mark the barrel with the twist rate.
“The overturning moment MW tends to rotate the bullet about an axis, which goes through the CG (center of gravity) and which is perpendicular to the plane of drag….
Ruprecht Nennstiel, a forensic ballistics expert from Wiesbaden, Germany, has authored a great resource about bullet behavior in flight. Nennstiel’s comprehensive article, How Do Bullets Fly, explains all the forces which affect bullet flight including gravity, wind, gyroscopic effects, aerodynamic drag, and lift. Nennstiel even explains the rather arcane Magnus Force and Coriolis Effect which come into play at long ranges. Nennstiel’s remarkable resource contains many useful illustrations plus new experimental observations of bullets fired from small arms, both at short and at long ranges.
Shadowgraph of .308 Winchester Bullet
A convenient index is provided so you can study each particular force in sequence. Writing with clear, precise prose, Nennstiel explains each key factor that affects external ballistics. For starters, we all know that bullets spin when launched from a rifled barrel. But Nennstiel explains in greater detail how this spinning creates gyroscopic stability:
“The overturning moment MW tends to rotate the bullet about an axis, which goes through the CG (center of gravity) and which is perpendicular to the plane of drag, the plane, formed by the velocity vector ‘v’ and the longitudinal axis of the bullet. In the absence of spin, the yaw angle ‘δ’ would grow and the bullet would tumble.
If the bullet has sufficient spin, saying if it rotates fast enough about its axis of form, the gyroscopic effect takes place: the bullet’s longitudinal axis moves into the direction of the overturning moment, perpendicular to the plane of drag. This axis shift however alters the plane of drag, which then rotates about the velocity vector. This movement is called precession or slow mode oscillation.”
Raise Your Ballistic IQ
Though comprehensible to the average reader with some grounding in basic physics, Nennstiel’s work is really the equivalent of a Ph.D thesis in external ballistics. You could easily spend hours reading (and re-reading) all the primary material as well as the detailed FAQ section. But we think it’s worth plowing into How Do Bullets Fly from start to finish. We suggest you bookmark the page for future reference. You can also download the complete article for future reference and offline reading.
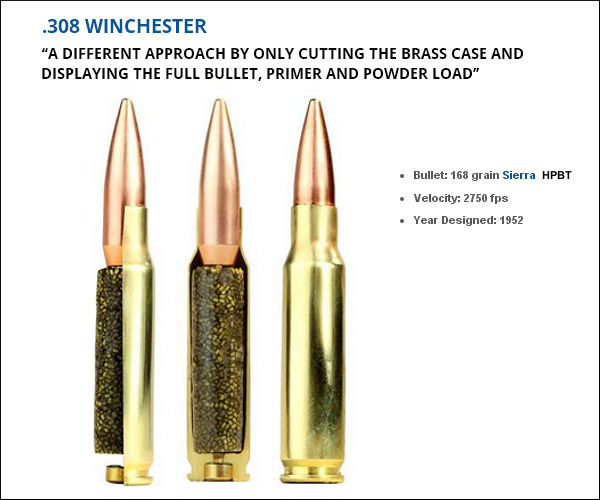
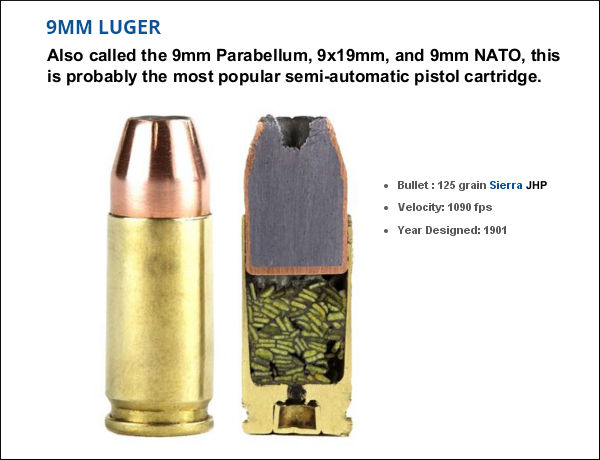
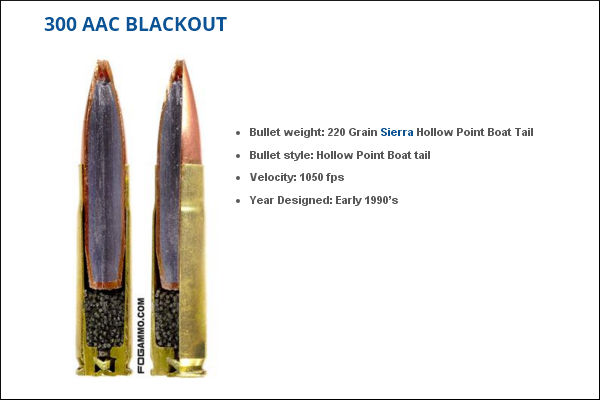
Here’s something you don’t see every day — the inside of loaded cartridges, sliced halfway through. This lets you see how bullet core, jacket, cartridge case, powder, and primer all fit together. Give credit to the folks at FOG Ammunition for creating this interesting series of cut-through ammo images. We show four cartridges here: the .308 Winchester, 9mm Luger, 300 BLK, and .50 BMG. You’ll find two more (the .223 Remington and .45 ACP) on the originalFOG Ammo Blog Article.
This .308 Winchester model took on a different approach by only cutting the brass case and displaying the full bullet, primer and powder load. A spec amount of powder was used to create the model powder form. An estimated 10% volume was added during the forming process, along with an undetermined amount of air pockets.
This bisection is a 9mm Luger Jacketed Hollow Point round with flake powder held together with super glue. After this self-defense round was cut by a trained professional the round was polished by hand. This might look like stick powder, but those are in fact flakes stacked up in cross-section. Designed in 1901 by Georg Luger, this popular cartridge is used by civilians, military, and law enforcement.
For this model of the .300 AAC Blackout (aka 300 BLK), a Dremel tool was used to create a pie cut within the bullet and brass case. A measured amount of power, roughly 65% of spec charge, was placed inside the case with super glue. This cartridge was originally optimized for subsonic use with a suppressor, so the amount of powder used is small relative to the nominal case capacity. That leaves more room for the relatively large .30-caliber bullet.
Last but definitely not least is the .50 Caliber BMG round (aka .50 Browning Machine Gun). Famed for its wartime use in the M2 Machine gun, the .50 BMG round is also used in civilian Long Range competitions. A typical .50 BMG cartridge holds over 225 grains of powder. That’s almost ten times the amount in a 5.56×45 NATO Round! To demonstrate the size of the .50 BMG, check out that .223 Rem for comparison.
Hunting season is right around the corner. That means its time to inspect all your hunting gear, including your scope set-up. If you have a new optic, you’ll want to get it mount it correctly, A proper scope installation involves more than just tensioning a set of rings — you need to consider the proper eye relief and head position, and it should be leveled correctly. This video shows a simple, quick method to mount a scope. The method assumes that the reticle (cross-hairs) are square without the turret. You’ll want to confirm that with a plumb line hanging straight down, a procedure you can do indoors.
In this NSSF video, Ryan Cleckner shows how to set up a scope on a hunting or tactical rifle. Ryan, a former U.S. Army Sniper Instructor, notes that many hunters spend a small fortune on equipment, but fail to set up their rifle to use the optics optimally. Cleckner likens this to someone who owns an expensive sports car, but never adjusts the seat or the mirrors.
Ryan notes that you want your head and neck to be able to rest naturally on the stock, without straining. You head should rest comfortably on the stock. If you have to consciously lift your head off the stock to see through the scope, then your set-up isn’t correct. Likewise, You shouldn’t have to push your head forward or pull it back to see a clear image through the scope. If you need to strain forward or pull back to get correct eye relief, then the scope’s fore/aft position in the rings needs to be altered. Watch the full video for more tips.
Tips on Mounting Your Scope and Adjusting Your Comb Height:
1. Normally, you want your scope mounted as low as possible, while allowing sufficient clearance for the front objective. (NOTE: Benchrest shooters may prefer a high mount for a variety of reasons.)
2. Once the scope height is set, you need to get your head to the correct level. This may require adding an accessory cheekpad, or raising the comb height if your rifle has an adjustable cheekpiece.
3. Start with the rifle in the position you use most often (standing, kneeling, or prone). If you shoot mostly prone, you need to get down on the ground. Close your eyes, and let you head rest naturally on the stock. Then open your eyes, and see if you are too low or too high. You may need to use a cheekpad to get your head higher on the stock.
4. If your scope has a flat on the bottom of the turret housing, this will help you level your scope. Just find a flat piece of metal that slides easily between the bottom of the scope and the rail. Slide that metal piece under the scope and then tilt it up so the flat on the bottom of the scope aligns parallel with the flats on the rail. Watch the video at 8:40 to see how this is done.
Video find by EdLongrange. We welcome reader submissions.
Tomorrow, September 28th, is National Hunting and Fishing Day, held each year on the fourth Saturday of September. To help the avid hunters among our readers, here are Twenty Tips that can help ensure a safe and successful hunt. These tips have been compiled from our AccurateShooter Hunting Forum, with help from Hunting Editor Colton Reid (who has already been out hunting this month). Some items are preparatory — such as working with maps, sighting in the rifle, and improving physical fitness. We also talk about equipment — having the right gear, from proper boots to a GPS for multi-day hunts.
Of course there are entire volumes written on hunting, but these 20 Tips can benefit all hunters. Follow these suggestions and you should have a safer hunting experience with greater likelihood of success. If you liked these pointers, you’ll find two dozen more helpful hints on the NSSF Website.
Preparations Before The Hunt
1. Map Your Hunt and Notify Others — Before your hunt, make a plan and notify friends and family members about WHERE you are going and your intended return date and time. Print out a Google Satellite map and locate landmarks and trailheads. Mark where you plan to park your vehicle and give a copy of this map to friend and/or family members. A hunter may injure himself by falling off a rock, or tumbling in a creek-bed. After that kind of injury the hunter may be confused or unable to walk. If you get stranded in the wilderness, you want trusted persons to know where you are. So, before you leave on a trip, provide a map to a friend or family member. Show them where you will leave your vehicle, and where you expect to be every day of your hunting adventure.
2. Licenses and Permits — Make sure you have a valid hunting licenses and all the necessary tags. Begin this process with ample time before your intended hunt(s). The NSSF adds: “If you are crossing state or national borders, find out about any special considerations you must take care of. Border crossings can mean knowing about firearm transport laws or Chronic Wasting Disease-related regulations.”
3. Work on Your Fitness — On a multi-day hunt you may be trekking many miles. You need to be in good shape. If you are out of shape you may be putting yourself in a precarious situation, particularly if you underestimate the terrain difficulty. As the NSSF says: “Not being able to handle the conditions lessens your chances of success, can turn a great experience into an agonizing one and can endanger your health.”
4. Do Your Homework — Study the area you will be hunting. Talk to other hunters. Look at satellite photos. Get a real sense of the walking and terrain challenges. For a multi-day hunt, MAKE a PLAN. The NSSF states: “Eliminate surprises. Learn as much about where you will be staying, the area you will be hunting, what the weather might be like and what you need to bring[.]”
5. Rifle and Ammo — Make sure your rifle is sighted-in and your ammo is tested. Sight-in your rifle with the ammo you plan to use on your hunt. CLICK HERE for 4-Shot Sight-in Method. After sighting-in from the bench, confirm your zero by shooting from typical hunting positions (kneeling and with forearm supported on a rock or post).
6. Shooting Positions — Practice the shooting positions you will use in the field. Practice sitting, kneeling, and prone positions. You should also practice with shooting sticks, using your day pack as a rest, and with a bipod. Try to have a rock-steady rest before taking your shot.
7. Back-Up Irons — If possible, select a rifle with back-up iron sights. While modern scopes are very durable, they can and do fail (glass can crack). If you’ve invested a lot of time and money in your hunt, back-up iron sights can keep you in the game even if your riflescope fails.
8. Communications and GPS — Bring a GPS if you are in a wilderness area far from civilization. It’s a good idea to bring a cell phone, but you may not have coverage if you’re quite a distance from populated areas. A smart-phone also doubles as a digital camera to record your trophies. For navigation and safety, consider getting Garmin inReach Explorer+. This high-tech handheld unit features interactive SOS, connecting you to the GEOS 24/7 search-and-rescue monitoring center. They also allow you to send and receive text messages, no matter where you are, via advanced inReach satellite technology. Yes you can communicate even if you are miles from the nearest cell tower.
9. Select Good Gear — Make sure you have GOOD BOOTS that are comfortable — you’ll spend a lot of time on your feet. You may want a pack with harness for your rifle so you have both hands free. On a multi-day trip, make sure you can carry enough water, and that you will stay warm enough at night. Good practices for backpacking apply to multi-day hunts.
10. Make a Gear Checklist — Create a complete checklist of the gear and supplies you need. That includes arms, ammunition, rangefinder, binoculars, proper clothing (including spare clothes), hunting accessories, sleeping gear (on multi-day hunts), toiletries, medications. Don’t forget a good first aid kit — lots of bad things can happen during any wilderness trip. You can cut a hand, break an ankle or worse.
During The Hunt
11. Have a Plan — know where you plan to go and when. Try to be where you want in the early morning and early evening hours when deer are likely most active.
12. Take Your Time — If you spot a deer and get too excited and don’t take your time you may spook him. Go slow and glass. If possible, wait for the animals to bed down and relax. Then work out the best way to approach your prey. Remember, “You get so few opportunities, don’t screw it up!”
13. Glass More, Walk Less — Let your eyes do the walking — get good binoculars and use them. With their heightened senses of smell and hearing, deer/elk are able to spot you way better than you can spot them. If you are walking around a lot, chances are you are getting spotted by your prey.
14. Riflescopes Are Not Binoculars — Never use a riflescope as a substitute for binoculars. The temptation to do so is real, but when one does this, one is by definition pointing the muzzle of the gun at unknown targets. We like binoculars with built-in rangefinders. When glassing at long range, try supporting your binoculars on your pack.
15. Be Sure of Your Target before Shooting — Every year during whitetail season, farmers are forced to spray-paint their cattle or risk having them “harvested” by hunters who don’t bother confirming the species in their sights. Hunters with “buck fever” can make mistakes. When in doubt, don’t shoot.
16. Know When to Unload — When finished hunting, unload your firearm before returning to camp. You should also unload your gun before attempting to climb a steep bank or travel across slippery ground.
17. Bring Hearing Protection — While pursuing and stalking your prey you’ll want full sensory use of your ears. But when you’re finally ready to take the shot, slip in hearing protection. A shot from a large-caliber hunting rifle can exceed 170 decibels. Unprotected exposure to noise from a SINGLE 170+ dB shot can cause permanent hearing damage. (Source: ASHA.org). If you make a follow-up shot, you double that noise hazard. Therefore a hunter with a non-suppressed rifle should have hearing protection available.
You can keep a pair of easy-to-use quick-insert ear plugs on a cord around your neck. Or, get a lightweight neck band with earbuds, such as the Sellstrom Band, Peltor Band, or 3M Safety Band, all with a good 25 dB or better Noise Reduction Rating. You can keep these lightweight bands around your neck for quick deployment before you shoot.
“Once a hunter is successful, the REAL work begins.” — Colton Reid
18. Harvesting the Animal — When dressing your animal, be careful with the meat. You’ll want very sharp knives. Some hunters prefer knives with replaceable, razor-sharp blades. Don’t rush the task. Make sure you don’t get moisture or dirt on meat. The three spoilers of meat are heat, moisture, and dirt.
19. Pace Yourself When Packing Out — If you DO succeed, and bring down a big buck, will you be able to dress the animal and carry out the meat? Always be prepared to hike out with extra weight. If you are successful, make sure not to waste the meat you worked so hard for. Choose a pack that can help you carry a heavy load. Remember, this is not an insignificant challenge — you may be carrying 60 to 100 extra pounds in addition to your other gear. Again, take your time. Rest as needed. Don’t hurt yourself.
20. Remember to Enjoy the Experience — Our Hunting Editor, Colton Reid, offers this sage advice to all hunters, but particularly to novices: “Have fun, and appreciate your hunt, whether you bag a buck or not. It is a privilege to experience the wilderness and to get away from the city. Enjoy it while you’re out there. And keep your spirits up. You may get tired, but remember that ‘comes with the territory’. At the end of the day, yes you may be exhausted. And you may want to quit and go home. But stay positive, stay focused. Be patient, the experience is worth it.”
CLICK HERE for Hunter Training/Mentoring Programs State-by-State.
Visit WhereToHunt.org
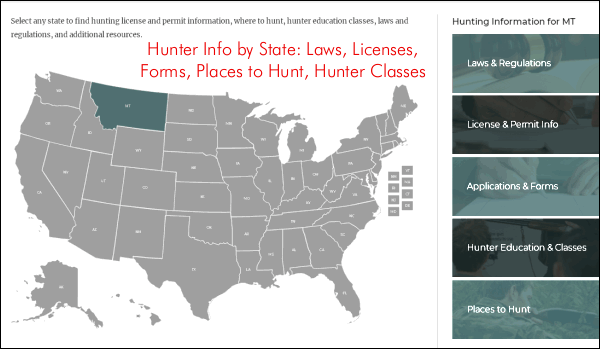
There’s a great online resource for hunters that will help you find game locations in your state and ensure you have all the proper permits and game tags. WheretoHunt.org features an interactive map of the country. For all 50 states, the NSSF has compiled information about hunting license and permits, where to hunt, hunter education classes, laws and regulations and more. For each state you’ll also find a link for required applications and license forms.


 CONCLUSION: Stainless steel barrels and components won’t rust nearly as fast as blued steel, but you still have to take precautions — particularly removing sweat and corrosive salts from the barrel. Also, don’t let moisture build up inside or outside of the barrel. We recommend wiping your barrels and actions with Eezox, or Corrosion-X after each use. These are both extremely effective rust-fighters that go on thin, without leaving a greasy residue. (Eezox leaves a clear finish, while Corrosion-X has a slightly waxy finish.) Also store your guns in Bore-Store bags when the guns go in the safe. Bore-Stores wick away moisture, and the synthetic fleece inner surface is treated with rust-fighting chemicals. Bore-Stores also protect your guns against dings and scratches.


 With a conventional barrel installation, employing a shoulder with a threaded tenon, it is difficult to index the barrel. Even with a cone breech (photo right) that eliminates the problem of extractor cuts, you’d have to use shims to alter the barrel index position, or otherwise re-set the shoulder each time you screwed the barrel in further.




 Sometimes you’ll get a barrel that doesn’t stabilize bullets the way you’d anticipate, based on the stated (or presumed) twist rate. A barrel might have 1:10″ stamped on the side but it is, in truth, a 1:10.5″ twist or even a 1:9.5″. Cut-rifled barrels, such as Kriegers and Bartleins, normally hold very true to the specified twist rate. With buttoned barrels, due to the nature of the rifling process, there’s a greater chance of a small variation in twist rate. And yes, factory barrels can be slightly out of spec as well.




 In this NSSF video, Ryan Cleckner shows how to set up a scope on a hunting or tactical rifle. Ryan, a former U.S. Army Sniper Instructor, notes that many hunters spend a small fortune on equipment, but fail to set up their rifle to use the optics optimally. Cleckner likens this to someone who owns an expensive sports car, but never adjusts the seat or the mirrors.