Looking for a fun, DIY project this winter? Here’s a useful project — a handy ammo caddy you can craft at home pretty easily. And your shooting buddies will be impressed with your ingenuity. Plus the wife won’t mind having a spare knife-holder for the kitchen.
Forum member Alex W. (aka “zfastmalibu”) came up with a clever adaptation of an item you may already have on your kitchen counter. By drilling a few strategically-placed holes in a wood knife-holding block, Alex created a handy, 20-round ammo holder for the bench. We’re not sure the wife will appreciate the new holes in her kitchen accessory, but we think this is a smart invention. Alex asked fellow Forum members: “What do you think, is there a market for it?” We think there is. Of course, with a ruler and an electric drill you could probably make your own version easily enough.
Most bolt-action rifle shooters work the bolt with their trigger-pulling hand. This is because most rifles sold to right-handed shooters come with right-side bolts, while “lefty” rifles come with left-side bolts. This “standard” configuration requires the shooter to take his dominant, trigger-pulling hand off the stock to cycle the bolt, then re-position his hand on the stock, and “re-claim” the trigger. Often the shooter must lift or move his head to work the bolt, and that also requires him to re-establish his cheek weld after each and every shot. Not good.
This really doesn’t make much sense for precision shooting with fore-end support*. There is a better way. If you leave your trigger hand in position and work the bolt (and feed rounds) with the opposite hand, then you don’t need to shift grip and head position with each shot. All this requires is a weakside-placed bolt, i.e. a left bolt for a right-handed shooter or a right bolt for a left-handed shooter. The video below shows a “Lefty” working a right bolt. Note how efficient this is:
As our friend Boyd Allen explains: “If you think about it, if you are going to work with a factory action where your options are left bolt and left port or right bolt and right port, and you are building a rifle that will only be shot from a rest, using the left/left for a RH shooter or using a right/right for a LH shooter works better than the conventional configuration”.
Shoot Like a Champ and Work the Bolt with Your Weakside Hand
Derek Rodgers is a recent F-TR World Champion, a King of 2 Miles champion, AND is the only person to have won BOTH the U.S. F-Open and the U.S. F-TR National Championships.
And guess what? Derek runs this kind of “opposite” bolt set-up. Yep, Derek shoots right-handed with a left bolt. Though Derek is a right-hander, he shoots with a Left Bolt/Left Port (LBLP) action. He pulls the trigger with his right index finger, while working the left-side bolt with his left (weakside) hand. This allows him to stay in position, and maintain his cheekweld. He places his right hand on the grip, while manipulating the bolt (and feeding rounds) with his non-trigger-pulling hand.
Past F-TR World Champion and Past King of 2 Miles Derek Rodgers
This is the rifle with which Derek won the 2013 F-TR National Championship.
*For true standing, off-hand shooting (whether in competition or on a hunt), a conventional strongside bolt placement makes sense, since the non-dominant arm must support the front of the rifle all the time. When shooting from bipod or rest, it’s a different story.
Our take on Bore-Store Gun sleeves is simple: They work great, so buy them and use them — for ALL your valuable firearms.
Winter’s here, with rain and snow in much of the country. We known readers will have their guns in the safe for long periods. For winter storage, we recommend Bore-Stores. These thick, synthetic-fleece sacks cushion your guns, preventing nicks and scratches. The breathable fabric wicks away moisture, and the fibers are coating with corrosion inhibitors. I personally use Bore-Stores for in-safe storage with all my guns, and I have never had one of my guns rust inside a Bore-Store, even when I lived a stone’s throw from the ocean and its salty air.
Bore-Stores are offered in a range of sizes to fit everything from a snub-nosed revolver to a 33″-barrelled Black Powder Rifle. Bore-Stores can be purchased for $9.99 – $28.99 from Borestores.com. For most scoped rifles, we recommend the 10″x46″ SCR-1 case ($25.99). The Bore-Store manufacturer, Big Spring Enterprises will also craft custom sizes on request. For a long-barreled F-Class or ELR rig you may need a custom length. Or you can remove the scope and use the 7″x52″ SG-1 Shotgun Bore-Store for up to 32″ barrel ($28.99).
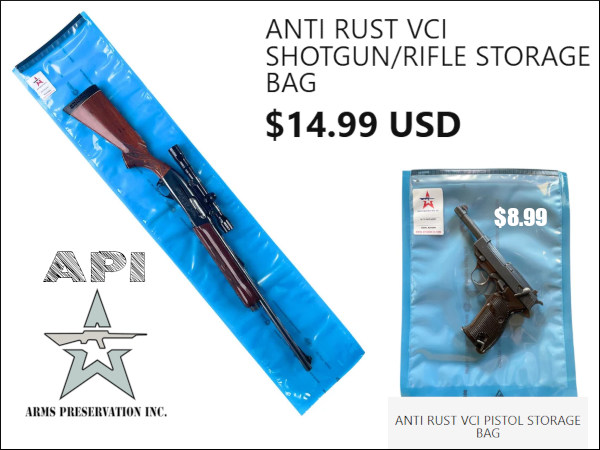
API-Brand Anti-Rust VCI Storage Bags — Affordable and Effective
Consider VCI Bags for Long-Term Storage
While we prefer Bore-Stores for regularly-used guns, if you have heirloom firearms that will be kept in storage for very long periods without seeing any use, you may want to grease them up and place them in the thin, but rugged API brand VCI Storage Bags. The interior VCI lining emits a safe corrosion inhibitor vapor. The multi-layer exterior locks out humidity and airborne contaminants. These bags are also resistant to petroleum-based chemicals and seal out moisture. They have a handy velcro opening.
Here’s one VITAL bit of advice for using sealed gun storage bags. Be absolutely sure, before you seal up the bags, that your guns are DRY and that all metal surfaces have been coated with an effective anti-corrosive, such as BoeShield T9 or Eezox. NOTE: If you can’t afford the $15 API sacks, Brownells offers a three-pack of 12″x 60″ anti-rust rifle sacks for $22.99 — under 8 bucks a gun. That’s certainly cheap insurance for rifles and shotguns that may cost many thousands of dollars.
Get Your Guns Out of Foam-lined Cases — They Are Rust Magnets
Just about the worst thing you can do for long-term storage (short of leaving your rifle outside in the rain) is to store firearms in tight, foam-padded cases. The foam in these cases actually collects and retains moisture from the air, acting as the perfect breeding ground for rust. Even in warm summer months, humid air can leave moisture in the foam.
Remember, those plastic-shelled cases with foam interiors are for transport, not for long-term storage. Don’t repeat the mistake of a wealthy gun collector I know. He stored four valuable Colt Single Action Army (SAA) revolvers in individual foam-padded cases, and locked these away in his gun safe. A year later, every one of his precious SAAs had rusted, some badly.
NRA Media offers a series of 40 informative videos about the Science of Shooting, covering a wide range of topics, from eye dominance to long-range ballistics. These videos feature high production values, with super-slow motion segments, as well as helpful computer graphics to illustrate the principles covered.
The videos are narrated by Jessie Duff, a top action pistol shooter (and the first women ever to achieve USPSA Grand Master status). Jessie is assisted by talented shooters such as Top Shot Season 4 Champion Chris Cheng. There are forty videos in the Firearm Science Video Series. Here are five NRA videos, with links to others below. You’ll find all 40 NRA Firearm Science Videos HERE.
Eye Dominance — How to Determine Which Eye is Dominant
Host Jessie Duff and longtime shooter Krystie Messenger demonstrate how eye dominance affects aim and teach you how to determine your dominant eye in this edition of Firearm Science. There are very simple tests you can do to determine your eye dominance. This Editor is right-handed but left-eye dominant. All competitive shooters should check for eye dominance. If you are cross-dominant, you can alter your head position or put a paper patch on one frame of your shooting glasses.
Eye Protection — Effect of Different Color Lenses
No matter what you’re shooting, eye protection should always be worn. But with so many choices, what should you wear? In this edition of Firearm Science, two-time Olympic trap shooter Corey Cogdell explains lens color options for protective eyewear. Different colors may be selected according to the light conditions and the sport. For most rifle shooters using magnified scopes, clear lenses are probably the best choice, except on very bright summer days.
Iron Sights vs. Optics
Host Jessie Duff and shooter Krystie Messenger demonstrate the benefits and drawbacks of using iron sights and optics in this edition of Firearm Science. For AR-type rifles, choosing the right option depends on the intended use of the rifle and the rules of competition. For example, a “Standard military Rifle” for CMP competition must have iron sights. But current NRA service rifle competition (and CMP unlimited military rifle class) allows scopes. Olympic smallbore shooters and Palma shooters have shown that extreme accuracy IS possible with sophisticated target sights. Below is the iron-sights Palma rifle with which John Whidden (Whidden Gunworks) won NRA Long-Range National Championships.
Today’s showcase shows how CCI, Federal, and Remington .22 LR rimfire ammunition types are produced in large American factories. CCI and Federal, until very recently, were part of the Vista Outdoor Kinetic Group. In December 2024 CCI and Federal along with other Vista ammo brands were sold to a Czech company, CSG.* Most CCI rimfire is produced in Idaho, while most Federal rimfire ammo is produced in Anoka, Minnesota. Here we feature videos from CCI, Federal, and Remington ammo plants. Watch and learn how rimfire ammo is made.
The Manufacturing Process for .22 LR Rimfire Ammunition Shooting Sports USA explains: “Rimfire cartridge cases are the oldest self-contained cartridge in existence, having been in continuous production since the mid-1850s. Rimfire cases are drawn from a thin piece of brass and formed with a hollow rim. A priming compound is then forced into the case using centrifugal force, where it is charged with powder and a bullet is seated in the mouth of the case. The case is then crimped around the bullet to ensure sufficient push and pull when the round is fired. When the firing pin strikes the thin brass rim of the case, the hollow rim is crushed and the primer is ignited.” Source: SSUSA.org 9/2/2017.
.22 LR Ammo Production at Federal Ammo Plant in Minnesota
Note to Viewers — After Starting Video, Click Speaker Icon to HEAR audio!
A while back a Field & Stream writer toured the Federal ammunition production facility in Anoka, Minnesota. This large plant produces both rimfire and centerfire ammunition. While touring the plant, the reporter was allowed to capture video showing the creation of .22 LR rounds from start to finish. This is a fascinating video, well worth watching. Click speaker icon for sound.
22Plinkster Tours CCI/Speer Idaho Factory
Trickshot artist and YouTube host 22Plinkster was able to tour the CCI/Speer production facility in Lewiston, Idaho. This large plant produces both rimfire and centerfire ammunition. While touring the plant, 22Plinkster was allowed to capture video showing the creation of .22 LR rounds from start to finish.
This revealing video shows all phases of .22 LR ammo production including cupping, drawing, annealing, washing, drying, head-stamping, priming, powder charging, bullet seating, crimping, waxing, inspection, and final packaging. We really recommend you watch the video from start to finish. Well worth watching, this excellent video has logged 3.2 million views on YouTube.
Remington Factory Produces Millions of Rounds of Rimfire Ammo
Billions of .22 Long Rifle rounds are produced every year, and Remington Ammunition in Lonoke, Arkansas produces a significant share of the rimfire ammunition used worldwide. This “American Rifleman Television” feature shows the full ammo production process. At the start, brass cups are stamped out of large sheets of brass, and the cups then move on to have the headstamps applied and rims formed. Next, the rounds move on to be annealed and rinsed. Then the cases move onto priming. A wet priming pellet is then pressed into each empty .22 case, and the case is spun rapidly, spreading the pellet mix into the inner cartridge rim. The primed cartridges are then sent to a drying house, where they’ll sit for several days to allow the priming mixture to dry. The Remington factory is very efficient, with “some of the fastest rimfire-making equipment on the planet”.
*In December 2024, Vista Outdoor completed the $2.23 billion sale of the company’s “Sporting Products” division — which is known as the Kinetic Group and includes American ammunition brands CCI, Federal Premium, Hevi-Shot, Remington, and Speer — to the Czechoslovak Group (CSG), a Czech conglomerate. READ Full Story of Vista Outdoor Kinetic Group ammo brands sale.
We like Lyman’s Electronic Digital Trigger Pull Gauge, which is faster and more precise than the previous model. The latest Lyman Pull Gauge measures trigger pull weights from 1 ounce to 12 pounds with resolution of 0.1 ounces (2.8 grams). It features an adjustable, 4-position rod which retracts into the gauge body. We think that anyone running match triggers below 2.5 pounds pull weight should have a gauge like this. Among the pull gauges on the market, we think the Lyman unit offers great performance for the price.
Features: More Precise Strain Gauge | Improved Grip Shape | Adjustable Rod Lengths
Lyman’s Electronic Digital Trigger Pull Gauge is designed to be the fastest and most accurate trigger pull gauge available. State-of-the-art strain gauge technology allows for repeatable accuracy of 1/10 ounce (2.8 grams). The gauge features a large, easy-to-read LCD display and you can switch from ounces to grams with the push of a button. The gauge can also deliver a pull weight average of the last 10 readings. That’s very helpful when working with factory triggers that may not be very consistent.
The Lyman Trigger Pull Gauge features a solid, collapsible rod with four locking positions. Being able to adjust length makes it easier to use the gauge with a wide variety of firearms — pistols, rifles, and shotguns. The locking feature prevents the rod from flexing when applying pressure to the trigger. When not in use, the rod conveniently collapses into the gauge body, making the whole unit more compact. The new Trigger Pull Gauge comes in an internally-padded plastic case that can be easily stored in a drawer or on your work bench.
The U.S. Army Marksmanship Unit (USAMU) regularly published reloading “how-to” articles on the USAMU Facebook page. One excellent “Handloading Hump Day” post covered preparation of once-fired 5.56x45mm brass. This article, the first in a 3-part series, has many useful tips. If you shoot a rifle chambered in .223 Rem or 5.56x45mm, this article is worth reading. You can obtain once-fired Lake City 5.56x45mm brass for less than half the cost of premium .223 Rem brass.
This week, Handloading Hump-Day will answer a special request from several competitive shooters who asked about procedures for morphing once-fired GI 5.56mm brass into accurate match brass for NRA High Power Rifle use. The USAMU has used virgin Lake City (LC) 5.56 brass to win National Championships and set National Records for many years. In this 3-part series, we’ll share techniques proven to wring match-winning accuracy from combat-grade brass.
GI brass has an excellent attribute, worth noting — it is virtually indestructible. Due to its NATO-spec hardness, the primer pockets last much longer than most commercial brass when using loads at appropriate pressures.
Preparing Once-Fired GI 5.56 Brass for Reloading (Part 1 of 3)
Assuming our readers will be getting brass once-fired as received from surplus dealers, the following steps can help process the low-cost raw material into reliably accurate components.
1. Clean the Brass
First, clean the brass of any dirt/mud/debris, if applicable. Depending on the brass’s condition, washing it in a soap solution followed by a thorough rinsing may help. [This step also extends the life of the tumbling media.] Approaches range from low-tech, using gallon jugs 1/2 full of water/dish soap plus brass and shaking vigorously, to more high-tech, expensive and time-consuming methods.
2. Wet-Tumbling Options (Be Sure to Dry the Brass)
When applying the final cleaning/polish, some use tumblers with liquid cleaning media and stainless steel pins for a brilliant shine inside and out, while others take the traditional vibratory tumbler/ground media approach. Degree of case shine is purely personal preference, but the key issue is simple cleanliness to avoid scratching ones’ dies.
If a liquid cleaner is used, be SURE to dry the cases thoroughly to preclude corrosion inside. One method is to dump the wet brass into an old pillow case, then tilt it left/right so the cases re-orient themselves while shifting from corner to corner. Several repetitions, pausing at each corner until water stops draining, will remove most water. They can then be left to air-dry on a towel, or can be dried in a warm (150° F-200° F max) oven for a few minutes to speed evaporation.
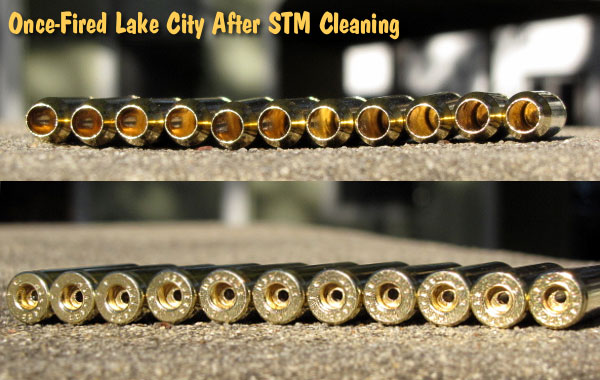
Shown below are Lake City cases after cleaning with Stainless Media (STM). Note: STM Case cleaning was done by a third party, not the USAMU, which does not endorse any particular cleaning method.
NOTE: The USAMU Handloading (HL) Shop does not RE-load fired 5.56 brass. We use virgin LC brass with our chosen primer already staked in place. However, our staff has extensive personal experience reloading GI brass for competition, which will supplement the Shop’s customary steps. In handloading, as in life, there are many ways to accomplish any given task. Our suggestions are note presented as the “only way,” by any means. Time for loading/practicing is always at a premium. Readers who have more efficient, alternative methods that maintain top accuracy are invited to share them here.
3. Inspect Every Case
Once dry, inspect each case for significant deformation (i.e., someone stepped on it), damaged mouths/necks and case head/rim damage. Some rifles’ ejectors actually dig small chunks of brass out of the case head — obviously, not ideal for precision shooting. Similarly, some extractors can bend the case rims so badly that distortion is visible when spinning them in one’s fingers. These can be used for plinking, but our match brass should have straight, undamaged rims.
Dented case mouths are common, and these can easily be rounded using a conical, tapered tool, [such as a .223 expander mandrel. A dummy 7.62 or .30-06 cartridge with a FMJ spitzer can also work.] If most of your brass is of one headstamp, this is a good time to cull out any odd cases.
4. Check the Primers Before Decapping
Your clean, dry and inspected brass is now ready for full-length sizing, decapping and re-priming. Historically, primer crimps on GI brass have caused some head-scratching (and vile language) among handloaders. Our next installment will detail efficient, easy and practical methods to remove primer crimp, plus other useful handloading tips. Until next week, Good Shooting!
Accuracy Potential of Mil-Surp 5.56×45 Brass
So, how accurate can previously-fired GI surplus brass be in a good National Match AR-15? Well, here’s a data point from many years ago that might be of interest. A High Power shooter who wrote for the late Precision Shooting magazine took a Bill Wylde-built AR match rifle to a registered Benchrest match. He had no difficulty obtaining consistent 0.5-0.6 MOA accuracy at 200 yards using LC brass and a generic “practice” load that was not tuned to his rifle.
For many years, the U.S. Army Marksmanship Unit (USAMU) regularly published reloading “how-to” articles on the USAMU Facebook page. In this article, the USAMU’s reloading gurus address a question frequently asked by prospective handloaders: “Should I buy a single-stage press, or a progressive?” The USAMU says the best answer is Solomon-esque in both its wisdom and simplicity: “Get BOTH!” However, there is definitely more to the issue, as the USAMU explains below.
Progressive Press Safety Considerations
by USAMU Staff
Many are the beginning handloaders who have asked a friend about their “setting up” a progressive press for them. The idea is that the newbie could then just feed in components and crank out buckets of practice ammo without needing to really learn much about handloading. Tempting though this might be, that’s simply not how it works. Such an approach might be ok if there were never a malfunction with either press or operator, but that’s unrealistic. Our hypothetical newbie would then lack the knowledge to problem-solve most situations.
Worse yet, several different handloading operations would be occurring at different stations on the progressive press at the same time. It takes an experienced operator to keep track of, and truly understand the significance of, all those potential mini-problems. Loading without this experience is a recipe for potential disaster – such as a double powder charge (especially with pistol cartridges) dropped while the loader was attending to some other function, etc. Progressives are an animal unto themselves, and while they offer many benefits, they do take some getting used to – even by experienced handloaders!
ILLUSTRATIVE HORROR STORY
Here, enter a 40-year veteran handloader who decided to jump onto the progressive bandwagon late in his career, having used only single-stage presses all his life. A High Master NRA High Power Rifle competitor, he had no background in competitive pistol shooting, where historically most progressive presses are found.
Experienced Action Pistol shooters have typically encountered multiple episodes in which shooters “skipped” a powder charge for some reason, leading to a squib round and a bullet possibly lodged in the bore. Thus, at matches, it’s reflexive for them to yell “STOP!” in unison if they see a shooter get a “click” vs. a “bang”, and rack the slide to keep firing. This writer has personally seen several pistols saved in just such scenarios over the years.
Click No Bang — What NOT to Do
Our High Master set up a popular progressive press and began turning out .223 Rem 100-yard practice ammo with abandon. He was using a moly-coated 52gr match bullet and an economical, fast-burning surplus powder that gave great accuracy. Once on the range, he began practicing strings of rapid-fire. All was well, until he heard “Click!” rather than “Boom”.
Lacking the above experience or onlookers to halt him, he reflexively operated the charging handle on his expensive, custom NM AR15 Service Rifle, and the next trigger squeeze reportedly registered on seismographs over at least a three-state radius. He sat, uninjured but bewildered, until the hail of expensive bits and pieces quit raining down around him.
When the smoke cleared, he immediately cursed the horrid, evil, demonically-possessed progressive press for this, his first-ever reloading mishap. His $1400 NM upper was ruined, but thankfully, his $800 pre-ban lower… and he had escaped injury.
This tale is told not to discourage the use of progressive presses, but to emphasize the need to EASILY and IMMEDIATELY KNOW what is happening with the press at each station, every time the handle is cranked. Not to do so is, as they say, “bad ju-ju.”
It illustrates why we at the USAMU Handloading Shop agree in recommending that new handloaders should begin with a single-stage press. Once one thoroughly learns the steps in each phase of handloading by repeated experience, then one will be qualified to move on to a progressive press.
The single-stage press will REMAIN virtually indispensable for one’s entire handloading career, even after having purchased a progressive press (or two). There are endless small projects that are best handled on a single-stage press, and a poll of USAMU’s Handloading staff reveals that not one would willingly be without his single-stage press, despite owning at least one progressive.
When shooting any match that requires moving back and forth between multiple target distances it is very handy to have your ballistics data, i.e. your “come-ups”, placed within easy view. That way you can instantly see your elevation for various target distances in seconds. This can really help a PRS/NRL competitor on timed stages. And having a convenient “Dope” display of elevation at various distances can also benefit varminters who are shooting critters. In our varmint hunters we targeted p-dogs from about 80 yards out to 500+.
PRC DOPE Roller QD Ballistic Data Turret
The PRC DOPE Roller QD Ballistic Data Turret provides a handy, low profile display of windage and elevation data. You can see your “dope” without breaking position from behind the rifle. Then simply rotate the knob to display data from various distances. The ballistic data is placed by wrapping a simple 1″ x 3″ adhesive address label around the outside surface of the DOPE Roller. This handy quick-detach roller retails for $64.95 from Precision Rifle Components.
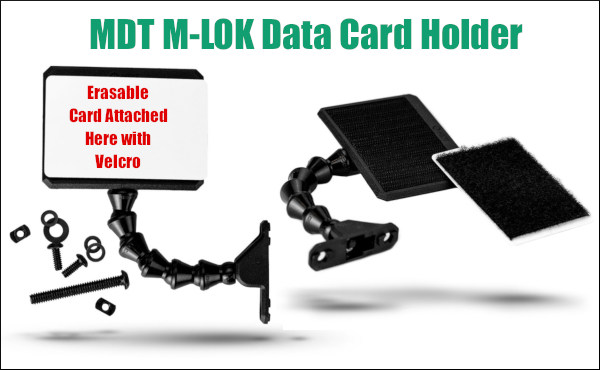
MDT M-LOK Data Card Holder
The MDT M-LOK Data Card Holder has an adjustable neck allowing you to easily position your ballistics data for optimal viewing. Data entries are written on on a reusable card that attaches with Velcro. The Data Card Holder Kit comes with hardware to mount to any M-Lok rail. In addition the card holder fits directly to an MDT ACC chassis attachment point. This MDT kit includes: M-LOK Data Card Holder, Wet Erase Data Card, Wet Erase Marker, and installation hardware. NOTE: The Card Holder sticks out about 6.7″ when fully extended, but arm links can be removed to make the arm shorter. The unit folds flat for storage. This complete kit is $59.95 at Creedmoor Sports.
Warne Universal Data Card Holder
The Warne Universal Data Card Holder easily attaches to the scope tube, in left or right configurations, for a universal fit. Data is displayed in a convenient location to make quick and accurate target transitions, and the articulating arm allows for low profile storage while not in use. The Warne Universal Data Card Holder retails for $88.49 at Warnescopemounts.com. Three ring sizes are offered: 30mm, 34mm, 35mm. A 50-pack of Warne Data Card label refills is currently $16.99 from Warne.
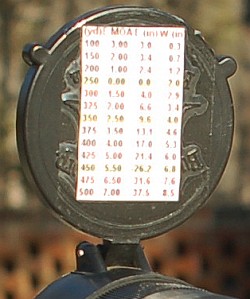
Scope-Cover Mounted Ballistics Table
Another option is to place your ballistics card on the back of the front flip-up scope cover. This set-up is used by Forum member Greg C. (aka “Rem40X”).
With your ‘come-up’ table on the flip-up cover you can check your windage and elevation drops easily without having to move out of shooting position.
Greg tells us: “Placing my trajectory table on the front scope cover has worked well for me for a couple of years and thought I’d share. It’s in plain view and not under my armpit. And the table is far enough away that my aging eyes can read it easily. To apply, just use clear tape on the front objective cover.”
Cheap But Effective — Tape on the Stock with Ballistics Data
At the 2021 Nightforce ELR Steel Challenge, Applied Ballistics guru Bryan Litz wrote his come-ups on blue masking tape applied to his stock. He did this based on a tip from Chase Stroud. With the tape applied behind the action, the numbers are easily visible. This “cheap trick” does work apparently — Bryan won the match with a convincing victory over 220 other shooters. READ Match Report.
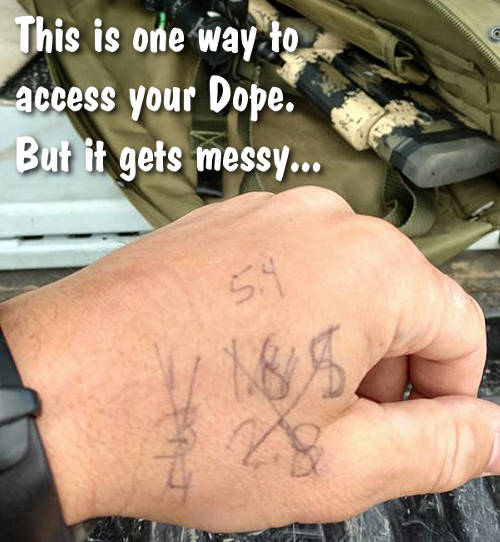
Cheap But NOT So Effective — Numbers on Hand
Many of us have scribbled some come-ups on the back of a hand or on our forearm using a marking pen. That can work if you only have a couple distances to deal with — say 100 and 300 yards. But if you want a more complete Come-up table, get one of the card-holders shown above. Writing numbers on the skin is generally not such a good idea….
At long range, small bullet holes are much easier to see “in the white” than in the black center of the normal High Power target. When you’re practicing at long range using a scoped rifle, one way to enhance your ability to see your bullet holes is to print a “negative” version of the regulation bullseye target so that your black center is now white.
How do you create a “negative” of a target image? Many image programs, including the FREE Irfanview software, have a “Negative” function in the pull-down menu. If you don’t see a “Negative” menu option in your program, look for a “substitute colors” option. Many printers also have a “reverse colors” function. If you can’t find a solution with your computer or printer, just take a normal bullseye target to a copy shop, and the staff can easily print you a set of targets with white centers in black fields.
Forum member Watercam has a Pentax PF-80ED spotting scope that allows him to see 6mm bullet holes in the white at 600 yards. However, 6mm holes in the black are only visible out to 400 yards or so. Accordingly, Watercam uses a modified “reversed” black-to-white target for 600-yard practice. Watercam explains: “[Using the Pentax] With my 6mm and limited mirage I see defined, 6mm holes in the white out to 600. In the black, however, I can see bullets holes at about 400. I now use reverse-color targets for training without a pit partner at the 600-yard line.”
The Hi-Viz Solution — Day-Glo Pasters
If you’re not concerned with official scoring rings, you can use an all-white target with a bright, fluorescent target dot in the middle. A 2″- or 3″-diameter stick-on target dot is highly visible at 600 yards. Birchwood Casey Target Spots® assortment #33928 offers neon orange target dots in 1″, 2″, and 3″ diameters.
TARGET TIP — Use Chart Paper
For practice backers for the Day-GLo pasters at long distance, use Flip Chart Paper (aka Easel Pads) marked with graph lines at 1″ intervals. Available either regular or self-stick, one sheet can hold 4-8 pasters and the white paper allows for easy spotting of the holes and quick estimation of group size. Get Flip Chart Paper at Amazon.com, Staples, or Office Depot.
Brits Use White-Field Target for F-Class
In the UK, some ranges are now using a “reverse-style” target with a mostly white area. Laurie Holland says this allows shooters to see shots much more easily. Laurie reports: “Here’s a photo of the 500/600 yard F-Class match target we use in PSSA comps at Diggle Ranges with club members Chris Hull (L) and Terry Mann (R). We now use this target form at all ranges up to 1K for F-Class, and, yes you can often see your hits at 600 yards on the target before the markers pull it. Regards from England — Laurie”.


 Here’s one VITAL bit of advice for using sealed gun storage bags. Be absolutely sure, before you seal up the bags, that your guns are DRY and that all metal surfaces have been coated with an effective anti-corrosive, such as BoeShield T9 or Eezox. NOTE: If you can’t afford the $15 API sacks, Brownells offers a three-pack of
  Remember, those plastic-shelled cases with foam interiors are for transport, not for long-term storage. Don’t repeat the mistake of a wealthy gun collector I know. He stored four valuable Colt Single Action Army (SAA) revolvers in individual foam-padded cases, and locked these away in his gun safe. A year later, every one of his precious SAAs had rusted, some badly.


 Scope-Cover Mounted Ballistics Table

 Forum member Watercam has a Pentax PF-80ED spotting scope that allows him to see 6mm bullet holes in the white at 600 yards. However, 6mm holes in the black are only visible out to 400 yards or so. Accordingly, Watercam uses a modified “reversed” black-to-white target for 600-yard practice. Watercam explains: “[Using the Pentax] With my 6mm and limited mirage I see defined, 6mm holes in the white out to 600. In the black, however, I can see bullets holes at about 400. I now use reverse-color targets for training without a pit partner at the 600-yard line.”


