Conventional brass jags work great — except for one thing. They can react to solvents, leaving a blue “false positive” on patches. In recent years, jag-makers have experimented with many different materials in an effort to cure the solvent-reaction problem. Today we have polymer jags, nickel-plated jags, and stainless steel jags. And the latest innovation is the aluminum jag from Dewey.
J. Dewey Mfg. offers a series of “Copper Eliminator” jags and brush adapters made from aircraft-grade aluminum with the same hardness as brass. Dewey claims that its aluminum jags will not become embedded with grit or particles that could harm your bore. At the same time, Dewey’s aluminum jags will not react to ammoniated bore solvents that can turn patches blue green when used with brass jags. Dewey aluminum jags are offered with either male OR female 8/32 threads.
ADDING ESSENTIAL EQUIPMENT — Bix’N Andy Rem 700 Competition Trigger By Les Voth
An accomplished shooter buddy of mine is going to Tennessee for a family visit, but with the priorities a guy’s gotta have, he’s going to stop off at a F-Class match in Indiana on his way there. F-TR is his chosen corner of that discipline.
A Krauger Arms action is the rifle’s anchor/foundation, with a 28” Heavy Varmint MullerWorks cut barrel, Richards Microfit self-finished stock, Vortex scope, Leupold rings, Sinclair bipod makes up the equipment. He’s running Lapua brass and Berger 185 Juggernaut Target bullets. The powder? VV N150.
Benefits of a Trigger Upgrade
What we are encouraged to do as competitive shooters is run what we brung until some part of that is clearly holding us back. But sometimes some don’t know if something will, actually, make them better. Anyone who has already won their division in a F-Class match, and consistently scored right up at the top, must know their equipment and what that package brings to the target. My buddy knew, said so, and I believed him. But if there was a way to help even incrementally, I was after that increment.
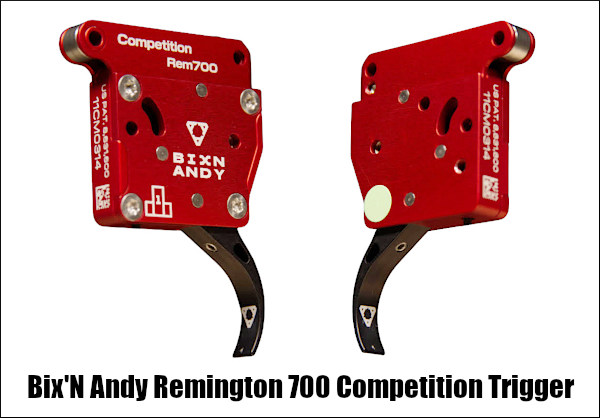
Pulling out a used Bix’N Andy Remington 700 Competition trigger, I handed it to him and said, “I built this out of the used parts bin. Put it into your gun. Shoot it in Indiana, and give it back to me when you get back home.” Buddy put it in his gun and went to the underground range and shot it at 100 yards that night.
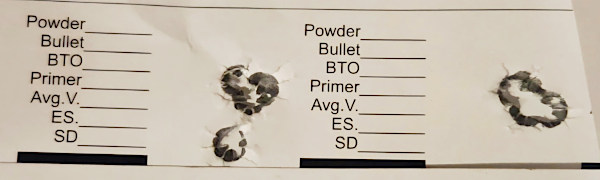
This target is the result of the use of the borrowed trigger. In the first group, on the left, the 30 cal hole on the bottom is the cold bore shot, out of a newly cleaned barrel. The group above the cold bore shot is seven rounds. The second group, on the right, is also seven rounds, shot immediately after the first group.
Buddy said, “I’ve done that before — but it’s never been that easy before! It’s always taken everything I’ve had to get those results!” Here’s how he described his first experience with this trigger: “Effortless”. For him to see the result of his ongoing lack of effort was exciting and exhilarating. It was easier than it had ever been. The kicker was that he did not have to concentrate on the trigger at all. He said he could concentrate on fundamentals more completely, and was not distracted by anything trigger-related.
Comparing Previously Installed Trigger
I will not mention the brand of trigger this Bix’N Andy Comp trigger replaced, but he brought it in the next morning so we could use our measuring device/fixture to compare pull force with the Comp trigger. To his astonishment the trigger force required to between the Bix’N Andy Competition trigger and what he had been using was within an ounce and a half. The difference was in the inner mechanisms of each trigger. The Bix’N Andy felt effortless. With the other, it felt like he had to “overcome” something.
Conclusion
I’m glad he’s happy with the Bix’N Andy Rem 700 trigger. I’ll get the used-bin trigger back when he gets home, but he’ll acquire a brand new Bix’N Andy Remington 700 Single Stage Competition trigger from Bullet Central as soon as he relinquishes that borrowed piece.
This coming Saturday, September 26th, is National Hunting and Fishing Day, held each year on the fourth Saturday of September. To help the avid hunters among our readers, here are Twenty Tips that can help ensure a safe and successful hunt. These tips have been compiled from our AccurateShooter Hunting Forum, with help from Hunting Editor Colton Reid (who has already been out hunting this month). Some items are preparatory — such as working with maps, sighting in the rifle, and improving physical fitness. We also talk about equipment — having the right gear, from proper boots to a GPS for multi-day hunts.
Of course there are entire volumes written on hunting, but these 20 Tips can benefit all hunters. Follow these suggestions and you should have a safer hunting experience with greater likelihood of success. If you liked these pointers, you’ll find two dozen more helpful hints on the NSSF Website.
Preparations Before The Hunt
1. Map Your Hunt and Notify Others — Before your hunt, make a plan and notify friends and family members about WHERE you are going and your intended return date and time. Print out a Google Satellite map and locate landmarks and trailheads. Mark where you plan to park your vehicle and give a copy of this map to friend and/or family members. A hunter may injure himself by falling off a rock, or tumbling in a creek-bed. After that kind of injury the hunter may be confused or unable to walk. If you get stranded in the wilderness, you want trusted persons to know where you are. So, before you leave on a trip, provide a map to a friend or family member. Show them where you will leave your vehicle, and where you expect to be every day of your hunting adventure.
2. Licenses and Permits — Make sure you have a valid hunting licenses and all the necessary tags. Begin this process with ample time before your intended hunt(s). The NSSF adds: “If you are crossing state or national borders, find out about any special considerations you must take care of. Border crossings can mean knowing about firearm transport laws or Chronic Wasting Disease-related regulations.”
3. Work on Your Fitness — On a multi-day hunt you may be trekking many miles. You need to be in good shape. If you are out of shape you may be putting yourself in a precarious situation, particularly if you underestimate the terrain difficulty. As the NSSF says: “Not being able to handle the conditions lessens your chances of success, can turn a great experience into an agonizing one and can endanger your health.”
4. Do Your Homework — Study the area you will be hunting. Talk to other hunters. Look at satellite photos. Get a real sense of the walking and terrain challenges. For a multi-day hunt, MAKE a PLAN. The NSSF states: “Eliminate surprises. Learn as much about where you will be staying, the area you will be hunting, what the weather might be like and what you need to bring[.]”
5. Rifle and Ammo — Make sure your rifle is sighted-in and your ammo is tested. Sight-in your rifle with the ammo you plan to use on your hunt. CLICK HERE for 4-Shot Sight-in Method. After sighting-in from the bench, confirm your zero by shooting from typical hunting positions (kneeling and with forearm supported on a rock or post).
6. Shooting Positions — Practice the shooting positions you will use in the field. Practice sitting, kneeling, and prone positions. You should also practice with shooting sticks, using your day pack as a rest, and with a bipod. Try to have a rock-steady rest before taking your shot.
7. Back-Up Irons — If possible, select a rifle with back-up iron sights. While modern scopes are very durable, they can and do fail (glass can crack). If you’ve invested a lot of time and money in your hunt, back-up iron sights can keep you in the game even if your riflescope fails.
8. Communications and GPS — Bring a GPS if you are in a wilderness area far from civilization. It’s a good idea to bring a cell phone, but you may not have coverage if you’re quite a distance from populated areas. A smart-phone also doubles as a digital camera to record your trophies. For navigation and safety, consider getting Garmin inReach Explorer+. This high-tech handheld unit features interactive SOS, connecting you to the GEOS 24/7 search-and-rescue monitoring center. They also allow you to send and receive text messages, no matter where you are, via advanced inReach satellite technology. Yes you can communicate even if you are miles from the nearest cell tower.
9. Select Good Gear — Make sure you have GOOD BOOTS that are comfortable — you’ll spend a lot of time on your feet. You may want a pack with harness for your rifle so you have both hands free. On a multi-day trip, make sure you can carry enough water, and that you will stay warm enough at night. Good practices for backpacking apply to multi-day hunts.
10. Make a Gear Checklist — Create a complete checklist of the gear and supplies you need. That includes arms, ammunition, rangefinder, binoculars, proper clothing (including spare clothes), hunting accessories, sleeping gear (on multi-day hunts), toiletries, medications. Don’t forget a good first aid kit — lots of bad things can happen during any wilderness trip. You can cut a hand, break an ankle or worse.
During The Hunt
11. Have a Plan — know where you plan to go and when. Try to be where you want in the early morning and early evening hours when deer are likely most active.
12. Take Your Time — If you spot a deer and get too excited and don’t take your time you may spook him. Go slow and glass. If possible, wait for the animals to bed down and relax. Then work out the best way to approach your prey. Remember, “You get so few opportunities, don’t screw it up!”
13. Glass More, Walk Less — Let your eyes do the walking — get good binoculars and use them. With their heightened senses of smell and hearing, deer/elk are able to spot you way better than you can spot them. If you are walking around a lot, chances are you are getting spotted by your prey.
14. Riflescopes Are Not Binoculars — Never use a riflescope as a substitute for binoculars. The temptation to do so is real, but when one does this, one is by definition pointing the muzzle of the gun at unknown targets. We like binoculars with built-in rangefinders. When glassing at long range, try supporting your binoculars on your pack.
15. Be Sure of Your Target before Shooting — Every year during whitetail season, farmers are forced to spray-paint their cattle or risk having them “harvested” by hunters who don’t bother confirming the species in their sights. Hunters with “buck fever” can make mistakes. When in doubt, don’t shoot.
16. Know When to Unload — When finished hunting, unload your firearm before returning to camp. You should also unload your gun before attempting to climb a steep bank or travel across slippery ground.
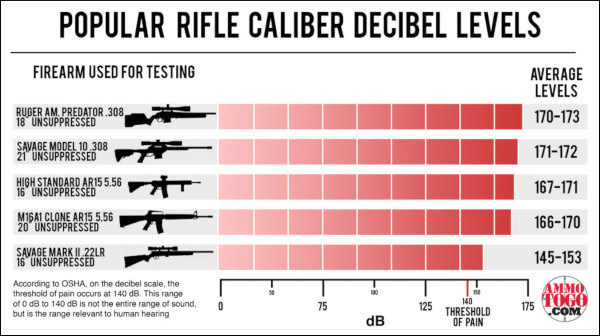
17. Bring Hearing Protection — While pursuing and stalking your prey you’ll want full sensory use of your ears. But when you’re finally ready to take the shot, slip in hearing protection. A shot from a large-caliber hunting rifle can exceed 170 decibels. Unprotected exposure to noise from a SINGLE 170+ dB shot can cause permanent hearing damage. (Source: ASHA.org). If you make a follow-up shot, you double that noise hazard. Therefore a hunter with a non-suppressed rifle should have hearing protection available.
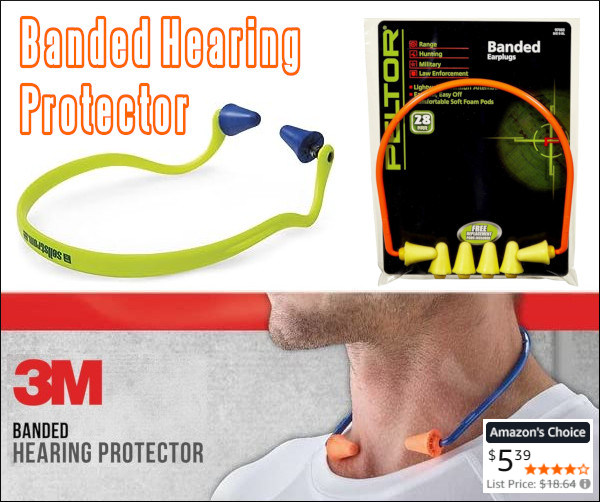
You can keep a pair of easy-to-use quick-insert ear plugs on a cord around your neck. Or, get a lightweight neck band with earbuds, such as the Sellstrom Band, Peltor Band, or 3M Safety Band, all with a good 25 dB or better Noise Reduction Rating. You can keep these lightweight bands around your neck for quick deployment before you shoot.
“Once a hunter is successful, the REAL work begins.” — Colton Reid
18. Harvesting the Animal — When dressing your animal, be careful with the meat. You’ll want very sharp knives. Some hunters prefer knives with replaceable, razor-sharp blades. Don’t rush the task. Make sure you don’t get moisture or dirt on meat. The three spoilers of meat are heat, moisture, and dirt.
19. Pace Yourself When Packing Out — If you DO succeed, and bring down a big buck, will you be able to dress the animal and carry out the meat? Always be prepared to hike out with extra weight. If you are successful, make sure not to waste the meat you worked so hard for. Choose a pack that can help you carry a heavy load. Remember, this is not an insignificant challenge — you may be carrying 60 to 100 extra pounds in addition to your other gear. Again, take your time. Rest as needed. Don’t hurt yourself.
20. Remember to Enjoy the Experience — Our Hunting Editor, Colton Reid, offers this sage advice to all hunters, but particularly to novices: “Have fun, and appreciate your hunt, whether you bag a buck or not. It is a privilege to experience the wilderness and to get away from the city. Enjoy it while you’re out there. And keep your spirits up. You may get tired, but remember that ‘comes with the territory’. At the end of the day, yes you may be exhausted. And you may want to quit and go home. But stay positive, stay focused. Be patient, the experience is worth it.”
CLICK HERE for Hunter Training/Mentoring Programs State-by-State.
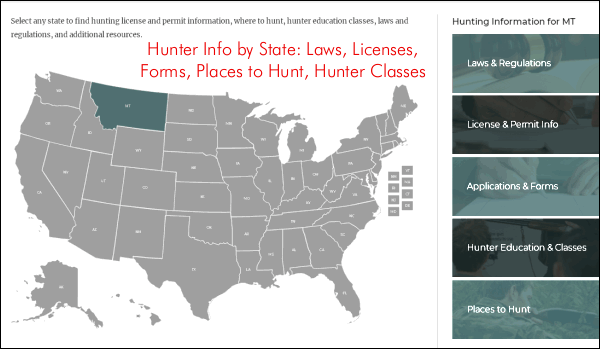
Visit WhereToHunt.org
There’s a great online resource for hunters that will help you find game locations in your state and ensure you have all the proper permits and game tags. WheretoHunt.org features an interactive map of the country. For all 50 states, the NSSF has compiled information about hunting license and permits, where to hunt, hunter education classes, laws and regulations and more. For each state you’ll also find a link for required applications and license forms.
At the request of our readers, we provide select “Deals of the Week”. Every Sunday afternoon or Monday morning we offer our Best Bargain selections. Here are some of the best deals on firearms, hardware, reloading components, optics, and shooting accessories. Be aware that sale prices are subject to change, and once clearance inventory is sold, it’s gone for good. You snooze you lose.
NOTE: All listed products are for sale to persons 18 years of age or older. No products are intended for use by minors.
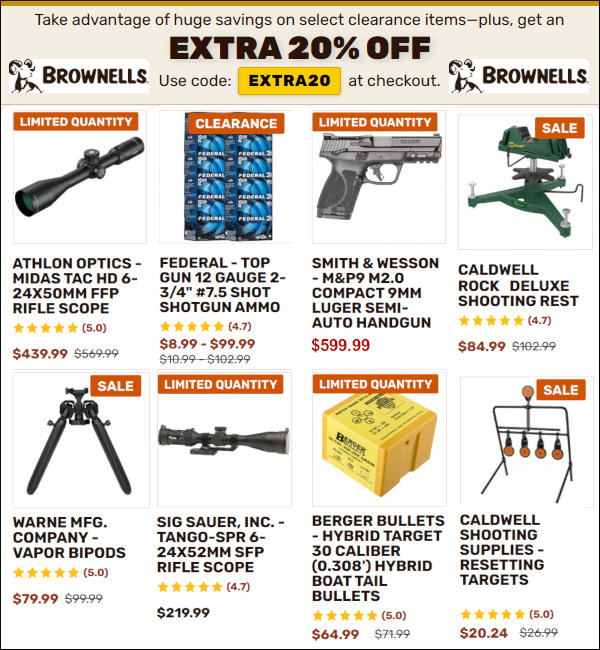
Brownells — Clearance Sale + Save 20% with Code EXTRA20
⏺️ » Deals on guns, ammo, optics, and gear plus 20% OFF Code
Get major savings with the Brownells Clearance Sale. Along with the already discounted prices, on most of these clearance items you can save an additional 20% with Code EXTRA20. Sale items include rifle scopes, Colt Pistols, bipods, shooting rests, ammo (rifle, pistol, shotgun), cartridge brass, bullets (Berger, Sierra, Hornady), reloading equipment, rifle cases and more. Definitely check out this Clearance Sale. There are exceptional deals plus 20% savings.
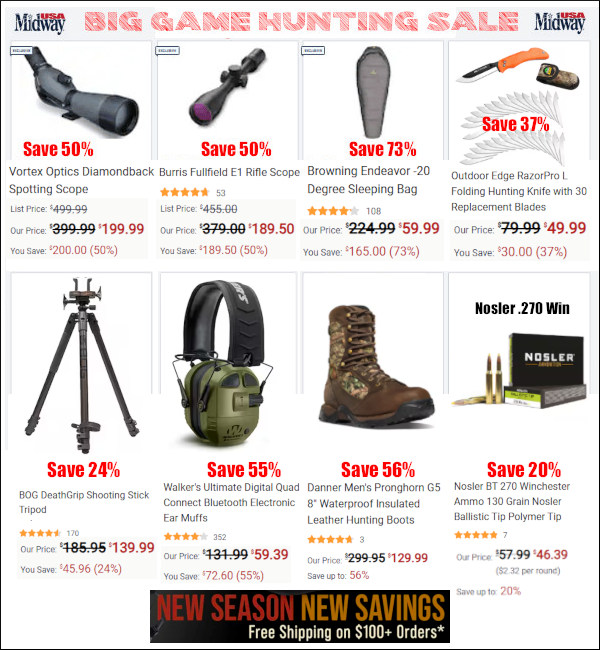
MidwayUSA — Big Game Hunting Sale, Large Product Selection
⏺️ » Major discounts on optics, accessories, ammo and free 100+ shipping
If you need hunting gear and ammo, check out the Big Game Hunting Sale over at MidwayUSA. Here you’ll find deep discounts on everything you’ll need for your next hunt. You’ll find major savings on rifle scopes, spotting scopes, trail cams, field tripods, tree-stands, walkie-talkies, boots and other hunting gear. In addition, a huge selection of hunting ammunition from Barnes, Federal, Hornady, Nosler, Remington and Winchester is ON SALE. Plus, MidwayUSA is offering FREE Shipping on $100+ orders.
As an Amazon affiliate, this site can earn revenues through sales commissions.
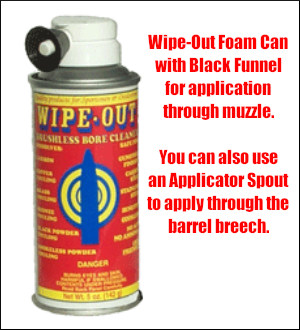
Wipe-Out brushless foam bore cleaner is a product we’ve used with great success on many rifles. With sufficient dwell time, it removes both carbon and copper fouling. You can combine it with Wipe-Out Accelerator or Patch-Out liquid to speed up cleaning time. Many shooters, including this editor, find that bore-brushing has been virtually eliminated with the regular use of Wipe-Out. (With some barrels however, you may still have to brush or use a bore paste if you notice stubborn carbon build-up in the throat area.)
CLICK HERE for full official instructions on use of Wipe-Out foam applied from the muzzle or the breech.
Method One: Apply Through Muzzle Our standard procedure with Wipe-Out is to insert an O-ring-sealed cleaning rod guide into the chamber and then squirt through the muzzle in short puffs. IMPORTANT: Put a towel or rag on the comb of your stock and watch for a little bit of foam to exit the rod guide. We usually wait 30 minutes for the bubbles to dissipate, then do a second foam application. Be sure to clean off any excess foam before it drips on your stock. It is important to keep the foam off fine wood or paint finishes.
Our actual routine normally starts with 3-4 wet patches with Carb-Out (to get the loose black stuff out), followed by the two foam cycles as explained above. Then we plug both ends of the barrel, drive home from the range and dry-patch out on arrival at the house. If the gun is going to be used again soon, that’s all we do. If there will be long-term storage we’ll run some Eezox down the bore.
Method Two: Apply Wipe-Out from Breech
You can also apply Wipe-Out from the breech. To allow breech-first application, Wipe-Out cans now come with a short plastic tube and a plastic tip that fits in your chamber. These can also be purchased separately for $2.50. However, we’ve found the plastic tip is too big for some chambers and it is not always easy to get a good, secure seal even if it does fit. Jason Baney has come up with a solution. READ Jason’s Wipe-Out Article.
Use Fitted Tubing for Breech-First Applications of Wipe-Out
You can apply Wipe-Out through the breech very effectively if you use fitted, plastic tubing. While this works well for bolt-actions, breech application is particularly handy for the Garand, M1A and other semi-autos. Jason Baney has written a short article describing this process. In a nutshell, you need one piece of tubing that fits the chamber tightly and then connects with a second, smaller diameter tube that attaches to the Wipe-Out can. This avoids any “over-spray” of foam in the action area, providing a clean, simple solution. Just squirt for a second or so, and wait for white foam to come out of the muzzle. Be sure to keep Wipe-Out off fine wood stocks.
Finnish gun manufacturer SAKO Ltd. crafted the impressive S20 series of “hybrid” rifles. These are offered in a Hunter model and a Precision model. Both feature an internal aluminum chassis, adjustable trigger, and integral Picatinny rail on top. Users can change fore-ends and rear sections to suit different disciplines. Use the rifle for a PRS match one weekend and hunt with it the next.
SAKO states: “The user will be able to switch between the stocks and fore-ends quickly and easily and can change the rifle from a tactical to a hunting rifle or vice versa in a matter of minutes with no need to re-zero optics after assembly. The stocks can be taken down easily by loosening up two screws between the rear stock and fore-end.” Both 20″ and 24″ barrel versions have been offered, with a wide variety of chamberings/calibers: .243 Win, 6.5 Creedmoor, 6.5 PRC, .270 Win, 7mm Rem Mag, .308 Win, .30-06 Springfield, .300 Win Mag.
The SAKO S20’s stainless steel action features a 3-lug, push-feed bolt with plunger ejection. The Cerakoted receiver of the S20 features a machined Picatinny rail for easy scope mounting. The trigger of the S20 is adjustable for pull weight and for position within the trigger guard (± 7mm) to ensure good length of pull for the shooter. The muzzle of the rifle is 5/8×24 threaded, allowing for the addition of muzzle devices such as suppressors or brakes (some models come with factory brakes installed).
The Picatinny rail is machined directly on the receiver. The S20 action features a 3-lug bolt with 60° bolt throw. SAKO says the “high locking-lug surface area increases both safety and performance.” The full length of the action mates with a matching V-bed in the aluminum chassis. S20 factory accessories include monopod, muzzle brake, barricade stop and a thumb rest add-on.
SAKO sells the S20 in a variety of configurations. You can buy a single stock system or with both stocks. The Hunter model is offered with a variety of camouflage finishes. The SAKO website lists six different camo options for the S20 Hunter model: First Lite Fusion, Roughtech Green, Roughtech Desert, Hunter Camo, Polyfade Gray, and Polyfade Gray/Green.
PHOTO: SAKO Hunter Model S20s are available with Camouflage stocks in multiple colors and patterns.
The SAKO S20 Precision model has a more vertical grip, wider fore-end (with rail mount), and a flat section in the buttstock that enhances bag riding. This can be used for tactical-style competition as well as varminting and hunting. M-Lok system allows mounting of bipods and other accessories.
SAKO S20 Review in GunsAmerica Digest
A few years ago GunsAmerica Digest published a very thorough SAKO S20 Hybrid field test and review. That article explained how to swap stocks and fore-ends and how to adjust the trigger. The reviewer, Jeff Cramblit, noted the smooth function of the action and gave high praise to the modular stock system:
“Sako was right all along, the S20 is a ‘Hybrid’ rifle. My favorite configuration after all the testing … is the Hunter buttstock and the Precision forearm. This gives me the ability to use all my rail mounted accessories and I like how the thumbhole stock feels even better than the Precision grip. It [was] 11 pounds 5.5 ounces when outfitted with the Leupold Mark 5HD 3.6-18x and the Hatch bipod[.]
The Sako S20 is an impressive rifle. It carries and balances well, shoots fantastic, has a great trigger, smooth action, reliable magazines, and the fact that you can have it your way is an added bonus.”
SAKO S20 Proves Very Effective for Hunting
The SAKO S20 is definitely a good hunting rifle. SAKO has offered the S20 with many popular hunting chamberings including: .243 Win, 6.5 CM, 6.5 PRC, .270 Win, 7mm Rem Magnum, .308 Win, .30-06 Springfield, .300 Win Magnum. The photo above was taken by a hunter in Europe who purchased the S20. He used it successfully to nail a wild hog.
SAKO S20 Specifications
Calibers/Chamberings: .243 Win, 6.5 CM, 6.5 PRC, .270 Win, 7mm Rem Magnum, .308 Win, .30-06 Springfield, .300 Win Magnum. Receiver: Grey Cerakoted Stainless Steel with integral scope bases Barrel: 20″ or 24″, Grey Cerakote, Cold Hammer-Forged (some models fluted); muzzle 5/8×24 threaded Trigger: Adjustable 2 to 4 pounds Stock: Chassis mounted Hunter or Precision model, adjustable cheek piece, adjustable length of pull Magazine Capacity: 5- or 10-rounds for standard cartridges, 3- or 7-rounds for magnum cartridges
Take-Down Stock with Modular Front and Rear Sections
The takedown stock of the SAKO S20 allows for great modularity, so that S20 rifles can be configured according to owner preferences with different rear stocks and fore-ends. The S20’s aluminum chassis is covered by a strong but comfortable outer shell material that SAKO calls H.I.R. – High Impact Resistant. The same H.I.R. material is used on car dashboards. The outer shell is currently offered in two styles — a thumbhole hunter and a more tactical style with straight toe and conventional grip.
Full Adjustability — Even Trigger Position
Adjustable ergonomics are a big part of the S20 design. The multi-adjustable trigger (available in both single-stage and two-stage variants) can be moved backwards or forwards to better fit different hand sizes. An adjustable cheek piece and LOP spacers help provide a proper fit.
M-Lok System Allows Easy Mounting of Accessories
The new SAKO S20 can accept a wide range of accessories, attached via aluminum M-LOK placements. SAKO-made accessories include Rear Mono-Pod, Barricade Stop, and Thumbrest. And yes SAKO threads the muzzles 5/8×24 for use with brakes and suppressors. This video shows how accessories mount:
Field Sports Unboxing Video of SAKO S20 with Hunter Stock
This S20 “first look” video was created by the UK Fieldsports channel. The reviewer was impressed with the S20’s interchangeable stock system: “The modularity allows the rifle to be configured to the shooter’s preferences with different rear stocks and fore-ends. At launch, SAKO introduced both the tactical precision stock and the ergonomic hunting stock, the latter being an improved version of a traditional thumbhole stock more like a pistol grip. Switching between rear stocks is fast and easy, virtually changing the rifle from a target rifle to a hunting rifle, or vice versa, with the correct grip, in a matter of minutes.”
The Fieldsports review added: “Overall, the adjustable ergonomics are a big part of the S20 design. The multi-adjustable trigger can be moved backwards or forwards to better fit different hand sizes and to achieve the optimal trigger position, and its weight and length of pull can be adjusted. The quick-adjustable cheek piece and spacer adjustable length of pull help to achieve the best possible shooting posture. Combined with a wide selection of M-LOK and QD compatible accessory options, S20 adapts to all body sizes and shooting situations.”
Field Test of SAKO S20 — Sub-MOA Accuracy with .300 Win Mag
In this test, using factory ammunition, the shooter achieved sub-MOA accuracy with a SAKO S20 Precision chambered in .300 Win Mag. The very first three shots out of the gun went into about 3/4″ with two shots touching (SEE 04:25 – 4:50 time-marks). The tester offered this rifle description: “Boasting a cold hammer-forged, fluted stainless steel barrel with a recessed crown and a durable Cerakote® finish, this precision rifle ensures impeccable accuracy in virtually any environment. The sculpted stock features an adjustable cheek pad and recoil pad for a customizable fit[.] An M-Lok monopod is easily fitted for added stability in the rear, while the adjustable trigger ensures a consistent, user-specific pull[.] The receiver is mounted to a full-length bedding for improved strength and durability. Plus, the oversized bolt handle ensures intuitive, snag-free manipulation, while a low throw profile easily clears your scope.”
Hunting season is starting soon in most states. For many, Fall hunting season involves liberating a rifle that sits in a safe most of the year, grabbing a box of cartridges, and heading to the wilds. But this “once a year thing” carries with it potential risks.
It is all to easy to grab some rounds that may look right, but which are, in fact, a slightly different chambering. Likewise it is possible some hunting rounds got put in the wrong box after last year’s hunting trip. Be very careful when you get ready for a hunting trip — check the headstamp, cartridge dimensions, and bullet diameter of all your rounds. If you make an ammo selection mistake, the consequences can be disasterous, as this story reveals.
The .223 WSSM and 6mmBR Disaster Report by Dr. Jim Clary
Under most circumstances, shooters don’t have to worry about chambering the wrong cartridge into the wrong rifle. After all, the cartridges are well marked and we all know which rifle we are shooting on any given day. In many cases, incorrect cartridges cannot be chambered — larger cases will not fit in smaller chambers, for example. No problem! That being said, I can tell you that even an experienced, careful and normally safe shooter can make a mistake.
The following is an account of just such a mistake that could have resulted in death or dismemberment. Fortunately, the shooter was not hurt, but the rifle was completely destroyed.
Last year, a friend purchased a Savage Precision right bolt, left port, single shot bolt action in 6mmBR Norma. It was an incredible prairie dog gun and he spent the summer burning powder and busting dogs. In October, he purchased a stainless steel Browning A-Bolt Varmint in .223 WSSM. The weather in the upper Midwest turned sour by the time he got the brass tuned up and he only got to fire it a few times before he was “socked in” for the winter. Thus, he spent his evenings loading ammo for the spring thaw.
During a break in the weather, he grabbed both rifles and a couple of bags of .223 WSSM and 6mmBR cartridges and headed to the range to check out his new loads. In case you are not familiar, the 6mmBR is smaller in diameter and a mite shorter than the .223 WSSM. Because of this, it will chamber in a .223 WSSM, but the .243 caliber (6mm) bullet is too big for the .22 caliber bore. That is what happened to my friend.
The rest is history — when he squeezed the trigger, all hell broke loose. The entire bottom of the rifle blew out, including the magazine assembly. The explosion actually cut the stock into two pieces. However, the bolt held and amazing as it may seem, the .243 bullet was “swaged” right out of the .223 barrel.
6mmBR (left) and .223 WSSM (right) cartridges above the remains of Browning A-Bolt rifle.
One Small Mistake Is All It Takes
Now, realize that my friend has been shooting all manner of firearms, safely, for over half a century. He is meticulous, thorough and conscientious in his approach to reloading and shooting. However, he made one mistake. He put some lose 6BR cartridges in a baggie as he packed up from a prairie dog hunt last summer, without noticing that the baggie was marked .223 WSSM in black marker. Then, when the break in his winter weather came, he grabbed the bag, believing it to be the WSSM cartridges and didn’t check the head stamp.
Couldn’t happen to you? How many times have we emptied our pockets of cartridges and dropped them into a plastic container on the shooting bench? How many times have we set down to a marathon reloading session, loading several calibers in a row? How many times have we put the wrong bullets, cases or primers into the incorrect container? My point is that even the safest of us can make a mistake. So, look at the picture above and take a bit more time when you reload your ammunition at home or chamber a round in the field. It might save your life.
Garmin Acquires Applied Ballistics LLC
There was big news this week in the shooting industry. Garmin Ltd. has acquired Applied Ballistics LLC, the company founded and run by Bryan Litz, a top software engineer, ballistics guru, and world-class rifle shooter. Applied Ballistics has developed some of the most sophisticated and accurate ballistics software. It can run on your computers and tablets, and Applied Ballistics software has also been integrated into mobile devices, rangefinders, and Kestrel Weather Meter wind reading units.
To mark this important development for Applied Ballistics, today we feature eight notable videos. These include NSSF “Elements of Long Range Shooting” videos hosted by Bryan Litz of Applied Ballistics. In that multi-part series, Bryan covers a variety of topics of interest to precision shooters. Watch other informative Long Range Shooting and Ballistics videos with Bryan Litz on the NSSF YouTube Channel.
Understanding Muzzle Velocity
In this 55-minute video Bryan Litz explains how to measure muzzle velocity with various chronograph types and then explains some methods for optimizing your ES/SD. Bryan explains: “Muzzle velocity is an important variable for long range shooters. This video covers some key concepts for beginners and also goes into some advanced topics that are not normally encountered to keep it interesting for experienced shooters as well.”
How to Employ AB Quantum Software
This video is a very useful guide on getting started with AB Quantum™. Bryan Litz demonstrates the essential setup process: 1) quickly building an accurate profile; 2) establishing your zero, and 3) verifying the data at 100 yards. The proof is on the target. After creating a new ballistics profile, Bryan uses the verified profile to shoot a successful group at 1000 yards.
Standard Deviation INFO | Wind Speed and Direction
Powder Storage — Temperature and Humidity
In this video, Bryan Litz offers very helpful advice on how to store powder properly to ensure that you do not experience unpredictable velocities and higher-than-normal ES/SD. You want to keep your powder in a location which avoid high spikes in temperature and humidity. In addition powder bottles should not be stored in a thick-walled gun safe.
Bullet Ballistic Coefficients
A bullet’s ballistic coefficient (BC) basically expresses how well the bullet flies through the air. Higher BC bullets have less aerodynamic drag than lower BC projectiles. You will see BCs listed as either G1 and G7 numbers. These correspond to different bullet shape models. Generally speaking, the G7 model works better for the long, boat-tail bullets used for long-range shooting. Notably, a bullet’s drag is NOT constant in flight. The true BC can vary over the course of the trajectory as the bullet velocity degrades. In other words, “BC is dynamic”. That said, you can make very accurate drop charts using the BCs provided by major bullet-makers, as plugged into solvers. However, long-range competitors may want to record “real world” drop numbers at various distances. For example, we’ve seen trajectories be higher than predicted at 500 yards, yet lower than predicted at 1000.
Big Boomers — Large-Caliber Rifles for Long Range
Bryan Litz defines “Large Caliber” as .338 caliber and bigger. These rifles can shoot heavy bullets with high BCs. That’s great for ELR shooting. However there are trade-offs. It can be hard to maintain good fundamentals of marksmanship (trigger control, sight alignment) when you’re fighting heavy recoil and burning 100+ grains of powder. Accordingly, Bryan recommend a muzzle brake with any cartridge .338 or above. Also, when considering lathe-turned solid bullets, remember that these typically have less sectional density compared to lead-cored bullets with similar profiles. This affects ballistics as well as recoil energy.
BONUS: Bryan Litz Interview with Erik Cortina
Bryan Litz is arguably the leading ballistics expert on planet earth. A talented shooter who has won major F-Class, ELR, and Palma matches, Bryan is a high-IQ scientist who has developed the ballistics software many of us now use in Kestrels and other devices to calculate scope clicks with extreme precision. In this interview, Bryan explains basic ballistics principles and also corrects some popular misconceptions. This is a great interview that has received much praise from viewers, one of whom has noted: “Bryan is a walking science lab. He puts out amazing data-based info[.]” With 107,000 views, this is Erik Cortina’s second-most popular video ever.
TEN Shots in 0.303″ (0.289 MOA) at 100 Yards
Look at that target showing TEN shots at 100 yards, with eight (8) shots in the main cluster at the top. The ten-shot group measures .303″ (0.289 MOA), as calculated with OnTarget Software. Not bad for a handgun — a very nice bolt-action XP-100 pistol! What do you think, can your best-shooting rifle match the 10-shot accuracy of this XP-100 pistol?
Report by Boyd Allen
This story goes back a few seasons… this remarkable XP-100 pistol belongs to Dan Lutke, a Bay Area benchrest shooter who publishes the results for the Visalia matches to the competitors and the NBRSA. He has been an enthusiastic competitor for an number of years, at various ranges, notably Visalia and Sacramento. The action is a Remington XP-100, to which a Kelbly 2 oz. trigger has been fitted. On top is an old Japanese-made Tasco 36X scope (these were actually pretty darn good). The Hart barrel (a cast-off from Dan’s Unlimited rail gun) was shortened and re-chambered for the 6x45mm, a wildcat made by necking-up the .223 Remington parent case. The custom stock/chassis was CNC-machined by Joe Updike from 6061 Billet Aluminum to fit the XP-100 action and mount a target-style AR grip with bottom hand rest. The gun was bedded and assembled by Mel Iwatsubu. In his XP-100 pistol, Dan shoots 65gr custom boat-tails with Benchmark powder.
This diagram shows the most common 6x45mm wildcat, which is a necked-up version of the .223 Remington parent cartridge. NOTE: The dimensions for Dan Lutke’s benchrest version of this cartridge may be slightly different.
ACAD drawing by Peter Gnanapragasam CC by SA 3.0, via Wikimedia Commons. Title Added.
Story tip from Boyd Allen. We welcome reader submissions.
Splatterburst 1″ circles, 62 per sheet, 10-pk $9.99. These can be pasted on other paper backers.
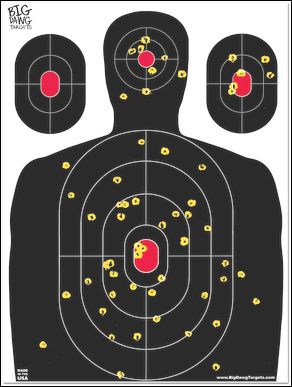
We’ve all seen conventional splatter targets with a single large black bullseye. When a shot hits the target, a halo (usually neon yellow) appears around the bullet hole. This makes it easier to see your shot placements indoors, or at long range outdoors. Today we feature a variety of other targets that also offer the cool halo/splatter effect. We’ve found grids, multiple bull targets, sheets with 62 one-inch circle pasters, handgun training targets, and even white background splatter targets (that produce black halos). Try out some of these targets for fun (kids love plinking with splatter targets).


 J. Dewey Mfg. offers a series of “Copper Eliminator” jags and brush adapters made from aircraft-grade aluminum with the same hardness as brass. Dewey claims that its aluminum jags will not become embedded with grit or particles that could harm your bore. At the same time, Dewey’s aluminum jags will not react to ammoniated bore solvents that can turn patches blue green when used with brass jags. Dewey aluminum jags are offered with either male OR female 8/32 threads.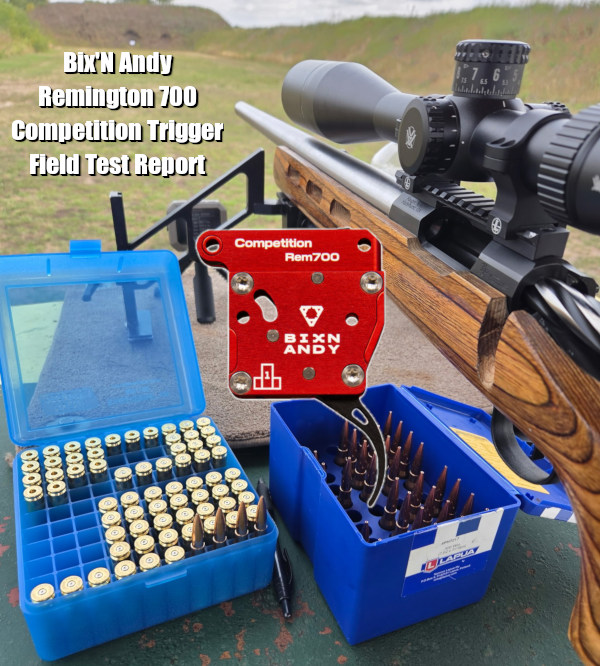















 Method Two: Apply Wipe-Out from Breech


 Hunting season is starting soon in most states. For many, Fall hunting season involves liberating a rifle that sits in a safe most of the year, grabbing a box of cartridges, and heading to the wilds. But this “once a year thing” carries with it potential risks.