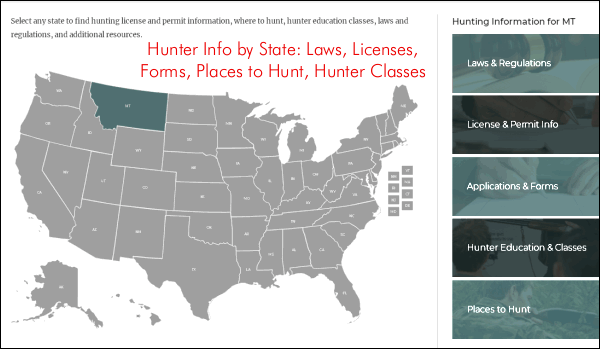
Click Map to launch interactive webpage with info for all 50 states.
Going hunting soon? Need to find out about hunting licenses, deer tags, local regulations, and the best hunting areas? Then visit WheretoHunt.org. This website has an interactive map of the country. Simply click on a state to find the info you need.
For all 50 states, the NSSF provides information about hunting licenses and permits, where to hunt, hunter education classes, laws and regulations and more. For each state you’ll also find a link for required applications and license forms. Have a safe and productive hunt this year.
Many short-range Benchresters have thought about converting their 6 PPC rig to shoot a 30BR for score matches, or a Dasher for mid-range (or even 1000-yard) games. That way you can have a rifle that does double (or triple) duty, giving you the most bang for your buck. Though an action with a PPC bolt won’t normally work with 30BR/6BR/Dasher cases with their larger .308-class rim (0.4728″ diameter), there is a pretty easy solution that allows you to cycle these bigger cartridges with a 6PPC-style bolt (designed to fit .220 Russian rims).
“Rebating case rims … lets you shoot a 30BR in score matches using your PPC action. All you need is a new barrel. This saves buying another bolt, receiver, or rifle.” — Butch Lambert
Butch Lambert of ShadeTree Engineering provided this tip. Butch notes that many 6 PPC benchrest group shooters also enjoy shooting in score matches. But to be really competitive in the BR for score game, that means shooting a 30BR, which has a wider, .308-class rim (0.4728″ diameter). Likewise, if you want to compete in 600-yard registered BR events or in varmint matches, you probably want to run a bigger case, such as the 6BR, 6mm Dasher, or 6-6.5×47. Those cartridges also have the larger 0.4728″ rims.
Rebate Your 30 BR Rims
To convert a PPC-boltface action to shoot bigger cases you can spend a ton of money to buy a new bolt. That can cost hundreds of dollars. The simpler solution is to turn down the diameter of the larger cases on a lathe. Butch explains: “We’ve seen plenty of interest in rebating case rims. This lets you shoot a 30BR in score matches using your PPC action. All you need is a new barrel. This saves buying another bolt, receiver, or rifle if you have a PPC boltface. Anyone who has access to a lathe can do this job pretty easily. Yesterday I turned 150 case in about an hour.”
At right is the lathe form tool Butch uses to rebate the case rims.
Do you often carry a concealed handgun? Then you can benefit from Beretta’s FREE 15-page e-book, Ten Essential Tips for CCW Holders. This eBook, in handy PDF format, helps gun owners select an appropriate handgun (and holster), understand legal obligations and responsibilities, and train effectively with the firearm. This short PDF eBook offers many useful tips to consider, in particular for gun owners who are contemplating the pros and cons of everyday carry for themselves.
As the Beretta CCW booklet says, “Carrying a concealed handgun requires a certain amount of confidence. You need to be confident in your knowledge of laws and regulations. You have to have confidence in your accuracy, and you need to trust that you can carry a gun effectively, securely and comfortably. If a gun is a burden for you to carry, you probably won’t.”
Surprising Facts About Actual Defensive Handgun Use
You may be surprised to learn when and how handguns are actually used for self-defense. Most defensive uses are at very short range and the incident only lasts a matter of seconds. You need to be prepared, and train to be proficient drawing and aiming your weapon. And remember, shooting is a last resort, when a safe retreat is not available.
55% of gunfights take place in 0-5 feet.
20% of gunfights take place in 5-10 feet.
20% of gunfights take place in 10-21 feet.
95% of gunfights take place in 0-21 feet. (Source: FBI)
The average man can cover 21 feet of ground in 1.5 seconds.
The average gunfight is over in 3-5 seconds.
3 to 4 shots are usually fired.
Most gunfights take place in low-light conditions.
On average, one shot in four strikes someone.
Here are two (2) sample pages from Beretta’s CCW eBook.
For many Americans, real incomes have stayed flat in recent years, while inflation has increased the cost of living very significantly in since 2020. Accordingly, it’s important to save money whenever possible. Prices are going up, but wages aren’t following (for most of us). Here are six ways shooters can save money on gear purchases and other shooting-related expenses.
1. Watch for Our Deals of the Week. Every Monday, in our Daily Bulletin, AccurateShooter.com offers some of the best deals to be found. We search the web to find great deals on ammo, reloading components, optics, tools, firearms, gun safes, electronics and more. It’s not unusual to find savings of 20-35% through our Deals of the Week. And many of our vendors are now offering special deals just for AccurateShooter.com readers.
2. Check Out the Forum Classifieds. There are great deals to be found every day in the AccurateShooter Shooters’ Forum. The latest deals are displayed in the right column of every Forum page. To see all the listings, browse through the Forum MarketPlace section which has four main categories:
Guns, Actions, Stocks, & Barrels
Tools, Dies, Rests, Reloading Components & Misc
Scopes, Optics, Sights, Rings, Bases Etc.
Commercial Sales by Paid Sponsors
3. Share a Ride to Matches. Fuel prices are on the rise — Regular-grade gasoline is over $6.05 per gallon in California now and around $4.33/gallon nationwide. With many shooters living 30-100 miles from the nearest range, fuel remains a big part of a shooter’s hobby budget. We’d say 90% of shooters drive solo to matches, often in large, gas-guzzling trucks. If you drive 200 miles round-trip to attend a match in a 20-mpg vehicle, you’ll burn over $43.00 worth of gasoline on your trip. That adds up. By simply sharing the ride with one fellow shooter you cut your fuel expenditures in half. And, if you alternate vehicles with a buddy from one match to the next, you save on vehicle wear and tear. At $0.84/mile (average overall operating costs for an SUV) consider the savings.*
4. Use Discount Codes to Save. It’s always smart to check for discount codes before you buy. In the Daily Bulletin, we feature “Deals of the Week” every Monday morning, and we provide discount Coupon Codes when available. These can reduce the price substantially or lower shipping costs. Search codes for Brownells, Creedmoor Sports, EuroOptic, Graf’s, Midsouth, Powder Valley, Sportsman’s Warehouse, KYGUNCO, MidwayUSA, and Precision Reloading. Check your email also — some discount codes are only announced in email newsletters. If you can’t find a Coupon Code for your preferred vendor, visit Gun.deals and/or RetailMeNot.com. Both those sites list current coupon codes, and RetailMeNot.com covers thousands of vendors.
5. Shop for “Demo” Optics. Modern high-quality optics can easily cost $1500.00 or more, often exceeding the value of the rifle on which they are mounted. However, you can often save 20-30% by purchasing demo optics. These are normally display units used at trade shows. They may have slight ringmarks, but otherwise they are “as new”, having never been carried in the field or used on a rifle that has fired live ammo. When purchasing demo scopes, you should always ask about the warranty before consummating the sale. However, most demo scopes from name-brand manufacturers come with full factory warranties. EuroOptic.com and SWFA.com are two respected vendors that offer a good selection of demo optics.
6. Train with Rimfire Rifles. Good match-grade centerfire, hand-loaded ammo, counting premium bullets, powder, primers, and brass (figuring 10X loads), can now exceed $1.60 per round. And if your $600 (as chambered and fitted) competition barrel is toast after 1500 rounds, add $0.40 for barrel deprecation per shot. So you’re effectively spending two bucks a round total! By contrast, you can get quite good .22 LR target ammo for under $0.18 per round. Good rimfire barrels last a long, long time, so you don’t have to be concerned about wearing out your barrel quickly. A quality rimfire barrel can retain its accuracy for 7,000 rounds or more. If you run the ballistics, a .22 LR round at 100 yards can emulate the wind drift experienced by a centerfire cartridge at long range. This allows for effective cross-training with much less expensive ammo.
*The average cost to operate a medium SUV in the US is approximately $0.84 per mile, as reported by AAA. This includes fuel, depreciation, repairs, parts insurance, and registration.
Starline Brass offers a series of videos with helpful reloading tips. Focused primarily on pistol cartridges, these short videos can help anyone get started with metallic cartridge reloading. If you load pistol rounds on a progressive, this video series is particularly helpful. The on-camera host is Hunter Pilant, son of Carroll Pilant of Sierra Bullets.
Preventing Double Charges
Tip: Use a bulky powder that fills your case more than half way with a correct charge. This will overfill the case if it is double-charged, making it very difficult to seat a bullet.
Tumble New Brass Before Loading the First Time
Tip: Tumble new pistol cartridge brass in used media for 30 minutes before loading for the first time. This will add enough graphite (carbon residue) to smooth case entry into dies. You can also lube the case mouths with graphite, or use spray lube.
Powder Through Expander — How to Eliminate Hang-ups
Tip: When loading pistol brass with a progressive press, sometime the powder-through expander is hard to remove, especially with short cases. There are two fixes — first, try deburring the inside of the case mouth on your cases. Second, the radius of the powder through expander plug can be modified to smooth entry and exit (see photo). Starline will do this modification for free.
The last half-inch or so of your barrel is absolutely critical. Any damage (or abnormal wear) near the crown will cause a significant drop-off in accuracy. Here are ways you can check the end of your barrel, using a common Q-Tip.
Use Q-Tip for Barrel Inspection
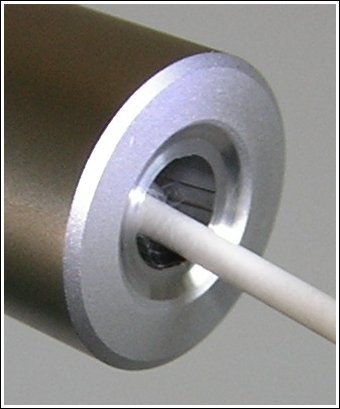
To find out if you have a burr or damage to your crown, you can use an ordinary Q-tip cotton swab. Check the edges of the crown by pulling the Q-tip gently out past the edge of the crown. If you have a burr, it will “grab” the cotton and leave strands behind.
Larry Willis has another way to use a Q-Tip: “Here’s a neat trick that will surprise you with how well it works.” Just insert a Q-Tip into your barrel (like the picture below), and it will reflect enough light so that you can get a real good look at the last half inch of rifling and the crown of your barrel. In most cases you’ll find that this works much better than a flashlight. Larry tells us: “I’ve used this method about a jillion times. Q-Tips are handy to keep in your cleaning supplies anyway. This is a good way to judge approximately how well you are cleaning your barrel when you’re at the range. It’s also the best way to examine your barrel when you’re in the field.”
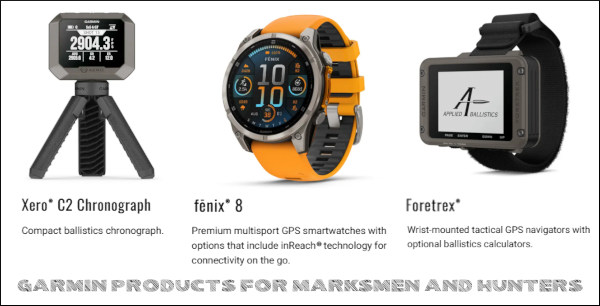
Garmin Ltd. (NYSE: GRMN) has acquired Applied Ballistics LLC, a leading provider of ballistic research, projectile data, and integrated solver technologies dedicated to enhancing accuracy. The acquisition will advance Garmin’s product offerings for tactical, shooting sports, and hunting markets.
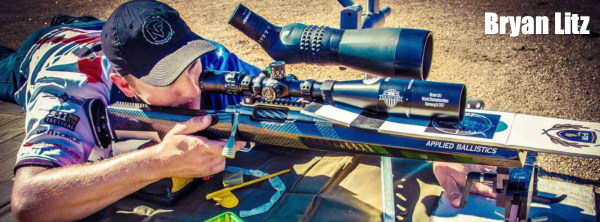
Applied Ballistics LLC was founded by Bryan Litz, a scientist and software expert who is also a top-level marksman who has won major championships. Bryan is both a great shooter AND a ballistics wizard. In 2015, Bryan Litz won the F-TR Mid-Range AND Long-Range National Championships hosted at Ben Avery. And at the 2014 Berger SW Nationals (SWN), Bryan took top honors among all sling shooters. If you only know Bryan Litz from his Applied Ballistics Books and DVDs, you may not realize that Bryan is also a great rifle shooter along with being an actual rocket scientist.
“Applied Ballistics is a natural complement to Garmin’s outdoor and tactical product portfolio. Building on a successful relationship spanning nearly 10 years, this acquisition brings industry-leading software, proprietary projectile data and precision firing solutions in-house. By bringing our teams together, we can accelerate innovation and deliver even more capable, integrated solutions to customers who depend on accuracy.” — Brad Trenkle, Garmin Co-Chief Operating Officer
Applied Ballistics develops professional-grade ballistic solvers and radar-validated projectile models for hunters, competitive shooters and other long-range customers. The company continues to expand its ecosystem of connected products, helping users improve accuracy, better understand their equipment and share trusted ballistic data across devices and applications—providing an unparalleled, science-based approach to long-range shooting.
Headquartered in Howard City, Michigan, the Applied Ballistics portfolio includes the Applied Ballistics Quantum App, a premier ballistic solver and data management program favored by top shooters worldwide.
How to Employ AB Quantum Software — Getting Started
In this video, Bryan Litz offers an informative guide on getting started with AB Quantum™. Bryan demonstrates the essential setup process: building an accurate profile, establishing your zero, and verifying the data at 100 yards. Bryan then uses the verified profile to shoot a successful group at 1000 yards.
About Garmin International Inc.
Garmin products have revolutionized the aviation, automotive, fitness, marine and outdoor markets. Garmin produces hand-held GPS units, Vehicle GPS systems, Smart watches, Marine Radars, Flight Displays, and many other products used by hunters, marksmen, boaters, pilots, and outdoor enthusiasts.
Garmin International, Inc. is a subsidiary of Garmin Ltd. which is incorporated in Switzerland, with its principal subsidiaries are located in the United States, Taiwan, and the United Kingdom. Garmin is a registered trademark of Garmin Ltd., all rights reserved.
Today we share some smart tips from a past F-Class and Sling Champion who is both a great shooter AND a ballistics wizard. Founder of Applied Ballistics LLC, Bryan Litz is the author of multiple books and creator of advanced Ballistics Software.
Bryan is also a highly skilled competitor. In 2015, Bryan Litz won the F-TR Mid-Range AND Long-Range National Championships hosted at Ben Avery. And at the 2014 Berger SW Nationals (SWN), Bryan took top honors among all sling shooters. If you only know Bryan Litz from his Applied Ballistics Books and DVDs, you may not realize that this guy is a also great marksman along with being an actual rocket scientist!
Given his impressive track record in both F-Class and Palma (Fullbore) out to 1000 yards, we asked Bryan if he had any advice for other long-range competitors.
First Bryan provided three tips concerning Ballistics, his special area of expertise. Next Bryan offered three more general tips about long-range competition — how to analyze your shooting, how to choose your ‘wind strategy’, and how to avoid the most costly mistakes, i.e. how to avoid the “train-wrecks”.
Bryan Litz won the 2015 F-TR Mid-Range and Long-Range Championships with this sleek rig:
Litz Ballistics Tips
Ballistics TIP ONE. If you’re having trouble getting your ballistic software to match actual drops, you need to look at a number of possible reasons. Here are some common issues that can cause problems.
Click Values Are Not Exact. Scopes and iron sights don’t always produce accurate adjustments. In other words, if your ballistics program predicts 30 MOA of drop, and you dial 30 MOA but hit low, it might be that your sight actually only moved 28 MOA (for example). To see if your sight is adjusting accurately, shoot a tall target at 100 yards and measure group separation when dialing your sight.
Barometric vs. Station Pressure. This is a commonly misunderstood input to ballistics programs. You can avoid this pitfall by remembering the following: station pressure is the actual measured pressure at your location, and you don’t need to tell the program your altitude when using station pressure. Barometric pressure is corrected for sea level. If you’re using barometric pressure, you also have to input your altitude.
Muzzle Velocity. Chronographs are not always as accurate as shooters think they are — your true MV may be off by 10-20 fps (or more). If your drop is different than predicted at long range, it might be because your muzzle velocity input is wrong.
Mixing Up BC (G1 vs. G7). Knowledgeable long range shooters know that the G7 standard is a more representative standard for modern LR bullets. However, using G7 BCs isn’t just a matter of clicking the ‘G7′ option in the program. The numeric value of the BC is different for G1 and G7. For example, the G1 BC of the Berger 155.5 grain Fullbore bullet is .464 but the G7 BC is .237. If you were to enter .464 but click on G7, the results would be way off.
Ballistics TIP TWO. A properly installed level is absolutely essential for long range shooting. Without a good level reference, your long range wind zero will be off due to minor canting of the rifle from side to side. You can verify that your level is installed correctly on a 100-yard ‘tall target’. Draw a plumb line straight up the target and verify that your groups track straight up this line as you go up in elevation.
Ballistics TIP THREE. If your long range ballistic predictions aren’t tracking, always come back and verify your 100-yard zero. Sometimes a simple zero shift can be misconstrued as errors in long range ballistics predictions.
Litz Competition Shooting Tips
Competition TIP ONE. Improving your scores in long range competition is a constant process of self-assessment. After each match, carefully analyze how you lost points and make a plan to improve. Beginning shooters will lose a lot of points to fundamental things like sight alignment and trigger control. Veteran shooters will lose far fewer points to a smaller list of mistakes. At every step along the way, always ask yourself why you’re losing points and address the issues. Sometimes the weak links that you need to work on aren’t your favorite thing to do, and success will take work in these areas as well.
Competition TIP TWO. Select your wind shooting strategy carefully. For beginners and veterans, most points are typically lost to wind. Successful shooters put a lot of thought into their approach to wind shooting. Sometimes it’s best to shoot fast and minimize the changes you’ll have to navigate. Other times it’s best to wait out a condition which may take several minutes. Develop a comfortable rest position so you have an easier time waiting when you should be waiting.
Competition TIP THREE. Actively avoid major train wrecks. Sounds obvious but it happens a lot. Select equipment that is reliable, get comfortable with it and have back-ups for important things. Don’t load on the verge of max pressure, don’t go to an important match with a barrel that’s near shot out, physically check tightness of all important screws prior to shooting each string. Observe what train wrecks you and others experience, and put measures in place to avoid them.
Looking down-range with F-TR rifle at Ben Avery Shooting Facility in Phoenix, Arizona.
Bullet Stability and Twist Rates
In this video, Bryan Litz talks about bullet in-flight stability and how to calculate barrel twist-rate requirements for long-range bullets. Bryan explains that bullet stability (for conventional projectiles) is basically provided by the spinning of the bullet. But this spin rate is a function of BOTH the nominal twist rate of the barrel AND the velocity of the projectile. Thus, when shooting the same bullet, a very high-speed cartridge may work with a slower barrel twist rate than is required for a lower-speed (less powerful) cartridge. For match bullets, shot at ranges to 1000 yards and beyond, Bryan recommends a twist rate that offers good stability.
You’ll find more expert information on long-range shooting and ballistics on the Applied Ballistics website and the Bryan Litz Ballistics Facebook page. Bryan’s most recent Facebook post talks about the Coriolis effect — the apparent drift of a rifle trajectory due to the rotation of the earth.
To learn more, we recommend you subscribe to the Applied Ballistics Science of Accuracy — with in-depth articles, brilliant podcasts, exclusive videos and more.
Ever wondered what the air around a moving supersonic bullet really looks like? Check out this video from the Bryan Litz Ballistics Facebook page. This is a Schlieren video* of a 6mm 109gr Berger LRHT bullet at about 2800 fps as fired from Francis Colon’s PRS rifle at the Applied Ballistics Lab.
Bryan Litz notes: “You can clearly see the compression (shock) wave at the front of the bullet. A compression wave is formed when the air has to move faster than the speed of sound to get out of the way, which is certainly the case for this bullet which is moving about 2.5 times the speed of sound (Mach 2.5).
That shock wave is the ‘snap’ you hear when bullets fly past you if/when you’re downrange. Also, compressing the air into a shockwave takes energy, and that energy comes directly out of the forward velocity of your bullet and gets converted into heat and noise as the shock wave forms and dissipates.
The turbulent wake at the base of the bullet shows where/how base drag applies. The third and smallest component of drag for a supersonic bullet is skin friction drag, which is a viscous boundary layer effect, and is the least visible in this image. So as you head to the range or the hunting stand, think about the absolute violence your bullets are committing in the atmosphere, before they even reach the target!”
Want to learn the basics of position shooting? Then you should check out an article by Gary Anderson, DCM Emeritus, in On the Mark digital magazine (Summer 2014, pp. 6-13). This article covers all the key elements: body position (prone, sitting, standing), sling use/adjustment, sight picture, aiming process, and trigger control. While this 8-page article was specifically written for Rimfire Sporter shooters, the techniques described by Anderson apply to all types of position shooting, whether you shoot air rifles, smallbore rifles, or centerfire rifles.
Here’s what Anderson says about aiming — how to keep your sights steady and get them centered on the middle of the target:
Trigger Contact and Center As soon as aiming at the target begins, the index finger must move from the trigger-guard to contact the trigger. It is important to get initial pressure on the trigger as soon as aiming begins. Then the shooter must focus on the sight picture and centering the sight picture movements over the aiming point. No one, not even champion shooters, can hold the aligned sights perfectly still. The sights are going to move a little bit or a lot, depending on the shooter’s skill level. The secret is to center those sight picture movements over the aiming point on the target (see trace illustration) before pulling the trigger.
When the sight picture movements on the target are centered, the last step in firing the shot is to add… smooth pressure on the trigger until the shot breaks.
Anderson also discusses the 5 Basics of Shot Technique:







 2. Check Out the Forum Classifieds. There are great deals to be found every day in the AccurateShooter
  3. Share a Ride to Matches. Fuel prices are on the rise — Regular-grade gasoline is over $6.05 per gallon in California now and around $4.33/gallon nationwide. With many shooters living 30-100 miles from the nearest range, fuel remains a big part of a shooter’s hobby budget. We’d say 90% of shooters drive solo to matches, often in large, gas-guzzling trucks. If you drive 200 miles round-trip to attend a match in a 20-mpg vehicle, you’ll burn over $43.00 worth of gasoline on your trip. That adds up. By simply sharing the ride with one fellow shooter you cut your fuel expenditures in half. And, if you alternate vehicles with a buddy from one match to the next, you save on vehicle wear and tear. At $0.84/mile (average overall operating costs for an SUV) consider the savings.*
 4. Use Discount Codes to Save. It’s always smart to check for discount codes before you buy. In the Daily Bulletin, we feature “Deals of the Week” every Monday morning, and we provide discount Coupon Codes when available. These can reduce the price substantially or lower shipping costs. Search codes for Brownells, Creedmoor Sports, EuroOptic, Graf’s, Midsouth, Powder Valley, Sportsman’s Warehouse, KYGUNCO, MidwayUSA, and Precision Reloading. Check your email also — some discount codes are only announced in email newsletters. If you can’t find a Coupon Code for your preferred vendor, visit
  5. Shop for “Demo” Optics. Modern high-quality optics can easily cost $1500.00 or more, often exceeding the value of the rifle on which they are mounted. However, you can often save 20-30% by purchasing demo optics. These are normally display units used at trade shows. They may have slight ringmarks, but otherwise they are “as new”, having never been carried in the field or used on a rifle that has fired live ammo. When purchasing demo scopes, you should always ask about the warranty before consummating the sale. However, most demo scopes from name-brand manufacturers come with full factory warranties.
  6. Train with Rimfire Rifles. Good match-grade centerfire, hand-loaded ammo, counting premium bullets, powder, primers, and brass (figuring 10X loads), can now exceed $1.60 per round. And if your $600 (as chambered and fitted) competition barrel is toast after 1500 rounds, add $0.40 for barrel deprecation per shot. So you’re effectively spending two bucks a round total! By contrast, you can get quite good .22 LR target ammo for under

 The last half-inch or so of your barrel is absolutely critical. Any damage (or abnormal wear) near the crown will cause a significant drop-off in accuracy. Here are ways you can check the end of your barrel, using a common Q-Tip.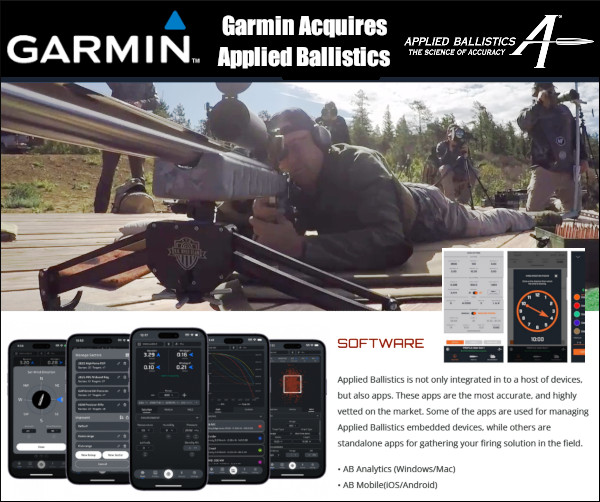



 As soon as aiming at the target begins, the index finger must move from the trigger-guard to contact the trigger. It is important to get initial pressure on the trigger as soon as aiming begins. Then the shooter must focus on the sight picture and centering the sight picture movements over the aiming point. No one, not even champion shooters, can hold the aligned sights perfectly still. The sights are going to move a little bit or a lot, depending on the shooter’s skill level. The secret is to center those sight picture movements over the aiming point on the target (see trace illustration) before pulling the trigger.


