For many years, the U.S. Army Marksmanship Unit (USAMU) regularly published reloading “how-to” articles on the USAMU Facebook page. In this article, the USAMU’s reloading gurus address a question frequently asked by prospective handloaders: “Should I buy a single-stage press, or a progressive?” The USAMU says the best answer is Solomon-esque in both its wisdom and simplicity: “Get BOTH!” However, there is definitely more to the issue, as the USAMU explains below.
Progressive Press Safety Considerations
by USAMU Staff
Many are the beginning handloaders who have asked a friend about their “setting up” a progressive press for them. The idea is that the newbie could then just feed in components and crank out buckets of practice ammo without needing to really learn much about handloading. Tempting though this might be, that’s simply not how it works. Such an approach might be ok if there were never a malfunction with either press or operator, but that’s unrealistic. Our hypothetical newbie would then lack the knowledge to problem-solve most situations.
Worse yet, several different handloading operations would be occurring at different stations on the progressive press at the same time. It takes an experienced operator to keep track of, and truly understand the significance of, all those potential mini-problems. Loading without this experience is a recipe for potential disaster – such as a double powder charge (especially with pistol cartridges) dropped while the loader was attending to some other function, etc. Progressives are an animal unto themselves, and while they offer many benefits, they do take some getting used to – even by experienced handloaders!
ILLUSTRATIVE HORROR STORY
Here, enter a 40-year veteran handloader who decided to jump onto the progressive bandwagon late in his career, having used only single-stage presses all his life. A High Master NRA High Power Rifle competitor, he had no background in competitive pistol shooting, where historically most progressive presses are found.
Experienced Action Pistol shooters have typically encountered multiple episodes in which shooters “skipped” a powder charge for some reason, leading to a squib round and a bullet possibly lodged in the bore. Thus, at matches, it’s reflexive for them to yell “STOP!” in unison if they see a shooter get a “click” vs. a “bang”, and rack the slide to keep firing. This writer has personally seen several pistols saved in just such scenarios over the years.
Click No Bang — What NOT to Do
Our High Master set up a popular progressive press and began turning out .223 Rem 100-yard practice ammo with abandon. He was using a moly-coated 52gr match bullet and an economical, fast-burning surplus powder that gave great accuracy. Once on the range, he began practicing strings of rapid-fire. All was well, until he heard “Click!” rather than “Boom”.
Lacking the above experience or onlookers to halt him, he reflexively operated the charging handle on his expensive, custom NM AR15 Service Rifle, and the next trigger squeeze reportedly registered on seismographs over at least a three-state radius. He sat, uninjured but bewildered, until the hail of expensive bits and pieces quit raining down around him.
When the smoke cleared, he immediately cursed the horrid, evil, demonically-possessed progressive press for this, his first-ever reloading mishap. His $1400 NM upper was ruined, but thankfully, his $800 pre-ban lower… and he had escaped injury.
This tale is told not to discourage the use of progressive presses, but to emphasize the need to EASILY and IMMEDIATELY KNOW what is happening with the press at each station, every time the handle is cranked. Not to do so is, as they say, “bad ju-ju.”
It illustrates why we at the USAMU Handloading Shop agree in recommending that new handloaders should begin with a single-stage press. Once one thoroughly learns the steps in each phase of handloading by repeated experience, then one will be qualified to move on to a progressive press.
The single-stage press will REMAIN virtually indispensable for one’s entire handloading career, even after having purchased a progressive press (or two). There are endless small projects that are best handled on a single-stage press, and a poll of USAMU’s Handloading staff reveals that not one would willingly be without his single-stage press, despite owning at least one progressive.
When you make a reloading mistake, you may need to “pull down” assembled ammo. The embedded UltimateReloader.com video demonstrates how to use the Hornady Cam-Lock bullet pulling system.
When Reloading Goes Bad — The Danger of Over-Charging
Our friend Gavin Gear of UltimateReloader.com was recently reloading some 9mm pistol ammo with his Hornady progressive press. As part of his reloading procedure, he visually checks the cases — and he noticed that the charges seemed high. Sure enough, his most recently-produced rounds were about two grains over spec. He diagnosed the issue: “I was using a powder measure without a baffle. What happened was, over the course of the loading session, things settled in, and the charge level increased.”
Not knowing just when his powder measure started delivering too much powder, Gavin decided, for safety’s sake, to pull down all the ammo he had just reloaded. Yes that’s time-consuming, but it’s better than the alternative — having a dangerous Kaboom while shooting. With fast-burning pistol powders, a two-grain over-charge could cause a blown case, damaged firearm, and/or serious injury.
Watch Cam-Lock Bullet Puller Used to Remove Bullets from Loaded Ammo:
Use of Bullet Puller starts 4:00 minutes into video.
Gavin says it is vitally important to perform safety checks during the reloading process: “You’ve got to do it — check every single round to make sure there IS powder, and that there’s not too MUCH powder. Double, Triple, Quadruple check your components… and your powder charges. You can’t be too careful.”
To pull down a loaded round, first place the cartridge in the shellholder on your press ram. Then raise the round up into the bullet puller device installed where a die would go. The Hornady Cam-lock bullet puller works by clamping the bullet in a collet when you flip down the red-coated lever. Then, with the case held by the rim in the shell-holder, the bullet exits the cartridge as the press ram is lowered. It takes time, but it’s pretty fool-proof once you get the hang of it. This entire process is illustrated in Gavin’s video, starting near the four-minute mark.
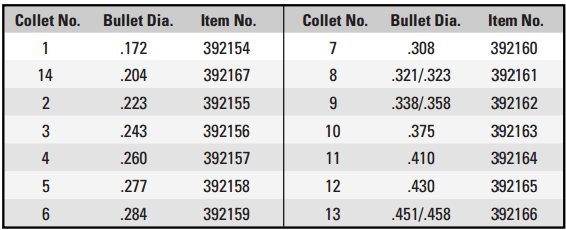
The Hornady Cam Lock Bullet Puller has four (4) key components: 1. Cam-Lock die body; 2. Cam-Lock lever; 3. Stem; and 4. Collet (Caliber-specific).
NOTE: In order to use this tool, you’ll need the appropriate collet for each diameter range of bullets you intend to pull. For example use collet #3 for 6mm, collect #6 for 7mm, and collet #7 for .308 Caliber.
RCBS Lock-Out Die
A good safety option for users with progressive presses is the RCBS Lock-Out Die. This has a charge detection rod that dips into each case after powder has dropped. You adjust the die to the proper charge height for your desired load. If the actual dispensed charge is too high or too low, the Lock-Out Die senses the problem and stops the press from advancing to the next case (it does this by preventing the ram/shellplate from fully elevating). We’ve used the Lock-out die with success for both pistol and rifle cartridges. It’s sensitive to about one-half grain with pistol powders.
This Lock-Out Die works with Hornady and Dillon progressives as well as with RCBS progressives. It does take up one die station on the press.
At the request of our readers, we provide select “Deals of the Week”. Every Sunday afternoon or Monday morning we offer our Best Bargain selections. Here are some of the best deals on firearms, hardware, reloading components, optics, and shooting accessories. Be aware that sale prices are subject to change, and once clearance inventory is sold, it’s gone for good. You snooze you lose.
NOTE: All listed products are for sale to persons 18 years of age or older. No products are intended for use by minors.
Natchez — End of Year Clearance Sale
⏺️ » Great savings on ammo, outdoor gear, optics and more
Right now Natchez in running a massive End of Year Clearance Sale with significant discounts on over 1000 products. On sale are optics, ammunition, reloading components (brass, bullets, powder, primers), gun accessories, hunting gear, and much more. With these end-of-year discounts, this is a great opportunity to save big bucks in the final week of 2025.
EuroOptic — End of Year Vortex Sale with 15% Off Code
⏺️ » Save 15% on Vortex scopes, binoculars, spotters, red dots
EuroOptic is running a major Vortex 15% Off Sale this week. You can save 15% on competition scopes, hunting optics, tactical optics, spotting scopes, binoculars, laser rangefinders, and red dot optics. NOTE: This sale may expire very soon so you should grab these bargains while you can. During check-out use Code VTX15 to save 15% (some exclusions).
As an Amazon affiliate, this site can earn revenues through sales commissions.
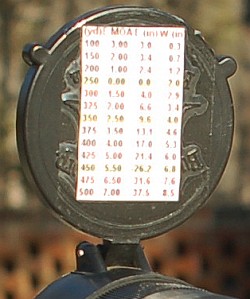
When shooting any match that requires moving back and forth between multiple target distances it is very handy to have your ballistics data, i.e. your “come-ups”, placed within easy view. That way you can instantly see your elevation for various target distances in seconds. This can really help a PRS/NRL competitor on timed stages. And having a convenient “Dope” display of elevation at various distances can also benefit varminters who are shooting critters. In our varmint hunters we targeted p-dogs from about 80 yards out to 500+.
PRC DOPE Roller QD Ballistic Data Turret
The PRC DOPE Roller QD Ballistic Data Turret provides a handy, low profile display of windage and elevation data. You can see your “dope” without breaking position from behind the rifle. Then simply rotate the knob to display data from various distances. The ballistic data is placed by wrapping a simple 1″ x 3″ adhesive address label around the outside surface of the DOPE Roller. This handy quick-detach roller retails for $64.95 from Precision Rifle Components.
MDT M-LOK Data Card Holder
The MDT M-LOK Data Card Holder has an adjustable neck allowing you to easily position your ballistics data for optimal viewing. Data entries are written on on a reusable card that attaches with Velcro. The Data Card Holder Kit comes with hardware to mount to any M-Lok rail. In addition the card holder fits directly to an MDT ACC chassis attachment point. This MDT kit includes: M-LOK Data Card Holder, Wet Erase Data Card, Wet Erase Marker, and installation hardware. NOTE: The Card Holder sticks out about 6.7″ when fully extended, but arm links can be removed to make the arm shorter. The unit folds flat for storage. This complete kit is $59.95 at Creedmoor Sports.
Warne Universal Data Card Holder
The Warne Universal Data Card Holder easily attaches to the scope tube, in left or right configurations, for a universal fit. Data is displayed in a convenient location to make quick and accurate target transitions, and the articulating arm allows for low profile storage while not in use. The Warne Universal Data Card Holder retails for $88.49 at Warnescopemounts.com. Three ring sizes are offered: 30mm, 34mm, 35mm. A 50-pack of Warne Data Card label refills is currently $16.99 from Warne.
Scope-Cover Mounted Ballistics Table
Another option is to place your ballistics card on the back of the front flip-up scope cover. This set-up is used by Forum member Greg C. (aka “Rem40X”).
With your ‘come-up’ table on the flip-up cover you can check your windage and elevation drops easily without having to move out of shooting position.
Greg tells us: “Placing my trajectory table on the front scope cover has worked well for me for a couple of years and thought I’d share. It’s in plain view and not under my armpit. And the table is far enough away that my aging eyes can read it easily. To apply, just use clear tape on the front objective cover.”
Cheap But Effective — Tape on the Stock with Ballistics Data
At the 2021 Nightforce ELR Steel Challenge, Applied Ballistics guru Bryan Litz wrote his come-ups on blue masking tape applied to his stock. He did this based on a tip from Chase Stroud. With the tape applied behind the action, the numbers are easily visible. This “cheap trick” does work apparently — Bryan won the match with a convincing victory over 220 other shooters. READ Match Report.
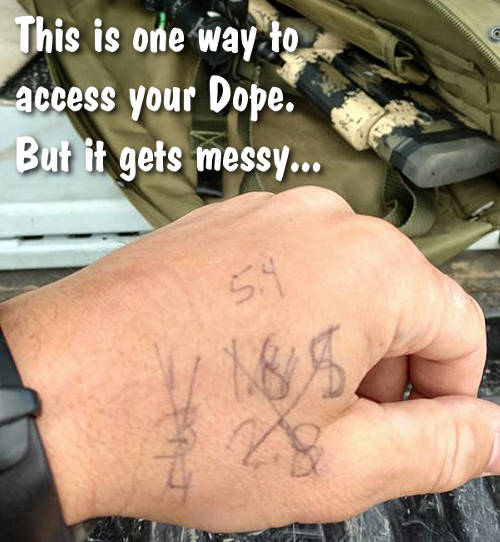
Cheap But NOT So Effective — Numbers on Hand
Many of us have scribbled some come-ups on the back of a hand or on our forearm using a marking pen. That can work if you only have a couple distances to deal with — say 100 and 300 yards. But if you want a more complete Come-up table, get one of the card-holders shown above. Writing numbers on the skin is generally not such a good idea….
Our friend Dennis Santiago is a talented Service Rifle shooter, who regularly competes with an AR shooting the .223 Rem cartridge. A few seasons back, he decided to go over to the “dark side”, putting together a Palma (fullbore) rifle chambered for the .308 Winchester. Dennis selected a Competition Machine (Gary Eliseo) R1 Chassis for the project. Here’s Santiago’s account of his “true blue” Palma build.
Palma Rifle Report by Dennis Santiago
“This project was a .308 Win Palma rifle with an Eliseo R1 chassis, Rem 700 action (blue-printed with PT&G upgrades), Jewell trigger, Boots Obermeyer 1:11″-twist barrel, and Phoenix sights holding Gehmann apertures. Next comes chassis and sling set-up, initial mechanical zeroing, and load development. Yup, I have a bunch of Peterson small primer .308 brass, Sierra #2156 155gr MKs, and Varget to get started with. I’m told I can drive 155gr pills to stay supersonic to 1K. Should make for an interesting 2020. My goal was to be cozy with this blue beast by the time the Berger Southwest Nationals kicked off in February 2020.”
CLICK Imagefor full-screen photo with more detail.
Pinning the Picatinny — For a Super-Solid Mount
One of the key parts of the build, Dennis explains, is mounting the top rail with pins: “Once the rail is aligned using a spin-centered optic, it locks down with three 3/16″ roll pins. That way there is no reliance on screws that can come loose. Above is a photo of the top of the Eliseo tube chassis showing the three, 3/16″ roll pins that unitize the Picatinny rail. You can also see the four brass screws that just kiss the action to fully stabilize it in the tube. The recoil ring buttresses completely around the action with metal to metal contact. There are a million details hidden inside a Gary gun.”
Phoenix Sights Front and Rear
Rise of the Phoenix — Here are the sights for the Eliseo R1. There are very few manufacturers left making these kinds of ultra-precise and repeatable iron sights.
These Ray-Vin tools help set mechanical zero on the sights. Dennis notes: “Finally a reason to pull out the Ray-Vin calibration paraphernalia to set up a mechanical zero. This photo is for all of you who still remember that those barrel flats and screws in our sight towers actually had a purpose once upon a time.”
Sling ‘N Irons — Classic Palma Configuration Dennis plans to use an Eric Hollis sling with his new blue Palma rifle.
Peterson Small Primer .308 Win Brass for Santiago’s Rig
Dennis has used Peterson Cartridge Small Rifle primer .308 Win brass. Peterson offers a “Select” version weight-sorted and length-sorted at the factory. All Select casings (in a 50ct box) are guaranteed to be within 1 grain in weight and .001″ in OAL. Peterson Select brass is available for 20 different cartridge types, including .308 Win both small primer/small flash hole and large primer/large flash hole.
Now Adapted with a Scope
Currently (in 2025) Dennis has this rifle fitted with a high-magnification Nightforce zoom scope, and he competes with his blue prone rifle in the “Any-Any” division. He usually runs the scope at about 22X power. For an older guy with aging eyes, being able to run high-magnification optics is a big plus.
With the optics Dennis has found the rifle to be exceptionally accurate. Shooting 168gr bullets it has produced 5-round groups around 1/3-MOA during testing. And it can easily hold the X-Ring at 300 yards.
Getting the Blue Rifle Ready for the Berger SW Nationals
Dennis has campaigned his rifle at recent Berger Southwest Nationals (SWN) events. At the SWN a Palma shooter can shoot iron sights, or also fit a scope and shoot in the “Any Sights” category. The week-long Berger SWN is the biggest rifle match in the Western United States. Hundreds of shooters compete in both individual and team events. The SWN begins with the Mid-Range Nationals at 600 yards. Then the Long-Range matches are held, with targets out to 1000 yards. Watch the video to see the Ben Avery facility, home of the Berger SWN:
Chassis-maker Gary Elesio at the 2017 Berger SW Nationals. Gary shoots what he sells:
At long range, small bullet holes are much easier to see “in the white” than in the black center of the normal High Power target. When you’re practicing at long range using a scoped rifle, one way to enhance your ability to see your bullet holes is to print a “negative” version of the regulation bullseye target so that your black center is now white.
How do you create a “negative” of a target image? Many image programs, including the FREE Irfanview software, have a “Negative” function in the pull-down menu. If you don’t see a “Negative” menu option in your program, look for a “substitute colors” option. Many printers also have a “reverse colors” function. If you can’t find a solution with your computer or printer, just take a normal bullseye target to a copy shop, and the staff can easily print you a set of targets with white centers in black fields.
Forum member Watercam has a Pentax PF-80ED spotting scope that allows him to see 6mm bullet holes in the white at 600 yards. However, 6mm holes in the black are only visible out to 400 yards or so. Accordingly, Watercam uses a modified “reversed” black-to-white target for 600-yard practice. Watercam explains: “[Using the Pentax] With my 6mm and limited mirage I see defined, 6mm holes in the white out to 600. In the black, however, I can see bullets holes at about 400. I now use reverse-color targets for training without a pit partner at the 600-yard line.”
The Hi-Viz Solution — Day-Glo Pasters
If you’re not concerned with official scoring rings, you can use an all-white target with a bright, fluorescent target dot in the middle. A 2″- or 3″-diameter stick-on target dot is highly visible at 600 yards. Birchwood Casey Target Spots® assortment #33928 offers neon orange target dots in 1″, 2″, and 3″ diameters.
TARGET TIP — Use Chart Paper
For practice backers for the Day-GLo pasters at long distance, use Flip Chart Paper (aka Easel Pads) marked with graph lines at 1″ intervals. Available either regular or self-stick, one sheet can hold 4-8 pasters and the white paper allows for easy spotting of the holes and quick estimation of group size. Get Flip Chart Paper at Amazon.com, Staples, or Office Depot.
Brits Use White-Field Target for F-Class
In the UK, some ranges are now using a “reverse-style” target with a mostly white area. Laurie Holland says this allows shooters to see shots much more easily. Laurie reports: “Here’s a photo of the 500/600 yard F-Class match target we use in PSSA comps at Diggle Ranges with club members Chris Hull (L) and Terry Mann (R). We now use this target form at all ranges up to 1K for F-Class, and, yes you can often see your hits at 600 yards on the target before the markers pull it. Regards from England — Laurie”.
One eye or two? That’s the question that confounds some pistol shooters, particularly during slow fire. When shooting one-handed, some bullseye pistol shooters use a piece of tape or paper on one lens of their shooting glasses to obscure their non-dominant eye. That way they can get a more precise sight picture. However, when shooting two-handed, it’s almost always better to shoot with both eyes open. And if you are doing a “move and shoot” session/match, you’ll surely want to have both eyes open.
Champion pistol shooter Doug Koenig says he always shoots handguns with both eyes open: “To me it’s very simple — I wouldn’t drive my car with one eye closed. I wouldn’t walk around the house with one eye closed. To me, it’s all about your vision, your depth perception.” Doug adds that you definitely need both eyes open to transition quickly from target to target.
With both eyes open you’ll have better depth perception and peripheral vision. You will also be able to transition from target to target more quickly. In a timed, multi-target stage, you’ll want to move your head/eyes to the next target right after you break a shot. You’ll find that you will then reflexively move the handgun on to the new target when you swing your vision on to it. Don’t linger on the target you just shot — move to the next.
Here are two other helpful videos from Doug Koenig and the NSSF:
Sight Alignment and Sight Picture
Trigger Press and Trigger Control
Doug Koenig’s List of Championships:
10-time World Champion
18-time Bianchi Cup winner
2016 NRA World Shooting Champion
More than 70 National Championships
6-time World Action Pistol Championship Winner
3-time World Speed Shooting Champion/Steel Challenge
Watch more excellent, informative Doug Koenig videos on KoenigShooting.com. Doug’s video features include pistol set-up, proper stance and grip, Steel Challenges tips, and even rifle setup, and PRS basics.
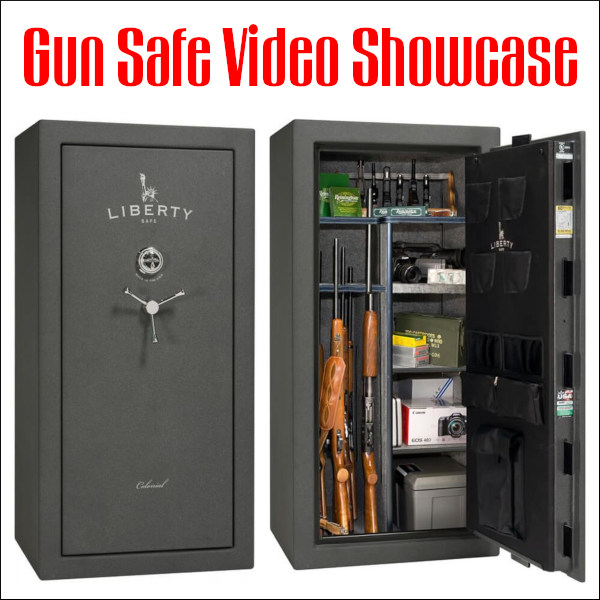
Today’s Saturday Showcase covers gun safes. Every firearms owner should have a secure, quality gun safe with ample capacity. There are numerous choices in gun safes — but we have one key bit of advice — buy BIGGER than you think you need, because your gun collection will likely grow over time. Also you should consider the fire rating of your safe. There are other key factors to consider, such as wall thickness, lock type, shelf and storage layout, and humidity control. We recommend that all Bulletin readers read our detailed, Gun Safe Buyers Guide. This in-depth 9400-word article covers ALL these topics:
Anti-Corrosion
Budget Safes
Bolt Layout
Door Seals
Fire Proofing
Handgun Storage
Hinges
Humidity Control
Installation Tips
Interior Layout
Interior Lighting
Locks–Dial vs. Digital
Modular Safes
Rotary Racks
Size and Weight
Temperature Control
Wall Thickness
Water Proofing
Technical Features of Gun Safes — What You Need to Know
This is a very sensible, informative video that examines the technical features of gun safes. You’ll learn about the steel “gauge” or thickness, the different types of hinges, lock controls, and fire-proofing options. We think anyone contemplating purchase of a large home safe should watch this video, prepared by a respected safe retailer in Las Vegas.
Assembly of SnapSafe Titan XXL Double Door Modular Safe
In this video Gavin Gear of UltimateReloader.com shows the unpacking and assembly of a large, twin-door SnapSafe modular safe. This video shows how individual panels are assembled one by one, and how the twin doors are attached. Gavin also shows the process of installing the interior insulation panels which provide basic fire protection. Remarkably, this entire XXL modular safe can be put together with simple tools in less than an hour. SEE Full Article HERE.
Features of a Quality Safe under $1000
Even if you already have a safe, this video is well worth watching. The host shows a variety of accessories and upgrades that all gun safe owners should consider. The host explains why you should have a dehumidifier or Golden Rod. He also shows how to install handy interior lights that activate automatically when the door is opened.
The Gun Vault — The Next Step Beyond a Jumbo Gun Safe
If you have a very large gun collection and are building a new custom home, you may want to consider a Gun Vault. This is essentially a large, secure room, with a very heavy door and thick walls. In this interesting video, Atlas builds a large walk-in gun vault using the Gallow Tech Shelving System and a Fort Knox Gun Vault door.
After the Fire — What Actually Happens in a Burned Safe
In this video, the hosts open a “fireproof” gun safe that went through an actual house fire. See what happens when a gun safe that is supposed to be fireproof actually is exposed to a major fire. The results are surprising to say the least. This video shows that you need to do your homework before buying a “fireproof” safe. Understand how the fire rating systems work, and learn how the interior materials and construction make a big different in real world fire protection.
Mechanical Locks vs. Electronic Locks — What You Need to Know
One important decision when buying a gun safe is the choice of locking mechanism. Should you go with a mechanical lock or an electronic lock? There are pros and cons to both dial locks and e-locks, and as long as you get a quality lock, neither is a bad choice. To help you make your decision, This video explains the differences between the two, and reasons why you might choose one over the other.
How to Assemble a Modular Safe with Simple Tools
For gun owners who move frequently, or who may live in an upstairs apartment or condo, a modular safe makes sense. Steelhead Outdoors, based in Minnesota, offers three different safes: Nomad 26, 32, and Nomad 38. The video below shows how to assemble a Steelhead Outdoors Nomad series safe. If you have basic skills, these safes can be assembled easily in 60-90 minutes. Steelhead recommends having two people to do the job. The entire safe ships in four (4) boxes. Wrenches are included with the safe.
This time-lapse video shows the entire process of assembling the safe, start to finish.
Guide to Quick Access Handgun Safes
A quick access safe can keep your pistol secure, but also readily accessible. But not all of these devices are created equal. This video explains the features you need in a small pistol safe. The video also examines the pros and cons of seven different handgun safes. We recommend that you do NOT keep your handgun safe in plain view, such as on a bedside table. There are other locations where you still have quick access, without tempting home intruders.
Wireless Hygrometer Reports Temperature and Humidity Inside Safes
The Hornady Security® Wireless Hygrometer monitors temperature and humidity in real-time, all without opening the gun safe. The wireless hygrometer employs a remote sensor inside your safe, which measures temperature and humidity data. This data is then sent to an external base display. Wireless technology eliminates the need to open the safe and check the storage environment, preventing temperature and humidity spikes from the outside air.
The display features a large touchscreen that shows current high/low data from both the base and remote units in Fahrenheit or Celsius. The hygrometer pairs with Hornady Security’s in-safe dehumidifiers to combat oxidation-causing moisture.
Gun Safe Installation Recommendations
Every safe, when possible, should be anchored in place with heavy-duty fasteners. Ideally, use multiple bolts in the bottom of the safe, anchored to concrete or solid foundation. Choose the appropriate lag bolts or anchors for the material below your safe. If you can’t mount to the floor, bolt the safe to wall studs. You can locate the position of the studs with an inexpensive electronic “Stud Sensor” available at home supply stores.
Check the thickness of your safe floor. If the steel on the bottom of your safe is fairly thin, place a steel backing strip between the bolt heads and the safe bottom. (Large washers will work, but a backing strip is better.) Without such reinforcement, the bolt heads may pull right through thin-gauge steel if the safe is rocked, or levered from the bottom with a pry-bar.
Locate your safe in the corner of a room or in a recess that blocks access to one or more sides of the safe. On many gun safes, the steel on the top, sides, and rear is thinner than on the door. Blocking access to the sides makes it much more difficult to use power tools on the sides, where the safe is most vulnerable. It’s also wise to place the safe in a relatively tight space with limited room to maneuver. Anything that makes the safe harder to move helps deter would-be thieves.
Many people place their safe in a garage or basement. That’s not necessarily a bad idea, but people also tend to store their tools in the same locations. Don’t store your power tools next to the safe. One safe-maker told us how a customer’s safe was defeated using the owners’ own cutting torch which was stored right next to the safe!
Inspect the area around the safe. Avoid locations where there are a lot of wood beams, paint cans, or other combustible material nearby. In the event of a serious house-fire, these items will fuel the flames, increasing the likelihood that items inside your safe will be heat-damaged. Chris Luchini, co-author of Rec.Gun’s Guide to Gun Safes, offers some practical advice: “Get an alarm system. If the burglars hear an alarm go off, they are less likely to stick round to finish the job. Alarms on both the house and the safe area are a good idea.”
Well 2025 is almost over. It’s time to take stock of your gun-related spending for the year. Did you spend a lot or a little? Were you conservative with gun spending this year or did you bust your budget in 2025?
Here’s a survey that will help you access your gun spending compared to other gun guys. Heads up fellows — you probably want to keep this page confidential. Your spouse probably doesn’t want to be reminded about all the times you ignored the “Honey Do” list and headed off to the range instead. And she certainly doesn’t want to know how much you spend every year on your gun hobby.
Answer these two polls to see how dedicated (or should we say “obsessed”) a gun guy you really are. Once you vote you can see how your shooting (and spending) habits compare to other readers. Full results display after you select an answer and click the “Vote” button.
Click to vote in our current Readers’ polls.
Click “View Results” to see what other readers have selected.
The rifle cartridge money clip was a real product from ReleaseMeCreations.com (now sold out). You can, of course, make your own cartridge money clip with a Dremel tool for free.
Editor: Many new barrels will deliver higher velocities with the same load after 100-150 rounds through the bore. The exact reasons for this speed-up are not 100% certain, and velocity increases (if any) will vary from one barrel to the next. But this “speeding up” phenomenon is common, so be prepared if this happens with your next barrel. If you do experience a significant velocity increase you should probably re-tune your load AFTER the velocity stabilizes at the higher level.
From the Sierra Bullets Blog Article by Mark Walker, Sierra New Product Development Director
In a previous post, I discussed a couple of methods to tune a load to your barrel to help achieve the best accuracy possible. People most often work on load tuning if they get a new rifle or have a different barrel installed. In both instances, the barrel is new and has not been fired very much. According to most competitive shooters, this is the most accurate your barrel will ever be, so getting it tuned and shooting accurately is a priority.
The Speed Up Phenomenon After 100-150 Rounds
Even though after you work up a load and your new barrel is shooting great, a lot of shooters notice that at around 100 to 150 rounds their rifle may stop shooting as accurately. I had this happen to a rifle and I was confused as to why something that worked so well to begin with would all of a sudden quit shooting. I decided to break out the chronograph to do another load work up to see what was going on. To my surprise, the velocity had increased around 80 fps over the original velocity! After performing another ladder test and adjusting the seating depth, the rifle was once again shooting well.
There are several thoughts on why this may happen, however, you can rest assured that it does happen. One thought is that as the barrel breaks in, the tooling marks in the throat of the chamber smooth out and allow less resistance to the bullet as it exits the bore thereby increasing speed. Another idea is that the throat area starts to get a little rough which in turn causes more resistance which increases pressure and therefore more velocity. I’m sure there are some out there who have a better understanding as to why this happens, but it can definitely affect the accuracy of your rifle. So be aware and never be afraid to rework a load to keep your rifle in tune.
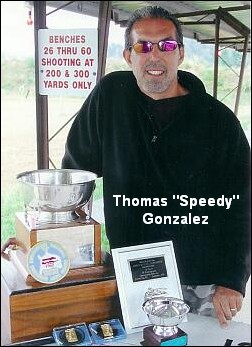
Experts Confirm That Barrel Speed-Up Is Common Two respected shooters have observed an increase in velocity with new barrels, typically after 100 rounds. Gunsmith and Hall-of-Fame benchrest shooter Thomas “Speedy” Gonzalez has documented barrel speed-up with testing. Moreover, Speedy’s bore-scope barrel inspections revealed a smoothing of the barrel lands. Jim See, a top PRS competitor, has encountered barrel speed-up many times. Accordingly, he re-tunes his load at 150 rounds.
“Alex Lipworth and I documented this phenomenon about four years ago and I have told all my customers about this. My son Mikee would shoot 100 rounds through all new barrels we planned on shooting before we would begin to do load development. We had a shooting snail that caught all the bullets set up in front of an indoor bench. We called it a wear-in process because upon careful examination of the bore when the ‘Speed Up’ takes place the cut-rifled bore resembles that more of a button-rifled barrels with the lands taking on more the softer look of a buttoned bore.” — Speedy Gonzalez
“Seen it [barrel velocity increase] too many times to count. All my match barrels get a ‘generic round’ loaded for them, which has worked well in barrels historically. After I hit 150 rounds I fine-tune the load and never look back, until the tube starts to slow down at it’s life end.” — Jim See


 RCBS Lock-Out Die


 Scope-Cover Mounted Ballistics Table


 Forum member Watercam has a Pentax PF-80ED spotting scope that allows him to see 6mm bullet holes in the white at 600 yards. However, 6mm holes in the black are only visible out to 400 yards or so. Accordingly, Watercam uses a modified “reversed” black-to-white target for 600-yard practice. Watercam explains: “[Using the Pentax] With my 6mm and limited mirage I see defined, 6mm holes in the white out to 600. In the black, however, I can see bullets holes at about 400. I now use reverse-color targets for training without a pit partner at the 600-yard line.”


 Every safe, when possible, should be anchored in place with heavy-duty fasteners. Ideally, use multiple bolts in the bottom of the safe, anchored to concrete or solid foundation. Choose the appropriate lag bolts or anchors for the material below your safe. If you can’t mount to the floor, bolt the safe to wall studs. You can locate the position of the studs with an inexpensive electronic “Stud Sensor” available at home supply stores.
 Locate your safe in the corner of a room or in a recess that blocks access to one or more sides of the safe. On many gun safes, the steel on the top, sides, and rear is thinner than on the door. Blocking access to the sides makes it much more difficult to use power tools on the sides, where the safe is most vulnerable. It’s also wise to place the safe in a relatively tight space with limited room to maneuver. Anything that makes the safe harder to move helps deter would-be thieves.

 Two respected shooters have observed an increase in velocity with new barrels, typically after 100 rounds. Gunsmith and Hall-of-Fame benchrest shooter Thomas “Speedy” Gonzalez has documented barrel speed-up with testing. Moreover, Speedy’s bore-scope barrel inspections revealed a smoothing of the barrel lands. Jim See, a top PRS competitor, has encountered barrel speed-up many times. Accordingly, he re-tunes his load at 150 rounds.


