UPDATE: On 2/5/2024, the 9th Circuit granted a stay of Judge Benitez’s injunction ruling. So Californians may NOT purchase ammunition from out of state. CLICK Here for CRPA update and watch video below for details.
NOTE: The Benitez Ruling Explained Below Has Been Blocked by the 9th Circuit
Big news for California gun owners. You can now purchase ammunition online and have it shipped directly to your residence in California. And you can purchase ammo at California gun shops without paying for a background check. A Federal Judge has issued an injunction that blocks application of California laws requiring costly background checks for ammo purchases. NOTE: Right now, Californians can buy ammo without these restrictions, but it is possible that the Ninth Circuit could change things very soon. Act now while you can. Being able to mail-order ammunition from major vendors outside California makes ammo more affordable for Californians.
On January 30, 2024, in the case of Rhode v. Bonta, U.S. Federal District Court Judge Roger Benitez issued an order blocking the application of California laws which place severe limits on ammunition purchases by Californians. Benitez ruled that California’s laws requiring background checks on ammunition purchases were unconstitutional and invalid on multiple grounds. As noted by the San Diego Union-Tribune: “U.S. District Judge Roger Benitez ruled that such restrictions violate the Second Amendment. He also ruled that the portion of the law restricting out-of-state purchases violated the dormant Commerce Clause and is preempted by federal law regulating interstate transportation of firearms.”
Washington Gun Law Video Explains the Key Legal Points of Judge Benitez’s Order:
The Associated Press reports: “California residents don’t have to pay for and pass a background check every time they buy bullets, a federal judge has ruled. The Tuesday [1/30/2024] ruling by U.S. District Judge Roger Benitez took effect immediately. California Attorney General Rob Bonta [then] asked Benitez on Wednesday to delay the ruling[.]” Subsequently, Judge Benitez issued an order denying Bonta’s stay request. So, until the 9th Circuit acts, the injunction stands and Californians can buy ammo without a background check.
Four years ago, in April 2020, Judge Benitez had issued a preliminary injunction blocking California’s ammo background check laws. But days later the 9th U.S. Circuit Court of Appeals issued a stay of that injunction, effectively negating the Benitez ruling, and putting California’s unconstitutional laws back into effect. But there have been significant changes now based on recent U.S. Supreme Court decisions, in particular the Bruen case: “After the Supreme Court’s 2022 ruling in New York State Rifle & Pistol Association, Inc. v. Bruen, the 9th Circuit sent the case back to Benitez to be relitigated under that new framework, which holds that modern gun laws must be ‘consistent with the nation’s historical tradition of firearm regulation’.” (SD Union-Tribune).
If you want to ship handguns, as a private party (non-FFL), there are now very limited options. You cannot use the U.S. Postal Service, and, since September 2021, you cannot use FEDEX. Yes, that’s right, FEDEX no longer allows non-FFLs to ship handguns. And now UPS also requires firearms shippers to have a Federal license: “Shipments containing Firearm Products are accepted for transportation only from shippers who are federally licensed and have an approved UPS agreement for the transportation of Firearm Products.” (SEE UPS Rules).
So going through an FFL is the only option. There IS an alternative that can save you significant money. By ordering your shipping labels from ShipMyGun.com, you could save $50 or more on UPS handgun shipping. It is quick and easy.
ShipMyGun.com has a large FFL database, so you can verify the recipient’s address and FFL status. The ShipMyGun.com website has a simple to use label-printing process.
All handgun shipments are fulfilled via next day air. Long guns are shipped quickly via ground and typically arrive within 3-5 business days. (NOTE: For rifles and shotguns it is still possible to use U.S. Postal Service and FEDEX, following their rules.)
How ShipMyGun.com Works
Go to ShipMyGun.com. Click the Create Shipment/Get Started Link. The choose handgun or long gun (rifle, shotgun). Use the FFL Database to find the address for the FFL shop to which the gun will be shipped. All shipments must go to an FFL. Then you fill out the billing information. After confirming all the info, print the label. Then you attach the label to your shipment box and take it to a participating UPS facility. (NOTE: some private UPS stores will NOT handle ANY firearms).
Shipping Questions? Read the FAQ Page
ShipMyGun.com has a helpful Frequently Asked Questions (FAQ) Page. We suggest you read over this before your first shipment. GO TO FAQ PAGE.
Here are some notable Questions & Answers:
Q. Can I ship ammo with my gun?
A. NO, it is against the law to include ammo with your firearm shipment. Loose ammo or boxed ammo cannot be included. Also, inspect (clear) your firearm to ensure it is NOT LOADED prior to packaging.
Q. Should I include identification?
A. Yes, you MUST include a copy of your driver’s license. Dealers will not accept a private party transfer without it. Failing to include your drivers license could delay the recipient from being able to accept their transfer or result in the firearm being returned to you at an additional cost.
Q. Are there any restrictions on what I can and cannot ship?
A. Simply put, yes. You can find our restrictions on our State Restrictions Page. Please note: it is your responsibility to ensure that the firearm you are shipping is legal to own at its destination. If it is not, the dealer who receives the firearm will not transfer it to its intended recipient[.]
About ShipMyGun.com
ShipMyGun.com is a division of BudsGunShop.com. The business has now shipped over 1 million guns for over 250,000 customers. This allows ShipMyGun.com to pass on significant discounts for both private party shippers and FFL shippers.
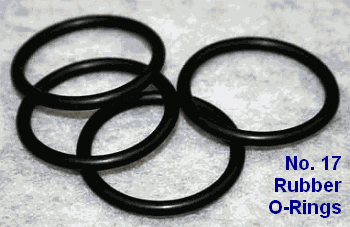
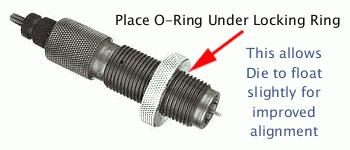
Here’s an inexpensive procedure that can help you load straighter ammo, with slightly better measured concentricity (i.e. less run-out) on the case necks and bullets. Simply use a Rubber O-Ring on the underside of the die locking ring. This allows the die to self-align itself (slightly) to the case that is being sized. Without the O-Ring, if the flat surface on the top of your press is not perfectly square with the thread axis, your die can end up slightly off-angle. This happens when the bottom of the locking ring butts up tight against the top of the press. The O-Ring allows the die to float slightly, and that may, in turn, reduce the amount of run-out induced during case sizing.
Top prone shooter GSArizona, who sadly passed last year, tried this trick and said it works: “Go to your local hardware store and get a #17 O-Ring (that’s the designation at Ace Hardware, don’t know if its universal). Slip the O-Ring on the die and re-adjust the lock ring so that the O-Ring is slightly compressed when the die is at the correct height. Size and measure a few more cases. You will probably see a slight improvement in neck concentricity as the die can now float a bit as the case enters and leaves it. This isn’t going to be a dramatic improvement, but it’s a positive one.”
We want to stress that adding O-Rings to sizing dies may help some reloaders, but we don’t offer this as a panacea. Try it — if using the O-Ring reduces measured runout that’s great. If it doesn’t, you’ve only spent a few pennies to experiment.
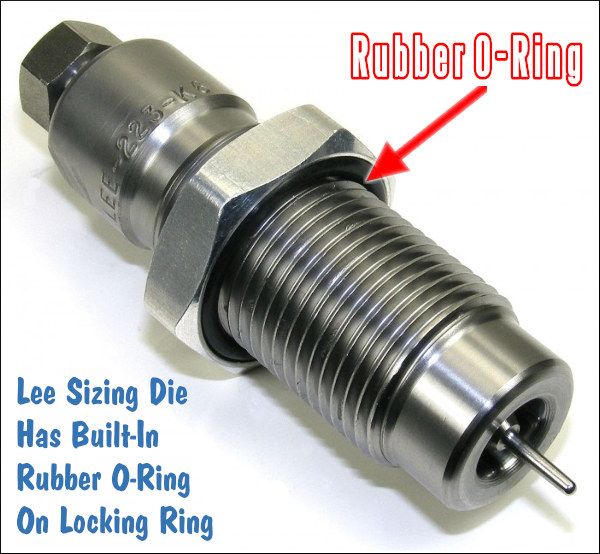
Lee Precision makes die lock rings with built-in O-Rings. Lee’s distinctive lock ring design allows the same kind of self-alignment, which is good. However, Lee lock rings don’t clamp in place on the die threads, so they can move when you insert or remove the dies — and that can throw off your die setting slightly. By using an O-Ring under a conventional die lock ring (that can be locked in place), you get the advantages of the Lee design, without the risk of the lock ring moving.
The Southwest Nationals (SWN), one of the biggest F-Class competitions in the USA, is coming up soon in Phoenix, Arizona. Hosted by the Desert Sharpshooters Rifle Club at the Ben Avery Shooting Facility, the 2024 SWN takes place February 14-18, 2024. CLICK HERE for SWN Match Program.
Practice at 300 Yards with Reduced Size Target Centers
If you’re headed to Phoenix in a couple weeks but want to practice for the big F-Class match, here’s a handy training option. Forum member SleepyGator is an F-Class competitor, but there are no long-distance ranges close to his home. Accordingly, he wanted some “reduced-distance” targets he could use at 300 yards for practice. There IS an official reduced-distanced standard for 300-yard F-Class matches. This utilizes the NRA No. MR-63FC – F-Class Target Center which is pasted over the MR-63 target. It provides a 1.42″ X-Ring, 2.85″ 10-Ring, and 5.85″ Nine-Ring. We offer some free targets you can print out for use at 300 yards. The dimensions of F-Class targets are found in the NRA High Power Rules, Sec. 22, part 4, page 70-71 — see sample below.
To duplicate the 300-yard target, SleepyGator made a printable version of the MR-63FC Target Center, along with a pair of training targets with two bulls and five bulls. The two-bull and five-bull targets mirror the scoring rings on the MR-63FC, but they display only the innermost three rings and two rings respectively. All three targets are Adobe PDF files that can be easily printed.
NOTE: You may need to adjust the scale (sizing) on your printer to get the dimensions exactly correct. As noted above, when printed, the 10-Ring on all three targets should measure 2.85″. This should provide some handy practice targets you can use between matches. Thanks to SleepyGator for providing these targets. You can download all three as a .Zip archive. After downloading the .Zip file, just click on the .Zip archive to extract the individual targets.
Do you own an older RCBS electronic powder dispenser? If you do, take the time to watch this ChargeMaster Tuning video from 8541 Tactical. This nine-minute video demonstrates how to re-program your older ChargeMaster to “tune” the dispensing process. The video shows the exact programming procedures to follow, step-by-step. Some folks want a faster powder flow — others tune their machines for a more reliable drop (with fewer over-runs). One cheap and popular modification is to insert a 1″-long section of a McDonald’s plastic straw in the ChargeMaster’s silver dispensing tube. This works surprisingly well to smooth kernel drop and prevent “clumping” that can cause an over-charge. The McDonald’s straw MOD is demonstrated in this video, starting at the 6:22 mark.
Large-Diameter Dispensing Tube Mod
Many folks have had success with the McDonald’s straw modification demonstrated in the above video. However, some folks would like to get even better flow performance (with virtually no clumping). Forum Member Frank B. has come up with a new option using a brass hose fitting with a large outside diameter. The hose fitting (with tape wrapped around the barbed nose section) is placed inside the RCBS dispensing tube (have some kind of wrap — you don’t want metal-on-metal). Here’s how the unit looks installed:
Frank tells us: “I have found a cure for the over-throw problem. It is a simple 1/4″ barbed hose nipple. I wrapped a couple layers of tape around the barbed end for a snug fit. With this in place, I have thrown 100+ charges of Varget without a single overthrow. The ID of the barbed end needs to be approximately 3/16″ to feed a steady flow. This works because of the larger ID at the drop.”
Frank adds: “You can see in the photo that the powder is not stacking up. You can watch it drop one grain at a time. Hope this will take the aggravation out of your case charging.” For best performance with this brass fitting MOD, we recommend de-burring and smoothing out the front edge of the brass fitting over which the kernels drop.
Brass fitting mod suggested by Boyd Allen. We welcome reader submissions.
John Weber, a 70-year-old from England, was given a metal mug by his grandfather in 1945. Though his grandfather had a “good eye” for antiques, John never thought the metal mug was worth much. He played with it as a child, and even used it as a target for his air rifle. The mug, assumed to be brass, has languished in a shoe box under Weber’s bed for decades.
Well, it turns out Weber’s old mug may be the world’s most expensive plinking target! The cup is actually made of solid gold, and is a rare, ancient artwork, crafted over 2300 years ago. The unusual mug, decorated with twin, opposite-facing female heads, was appraised with a value exceeding one-quarter million dollars ($250,000)!
According to news reports, Weber decided to have the old mug (thought to be brass) appraised when he moved from his house. He was shocked to learn that the mug is a Persian gold treasure, beaten out from a single sheet of gold before the time of Alexander the Great. Experts said the type of gold and the way the cup was hammered was “consistent with Achaemenid gold and gold smithing” dating back to the third or fourth century BC. The Achaemenid Empire ruled most of the Middle East and was conquered by Alexander the Great in 330 BC. Could this cup be one of Alexander’s war trophies? What stories could it tell from the past 2300 years?
Ancient Gold Cup Brings $99,000 at Auction
The rare cup was sold at auction by Duke’s Auction house in southwest England in June, 2008. Though the Cup was valued much higher by experts, it only fetched £50,000, or roughly $99,000 U.S. Dollars (at 2008 exchange rates). John Webber said he was still very pleased with that result.
This article is part of Sinclair Int’l Step-By-Step Reloading Series. Most of the products mentioned in this article are sold through Brownells.com.
by Roy Hill, Brownells/Sinclair Copywriter
Making your own precision handloads is a meticulous journey with many steps, many important matters to consider, and many sets of measurements to calculate. For those who pursue the perfect group, the highest score, the really long accurate shot, the rewards more than outweigh the effort. Choosing the right cases, deburring the flash holes, making the primer pockets uniform, trimming the cases, and lubricating them are all familiar – and critical – steps along the journey. And now that your brass preparation is complete, you are at last ready to start running the cases through your press and fill them with primers, powder, and bullets. The very first die the brass encounters is the sizing die. You insert the case, work the press’s lever to return the case to its correct pre-fired dimensions – and the journey continues.
There are three types of sizing dies to think about: neck, full-length, and small base. All three have specific benefits and potential drawbacks, and you should choose the type of die you use by thinking very carefully about what kind of shooting you plan to do with your handloads. No matter which type you select, most sizing dies will also punch out the old spent primer with some sort of decapper assembly that uses a hardened steel rod. Many types of sizing dies use an expander ball inside the die to make sure the neck of the case will accommodate a bullet after being sized. With some size dies, the expanders are easily removable and interchangeable, letting you get exactly the neck tension you want. When sizing cases (neck of full-length), rifle cases always need lube.
Neck-Sizing Dies Neck-sizing dies resize only the neck of the case. The benefit of sizing only the neck is that the brass is “worked” very little, reducing the amount of changes to the brss. [We recommend full-length sizing for all applications after the first couple of firings, and semi-auto brass should be full-length sized every time!] Sinclair recommends that neck-sized-only cartridges should not be used any in other rifle besides the one they were originally fired from [unless they are also FL-sized], or in any action other than a bolt-action.
Full-Length Sizing Dies
Full-length sizing dies resize the full length of the case, not just the neck. Full-length sizing helps create handloads that will function in any rifle, not just the one from which the cases were originally fired. The potential downside of full-length sizing is that it may shorten case life because it works the brass more than neck sizing. But it’s possible to “tune” today’s full-length sizing dies so they barely work the brass at all, as this article by Sinclair Reloading Tech Ron Dague shows.
Illustration Shows How a Full-Length Sizing Die Works
Another way to reap the benefits of full-length sizing is to use Redding’s full-length bushing dies, which size the full length of the case but use a system of interchangeable bushings that enable you give the case neck the bare minimum of resizing needed. To see how finely adjustable bushing dies are, and how they resize the case while fully supported, CLICK HERE for Video. The neck bushing helps you precisely control the neck tension to help increase the consistency and accuracy of your handloads.
Small Base Dies
A Small Base Die is another type of full-length sizing die, but one that is typically used when reloading for semi-automatic rifles, like the AR-15, M14, or AR-style .308 rifles. (It may also work well for bolt guns that need extra sizing on the lower section of the case.) A small base die works exactly like a full-length sizing die, only it compresses the brass just a bit more, usually about .001″ more, and may even push the case shoulder back just a hair. Small base dies give that extra bit of compression to the brass to help make sure the case will properly extract from a semi-automatic firearm. The upside is that you get handloads that should work flawlessly in your semi-automatic. The downside is case life may be shortened as compared to brass used only in one bolt-action rifle, because the brass is worked more.
Shoulder Bump Gauges
A handy tool for setting up your full-length sizing dies as close as possible to your rifle’s chamber is a shoulder bump gauge. The bump gauge lets you resize the case as little as possible, to extend case life and help your handloads fit your rifle almost like a neck-sized only die. You use deprimed cases fired in your rifle and bump gauge inserts to help you set up the die so it resizes the case only about .001″ to .004″, depending on what type of rifle you’re shooting.
Video shows how to use a shoulder bump gauge to set up your full-length dies
Article Find by EdLongrange. We welcome reader submissions
There are many products used successfully for case lubrication for case sizing. And for neck-turning a variety of lubricants are favored. The video above explains the basics of case lubrication with die wax, and spray lubricants. Below we mention three products that have proven very effective. For cases that have a close fit to your chamber via custom FL dies, Ballistol works well and is easy to apply and remove. For neck-turning, some of our Forum members have had great success with some automotive lubricants.
Three Good Lubricants You May Not Have Tried Before If you’re using a body die or a full-length sizing die, try using Ballistol (in the aerosol can) as a lube. It works GREAT without the tacky or gooey residue left by most case lubes. It will also clean off carbon residues on the neck as you lube the case. Just spray a little on a cotton patch (or your fingertips) and wipe each case before you run it up into the die. If you are using a steel neck bushing, be sure to wipe the neck as well. You can usually do a half-dozen BR-sized cases before you need to re-apply Ballistol on the patch. Ballistol is non-toxic, bio-degradeable, and will not harm your skin. It is very slippery, but can easily be removed with a rag or paper towel. Try it–you may retire your One-Shot. Ballistol can also be used to protect wood stocks.
Note, for heavy case-forming or necking up case necks, we still recommend a thicker lubricant, such as Imperial Die Wax. But for normal case sizing, after your neck has been expanded, Ballistol will do the job, and you won’t need to tumble the brass afterwards. All you need is a very thin layer of Ballistol, and this easily wipes off with a paper towel.
For Neck-Turning, Try STP Blend or Assembly Lube
For lubing the neck-turning tool mandrel while turning case necks, many folks use a blend of STP® Oil Treatment and Mobil 1 lube. Chuckw2 reports: “Try STP and Mobile 1 Synthetic oil in a 50/50 mixture. Very slick, you will need to tumble your cases after turning.” STP is a very thick lubricant, that flows and clings almost like honey. Jason reports the STP blend comes off easily in an ultra-sound bath, using a bit of detergent. At many retailers, STP is also available in a convenient 7-ounce tube, so you don’t have to buy a large bottle.
Another even cheaper option is assembly lubricant. For turning his case necks, RStreich uses assembly lube from an auto parts store. He notes: “The brand I have is reddish in color and kind of sticky like honey. It’s far better than the Imperial die wax I was using before.” There are a variety of types, both with and without moly additive, and you can select the viscosity you prefer if you sample a few brands. Be sure to clean out any lube residue from the inside of your necks when you have completed your neck-turning.
Have you recently purchased a new scope? Then you should verify the actual click value of the turrets before you use the optic in competition (or on a long-range hunt). While a scope may have listed click values of 1/4-MOA, 1/8-MOA or 0.1 Mils, the reality may be slightly different. Many scopes have actual click values that are slightly higher or lower than the value claimed by the manufacturer. The small variance adds up when you click through a wide range of elevation.
In this video, Bryan Litz of Applied Ballistics shows how to verify your true click values using a “Tall Target Test”. The idea is to start at the bottom end of a vertical line, and then click up 30 MOA or so. Multiply the number of clicked MOA by 1.047 to get the claimed value in inches. For example, at 100 yards, 30 MOA is exactly 31.41 inches. Then measure the difference in your actual point of impact. If, for example, your point of impact is 33 inches, then you are getting more than the stated MOA with each click (assuming the target is positioned at exactly 100 yards).
How to Perform the Tall Target Test
The tall target test determines if your scope is giving you the proper amount of adjustment. For example, when you dial 30 MOA, are you really getting 30 MOA, or are you getting 28.5 or 31.2 MOA? The only way to be sure is to verify, don’t take it for granted! Knowing your scopes true click values insures that you can accurately apply a ballistic solution. In fact, many perceived inaccuracies of long range ballistics solutions are actually caused by the scopes not applying the intended adjustment. In order to verify your scope’s true movement and calculate a correction factor, follow the steps in the Tall Target Worksheet. This worksheet takes you thru the ‘calibration process’ including measuring true range to target and actual POI shift for a given scope adjustment.
NOTE: When doing this test, don’t go for the maximum possible elevation. Do NOT max out the elevation knob, running it to the top stop. Bryan Litz explains: “It’s good to avoid the extremes of adjustment when doing the tall target test. I don’t know how much different the clicks would be at the edges, but they are not the same.”
Tall Target Test For Milrad Scopes with B2B Target
This Precision Rifle Network video shows how to do a scope-tracking test using the pre-printed Sniper’s Hide Tall Target from Box to Bench Precision (B2B). With the primary line divisions in MILs, this printed target is perfect for Milliradian scopes. From bottom of the vertical line to the top there are 10 mils (36 inches) of travel. The markings are high contrast to make the testing easier.
In this video, there are some very helpful tips on setting up the target frame correctly and making sure the Tall Target is perfectly vertical. A plumb line can help. In this video the vertical tracking of a Burris XTR III 5.5-30x56mm scope is tested. Actual testing begins at 7:20 time-mark. The Precision Rifle Network has many other informative videos, with a new video released every week.
Should You Perform a WIDE Target Test Too?
What about testing your windage clicks the same way, with a WIDE target test? Bryan Litz says that’s not really necessary: “The wide target test isn’t as important for a couple reasons. First, you typically don’t dial nearly as much wind as you do elevation. Second, your dialed windage is a guess to begin with; a moving average that’s different for every shot. Whereas you stand to gain a lot by nailing vertical down to the click, the same is not true of windage. If there’s a 5% error in your scope’s windage tracking, you’d never know it.”
Verifying Scope Level With Tall Target Test
Bryan says: “While setting up your Tall Target Test, you should also verify that your scope level is mounted and aligned properly. This is critical to insuring that you’ll have a long range horizontal zero when you dial on a bunch of elevation for long range shots. This is a requirement for all kinds of long range shooting. Without a properly-mounted scope level (verified on a Tall Target), you really can’t guarantee your horizontal zero at long range.”
NOTE: For ‘known-distance’ competition, this is the only mandatory part of the tall target test, since slight variations in elevation click-values are not that important once you’re centered “on target” at a known distance.
AR-platform rifles are fun and versatile, but the standard, mil-spec triggers leave much to be desired. They tend to be gritty, with creep and heavy pull weight. One of the easiest, most effective AR upgrades is a trigger group swap. An improved fire control group makes a huge difference. There are many aftermarket trigger options for the AR platform rifles. Choose single-stage or two-stage, either standard trigger assembly or unitized “drop-in” trigger, such as those made by Timney or Triggertech.
When upgraded with a precision trigger and match barrel, AR-platform rigs work great in NRA High Power competitions (Photo from NRA Blog, at Camp Perry).
Two-Stage vs. Single-Stage Triggers
Two-stage triggers have two separate movements. The first stage offers a light, spring-loaded pressure that works against the shooter’s pull until stopping at the second stage – this is called “take-up”. If there is no spring pressure, it is known as “slack”. Should the shooter continue to pull the trigger once he’s arrived at the second stage, the mechanism will operate like a single-stage trigger from there until engaging the sear and firing the gun. Some shooters prefer a two-stage trigger because it allows a mental preparation (first stage) before the final decision to “break the shot”.
Single-stage triggers feature no take-up or slack, as they begin engaging the sear as soon as the shooter begins pulling the trigger. Some competitive shooters prefer the two-stage trigger because of the feedback it provides during its first stage, while other shooters, including those using their rifle in tactical scenarios, may want the surety of a single-stage trigger, ready to engage and fire once their finger is inside the trigger guard. Regardless of preference, a good trigger will feature minimal creep and should be free of grittiness, providing a smooth, even break.
Drop-In Trigger Assembly vs. Standard Trigger Group
Once you decide between a single-stage or two-stage trigger, you can choose between standard and drop-in trigger groups. Standard trigger groups feature all the fire control group parts separated, and need to be pieced together and installed much like a mil-spec trigger, while drop-in trigger are pre-assembled and contained within a casing that simply drops in to the receiver and accepts the pins, hence the name.
After-Market Trigger Comparison
Some shooters prefer drop-in triggers due to the ease of installation, while others opt for standard groups so they can access the components individually for cleaning adjustment or replacement. If one piece of a drop-in trigger fails, you’ll need to either replace the entire unit or send it to the manufacturer for repair, whereas you may be able to simply replace the broken component of a standard trigger without needing a whole new trigger set.
Trigger Terminology — “Creep”, “Stacking”, “Overtravel”
“Creep” or “travel” is the distance the trigger moves between the end of take-up and when the trigger breaks to fire the fun. Too much creep can affect accuracy, but no creep can be unsafe, as the shooter may not be prepared to fire. “Stacking” occurs when the trigger weight actually increases during travel — this shouldn’t happen. Lastly, “overtravel” is the distance the trigger continues moving back after the gun fires.
This article is based on a longer story in the NRA Blog.


 ShipMyGun.com has a large FFL database, so you can verify the recipient’s address and FFL status. The ShipMyGun.com website has a simple to use label-printing process.


 Neck-sizing dies resize only the neck of the case. The benefit of sizing only the neck is that the brass is “worked” very little, reducing the amount of changes to the brss. [We recommend full-length sizing for all applications after the first couple of firings, and semi-auto brass should be full-length sized every time!] Sinclair recommends that neck-sized-only cartridges should not be used any in other rifle besides the one they were originally fired from [unless they are also FL-sized], or in any action other than a bolt-action.


 If you’re using a body die or a full-length sizing die, try using Ballistol (in the aerosol can) as a lube. It works GREAT without the tacky or gooey residue left by most case lubes. It will also clean off carbon residues on the neck as you lube the case. Just spray a little on a cotton patch (or your fingertips) and wipe each case before you run it up into the die. If you are using a steel neck bushing, be sure to wipe the neck as well. You can usually do a half-dozen BR-sized cases before you need to re-apply Ballistol on the patch. Ballistol is non-toxic, bio-degradeable, and will not harm your skin. It is very slippery, but can easily be removed with a rag or paper towel. Try it–you may retire your One-Shot. Ballistol can also be used to protect wood stocks.
 For Neck-Turning, Try STP Blend or Assembly Lube
 Another even cheaper option is assembly lubricant. For turning his case necks, RStreich uses assembly lube from an auto parts store. He notes: “The brand I have is reddish in color and kind of sticky like honey. It’s far better than the Imperial die wax I was using before.” There are a variety of types, both with and without moly additive, and you can select the viscosity you prefer if you sample a few brands. Be sure to clean out any lube residue from the inside of your necks when you have completed your neck-turning.


 Verifying Scope Level With Tall Target Test


