For many Americans, real incomes have stayed flat in recent years, while inflation has increased the cost of living very significantly in the past four years. Accordingly, it’s important to save money whenever possible. Prices are going up, but wages aren’t following (for most of us). Here are six ways shooters can save money on gear purchases and other shooting-related expenses.
1. Watch for Our Deals of the Week. Every Monday, in our Daily Bulletin, AccurateShooter.com offers some of the best deals to be found. We search the web to find great deals on ammo, reloading components, optics, tools, firearms, gun safes, electronics and more. It’s not unusual to find savings of 20-35% through our Deals of the Week. And many of our vendors are now offering special deals just for AccurateShooter.com readers.
2. Check Out the Forum Classifieds. There are great deals to be found every day in the AccurateShooter Shooters’ Forum. The latest deals are displayed in the right column of every Forum page. To see all the listings, browse through the Forum MarketPlace section which has four main categories:
Guns, Actions, Stocks, & Barrels
Tools, Dies, Rests, Reloading Components & Misc
Scopes, Optics, Sights, Rings, Bases Etc.
Commercial Sales by Paid Sponsors
3. Share a Ride to Matches. Fuel prices are on the rise — regular-grade gasoline is $5.13 per gallon in California now and around $3.54/gallon nationwide. With many shooters living 30-100 miles from the nearest range, fuel remains a big part of a shooter’s hobby budget. We’d say 90% of shooters drive solo to matches, often in large, gas-guzzling trucks. If you drive 200 miles round-trip to attend a match in a 20-mpg vehicle, you’ll burn over $35.40 worth of gasoline on your trip. That adds up. By simply sharing the ride with one fellow shooter you cut your fuel expenditures in half. And, if you alternate vehicles with a buddy from one match to the next, you save on vehicle wear and tear. At $0.58/mile (overall operating costs) consider the savings.
4. Use Discount Codes to Save. It’s always smart to check for discount codes before you buy. In the Daily Bulletin, we feature “Deals of the Week” every Monday morning, and we provide discount Coupon Codes when available. These can reduce the price substantially or lower shipping costs. Search codes for Brownells, Creedmoor Sports, EuroOptic, Graf’s, Midsouth, Powder Valley, Sportsman’s Warehouse, KYGUNCO, MidwayUSA, and Precision Reloading. Check your email also — some discount codes are only announced in email newsletters. If you can’t find a Coupon Code for your preferred vendor, visit Gun.deals and/or RetailMeNot.com. Both those sites list current coupon codes, and RetailMeNot.com covers thousands of vendors.
5. Shop for “Demo” Optics. Modern high-quality optics can easily cost $1500.00 or more, often exceeding the value of the rifle on which they are mounted. However, you can often save 20-30% by purchasing demo optics. These are normally display units used at trade shows. They may have slight ringmarks, but otherwise they are “as new”, having never been carried in the field or used on a rifle that has fired live ammo. When purchasing demo scopes, you should always ask about the warranty before consummating the sale. However, most demo scopes from name-brand manufacturers come with full factory warranties. EuroOptic.com and SWFA.com are two respected vendors that offer a good selection of demo optics.
6. Train with Rimfire Rifles. Good match-grade centerfire, hand-loaded ammo, counting premium bullets, powder, primers, and brass (figuring 10X loads), can now exceed $1.50 per round. And if your $600 (as chambered and fitted) competition barrel is toast after 1500 rounds, add $0.40 for barrel deprecation per shot. So you’re approaching two bucks a round total! By contrast, you can get quite good .22 LR target ammo for under $0.18 per round. Good rimfire barrels last a long, long time, so you don’t have to be concerned about wearing out your barrel quickly. A quality rimfire barrel can retain its accuracy for 7,000 rounds or more. If you run the ballistics, a .22 LR round at 100 yards can emulate the wind drift experienced by a centerfire cartridge at long range. This allows for effective cross-training with much less expensive ammo.
At the request of our readers, we provide select “Deals of the Week”. Every Sunday afternoon or Monday morning we offer our Best Bargain selections. Here are some of the best deals on firearms, hardware, reloading components, optics, and shooting accessories. Be aware that sale prices are subject to change, and once clearance inventory is sold, it’s gone for good. You snooze you lose.
NOTE: All listed products are for sale to persons 18 years of age or older. No products are intended for use by minors.
1. Bullet Central — Bartlein Barrels In Stock
⏺ Avoid the wait — top-tier Bartlein barrels in stock
Getting competition-grade barrels typically requires long waits when ordering from the barrel-makers. But here’s good news — Bartlein Barrels are in stock now at Bullet Central in a wide variety of calibers and profiles. From straight 1.25″ profile to slim tapers there’s a quality Bartlein for most applications.
2. Midsouth — Peterson Brass in Stock with Savings
⏺ Great brass for popular cartridges including magnums
Midsouth now has a large selection of Peterson Brass in stock. Known for consistent quality and wide range of cartridge types, Peterson brass is very popular with hunters, PRS/NRL shooters, and high power competitors. Currently, 20 Peterson brass cartridge types are in stock now at Midsouth including 22 Creedmoor, 6mm Creedmoor, 6.5×47 Lapua, 6.5 Creedmoor, .260 Rem, 7mm-08, 7mm PRC, 28 Nosler, and a wide selection of magnums.
3. Powder Valley — Barnes Bullet Sale
⏺ Save 10% on excellent all-copper varmint and hunting bullets
Whether for hunting or target shooting, Barnes Bullets are quite popular, particularly where lead-containing ammo is prohibited. From all-copper hunting bullets to polymer-tipped competition bullets there’s something for everyone on sale now at Powder Valley. Barnes all-copper TSX bullets are a good option for game hunters who need non-lead bullets.
4. Creedmoor Sports — Redding Boss ProPak Kit, $284.95
⏺ Big discount on single-stage press and tools, 50% Off MSRP
This Boss ProPak combo combines popular Redding products into one neat, money-saving package for reloaders. The Redding Boss ProPak Kit combines a single-stage Redding Boss Press, Beam Scale, Powder Trickler, Case Prep Kit (with brushes), Deburring tool, Powder Funnel, and Case Lube Kit. Get all this for just $284.95, half the MSRP. Just add dies and start reloading.
5. Graf & Sons — Cutting Edge Bullets
⏺ Superb consistency and quality — great for ELR comps and LR hunting
Are you looking for NO-LEAD solids for hunting and ELR? Check out Cutting Edge Bullets at Grafs.com. These are machined from lead-free solid copper bar stock on a CNC swiss lathe. These are high-BC, solid bullets designed for target and hunting use. A unique feature of Cutting Edge Bullets is the patented SealTite™ band — a band slightly larger than caliber diameter around the bullet which was designed to eliminate fliers by preventing gas blow-by.
6. Amazon — Lyman Case Prep Xpress, $159.99
⏺ Great price on excellent 5-station case prep center
The popular Lyman Case Prep Xpress has five stations (with a high torque gear motor) so you can run multiple case prep tools on one machine. This allows you to chamfer cases inside and out, brush case-necks, clean/uniform primer pockets, and ream military crimps. The Case Prep Xpress ships with case neck brushes and multiple tool heads. Included with the machine are: Inside Deburr (VLD) Tool, Primer Pocket Uniformers (Sm/Lg), Primer Pocket Reamers (Sm/Lg), Primer Pocket Cleaners (Sm/Lg), Case Neck Brushes (.25, .30, .38, .45 Cal), and Clean-up Brush. A dump pan provides easy clean up of brass shavings.
⏺ Save $229 on solid hunting optic with good reviews
Need a very affordable yet reliable scope for your hunting rifle? Consider the Burris Fullfield E1 Rifle Scope 3-9x50mm, a real steal for $99.99 ($229 off). This has a handy Ballistic Plex E1 reticle with hold-over marks. The latest Burris Fullfield II riflescopes have upgraded windage/elevation knobs, a new integrated power ring, and an eyepiece that accepts flip-up lens caps.
8. Amazon — Frankford Arsenal Depriming Tool, $39.99
⏺ Convenient tool — no press needed to deprime anywhere
Decapping fired brass can be tedious when using a reloading press and decapping die. Make things easier with the Frankford Arsenal Platinum Series Hand Deprimer Tool. You can deprime cases while watching TV. This handheld unit features an easily removable spent primer catch tube and an assisted-ejection case holder for easy removal of deprimed cases. The handle is spring-loaded to return the deprimer to the start position automatically.
9. Palmetto SA — CMMG Bravo .22 LR Conversion Kit, $169.99
⏺ Save big buck$ by shooting .22 LR ammo in your AR15
Do you own an AR but want to shoot low-cost .22 LR ammo? A good, proven solution is the CMMG Bravo .22 LR AR Conversion Kit. With this kit you can use your AR15 in rimfire tactical matches. The Conversion Kit offers a bolt replacement and comes with three magazines that hold small rimfire rounds while fitting securely in a standard AR15 magwell. This kit is compatible with MIL-STD AR upper receivers.
10. Amazon — Frankford Arsenal Hinged Ammo Box, $2.95 and up
⏺ Compact, durable box with lid that lays flat when open
Frankford Arsenal Hinge-Top Ammo Boxes are now discounted. These see-through boxes are well-made with a good mechanical hinge and secure closure. The hinge design allows the lid to lie flat when open — it doesn’t spring back like some other ammo boxes. These boxes are made from durable, high-density polymer and the boxes can be stacked vertically in your loading room or during transport. NOTE: The $2.95 #509 box holds FIFTY (50) rifle rounds. The Amazon description incorrectly refers to Frankford’s larger #1009 100-rd capacity hinged box which costs $5.99.
With the growing popularity of tactical shooting competitions, unfortunately more and more young males are now suffering from psychological issues, some of which are quite serious. For this reason, the National Institute of Healthe (NIH) recently published an advisory stating that health professionals should watch for worrisome issues that commonly arise with participants in PRS and NRL competitions:
“Notice: Individuals who compete in PRS/NRL activities may exhibit multiple mental and emotional issues. This is related primarily to competition stress and financial anxiety over excessive costs of PRS/NRL participation. We recommend immediate intervention, particularly if the individual is married.”
These PRS/NRL shooters may exhibit “anger, anxiety, and inability to control emotions” warned the NIH. This typically happens after a poor shooting performance or when the individual contemplates the vast sums of money he has spent on PRS/NRL guns, gear, optics and ammo. The anger and anxiety can be most extreme when a competitor is soundly defeated at the range by other shooters with very inexpensive rifles. This can create anger and even lead to violence or worse, suicidal thoughts.
Compulsive Spending Behavior Among PRS/NRL Participants
In addition, the NIH warned that the initial “rush” and thrill of PRS/NRL competition has lead to compulsive spending behavior, similar to a “gambling addiction”. The individual spends more and more money on gear and equipment when there is no good reason to do so and no performance gain. Analysts explain that the very act of shopping and spending provides an addictive brain reaction which can cause PRS/NRL participants to spend more and more money even after they stop shooting matches. The spending becomes compulsive.
Post Range Shooting Disorder — PRSD
Analyzing the behavior and emotions of precision shooters, psychotherapists have adopted a new terminology for the mix of troublesome issues that PRS/NRL competitors exhibit in great numbers. The disturbed condition has been deemed “PRSD” which stands for Post Range Shooting Disorder (PRSD).
PRSD is most acute with PRS/NRL competitors who spend huge sums of money yet perform poorly at matches. The anxiety is increased with young married men who cannot reveal to their spouses the true costs of their precision shooting hobby. That in turn leads to guilt, conflict, and higher rates of divorce.
Psychotherapists have observed multiple symptoms of PRSD among competitive shooters, particularly those who have spent over $5000 on their shooting gear yet regularly get beaten by others with cheap factory rifles. That leads to anger, frustration, and other negative emotions.
Do you know someone with PRSD? Look for these common symptoms and behavior patterns:
1. Lack of control over purchasing and spending
2. Challenged relationships (esp. Wife issues)
3. Inability to control emotions
4. Lack of focus during working hours
5. Negative self-perception and self-loathing
6. Avoidance of certain places (such as ranges where scores were poor)
7. Sleep disturbances and nightmares
8. Making grumpy posts on social media
9. Boredom in reloading room
10. Increased beer consumption
How to Cope with PRSD
Psychotherapists and counselors have found that PRSD can be significantly lessened with conscious, sustained effort over the course of many weeks. They recommend a five-stage plan:
1. Stop buying new tactical rifles and optics, and maxing out your credit cards.
2. If married, give $3 to your wife for every $1 you spend on your gun hobby.
3. Limit monthly PRS/NRL spending to one-half of your rent/mortgage.
4. Stop keeping score at PRS/NRL matches — chill and relax.
5. Get another hobby.
Over the past month, many of the world’s best long range shooters competed in South Africa. First was the South African Open Championship, held March 9-15, 2024 for “Target Rifles”. This was followed by the 32nd World Long Range Championships for Fullbore/Palma rifles, with individual and team competitions held March 16-23, 2024. The World LR Championships event was for “hard-holders”, shooting iron-sighted rifles prone with sling. There were shooters from at least 12 countries: Australia, Canada, Channel Islands, Germany, Great Britain, Japan, Kenya, Ireland, N. Ireland, New Zealand, South Africa, and the USA.
The World LR Championships and the South African Open Championships were held at the Genl De Wet range West of Bloemfontein in South Africa. Conditions were very challenging — with very hot temperatures on the range and challenging winds.
Individual Top 20 Results 32nd World Long Range Championships
Australian Ash Bidgood won the Individual World Championship with an impressive 739-92V score. Great Britain’s Glyn Barnett was a close second (on V-Count) with 739-86V. In third place was another Brit, J.C. Underwood, who tallied 738-78V.
Two Americans finished in the top 15, Brandon Green (733-82V, 8th place) and Amanda Elsenboss (659-59V, 11th place). Both Brandon and Amanda are past USA National Champions who previously served in the U.S. Army and shot with the USAMU Team.
Other Grand Aggregate Divisional Winners include:
Veterans: B. Carter, New Zealand, 661-60V
Ladies: R.L. Furniss, Great Britain, 662-73V
Veterans Over 70: J. Jeffrey, Australia 548-51V
Under 25-21 Age: M. Baily, Australia, 661-84V
Under 21: T. McGowen, USA, 648-61V
Team Results: 32nd World Long Range Championships
1. Australia Total: 7172.996 | Day 1: 3580.474 Day 2: 3592.522
2. Great Britain Total: 7168.1005 | Day 1: 3578.469 Day 2: 3590.536
3. South Africa Total: 7153.869 | Day 1: 3562.405 Day 2: 3591.464 Click HERE for All Team Scores
4. United States Total: 7140.876
5. New Zealand Total: 7030.703
6. Canada Total: 6946.592
7. Germany Total: 6683.465
Team Australia won the Long Range World Championship with leading scores on both days of competition. The Aussies shot well, earning the Gold medal with a 7172.996 total vs. 7159.1004 for the Brits. Team Australia reported on its Facebook page: “We’d like to summarize how the 2024 Palma in South Africa evolved and highlight just how extraordinary it was. World records were repeatedly smashed and, while Australia defended and retained our world championship title earned in 2019, this was only the 4th time Australia has won the Palma since its inception in 1876.”
All four leading teams smashed the old full match Palma record of 7106.825 set by Great Britain in 2015, with Australia setting the new Palma world record with 7172.995. On Day 2, Australia set a new single-day world Team world record of 3592.521. That’s 37 points higher than the previous team record of 3555.424 set by GB in 2015.
The new individual World Record (during team competition) went to Australia’s Brett McCauley with 450-73V — breaking the world record of 449-55V set by Toby Raincock of GB in 2015. And, on Day 2, Great Britain’s Theo Dodds set a one-day individual world record with 225-40V.
USA’s Brandon Green Wins South African Open Championship
Former USAMU shooter Brandon Green topped the field in the South African Open Championship, which took place before the World Championships. Brandon won the SA Open individual title in a dramatic shoot-off. Congratulations to Brandon Green for an impressive come-from-behind victory to win the South African Nationals. Brandon finished with 924-93V, edging out Great Britain’s M.J. Ensor (923-101V) by a single point. Now that’s close!
Photo credit Chris Wheeden, GB Veterans Team
Shooter’s Report from South Africa by Paula Crenshaw
The first week of competition was the South African National Championships which was (for some) a warm-up to the World Long Range Championships. The U.S. National Rifle Team had five teams there. These were: Palma Team, the Veterans Team (those over 60), Goodwill Team, Junior Under 25, and Junior Under 21 teams. Competitions included team competitions and individual competitions.
I was not happy with my performance but I’m not particularly disappointed either. I know what I need to do. My .223 Rem caliber Palma rifle was also not ideal, and I’m eager to shoot my new .308 Win rifle. My Goodwill Team did take second in the Chairman’s Match.
Photo from last day of individual World Championship. The heat was tough.
The entire experience was amazing. It was also incredibly challenging with the heat wave and the winds. My teammates are outstanding people and I met many wonderful fellow shooters from other countries. Shooting while wildebeests and ostriches roamed the range (see above) was … interesting! Captain Bob’s wild dash to get me my forgotten bolt from the hotel was one for the storybooks … and his comment that he’d do it again despite being banned from the range warmed my heart. To my teammates John, Mark, Seth, and our coach Yvonne: Thank you!
The USA women competitors. Right to left: Trudy Fay, Paula Crenshaw, Yvonne Roberts, Kacie McGowan, Amanda Elsenboss, Jessica Hudson.
Here is a cool overhead photograph of the Genl De Wet shooting range outside Bloemfontein, South Africa.
Photo credit Chris Wheeden, GB Veterans Team
About the Long Range World Championship — Rifles and Course of Fire by Paula Crenshaw
Fullbore and Palma are different courses of fire, but both shot with similar rifles. The 87th South African Open Bisley Championships was a fullbore event held March 9-15, 2024. There were individual and team matches. The 32nd World Long Range Championships was a Palma event held March 16-23, 2024. A Palma match is shot at 800, 900, 1000 yards (or 700, 800, 900 meters) and has 15 shots for record at each distance using a .223 Rem or .308 Win (7.62×51) caliber iron-sighted rifle. A Palma rifle is always shot with a sling and iron sights.
Fullbore competition has 2-3 shooters to the mound (except in the USA where sometimes string fire is allowed at 1000 yards), 10 shots (sometimes 15) and shot at 300, 500, 600, 900, 1000 yards (or the equivalent in meters).
The Palma discipline has evolved into the “The World Long Range Championships, Individual and Palma Team Matches”. It has gone through many changes since 1876 and has developed its own set of rules and requirements for target, rifle, and cartridge. The match is now held at 4-year intervals. Teams consist of 16 firing members and two alternates along with a support group of a team captain, adjutant, five coaches, and a non-firing armorer, with total team size not to exceed 26 members. The match in South Africa was shot at 700, 800, and 900 meters.
The Palma is a match of great distinction. While the long range championships include individual matches and a nation’s other teams such as the Veterans teams, Under 25, Under 21, and USA’s Goodwill team, it is the Palma teams that hold the highest honor. The World Long Range Championships culminate with the Palma teams competing from each country. For an excellent detailed history I recommend A History of the Palma Match by Hap Rocketto, first published in 1996 (CLICK HERE FOR PDF).
Photo Credits: Credit top image, range flags image, and Brandon Green Chair image Great Britain Rifle Team. Other images credit Paula Crenshaw, Team USA, Team Australia, Chris Wheeden.
We are now officially in springtime, so the outdoor season will be underway soon. Do you have a good first-aid kit in your vehicle to deal with possible injuries to family members of all ages? For just $20.00 on Amazon you can get an excellent kit from Be Smart/TRI, the #1 maker of First Aid Kits in the USA. Don’t delay, we expect this sale price to go up soon.
TRI’s Be Smart Get Prepared First Aid Kit has 201 items inside a sturdy case with shoulder strap and carry handle. There is also a handy, detachable mini pouch with key essentials for first aid on-the-go. You can easily bring the mini-pouch along on a bike ride or hike.
This multi-purpose First Aid Kit includes:
• 50 – Bandages 3/4 x 3
• 30 – Bandages 3/8 x 1 1/2
• 6 – Bandages Closure
• 3 – Knuckle Bandages
• 1 – Tapes – .5 x 2.5yd Waterproof
• 10 – Cotton Tips – 2.75″”/10 Pack
• 4 – Finger Splints
• 1 – First Aid Guide
• 4 – Gauze Pad – 2 x 2 / 4 ply
• 4 – Gauze Pad – 4 x 4 / 4 ply
• 1 – Gauze Pad – 5 x 9
• 2 – Nitrile Gloves
• 1 – Instant Cold Pack – 5 x 6
To help ensure that outdoor adventures remain safe and trouble-free, the CTD Shooters’ Log has a helpful Essential Summer Survival Guide. This is worth reading before you venture away from civilization.
Here are some highlights of the article with links for MORE INFO:
First Aid Kits for Campers
You should never venture outside without a first aid kit close at hand. While exploring the outdoors, all types of accidents can occur—from cuts, scrapes, and burns to broken limbs and severe allergic reactions.
Basic Survival Skills
Basic survival skills are a necessity if you plan to spend any amount of time outdoors. These five tips, plus a how-to on what to pack in a lightweight, basic survival kit will help if you are ever stuck, lost, stranded or injured in the field.
How to Treat Burns
Fireworks, barbeques and campfires — in the summer we are frequently around fire, which increases our chance of getting burned. A first-degree burn is most likely home treatable, while a third degree burn requires immediate medical attention. Learn how to spot the differences between minor and severe burns.
Creedmoor Sports has recently expanded and updated the Creedmoor Sports InfoZone. This web resource contains valuable information about reloading, rifle maintenance, marksmanship skills, and gunsmithing. In addition, the InfoZone has Competition Reports, numerous Gear Reviews, and general Shooting Sports News.
For this Saturday Showcase, you’ll find five InfoZone Videos hosted by Bill Gravatt, President of Creedmoor Sports. There are over 85 other videos on the Creedmoor Sports YouTube Channel. Bill Gravatt is an expert on reloading processes and gear. He developed many of the popular tools for Sinclair Int’l, and now he directs operations for Creedmoor Sports.
Reloading Procedures with Bill Gravatt
Here are five helpful videos Bill Gravatt created for the Creedmoor Sports InfoZone. These videos cover a variety of essential processes for handloading. In addition Bill Shows how to find the exact twist rate in your rifle barrels.
How to Determine a Barrel Twist Rate
Bill Gravatt of Creedmoor Sports demonstrates an easy method to determine your barrel’s twist rate. Knowing the twist rate is essential to selecting suitable bullets for your discipline.
How to Seat Bullets with Inline Press
Many top Benchrest and F-Class shooters favor inline presses for bullet seating. With good hand dies (such as Wilson) and a inline Arbor press (such as a 21st Century), you can get great results with super seating depth consistency and very low run-out.
How to Trim Cases with L.E. Wilson Trimmer
There are many ways to trim cartridge brass. If you need to trim hundreds of cases it may pay to have a dedicated power trimmer. However, for most rifle shooters, a good hand trimmer will do the job very well. We regularly use a Wilson trimmer to trim our cases, as demonstrated in this video.
How to Clean Cartridge Cases
It is important to regularly clean cartridge brass. There are many different means. Wiping the outside with a solvent is a good start. For more thorough cleaning inside and out tumbling or wet-tumbling will do the job. After tumbling in media, you should always check the primer pockets and flash holes before loading.
How to Clean Reloading Dies
Cleaning your reloading dies is something that many who reload often neglect. In this 60-second Tech Tip, Bill Gravatt provides some tips on cleaning your reloading dies.
BONUS Video: How to Fine Tune Seating Depth
Now that you’ve learned Reloading Basics from the Creedmoor Sports videos, here’s a great video from our friend Keith Glasscock that will help you get optimal results when seating bullets. Keith is one of America’s greatest F-Class competitors, with multiple podium finishes at F-Class National Championships. With over 213,000 views, this is the most popular video Keith has created for his Winning in the Wind YouTube Channel.
About Creedmoor Sports — 45 Years of Service to Marksmen
For the past 45 years, since 1979, Creedmoor Sports has been supplying quality equipment and supplies to avid shooters in a wide variety of disciplines: Rimfire, F-Class, PRS/NRL, Silhouette, Service Rifle, Benchrest, and more. Specializing in competitive centerfire, smallbore, and air rifle accessories, as well as reloading components and tools, Creedmoor Sports seeks to provide its customers with the right gear to help them achieve their personal shooting goals.
Today is Good Friday and Easter will be celebrated Sunday, March 31, 2024. In connection with this Easter weekend, many companies are currently offering Easter-themed discounts and promotions. Here we list some of the top bargains and discounts you can get.
There is a good list of Easter Weekend Sales on the PewPewTactical.com website. You’ll find a selection of ammo bargains for .22 LR, 9mm Luger, .223 Rem/5.56, and Shotgun Ammunition.
Now through Monday, April 1st at 12:00 pm Central Time, you can get FREE Ground Shipping on all Creedmoor Sports purchases over $99.00. Use CODE EASTER24. NOTE: Certain exclusions apply.
Palmetto State Armory Easter Deals
Palmetto State Armory is running a pretty big Easter-themed sale. You’ll find complete AR-15 Blem lower starting at just $149.99, major discounts on S&W, SIG Sauer, and Taurus handguns, plus significant discounts on a wide variety of major-brand optics.
Brownells Discount Codes for March 2023
For the month of March, Brownells has three special discount codes. These codes can save you up to 15% on a major purchase:
$20 Off Orders $200+. Use Code MARCH20
$55 Off Orders $500+. Use Code MARCH50
$152 Off Orders $1000+. Use Code MARCH120
In addition, there are other current Brownells Discount Codes running which may be available for longer periods (no specific expiration date — may end soon).
10% OFF $150+. Use Code TTB10
$10 Off $100+. Use Code GIFT10
15% OFF Select Optics. Use Code OPTICS15
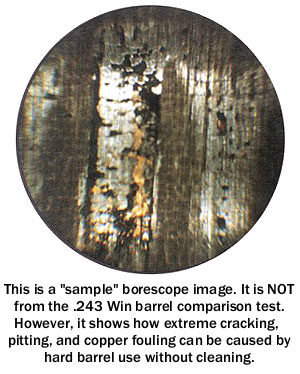
Can sustained rapid-fire shooting with no cool-down period wear out a quality barrel more quickly? The answer is “Yes” according to Forum member LCazador, who did an interesting comparison test with two .243 Winchester barrels. He started off with two, identical, match-grade HV taper stainless barrels. Both were NEW at the start of testing, and LCazador shot the same load through each: 95gr match bullets with 38 grains of Hodgdon Varget. After giving both barrels the same, gentle 20-round break-in, 300 rounds were then fired through each barrel — in very different ways. Barrel condition and wear were monitored with a borescope.
Barrel One — Slow Fire, Cool Down Periods, Cleaning Every 50 Rounds
At the end of the 300-round test, Barrel One looked brand new. There was none of the severe fire cracking found in Barrel Two. This barrel was shot no more than 10 times without a cool down and firing was done at a much slower pace. Cleaning for this barrel was done every 50 shots.
Barrel Two — Fast Firing, No Waiting, Cleaning Every 100 Rounds
The second barrel, which received hard use and minimal cleaning, was severely damaged with severe fire cracking at the leade and throat. As a result, the barrel had to be re-chambered. This barrel was shot 100 rounds at time without cleaning and was shot up to 20 times in succession without a cool down.
LESSON LEARNED — Heat Kills Barrel Life
Don’t let your barrel get too hot, and keep it clean. One afternoon can ruin a barrel!
Monitoring Barrel Wear with Borescope
Some folks worry too much about what their borescopes reveal — many barrels do not have to be “squeaky clean” to perform well. In fact some barrels run better after ten or more fouling shots. However, a borescope can be very helpful when your barrel starts losing accuracy for no apparent reason. Forum member FdShuster writes:
“A borescope is a positive way of backing up your suspicions when the rifle starts to throw an occasional (soon followed by more frequent) wild shot. Using the scope is also an excellent way to determine that the cause is barrel wear and not simply a need for a concentrated cleaning session to remove built up copper and more importantly, carbon fouling.
I’ve had a few barrels that gave every indication of being shot out. But I ‘scoped them out and found the cause to be nothing more than requiring a good cleaning. They then returned to their usual performance. There’s no guessing involved when you are able to get ‘up close and personal’ using the scope. The borescope also provides an excellent view of the all-important condition of the crown. My borescope is one of the most valuable investments I’ve ever made.”
by Sierra Bullets Ballistic Technician Paul Box This cartridge was introduced by Winchester in 1935 in their model 54 rifle. A year later, it was added as a standard cartridge in the model 70. What might not be common knowledge to some reloaders is that the prototype for the Swift was developed in 1934-35 by Grosvenor Wotkyns by necking down the 250 Savage case, but in the end, Winchester chose the 6mm Lee Navy case for the foundation for this cartridge.
This cartridge was far ahead of its time and for that reason it received a lot of bad press. We’ve all read the horror stories through the years. Many of those stories were just simply repeated from previous articles even the wording was just slightly different. So how bad was the Swift? Let’s take a deeper look.
Some of the early Swifts had soft barrel steel and some of the rare ones even had barrels that were .223 in bore size. This stemmed from the fact that the .22 Hornets prior to the end of World War II were .223 in bore size and some of these barrels were chambered in the Swift. It was rumored that the Swift peaked in pressure far too quick. I’ll bet they did with a turkey extra full choke barrel.
Burn rates of powders were limited at that time as well, so the Swift was limited in its true ability due to that. It was almost like building a funny car for drag racing when only kerosene was available.
One of the longest lasting black eyes was that it shot barrels out so fast. If you get the barrel branding iron hot and fail to clean it often this can happen. Common sense will go a long ways here. Keep the barrel as cool as you can and properly clean it every fifteen rounds or less will go a long way to improving accuracy life of a Swift.
So what is the real truth about this cartridge? I’m glad you ask. I’ve been shooting the .220 Swift for over 43 years now. It is one of the best varmint cartridges I’ve ever owned. It is not hard to load for, it doesn’t suddenly peak in pressure and it isn’t the barrel burner that you’ve heard. Hodgdon powders once reported a Remington 40-X with over 3,000 rounds of full power loads averaged .344” for five, 5-shot groups. My findings have been the same. It isn’t as hard on barrels as it has been made out to be.
I’ve also read that down loading it slightly will help in barrel life. This is true, but if you buy a thoroughbred you want him to run. Barrels are threaded on the end for a reason. If you have enough fun to shoot out a Swift barrel, just rebarrel it.
The bottom line is enjoy the .220 Swift for what it was meant to be. The popularity of the Swift has slipped in the last twenty years and few factory rifles are now available in this caliber. There is no reason for this and I know the Swift will always have a strong and loyal following.
PMA Tool offers lightweight yet sturdy cleaning cradles that are handy, affordable, and easy to transport. PMA’s popular single-gun cradle, priced at $99.95, is ideal for benchrest and F-Class rigs. It measures about 17″ in length and weighs about one pound. You can choose among 2.25″, 3″, 4″, 5″, and 6″-wide saddles (U-shaped padded supports) to match your forearm width.
PMA also offers an excellent double cradles for $149.95. These twin cradles have 2.5″, 3″, or 4″ saddles, or a combo of 3″ / 2.25″ front saddles. All these cradle types secure your rifle(s) in a muzzle-down position that allows easy cleaning and prevents solvents from running back into the action. The front saddles and all contact surfaces are covered by thick silicone rubber padding which grips the rifle securely yet protects the stock and components from scratches.
These cradles are most commonly sold with a 3″-wide front saddle for Benchrest and F-Open style stocks, or a 2.25″-wide front saddle for rifles with narrower fore-ends such as those found on F-TR, Hunter Class, and varmint stocks. In addition, you can get 4″-wide, 5″-wide, and even 6″-wide saddles for the big, long range benchrest rifles.
Double Rifle Cradle is a Smart, Versatile Design
PMA’s double rifle cleaning cradle was was designed from the ground up to work perfectly for two rifles side-by-side. Using the same tie bar and protective saddles found on the single cradel, PMA widened the base and created new uprights to support the saddles, making the cradle as narrow and light as possible, while retaining all the protective and non-slip features from our single unit.
This PMA Tool double cradle unit is available with twin 3″ front saddles, double 2.5″ front saddles or combination 3″ / 2.25″ front saddle configurations to accommodate different classes of benchrest rifles.


 2. Check Out the Forum Classifieds. There are great deals to be found every day in the AccurateShooter Shooters’ Forum. The latest deals are displayed in the right column of every Forum page. To see all the listings, browse through the Forum MarketPlace section which has four main categories:
 3. Share a Ride to Matches. Fuel prices are on the rise — regular-grade gasoline is $5.13 per gallon in California now and around $3.54/gallon nationwide. With many shooters living 30-100 miles from the nearest range, fuel remains a big part of a shooter’s hobby budget. We’d say 90% of shooters drive solo to matches, often in large, gas-guzzling trucks. If you drive 200 miles round-trip to attend a match in a 20-mpg vehicle, you’ll burn over $35.40 worth of gasoline on your trip. That adds up. By simply sharing the ride with one fellow shooter you cut your fuel expenditures in half. And, if you alternate vehicles with a buddy from one match to the next, you save on vehicle wear and tear. At $0.58/mile (overall operating costs) consider the savings.
 4. Use Discount Codes to Save. It’s always smart to check for discount codes before you buy. In the Daily Bulletin, we feature “Deals of the Week” every Monday morning, and we provide discount Coupon Codes when available. These can reduce the price substantially or lower shipping costs. Search codes for Brownells, Creedmoor Sports, EuroOptic, Graf’s, Midsouth, Powder Valley, Sportsman’s Warehouse, KYGUNCO, MidwayUSA, and Precision Reloading. Check your email also — some discount codes are only announced in email newsletters. If you can’t find a Coupon Code for your preferred vendor, visit Gun.deals and/or RetailMeNot.com. Both those sites list current coupon codes, and RetailMeNot.com covers thousands of vendors.
 5. Shop for “Demo” Optics. Modern high-quality optics can easily cost $1500.00 or more, often exceeding the value of the rifle on which they are mounted. However, you can often save 20-30% by purchasing demo optics. These are normally display units used at trade shows. They may have slight ringmarks, but otherwise they are “as new”, having never been carried in the field or used on a rifle that has fired live ammo. When purchasing demo scopes, you should always ask about the warranty before consummating the sale. However, most demo scopes from name-brand manufacturers come with full factory warranties. EuroOptic.com and SWFA.com are two respected vendors that offer a good selection of demo optics.
 6. Train with Rimfire Rifles. Good match-grade centerfire, hand-loaded ammo, counting premium bullets, powder, primers, and brass (figuring 10X loads), can now exceed $1.50 per round. And if your $600 (as chambered and fitted) competition barrel is toast after 1500 rounds, add $0.40 for barrel deprecation per shot. So you’re approaching two bucks a round total! By contrast, you can get quite good .22 LR target ammo for under $0.18 per round. Good rimfire barrels last a long, long time, so you don’t have to be concerned about wearing out your barrel quickly. A quality rimfire barrel can retain its accuracy for 7,000 rounds or more. If you run the ballistics, a .22 LR round at 100 yards can emulate the wind drift experienced by a centerfire cartridge at long range. This allows for effective cross-training with much less expensive ammo.


 Monitoring Barrel Wear with Borescope
 This cartridge was introduced by Winchester in 1935 in their model 54 rifle. A year later, it was added as a standard cartridge in the model 70. What might not be common knowledge to some reloaders is that the prototype for the Swift was developed in 1934-35 by Grosvenor Wotkyns by necking down the 250 Savage case, but in the end, Winchester chose the 6mm Lee Navy case for the foundation for this cartridge.


