Summer is coming soon, and temperatures are starting to heat up. We are already seeing unseasonably hot conditions in many areas of the country. You never want your barrels to get too hot, which can happen more quickly in summertime. Accuracy suffers when barrels over-heat, and excessive heat is not good for barrel life. So how do you monitor your barrel’s temperature? You can check if the barrel is “warm to the touch” — but that method is not particularly precise. There is a better way — using temperature-sensitive strips. McMaster.com (an industrial supply house) offers stick-on temp strips with values from 86° F to 140° F. A pack of ten (10) of these horizontal strips (item 59535K13) costs $14.06. That’s a mere $1.40 per barrel for strips — cheap insurance for your precious barrels. For best barrel life, you should try to keep your barrels under 120 degrees F.
NOTE: On the McMaster.com website, you’ll need to scroll down to the multi-use “Temperature Indicating Labels”. Then click on the horizontal label and select item 59535K13, as shown below.
Forum member Nomad47 says: “I have temperature strips (bought at McMaster-Carr) on all my barrels. I try not to shoot when the barrel gets to 122 degrees or higher[.]” Here are photos of the McMaster-Carr temp strips on Nomad47’s customized Savage.
Creedmoor Sports now offers handy Temp Strips, with 3-packs for $12.95. These have colored temp range markers so you can quickly see if your barrel is getting too hot. Creedmoor Sports notes: “The temperature range of 30-160° spaced in 10° increments fit most … shooting situations. The 1″-wide 6″-long LCD strip will provide many years of service. In general, we recommend that if a barrel begins to reach 140°, it is too hot and continuing to shoot at these temperatures accelerates barrel wear These barrel temperature strips use a 3M® adhesive and will stick to blued, parkerized and stainless barrels.”
Bad things can happen if your barrel gets too hot. First, with some barrels, the point of impact (POI) will shift or “walk” as the barrel heats up excessively. Second, even if the POI doesn’t change, the groups can open up dramatically when the barrel gets too hot. Third, if the barrel is very hot, the chamber will transfer heat to your loaded cartridge, which can lead to pressure issues. Finally, there’s considerable evidence that hot barrels wear out faster. This is a very real concern, particularly for varmint shooters who may shoot hundreds of rounds in a day. For this reason, many varminters switch among various guns, never letting a particular barrel get too hot.
Neconos.com offers BAR-L Temp Strips that visually display heat readings from 86 to 140 degrees. Think of these strips as compact, unbreakable thermometers that monitor barrel heating.
Put a strip on the side of the barrel and the barrel’s temp will be indicated by a stripe that changes from black to green. There is also a “general purpose” strip that reads to 196 degrees (see bottom row). The Benchrest model strip (86°F to 140°F) is in the middle. These Bar-L temp strips cost $12.70 each, or $25.00 for a 3-pack.
NOTE: These strips can be permanently fixed to the barrel with the heavy-duty clear plastic tape strip provided with the BAR-L Temp strip.
Precision Rifle fans should watch Shooting USA this week. On Wednesday, May 17, 2023 Shooting USA offers a special edition devoted to the 2022 Armageddon Gear AG Cup Invitational. The AG Cup posts the biggest cash money match in Precision Rifle Competition. It’s an elimination format shot over three days of challenging competition on stages of fire created at K and M Precision’s ranges in West Tennessee. Match organizer, Tom Fuller joins John Scoutten to narrate the action and the award of the cash in extended coverage of the match.
This video shows highlights from the 2022 AG Cup, with many stages illustrated.
It’s the fourth year for the richest rifle tournament in the world. The AG Cup is the brainchild of Tom Fuller, the owner of Armageddon Gear, and to say it’s a success is a bit of an understatement. $75,000 in prize money was up for grabs, with a huge cash prize for the overall matche winner.
Shooting USA runs on the Outdoor Channel Wednesdays 9:00 PM Eastern and Pacific, 8:00 PM Central.
No Outdoor Channel on cable? Then you can subscribe to Stream the Broadcast on the internet.
During this week’s Shooting USA special, John Scoutten and Armageddon Gear’s Tom Fuller report the action and interview top precision rifle shooters. The Grand Prize of $20,000 was awarded for the best overall score, based on accuracy and time. There were also substantial cash prizes for each stage winner.
This 2022 AG Cup video has good footage of the stages and views downrange.
Arena Training Facility — 2300 Acres
The 2300-acre Arena Training Facility is a premier shooting facility with multiple shooting ranges from 50m to 2100m. Arena’s 1000-yard covered Known Distance range offers multiple benches, steel and paper targets out to 1000 yards. On Arena’s UKD (unknown distance) range shooters can engage steel out to 2300 yards. This 2100m UKD range boasts a 3-Story Shooting Tower, Air-Conditioned Shoot House, and multiple Positional Challenges.space.
Armaggedon Gear — Tactical Accessories Armageddon Gear, founded by former U.S. Army Ranger Tom Fuller, sells support bags, gun cases, slings, suppressor covers, scope covers, and a wide variety of other accessories popular with the PRS/NRL crowd. Armageddon Gear now provides products to the U.S. Military, Law Enforcement, as well as PRS/NRL competitors.
If you are looking for a modern, extremely powerful semi-auto pistol, you may want to consider the new S&W Performance Center M&P 10mm M2.0 pistol. This boasts a long 5.6″ barrel for extra velocity. The barrel is also ported for reduced muzzle flip and less perceived recoil. The gun would be a very powerful defensive pistol and S&W says it can serve well for hunting.
Smith & Wesson states: “The new Performance Center 10mm was conceived with both the hunter and target shooter in mind. The goal was to build upon the M2.0 10mm series, with the intention of having reduced felt recoil and quicker follow-up shots. Popular features previously seen on other 5.6-inch PC pistols are present in this design and, when paired with the flat-shooting 10mm Auto cartridge, provide the end user a total package for hunting, self-defense, or at the range.”
Building off the success of the M&P 10mm M2.0, Smith & Wesson incorporated new features designed to increase the new Performance Center 10mm pistol’s performance. Chambered in 10mm Auto, this new full-size polymer handgun boasts a ported 5.6-inch barrel to reduce muzzle rise, optic-height tritium night sights for a clear sight picture in low-light conditions, and a Performance Center-tuned flat M2.0 trigger with a crisp break and audible reset.
The new Performance Center 10mm slide is cut for optics and ships with Smith & Wesson’s C.O.R.E. plate system, two 15-round magazines, and four interchangeable palmswell grip inserts. This pistol is made in the U.S.A. and has an MSRP of $749.00.
At the request of our readers, we provide select “Deals of the Week”. Every Sunday afternoon or Monday morning we offer our Best Bargain selections. Here are some of the best deals on firearms, hardware, reloading components, optics, and shooting accessories. Be aware that sale prices are subject to change, and once clearance inventory is sold, it’s gone for good. You snooze you lose.
NOTE: All listed products are for sale to persons 18 years of age or older. No products are intended for use by minors.
⏺ Hard to beat SFP scope at this price — great glass
Here’s a great deal on an excellent ZEISS 6-24x50mm SFP optic, with 1/4 MOA clicks, and handy Z-MOA1 reticle. The glass is exceptional — at the $849.99 sale price, you’ll be hard to beat the quality of this scope. It is a great choice for varmint work and club matches. Here are actual purchaser reviews: “Excellent, A++, Clear glass”; Awesome clarity and the adjustments are spot on — Zeiss V4 scopes are hard to beat for the money”; “Great mid-level scope. Clear Glass with a good no nonsense reticle and easy to operate turrets”.
2. Midsouth — 1500 Fiocchi Small Rifle Primers, $129.99
⏺ High quality primers in bigger quantity 1500 pack
You may not have tried Fiocchi primers before, but these are effective and very reliable. These primers are manufactured on modern equipment using the best available materials. Folks, please note, this is for 1500 (one thousand five hundred) primers. Fifteen hundred. Nearly all other primer sellers ship packs of 1000 primers. So you get 50% more than normal. This is the equivalent of $86.66 for 1000 primers — a very good deal these days. NOTE: They are somewhat harder than average and work well for military firearms with floating firing pins.
3. Precision Reloading — Wilson Products Sale Through 5/18/22
⏺ Great products with good discounts, but act soon, sale ends 5/18/23
We highly recommend Wilson products. This editor uses a Wilson case trimmer and Wilson micrometer inline seating dies. They work great. Right now you can get significant savings on ALL Wilson products at Precision Reloading. Save on Case Trimmers, Seating dies, case gauges, bushings, deburring tools, as well as combo tool/die kits.
⏺ Great Deal — 20% Off reloading kit with 500 free bullets and free shipping
Here’s an excellent reloading package with everything you need to start handloading cartridges. And right now you can save 20% and get free shipping. With this Hornady Lock N Load Deluxe Classic Reloading Kit you get the Classic single-stage press, powder measure with stand, digital scale, hand priming tool, OAL gauge tool, calipers, loading block, bullet release “hammer”, powder trickler, funnel, chamfer/debur tool, shellholder pack, die bushings, lock rings, Hornady Reloading Manual and much more. Folks, this is a great bargain at $319.99! The same Hornady L-N-L Classic Press Kit is $369.97 on Amazon, fifty bucks more. Plus you get 500 FREE bullets from Hornady with the purchase of this kit.
5. MidwayUSA — Leupold 12-40x60mm HD spotter, $1199.99
⏺ Big discount on very good spotter for hunters and field shooters
Here is an excellent spotting scope for hunter and tactical shooters who have to carry lots of gear in the field. This Leupold 12-40x60mm HD spotter is compact and relatively light weight. The prism-less Folded Light Path (FLP) system uses mirrors to compress a long optical system into half its typical length. And this scope has great glass with best-in-class eye relief. Right now save $300.00 on this spotter. NOTE: This is a factory-refurbished item that may have a slight blemish, but it comes with the full lifetime Leupold warranty.
Here’s a patriotic, American-Flagged theme rimfire starter rifle for a junior marksman in training. Right now KYGUNCO has the Keystone 2d Amendment Crickett Precision .22 LR Rifle, complete with scope and bipod, for just $392.99. Plus, Keystone is offering a $75 factory rebate through 5/31/2023. That lowers your net cost to $317.99. If you don’t need the scope or bipod you can also get the basic Crickett Precision Rifle in Flat Dark Earth for $292.99, or $217.99 after the $75.00 rebate. These rifles feature adjustable cheekpiece and adjustable LOP with spacers. REBATE Details.
⏺ Very handy conversion — shoot .22 LR with your AR15
Save money when training with your AR15 by using this CMMG AR15 .22 LR Conversion Kit. You get a complete new rimfire bolt mechanism plus three (3) magazines that fit .22 LR cartridges. Right now this kit is on sale at Brownells for $179.99. Then use Brownells Code CART20 during check-out to lower the net cost to just $159.99. That’s a great deal. You can get decent .22 LR ammo for under ten cents a round. Centerfire .223 Rem ammo can easily cost $0.50 per round (or more), so this kit will pay for itself after just 400 rounds. CMMG recommends Federal 36gr plated round-nose ammo for best performance.
8. Graf & Sons — CCI .22 LR Ammunition from $3.99/50
⏺ Quality CCI .22 LR ammo in stock at very good prices
With the growth of NRL22, PRS 22, and rimfire F-Class, more and more shooters are competing with rimfire rifles. And with action steel matches, rimfire pistol shooting is hugely popular these days. Thankfully, its still possible to get good rimfire ammo at reasonable prices. At Graf’s you’ll find good CCI .22 LR ammunition starting at just $0.08 (eight cents) per round. CLICK HERE for CCI .22 LR Deals.
Florida Governor Ron DeSantis has signed Florida SB 214, a law that bars credit card companies from implementing a special Merchant Category Code (MCC) for credit card purchases at firearm retailers. This new Florida law will esure that the privacy of customers at firearm retailers remains protected and is not collected to be used in an illegal backdoor firearm registry.
“Governor DeSantis is standing up against a ‘woke’ initiative … to use lawful private transactions as a means to usher in gun control,” said Lawrence G. Keane, NSSF Senior Vice President and General Counsel. “No law-abiding American should be subjected to having their name and financial data being added to a government-accessible watchlist simply for exercising their Second Amendment right to keep and bear arms. Governor DeSantis is ensuring that Floridians won’t be held captive by the radical ‘woke’ antigun agenda that seeks to weaponize credit cards in gun owners’ wallets against them.”
Florida’s SB 214 will ensure that the names of law-abiding firearm owners are not illegally recorded on a list or registry. The law also prohibits a payment settlement entity, merchant acquiring entity or third party settlement organization from assigning a MCC classifying a merchant as a seller of firearms or ammunition. And SB 214 authorizes the Florida Dept. of Agriculture and Consumer Services to investigate alleged violations of the law.
BACKGROUND: In late 2022, the International Organization for Standardization (ISO) announced it would create a unique MCC, at the behest of Amalgamated Bank, which has been described as the Left’s Private Banker, that would allow credit card companies to monitor transactions at firearm retailers. Credit card companies suspended plans to implement the use of unique firearm retailer MCCs after significant opposition by NSSF and several state governments.
Idaho, Mississippi, and West Virginia Have Passed Similar Legislation
Florida joins West Virginia, Mississippi and Idaho in enacting laws to protect firearm purchasers’ privacy when using credit cards at firearm retailers. Legislation similar to Florida’s law is pending in Congress.
Fighting Back — 24 State Attorney Generals Oppose New Code
The Attorney Generals (AGs) of 24 states have sent letters to Credit Card company CEOs requesting elimination of the new Merchant Category Code (MCC) for gun stores being implemented by Visa, Mastercard, and American Express. These AGs of 24 states stated their intent to “marshal the full scope of our lawful authority” to block the use of the new Code to be applied to gun and gun-related sales.
The AGs sent a letter last week to the CEOs of American Express, Mastercard, and Visa. The AGs explained that the Code could be misused and lead to a de facto gun registry: “Creating and tracking this data only matters if your institutions are considering using that information to take further, harmful action—like infringing upon consumer privacy, inhibiting constitutionally protected purchases by selectively restricting the use of your payment systems, or otherwise withholding your financial services from targeted ‘disfavored’ merchants.” READ MORE.
The AGs added that the Code would not be able to distinguish between actual firearms sales vs. hunting/outdoor accessories, leading to problems for consumers: “This categorization would not recognize the difference, for example, between the purchase of a gun safe and a firearm. Nor would it capture firearm purchases made at department stores, resulting in arbitrarily disparate treatment of ‘gun store’ merchants and consumers.”
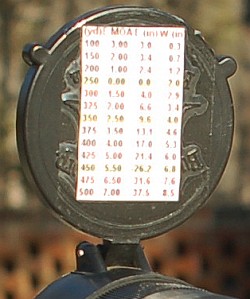
Tactical competitor Zak Smith stores his elevation and wind drift data on a handy laminated data card. To make one, first generate a come-up table, using one of the free online ballistics programs such as JBM Ballistics. You can also put the info in an Excel spreadsheet or MS Word table and print it out.
Above is a sample of a data card. For each distance, the card includes drop in inches, drop in MOA, drop in Mils. It also shows drift for a 10-mph cross wind, expressed in inches, MOA, and mils. Zak explained that “to save space… I printed data every 50 yards. For an actual data-card, I recommend printing data every 20 or 25 yards.” But Zak also advised that you’ll want to customize the card format to keep things simple: “The sample card has multiple sets of data to be more universal. But if you make your own data card, you can reduce the chance of a mistake by keeping it simple.”
Once you have the card you can fold it in half and then have it laminated at a local office store or Kinko’s. Keep this in your pocket, tape it to your stock, or tie the laminated card to your rifle. If you regularly shoot at both low and high elevations, you may want to create multiple cards (since your ballistics change with altitude). To learn more about ballistic tables and data cards, check out the excellent “Practical Long-Range Rifle Shooting–Part 1″ article on Zak’s website.
Scope-Cover Mounted Ballistics Table
Another option is to place your ballistics card on the back of the front flip-up scope cover. This set-up is used by Forum member Greg C. (aka “Rem40X”).
With your ‘come-up’ table on the flip-up cover you can check your windage and elevation drops easily without having to move out of shooting position.
Greg tells us: “Placing my trajectory table on the front scope cover has worked well for me for a couple of years and thought I’d share. It’s in plain view and not under my armpit. And the table is far enough away that my aging eyes can read it easily. To apply, just use clear tape on the front objective cover.”
The 22BR cartridge is viewed by many as primarily a varmint round. However, with modern, high-BC bullets, it offers excellent long-range performance. With high-BC 80-95gr .22 caliber bullets, the 22BR can excel in a variety of shooting disciplines. Here we feature the Tubb 2000 rifle of Clint Greenwood. Clint did his load testing with the 90gr JLK (Jimmy Knox) VLDs, but now the new Sierras promise to rival the performance of the JLKs with readily-available factory bullets. That’s good news for long-range shooters since we’re told Jimmy is retiring from the bullet-making business.
A ‘New Twist’ on the Tubb 2000
A few seasons back, Texan Clint Greenwood let us know about a 22BR project he had in the works. We were intrigued by the potential of 90gr bullets in this cartridge. Clint reports: “I got involved with the 22BR after working with its parent case, the 6mm BR Norma. I became interested in the 6BR about three years ago. I had read everything I could find concerning the 6BR, particularly several of Larry Bartholome’s Precision Shooting articles. I was convinced that I just had to have a 6BR, so I took a Rem 700 short action that I had and sent it off to Greg Tannel for some work. While waiting for the rifle to return, I succumbed to the fever and purchased a Tubb 2000, also in 6BR. Both of these rifles were outstanding. It was harder to find a load that didn’t work in the 6BR than to find one that did.
I devote most of my shooting time to High Power XC, but shoot the occasional prone match. My home club was constructing a 1000-yard range and would shortly begin shooting monthly 1000 prone matches. I had originally planned to shoot one of my 6BRs in the prone matches, but a friend that I shoot with, also a 6BR fan, had recently built a bolt-gun in 22BR, and was really pleased with it. We talked at length about his rifle. He had Dave Kiff grind a reamer that would allow him to neck down Lapua 6BR brass to 22 BR and not have to neck turn. His rifle was barreled with a 7.7-twist Kreiger, and he was having great success shooting the 80 Sierra MK across the course.
Better BC for Service Rifle Competition I am primarily a Service Rifle shooter, shooting an AR. Being aware of the self-imposed limitations of shooting the AR Service Rifle, particularly at long range, I had always endeavored to gain every advantage for myself. When the .224 90gr Jimmy Knox (JLK) VLDs came out… I jumped on the bandwagon with a passion. I was easily able to obtain 2750 FPS with the 90 out of the tiny .223 case using VV N540, moly and CCI 450 primers. This familiarity with the quirks of the 90 JLK led me to build my wife a prone rifle in .223.
I had John Holliger chamber a 30″ PacNor in 1:6.5″-twist for the rifle. John Holliger is absolutely the guru for 6.5-twist barrels, having pioneered them. I have had a half-dozen 6.5-twist PacNors that John has done, and every one has been a hummer. Using the 30″ barrel, I was able to push the 90gr JLK to 2900 FPS with no problems. The 90gr JLK’s BC has been listed from .560 to .590, and pushing it at 2900 fps, it was obvious that, as far as a .22 was concerned, the 90gr JLK was the best wind-bucking bullet [available at the time]. [Editor’s NOTE: There are now other high-BC .22 caliber bullets from Berger, Lapua, and Sierra].
Several factors converged at once to finally turn on the dim 10-watt bulb in my head. I had a large supply of Lapua 6BR brass, several thousand 90gr JLKs, a friend with a 22BR reamer for loan, and a gunsmith that really knew his way around 6.5 twist PacNor barrels who also made T2K barrels. I was doomed! Holliger chambered a 30″ 6.5-twist PacNor for my T2K, using my friend’s reamer. I was busy getting tooling ready. When the barrel arrived, I removed the 6BR barrel off of my T2K, and screwed the 22BR barrel on.”
22BR Cartridge Basics
The 22BR is a simple wildcat formed by necking-down 6mm BR brass. Case forming is easy — just run a 6BR case through a 22BR sizing die. With custom bullets, the 22BR has done well in NBRSA short-range Benchrest. Accuracy is on a par with 6mm BR out to about 250 yards, but from there, the 6mm VLDs, with their high BCs, buck the wind better. The 22BR with 90gr bullets offers very impressive ballistics, with less recoil than you might experience shooting a 6BR or 6mm Creedmoor with 105-110gr projectiles.
Forming the 22BR Case
Forming 22BR brass is not complicated. Starting with 6mm BR cases from Peterson or Lapua, you simply run the case through a 22BR full-length sizing die. Be sure to outside-chamfer the case mouths first and lube the case necks and body.
To reduce run-out, half-way through the stroke back out the case and rotate it a half-turn. Then finish by running the case all the way up into the FL die. You can also use a bushing neck-sizing die, but it goes more smoothly if you use an intermediate bushing, then do a second pass with your final bushing. (Or, if you have a Redding 22BR die, using it first will reduce the neck enough to finish with a single bushing.) Using a full-length sizing die is the better method, as the bushings tend to push brass down to the neck-shoulder junction (NSJ). With either method we suggest you run a mandrel down the necks after necking down, and neck-turn the last .050″ or so of the neck and slightly up into the shoulder. This will remove any bulge at the NSJ, and help prevent doughnut formation. And remember to load a few dummy cases before you spec the neck diameter for your reamer to ensure your cases will chamber without further neck-turning.
Load Development for the 22 BR
After necking down the brass from 6mmBR, Clint used a K&M neck turner to remove the doughnuts formed when necking down. He ran the turned brass back through the sizer die, with no expander, and then inside-neck-reamed with a .221 reamer. Then, as a last step he used a mandrel to expand the necks, using two different mandrels to obtain some cases with .004 and some with .002 neck tension.
Clint reported: “I talked with Wes Grass, who had been playing with the 22BR and the 90 JLK. He opined that Varget, while a stellar powder in the 6BR, was simply too fast for the 22BR pushing the 90-grainer. Wes suggested trying VV N550, of which I had a supply. I loaded incremental loads of 0.5 graina of Varget and N550, in the two different sets of neck-tensioned cases. Being familiar with the 6BR, and having spoken with Wes about his loads, I began the Varget loads at 30.0 going up to 32.0. The N550 started at 30.0 also, and went up to 31.5.” Here is a table with the loads Clint worked up using the 90gr JLK:
VARGET Charge
Velocity
Extreme Spread
Std. Dev.
30.5
3022
14.3
6.2
31.0
3091
28
11.5
32.0 Ejector marks — too hot
3185
2.5
2.2
Vihtavuori N550 Charge
Velocity
Extreme Spread
Std. Dev.
30.0
2861
60.9
27
30.5
2930
46
16.5
31.0
2960
33
12.7
31.3 — Match Load
3050
22
9
31.5
3062
10.5
4.9
Clint noted: “All of the above loads used Lapua 6BR brass, neck turned and reamed, .004 tension, CCI BR4 primers. (I did settle on .003 neck tension). These loads were OK in my rifle. Reduce at least 10% before using them! [EDITOR’S NOTE: If you start about 10% under these loads, that should be a good beginning point for using the 90gr Sierra Match-King in a 22BR.]
Final Thoughts on Bullets, Powder and the 22BR
Clint Greenwood found that his 90gr JLK .22 Caliber worked best in his barrel seated well into the lands. You may get different results with different brands of VLD bullets or hybrid bullets. We recommend trying different seating positions and evaluating what works best.
Clinet explained his load development using 500 series VV powder. He observed that he had to get the pressures up pretty high. With higher pressures, “the groups will suddenly shrink dramatically. When you reach the operating pressure for the 500 series of powder, groups shrink dramatically, as if a light switch has been thrown.”
Working up the loads for the 22BR didn’t yield any surprises with the components that I had chosen. At 30.5 grs, the VV N550 loads began to really group into knotholes. 31.5 grains of N550 yielded some pretty impressive groups, as well as chrono numbers that were encouraging. I decided to back off 0.2 grains, as shooting in South Texas, I might be shooting these loads anywhere from 45 degrees to 110 degrees. The VV 500 series is fairly temperature insensitive, not as good as Varget, but decent, but on a few occasions in the past I have had a few “pressure excursions” that were unsettling in .223, and didn’t want to go there with my T2K. Dropping the loads 0.2 grains didn’t appear to change the accuracy and gave me a little insurance. At 200 yards, the warmer N550 loads were consistently under 1/2 MOA. I expect a bit better results when I use the fireformed brass, instead of the new Lapua that was sporting .010″ runout.
I am really pleased with the accuracy of my T2K in 22BR. I have to give most of the credit to John Holliger. If he hadn’t gone out on a limb and experimented with the PacNor 6.5 twist .22 barrel, none of this would have been possible. Good Luck, and remember to work up to these loads! — Clint Greenwood
David Tubb Explains T2K Stock Adjustments
I advocate setting stock length a little longer than most people might. I am a firm believer that it is best to “reach” slightly for the pistol grip as this ensures a strong, secure hold on the rifle. I pull the rifle firmly into my shoulder pocket when shooting offhand, and also prefer to have what I would characterize as very firm contact between rifle butt and shoulder in the sitting and prone positions as well. When using a sling in prone or sitting, stock length (and sling tension) should be great enough so that, at the least, you have to push the buttpad forward with your hand in order to place the stock into the shoulder pocket. My buttstock is shortest offhand and longest prone. If my standing setting is “0”, I’m usually out about 1-1/2 inches for sitting and about another inch for prone. I have found that many people tend to shoot with a stock that’s too long in sitting and too short everywhere else.
I have found the cast off/on adjustment feature on the buttstock greatly helps in attaining the natural shooting positions I desire. For prone, I offset the clamping block so the buttplate moves outward [the index mark on the clamp is to the right of center on the scale on the receiver extension tube]. I swing it a little bit inward for offhand and slightly more inward for sitting. The amounts of cast on/off (in clock-face terms) are approximately 6:30 for standing, 4:30 for prone, and 8:00 o’clock for sitting.
Stock Length Adjustment Procedure
The buttstock is adjustable in length 4-plus inches. This adjustment is accomplished by moving the buttplate tube in or out after loosening the four screws on the clamping block. Ensure that the buttstock tube is fully contained in the block. The extent of rearward (lengthening) movement is determined by the front of the buttstock tube fitting flush with the front of the block.
Cast and Cant Adjustment Procedure
The buttstock is adjustable for cast or offset by loosening the four screws on the clamping block and swiveling the block on the receiver extension tube. The buttplate itself is adjustable for cant up to 360 degrees and after loosening the screw directly in the center of the rubber recoil pad is adjustable for height at approximately 1-1/2 inches. The cheekpiece is adjustable vertically approximately one inch. The vertical cheekpiece adjustment is accomplished via the top knurled ring. The lower knurled ring will then secure the setting.
For more information on the Tubb 2000 Rifle and SSS Accessories, contact:
Superior Shooting Systems
Maker of Tubb 2000 Accessories,
and DTAC Bullets and Brass DavidTubb.com
“God could not be everywhere, and therefore he made mothers.” — Rudyard Kipling
Today, May 14, 2023, is Mother’s Day. There are more than 85 million mothers in the United States, and today is the day we recognize all those ladies who brought life into the world.
Mothers deserve our praise, our devotion, and our concern for their health and happiness.
Be good to your mother, cherish her, and love her without fail… always. In her latter years, attend to her needs, help her with her health, and take time to bring brightness (and laughter) into her life. Let her know that you appreciate all the sacrifices she made, and that you are grateful for all that she did for her children and family.
This Mother’s Day tribute was created by a man who had lost his mother. It will help all of us appreciate all the things our mothers did for us.
Here are some quotes for Mother’s Day:
“Only mothers can think of the future — because they give birth to it in their children.” — Maxim Gorky
“Men are what their mothers made them.” — Ralph Waldo Emerson
“Such a mysterious business, motherhood. How brave a woman must be to embark on it.” ― M.L. Stedman
“All that I am or ever hope to be, I owe to my angel mother.” ― Abraham Lincoln
Team Smith & Wesson shooter Julie Golob has a message for Mother’s Day (Sunday, May 14th). Julie writes: “While some are using Mother’s Day week to push a gun control agenda, I’d like to encourage moms to ‘Take a Moment’. Talk to your kids about firearms safety. Help them learn what to do around firearms and have an open, honest discussion about guns and gun safety.
I truly believe that, no matter if you are pro-gun or anti-gun, everyone should know and understand the basic rules of firearm safety. It is equally important for parents to have the discussion about guns and what to do if your child finds one. Both the NSSF’s Project ChildSafe and the NRA’s Eddie Eagle GunSafe® Program are excellent. They offer resources for parents, educators, and child care providers to help ensure kids stay safe.
In this video, Julie encourages parents to have “the talk” about firearm safety with their kids sooner rather than later, and provides tips for how to have a helpful discussion. Sherra Scott, a mom and a certified NRA instructor, agrees with Julie: “Whether you have firearms in your home or not, if you have children in your life, please watch this video and talk WITH them about firearm safety and what to do if they come into contact with a firearm.”
Rifle accuracy is pointless unless you can see your target and aim precisely. That’s why good optics are so important for precision shooting — from 50 yards out to a mile and beyond. Top quality scopes can be very expensive — you’ll see optics costing $3000 or more on many competition F-Class and PRS rifles. Today’s video showcase covers important “Riflescope Knowledge”, including how to adjust for parallax, and how to properly sight-in your scoped rifle. In addition there’s a helpful video defining Minute of Angle (MOA) plus videos showing how to mount optics correctly (and avoid common scope-mounting mistakes).
Rifle Sight-In Process — Start to Finish
Here Ryan Cleckner shares his process for sighting in a scoped rifle. This helpful video covers the full process: bore-sighting, 25-yard shot confirmation, shooting groups, making adjustments at 100 yards, and finding mechanical zero. Looking for more valuable rifle instruction? Then check out Ryan Cleckner’s book, Long Range Shooting Handbook.
How to Adjust for Parallax
Most precision rifle scopes have parallax adjustment, but what is it and why do you need to adjust it? In this Shooting USA video, John Paul of JP Rifles defines parallax and explains why you need to set parallax correctly for the distance to your target. The video then show how to adjust parallax correctly, a process which should start with the scope’s ocular focus.
Understanding Minute of Angle (MOA)
In this video, Ryan Cleckner explains the measurement term “minute of angle” (MOA) and how to use MOA adjustments on your scope to compensate for bullet drop at varying distances. MOA is an angular measurement, used often in long range shooting, that is 1/60th of one degree of a circle. One MOA represents 1.047″ at 100 yards and 10.47″ at 1000 yards. Want to learn more? Read Ryan Cleckner’s article Understand and Using Minute of Angle.
Scope Mounting: Common Scope-Mounting Mistakes To Avoid
Mounting a scope isn’t a super-complex or highly technical job, but there are ways you can mess it up. This Brownells video explains common pitfalls to avoid when you’re mounting a rifle scope.
1. Make sure the rings don’t touch any part of the turret housing, objective bell, or eyepiece. Any one or combination of those will throw off your shot groups big time. Make sure those rings are clamping ONLY the scope’s main tube.
2. Ensure that the scope rings are properly clamped to the scope base. If you can grasp the scope with one hand and the rifle with the other and there’s play between them, your groups are going to be all over the place! Scope rings come with torque specs for a reason.
3. Make sure there’s clearance between the objective bell and the rifle. No part of the scope should touch the rifle itself. The only nexus between the scope and the rifle should be the scope rings — and they’re not actually part of the rifle. This also applies to a removable lens cover. When it’s on the scope, it should not touch any part of the gun.
4. Don’t mount the scope too low on an AR-15. On most rifles, you do want the centerline of the optic as close to the bore as you can get it. But the AR-15’s stock is on almost the same plane as the top of the receiver, so you need some height on the scope. Otherwise, it’ll be too low for you to look through it.
5. Overtightening the scope rings is VERY BAD. You can actually crush the scope tube and damage the optic beyond repair. Stick to those torque specs! If the rings come with a little wrench, that wrench is all you need to tighten them.
How to Sight In a Riflescope — Vortex Tech Talk
This popular video from Vortex Optics explains how to sight-in a rifle so that the reticle is aligned correctly and the scope is zeroed properly for your intended application/discipline. People need to remember that the sight height established by the rings will affect their zero, as the centerline of the scope is above the centerline of the barrel.
Scope Mounting — Proper Alignment and Torque Values
An improperly installed scope can cost you points at a match. In this video, MDT Pro Shooter Keith Baker explains the simple steps required to ensure your scope is secured properly with the reticle aligned correctly. The video centers on a typical Precision Rifle optics installation, but the techniques will also work for hunting, varmint, and benchrest rifles.


Neconos.com offers BAR-L Temp Strips that visually display heat readings from 86 to 140 degrees. Think of these strips as compact, unbreakable thermometers that monitor barrel heating.


 Scope-Cover Mounted Ballistics Table
 Better BC for Service Rifle Competition
 The 22BR is a simple wildcat formed by necking-down 6mm BR brass. Case forming is easy — just run a 6BR case through a 22BR sizing die. With custom bullets, the 22BR has done well in NBRSA short-range Benchrest. Accuracy is on a par with 6mm BR out to about 250 yards, but from there, the 6mm VLDs, with their high BCs, buck the wind better. The 22BR with 90gr bullets offers very impressive ballistics, with less recoil than you might experience shooting a 6BR or 6mm Creedmoor with 105-110gr projectiles.


 Today, May 14, 2023, is Mother’s Day. There are more than 85 million mothers in the United States, and today is the day we recognize all those ladies who brought life into the world.
 Team Smith & Wesson shooter


