372,000,000 views! Today’s five feature videos have, collectively, been viewed 372 million times on YouTube. Today’s Saturday special features five remarkable animated firearms videos from Matt Rittman, a very talented computer graphic artist. Matt employs multiple software programs to create these incredibly detailed animations. His software tools of the trade include Cinema 4D, Substance Painter, and Corona renderer. Don’t think this is easy. Some of these videos took over 500 man-hours to create. Enjoy!
AR-15 Full Animation — Components and Function
While there are other AR-15 animations on YouTube, we think this is the most accurate and creative, showing the function of a wide variety of components, including the bolt carrier, extractor, trigger, stock buffer, safety system, forward assist, and mag release. It also shows modes of a military M16, showing 3-round burst fire, and full-auto, employing disconnectors and auto sear. If you are planning to assemble/disassemble an AR, this is definitely worth watching start to finish. This video has recorded over 2 million views in just three weeks!
4:00 Auto Fire
4:58 Burst Fire
6:22 Bolt Catch
6:40 Sights
7:33 Adjustable Stock
7:50 Ejection Port Cover
Mauser Kar-98K Bolt Action Rifle video
This elaborate 3D animation shows how a Mauser-type Karabiner 98 Kurz (aka Kar-98K) bolt-action rifle works. Substance Painter was used to create the wood stock texture. Creator Matt Rittman states that this 3.7 minute video took over 500 man-hours to create. You have to admire the dedication involved in that kind of hard work.
This 3D animation video shows the popular Glock 19 (Gen 4) pistol. This modern, polymer-framed, striker-fired pistol has constant trigger pull for all shots. Some folks call this a DAO (double-action-only) trigger but that’s not really correct. Unlike the Model 1911, on a Glock there is no external safety on the frame or slide. The trigger “shoe” (the part that contacts finger) includes a central blade. This prevents the gun from firing unless the trigger is depresses normally. Glock calls this the “safe action”. The creator, Matt Rittman states: “Cinema 4D was used to create each individual part, as well as animating everything. Substance Painter was used to create the main textures. Corona renderer was used to render everything. This animation [with 84.6 million views] took me over 500 hours to create.”
Elements of Video:
0:11 Basic Function
0:39 Case Extraction
0:47 Cartridge Loading
1:02 Trigger Reset
1:28 Trigger Safety
Pump shotguns are essential firearms for hunting and home defense. The clever design of pump-action shotguns make them reliable even when feeding large diameter, blunt-ended 12 gauge shot-shells.
With 226 million views, this AK-47 video might just be the most-watched firearms tech video on YouTube. The video highlights the design features the account for the AK’s legendary reliability. For viewers with an eye to detail Matt adds this clarification: “The firing pin does NOT puncture the bullet primer. It just strikes it against the anvil, initiating the firing sequence.”
Are you feeling lucky? Here is one of the better hunting season prize packages we’ve seen in recent years. It’s easy enough to enter to win an impressive collection of products including a lever-action rifle, Taurus Tracker revolver, multiple Vortex optics products, knives and much more. There is no purchase necessary for a chance to win.
Alien Gear Holsters, American manufacturer of holsters and firearms accessories, has pulled together some of the top brands in the industry to create an impressive hunting season giveaway for 2022. There’s a massive collection of cool products for the 2022 Hunting Season Prize Package. Shawn Hostetter, CEO of Alien Gear Holsters, states: “All together this prize package is worth several thousand dollars and would make an incredible start to hunting season, or a fantastic gift for the hunter in the family.”
Products Included in the impressive Prize Package:
- A Rossi R92 Rifle .44 Magnum 16″ barrel, 8-round capacity
– A Taurus Tracker Revolver
– Eberlestock Vapor 500 Backpack w/ Scabbard
– Vortex Diamondback HD 16 – 48 X 65 Spotting Scope
– Vortex Diamondback HD 2000 Rangefinder
– Vortex Viper HD 10 X 42 Binoculars
– Tactacam Spotter LR Spotting Scope Camera
– A 103 Skinner Knife and A 657 Pursuit Large Guthook Knife
– O-Light Javelot Turbo Light and Mounting Hardware w/ Remote Switch
– A Quake Kits Reasonably Prepared Emergency Kit
– Aid-PAK Gen-2 from Urban Medical Gear
– Alien Gear Holsters Cloak Chest Holster and Cloak Slide Holster
– Bigfoot Gun Belts OD Green Tactical Belt
– Shot IQ Precision Pistol Course from Joel Turner
It’s easy to enter by filling out Online Entry Form. Eligible participants have until September 30, 2022, to enter for a random chance to win this ultimate hunting package.
Laminated wood stocks offer an excellent combination of price and performance, and they can be obtained in a myriad of styles to suit your discipline — hunting, benchrest, tactical, silhouette, or high power. Laminated stocks can be a little trickier to finish compared to a hardwood such as walnut, as laminates are often delivered in bright or highly contrasting colors. Traditional wood finishes can alter the colors. Also, filling the pores in laminated stocks is an issue.
Automotive clear-coat products have become popular for finishing laminated wood stocks because they won’t alter the stock’s colors, and the clear-coat provides a durable weather-resistant finish. Clear-coat is also easy to “touch up” and it fills pores better than some other alternatives. Mike Ricklefs has written a comprehensive article on stock painting that includes a special section on clear-coating over laminated woods. If you want to clear-coat a stock, Mike’s article is a must-read!
1. When finishing laminated stocks with clear-coat, you need to prepare the wood carefully, and build up quite a few thin layers one at a time. Begin by sanding, with progressively finer paper, all the way to 400 grit. Certain laminated stocks are so rough when they come from the stock-maker, that you may have to be very aggressive at first. But be careful with angles and the edges of flats. You don’t want to round these off as you sand.
2. After sanding, use compressed air to blow out all dust from the pores of the wood. This is very important to avoid a “muddy” looking finish. If you don’t blow the dust out with air before spraying the clear it will migrate out as you apply the clear. Also, after each sanding session, clean your painting area to remove excess dust. I also wet down the floor of my spray booth to keep the dust down.
3. Some painters recommended using a filler to close the pores. That’s one technique, but the filler can detract from the clarity of the final finish. Rather than use a pore-filling sealer, I use a high solids or “build” clear for the initial applications. This is slightly thicker than “finish” clear and does a good job of sealing the pores. Three (3) fairly heavy coats of “build” clear are applied. If you get a thick spot or a run in the finish at this point, it is not the end of the world but this does create more sanding work.”
There is a helpful thread in our Shooters’ Forum that discusses the use of clear-coating on laminated stocks. Member BHoges offered this advice: “Stick with Diamont, Glassurit, and Spies. If anyone has questions, I painted cars for a long time.”
Forum member Preacher, whose bolt-action pistol is shown at right, states: “I buy my two-part clear-coat from the local NAPA dealer. They recommended Crossfire mixed 4:1. I really like the end results. There are six coats on that stock that were sanded down to bare wood for the first two, and then 600 wet-sanded for the other four coats. Two to three coats would be sufficient if the pores were filled first, but I would rather fill ‘em with the clear as it seems to make it appear deeper and I have the time to devote to it. I have PPG’s Deltron DC 3000 clear-coat on a few stocks of mine, but I like the NAPA better price wise, and it seems to hold up just as good as the Deltron.”
As part of NRA Women TV, hunting guide Kristy Titus hosts a series of videos that explain important strategies and shooting skills for hunters. Titus, co-host of the Team Elk TV show, is a certified instructor who has hunted around the globe. She grew up in the outdoors, running pack mules in Oregon with her father. In these videos, Kristy discusses demonstrates field positions that can be employed during a hunt. She also explains preparation for a hunt, including fitness training.
Click each link below to watch other Kristy Titus Hunting Videos.
“When it comes to bolt-action rifle fit, there is no ‘one size fits all’,” says Titus. “When picking out your rifle [consider options] after the purchase to ensure you are as comfortable as possible.”
The Civilian Marksmanship Program will have a huge new training and shooting facility thanks to Larry and Brenda Potterfield, the founders of MidwayUSA. The CMP announced that it received a massive gift from the Potterfields — a 76,800-square-foot facility along with more than five acres of land in Columbia, Missouri. Conversion/renovation of the facility to a competition center is expected to begin in early 2023.
The 76,800-square-foot MidwayUSA warehouse will be transformed into a Competition Center focused on indoor smallbore rifle and air rifle. The facility will be equipped with 100 air rifle targets and 50 smallbore targets. Programs will include coach training, monthly matches, summer camps, outreach camps, and more. Notably, on-site cameras and monitors will provide live-action viewing for up to 1,000 spectators. The Center will be open to the public year-round for shooting and training.
“On behalf of CMP, I want to thank the Potterfield family for this generous gift,” said Judy Legerski, outgoing Chairman of the CMP Board of Directors. “The timing couldn’t be better. August is National Shooting Sports month, and we look forward to developing this Competition Center to continue our support of youth shooting sports. For generations, this Competition Center will have tremendous impact on youth, families and the community. We look forward to partnering with the Potterfields in creating a site that meet the needs of both beginning marksmen and competitive shooters[.]”
When conversion of the donated warehouse is complete, the new CMP Missouri competition center will have 100 rifle target stations, with a firing hall similar to the 80-position CMP South Competition Center.
“We are fortunate and pleased to donate this building to the Civilian Marksmanship Program, an organization who shares our vision for youth shooting sports,” said Larry Potterfield, MidwayUSA Founder and Executive Chair of Board of Directors. “We’re confident the CMP will utilize the facility to develop new and existing competitive shooters and continue to add value to our local community.”
About the Civilian Marksmanship Program
The Civilian Marksmanship Program is a federally chartered 501(c)(3) non-profit corporation dedicated to responsible use of firearms and air guns through gun safety training, marksmanship training, and competitions. The CMP’s key mission is promoting marksmanship training and competition for citizens of the United States. For more information, visit TheCMP.org.
About Larry and Brenda Potterfield and MidwayUSA
Both country kids from Missouri, Larry and Brenda Potterfield turned their passion for shooting sports into a career by opening a small gun shop in 1977 that would eventually become MidwayUSA. They instilled family values like honesty, integrity, and respect for others into the business, and strive to maintain this culture with each new employee.
What’s old is new again. The metal-framed pistol is making a comeback. Smith & Wesson has just introduced its new M&P9 M2.0 METAL, S&W’s first full-size M&P pistol in an all-metal configuration. Built with a T6 aluminum frame finished in Tungsten Gray Cerakote, this 9mm Luger pistol includes a 4.25″ barrel, M2.0 flat face trigger, and optics-ready slide.
Why go to a metal frame? The T6 Aluminum frame is heavier than polymer. This increases the overall weight of the pistol and lowers the center of gravity considerably. The gun therefore has less perceived recoil (less “snap”) and noticeably less muzzle flip. The new M&P M2.0 METAL is listed at 30.0 oz. unloaded, while the polymer M&P M2.0 is 24.7 oz. unloaded.
New M&P9 M2.0 METAL is 43% More Expensive Than Polymer M&P9 M2.0
The new M&P9 M2.0 METAL has a $899.00 MSRP, making it 43% more expensive than the polymer-framed M&P9 M2.0 which has a $629.00 MSRP. Is the aluminum frame worth the extra money? It depends. With a lower center of gravity and more mass, the M2.0 METAL will definitely be a better “gun games” pistol. But it will also be 5.3 oz. heavier — not so great for all-day carry.
For persons who use their M&P mostly for target work and gun games, the heavier weight and reduced muzzle flip is a plus. Owners may also like the rigidity of the Cerakoted Aluminum frame. S&W has a new enhanced sear for this model, which delivers a “shorter take-up, and cleaner break”. That also should help action pistol competitors.
Full Compatability with Existing M&P9 Magazines and Holsters
The M&P9 M2.0 METAL will accept any M&P9 M2.0 17-round 9mm magazine and will fit any normal M&P9 fullsize compatible holster. Notable features include enhanced sear for lighter, crisper trigger break, an optics-ready slide, and new “flat face” trigger.
M&P9 M2.0 METAL FEATURES
T6 Aluminum Frame with Tungsten Gray Cerakote® Finish
Optics-Ready pistol slide has mounting recess for red dots
Four interchangeable palmswell grip inserts: S, M, ML, L
Textured polymer front strap
Wide slide stop and reversible magazine release
M2.0 flat face trigger for consistent finger placement
Forward slide serrations and Picatinny-style frame rail
Enhanced sear for lighter, crisper trigger let-off
Fits all standard M&P9 compatible holsters
Accepts any 17-round 9mm M2.0™ magazine
Comes with two 17-round magazines.
Jerry Miculek Tests New M&P9 M2.0 Metal Pistol — Says It Shows Exceptional Accuracy
The U.S. Army Marksmanship Unit regularly published a reloading “how-to” article on the USAMU Facebook page. One excellent “Handloading Hump Day” post covered preparation of once-fired 5.56x45mm brass. This article, the first in a 3-part series, has many useful tips. If you shoot a rifle chambered in .223 Rem or 5.56x45mm, this article is worth reading. You can obtain once-fired Lake City 5.56x45mm brass for less than half the cost of premium .223 Rem brass.
This week, Handloading Hump-Day will answer a special request from several competitive shooters who asked about procedures for morphing once-fired GI 5.56mm brass into accurate match brass for NRA High Power Rifle use. The USAMU has used virgin Lake City (LC) 5.56 brass to win National Championships and set National Records for many years. In this 3-part series, we’ll share techniques proven to wring match-winning accuracy from combat-grade brass.
GI brass has an excellent attribute, worth noting — it is virtually indestructible. Due to its NATO-spec hardness, the primer pockets last much longer than most commercial brass when using loads at appropriate pressures.
Preparing Once-Fired GI 5.56 Brass for Reloading (Part 1 of 3)
Assuming our readers will be getting brass once-fired as received from surplus dealers, the following steps can help process the low-cost raw material into reliably accurate components.
1. Clean the Brass
First, clean the brass of any dirt/mud/debris, if applicable. Depending on the brass’s condition, washing it in a soap solution followed by a thorough rinsing may help. [This step also extends the life of the tumbling media.] Approaches range from low-tech, using gallon jugs 1/2 full of water/dish soap plus brass and shaking vigorously, to more high-tech, expensive and time-consuming methods.
2. Wet-Tumbling Options (Be Sure to Dry the Brass)
When applying the final cleaning/polish, some use tumblers with liquid cleaning media and stainless steel pins for a brilliant shine inside and out, while others take the traditional vibratory tumbler/ground media approach. Degree of case shine is purely personal preference, but the key issue is simple cleanliness to avoid scratching ones’ dies.
If a liquid cleaner is used, be SURE to dry the cases thoroughly to preclude corrosion inside. One method is to dump the wet brass into an old pillow case, then tilt it left/right so the cases re-orient themselves while shifting from corner to corner. Several repetitions, pausing at each corner until water stops draining, will remove most water. They can then be left to air-dry on a towel, or can be dried in a warm (150° F-200° F max) oven for a few minutes to speed evaporation.
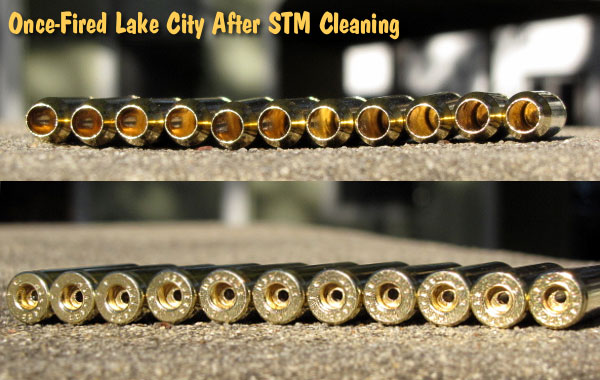
Shown below are Lake City cases after cleaning with Stainless Media (STM). Note: STM Case cleaning was done by a third party, not the USAMU, which does not endorse any particular cleaning method.
NOTE: The USAMU Handloading (HL) Shop does not RE-load fired 5.56 brass. We use virgin LC brass with our chosen primer already staked in place. However, our staff has extensive personal experience reloading GI brass for competition, which will supplement the Shop’s customary steps. In handloading, as in life, there are many ways to accomplish any given task. Our suggestions are note presented as the “only way,” by any means. Time for loading/practicing is always at a premium. Readers who have more efficient, alternative methods that maintain top accuracy are invited to share them here.
3. Inspect Every Case
Once dry, inspect each case for significant deformation (i.e., someone stepped on it), damaged mouths/necks and case head/rim damage. Some rifles’ ejectors actually dig small chunks of brass out of the case head — obviously, not ideal for precision shooting. Similarly, some extractors can bend the case rims so badly that distortion is visible when spinning them in one’s fingers. These can be used for plinking, but our match brass should have straight, undamaged rims.
Dented case mouths are common, and these can easily be rounded using a conical, tapered tool, [such as a .223 expander mandrel. A dummy 7.62 or .30-06 cartridge with a FMJ spitzer can also work.] If most of your brass is of one headstamp, this is a good time to cull out any odd cases.
4. Check the Primers Before Decapping
Your clean, dry and inspected brass is now ready for full-length sizing, decapping and re-priming. Historically, primer crimps on GI brass have caused some head-scratching (and vile language) among handloaders. Our next installment will detail efficient, easy and practical methods to remove primer crimp, plus other useful handloading tips. Until next week, Good Shooting!
Accuracy Potential of Mil-Surp 5.56×45 Brass
So, how accurate can previously-fired GI surplus brass be in a good National Match AR-15? Well, here’s a data point from many years ago that might be of interest. A High Power shooter who wrote for the late Precision Shooting magazine took a Bill Wylde-built AR match rifle to a registered Benchrest match. He had no difficulty obtaining consistent 0.5-0.6 MOA accuracy at 200 yards using LC brass and a generic “practice” load that was not tuned to his rifle.
Folks, if you are thinking about a major gun-related product purchase, today’s the day. Right now Brownells has discount codes that offer up to 18% off your purchases. What’s the catch? Well some of these discount codes expire today August 31st at 11:59 pm Central Time, so don’t delay. With Code WORK45 you can save $45 on a purchase of $250 or more. Or Use Code AUGUST55 to save $55 off $500 (11%). If you’re planning a big buy, use code AUGUST120 to save a whopping $120 on a purchase of $1000 or more. NOTE: Some Brownells discount codes (see below) expire at the end of August, while others may expire later. If one Code doesn’t work, try another. This codes apply to firearms components, reloading supplies, tools, optics and more…
COMING SOON: In a couple days, we’re advised that a new Brownells Labor Day Sale Code could activate — Use Code LABORDAY to Save $55 Off $300 (18%). (Guys — this has not been activated yet, so we can’t be absolutely sure, but this CODE was posted on Gun.Deals/coupons.)
With inflation and rising prices, it’s more important than ever to take advantage of discounts and promotions. We’ve located the latest Discount Codes for Brownells Purchases that can save you 10% (or more) on your purchases. These Brownells Discount Codes qualify you for significant savings on guns, ammo, parts, and reloading components at Brownells. Use these Codes during check-out and the savings will reduce your net cost. For example, save $55 on a $500 purchase, $30 off $300, or $25 off $250 — saving 10% or more.
We know some guys who make their own stocks, and others who do their own chambering. But consider this, Robert Carnell of Australia built his own state-of-the-art, water-cooled, tension-barrel Rail Gun, even including the action. That’s right, Robert designed and crafted his own precision action. This has got to be the ultimate home gunsmithing, do-it-yourself (DIY) project.
Carnell is an accomplished benchrest shooter and past Australian Sporter Class Champion. In 1993 he won a Silver Medal at the World Championships. But Carnell is far more than an ace trigger-puller. Robert is a skilled and creative “home gunsmith” who has crafted his own custom action and built his own railguns from scratch. Robert also runs the Austrialian Benchrest Bulletin website.
Home-Built Rail Gun — Aussie Innovation
Below are photos of one of Rob Carnell’s most amazing builds. This liquid-cooled, tension-barrel rail gun is a great example of self-reliant Aussie engineering. The barrel runs inside a coolent-filled, large-diameter sleeve, much like an old water-cooled machine gun. This is the fourth rail gun that Rob built, and the second fitted with a tensioned barrel.
Robert explains: “My railgun design has a 1.75″ barrel under tension inside an aluminium tube filled with radiator coolant. There is nearly a gallon of coolant, and the barrel stays cool no matter how many shots I seem to fire, or how quickly they are shot. The brass nut on the front rides on a nylon bearing and can be tightened to get the best accuracy. I am a believer in the ‘tuner’ idea and this seems to work for me. The main tube is thick-walled aluminium 600mm (24″) long. There is a flange at both ends. The flange at the back fits onto the barrel before the action is screwed on. The front flange is a press-fit into the tube, then there is a brass nut that fits over the barrel and screws against a nylon washer on the front flange. The Railgun’s base is aluminium and has the standard adjustments — windage, elevation and a sighter cam. In addition, there is a 1/10 thou dial indicator for windage. This allows me to zero the indicator and shoot my group. If I need to add a bit of windage for a condition, I can quickly get back to the original position if my condition comes back.”
Home-Built Action Uses Rem Bolt
Rob’s rail gun uses his own home-made stainless action, which features Panda-spec threads and a modified Remington 700 aftermarket bolt. Not bad for a do-it-yourself project we’d say! CLICK HERE to read how Rob designed and built the action.
Small patches are not very efficient at distributing bore cleaning liquids inside your bore. The problem with a tight-fitting patch is that the solvent gets squeezed off in the first few inches. You can switch to a smaller jag, or a bore mop, but there is an even better way to get an ample amount of solvent in your bore. Just spray directly into the bore with a wash bottle, an inexpensive plastic bottle with an L-shaped dispensing neck, tapered at the end.
When using the wash bottle, you can either just plug the breech and spray from the muzzle end (where most copper fouling is), or, alternately, put the wash bottle neck directly in the chamber and spray forward. When spraying from the chamber forward, you may need to use a rubber O-Ring to seal off the action… depending on the bore size and the particular wash bottle’s neck spout diameter. We prefer to plug the breech and squirt from the muzzle.
Bottle Solvent Application Great for Smaller Bores
Using wet patches or wet brushes is an inefficient way to really saturate the tight bores of 17s, 20s, and 22s. Even with a cotton bore mop, most of the solvent will be squeezed out before it gets to the end of the bore, where most copper fouling occurs. For these smaller 17, 20, and 22-caliber bores, you can just take the wash bottle and stick the tapered nozzle right in the chamber. The tapered end will press fit in the throat, sealing off the chamber. With the barrel slightly nose-down, give the bottle a couple good squirts until the solvent mists out the muzzle. In just a few seconds, this will put more solvent in the bore than a half-dozen wet patches.
A solvent-filled wash bottle is also handy for wetting your brushes. It’s much easier to saturate a bore brush (without spilling solvent on your stock), by using the wash bottle. You can get wash bottles from USPlastic.com, Amazon.com, or lab supply stores.


 Forum member Preacher, whose bolt-action pistol is shown at right, states: “I buy my two-part clear-coat from the local NAPA dealer. They recommended Crossfire mixed 4:1. I really like the end results. There are six coats on that stock that were sanded down to bare wood for the first two, and then 600 wet-sanded for the other four coats. Two to three coats would be sufficient if the pores were filled first, but I would rather fill ‘em with the clear as it seems to make it appear deeper and I have the time to devote to it. I have PPG’s Deltron DC 3000 clear-coat on a few stocks of mine, but I like the NAPA better price wise, and it seems to hold up just as good as the Deltron.”


 T6 Aluminum Frame with Tungsten Gray Cerakote® Finish