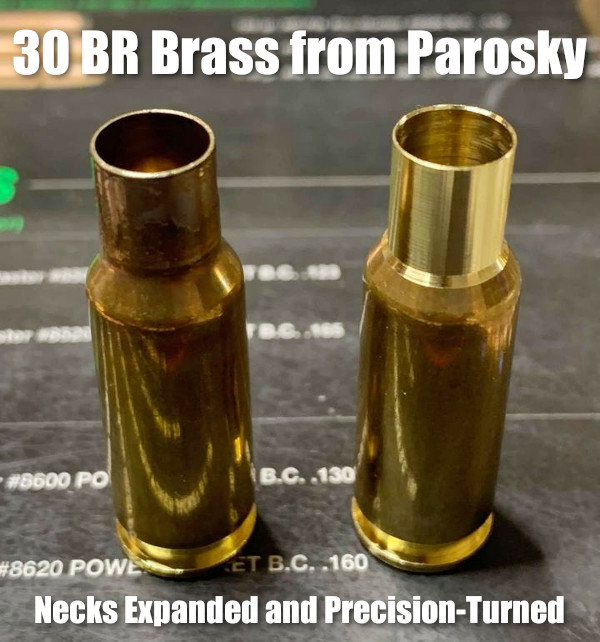
Here’s good news for 30 BR shooters. Paul Parosky, maker of the excellent PRP Custom Bullets, is now offering 30 BR neck-turned brass. This can save you considerable time and effort forming 30 BR cases from Lapua 6mmBR brass. And the neck-turning is superb, again representing time savings (and no tools to buy). You can order this 30 BR brass from PRPbullets.com. If you communicate with the PRP team, Paul may be able to neck-turn to your specific thickness. Paul notes: “Here are necks turned for a 0.330 neck. I’ll try my best to accommodate anyone’s neck dimensions as they wish. Just contact us through our website PRPBullets.com.”
About this Neck-Turning set-up — Paul Parosky notes: “For neck-turning I’m using an old drill press that has been re-worked. The cutter and spindle are all indicated before neck turning to ensure no runout. The RPM is around 520. The lube I use is a mixture of royal and mystery oil.”
Why the 30 BR Dominates 100/200 Benchrest for Score Competition
The 30BR, along with some wildcat variants, remains the dominant cartridge in short-range (100/200) benchrest-for-score competition. The 30BR’s .308″-diameter bullets are larger than the 6mm bullets used by the 6PPC (which rules group BR competition). The bigger 30-Cal diameter has an advantage in touching scoring rings. In addition, the 30 BR is also relatively easy to tune, and barrel life is considerably better than with smaller-caliber benchrest cartridges. For more information, see our AccurateShooter 30 BR Cartridge Guide.
Cases are Expanded, Then Neck-Turned
To produce his 30 BR brass, Parosky first uses a series of expander mandrels. Then he neck-turns with power using a converted drill press. Paul tells us: “This is done the old school way, I use three different tapered expander mandrels, then neck-turn it to the proper neck chamber, then run them up through a FL expander mandrel to ensure necks are straight. Then I clean all the cases.”
Paul Parosky Can Also Neck-Turn 6PPC Brass
Paul Parosky also expands and neck-turns 6PPC cases that are made from parent Lapua .220 Russian cartridge brass. Here, illustrating his 6PPC neck-turning operation, is a Paul Parosky post on the USA Benchrest & Extreme Precision Shooters Facebook page.
Bet you’ve never seen anything like this before — a “double-decker” indoor shooting range. Lotus Gunworks of Jensen Beach, Florida, operates a super-sized twin-level indoor shooting range featuring a two-story-high steel funnel bullet trap. Nicknamed the Lotus 8/11 for the number of steel panels used to create it (eight panels on the bottom slope and 11 panels on the top slope), this version of Action Target’s Total Containment Trap is the first of its kind. “No one has ever seen a range like this before” noted Lotus Gunworks’ Robbie Abell.
Abell came up with the two-story concept when it became clear that the new Lotus building in Jensen Beach was not wide enough for two side-by-side ranges AND a gun store. Necessity was the mother of invention… Lotus wanted at least two ranges, so the only option was to make a double-decker range where both levels shot into the same bullet trap.
Indoor ranges require ventilation to remove potentially hazardous dust and lead particles. The sheer size of the double-decker range presented a unique challenge, but Carey’s Small Arms Range Ventilation installed a system that can completely replace all the range air every 80 seconds.
Other Multi-Level Shooting Ranges
While the Lotus Range may have the first two-story bullet trap, it’s not really the first-ever double-decker indoor shooting range. Other multi-level ranges exist, they just don’t have the giant bullet trap. In fact, some of the multi-level ranges in Europe are bigger and even more sophisticated.
Brünig Indoor facility — Multi-Level Range Underground
Switzerland boats a popular shooting facility built completely underground. The large, deluxe Brünig Indoor facility includes a 300m underground range with multi-level shooting stations.
This video shows centerfire rifle practice on the upper level of one of Brünig Indoor’s shooting tunnels:
Dutch Double-Decker Range
Here’s a Dutch Double-Decker Range. Check out Schietsportvereniging (SSV) Katwijk, a great twin-level range in Holland featuring electronic targets with displays at each shooting station (on both levels):
Here’s a rifle that earned a Presidential medal and a visit to the White House. This rifle has a unique heritage, having been used to shoot 3000 consecutive bulleyes in a single day. The year was 1926 and a high school shooter named Sam Moore hoped to set a record. With his trusty Winchester Model 52 rifle in hand, Moore fired 3,000 rounds downrange, only stopping when his rifle became too hot to hold and daylight was fading fast. But he had fired 3,000 consecutive bullseyes in NRA Junior Rifle competition (target at 50 feet). The event, which set a world record, received national attention.
Moore was summoned to Washington, DC on April 26, 1926 to meet President Calvin Coolidge. At the White House, President Coolidge met the young marksman and presented Moore with a gold medal. The engraving on the back reads: “Presented to L.S. Moore by the President of the United States [on] behalf of the National Rifle Association. Junior Rifle Corps World Record — 3000 — consecutive bullseyes.”
Editor: Consider how times have changed. In 1931 the U.S. President was proud to honor a junior marksman for a great achievement. Today the White House condemns everything gun related. And the State of California has passed legislation imposing $25,000.00 fines for promoting youth marksmanship (AB 2571).
Marksman Moore Went to the U.S. Naval Academy and Served in WW II
After high school, Sam Moore earned admission to the U.S. Naval Academy, and graduated in 1931. Later, Moore helped develop the Fairbairn-Sykes fighting knife, served in WW II as a USMC aviator, and maintained his interest in shooting until his passing in 1982. Moore’s rifle and engraved gold medal were donated to the National Firearms Museum by his son David.
To succeed in long-range shooting matches, given the high level of competition these days, you’ll need solid wind-reading abilities. We’ve found an article by Emil Praslick III, retired USAMU Service Rifle coach and U.S. Palma Team Coach, that can help you make better wind calls in competition.
Emil Praslick, now retired from the U.S. Army, is considered one of the best wind gurus in the United States, if not the world. During his service with the USAMU he authored an excellent two-part article on wind reading that is available on the CMP (Civilian Marksmanship Program) website. Both articles contain helpful illustrations, and are “must-read” resources for any long-range shooter–not just Service Rifle and Highpower competitors.
Part One covers basic principles, tactics, and strategies, with a focus on the 200-yard stages. Emil writes: “There are as many dimensions to ‘wind reading’ as there are stages to High Power competition. Your tactical mindset, or philosophy, must be different for the 200 and 300 yard rapid-fire stages than it would be for the 600 yard slow-fire. In the slow-fire stages you have the ability to adjust windage from shot to shot, utilizing the location of the previous shot as an indicator. Additionally, a change to the existing conditions can be identified and adjusted for prior to shooting the next shot.”
In Part Two, Praslick provides more detailed explanations of the key principles of wind zeros, wind reading, and the Clock System for determining wind values: “The Value of the wind is as important as its speed when deciding the proper windage to place on the rifle. A 10 MPH wind from ’12 o-clock’ has No Value, hence it will not effect the flight of the bullet. A 10 MPH wind from ‘3 o’clock’, however, would be classified as Full Value. Failure to correct for a Full Value wind will surely result in a less than desirable result.”
Praslick also explains how to identify and evaluate MIRAGE:
Determine the accuracy of the mirage. Mirage is the reflection of light through layers of air that have different temperatures than the ground. These layers are blown by the wind and can be monitored to detect wind direction and speed.
Focus your scope midway between yourself and the target, this will make mirage appear more prominent. I must emphasize the importance of experience when using mirage as a wind-reading tool. The best way to become proficient in the use of mirage is to correlate its appearance to a known condition. Using this as a baseline, changes in mirage can be equated to changes in the value of the wind. Above all, you must practice this skill!
Click HERE for more excellent instructional articles by Emil Praslick and other USAMU Coaches and shooters.
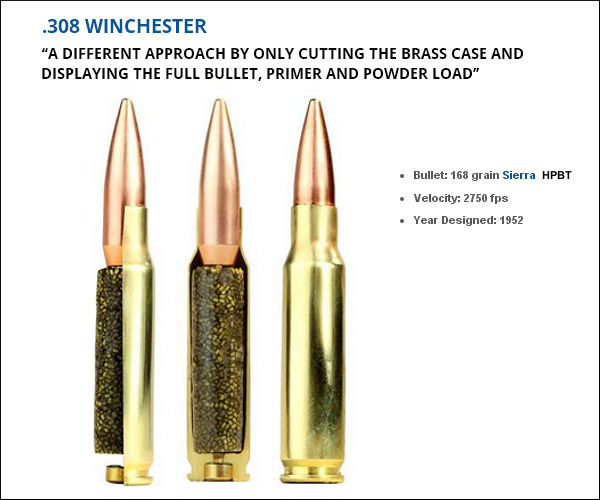
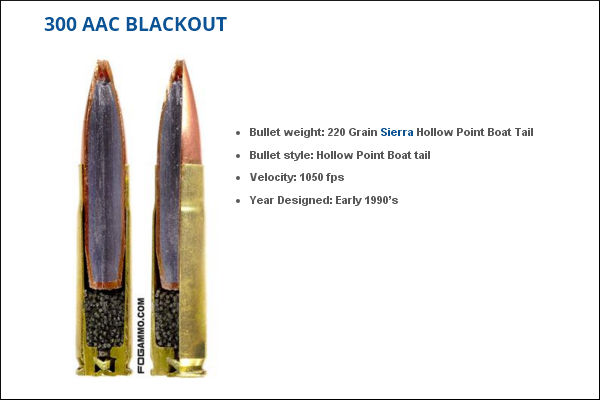
Here’s something you don’t see every day — the inside of loaded cartridges, sliced halfway through. This lets you see how bullet core, jacket, cartridge case, powder, and primer all fit together. Give credit to the folks at FOG Ammunition for creating this interesting series of cut-through ammo images. We show four cartridges here: the .308 Winchester, 9mm Luger, 300 BLK, and .50 BMG. You’ll find two more (the .223 Remington and .45 ACP) on the original FOG Ammo Blog Article.
This .308 Winchester model took on a different approach by only cutting the brass case and displaying the full bullet, primer and powder load. A spec amount of powder was used to create the model powder form. An estimated 10% volume was added during the forming process, along with an undetermined amount of air pockets.
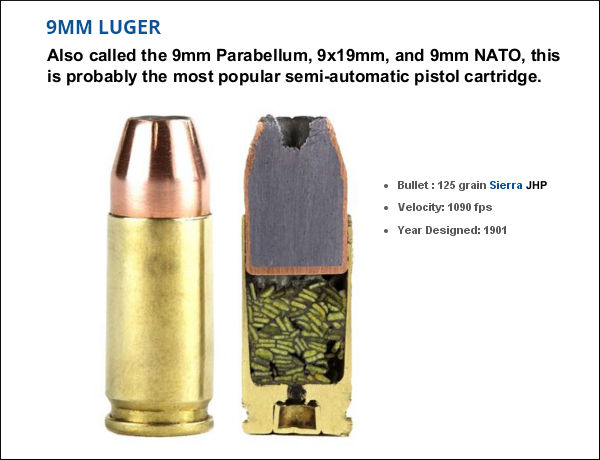
This bisection is a 9mm Luger Jacketed Hollow Point round with flake powder held together with super glue. After this self-defense round was cut by a trained professional the round was polished by hand. This might look like stick powder, but those are in fact flakes stacked up in cross-section. Designed in 1901 by Georg Luger, this popular cartridge is used by civilians, military, and law enforcement.
For this model of the .300 AAC Blackout (aka 300 BLK), a Dremel tool was used to create a pie cut within the bullet and brass case. A measured amount of power, roughly 65% of spec charge, was placed inside the case with super glue. This cartridge was originally optimized for subsonic use with a suppressor, so the amount of powder used is small relative to the nominal case capacity. That leaves more room for the relatively large .30-caliber bullet.
Last but definitely not least is the .50 Caliber BMG round (aka .50 Browning Machine Gun). Famed for its wartime use in the M2 Machine gun, the .50 BMG round is also used in civilian Long Range competitions. A typical .50 BMG cartridge holds over 225 grains of powder. That’s almost ten times the amount in a 5.56×45 NATO Round! To demonstrate the size of the .50 BMG, check out that .223 Rem for comparison.
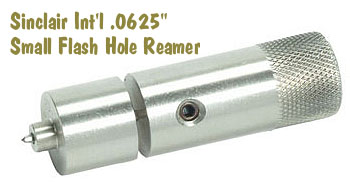
Even with high-quality brass from Lapua, Peterson, Norma, Alpha and RWS, occasionally you may find one or two cases per box which have a small flake or obstruction in the flash-hole. This will appear like a thin crescent on one side of the flash hole (see photo). You should inspect ALL new brass before loading to identify any pieces with a partially-obstructed flash hole. It’s a good idea to remove any flake or thin crescent left as an artifact of the flash-hole forming process. Because the flash-hole itself is normally centered and of the correct diameter, it is not necessary to ream the flash-hole to a larger diameter. All you really need to do is remove the small obstruction(s). This can be done quickly with inexpensive tools.
Use a Small Pin Vise to Remove Flash-Hole Obstructions
Folks have asked if there is a tool that can remove obstructions from a Lapua small, BR-sized flash hole without opening the hole size. The Lapua PPC/BR flash hole is spec’d at 1.5mm, which works out to 0.059055″. Most of the PPC/BR flash-hole uniforming tools on the market use a 1/16″ bit which is nominally 0.0625″, but these often run oversize — up to 0.066″.
If you want to just clear out any obstructions in the flash hole, without increasing the flash hole diameter, you can use an inexpensive “pin vise” with an appropriate drill bit. For $5.19, Amazon sells a 10-piece set of cobalt steel 1.5mm drill bits that match the Lapua flash hole exactly. Other vendors offer a #53 pin vise drill bit that measures .0595″ or .060″ (depending or source). An 0.0595″ bit is close enough. You can find pin vises and these small-diameter drill bits at hobby stores.
For quite some time, Sinclair Int’l has sold a similar device for small (PPC and BR-size) flash holes. Like the 07-3081 unit for large flash holes, the 073000 Reamer for small flash holes works from the outside, so it can index off the primer pocket. It reams to .0625″, and also costs $29.99. The standard dimension for Lapua 220 Russian and 6mmBR flash holes is 1.5mm or .0590″. This tool will permit standard-size decapping rods with .0625″ tips to work without binding. However, note that both Forster and Redding normally supply .057″ decapping pins with their PPC and BR dies. So, it is NOT necessary to ream your Lapua BR/PPC flashholes, unless you prefer to do so for uniformity. It IS, however, a good idea to check BR/PPC flash holes for burrs before loading the first time.
NOTE: If you purchase either the 073081 or 073000 Sinclair Flash Hole Reamer tools, we recommend you mic the cutter tip before you process a bunch of cases. Sometimes a tip comes through that is oversize. This will ream the flash holes larger than you may intend.
There is an informative article on the NRA’s American Hunter website regarding suppressor use for hunting. The article, What Hunters Need to Know About Suppressors, answers common questions about licensing, tax stamps, and suppressor types. The article explains the history of the $200 tax stamp which must be paid when acquiring a suppressor:
“Why the Tax? In 1934 … the federal government, while battling gangsters such as Al Capone, heavily restricted silencers with passage of the first National Firearms Act. Hoping to gain an advantage on criminals that often had better weapons than cops, the Feds placed a mandatory ‘sin’ tax on silencers that was so high it would effectively ban their purchase by all but the wealthiest individuals. In 1934, $200 was the equivalent of $3,500 today. The $200 tax still stands despite no evidence that a simple metal tube is capable of causing crime.” — American Hunter
The American Hunter article also discusses how well suppressors actually reduce noise. User should be aware that the sound level of a large, centerfire hunting cartridge will still exceed 130 decibels (dB) on average, even with a typical suppressor (silencer) in place. For that reason, we recommend that hunters continue to wear ear protection even when they shoot suppressed.
For example, Thunder Beast Arms says its latest Ultra 9 Suppressor will reduce the report of a .308 Win to 132-134 dB: “The ULTRA 9 will suppress a typical .308 bolt-action rifle down to approx. 132-134 dB. It also has very little or no ‘first round pop’ (FRP) in most applications.” NOTE: These dB levels are measured in accordance with MIL-STD-1474D using BK 2209 SLM offset one meter from muzzle.
How Loud Are Unsuppressed Rifles?
Firearms Are Loud — 140 dB to 175 dB. Audiology group ASHA explains: “Almost all firearms create noise that is over the 140-dB level. Exposure to noise greater than 140 dB can permanently damage hearing. A small .22-caliber rifle can produce noise around 140 dB, while big-bore rifles and pistols can produce sound over 175 dB. Firing guns in a place where sounds can reverberate, or bounce off walls and other structures, can make noises louder and increase the risk of hearing loss. Also, adding muzzle brakes or other modifications can make the firearm louder. People who do not wear hearing protection while shooting can suffer a severe hearing loss with as little as one shot[.] Audiologists see this often, especially during hunting season when hunters and bystanders may be exposed to rapid fire from big-bore rifles, shotguns, or pistols.” Source: ASHA, Recreational Firearm Noise Exposure.
How Much Does a Good Suppressor Really Reduce Firearm Sound Levels?
That depends on the rifle, the cartridge, and the effectiveness of the suppressor. The American Hunter article explains: “Suppressors retard the speed of propellant gases from the cartridge that rapidly expand and rush out of the barrel. It’s these gases that produce the loud boom that’s heard for miles. A suppressor’s series of internal baffles slows these gases so they are not all released at once, thereby muffling the sound.” Many good commercial suppressors can achieve 30-35 dB sound suppression. However, Zak Smith of Thunder Beast Arms says: “There are a bunch of manufacturers who publish values that are not reproducible, or use an ad-hoc test instead of a mil-spec test. In many cases we’ve tested the exact same suppressors they’ve advertised with 30-40 dB reductions and found they are actually in the high 20s instead.”
Again, for this reason, we recommend that hunters use ear protection, such as electronic muffs, even when shooting suppressed.
Choosing a Suppressor for Hunting Use
The American Hunter article explains that there are many types of suppressors on the market. Bigger suppressors are heavier, but they normally are more effective. You also have a choice in muzzle attachments:
“For most hunting applications, direct thread is the best choice. If you intend to buy only one suppressor yet you have multiple guns, it’s advantageous to buy a model sized and rated for the largest caliber you intend to use. While a suppressor made specifically for a .223 Rem. will reduce the sound of that round slightly better than a model made for .30 caliber, for example, you can use a .30-caliber can for smaller calibers — but not vice-versa. In general, the bigger the can, the more it reduces sound. Smaller suppressors, however, are easier to carry in the woods.” — American Hunter
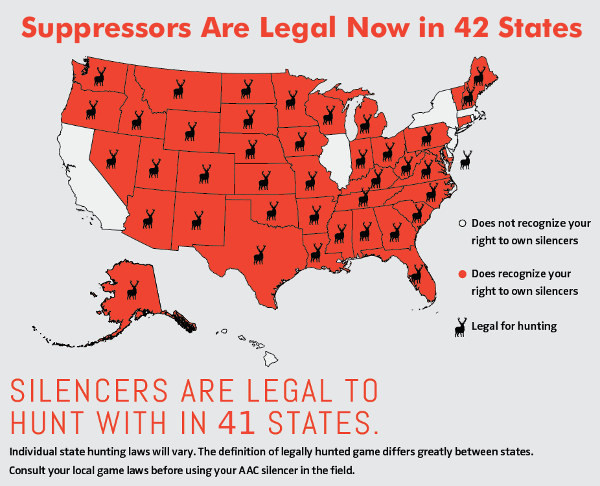
States Where Suppressor Ownership is Allowed
Currently, the following 42 states allow private ownership of suppressors: AL, AK, AZ, AR, CO, CT, FL, GA, ID, IN, IA, KS, KY, LA, ME, MD, MI, MN, MS, MO, MT, NE, NV, NH, NM, NC, ND, OH, OK, OR, PA, SC, SD, TN, TX, UT, VT, VA, WA, WV, WI, WY. NOTE: Suppressors are legal in Connecticut, but hunting with silencers is not allowed in Connecticut.
How to Apply for a Suppressor
To acquire a quality suppressor, you’ll first need to shop around, comparing verified performance. Unfortunately some manufacturer’s dB claims are exaggerated. Give due consideration to size, weight, and durability. When you’ve selected a brand and model, find a Class 3 dealer authorized by the ATF to sell suppressors. You must fill out ATF Form 4, get fingerprinted, and pass a background check. Along with two completed copies of Form 4, submit your fingerprint card, passport photo and a check for $200 to the ATF. Then you wait for the ATF to process your application. American Hunter says the average ATF suppressor processing wait time is now nine months.
BENEFITS OF SILENCERS
NOISE REDUCTION
According to OSHA, the threshold for a hearing safe impulse noise is 140 dB. Without hearing protection, exposure to any impulse noise over 140 dB causes varying degrees of permanent noise-induced hearing loss, which can also lead to tinnitus. Most well-engineered silencers take the dB level of their host firearm well below 140 dB, making those silencers effective primary hearing safety devices. You should always still wear hearing protection (muffs or plugs) when using suppressors.
RECOIL REDUCTION
By containing the explosion at the muzzle, suppressors significantly reduce perceived recoil energy, reduce the rifle’s rearward movement on recoil, and reduce rifle torquing and muzzle flip. The reduction of recoil (and rifle torquing/hopping) lessens shooter fatigue and helps the shooter get his sight picture back on target rapidly after firing. With smaller calibers, a suppressor may enable the shooter to maintain a nearly-continuous sight picture, following the shot into the target. In addition, by reducing felt recoil (and muzzle blast), a suppressor can help inexperienced shooters avoid flinching.
At the request of our readers, we provide select “Deals of the Week”. Every Sunday afternoon or Monday morning we offer our Best Bargain selections. Here are some of the best deals on firearms, hardware, reloading components, optics, and shooting accessories. Be aware that sale prices are subject to change, and once clearance inventory is sold, it’s gone for good. You snooze you lose.
NOTE: All listed products are for sale to persons 18 years of age or older. No products are intended for use by minors.
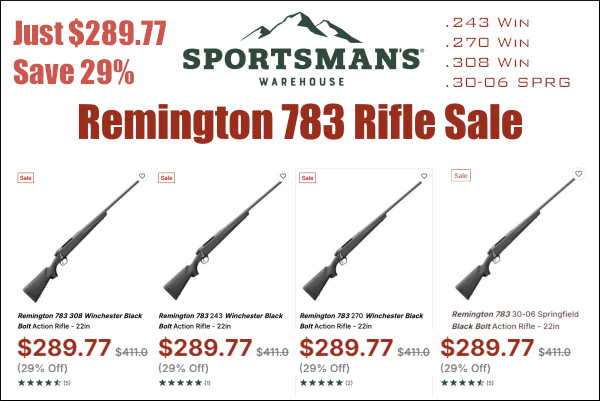
1. Sportsman’s WH — Rem 783 Rifle (Many Calibers), $289.77
⏺️ » Good quality hunting rifles under $300!
It’s hunting season. Here’s an amazing deal on a good Remington hunting rig. The Remington 783 rifle is available in a variety of popular chamberings for just $289.77 at Sportsman’s Warehouse. This modern rifle has a pillar-bedded action, free-floating button-rifled barrel, steel detachable magazine, and modern polymer stock. There are both 22″ and 20″ barrel options. The Rem 783 features Remington’s new user-adjustable Cross Fire trigger system.
2. Precision Reloading — FREE Hazmat On Purchases of $199+
⏺️ » Save $30-$45 with FREE Hazmat through 10/2/2025
When you purchase powder and/or primers, you normally must may the vendor a Hazmat fee of up to $45 per order. But right now Precision Reloading is offering FREE Hazmat on Powder and/or Primer Orders of $199 or More. To get FREE Hazmat use Coupon Code FREEHAZ at checkout. That can save you $30-$45 compared to other online retailers.
3. Midsouth — Hornady LNL Classic Press, $161.99
⏺️ » Good, strong single-stage press $38 less than elsewhere
The Hornady Lock-N-Load Classic Single-Stage Press is a very good press for loading pistol and rifle rounds. The Lock-N-Load Classic has a strong solid cast frame. The frame front is angled, allowing easier placement and recovery of cartridges. This press also works with Hornady’s Quick Change bushing system to allow rapid die changes. An optional Primer Feed tube system that holds up to 70 primers is available. NOTE: Midsouth is selling this press for just $161.99 — a great deal. This same press sells for $199.97 elsewhere.
4. Midsouth — ELEY .22 LR Rimfire Ammo Sale
⏺️ » Ultra high-quality .22 LR rimfire ammo with big discounts
ELEY .22 LR Rimfire Ammunition is favored by top rimfire shooters in multiple disciplines — Silhouette, Benchrest, Smallbore 3P/Prone, Field Target, NRL22 tactical, Steel Challenge, Biathlon, and Pistol. ELEY offers a wide range of ammo types starting at about $7.40 per box. Right now Midsouth has 14 types of ELEY rimfire ammo on sale including: Target, Ultra, TENEX EPS, Club, Match, Team, Semi-Auto BR Precision, High Velocity, Benchrest Outlaw, Bullseye, Subsonic, TENEX Pistol and more.
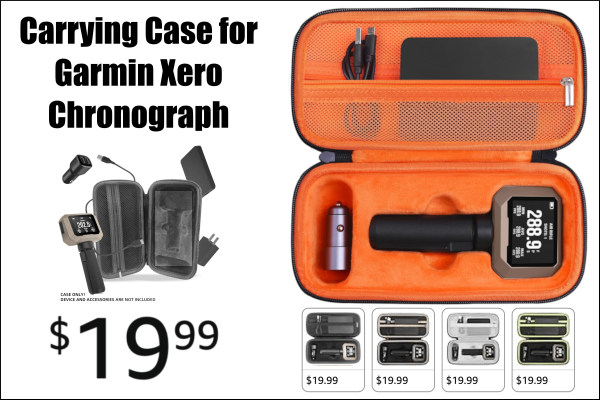
5. Amazon — Carry Case for Garmin Xero C1 Chronograph, $19.99
⏺️ » Handy, quality case for popular Garmin Radar Chronograph
This handy carry case is designed specifically for the Garmin Xero C1 Pro Chronograph. The nicely-padded, waster-resistant case holds the chrono mounted on its tripod, with a zippered compartment above for power cords and accessories. Three different inside colors are offered: Orange (as shown), Black, and Gray. And there are two other black interior versions with contrasting tan or green highlights. This kind of case is a “must-have” for transporting your $599 Garmin Chrono. There is also a smaller $9.99 Garmin Compact Travel Case that just holds the unit and a cord (not the power adapter). Both large and small cases provide protection from scratches, impacts, and everyday wear and tear.
6. Graf & Sons — Hornady Ammo Sale
⏺️ » Large selection of hunting and target ammo at good prices
Graf & Sons is currently running a major sale on Hornady Ammunition for both hunting and target shooting. Hornady Superformance ammo features polymer-tipped Hornady NTX bullets which are accurate and very effective on big game. Hornady’s Superformance ammo works in all action types, including semi‑autos. Along with Superformance ammo, many other ammo types are on sale, including .17 HMR rimfire.
7. Midsouth — Frankford Arsenal Perfect Primer Seater, $62.11
⏺️ » Excellent Primer Seating Tool with very positive user reviews
Amazon has the Frankford Perfect Primer Seater Tool for $62.11 (22% Off). This is a GREAT primer seating tool. It has good feel, plenty of leverage, and the primer tray works well. Importantly, it has a click-adjust wheel for precise primer seating depth control. Read our Frankford Primer Seating Tool Product Review. The tool comes complete with 12 precision shell holders. A quick thumb release system allows you to switch from small to large primers easily. Plus there is a hard stop so you won’t over-crush a primer.
8. Natchez — Federal .223 Rem, 500 Rounds, $199.99
⏺️ » Get 500rds of good .223 Rem ammo for just 40 cents each
Here’s great deal on quality Federal .223 Rem 55gr FMJ American Eagle Ammunition. A 500-round pack is now just $199.99, which works out to just 40 cents per round. American Eagle rifle ammunition offers consistent, accurate, affordable performance for the range. The loads feature quality bullets, reloadable brass cases and dependable primers.
Designed for the smaller heads of youth and women shooters, these Walker’s Slim Passive Earmuffs (#ad) feature a slim profile for comfort and convenience. Lightweight, foldable, and adjustable, these earmuffs are well-suited for female and younger shooters. The $18.02 price is a fantastic deal on good muffs with impressive 27dB Noise Reduction Rating (NRR). These are available in a variety of colors, including Flat Dark Earth (FDE) or Black for $18.02, Olive Green for $18.97, Coral for $20.16, and Teal for $22.53.
As an Amazon affiliate, this site can earn revenues through sales commissions.
You can spend thousands on a rifle, but that expensive hardware won’t perform at its best if you have poor trigger technique. One key element of precision shooting is trigger control. Our friend Kirsten Joy Weiss has produced a good video that shows how to refine your trigger technique for better accuracy. In this video, Kirsten talks about the actual placement of a shooter’s index finger on the trigger. It is important to have the finger positioned optimally. Otherwise you can pull the shot slightly left or slightly right.
Kirsten tells us: “Finger placement on the trigger might not seem like a big deal, but it actually is. The reason for this is because, depending on where your index finger is placed on the trigger, [this] translates to different muscle interactions with the gun.” Watch this video to see Kirsten demonstrate proper finger placement (and explain problems caused by improper finger positioning).
When you pull the trigger, you only want to engage the last section of your finger, in order to avoid unwanted muscle engagement and to achieve a smooth shot. Remember there is a “sweet spot” between the crease (first joint) and the tip of the finger. If you position the trigger in that “sweet spot”, you should see an increase in your accuracy. Don’t make the mistake of putting the trigger in the crease of your finger, as shown below.
Effects of Incorrect Finger Placements
You want to place the trigger shoe between the end of your finger and the first joint. If you place the trigger on the very tip of you finger you’ll tend to push the rear of the rifle to the left when engaging the trigger, causing shots to go right (for a right-handed shooter). On the other hand, if you put the trigger in the crease (first joint), you’ll tend to bring the rear of the rifle to the right, causing shots to fall left. This is illustrated below for a right-handed shooter.
For hunters in a tree stand, SFC McPhail recommends a position with your weakside leg pulled up and firmly braced on the front rail of the treestand. You can then rest your support arm on your leg. This provides a rock-solid position when shooting from a stand.
Team USA Olympian and ISSF World Cup Winner SFC Michael McPhail is one of the world’s best smallbore rifle shooters. He is also an avid hunter, who enjoys harvesting game with centerfire rifles. In a USAMU video, McPhail shows how competition shooting positions can be adapted for hunters. McPhail shows how well-established positions can provide a more stable platform for hunters in the field. That can help ensure a successful hunt. McPhail demonstrates three positions: kneeling, supported prone, and sitting in a tree-stand.
Watch SFC McPhail Demonstrate Positions for Hunters (Good Video):
McPhail first demonstrates the kneeling position. Michael notes: “I like kneeling. It’s a little bit of an under-utilized position, but it’s almost as stable as prone. It allows you get up off the ground a little bit higher to [compensate for] vegetation. For kneeling start by taking your non-dominant foot and put that towards the target, while at the same time dropping down to a knee on the dominant leg. At the same time … wrap the sling around wrist and fore-arm, lean slightly into the target and take the shot.”
McPhail shows a nice “field expedient” use of your backpack. He shows how the basic prone position can be adapted, using the pack as a front rifle support. McPhail recommends pulling your dominant (strongside) leg forward, bent at the knee. According to Michael, this takes pressure off the abdomen, helps minimizes heart beat effects, and helps with breathing.


 Moore was summoned to Washington, DC on April 26, 1926 to meet President Calvin Coolidge. At the White House, President Coolidge met the young marksman and presented Moore with a gold medal. The engraving on the back reads: “Presented to L.S. Moore by the President of the United States [on] behalf of the National Rifle Association. Junior Rifle Corps World Record — 3000 — consecutive bullseyes.”
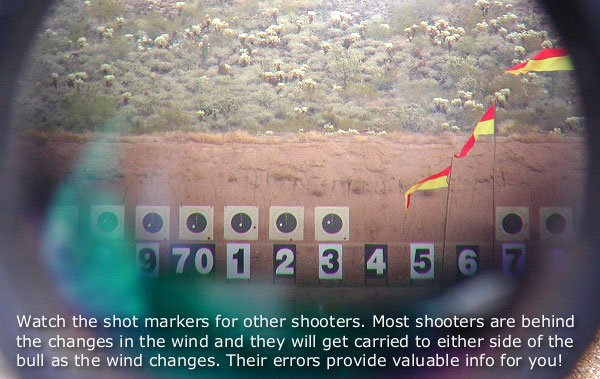

 Part One covers basic principles, tactics, and strategies, with a focus on the 200-yard stages. Emil writes: “There are as many dimensions to ‘wind reading’ as there are stages to High Power competition. Your tactical mindset, or philosophy, must be different for the 200 and 300 yard rapid-fire stages than it would be for the 600 yard slow-fire. In the slow-fire stages you have the ability to adjust windage from shot to shot, utilizing the location of the previous shot as an indicator. Additionally, a change to the existing conditions can be identified and adjusted for prior to shooting the next shot.”


 Team USA Olympian and


