Top is a CZ 457 MTR; middle Anschutz with BR stock; bottom is Bergara B14R in DPT Chassis.
With the variety of rimfire disciplines, from cowboy action to Olympic three-position smallbore, there are countless different rimfire designs on the market — bolt guns, lever guns, single-shots, toggle-links and more. These may shoot the same ammo, but they certainly vary in looks and ergonomics. This is testimony to human creativity.
In our Shooters’ Forum, you’ll find a long-running thread showcasing rimfire rifles for plinking, hunting, 3P Target Shooting, Silhouette, Rimfire F-Class, NRL22 and more. Here are some of the notable rifles featured in that popular Forum thread, with brief build/component details.
ARA Benchrest Rifle with Stiller Action, Shilen Ratchet Barrel
Forum member Peebles24 showcased his cool flame-paint-job .22 LR benchrest rifle against a scenic, snowy background (never too cold to shoot right?). “I had a new rifle built this past fall by Mark Penrod at Penrod Precision. Stiller 2500X action, Shilen ratchet barrel, Jewell trigger, McMillan stock, Harrell’s tuner, Sightron SIII 10-50×60mm glass. I’m shooting it off my Arnold Machine one-piece rest made locally by Cliff Arnold. I visited the Lapua Testing Center East and got a case of Midas+.” For ammo testing results, click photo at right.
In late April the gun competed in its first ARA benchrest match in Wabash, Indiana.
Beautiful MasterClass-Stocked Rifle for Rimfire F-Class
Here is a handsome rifle belonging to Forum member Redd. Set up for prone Rimfire F-Class-style competition, this rig features a Shilen Ratchet barrel with Erik Cortina Tuner fitted to a Stiller 2500X action. It boasts a beautiful MasterClass figured Walnut stock and rides on a SEB Joy-Pod bipod up front. The optic is a Nightforce 40x45mm Competition.
CZ 457 .22 Magnum Transformed with KRG Bravo Stock
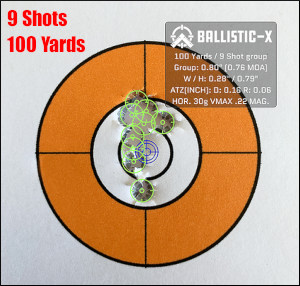
Forum member JAS-AS purchased a .22 Magnum CZ which he revived as a training rig with a new stock. He posted: “I use a CZ457 in .22 Magnum mainly as a trainer — bipod and rear bag kind of stuff. It has evolved over the last year or so. Next change will be a Lilja barrel. This because it can shoot brilliantly (at times) but not consistently. And accuracy degrades as it gets minimally dirty. Also, it doesn’t like 40gr rounds — the groups open up to 1.5 MOA. It’s at its best with 30 and 35 grain rounds running at up to 2250 fps. I believe that to be a twist-rate issue.”
The “Before” photo shows the rifle “as purchased” with a Nikon Monarch 4-16x42mm mildot scope. The “After” image shows the CZ 457 as modified. JAS-AS notes: “I added a bunch of stuff: KRG Bravo stock, Vortex Strike Eagle 5-25x56mm FFP scope, new bipod and Precision Underground bag, trigger spring. With this setup I shoot at 100 yards+ exclusively.” Show at right is a 9-shot group with the rifle at 100 yards. Three-shot groups at 100 have been below half-MOA.
Rimfire F-Class Rig with Curly Maple Stock
This handsome, ultra-accurate Smallbore F-Class rig belongs to member RMist of Team Pro-Shot Products. It has a Holeshot (Stiller) 2500X, stunning Cerus Curly Maple wood stock, Nightforce scope. Up front is the joystick co-axial SEB Joy-Pod.
How does this impressive rimfire F-Classer shoot? Amazingly well. That target at right shows TEN (10) rounds fired at 100 yards. Most centerfire rifles would have trouble beating that level of accuracy.
Rimfire Tactical Rig with CZ Action and McRees Precision Chassis
Here’s a modern chassis rig built with a CZ 455 action. Forum member A-Rob upgraded the CZ 455 with a SCAR 2-stage trigger. This rifle features a Keystone Accuracy-fitted glue-in barrel, Athlon 10-40x scope and McRees Precision chassis. As you can see from the target, it shoots great. Note: CZ has replaced its 455s with the new CZ 457 series with available metal chassis precision model. CLICK HERE to see full target sheet with six 5-shot groups at 50 yards, averaging 0.270″.
Savage Mark II Squirrel/Field Rifle
This Savage Mark II rifle isn’t fancy, but it has brought much satisfaction to its owner, Forum member “Ohio Varmint Shooter”. He posted: “Just a nice field gun. Less than $200 (without scope). Cheap wooden stock, thin pencil barrel. My squirrel/field gun. There is absolutely nothing special about this… except it’s lefthanded. It shoots fine, preferring CCI standard velocity rounds. I did splurge and put a more-than-needed scope on it. Most scopes with fixed parallax (in this category), have it fixed at 50 yards. I wanted variable parallax so I could set it at 35 yards. I don’t know if it really makes any difference, but I do try to go for accurate head shots. The scope is also a little overkill in magnification, but it does help with the head shots and my aging eyes.”
“As a youth in the 70s, I always dreamed of a left-handed bolt. So getting back into shooting/hunting about 8 years ago, I was delighted to discover this gun. Growing up I had a semi-auto 22, but being a lefty … it would spit powder on my face.” — Ohio Varmint Shooter
Tikka T1x Action in Eliseo Competition Machine Chassis
Here is Gary Eliseo’s personal Rimfire Match Target Rifle with Tikka T1x action. The T1x action is carried in Competition Machine Rimfire Chassis. Gary also posted some recent 100-yard groups, using SK rifle match ammo in this rifle. Gary runs Competition Machine LLC and produces the chassis system for this cool rig, along with outstanding Across-the-Course, High Power, and F-Class chassis systems for rimfire and centerfire rifles.
Vudoo Action Benchrest Rifle with Benchmark 3-Groove Barrel
Here is a classy benchrest rig belonging to Forum member FCJIM. It features a Vudoo LBRP action, Benchmark 3-groove barrel, Harrell’s Precision tuner, NightForce Benchrest scope, and McMillan Edge stock. The stock work was done by Doan Trevor, while FCJIM did the metal work himself, using a Nevius reamer. This rig likes to shoot ELEY Black and Lapua Midas+ ammo.
Last but not least, here is a “blast from the past”. This classic lever-action single shot is crafted by CPS Rifles (Paul Shuttleworth), a boutique gun-maker specializing in single-shot rifles, particularly reproductions of the Stevens 44 1/2. Note the richly-figured wood and the lovely color case-hardening on the receiver. There is a dual Set Trigger system. You pull one trigger through a relatively long stroke until it clicks. The the second trigger breaks the shot (and drops the hammer) with just a few ounces of pull weight. This rig, fitted with MPA Vernier-type tang sights, belongs to Forum member “Mills” from Texas.
Do you own an RCBS electronic powder dispenser? If you do, take the time to watch this ChargeMaster Tuning video from 8541 Tactical. This nine-minute video demonstrates how to re-program your ChargeMaster to “tune” the dispensing process. The video shows the exact programming procedures to follow, step-by-step. Some folks want a faster powder flow — others tune their machines for a more reliable drop (with fewer over-runs). One cheap and popular modification is to insert a 1″-long section of a McDonald’s plastic straw in the ChargeMaster’s silver dispensing tube. This works surprisingly well to smooth kernel drop and prevent “clumping” that can cause an over-charge. The McDonald’s straw MOD is demonstrated in this video, starting at the 6:22 mark.
Large-Diameter Dispensing Tube Mod
Many folks have had success with the McDonald’s straw modification demonstrated in the above video. However, some folks would like to get even better flow performance (with virtually no clumping). Forum Member Frank B. has come up with a new option using a brass hose fitting with a large outside diameter. The hose fitting (with tape wrapped around the barbed nose section) is placed inside the RCBS dispensing tube (have some kind of wrap — you don’t want metal-on-metal). Here’s how the unit looks installed:
Frank tells us: “I have found a cure for the over-throw problem. It is a simple 1/4″ barbed hose nipple. I wrapped a couple layers of tape around the barbed end for a snug fit. With this in place, I have thrown 100+ charges of Varget without a single overthrow. The ID of the barbed end needs to be approximately 3/16″ to feed a steady flow. This works because of the larger ID at the drop.”
Frank adds: “You can see in the photo that the powder is not stacking up. You can watch it drop one grain at a time. Hope this will take the aggravation out of your case charging.” For best performance with this brass fitting MOD, we recommend de-burring and smoothing out the front edge of the brass fitting over which the kernels drop.
Brass fitting mod suggested by Boyd Allen. We welcome reader submissions.
Introduction — What You Need in a Security Gun Safe
If you own firearms, you need a gun safe. In some states, such as California, if you don’t own a safe, you face potential liability if your firearms are stolen. Purchasing a safe is no easy decision however. There are dozens of safe manufacturers and countless design options. Sorting out the facts from the marketing claims can be difficult.
Today’s seven Saturday Showcase videos explain the most important qualities you should look for in a safe, and help you with the tough decisions, such as “Should I get a digital lock or a dial lock?”, “What kind of fire-proofing is most effective?”, “How big a safe do I really need?”, and “What interior works best with long-barreled scoped rifles?” You’ll find reviews of full-size safes, modular safes, and smaller handgun safes. Plus you’ll find expert advice on how to install your safe in your home and how to keep the contents free from rust.
Budget $1200-1500 for a safe from a major maker, with external hinges, and an interior at least 58″ high. That gives you room for 30″-barreled rifles with a top shelf for handguns and other valuables. A rotary rack and slide-out drawers are great additions.
Keypad or Dial? We favor rotary dial locks. With minimal maintenance they will function flawlessly for decades. But the digital locks offer quick-access and convenience. If you go digital, get a commercial-grade unit.
Fire-lining is worth getting, but a thin layer of sheet-rock doesn’t make a safe truly “fire-proof”.
Interior at least 58″ High and 30″ wide Overall Weight 750+ Pounds 8 Gauge or Heavier Wall Thickness Double-Wall, Composite Door with Relockers Minimum UL RSC Rated. TL-15 or TL-30 Rating is Desirable External Hinges
Mechanical UL Group II (or better) Lock with Standard Dial Or UL Type 1 Commercial-Grade Electronic Lock
Custom Interior Suitable for Scoped Guns with Long Barrels On-Door Storage System for Non-scoped Long Guns OR Rotary Gun Rack for Scoped Rifles and ARs
Internal (sandwiched) Insulator, Reinforced if Sheet-rock Palusol? Heat-Activated Expanding Door Seals
Slide-out Drawers for Handguns Fire-lined Inner Safe for Paper and Media
Low Gloss, Rust-resistant External Finish Pre-Drilled holes for Lag Bolts and in Rear for Electric Cord Overhead Fluorescent Lamp and/or LED Mini-lights on Strings
Advice for Gun Safe Buyers — Seven Key Things to Consider
This video covers key gun safe features — Seven Things to Consider Before Buying a Gun Safe. Not all gun safes are created equal. There are many variables — fire ratings, burglar ratings, colors, lock choices, internal capacity, door storage, and more. And with the recent controversy involving Liberty Safes, you should check the safe-maker’s policies regarding digital passcodes — you don’t want your passcode revealed without a warrant and/or without your consent.
DOs and DON’Ts of Safe Buying
DO purchase a safe that is bigger than you think you need.
Your gun collection is bound to grow over time. A good safe is more than just a gun locker–it becomes a secure storage device for your family’s other valuables as well. You’ll find you quickly fill up even a large safe. Spend the money for the size, protection, and features you want. Your gun collection may be worth many tens of thousands of dollars. Some people who visit this site wouldn’t hesitate to spend $1300 for a custom action or $1800+ for a competition scope, yet they don’t want to spend more than a few hundred dollars on a safe. That’s not common sense. If you’re on a tight budget, consider a used safe. Unlike many other products, safes don’t really wear out over time. When businesses change locations, you can get a very high quality commercial safe for little more than the cost of removing it.
DO spend more for a safe that offers fire-resistance.
But you have to do your homework–you can spend a lot of money for “fire-proofing” that actually is not very effective. Make sure if sheet-rock is used that it is properly installed. If you have valuable documents and media files, it’s not a bad idea to purchase a smaller, commercial-grade fire safe to put inside the gun safe. This gives you double protection.
DO look at many different brands of safes before you buy.
There ARE significant differences among brands. For example, Browning offers a unique (patent-pending) door-mounted rifle rack. Zanotti offers slide-out drawers and a modular design that is much easier for an owner to move. Ft. Knox uses an advanced method to secure and stabilize its fire-proofing layers within the safe. Brown offers custom exotic wood interior shelving and safes with commercial-grade burglary protection (much thicker steel with heavy composite doors and walls). Amsec offers a proprietary “DryLight” poured concrete-type fire insulation with greater structural strength than typical sheet-rock panels.
DO investigate the safe’s specifications.
Just because a safe is big and heavy doesn’t mean it’s particularly secure. Heavy-gauge steel is much more resistant to cutting and drilling than light 12- or 14-gauge steel. Some safes on the market have walls so thin they can be penetrated with a fire ax. We recommend 10-gauge steel at a minimum, and 8 gauge is much better. The safe should carry a UL RSC (Underwriters Laboratories “Residential Security Container”) or better rating.
DO ask about the safe’s safeguards against tampering.
A quality safe will feature extra armor or devices to defeat drilling. Low-grade safes can be opened in a few minutes with simple, battery-powered hand tools. All safes should have relockers to help ensure the safe remains locked in the case of a burglary. Relockers are hardened pins that are triggered during an attack, and cannot be retracted without hours of drilling. The number of relockers on a safe ranges from 2-10+ depending on the safe’s size and burglary grade.
DON’T store powder in your safe. A tightly-sealed metal box with a large quantity of powder inside is a bomb. Store powder in a separate, lightly-constructed cabinet or plastic box. The main thing for powder is to keep it dry and away from moisture and light.
Don’t Make the Mistake of Buying an Undersized Safe
The most common mistake people make when buying a gun safe is getting a safe that’s too small. This video explains why you should probably invest in a bigger safe. First, the rated gun capacity is exaggerated — rifles with mounted optics, long barrels, wide forearms and/or pistol grips take up considerably more space than a small rimfire rifle or a lever gun with iron sights. Second, your gun collection will likely grow in years to come. Third, you may want to store other valuables in the safe — such as vital documents, jewelry, watches, and pricey electronics. In this video the host notes: “Get a much larger safe than you think you’ll need at first. This will guarantee that you will have enough room for future purchases and all the guns and equipment you currently have.”
What Happens in a Fire and Deluxe Features
This video shows what can happen INSIDE a gun safe during a fire. This Winchester safe did not fare well during a major hourse. That’s why you want to buy a safe with a good fire rating.
This video shows the features of a large Superior Safe Co. gunsafe with internal organizers and door storage for handguns and accessories.
Modular Safes — Smart Option for Easier Moving
This article features a great video showing how to assemble a modular safe in under 30 minutes. This article also explains the benefits of modular gunsafes — primarily easier transport and installation. “Modular safes have been around for a few years now and are becoming more popular. Here’s why: The safe comes delivered to you in panels, so you can bring them into your home one at a time and put it together anywhere you like. This makes it easy to carry up and down stairs, onto elevators or anywhere! Security — Is it as secure as one that comes pre-assembled? The answer is, absolutely.” READ FULL ARTICLE on NRAWomen.com.
Five Good Gun Safes Under $500
We know some readers have a tight budget. This video looks at some recommended lower-cost safes under $500.00 list price. Note, however, that this video was produced in 2022. Now in 2023, with Bidenflation, the actual gun safe prices may be higher. For a full-size safe, we do recommend you spend quite a bit more — the investment in a higher quality safe, with better fire rating, is worth it.
Locking Device–Mechanical Dial vs. Digital Locks Recommendation: UL Group II mechanical dial lock or commercial-grade electronic.
For gun safes, we prefer rotary-combination dial locks, although commercial-grade electronic locks are now very good. While less convenient, and slower to open than electronic locks, combination locks are still more durable and trouble-free than the digital locks found on many low- to medium-cost gun safes. Among the combination locks, the Sargent & Greenleaf model 6730 (UL Group II) remains an industry standard. The director of Sturdy Safes noted: “An S&G 6730 will be working fine when your grandchildren have grandchildren.” For home use, we also recommend the standard, high-visibility “front-read” white on black dial.
Avoid the cheap, imported electronic locks. These are known for failing relatively quickly–the keypad internals just wear out. With some of these designs, if the lock fails while the door is closed, you’ll have to employ a professional gunsmith to drill your safe and replace the locking assembly and keypad. With any electronic lock, re-program your combination now and then so that keypad wear patterns don’t reveal the numbers you push to open the safe. But when you change the combination, be sure to record the new setting.
With a dial lock, choose a design that meets UL Group II (or better) certification. If you choose a digital lock, we strongly recommend that you select a UL Type I, Commercial Grade lock from LaGard, Sargent & Greenleaf, or Kaba Mas. Commercial-grade locks, such as the S&G Comptronic” 6120 or LaGard “SafeGard” are much more robust and are designed to be used 20 times a day or more in retail and banking environments. A good commercial digital keypad lock should give 10 years or more of continuous use before replacement is required. With any digital lock, however, you should replace the battery at least once a year. Normally this can be done without professional assistance.
A rapid-access bedside safe is a great way to keep your pistol secure, but also readily available, close at hand. Not all rapid-access pistol safes are created equal, however. In this video, John of Pew Pew Tactical explains what to look for in a small pistol safe, and points out the pros and cons of the four safes tested:
Fort Knox FTK-PB Simplex Pistol Box
Strong case, reliable no-battery locking system. Very good safe, but expensive ($299.00 on Amazon).
Vaultek Electronic Pistol Safes Vaultek offers multiple styles and sizes, many with advanced biometric capabilities. Vaultek rapid access safes are offered in sizes to hold a single handgun or multiple pistols along with other valuables.
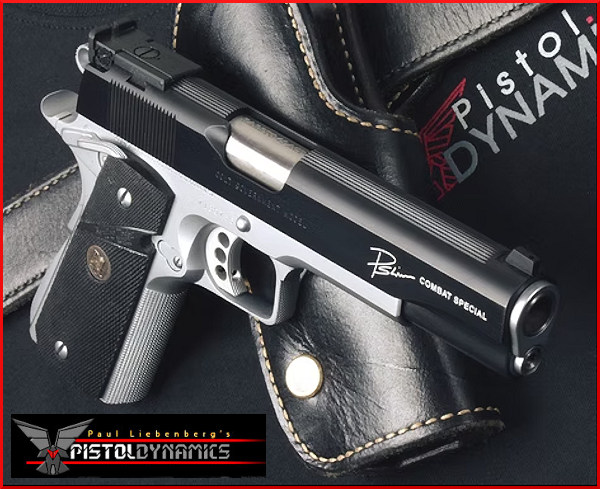
Paul Liebenberg of Pistol Dynamics is widely considered to be one of the finest pistol-smiths on the planet. When you ask other well-known handgun smiths whom they would rank among the very best, Liebenberg is a consensus pick. And Paul’s work is in high demand. There is a multi-year-long waiting list for his custom pistols, mostly built on 1911-platforms.
Some years back, Liebenberg shared his pistol building/tuning knowledge in a professional DVD from Panteao Productions. In that DVD, Liebenberg demonstrated the procedures he employs when crafting a custom 1911 pistol. The DVD’s topics covered included: fitting barrel and barrel bushing, installing grip safety and thumb safety, installing and tuning the trigger, installing and tuning extractor and ejector, relieving the mag well, undercutting the trigger guard, lowering the ejection port, and much more. Below are two YouTube videos that cover highlights from the DVD.
40+ Years Expertise
A trained industrial designer from South Africa, Paul Liebenberg was a member of the World Champion South African Practical Pistol Shooting Team. An NRA High Master and four-gun firearms instructor, Paul has competed successfully in many shooting disciplines.
In 1983 Liebenberg immigrated to the USA and joined Pachmayr Gun Works in Los Angeles where he rose to manage the Custom Gun Shop. In 1985 he opened Pistol Dynamics to build high-end 1911 competition handguns and Pachmayr pistols on contract to that company. Today Pistol Dynamics is in Florida where Paul continues to build high-end 1911 pistols. You can see his products at PistolDynamics.com
Are you curious about bullet stabilization? Do you understand why bullets can tumble or become unstable if the velocity gets too low or if the twist rate is inadequate. Here is an excellent video from Gunwerks that explains Bullet Stabilization.
This animated video starts by showing the design/shape differences between an older-style rifle bullet and a newer VLD-style bullet with higher BCs (Ballistic Coefficients). Generally speaking, the longer a bullet gets relative to diameter, the more RPM is required for stability. And to achieve that higher RPM you need more barrel twist and/or more RPM. The video illustrates where the Center of Gravity and the Center of Pressure are located. These are farther apart (in relative terms) for a VLD or Hybrid-style, long-nose bullet.
When the bullet is in flight there is an angle of attack. This is exaggerated in the animation for illustration purposes, but it is important to understand the the attack angle affect stability. The rotation rate (Revolutions Per Minute) is a function of bullet velocity as it leaves the muzzle and the twist rate of the barrel. Since long VLD-style bullets need more stability, the barrel twist rate needs to be higher than with shorter, fatter bullets. This is pretty much try for all calibers.
The importance of adequate barrel twist rates for bullet stabilization is further discussed in this next video featuring Bryan Litz of Applied Ballistics:
Bullet Stability and Twist Rates
In this video, Bryan Litz talks about bullet in-flight stability and how to calculate barrel twist-rate requirements for long-range bullets. Bryan explains that bullet stability (for conventional projectiles) is basically provided by the spinning of the bullet. But this spin rate is a function of BOTH the nominal twist rate of the barrel AND the velocity of the projectile. Thus, when shooting the same bullet, a very high-speed cartridge may work with a slower barrel twist rate than is required for a lower-speed (less powerful) cartridge. For match bullets, shot at ranges to 1000 yards and beyond, Bryan recommends a twist rate that offers good stability.
Forster Co-Ax® presses are very popular with owners because they are smooth-running, they produce very consistent ammo, and they allow quick and easy die changes. If you would like to add a Co-Ax to your loading room, now is a good time to buy — Grafs.com has Co-Ax presses in stock, at just $339.29 — that’s ten percent (10%) off the regular $376.99 price. This sale price includes a set of jaws, and includes ground shipping (in the lower 48), after a single $12.95 (per order) handling fee. If you’ve been hankering for a Co-Ax press, now is definitely a good time to buy.
If you are not yet familiar with the many unique features of the Forster Co-Ax, we recommend you watch the video embedded below. This shows how the press operates and highlights the design elements which set the Co-Ax apart from every other reloading press on the market.
Video Shows Special Features of Forster Co-Ax Reloading Press
Forster Co-Ax Press Video Review
This is a very thorough review of the Forster Co-Ax done by Rex Roach. This 14-minute video shows the key Co-Ax features, explaining how the floating case-holder jaws work (3:30 time-mark), how the dies are held in place (4:40 time-mark), how spent primers are captured (6:10 time-mark), and how to set the primer seating depth (10:00 time-mark). We’ve used a Co-Ax for years and we still learned a few new things by watching this detailed video. If you are considering purchasing a Co-Ax, definitely watch this video start to finish.
The Co-Ax case-holder features spring-loaded, floating jaws. These jaws have two sets of openings, small and large. This allows the system to adapt to various rim diameters. The jaw plates can simply be reversed to switch from small jaw to large jaw. In the photo above, the Co-Ax is configured with the large jaw openings in the center.
The Cartridge Comparison Guide is a remarkably comprehensive 340-page, spiral-bound book. Covering over 250 cartridges, the Second Edition of the Cartridge Comparison Guide is the product of many years of labor by Andrew Chamberlain, a Utah-based hunter. Andrew says his Guide “compares every factory available cartridge from the 17 calibers up to the 50 caliber cartridges”. (Sorry, most wildcat cartridges are not covered.) Chamberlain’s Guide also compiles cartridge data from major ammunition manufacturers such as Barnes, Federal, Hornady, Norma, Nosler, Remington, Sierra, Swift, Weatherby, and Winchester. It shows the optimal velocity achieved for each bullet weight and calculates bullet energy, recoil, and powder efficiency. Large color photos illustrate handgun and rifle cartridges.
The Cartridge Comparison Guide provides data for thousands of cartridge/bullet/velocity combos. Quick reference sheets and ballistics charts cover Trajectory, Velocity, and Energy out to 500 yards. The Cartridge Comparison Guide also offers a firearms lexicon, plus Appendices covering Cartridge Selection for Game Animals, Bullet Selection/Design, Bullet Expansion, and Wound Channel Characteristics.
New Content in Second Edition of Cartridge Comparison Guide
The Cartridge Comparison Guide (Second Edition) costs $39.99 plus shipping and tax. CLICK HERE to visit the Online Store where you can order the 340-page book. Here’s what’s new in the Second Edition:
Addition of Shotgun Ammunition (Both Slug and Shot loads).
Momentum Calculation for all Rifle, Shotgun and Handgun loads.
Integration of Shotgun Slug Ammunition with Center Fire Rifle Data Tables.
Factory Load Summary Added (Shows manufacturers and loads produced).
One factory load and one hand load for every bullet weight available in each cartridge.
Over 90 pages of additional ballistics content (roughly 35% more than in First Edition).
Great Resource for Hunters
One of Chamberlain’s main goals in creating the Cartridge Comparison Guide was to help hunters select the right cartridge for the job: “This started as a personal project to gather information on the more popular cartridges commonly used for hunting. I wanted to find the best all-around performing cartridge and rifle that a guy on a budget could shoot. I began comparing cartridge performance, versatility, bullet selection, powder efficiency, recoil generation vs. energy produced, standing ballistic data for different environments….”
Giant Cartridge Poster for Computer Wallpaper (1665×1080 pixels)
Here’s a great illustration of hundreds of cartridges and shotshell types. For dedicated reloaders, this would work great as desktop “wallpaper” for your computer. CLICK HERE for full-size image.
Do you need to find an FFL for a firearms transfer in your local area? Or perhaps you are selling a gun and need it shipped to an FFL in another city or state. Thankfully, there are two good online resource that can, in a matter of seconds, provide a list of Federal Firearms License holders in the area you need. These web resources will even locate those FFLs on a map AND list the fees they typically charge for transfers.
Sportsman’s Guide FFL Finder
The first resource is the Sportsman’s Guide FFL LOOKUP Page. This online search tool is fast and easy to use. Simply enter a Zip Code and then select a radius (in miles) within which to find FFLs. Here is an example for Billings, Montana with Zip Code 59103. Note that the transfer fees are listed for the first three “In-Network” FFLs. Click on each FFL business name to get more details.
Gunbroker FFL Finder
A good second resource is offered by GunBroker, the online gun trading/auction site. Gunbroker offers a handy online FFL Finder. This resource allows you to quickly find an FFL by zip code or state. Along with the FFL business name, this also lists fees. Click the “Map It” button to see a local map.
Gunbroker states: “Use our FFL Finder to locate FFL dealers in your area. You can search for FFL dealers by your zip code or by state. Use our FFL finder to get in touch with a local FFL dealer in order to complete your firearms purchase, or sign up to be part of our FFL Dealer Network.”
Shown below are the FFL Finder results for Billings, Montana and Zip Code 59103:
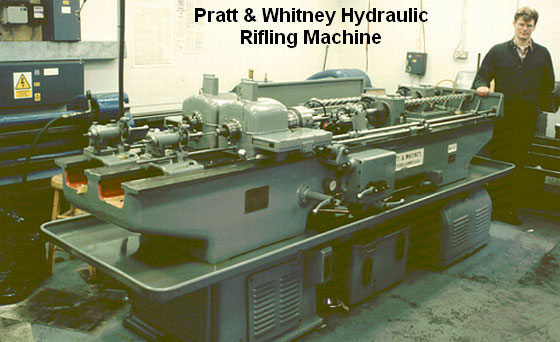
This video shows the process of cut-rifled barrel-making by Krieger Barrels, one of the world’s best barrel manufacturers. Krieger cut-rifled barrels have set numerous world records and are favored by many top shooters. The video show the huge, complex machines used — bore-drilling equipment and hydraulic riflers. You can also see how barrels are contoured, polished, and inspected.
For anyone interested in accurate rifles, this is absolutely a “must-watch” video. Watch blanks being cryogenically treated, then drilled and lathe-turned. Next comes the big stuff — the massive rifling machines that single-point-cut the rifling in a precise, time-consuming process. Following that you can see barrels being contoured, polished, and inspected (with air gauge and bore-scope). There is even a sequence showing chambers being cut.
Click Arrow to Watch Krieger Barrels Video:
Here is a time-line of the important barrel-making processes shown in the video. You may want to use the “Pause” button, or repeat some segments to get a better look at particular operations. The numbers on the left represent playback minutes and seconds.
Krieger Barrel-Making Processes Shown in Video:
00:24 – Cryogenic treatment of steel blanks
00:38 – Pre-contour Barrels on CNC lathe
01:14 – Drilling Barrels
01:28 – Finish Turning on CNC lathe
01:40 – Reaming
01:50 – Cut Rifling
02:12 – Hand Lapping
02:25 – Cut Rifling
“At the start of World War Two, Pratt & Whitney developed a new, ‘B’ series of hydraulically-powered rifling machines, which were in fact two machines on the same bed. They weighed in at three tons and required the concrete floors now generally seen in workshops by this time. Very few of these hydraulic machines subsequently became available on the surplus market and now it is these machines which are sought after and used by barrel makers like John Krieger and ‘Boots’ Obermeyer. In fact, there are probably less of the ‘B’ series hydraulic riflers around today than of the older ‘Sine Bar’ universal riflers.” — Geoffrey Kolbe, Border Barrels.
Most competitive shooters are pretty good about bore cleaning (some may even clean their bores too aggressively). However, we’ve found that many shooters neglect the chamber area and the bolt lug recesses. It’s too easy to clean the bore, slip out the guide rod and say “I’m done.” Sinclair Int’l explains why it’s important to clean the action interior: “Shooters use a lot of grease and oil on their bolts to reduce friction and to prevent wear[.] Unfortunately, both of these compounds attract grit, powder and primer residues. Cleaning your receiver is especially critical [with] custom actions where the fit between the action and bolt is held to very tight tolerances. Routine cleaning of the action will prevent unnecessary wear on the bolt body, locking lugs, and the action raceways/guide rails. Frequent action cleaning is also essential to keeping the trigger area free of debris which can cause trigger hang-ups and failures.”
Your rifle deserves a clean action and lug recesses. For action cleaning, our friend Danny Reever favors the PMA Action Cleaning Tool. This handy tool speeds up the cleaning process, letting you do a better job in less time. Danny reports: “I’ve been using the PMA Action Cleaning Tool Kit ($79.95) for quite some time. Previously, I used one of the old style (round knob) action-cleaning tools with cylindrical cotton rolls. I think the PMA Action Cleaning Tool Kit is easier to use, and possibly achieves better results. CLICK HERE to Read Full Tool Review.
Cleaning the Chamber
Combustion by-products, lubricants, and solvent residues can collect in your chamber. Severe build-up of grease and carbon can interfere with chambering. Also some solvents will promote corrosion. You need to keep your chambers clean.
1) Install a clean cotton mop of the correct size on the end of a chamber rod and insert the mop into the chamber. Rotate the mop several times to remove any brush bristles left behind and any excess solvent that was between the rod guide snout and the end of the chamber. Make sure the chamber is dry. Prior to storing a rifle you can oil the chamber but make sure the oil is removed prior to firing the rifle.
2) Alternatively, install an old bore brush on a chamber rod, overlap a couple of patches on the brush bristles, and wrap them around the brush completely. Then insert the patch-covered brush into the chamber while rotating it to remove the excess solvent and debris. Push it firmly into the neck area of the chamber. A similar method is to pierce a large patch on the end of the brush loop and insert it into the action, again rotating the brush as you push the patch up against the breech.
Cleaning the Lug Recess Area
The action lug recess area is one of the dirtiest places on a bolt-action rifle. To properly clean this area, always use a tool designed for the task, such as the $24.99 Sinclair Action Cleaning Tool (Brownells #749003115) which is part of the full Sinclair Action Cleaning Tool Kit ($48.99 at Brownells, #749004651).
1) Insert a cotton roll or cleaning felt into your lug recess cleaning tool and wet both ends and the face of the cotton roll/felt with solvent.
2) Insert the tool into the action and push it forward until it is positioned fully in the lug recess area and rotate the tool head several times. Then reverse the rotation for another few turns. While rotating the tool move it slightly in and out to cover the entire recess area and to also clean the breech face.
3) Remove the tool from the action and inspect the surface of the felt or cotton roll. If there is quite a bit of residue on both sides of the felt/roll, then repeat with another wet felt/roll.
4) When you feel the recess area is completely clean, insert a dry cotton roll into the tool and rotate the tool head to remove any remaining solvent and debris. If necessary, use a second dry cotton roll.
5) You can follow this step up with another pass of a mop or patches into the chamber to get any debris or solvent that pushed forward out of the lug recess area.


 Forum member Peebles24 showcased his cool flame-paint-job .22 LR benchrest rifle against a scenic, snowy background (never too cold to shoot right?). “I had a new rifle built this past fall by Mark Penrod at Penrod Precision. Stiller 2500X action, Shilen ratchet barrel, Jewell trigger, McMillan stock, Harrell’s tuner, Sightron SIII 10-50×60mm glass. I’m shooting it off my Arnold Machine one-piece rest made locally by Cliff Arnold. I visited the Lapua Testing Center East and got a case of Midas+.” For ammo testing results, click photo at right.


 Forum member JAS-AS purchased a .22 Magnum CZ which he revived as a training rig with a new stock. He posted: “I use a CZ457 in .22 Magnum mainly as a trainer — bipod and rear bag kind of stuff. It has evolved over the last year or so. Next change will be a Lilja barrel. This because it can shoot brilliantly (at times) but not consistently. And accuracy degrades as it gets minimally dirty. Also, it doesn’t like 40gr rounds — the groups open up to 1.5 MOA. It’s at its best with 30 and 35 grain rounds running at up to 2250 fps. I believe that to be a twist-rate issue.”
 This handsome, ultra-accurate Smallbore F-Class rig belongs to member RMist of Team Pro-Shot Products. It has a Holeshot (Stiller) 2500X, stunning Cerus Curly Maple wood stock, Nightforce scope. Up front is the joystick co-axial SEB Joy-Pod.


 For gun safes, we prefer rotary-combination dial locks, although commercial-grade electronic locks are now very good. While less convenient, and slower to open than electronic locks, combination locks are still more durable and trouble-free than the digital locks found on many low- to medium-cost gun safes. Among the combination locks, the Sargent & Greenleaf model 6730 (UL Group II) remains an industry standard. The director of Sturdy Safes noted: “An S&G 6730 will be working fine when your grandchildren have grandchildren.” For home use, we also recommend the standard, high-visibility “front-read” white on black dial.
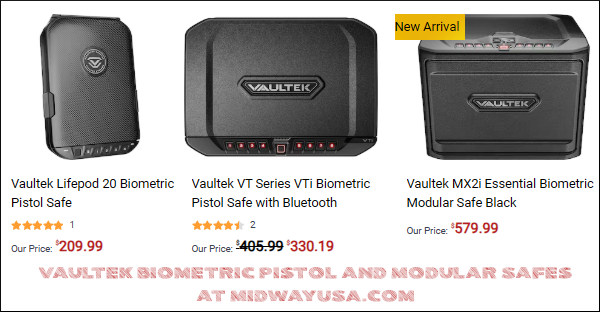

 40+ Years Expertise


 The
The